Crocheted letters can turn a plain project into something personal. A single initial can decorate a tote bag, while several letter squares can become a child’s name, nursery banner, classroom alphabet, baby blanket, cushion cover, or handmade learning set.
The difficulty is making every letter look as though it belongs to the same alphabet. Freeform appliqué letters can vary in height and width, while embroidered letters may be difficult to place evenly. This tutorial solves that problem by building every uppercase letter inside the same 5×7 grid.
Each chart cell becomes a small block of single crochet stitches. The letter is worked directly into a rectangular background with two-color tapestry crochet, so there are no separate letter pieces to assemble and no narrow strips to twist out of shape.
You will begin with a simple letter A square. Once you understand that example, the same method works for every chart from A through Z.
What You’ll Learn
- How to read a 5×7 crochet letter chart
- How to enlarge one chart cell into a visible crochet block
- How to carry a second yarn inside single crochet stitches
- How to change colors without creating a loose gap
- How to work charts back and forth in rows
- How to keep all alphabet tiles the same size
- How to prevent exposed floats and puckered fabric
- How to crochet the letter A from written instructions
- How to use the complete A–Z chart collection
- How to block, join, and customize the finished letters
Skill Level
Advanced beginner
You should be comfortable making a foundation chain, working single crochet, turning rows, counting stitches, and fastening off. Previous colorwork experience is helpful but not required.
Finished Size
Using worsted-weight yarn and a 4.0 mm hook, one 14-stitch by 18-row tile will usually measure approximately 3½–4 inches wide and 4–4½ inches tall.
The exact dimensions are not essential unless you are joining many squares. Consistency between your own squares matters more than matching a specific measurement.
Estimated Time
- First practice square: approximately 90 minutes
- Later squares: approximately 45–75 minutes
- Blocking and finishing: additional drying time
Materials You’ll Need
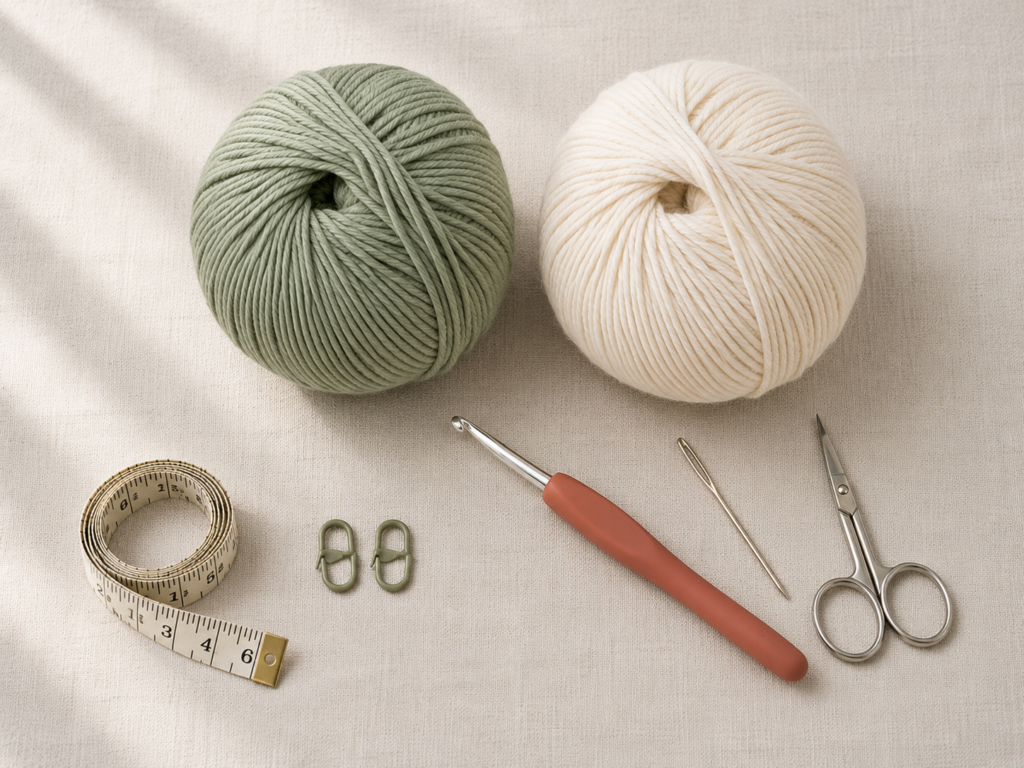
- Smooth worsted-weight yarn in a main background color
- Smooth worsted-weight yarn in a contrasting letter color
- 4.0 mm crochet hook
- Scissors
- Tapestry needle
- Two locking stitch markers
- Measuring tape or ruler
- Blocking mat and rustproof pins
- Optional row counter
- Optional chart highlighter
Cotton creates crisp, structured letters. Acrylic is lighter and works well for blankets, banners, and children’s learning projects. Avoid eyelash yarn, chenille, loosely spun roving, or highly variegated yarn while learning because the stitch openings and color changes will be difficult to see.
The Craft Yarn Council classifies worsted, afghan, and aran yarns in the medium or category 4 group. Its recommended hook ranges are general guidelines; a tapestry crochet fabric often benefits from a smaller hook because the goal is a firm, opaque surface.
Crochet Abbreviations Used
- ch = chain
- CC = contrasting color or letter color
- MC = main background color
- rep = repeat
- RS = right side
- sc = single crochet
- sl st = slip stitch
- st/sts = stitch/stitches
- WS = wrong side
This tutorial uses US crochet terminology.
A US single crochet is called a double crochet in standard UK terminology. The Craft Yarn Council’s abbreviation list and terminology comparison can help when converting between systems.
Before You Start
Gauge and Tension
Gauge is not critical for a single appliqué tile. It becomes important when several squares will be joined into a blanket, banner, or wall hanging.
Work a small 14-stitch swatch first. Your fabric should be:
- Firm enough to hide most of the carried yarn
- Flexible enough to lie flat
- Free from large gaps between color sections
- The same width at the top and bottom
A hook that is too large creates open stitches through which the unused color may show. A hook that is too small can make the fabric stiff and painful to work.
How the Letter Grid Works
Every uppercase letter is shown on a 5-column by 7-row chart.
Xmeans work the cell in CC..means work the cell in MC.- Every chart cell equals 2 single crochet stitches wide.
- Every chart line equals 2 crochet rows high.
The visible letter area therefore measures:
- 5 cells × 2 stitches = 10 stitches wide
- 7 cells × 2 rows = 14 rows tall
A two-stitch background border is added to both sides, producing 14 stitches total.
Two plain background rows are added below and above the letter, producing 18 rows total.
Row Direction
The charts show the letter as it should appear from the right side.
For a right-handed crocheter:
- Work the bottom chart line first.
- Read an RS row from right to left.
- Turn the work.
- Read the matching WS row from left to right.
- Move upward to the next chart line.
For a left-handed crocheter, reverse those directions.
Because every chart line is repeated twice, you work the first pass from one direction and the second pass from the opposite direction.
Turning Chain
Chain 1 at the end of each row and turn.
The turning chain does not count as a stitch. Place the first single crochet directly into the first stitch of the previous row.
How to Count Stitches
Every row must contain exactly 14 single crochet stitches.
Place one marker in the first stitch and another in the last stitch while learning. Count the row before turning. A missed edge stitch will quickly make the square lean.
Step-by-Step Crochet Tutorial
Step 1: Choose Your Colors
Select two yarn colors with clear contrast.
A pale cream letter against a medium sage background is easier to see than two similar greens. Light-on-dark or dark-on-light combinations generally produce the cleanest block letters.
Before committing to an entire name, wrap the two strands around a piece of card and view them from several feet away. The letter should remain recognizable from a distance.
Beginner tip: Use two solid colors from the same yarn line. Matching fiber content and thickness make tension easier to control.
Common mistake to avoid: A highly variegated background can cross through the letter color visually, making the alphabet difficult to read.
Step 2: Make the Foundation Chain and Bottom Border
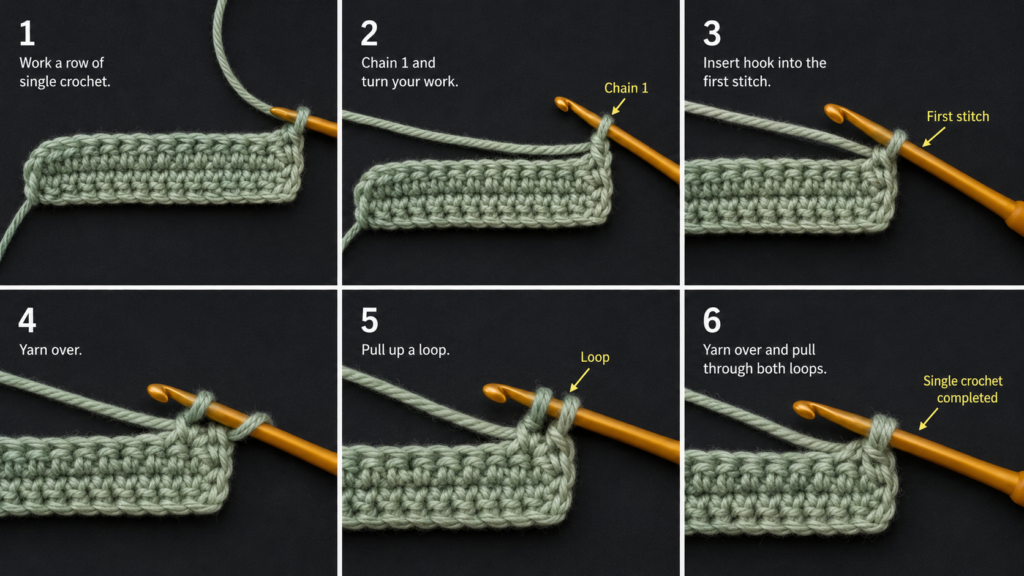
With MC, chain 15.
Row 1: Beginning in the second chain from the hook, sc in each chain across. You should have 14 sc. Ch 1 and turn.
Row 2: Sc in each stitch across. Ch 1 and turn.
These two rows form the plain border below the letter.
Lay the foundation edge flat. It should not curl into a tight crescent. When the chain is considerably tighter than the first row, remake it with a looser grip or use a hook 0.5 mm larger for the chain only.
Beginner tip: Count the small V shapes along the top of Row 1 instead of counting bumps along the foundation edge.
Common mistake to avoid: Do not crochet into the turning chain at the end of the row. It is not counted as a stitch in this pattern.
Step 3: Position the Contrasting Yarn
At the beginning of Row 3, place the CC strand along the top of Row 2.
Do not knot it to the fabric. Leave a tail approximately 6 inches long and hold the tail against the working edge with the strand.
Insert the hook into the first stitch. Work the MC single crochet around both the stitch and the CC strand. Continue enclosing the CC strand inside every background stitch until the chart tells you to use it.
The carried strand should rest near the top edge of the previous row. It should not hang below the work.
Beginner tip: Flatten the carried yarn with the index finger of your non-hook hand. This helps keep it in the center of the new stitches.
Common mistake to avoid: Do not pull the CC strand after every stitch. Smooth it gently so it remains straight without shortening the row.
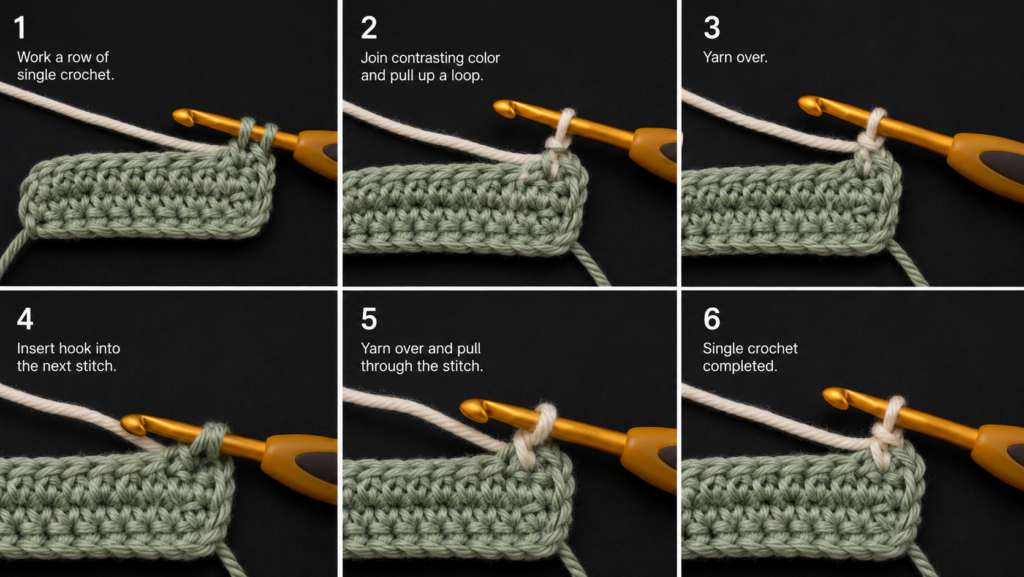
Step 4: Change from the Background Color to the Letter Color
A clean color change begins one stitch earlier than many beginners expect.
Work the last MC stitch before the cream section until two loops remain on the hook. Do not complete it with MC.
Drop MC behind the work. Pick up CC and draw CC through both loops. The stitch body remains MC, while the active loop becomes CC and is ready for the next stitch.
When changing back to MC, repeat the same procedure:
- Begin the final CC stitch.
- Stop with two loops on the hook.
- Pick up MC.
- Draw MC through the two loops.
- Continue with MC while carrying CC.
Changing on the last pull-through prevents a visible vertical bar of the old color from appearing at the beginning of the next section.
Beginner tip: Pause after every color change and check which yarn is active before making the next stitch.
Common mistake to avoid: Changing color after completing the stitch shifts the letter one stitch sideways.
Step 5: Crochet the Letter A
The A chart is:
.XXX.
X...X
X...X
XXXXX
X...X
X...X
X...X
The bottom chart line is worked first.
Because each chart cell equals two stitches and each chart line equals two rows, the letter A is written as follows.
Rows 3–4: Bottom Legs
With both yarns being carried:
- MC in next 2 sts
- CC in next 2 sts
- MC in next 6 sts
- CC in next 2 sts
- MC in final 2 sts
You should have 14 stitches.
Rows 5–6: Continue the Legs
Repeat Rows 3–4.
Rows 7–8: Continue the Legs Again
Repeat Rows 3–4.
At this point, the bottom half of the A should show two cream vertical columns separated by six sage stitches.
Rows 9–10: Make the Crossbar
- MC in next 2 sts
- CC in next 10 sts
- MC in final 2 sts
The ten cream stitches form the full horizontal bar.
Rows 11–12: Upper Sides
- MC in next 2 sts
- CC in next 2 sts
- MC in next 6 sts
- CC in next 2 sts
- MC in final 2 sts
Rows 13–14: Upper Sides Again
Repeat Rows 11–12.
Rows 15–16: Top of the A
- MC in next 4 sts
- CC in next 6 sts
- MC in final 4 sts
The background stitches at each end taper the top of the letter.
Rows 17–18: Top Border
Work 14 sc in MC.
You may cut CC after completing Row 16, leaving a tail long enough to weave in. Alternatively, carry it through Rows 17 and 18 when you want the entire tile to have identical thickness.
Beginner tip: Place a removable marker in the right side of the fabric. This prevents accidental mirroring of asymmetrical letters later.
Common mistake to avoid: Do not count the active loop on the hook as a completed stitch.
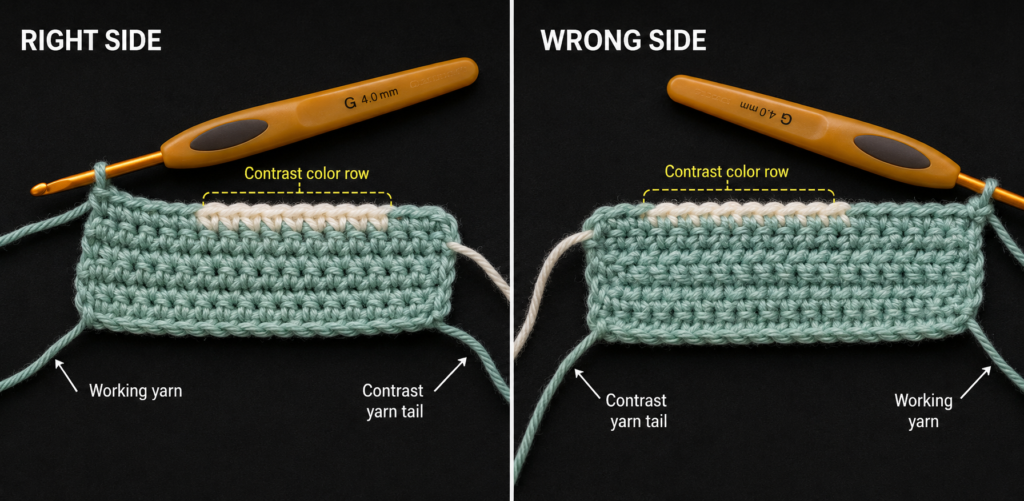
Step 6: Understand the Right Side and Wrong Side
Single crochet worked back and forth does not look identical on both sides. Choose the side on which the letter appears cleanest and call that the right side.
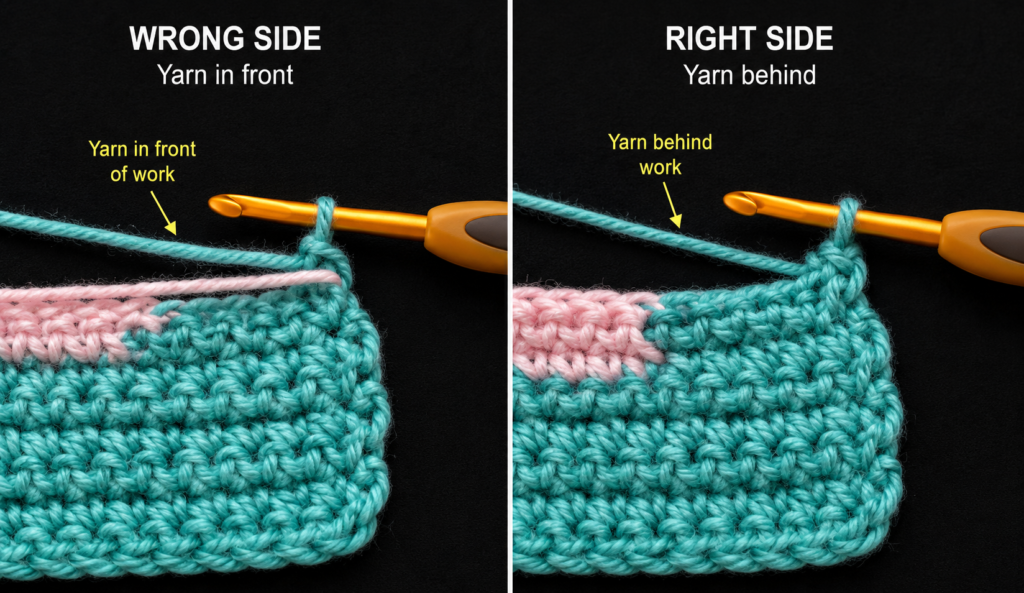
On RS rows, keep the inactive yarn toward the back of the fabric.
On WS rows, bring the inactive yarn toward the side facing you while you crochet over it. This helps the carried strand remain primarily on the wrong side instead of creating visible ripples across the front.
The fabric may still be usable from both sides, but the selected right side should be used consistently when arranging letters.
Beginner tip: Attach a locking marker to the lower-right corner of the RS.
Common mistake to avoid: Turning the square in different directions between rows can twist the two yarns together. Always turn the work in the same direction, then untwist the skeins periodically.
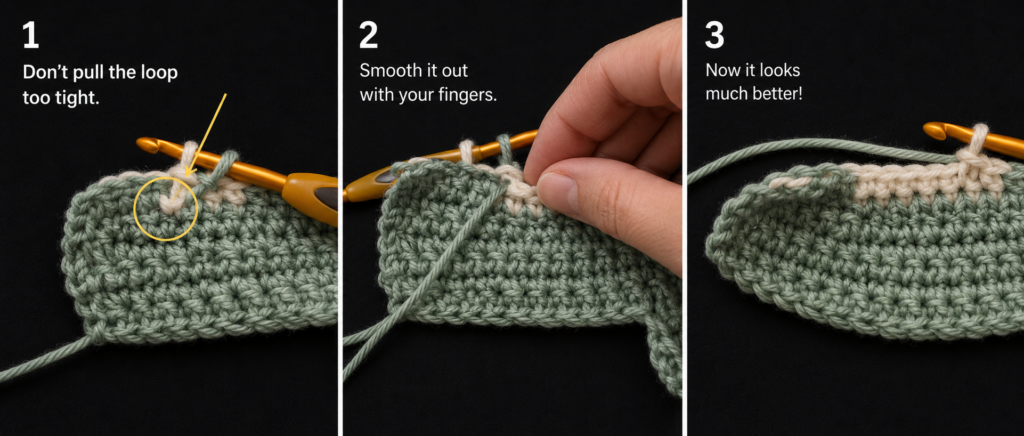
Step 7: Control the Carried-Yarn Tension
After working four or five stitches, spread the completed section across the fingers of your non-hook hand. The inactive strand should lie straight inside the row.
It should not form loops, but it should also not shorten the fabric.
A reliable routine is:
- Work four or five stitches.
- Stop.
- Spread the stitches to their natural width.
- Smooth the carried strand.
- Continue crocheting.
When the square begins to cup, narrow, or form a waist at the color section, the carried yarn is probably too tight.
When loops appear at the edge or back, the carried yarn is too loose.
Beginner tip: Measure the width after every four rows. Small tension changes are easier to correct before the entire letter is complete.
Common mistake to avoid: Pulling firmly on the inactive strand after changing colors can distort several earlier stitches at once.
Step 8: Avoid Exposed Floats
A float is a loose strand that crosses behind several stitches instead of being enclosed inside them.
In this project, carry the inactive yarn through every stitch in the 14-row letter area. That keeps the square uniformly thick and eliminates long strands that could catch on fingers, jewelry, or buttons.
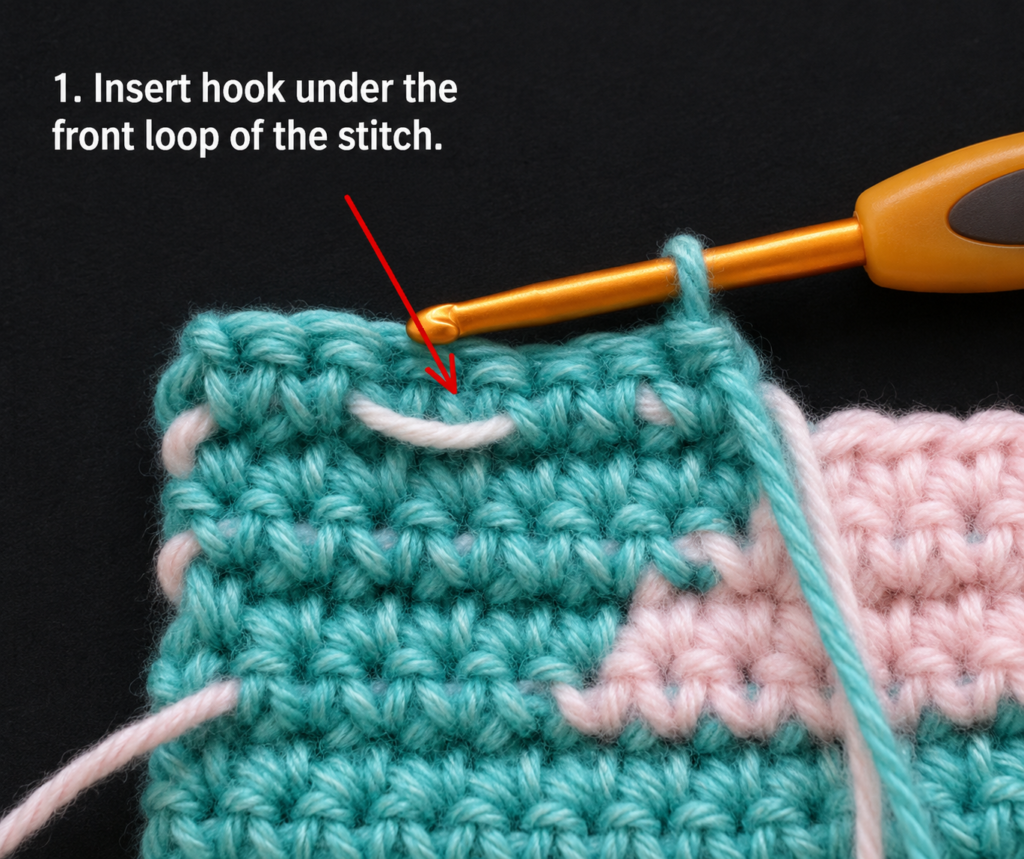
To enclose the inactive color:
- Lay it along the top of the previous row.
- Insert the hook into the next stitch and underneath the carried strand.
- Complete the new single crochet around both.
- Check the back before continuing.
Beginner tip: Examine the wrong side after each row. A float is easier to repair immediately than after several additional rows.
Common mistake to avoid: Do not leave the inactive color hanging behind a six-stitch background section. Enclose it even when it will not be used again until the other side of the letter.
Step 9: Position the Inactive Yarn on Alternate Rows
When the letter is worked back and forth, the side facing you changes on every row.
For the cleanest front:
- On an RS row, hold the inactive yarn behind the fabric.
- On a WS row, hold the inactive yarn on the side facing you.
- Enclose it as each single crochet is completed.
This does not mean allowing the strand to hang loosely. It remains aligned with the top of the row and is trapped inside the new stitches.
Beginner tip: Say “back on the right side, front on the wrong side” until the movement becomes automatic.
Common mistake to avoid: Do not wrap the inactive yarn around the outside edge when turning. Bring both yarns into position before making the first stitch.
Step 10: Check Whether the Carried Color Shows Through
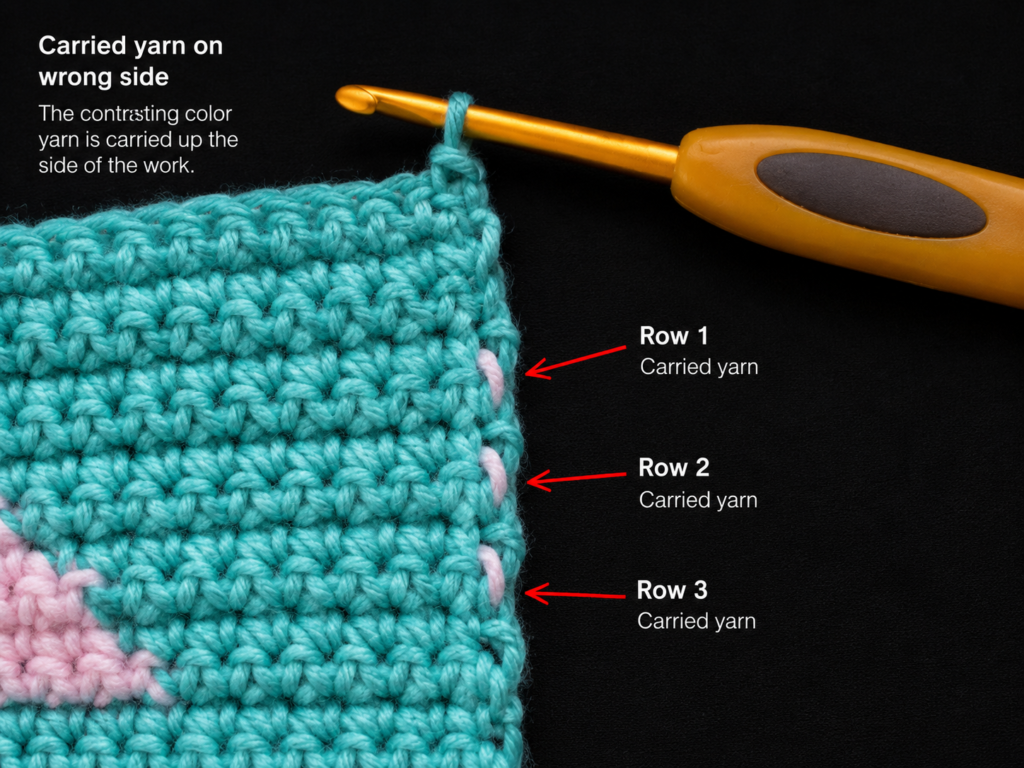
A tiny hint of the second color may remain visible in handmade tapestry crochet, particularly when the two yarns have extreme contrast. Large, repeated flashes of color indicate that the stitches are too open or the carried strand is sitting near the front surface.
Try these corrections:
- Move the carried yarn slightly toward the wrong side before inserting the hook.
- Work with a hook 0.5 mm smaller.
- Tighten the active stitch slightly.
- Smooth the carried strand without pulling the row inward.
- Use a less slippery yarn.
- Avoid splitting the carried strand with the hook.
Do not make the stitches so tight that inserting the hook becomes difficult.
How to Read the Complete Alphabet Charts
Each chart below is shown from the right side.
X= CC letter cell.= MC background cell- Begin with the bottom line.
- Each character represents two stitches.
- Work each chart line twice.
- Add two MC stitches before and after every expanded chart line.
- Work two plain MC rows before and after the seven chart lines.
Complete 5×7 Crochet Alphabet
Letters A–D
A       B       C       D
.XXX.   XXXX.   .XXXX   XXXX.
X...X   X...X   X....   X...X
X...X   X...X   X....   X...X
XXXXX   XXXX.   X....   X...X
X...X   X...X   X....   X...X
X...X   X...X   X....   X...X
X...X   XXXX.   .XXXX   XXXX.
Letters E–H
E       F       G       H
XXXXX   XXXXX   .XXXX   X...X
X....   X....   X....   X...X
X....   X....   X....   X...X
XXXX.   XXXX.   X.XXX   XXXXX
X....   X....   X...X   X...X
X....   X....   X...X   X...X
XXXXX   X....   .XXX.   X...X
Letters I–L
I       J       K       L
XXXXX   ..XXX   X...X   X....
..X..   ...X.   X..X.   X....
..X..   ...X.   X.X..   X....
..X..   ...X.   XX...   X....
..X..   ...X.   X.X..   X....
..X..   X..X.   X..X.   X....
XXXXX   .XX..   X...X   XXXXX
Letters M–P
M       N       O       P
X...X   X...X   .XXX.   XXXX.
XX.XX   XX..X   X...X   X...X
X.X.X   XX..X   X...X   X...X
X.X.X   X.X.X   X...X   XXXX.
X...X   X..XX   X...X   X....
X...X   X..XX   X...X   X....
X...X   X...X   .XXX.   X....
Letters Q–T
Q       R       S       T
.XXX.   XXXX.   .XXXX   XXXXX
X...X   X...X   X....   ..X..
X...X   X...X   X....   ..X..
X...X   XXXX.   .XXX.   ..X..
X.X.X   X.X..   ....X   ..X..
X..X.   X..X.   ....X   ..X..
.XX.X   X...X   XXXX.   ..X..
Letters U–X
U       V       W       X
X...X   X...X   X...X   X...X
X...X   X...X   X...X   .X.X.
X...X   X...X   X...X   ..X..
X...X   X...X   X.X.X   ..X..
X...X   .X.X.   X.X.X   ..X..
X...X   .X.X.   XX.XX   .X.X.
.XXX.   ..X..   X...X   X...X
Letters Y–Z
Y       Z
X...X   XXXXX
.X.X.   ....X
..X..   ...X.
..X..   ..X..
..X..   .X...
..X..   X....
..X..   XXXXX
Converting Any Chart Line into Crochet Stitches
Take this chart line:
X...XExpand each character to two stitches:
XX......XXAdd the two-stitch MC border at each side:
..XX......XX..The crochet instructions become:
- 2 MC
- 2 CC
- 6 MC
- 2 CC
- 2 MC
Total: 14 stitches.
For this line:
XXXXXThe instructions become:
- 2 MC
- 10 CC
- 2 MC
For this line:
.XXX.The instructions become:
- 4 MC
- 6 CC
- 4 MC
This conversion method works for all 26 letters.
Pattern Notes
Turning Chain Rule
Chain 1 and turn after every row. The chain does not count as a stitch.
Stitch Count
Every completed row contains 14 sc.
Count the first and last stitch carefully. Most leaning squares are caused by missing the first stitch after turning.
Repeat Pattern
Every chart line is repeated for two crochet rows.
For example:
- Bottom chart line = Rows 3–4
- Second chart line = Rows 5–6
- Third chart line = Rows 7–8
- Fourth chart line = Rows 9–10
- Fifth chart line = Rows 11–12
- Sixth chart line = Rows 13–14
- Top chart line = Rows 15–16
Rows 1–2 and 17–18 are plain MC border rows.
Right Side and Wrong Side
Row 1 can be designated as the RS. Attach a marker to that side and maintain the designation throughout the project.
Mirrored Letters
Letters such as F, G, J, L, P, Q, R, and Z are directional. Reading every chart line in the same direction will mirror alternate rows and distort the design.
Remember:
- RS: read from right to left for a right-handed crocheter.
- WS: read from left to right.
- Left-handed crocheters reverse these directions.
Carrying Yarn
Carry both colors through the complete 14-row letter field. Carrying both strands consistently helps maintain an even thickness.
The two plain border rows may be worked with MC alone.
Cutting Yarn
Do not cut either color during the letter area unless a particular design modification requires it. Frequent cutting produces unnecessary ends and may loosen the color transitions.
Common Beginner Mistakes
1. Changing Color Too Late
Problem: The old color appears at the beginning of the new section.
Fix: Change color while two loops of the final stitch remain on the hook.
2. Pulling the Carried Yarn Too Tightly
Problem: The square narrows or curls where the letter begins.
Fix: Spread the stitches to their natural width before adjusting the carried strand.
3. Leaving Long Floats
Problem: Loose yarn crosses the back of the square.
Fix: Crochet around the inactive strand in every stitch of the letter area.
4. Losing Edge Stitches
Problem: The tile becomes narrower with every few rows.
Fix: Mark the first and last stitches and verify that every row contains 14 sc.
5. Reading Every Row in One Direction
Problem: Asymmetrical letters look broken or mirrored.
Fix: Reverse the chart-reading direction after turning the work.
6. Splitting the Carried Yarn
Problem: Small pieces of the second color appear unpredictably on the front.
Fix: Insert the hook completely beneath the carried strand rather than through its plies.
7. Using Fluffy Yarn
Problem: Individual chart cells disappear and color changes become unclear.
Fix: Begin with smooth, tightly spun yarn that has visible stitch definition.
8. Making the Foundation Chain Too Tight
Problem: The lower edge is narrower than the upper edge.
Fix: Loosen the foundation chain or make it with a slightly larger hook.
9. Forgetting Which Side Is the Front
Problem: Letters are arranged with inconsistent surface texture.
Fix: Mark the RS immediately after completing Row 1.
10. Weaving Ends Through the Letter Color
Problem: A sage tail becomes visible inside a cream letter.
Fix: Weave each tail through matching-color stitches on the WS.
How to Customize This Crochet Project
Change the Yarn Weight
For smaller letters, try sport or DK yarn with an appropriately smaller hook.
For oversized classroom letters or cushion panels, use bulky yarn. Make a test tile because thicker yarn may create a very rigid fabric when two strands are carried together.
Make Larger Letters
The standard system uses:
- 2 stitches per chart cell
- 2 rows per chart line
For larger letters, use:
- 3 stitches per chart cell
- 3 rows per chart line
A 5×7 chart then becomes a 15-stitch by 21-row letter area before adding the border.
Keep the horizontal and vertical expansion similar so the letters do not look unusually wide or compressed.
Make Smaller Letters
Work one stitch and one row for each chart cell.
Add one background stitch on both sides and one background row above and below. This produces a compact 7-stitch by 9-row tile, although the tiny letters require careful tension.
Change the Border Width
The tutorial uses a two-stitch side border and two plain rows at the top and bottom.
Increase the border when:
- Squares will be joined with a decorative seam
- A larger blank area is desired around the letter
- The letters will become blanket blocks
- A border color will be added later
Add a Crochet Border
After blocking, join MC in any corner and work one round of single crochet.
Use:
(sc, ch 1, sc)in each corner for a subtle corner3 scin each corner for a rounded corner- Reverse single crochet for a corded finish
- Slip stitch for a minimal edge
When adding a border, place stitches evenly along the row ends. Too many stitches make the edge ripple; too few make it cup.
Use Different Color Arrangements
Try:
- Cream letters on sage backgrounds
- One background color with rainbow letters
- Alternating background colors
- School colors
- Pastel nursery colors
- Black-and-white high-contrast letters
- Gradient letters using several related shades
For a joined alphabet blanket, the same background color creates unity even when every letter uses a different contrasting color.
Project Ideas
Finished letter squares can become:
- Baby-name blankets
- Nursery banners
- Teacher gifts
- Classroom alphabet displays
- Reading-corner decorations
- Monogrammed cushion covers
- Personalized tote bags
- Initial patches
- Soft learning cards
- Holiday messages
- Wedding initials
- Family-name wall hangings
- Crochet bunting
- Quiet-book pages
- Personalized storage-bin labels
For a child’s learning set, secure all ends carefully and avoid adding loose buttons, beads, or magnets when the finished pieces may be handled by children under three.
Finishing Instructions
Fasten Off
After completing Row 18, cut MC, leaving a 6-inch tail. Pull the tail completely through the active loop.
Weave In the Ends
Turn the square to the WS.
Thread one tail through the tapestry needle. Weave horizontally through several stitches of the same color, change direction, and weave through a second section.
Do not pull tightly. The edge should remain the same width.
Weave:
- MC tails through MC stitches
- CC tails through CC stitches where possible
Trim the remaining yarn close to the fabric.
Shape the Corners
Gently stretch the square into a rectangle. Check that:
- The upper and lower edges have equal width.
- The side edges are vertical.
- The letter is centered.
- The corners form approximately right angles.
Block the Letter Square
Check the yarn label before applying heat or water.
For cotton:
- Soak the square briefly in cool or lukewarm water.
- Press out moisture without twisting.
- Place it on a blocking mat.
- Shape it to the desired dimensions.
- Pin the corners and edges.
- Allow it to dry completely.
For acrylic, gentle steam blocking may be used, but keep the heat source above the fabric and avoid touching the yarn directly. Excessive heat can permanently flatten or melt acrylic fibers.
Joining Several Letter Squares
Block every square to the same dimensions before joining.
Suitable joins include:
- Mattress stitch for a nearly invisible seam
- Whip stitch for a simple hand-sewn join
- Single crochet join for a visible ridge
- Flat slip-stitch join
- Continuous background border
Arrange the full name or alphabet on a flat surface before joining. Check spelling and letter direction twice.
Quick Printable-Style Summary
Skill level: Advanced beginner
Technique: Two-color tapestry crochet worked in rows
Yarn: Smooth worsted-weight yarn in MC and CC
Hook: 4.0 mm or size needed for firm fabric
Stitches: Chain and single crochet
Finished tile: Approximately 3½–4 inches wide by 4–4½ inches tall
Starting chain: Ch 15
Stitch count: 14 sc in every row
Total rows: 18
Bottom border: Rows 1–2 in MC
Letter area: Rows 3–16
Top border: Rows 17–18 in MC
Chart scale: Every chart cell equals 2 sc wide and 2 rows tall
Turning chain: Ch 1; does not count as a stitch
Color change: Use the new color for the final pull-through of the previous stitch
Finishing: Fasten off, weave in ends, shape, and block
FAQ
Can a complete name be crocheted in one panel instead of separate squares?
Yes. Place the 5×7 charts beside one another and leave at least one or two background cells between letters. Calculate the total stitch width before making the foundation chain.
Separate squares are easier for a beginner because a mistake affects only one letter.
Can these charts be used for corner-to-corner crochet?
Yes. Each X or . can represent one C2C block instead of a single crochet cell. The charts will produce small block letters, so enlarge each chart cell when making a large blanket.
Can the alphabet be worked with intarsia instead of tapestry crochet?
Yes. Small yarn bobbins can be used for separate color sections rather than carrying the unused strand across the complete row. Intarsia produces lighter fabric but creates more yarn tails.
Why does my letter lean?
The most common causes are missing edge stitches, inconsistent chart direction, a tight foundation chain, or carried yarn that has been pulled too tightly.
Count 14 stitches after every row and measure the width regularly.
Why is the contrasting yarn visible through the background?
The hook may be too large, the active stitches may be too loose, or the carried strand may be sitting too close to the front surface.
Move the strand toward the WS and test a smaller hook.
Can I use half double crochet instead of single crochet?
It is possible, but the letter cells will become taller and the chart proportions will change. Single crochet produces a dense, near-square unit that is easier to translate from a pixel grid.
How much yarn is required?
One letter square uses a small quantity of each color and is suitable for leftover yarn. The exact amount varies by yarn thickness, tension, and how much yarn is carried.
For a full alphabet blanket, purchase enough yarn from the same dye lot after completing and weighing one sample tile.
Do I need to block every letter?
Blocking is strongly recommended when squares will be joined. It evens the dimensions, straightens the edges, and makes the letter shapes easier to compare.
Conclusion
This crochet alphabet letters pattern turns every uppercase letter into the same manageable 5×7 grid. Once you can carry the unused yarn, complete a clean color change, and read alternate chart rows in the correct direction, the entire alphabet follows one predictable system.
Begin with A or another simple letter such as I, L, O, T, or X. Make one sample, check the fabric density, and record its finished measurements. That sample becomes the standard for the remaining letters.
A coordinated set of alphabet squares can then be arranged into names, initials, nursery decorations, classroom displays, blankets, banners, bags, and personalized gifts.





