A shower caddy is one of those crochet projects that earns its place almost immediately. Instead of making another decorative basket that sits on a shelf, you can crochet vertical storage for shampoo, soap, skincare, washcloths, or other lightweight bathroom essentials.
This beginner-friendly crochet shower caddy pattern uses three separate pockets connected vertically. All three pockets are the same width, so you only need to learn the basic pocket construction once. The only thing that changes is the depth.
You will start with a foundation chain, crochet around both sides of it to create a narrow oval base, build upward in single crochet, add open ventilation rows, and then assemble the three pouches with reinforced crochet connectors.
The design is intentionally different from a dry-room wall organizer. Because it is intended for bathroom use, this version includes open rows for airflow, washable yarn, non-wooden support rods, and a reinforced hanging point.
What You’ll Learn
By the end of this tutorial, you will know how to:
- crochet around both sides of a foundation chain;
- create a seamless-looking oval pouch base;
- maintain a consistent stitch count in joined rounds;
- add simple chain-space ventilation rows;
- make three matching storage pockets;
- reinforce the upper edge with a support rod;
- connect separate crochet pockets vertically;
- make a balanced hanger for a shower hook;
- adjust pocket depth without redesigning the entire project;
- finish and care for a functional crochet bathroom organizer.
Skill Level
Easy / confident beginner.
You should already be comfortable making chains and single crochet stitches. If you have never worked around both sides of a foundation chain, the first pocket may require a little concentration, but the process becomes repetitive very quickly.
Finished Size
Using the gauge given below, each pouch measures approximately:
- Width: 10–11 in / 25–28 cm
- Top pocket depth: about 5 in / 13 cm
- Middle pocket depth: about 6 in / 15 cm
- Bottom pocket depth: about 7–7.5 in / 18–19 cm
Finished hanging length depends on how much space you leave between the pockets, but approximately 27–30 in / 69–76 cm is practical for this version.
Do not treat finished measurements as load ratings. Your yarn, tension, support rods, shower hook, and attachment point all affect how much the organizer can safely hold.
Materials You’ll Need
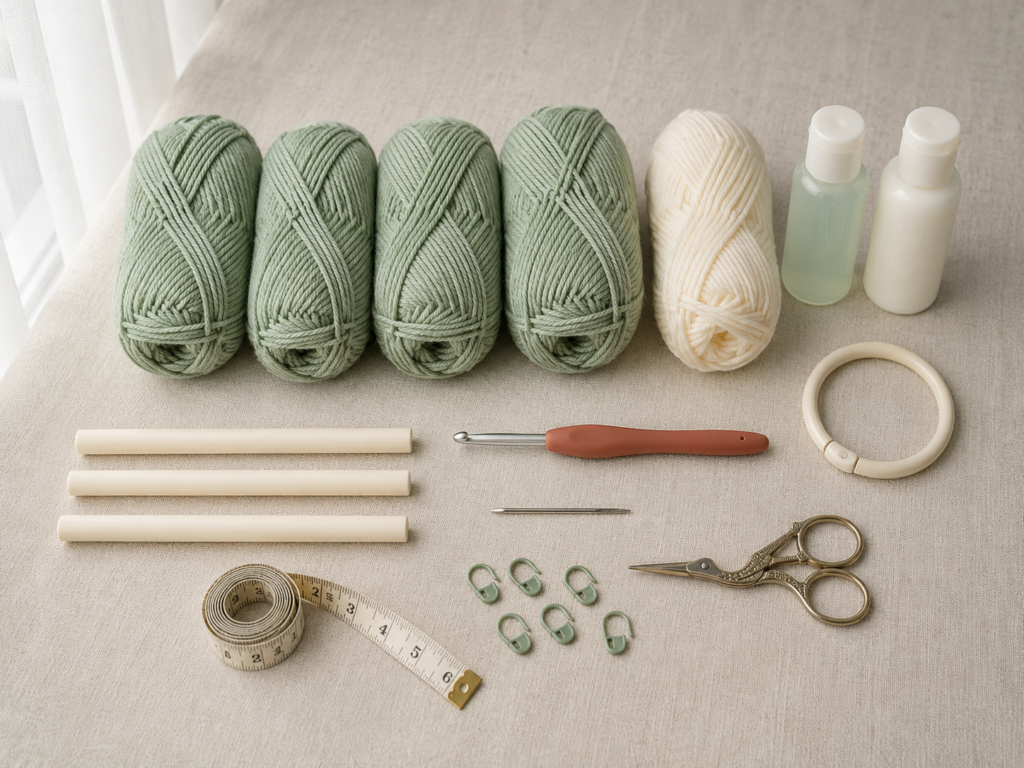
For this crochet shower caddy, gather:
- Approximately 450–550 yd / 410–500 m category #4 cotton or cotton-blend yarn
- Main color: dusty sage or another color of your choice
- Optional contrasting yarn for hanging cords
- 4.5 mm crochet hook
- Tapestry needle
- Scissors
- 4–6 locking stitch markers
- Measuring tape
- Three smooth plastic, acrylic, or rust-resistant metal support rods approximately 11–12 in / 28–30 cm long
- One rust-resistant shower ring or large hanging ring
The Craft Yarn Council categorizes crochet hook sizing by metric measurement and identifies 4.5 mm as a standard hook size. Crochet abbreviations such as ch, sc, dc, and sl st used below also follow standard US-style crochet abbreviations.
Crochet Abbreviations Used
This tutorial uses US crochet terminology.
- ch = chain
- sc = single crochet
- dc = double crochet
- sl st = slip stitch
- st / sts = stitch / stitches
- sp = space
- rep = repeat
These abbreviations are consistent with the Craft Yarn Council crochet abbreviation standards.
US/UK Terminology Note
Be careful if you normally follow UK terminology. A US single crochet is called a double crochet in UK terminology, so converting the terms incorrectly will dramatically change the fabric.
Gauge
Aim for approximately:
15 sc × 16 rounds = 4 in / 10 cm
Exact gauge is not as critical here as it would be for a sweater, but it still affects the width, depth, stiffness, and amount of yarn required.
If your pocket is much wider than expected, try a smaller hook.
If your fabric feels extremely stiff and difficult to work, move up by 0.5 mm.
Before You Start
Count Your Stitches
The most important number in this project is 82 stitches.
Once Round 1 is complete, each standard round should contain 82 stitch positions unless a particular decorative round specifically says otherwise.
Place a locking marker in the first stitch of each round. Do not move the marker until you are certain you have completed the round.
Keep the Pocket from Twisting
After the first two or three rounds, lay the work flat.
The rounded ends should sit opposite one another and the long sides should remain parallel. If the foundation looks twisted, correct it early rather than continuing for another ten rounds.
Avoid Curling
Slight curling at the beginning is normal.
Severe curling usually means the foundation chain is much tighter than the single crochet stitches above it. Try making the starting chain with relaxed tension or with a hook 0.5 mm larger.
Choosing Yarn
A smooth yarn makes the stitches easier to see and produces a cleaner storage pouch. Avoid extremely fuzzy yarn because the stitch openings are more difficult to identify.
For bathroom use, choose yarn you are comfortable washing repeatedly and always follow its care label.
Moisture Note
Any textile kept in a shower environment needs opportunities to dry. The open ventilation rows in this project reduce the amount of solid fabric and help prevent water from sitting in an uninterrupted dense pocket.
Do not leave water pooled inside the pouches.
Step-by-Step Crochet Tutorial
Step 1: Make the Foundation Chain
Using your main color and the 4.5 mm hook:
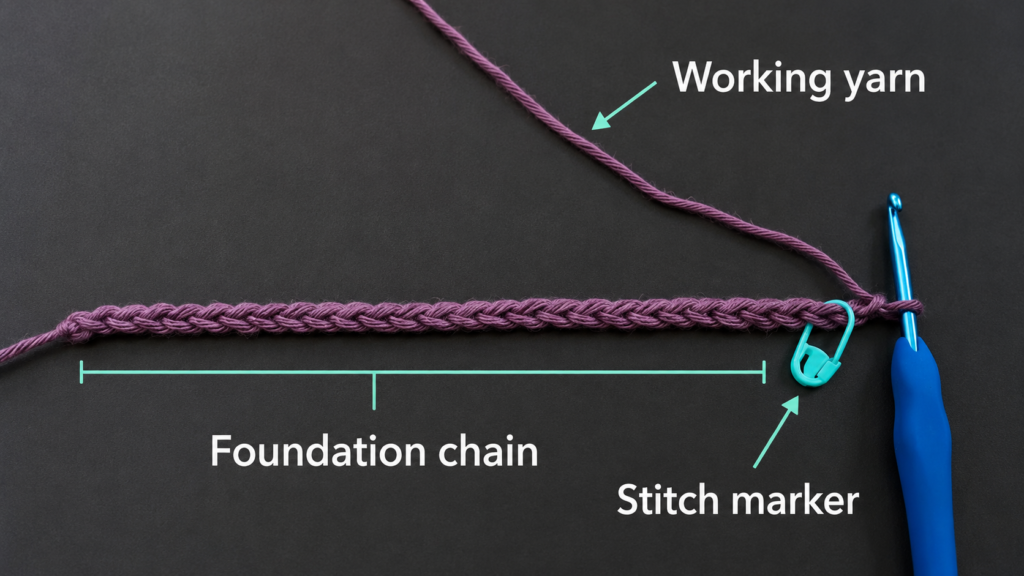
Ch 41.
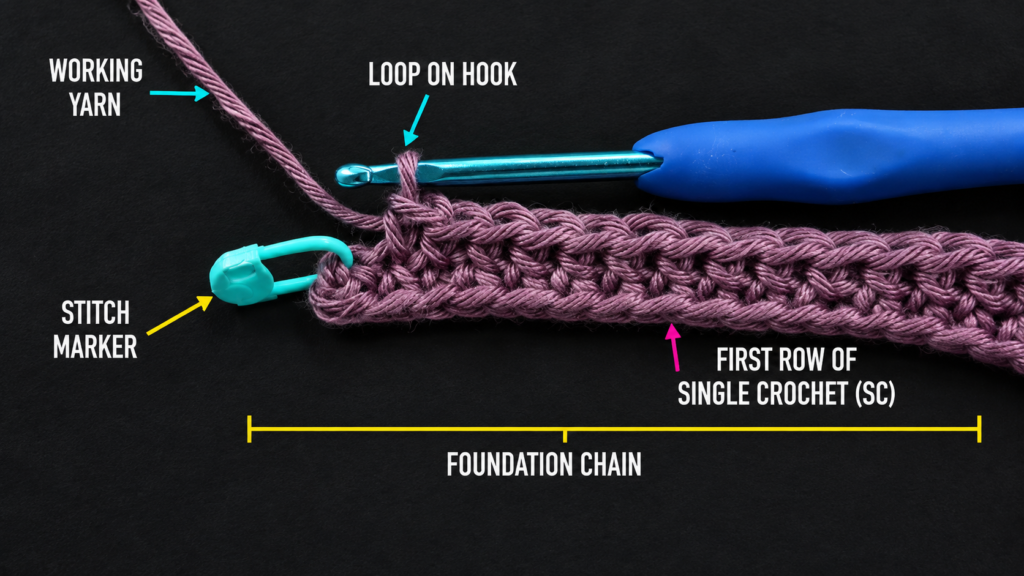
Do not pull these chains tight. The foundation should lie flat without bunching.
Count the chain from the hook backward. The active loop on your hook does not count as a chain.
Place a stitch marker near the first chain if that helps you locate it when you work along the underside later.
Beginner tip:
Lay the chain flat before continuing and count all 41 chains twice.
Common mistake to avoid:
Do not count the active loop on the crochet hook as Chain 1.
Step 2: Crochet Along the First Side
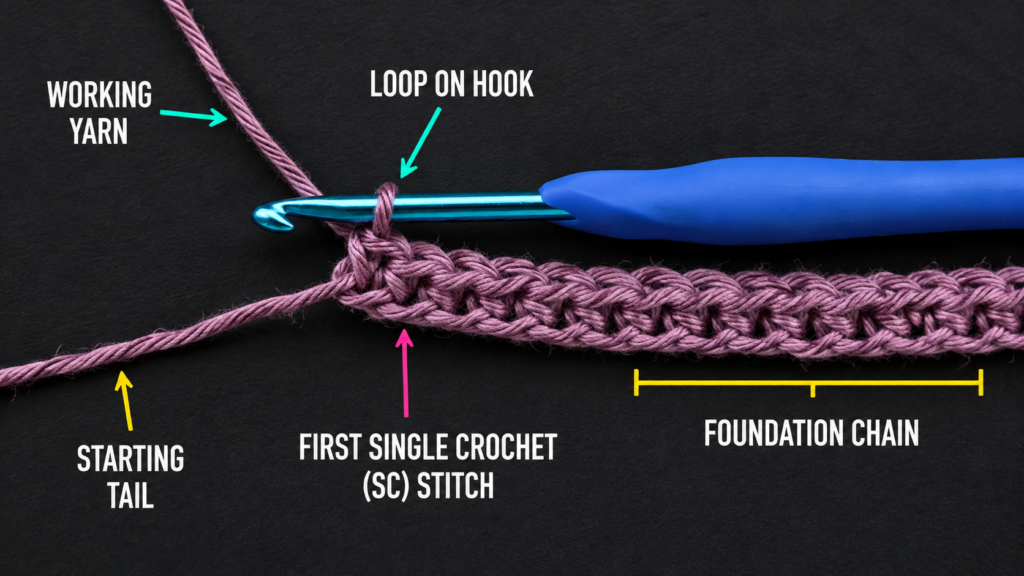
Starting in the second chain from the hook, make:
- 1 sc in the second chain;
- 1 sc in each of the next 38 chains;
- 3 sc in the final chain.
You have now reached the end of the foundation.
Those three stitches in the end chain allow the work to turn naturally instead of folding sharply.
Do not turn the project as you would when crocheting normal rows.
Instead, rotate the foundation so you can work along its unused underside.
Beginner tip:
After making the three end stitches, stop and locate the row of unused loops along the bottom before inserting the hook again.
Common mistake to avoid:
Do not accidentally start working back into stitches you already made. You want the unused side of the original chain.
Step 3: Work Along the Underside
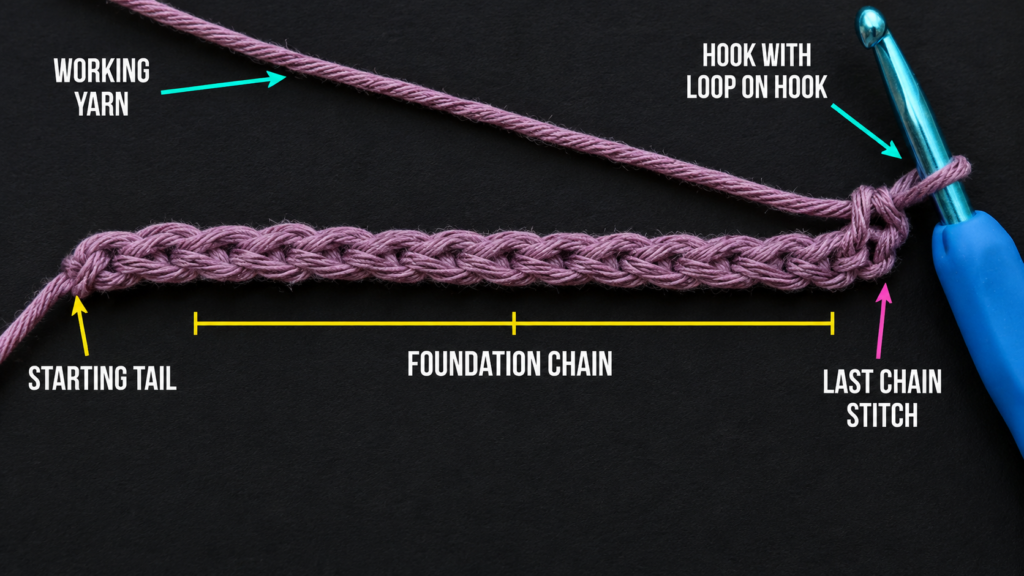
Continue along the opposite side of the foundation.
Make:
- 1 sc in each of the next 38 unused foundation loops;
- 2 sc in the same starting chain where your very first single crochet was made.
You should now have 82 stitches around the complete oval.
Join to the first sc with a sl st.
The shape will still look extremely narrow at this stage. That is correct. You are creating the folded bottom of a pouch rather than a large oval basket base.
Beginner tip:
Count the stitches before continuing. Fixing the count now is much easier than correcting a pocket after several inches.
Common mistake to avoid:
Missing one of the underside loops is common. If you finish with 81 stitches instead of 82, carefully recount the second side before adding a random extra stitch.
Step 4: Establish the Pocket Shape
Round 2
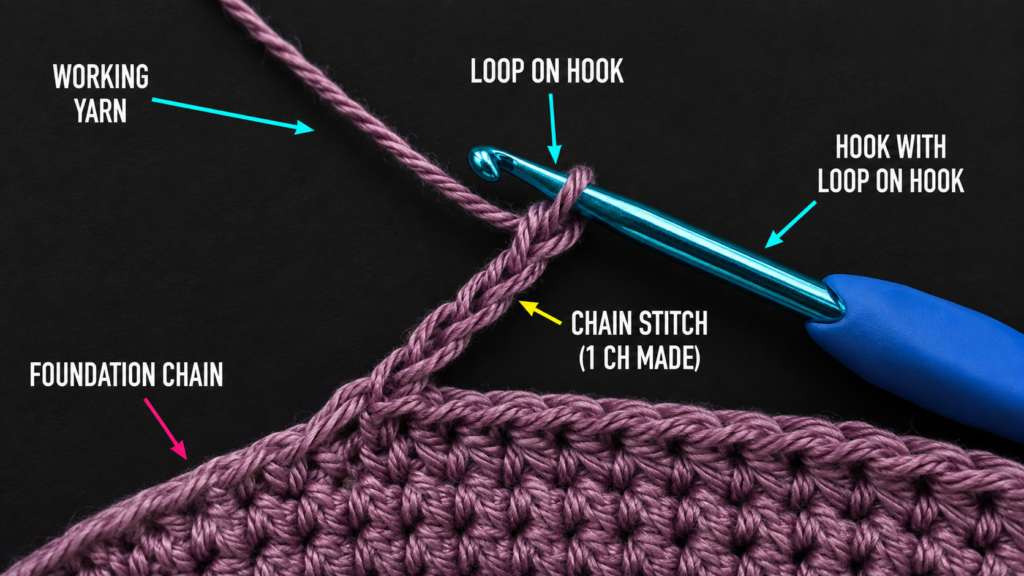
Ch 1. The chain does not count as a stitch.
Sc in the same stitch and in every stitch around.
Join with a sl st to the first sc.
82 sts.
Repeat another round of single crochet.
By Round 3, the narrow oval should begin to curve upward naturally.
Do not add increases. The purpose of Round 1 was simply to create the rounded closed base. Keeping 82 stitches now causes the fabric to grow vertically.
Beginner tip:
Flatten the pouch occasionally so the two rounded ends remain aligned.
Common mistake to avoid:
Adding extra stitches at the curved ends will make the pouch flare outward. Once Round 1 is complete, the stitch count remains unchanged.
Step 5: Keep the Round Join Under Control
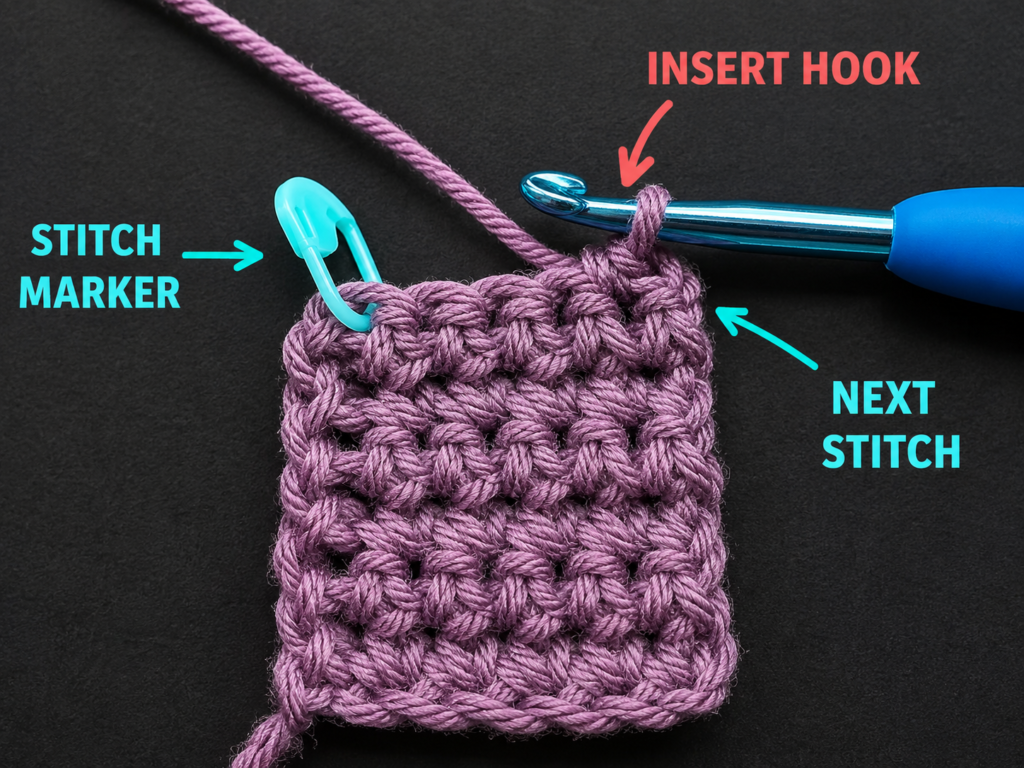
At every round:
- Place a marker in your first sc.
- Work the required round.
- Count if anything looks uneven.
- Join to the marked sc.
- Ch 1.
- Begin the next round in that same first stitch.
The marker matters because a joining slip stitch can visually resemble another stitch when you are new to joined rounds.
If you crochet into the slip stitch by mistake, the pocket slowly gains stitches and may begin to spiral or flare.
Beginner tip:
Move the stitch marker only after the first sc of the new round has been completed.
Common mistake to avoid:
Never assume the stitch immediately beside your hook is automatically the first stitch. Look for the marker.
Step 6: Crochet the Pocket Walls
Continue in sc, maintaining 82 stitches.
For this version:
Top Pocket
Work until the pocket measures approximately 2.5 in / 6.5 cm from the base.
Then work one ventilation round.
Continue in sc until approximately 4 in / 10 cm.
Work a second ventilation round.
Continue in sc until the pouch is approximately 5 in / 13 cm deep.
Middle Pocket
Work approximately 3 in / 7.5 cm in sc.
Add a ventilation round.
Continue another 2 in / 5 cm.
Add another ventilation round.
Continue until the pouch measures about 6 in / 15 cm deep.
Bottom Pocket
Work approximately 3.5 in / 9 cm in sc.
Add a ventilation round.
Continue approximately 2.5 in / 6 cm.
Add a second ventilation round.
Continue until the pocket measures approximately 7–7.5 in / 18–19 cm deep.
Ventilation Round
Ch 1.
Repeat around:
*sc in next st, ch 1, skip next st*.
Repeat the sequence around and join to the first sc.
On the following round, work:
- 1 sc in each sc;
- 1 sc into each ch-1 space.
You should return to 82 stitch positions.
This simple opening row adds flexibility and airflow without turning the entire pouch into loose mesh.
Beginner tip:
Count the chain spaces instead of counting every individual stitch if that feels easier.
Common mistake to avoid:
Do not work a normal sc into the stitch that was supposed to be skipped. Doing so adds extra stitches.
Step 7: Make the Top Support Row
When each pocket reaches its finished depth, work one final sc round.
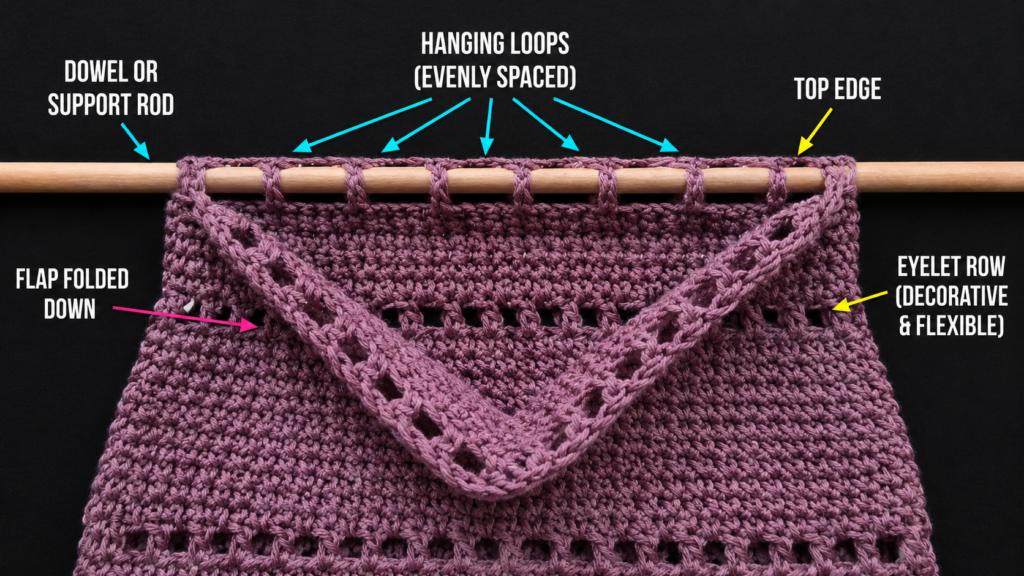
Then create one eyelet round:
Ch 3. The first two chains act as the height of the first dc and the third chain creates the first opening.
Skip the next stitch.
Continue around with:
*dc in next st, ch 1, skip next st*.
Join neatly.
This creates a row of evenly spaced openings near the upper edge.
Flatten the pocket and identify the back half.
Slide one shower-safe support rod horizontally through several chain spaces along the back half only.
The rod should extend slightly beyond both side edges.
Do not force an oversized rod through tiny chain spaces. If necessary, adjust your chain-space size or use a slimmer rod.
Beginner tip:
Insert the rod while the pouch is empty and lying flat.
Common mistake to avoid:
Do not weave the rod through both the front and back layers. It should support the back edge while allowing the pocket mouth to remain open.
Step 8: Make All Three Pockets
Repeat the same foundation and oval-base method until you have:
- one shallow top pocket;
- one medium middle pocket;
- one deeper bottom pocket.
All three begin with ch 41 and have 82 stitches around.
Only their finished depth changes.
This is one of the most beginner-friendly features of the design because you do not have to remember three different foundation counts.
Place all three pockets on your work surface.
Arrange them:
small → medium → large
from top to bottom.
Allow approximately 3–4 in / 7.5–10 cm between the support rods.
Do not connect anything permanently until you are satisfied with the visual spacing.
Beginner tip:
Temporarily tie the three rods together with scrap yarn and hang the organizer. It is much easier to judge spacing vertically than while everything is lying flat.
Common mistake to avoid:
Do not make the gaps so small that a tall shampoo bottle in the lower pocket collides with the pocket above it.
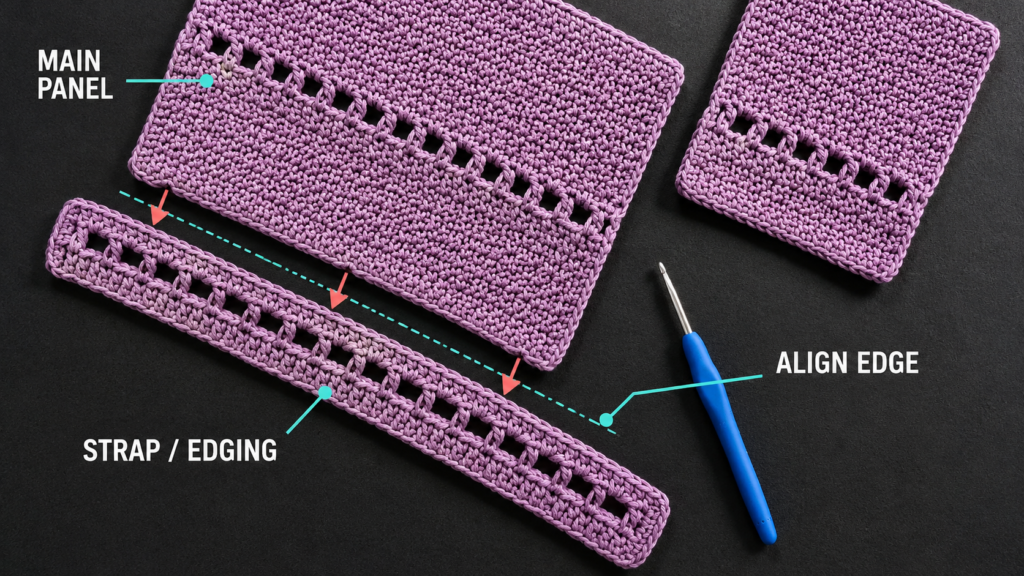
Step 9: Crochet Reinforced Side Connectors
For the joining cords, use two strands of yarn held together.
You may use the main color or a contrast such as warm ivory.
Start at the left end of the bottom support rod.
Secure the yarn firmly around the rod.
Make enough chains to reach the left end of the middle rod while maintaining your chosen gap.
For approximately 3.5 in / 9 cm of spacing, start with roughly 14–18 chains, then measure rather than relying on the number alone.
Attach securely around the middle rod.
Continue with the same number of chains to reach the upper rod.
Attach again.
Fasten off temporarily.
Repeat on the right side.
Hang the organizer briefly and compare both sides.
If one pocket tilts, adjust one connector before weaving in the ends.
Beginner tip:
Count and write down the number of chains used on the left side, then copy those counts on the right.
Common mistake to avoid:
Do not stretch the connector chain while measuring. A stretched chain will shorten after you release it.
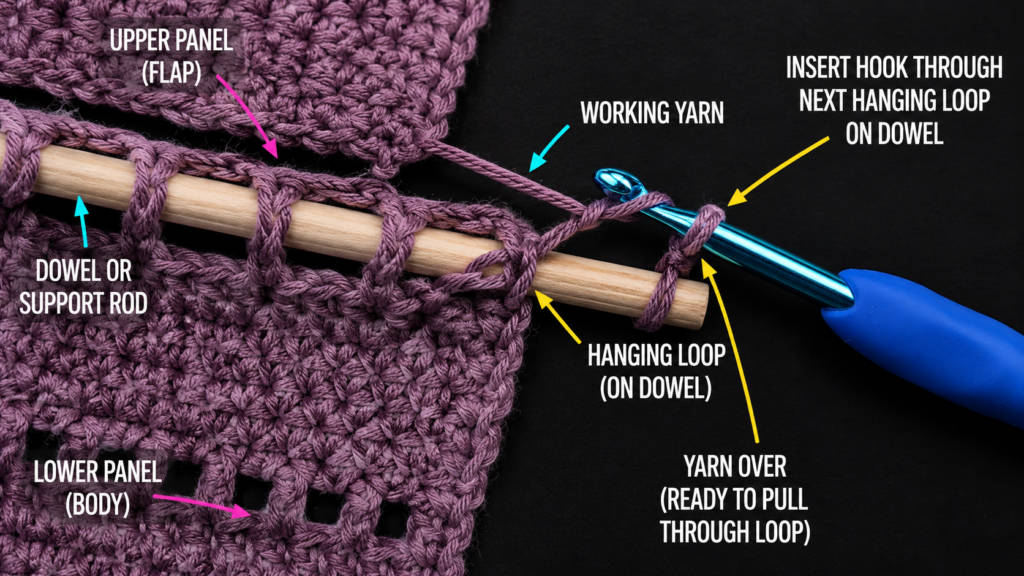
Step 10: Add the Top Hanger
Now add the part that connects the caddy to the shower hook.
Using two strands of yarn held together:
- Secure the yarn to the left end of the top support rod.
- Crochet a chain approximately 7–9 in / 18–23 cm long.
- Pass the working yarn around the shower ring and secure it.
- Crochet an equal-length chain down to the right end of the upper rod.
- Secure firmly to the rod.
The result should resemble a shallow inverted V with the ring centered above the top pocket.
Test the empty organizer.
If the top rod tilts, adjust one side before fastening off.
For an even more rigid hanger, you can slip stitch back along each chain before finishing.
Beginner tip:
Place the ring directly above the center of the pocket before determining the final chain length.
Common mistake to avoid:
Do not position the ring closer to one side. Even a small imbalance becomes more noticeable once bottles are added.
Pattern Notes or Stitch Notes
Turning Chain Rule
The ch 1 used at the beginning of a single crochet round does not count as a stitch.
Main Stitch Count
After completing the foundation round:
82 sts
Maintain this count through the solid single crochet rounds.
Ventilation Repeat
Repeat:
*sc 1, ch 1, skip 1*
around.
On the following round, work one sc into every sc and every ch-1 space to restore the dense fabric.
Right Side / Wrong Side
Because the pouches are worked around a foundation rather than back and forth in flat rows, right-side/wrong-side orientation is not especially important.
For assembly, decide which side has the neatest join and place that side toward the wall.
Size Adjustment
To make a wider caddy, increase the foundation chain.
To make it narrower, reduce the foundation chain.
Whenever you change the foundation length, remember that the completed oval round contains stitches from both sides of that foundation plus the stitches used to round the ends.
For beginners, changing pocket depth is safer than changing pocket width because it does not require recalculating the foundation.
Common Beginner Mistakes
1. The Pocket Gets Wider as You Crochet
Cause: You are probably crocheting into the joining slip stitch and accidentally adding stitches.
Fix: Keep the first sc marked and recount the round. Each regular round should contain 82 stitches.
2. The Foundation Twists
Cause: The chain was rotated incorrectly before crocheting the second side.
Fix: After Round 1, lay the narrow oval flat. Both long edges should run parallel.
3. One End Looks Larger Than the Other
Cause: The rounded-end stitch placement is uneven.
Fix: Recheck Round 1. Both ends should contain the intended turning stitches before you begin building upward.
4. The Pocket Is Too Floppy
Cause: Yarn, hook, or tension is producing fabric that is too loose.
Fix: Try a smaller hook or a firmer yarn. You can also add another solid sc round around the upper edge.
5. The Ventilation Openings Do Not Line Up
Cause: One skip was missed.
Fix: Stop at the mistake instead of compensating later. Unravel to the incorrect repeat and continue with sc, ch 1, skip 1.
6. The Three Pockets Hang Unevenly
Cause: The left and right connector chains differ in length.
Fix: Count the chains rather than judging them visually. Measure again while the chains are relaxed.
7. The Top Pocket Collapses When Loaded
Cause: The support rod is not centered or the connector cord is pulling on the crochet rather than the rod.
Fix: Attach the hanging system around or immediately adjacent to the support structure so the load is distributed across the reinforced upper edge.
How to Customize This Crochet Project
Change the Yarn Color
A monochrome caddy gives the project a clean modern look.
You could also try:
- sage + ivory;
- sand + cream;
- terracotta + oatmeal;
- navy + soft gray;
- eucalyptus green + natural cotton.
For a striped look, change color after a solid sc round rather than in the middle of a ventilation row.
Add a Fourth Pocket
Once you understand the construction, a fourth pouch is easy.
Crochet another 41-chain pocket and connect it below the current bottom pocket.
Remember that every additional pocket increases the total loaded weight.
Make One Pocket Extra Deep
For tall bottles, continue the bottom pouch for another 1–2 in / 2.5–5 cm before working the top support row.
No foundation recalculation is needed.
Add a Small Soap Pocket
Crochet a smaller rectangular or oval pouch and attach it to the front of the upper pocket.
Keep it shallow so wet soap can be removed easily.
Add More Openwork
You can substitute additional ventilation rounds for solid rounds.
Avoid making the entire bottom portion very open if you intend to store narrow bottles that could push through large holes.
Add a Decorative Border
A simple final round of contrasting single crochet can make the upper edge stand out.
Avoid heavy scallops or long loops around a shower caddy because they can trap water and interfere with removing bottles.
Gift Ideas
A handmade shower organizer can work well as:
- a dorm-room gift;
- a housewarming gift;
- a camper or RV organizer;
- a small-bathroom storage gift;
- a handmade spa basket component.
Fill the pockets only after gifting so the textile is not stored under load.
Finishing Instructions
Once the three pockets are assembled:
Fasten Off Securely
Leave tails long enough to weave through several stitches.
Connector tails deserve extra attention because those sections experience more pulling than decorative yarn ends.
Weave in the Ends
Use the tapestry needle to weave each tail through several neighboring stitches.
Change direction at least once rather than pulling the tail through one straight channel.
Check Alignment
Hang the caddy empty.
Look at it from several feet away.
Confirm:
- each support rod is level;
- the side connectors are equal;
- the shower ring is centered;
- the pockets open forward rather than twisting sideways.
Test Gradually
Add one lightweight item at a time.
Do not immediately fill every pocket with large bottles.
Your shower hook or wall attachment has its own load limit, so check that hardware separately.
Washing and Care
Follow the yarn manufacturer’s care instructions.
Remove any detachable support rods or metal hardware first if appropriate for the hardware you selected.
Reshape the empty caddy after washing and allow it to dry completely before reloading it.
Do not store the organizer permanently with standing water inside the pockets.
Quick Printable-Style Summary
Skill level: Easy / confident beginner
Yarn: Category #4 washable cotton or cotton blend
Hook: 4.5 mm
Main stitches: ch, sc, dc, sl st
Pocket foundation: Ch 41
First round: Work around both sides of the chain to create a narrow oval.
Main stitch count: 82 sts
Pocket construction: Continue sc in joined rounds without increasing.
Ventilation repeat:*sc in next st, ch 1, skip next st*
Pocket sizes:
Make three pockets from the same foundation width; vary only their depth.
Support:
Add an upper eyelet row and slide a shower-safe support rod through the back half of each pouch.
Assembly:
Connect rods vertically using equal-length reinforced crochet chains.
Hanger:
Attach reinforced chains from both ends of the top support rod to a centered shower ring.
Finishing:
Fasten off, weave in ends, test alignment empty, then add toiletries gradually.
FAQ
Can a crochet shower caddy actually get wet?
Yes, but the yarn and hardware need to be suitable for repeated bathroom use. Choose washable yarn, allow the organizer to dry thoroughly, and avoid trapping standing water inside dense pockets.
What yarn is best for a crochet shower caddy?
A smooth, washable cotton or cotton-blend yarn is a practical starting choice because it creates clear stitches and relatively firm fabric. Avoid highly stretchy novelty yarns for a loaded storage project.
The Craft Yarn Council’s yarn-weight system can help you compare standardized yarn categories when substituting yarn.
Can I make the entire caddy from cotton?
Yes. Just remember that wet cotton fabric will feel heavier than dry fabric, so do not overload the organizer and make sure its hanging hardware is secure.
Do I have to use support rods?
No, but they help keep the upper edge of each pouch from collapsing inward.
Without rods, you could make a completely soft version with reinforced crochet straps, although it will hang differently when loaded.
Why are the three pockets the same width?
Using the same foundation for all three simplifies the pattern significantly.
A beginner only has to learn one pouch construction. Different capacities are created by changing the number of rounds rather than recalculating three separate foundations.
Can I make the pockets wider?
Yes.
Increase the foundation chain, make a small swatch first, and remember that additional width also increases the amount of yarn and the potential load.
How do I stop the shower caddy from stretching?
Use firm tension, choose a stable yarn, reinforce the side connectors, support the top edge of each pouch, and avoid overloading it with oversized bottles.
Conclusion
This crochet shower caddy works because the construction is repetitive rather than complicated.
Once you understand how to crochet around both sides of the starting chain, the three pockets are variations of the same simple shape. Solid single crochet provides structure, open chain-space rows break up the dense fabric, and reinforced connectors turn the separate pouches into one vertical organizer.
Make the first pocket slowly and count carefully. The second and third should feel much faster because you will already understand the base, join, ventilation row, and upper edge.
Once the caddy is finished, hang it empty first, check the alignment, and then gradually add the bathroom items you actually use.
Save the tutorial so you can reuse the same pouch construction for a bathroom wall organizer, craft organizer, bedside caddy, camper storage system, or hanging nursery organizer later.





