A handmade crochet play mat is one of those projects that feels special from the very first stitch. It starts as a tiny circle of yarn, grows a little with every round, and eventually becomes a beautiful handmade piece for a nursery, playroom, or cozy corner.
If you have been looking for a crochet play mat pattern that is simple enough for beginners but still looks beautifully finished, this round design is a lovely place to start.
You don’t need complicated stitches, a collection of granny squares, or difficult sewing techniques. This entire crochet mat is worked as one large circle using half double crochet stitches and carefully spaced increases.
The best part? You can watch your project grow as you work.
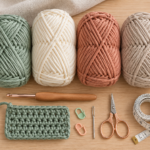
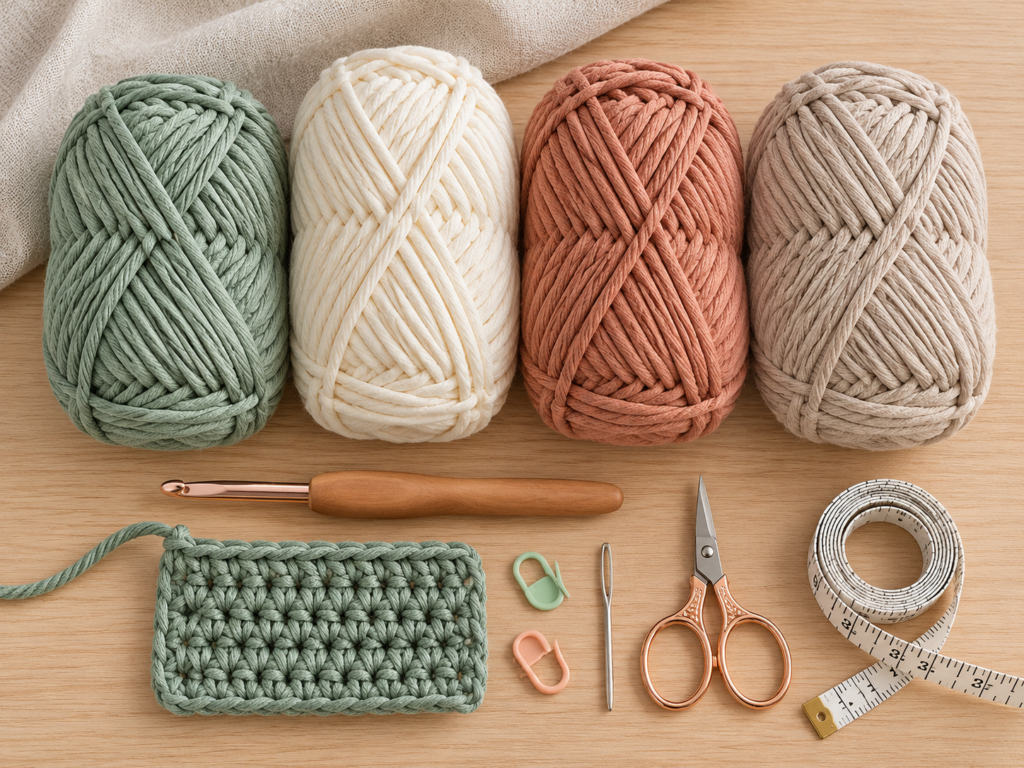
For this tutorial, we’re making a round mat in four soft colors: dusty sage, warm cream, muted terracotta, and oatmeal beige. The muted palette gives it a cozy, modern appearance, but you can use any combination of colors you love.
I’ll walk you through the starting ring, the first stitches, how to keep your circle flat, when to add increases, how to change colors, and how to finish everything neatly.
The instructions are written in US crochet terminology and include stitch counts, beginner tips, troubleshooting advice, and a quick pattern summary.
What You’ll Learn
By the end of this crochet play mat tutorial, you’ll know how to:
- Start a crochet project with a magic ring.
- Make half double crochet stitches.
- Work continuously in a spiral.
- Increase evenly to create a round shape.
- Use stitch markers to track rounds.
- Change yarn colors without leaving large gaps.
- Recognize curling and wavy edges.
- Adjust the mat’s size.
- Finish the edge and weave in loose ends.
If you have already made a simple crochet coaster, this project uses many of the same basic skills. The difference is that you keep growing your circle until it becomes a useful mat.
Crochet Play Mat Pattern Details
| Feature | Details |
|---|---|
| Pattern name | Cozy Circle Crochet Play Mat |
| Skill level | Easy beginner |
| Construction | One-piece, continuous spiral |
| Main stitch | Half double crochet |
| Yarn weight | Bulky #5 |
| Recommended hook | 6.5 mm |
| Shape | Round |
| Planned rounds | 16, plus optional expansion |
| Target size | About 30–36 inches with suitable yarn and sufficient additional rounds |
| Sewing required | None |
| Color changes | Three |
| Crochet language | US terms |
The 16-round base is a starting framework, not a guaranteed finished diameter. The final dimensions depend significantly on your yarn thickness, gauge, and the number of rounds added.
Materials You’ll Need
The materials are simple, and most crocheters will already have a few of these tools.
Yarn
Choose a washable bulky-weight #5 yarn with a smooth, soft surface. A cotton blend is a practical option because it offers stitch definition, reasonable durability, and a comfortable texture.
For a mat measuring approximately 30–36 inches across, a reasonable shopping allowance is around 600–900 yards (550–825 meters), but this is a preliminary estimate rather than a tested yardage requirement. Larger mats, denser stitches, and particular yarn constructions may require substantially more.
For our four-color design, prepare approximately:
- Color A: Dusty sage, for the center.
- Color B: Warm cream, for the second section.
- Color C: Muted terracotta, for the third section.
- Color D: Oatmeal beige, for the outer section.
Purchase enough matching dye lots to avoid unwanted color differences.
Crochet hook
Use a 6.5 mm crochet hook as your starting point. An ergonomic hook can make a difference when you’re working on a larger project with many repeated stitches.
The best hook is the one that creates a flexible fabric without excessively large holes. You may need to adjust your hook size according to your yarn.
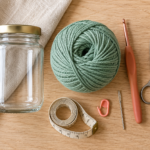
Other supplies
- Sharp yarn scissors.
- Blunt tapestry needle.
- Two removable stitch markers.
- Flexible measuring tape.
- Flat work surface for checking the mat’s shape.
- Optional row counter or notebook.
Crochet Abbreviations Used
You only need a handful of abbreviations to follow this free crochet play mat pattern.
| Abbreviation | Meaning |
|---|---|
| ch | Chain |
| hdc | Half double crochet |
| sc | Single crochet |
| sl st | Slip stitch |
| st / sts | Stitch / stitches |
| inc | Increase: work two hdc stitches into the same stitch |
| rep | Repeat |
| rnd | Round |
US and UK crochet terms: This pattern uses US terminology. A US half double crochet is known as a half treble crochet in UK terminology. The US single crochet is a UK double crochet.
How to Make a Half Double Crochet
If you’ve never made a half double crochet stitch, practice a few before beginning your mat.
First, wrap the yarn over your hook. Insert the hook into the stitch where you want to work. Wrap the yarn over the hook again and pull up a loop.
You should now have three loops on your hook.
Wrap the yarn over one more time and pull it through all three loops.
That’s one half double crochet stitch.
Half double crochet is a useful choice for this mat because it creates a relatively compact fabric while building height faster than single crochet.
What Does Increase Mean?
An increase means adding extra stitches so the circular fabric has enough room to spread outward.
For this project, one increase is made by working two half double crochet stitches into the same stitch.
Instead of working one stitch into a stitch from the previous round, you make two.
Those extra stitches are what help the mat stay flat as it grows.
Before You Start
Understand how a crochet circle grows
A crochet play mat is different from a rectangular blanket. Instead of turning at the end of each row, you’ll crochet around the center in a continuous spiral.
Every round becomes slightly larger.
As the diameter increases, the outer edge needs more stitches to cover the additional distance without pulling inward.
For our original design, we begin with 10 half double crochet stitches and add 10 stitches during each subsequent increase round.
This is a starting increase schedule, not a universal rule. Half double crochet circles can behave differently depending on yarn, hook size, stitch height, and tension. Check the fabric frequently and adjust when necessary.
Check your tension
Your stitches should be reasonably even, but they shouldn’t feel stiff.
If you’re gripping your hook tightly or struggling to insert it into each stitch, try loosening your hands or switching to a slightly larger hook.
If your stitches are extremely loose, with large openings that catch fingers easily, try a smaller hook or a denser yarn.
For a baby-oriented play mat, select a fabric that is smooth, stable, and comfortable without loose loops.
Count your stitches
Counting is particularly important in circular crochet.
The first round contains 10 stitches, the second contains 20, the third contains 30, and so on.
Because this design is worked in a continuous spiral, you’ll place a stitch marker in the first stitch of each round.
Whenever you reach the marker, remove it, work the next round’s first stitch, and place the marker into that new stitch.
Keep the mat flat
After every few rounds, spread your project on a table or the floor.
If the edges curl upward, the fabric may need more increases or looser tension.
If the edges ripple into waves, you may have added too many stitches.
Small imperfections can sometimes settle after washing and careful drying, but strong curling or ruffling should be corrected during construction.
Choose your colors
You can make the mat in one solid color, two colors, or several shades.
For this tutorial, the color arrangement is:
| Color | Main rounds |
|---|---|
| Dusty sage | 1–4 |
| Warm cream | 5–8 |
| Muted terracotta | 9–12 |
| Oatmeal beige | 13–16 and optional expansion |
Using several rounds per color produces broad, calm sections rather than narrow stripes.
A solid-color version is also a great choice for beginners because there are fewer yarn ends to weave in.
Step-by-Step Crochet Play Mat Tutorial
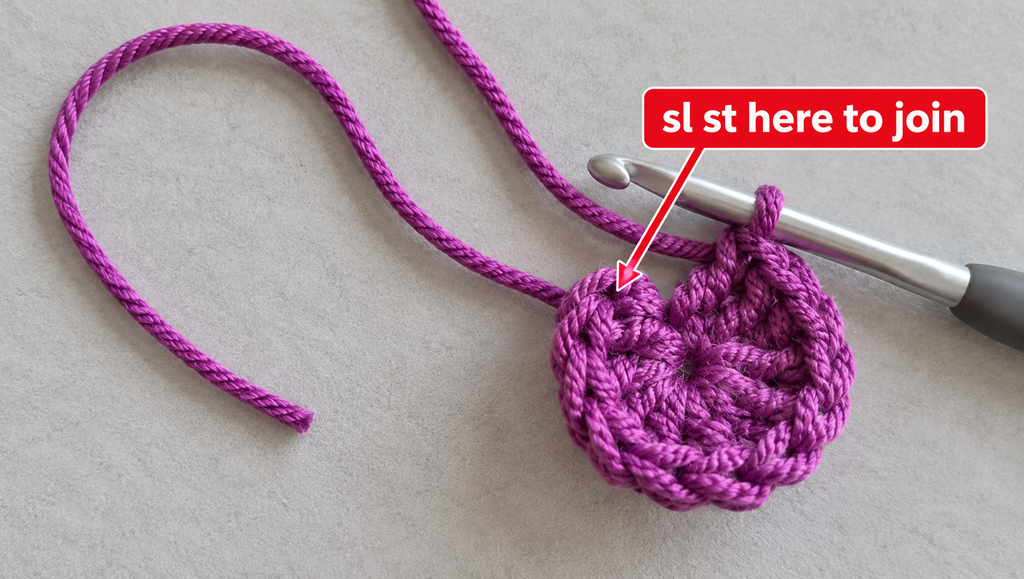
This original beginner pattern uses a continuous spiral. Do not turn your work or join at the end of every round. Only join with a slip stitch when completing the final edge.
The stitch count increases by 10 on each standard round.
Step 1: Make a Magic Ring
Begin with your dusty sage yarn and 6.5 mm crochet hook.
Leave a yarn tail approximately 6 inches long.
Make a loose loop of yarn, allowing the working yarn to cross over the tail. Insert your crochet hook beneath the front strand of the loop, catch the working yarn, and pull it through.
Chain one to secure the adjustable ring. This chain does not count as a stitch.
You should now have a loop large enough to crochet your first stitches into.
Don’t pull the ring closed yet. You’ll need room to work.
Beginner tip: If the magic ring feels tricky, practice making it a few times before you start. You can also use a chain-four ring as an alternative, although that may leave a more noticeable opening.
Common mistake to avoid: Don’t accidentally work into only one strand of the adjustable ring if the way you have formed it requires crocheting over both the ring loop and tail. Securing the tail helps keep the center from loosening.
Step 2: Crochet the First Round
Now you’re ready to make the center of your play mat.
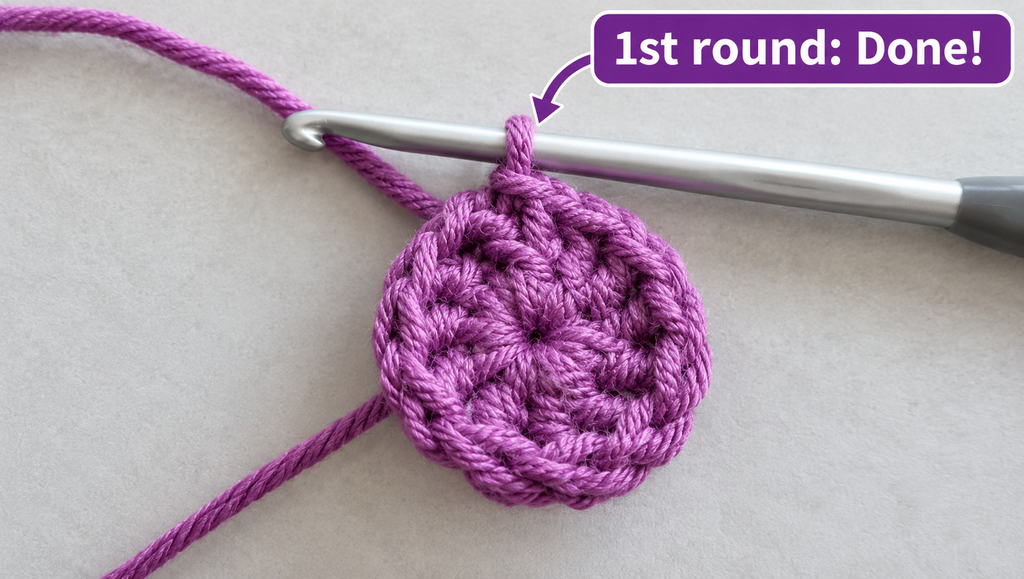
Work 10 half double crochet stitches into the magic ring.
To make the first stitch, yarn over, insert the hook through the center of the ring, yarn over again, and pull up a loop.
With three loops on your hook, yarn over and pull through all three loops.
Repeat until you’ve made 10 half double crochet stitches.
Count them carefully before moving to the next step.
Round 1: 10 hdc into magic ring. (10 sts)
The beginning chain doesn’t count toward your 10 stitches.
At this stage, the project will be very small. That’s exactly what you want.
Beginner tip: Spread the stitches along the adjustable ring as you work so they don’t become crowded in one area.
Common mistake to avoid: Don’t count the loop on your hook as a completed stitch. Only count the stitches you’ve actually finished.
Step 3: Close the Ring and Add a Stitch Marker
Hold the small crochet circle gently between your fingers.
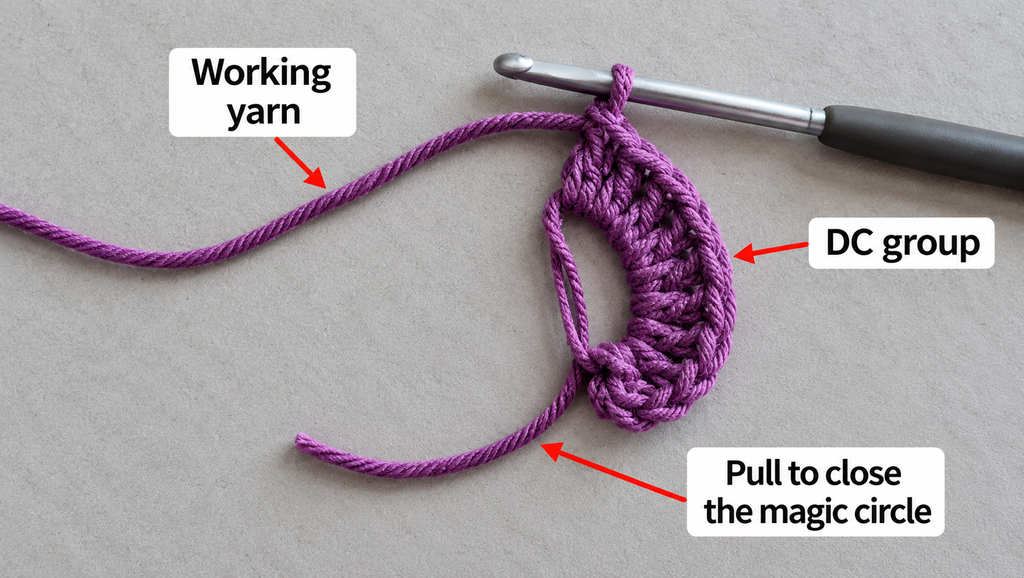
Find the loose tail of your magic ring and pull it slowly.
As you pull, the center opening should become smaller. Continue until the opening closes neatly.
Don’t cut the tail.
Instead, leave it long enough to weave securely into the back of the fabric later.
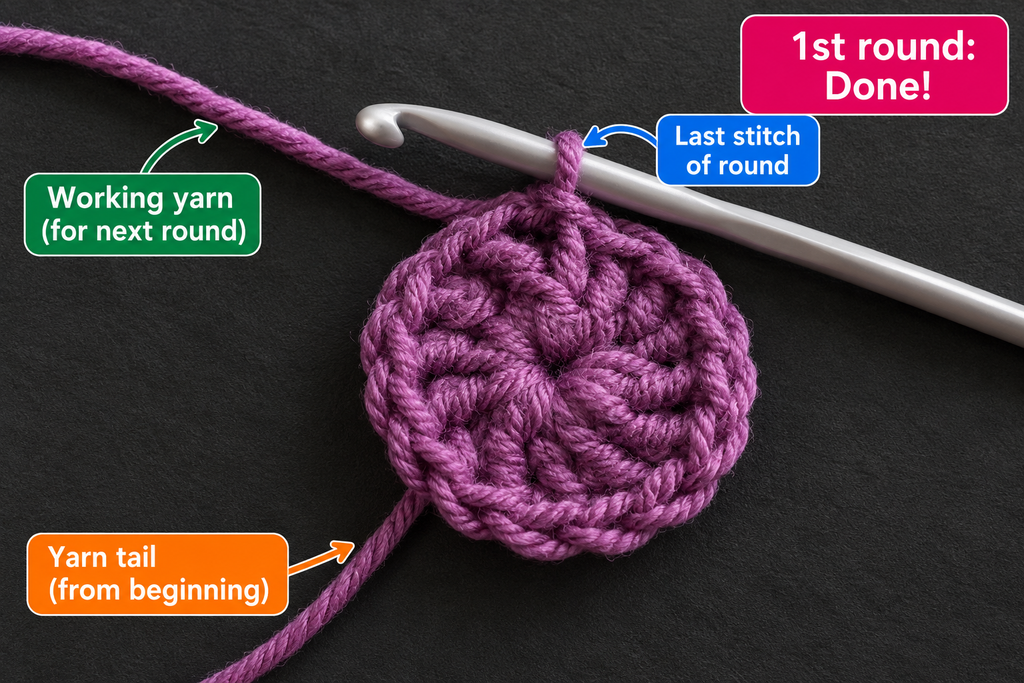
Now place a removable stitch marker into the top of the first half double crochet stitch of Round 1.
Because we’re working in a spiral, this marker is your guide to the start of each round.
You won’t make a slip stitch to join Round 1.
When you’re ready, simply continue into the next stitch to begin Round 2.
Beginner tip: Choose a stitch marker that contrasts with your yarn. A terracotta marker is easy to see against the dusty sage center.
Common mistake to avoid: If you lose track of the first stitch, count your 10 stitches again and identify the first stitch after the starting chain.
Step 4: Work Round 2 — Increase Every Stitch
In Round 2, we’ll make the circle wider by doubling the stitch count.
Work two half double crochet stitches into the first stitch.
Then work two half double crochet stitches into the next stitch.
Continue around, placing two hdc stitches into every stitch from Round 1.
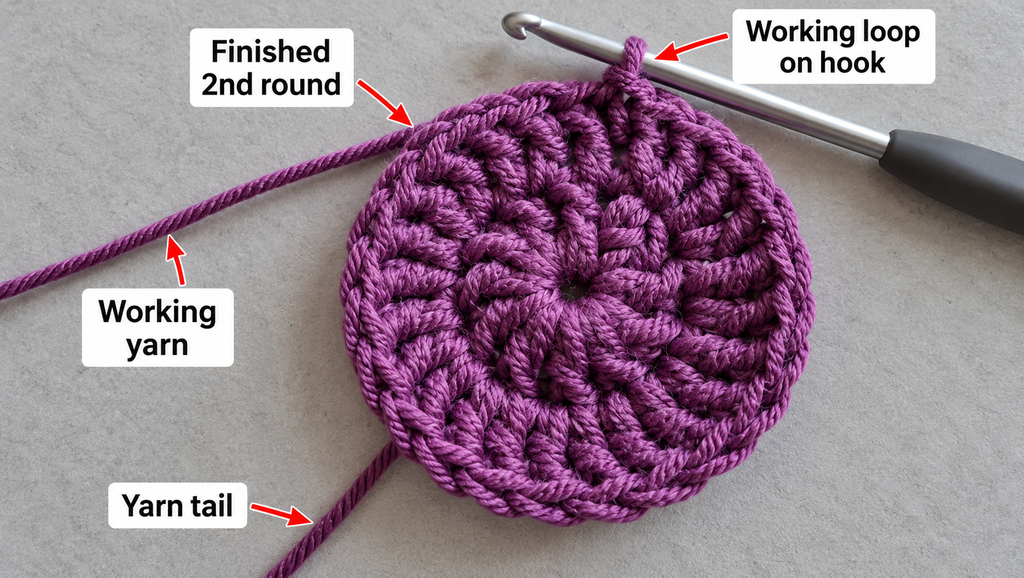
Round 2: 2 hdc in each stitch around. (20 sts)
Once you’ve finished the round, count your stitches.
You should have 20.
Move your stitch marker into the first stitch of the new round so it continues marking your starting position.
You should notice that the circle has already grown.
Beginner tip: When making an increase, keep both stitches in the same stitch space. Don’t move into the next stitch until you’ve finished both.
Common mistake to avoid: A very common error is making one stitch instead of two during an increase. This can throw off later stitch counts and may contribute to curling.
Step 5: Work Rounds 3 and 4 — Build a Flat Circle
The next two rounds introduce the repeating increase rhythm.
Instead of doubling every stitch, you’ll place one ordinary stitch between your increases, then two ordinary stitches.
Round 3
Work one hdc in the next stitch, then two hdc in the following stitch.
Repeat that two-stitch sequence all the way around.
Round 3: 1 hdc in next st, 2 hdc in next st; repeat around. (30 sts)
Round 4
Work one hdc in each of the next two stitches. Then work two hdc in the next stitch.
Repeat around.
Round 4: 1 hdc in each of next 2 sts, 2 hdc in next st; repeat around. (40 sts)
When you’ve completed Round 4, your center should resemble a small circular placemat.
Lay it on a flat surface and look at its shape.
The fabric should be reasonably flat, perhaps with a slight natural curve near the working edge.
Beginner tip: Count stitches after every round, not after several rounds. It’s much easier to fix an error when you catch it immediately.
Common mistake to avoid: Don’t increase in the same positions on every round without checking the shape. If the circle begins to form obvious corners, distribute increases more evenly by shifting their positions in subsequent rounds.
Step 6: Change to Cream and Work Rounds 5–8
Now the mat begins to develop its soft striped appearance.
At the end of Round 4, prepare your warm cream yarn.
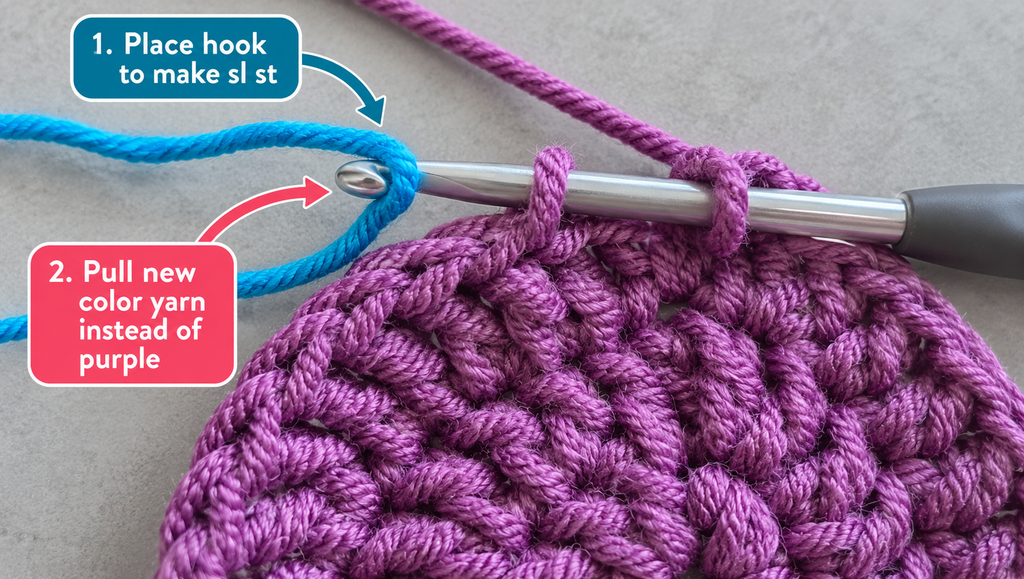
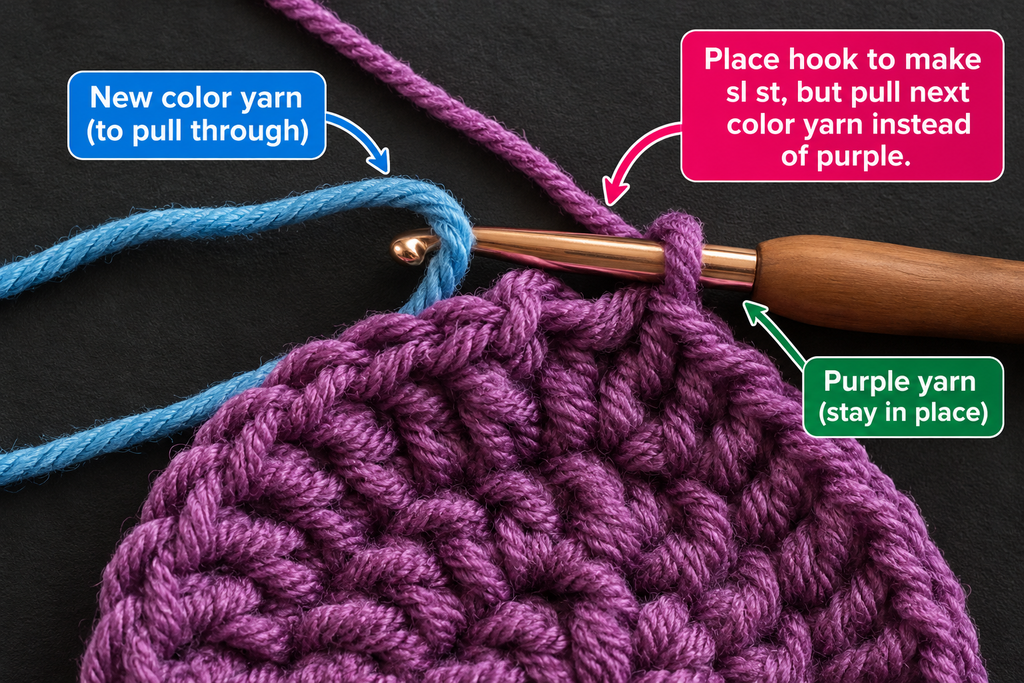
To create a smooth color transition, make the final half double crochet of Round 4 using dusty sage until the last yarn-over and pull-through.
Before that final pull-through, place your warm cream yarn over the hook and draw it through all three loops.
The completed stitch still belongs to Round 4, but your hook now holds a cream loop ready for Round 5.
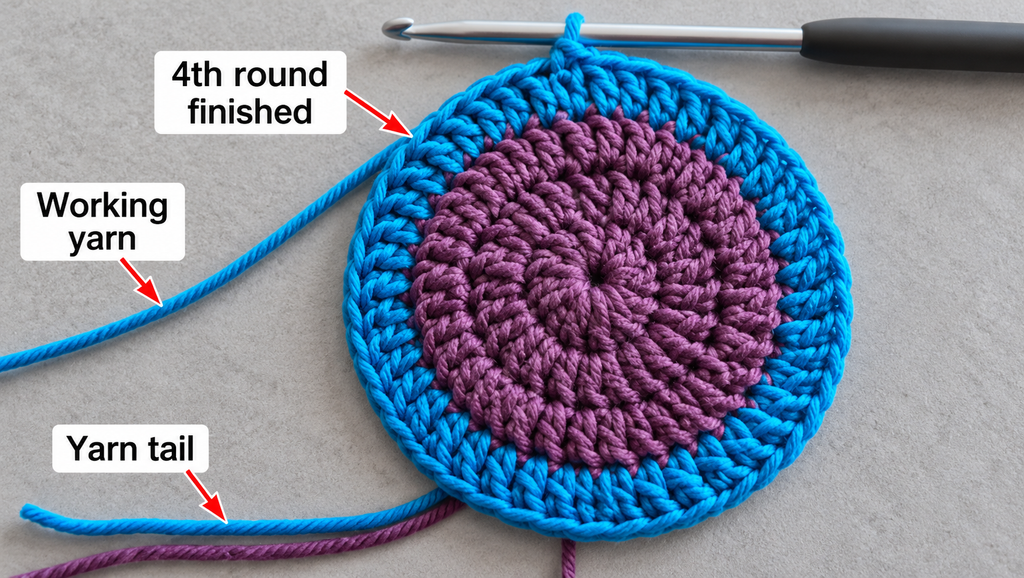
Leave a tail of approximately 6 inches from each color for weaving in later.
Continue working with warm cream yarn.
Follow these rounds:
Round 5: 1 hdc in each of next 3 sts, 2 hdc in next st; repeat around. (50 sts)
Round 6: 1 hdc in each of next 4 sts, 2 hdc in next st; repeat around. (60 sts)
Round 7: 1 hdc in each of next 5 sts, 2 hdc in next st; repeat around. (70 sts)
Round 8: 1 hdc in each of next 6 sts, 2 hdc in next st; repeat around. (80 sts)
You should now have a dusty sage center surrounded by a cream section.
Beginner tip: A new yarn color often makes your stitches easier to see. Use the color transition as an opportunity to check that your stitch counts and shape are correct.
Common mistake to avoid: Don’t cut the old yarn tail too short. A secure woven tail is more important than hiding the color change instantly.
Step 7: Add Terracotta and Check the Shape
After completing Round 8, change to muted terracotta using the same method.
You’ll continue placing 10 increases evenly throughout each new round.
Round 9: 1 hdc in each of next 7 sts, 2 hdc in next st; repeat around. (90 sts)
Round 10: 1 hdc in each of next 8 sts, 2 hdc in next st; repeat around. (100 sts)
Round 11: 1 hdc in each of next 9 sts, 2 hdc in next st; repeat around. (110 sts)
Round 12: 1 hdc in each of next 10 sts, 2 hdc in next st; repeat around. (120 sts)
Your mat should now be noticeably larger.
Spread it on a clean, flat surface and smooth the edges gently with your hands.
Look at the shape from directly above.
A reasonably even circle should have a flat center and edges that don’t rise significantly or form strong waves.
If you notice curling, check that you haven’t missed an increase and that your hook isn’t too small for the yarn.
If the edge is very wavy, count for accidental extra increases.
If your stitch counts are correct but the fabric still doesn’t lie flat, your particular yarn-and-hook combination may need a different increase rate. Correct the shape before adding more rounds.
Beginner tip: Don’t stretch the fabric aggressively when checking it. The goal is to see how it naturally rests.
Common mistake to avoid: Crocheting several more rounds while hoping a major shape problem will disappear. It is often better to correct one round now than unravel a much larger section later.
Step 8: Work the Oatmeal Outer Rounds
Now switch to oatmeal beige for the final main color section.
Follow the same increase system.
Round 13: 1 hdc in each of next 11 sts, 2 hdc in next st; repeat around. (130 sts)
Round 14: 1 hdc in each of next 12 sts, 2 hdc in next st; repeat around. (140 sts)
Round 15: 1 hdc in each of next 13 sts, 2 hdc in next st; repeat around. (150 sts)
Round 16: 1 hdc in each of next 14 sts, 2 hdc in next st; repeat around. (160 sts)
At this point, the base version of your crochet play mat is complete.
Use your measuring tape to check the diameter.
Measure across the center from one outside edge to the opposite edge.
If the mat is smaller than you’d like, continue adding rounds using the same mathematical structure.
For example:
Round 17: 1 hdc in each of next 15 sts, 2 hdc in next st; repeat around. (170 sts)
Round 18: 1 hdc in each of next 16 sts, 2 hdc in next st; repeat around. (180 sts)
Round 19: 1 hdc in each of next 17 sts, 2 hdc in next st; repeat around. (190 sts)
Round 20: 1 hdc in each of next 18 sts, 2 hdc in next st; repeat around. (200 sts)
Continue only as needed, monitoring flatness and keeping the increase distribution even.
The number of rounds necessary to reach a 30–36-inch diameter will vary. With some bulky yarns, more than 20 rounds may be required.
Beginner tip: Measure after every two or three additional rounds. A few inches of extra diameter make a big difference to a circular mat’s total area.
Common mistake to avoid: Don’t stop solely because you’ve reached a particular round number. Stop when the mat has the dimensions and shape you want.
Step 9: Make a Simple Finished Edge
Once the mat reaches your desired diameter, it’s time to finish the outer edge.
Because this pattern is worked in a spiral, the final round ends at a slightly different height from where it began.
To soften that transition, work a few progressively shorter stitches, if needed, before completing a slip stitch into the next appropriate stitch.
Keep the slip stitch loose enough that it doesn’t pull the edge inward.
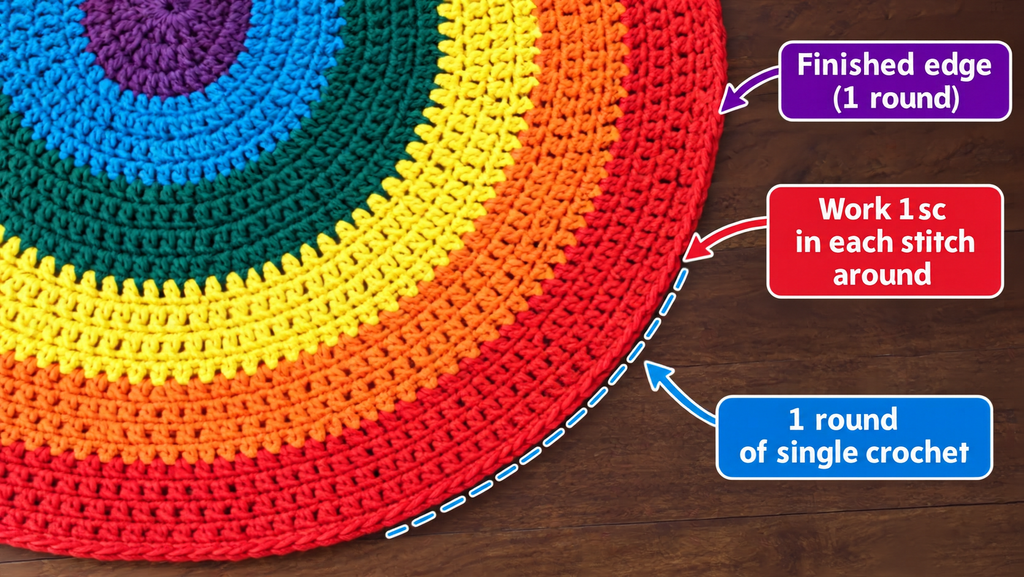
For a slightly more defined finish, you can work an optional round of single crochet before fastening off.
If you choose a single crochet border, check carefully that the edge stays flat. A plain one-for-one border may pull inward on some fabrics, so you may need to loosen your tension, use a larger hook, or distribute a few extra stitches.
Avoid a tight decorative border.
A simple, flexible edge generally works best for a mat intended to lie flat.
Beginner tip: Test the edge on a small section before completing the full round. If it tightens the fabric, adjust immediately.
Common mistake to avoid: Pulling the finishing slip stitch extremely tight. This can create a small lump or uneven spot at the edge.
Step 10: Fasten Off and Weave In the Ends
Cut your working yarn, leaving a tail approximately 6–8 inches long.
Pull the yarn tail completely through the final loop to secure the stitch.
Thread the tail through a blunt tapestry needle.
Turn your mat over.
Carefully weave the yarn through the backs of several nearby stitches. Change direction and weave through another section to help secure the tail.
Repeat for all color changes and the starting magic ring tail.
Do not rely only on short knots or trimmed ends, particularly when the mat will be washed frequently.
Once all the ends are secure, trim the remaining yarn.
Finally, smooth the mat flat and inspect both sides.
Beginner tip: Work yarn tails into stitches of the same color whenever possible. This helps keep the back of the mat neat.
Common mistake to avoid: Cutting yarn tails immediately after changing colors. It’s much harder to secure a tail properly once you’ve trimmed it too close.
Pattern Notes and Stitch Counts
This pattern becomes much easier when you understand the increase rule.
The first round begins with 10 stitches.
Each additional increase round adds 10 more.
| Round | Stitch count | Increase instruction |
|---|---|---|
| 1 | 10 | 10 hdc in magic ring |
| 2 | 20 | 2 hdc in every st |
| 3 | 30 | 1 hdc, inc |
| 4 | 40 | 2 hdc, inc |
| 5 | 50 | 3 hdc, inc |
| 6 | 60 | 4 hdc, inc |
| 7 | 70 | 5 hdc, inc |
| 8 | 80 | 6 hdc, inc |
| 9 | 90 | 7 hdc, inc |
| 10 | 100 | 8 hdc, inc |
| 11 | 110 | 9 hdc, inc |
| 12 | 120 | 10 hdc, inc |
| 13 | 130 | 11 hdc, inc |
| 14 | 140 | 12 hdc, inc |
| 15 | 150 | 13 hdc, inc |
| 16 | 160 | 14 hdc, inc |
This schedule is an original working framework that should be checked against the actual fabric. The increase rate may need adjustment for a flat result.
Do turning chains count?
No turning chains are used between rounds because this project is crocheted in a continuous spiral.
The single starting chain used to secure the magic ring does not count as a stitch.
Is there a right side and wrong side?
The side facing you as you crochet is the intended right side. You do not turn the work between rounds.
Keep the same side facing upward for the whole project to maintain consistent stitch appearance.
How do I make the mat larger?
Continue the established increase progression, adding approximately 10 stitches per round as long as the fabric remains flat.
Measure regularly.
A larger mat uses much more yarn because a circle’s area increases rapidly with its diameter.
Can I use a different stitch?
Yes, but changing stitches will change the fabric’s height, gauge, texture, and increase needs.
A single crochet mat will generally be denser and may require a different round calculation. A double crochet version grows taller per round and may also require a different increase schedule.
For your first version, follow the half double crochet instructions before experimenting.
Common Beginner Mistakes and How to Fix Them
Every crocheter occasionally makes mistakes, especially while learning to work in the round. The important thing is recognizing a problem early enough to fix it easily.
1. The center has a visible hole
Why it happens: The magic ring wasn’t tightened completely, or the starting loop loosened.
How to fix it: Gently pull the starting yarn tail to close the opening. If it won’t close, undo the first round and make the starting loop again.
2. The play mat curls upward
Why it happens: The yarn may be held too tightly, the hook may be too small, or the circle may not have enough increases.
How to fix it: Recount the previous round. If the count is correct, loosen your tension or adjust the increase placement or frequency to suit your yarn.
3. The edge looks wavy
Why it happens: There may be too many increases for your particular fabric.
How to fix it: Check for accidental increases. If the counts match but the rippling is strong, work back to the point where the mat was flat and space the next increases farther apart.
4. The circle looks like a polygon
Why it happens: Repeated increases stacked in the same positions can create visible corners.
How to fix it: Stagger the increase positions in future rounds while preserving the intended total stitch count.
5. You lose the beginning of the round
Why it happens: Spiral crochet has no obvious joining seam.
How to fix it: Use a removable stitch marker. Move it into the first stitch of every round without skipping a round.
6. The color changes look messy
Why it happens: The new yarn may have been introduced too loosely, or the previous yarn tail may have been pulled tight.
How to fix it: Change color during the last pull-through of a stitch. Leave enough tail to secure later, and adjust the stitch tension before continuing.
7. The edge becomes tight after finishing
Why it happens: Slip stitches or single crochet border stitches were worked too tightly.
How to fix it: Undo the affected edge and use looser tension or a larger hook.
8. Your play mat is smaller than expected
Why it happens: Different yarn brands, hooks, and tensions produce different measurements.
How to fix it: Measure the actual fabric, then add more properly increased rounds until you reach your desired size.
How to Customize This Crochet Play Mat
A simple circular pattern offers plenty of room for creativity.
Make it in a single color
For a minimalist appearance, use one soft yarn color for the entire mat.
Warm cream, oatmeal, sage, or pale gray all work beautifully in neutral spaces.
This is also the easiest choice for a beginner because you can work continuously without stopping to change yarn.
Try a pastel nursery palette
For a softer look, combine blush pink, pale peach, ivory, and light sage.
You could also use powder blue, cream, sand, and muted mint.
Choose colors that coordinate with the surrounding room instead of relying on very bright shades.
Make a rainbow version
If you love colorful crochet, choose six coordinating shades and change colors every three or four rounds.
Remember that yarn color changes do not affect your required stitch counts.
Create a smaller mat
A small version can be used as a decorative floor accent, pet resting mat, or washable tabletop protector, depending on the yarn and finished dimensions.
Stop after fewer rounds and check that the completed fabric lies flat.
Make an extra-large playroom mat
Continue adding correctly spaced increases until you reach the diameter you want.
For a large version, plan to purchase additional yarn. Doubling the diameter requires roughly four times the finished surface area.
Add subtle texture
Once you’re comfortable with the original version, you can experiment with occasional textured rounds.
However, raised bobbles, loose loops, attached appliqués, and detachable embellishments are not good choices for an infant-use surface.
For a baby-oriented mat, a smooth, closely worked fabric is preferable.
Turn it into a handmade gift
A handmade crochet play mat can be a thoughtful baby-shower or nursery gift.
Choose machine-washable yarn, make sure all ends are secure, and include care instructions.
For an especially polished presentation, fold the clean mat neatly and tie it with a removable ribbon for gifting. Take the ribbon away before the mat is used.
Finishing Instructions
Once the crochet work is complete, take a little extra time to check the finished mat.
First, inspect the center and make sure the magic ring is tightly closed. Confirm that the starting yarn tail has been woven securely into the fabric.
Next, check each color transition. Look for any loose ends or gaps that need attention.
Spread the mat flat and measure its diameter in two directions. These measurements should be reasonably similar, although handmade crochet doesn’t need to be mathematically perfect.
Should you block the mat?
Blocking may help relax small uneven areas, but it should not be used as a substitute for correcting significant stitch-count problems.
Follow the yarn manufacturer’s washing and care instructions.
If the fiber permits gentle wet blocking, dampen the mat, remove excess moisture without wringing, and spread it flat on a clean drying surface.
Shape it gently into a circle and let it dry completely.
Do not stretch the fabric excessively, especially if it will be used around small children.
How to wash a crochet play mat
Choose the care method listed on your yarn label.
A washable cotton blend may tolerate gentle machine washing, but care requirements vary.
Use a mild detergent and rinse thoroughly.
Dry according to the yarn’s instructions, and ensure the mat is completely dry before storing it.
Inspect the fabric regularly for loose yarn ends, damage, or stretched loops.
Important safety note for baby play mats
A handmade crochet mat is not a certified protective floor mat, padded safety product, sleep surface, or substitute for an appropriate play surface.
Use it only on a clean, flat, stable surface and directly supervise infants during awake play.
Keep it out of cribs, bassinets, and other infant sleep environments. If a baby becomes sleepy, move them to an appropriate firm, flat infant sleep surface.
Avoid cords, drawstrings, fringes, tassels, loose pom-poms, buttons, and detachable decorations. Never place the mat where it can bunch beneath a baby or slip on a hard floor. If you need fall protection or impact cushioning, choose a purpose-designed, safety-tested play surface rather than relying on crochet fabric.
Quick Printable-Style Pattern Summary
Cozy Circle Crochet Play Mat
Free beginner pattern • US crochet terms
Skill level: Easy beginner
Materials: Bulky #5 washable yarn, 6.5 mm hook, stitch marker, scissors, blunt needle, tape measure.
Main stitch: Half double crochet.
Starting method: Magic ring.
Round 1: 10 hdc into ring.
Round 2: 2 hdc in every stitch. (20)
Round 3: [1 hdc, inc] × 10. (30)
Round 4: [2 hdc, inc] × 10. (40)
Continue: On each new standard round, add one more ordinary hdc before each increase. Increase by 10 stitches per round while the circle remains flat.
Colors: Sage R1–4; Cream R5–8; Terracotta R9–12; Oatmeal R13–16 and optional additional rounds.
Finishing: Transition smoothly out of the spiral, fasten off, weave in all tails, and lay flat to shape.
Size: Measure the actual fabric and continue as needed.
Copy pattern summary
Crochet Play Mat Pattern FAQ
1. Is this crochet play mat pattern suitable for complete beginners?
Yes, although learning the magic ring and increasing in the round may take a little practice.
You only need to understand basic half double crochet stitches, increases, and how to use a stitch marker.
If you’re new to crochet, begin by making a small practice circle before starting the full mat.
2. What is the best yarn for a crochet baby play mat?
A smooth, washable yarn that creates a durable and comfortably flexible fabric is a practical choice.
Bulky cotton blends work well for this design, but yarn characteristics vary. Check the label for fiber composition, washing instructions, and the recommended hook size.
Avoid yarns that shed excessively or produce loose loops that may catch fingers.
3. How big should a crochet play mat be?
There isn’t one universal finished size.
A handmade play mat may be approximately 30–36 inches across, but the ideal dimensions depend on its intended use and available space.
Measure the area before beginning and remember that the crocheted mat is not a substitute for a safety-rated play surface.
4. How much yarn do I need for a round crochet play mat?
Yarn usage depends on finished diameter, yarn thickness, hook size, stitch pattern, and tension.
For this design, approximately 600–900 yards is a preliminary planning allowance, not a tested requirement.
The most reliable approach is to crochet and measure a sample, weigh the yarn used, and estimate the remaining requirement from your actual stitches and desired area.
Buy extra yarn if you’re planning a larger version.
5. Why is my crochet play mat curling?
Curling usually means the fabric is being pulled inward.
Possible causes include insufficient increases, tight tension, or a hook that’s too small.
Check your stitch counts first. If the counts are correct, experiment with tension, hook size, or the increase rate.
6. Can I make this crochet play mat without a magic ring?
Yes.
As an alternative, chain four and join the first chain with a slip stitch to make a loop. Work your first round into the center of that loop.
This method is often easier for beginners, but it may leave a small visible opening.
For baby-oriented projects, make sure the center is securely closed and doesn’t form a catch point.
7. Can I machine wash a crochet play mat?
Possibly, depending on the yarn.
Look at the fiber content and care instructions on your yarn label.
If machine washing is recommended, a gentle cycle may be appropriate. Always inspect the mat after washing to make sure it hasn’t developed loose tails, stretched loops, or damage.
Conclusion
Making a crochet play mat is a lovely way to practice crocheting in the round while creating something useful and beautiful.
The secret is to take your time with the first few rounds. Once you’re comfortable with the magic ring, half double crochet stitches, and increases, the rest of the project becomes a relaxing rhythm.
I especially love how the broad color sections turn a simple circle into a finished handmade piece without requiring complicated stitches.
Choose a soft yarn, keep your stitch marker close, and remember to check that your mat stays flat as it grows.
You can start with a smaller circle, add more rounds when you’re ready, and customize the colors to suit your space.
Save this free crochet play mat pattern so you can return to the instructions when you need them. And if you’re enjoying circular crochet projects, try making a matching round rug or a set of simple crochet coasters next.