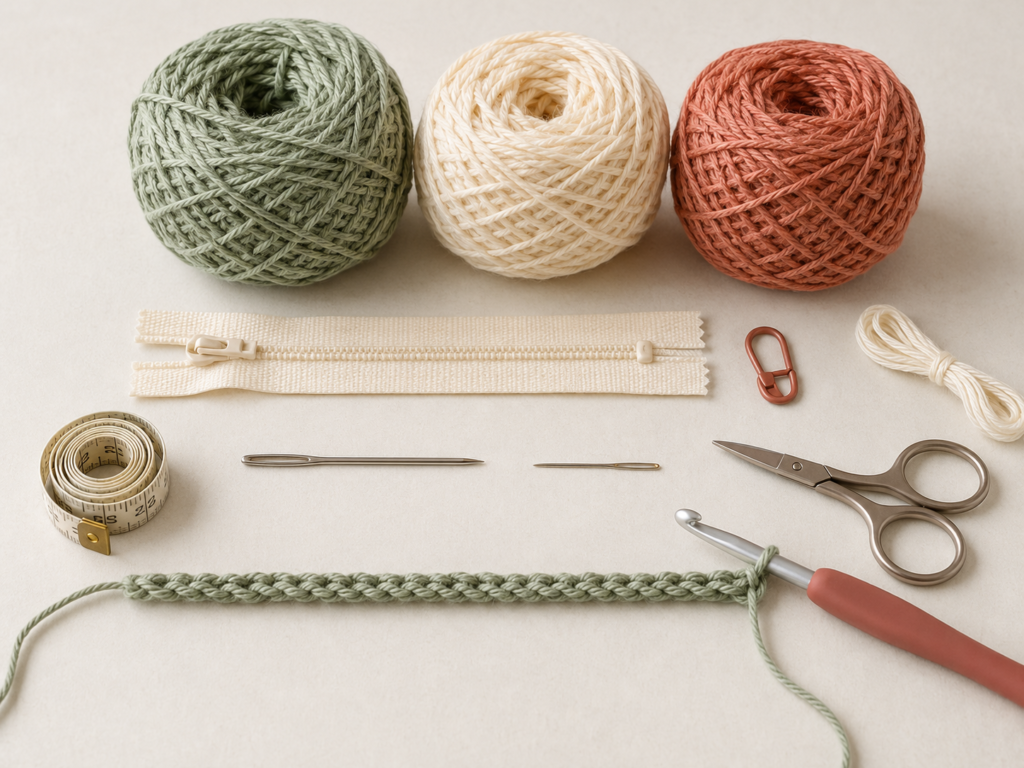
A crochet pencil pouch is one of those satisfying projects that feels genuinely useful the moment you finish it. Instead of practicing basic stitches on another square swatch, you can turn the same beginner skills into a sturdy case for pencils, pens, crochet hooks, art supplies, makeup brushes, or other small essentials.
This easy crochet pencil pouch pattern uses only three basic stitches: the chain, single crochet, and slip stitch. The construction begins with one foundation chain. You crochet along one side, curve around the end, work back along the opposite side, and then continue upward in rounds. That simple technique creates a seamless pouch body without sewing separate front and back panels together.
The project is especially useful for beginners who want to practice recognizing chains, counting stitches, maintaining even tension, using a stitch marker, and crocheting in the round. Basic projects using familiar stitches generally fall within the lower crochet skill classifications described by the Craft Yarn Council.
The pattern below is an original beginner version designed to make a pencil pouch approximately 8.5 inches wide by 3.5 inches high. You can easily adjust it for longer art pencils, crochet hooks, makeup brushes, or a smaller stationery case.
What You’ll Learn
By the end of this tutorial, you will know how to:
- Measure your longest pencil before starting.
- Make a foundation chain that determines the pouch length.
- Recognize and crochet into the underside back bumps of a chain.
- Work around both sides of a foundation chain.
- Shape smooth rounded ends.
- Keep a consistent stitch count in continuous rounds.
- Adjust the height and color pattern of the pouch.
- Fasten off cleanly and weave in ends.
- Hand-sew a zipper into crochet fabric.
- Add an optional fabric lining.
Materials You’ll Need
For one approximately 8.5 × 3.5 inch pencil pouch:
- Approximately 90–120 yards / 82–110 meters of DK or light-weight cotton yarn
- 3.5 mm / E-4 crochet hook
- One 8-inch nylon zipper
- Locking stitch marker
- Tapestry needle
- Small sewing needle
- Matching sewing thread
- Scissors
- Measuring tape
- Sewing pins or small clips
- Optional cotton fabric for lining
A smooth cotton yarn is particularly practical for this kind of project because it provides visible stitch definition and a relatively firm fabric. The Craft Yarn Council classifies DK and light worsted yarn within the light-weight category, although actual thickness can vary between individual yarns and manufacturers.
Finished Size
Approximately:
8.5 inches / 21.5 cm wide
3.5 inches / 9 cm high
The exact measurements will depend on your yarn, hook, tension, and number of body rounds.
Before starting, measure your longest pencil. Ideally, the finished internal width of the pouch should be approximately 0.5–1 inch longer than the longest item you plan to store.
Gauge and Tension
Approximate gauge for the sample:
22 single crochet stitches × 24 rounds = 4 inches / 10 cm
Exact gauge is not critical for this project because you can customize the foundation chain and height.
However, aim for a fabric that feels:
- Firm enough to hold its shape.
- Flexible enough to open comfortably.
- Dense enough that pencil tips cannot easily push through large gaps.
Do not force yourself to match the sample gauge if your stitches naturally differ. Instead, measure the foundation chain against your actual pencils before continuing.
Crochet Abbreviations Used
This tutorial uses U.S. crochet terminology:
- ch = chain
- sc = single crochet
- sl st = slip stitch
- st/sts = stitch/stitches
- rnd/rnds = round/rounds
- RS = right side
- WS = wrong side
In U.K. terminology, the U.S. single crochet is called a double crochet. The Craft Yarn Council maintains a standardized comparison of U.S. and U.K. crochet terminology.
Before You Start
Count your stitches early
The most important stitch count in this project is established in the first round. Once the oval foundation contains 92 stitches, every plain body round should also contain 92 stitches.
A locking stitch marker will make this much easier.
Keep the foundation chain relaxed
A foundation chain that is too tight can make the base curl or bow. Hold the yarn gently and allow each chain to slide easily along the thicker part of the hook.
Lion Brand’s beginner crochet guidance similarly emphasizes consistent tension and regular stitch counting when working foundation chains and first rows.
Do not confuse turning with rotating
For a flat crochet rectangle, you usually turn the project at the end of a row. For this pouch, you do not turn the work after completing the first side. Instead, you rotate around the end and begin working into the unused loops on the opposite side of the same foundation chain.
Right side and wrong side
The outside surface of the finished pouch is the right side. The inside is the wrong side. Once you begin the body rounds, keep the right side facing outward.
Step-by-Step Crochet Tutorial
Step 1: Measure Your Pencil and Make the Foundation Chain
Before picking up the hook, place your longest pencil beside a ruler.
For the sample size, make:
Ch 46.
This produces a pouch suitable for most standard pencils and pens when using DK cotton and a 3.5 mm hook.
Your chain should lie flat without twisting or curling tightly into itself.
For a customized pouch, stop chaining when the relaxed foundation is approximately the same length as your longest pencil, plus a little extra room for the pouch ends and zipper.
Beginner tip:
Do not stretch the chain while measuring it. Measure it in its relaxed state.
Common mistake to avoid:
Making the chain extremely tight. This makes the next row frustrating to crochet and can pull the base out of shape.
Step 2: Work the First Side of the Foundation
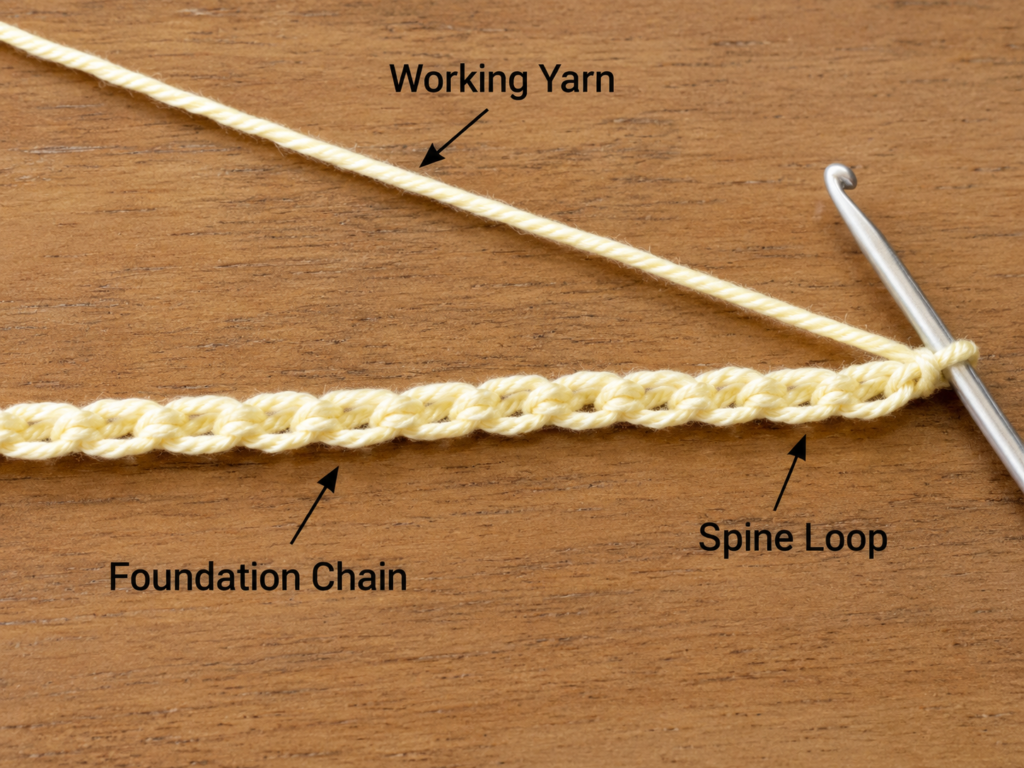
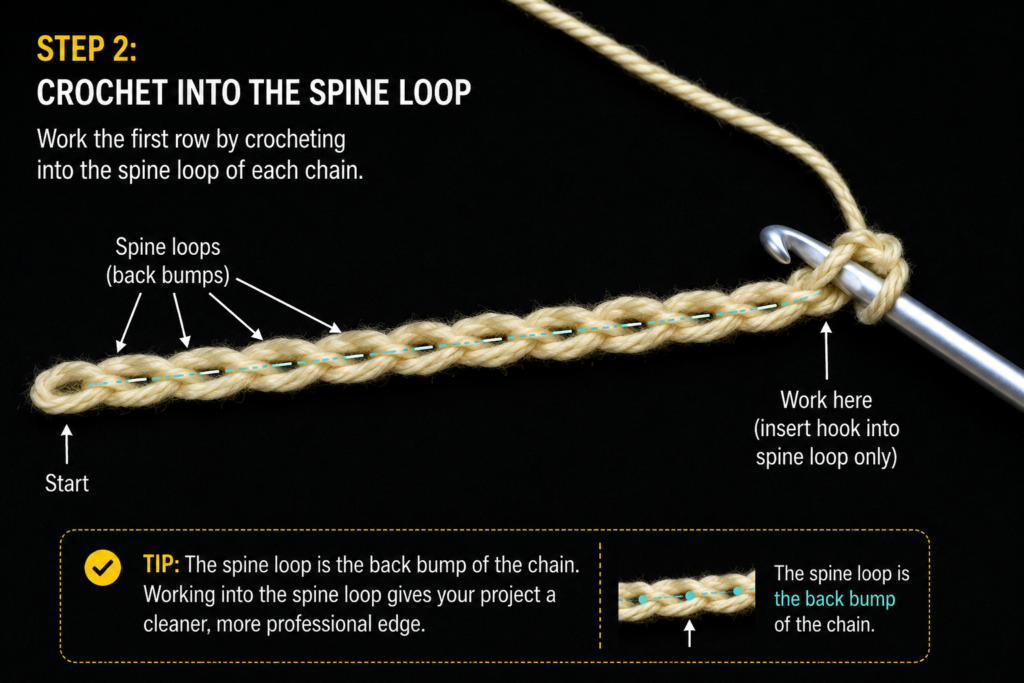
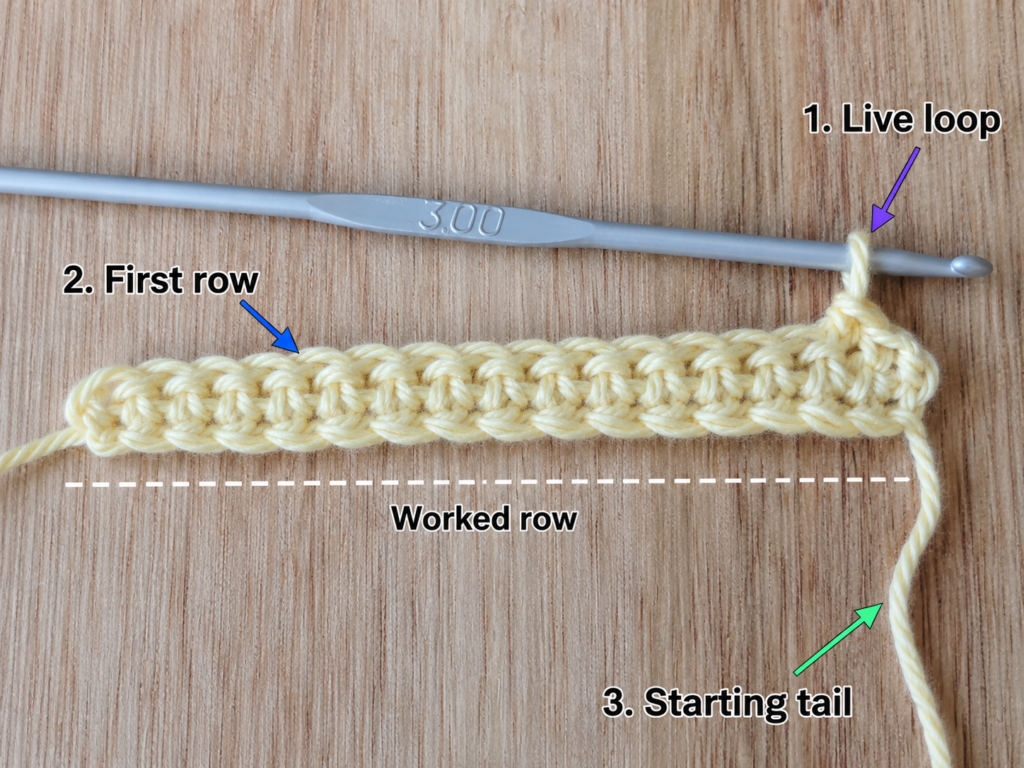
Rotate the chain slightly so you can see the small horizontal bumps running along the underside.
Starting in the second chain from the hook:
Sc in each of the next 44 chains.
You should now be at the final chain.
Working into the back bumps helps create a neat lower edge because the unused loops remain available for the opposite side.
To make one single crochet:
- Insert the hook into the correct chain.
- Yarn over.
- Pull up one loop. You now have two loops on the hook.
- Yarn over again.
- Pull through both loops.
Repeat until the first long side is complete.
Beginner tip:
Count every ten stitches. This is easier than reaching the end and discovering that your count is wrong.
Common mistake to avoid:
Skipping the first usable chain because it is hard to see. Remember that the loop currently on your hook never counts as a chain.
Step 3: Shape the First Rounded End
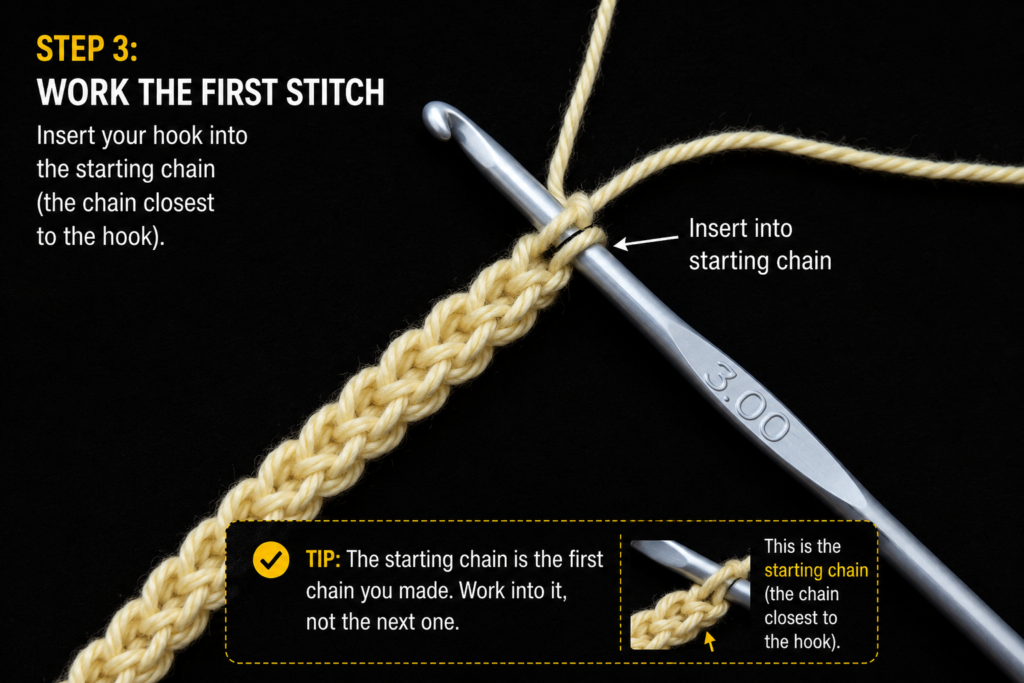
You are now at the final chain.
Work:
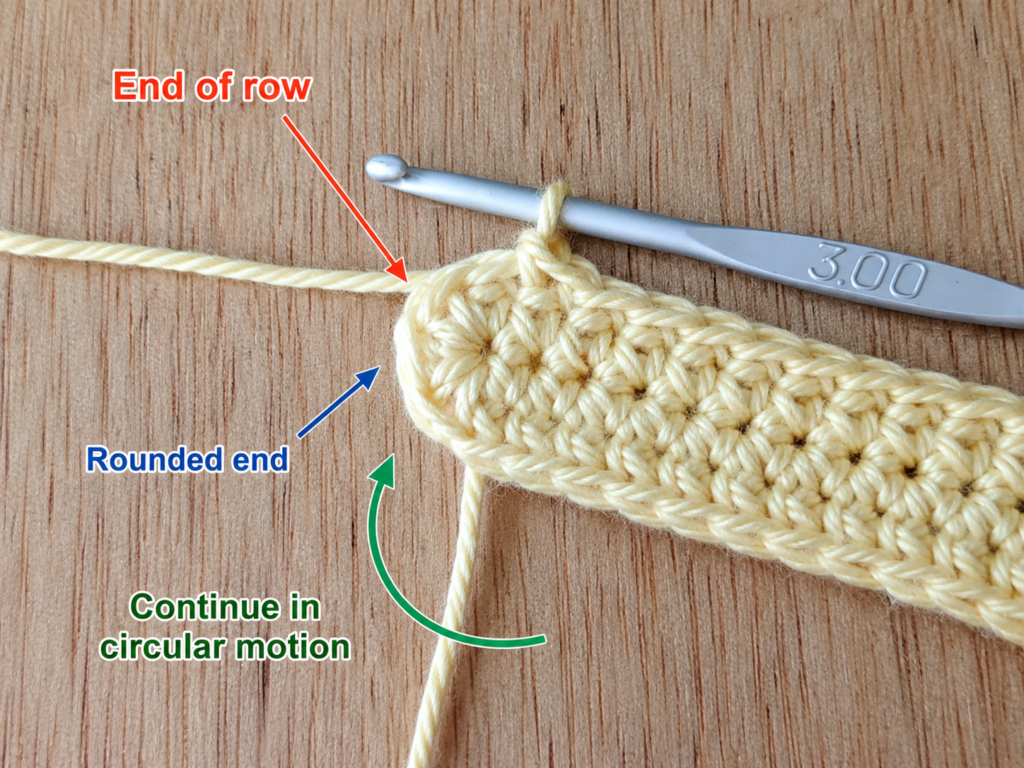
3 sc into the final chain.
These three stitches allow the fabric to curve smoothly around the end instead of forming a sharp corner.
After making the third single crochet, rotate the work slightly. You should now be able to see the unused loops running along the opposite side of the foundation chain.
Beginner tip:
Place a temporary stitch marker in the middle stitch of the three-stitch corner. It makes the structure easier to understand visually.
Common mistake to avoid:
Adding three extra stitches after already making one stitch in the end chain. In this original pattern, the final chain receives three single crochets total
Step 4: Crochet Along the Opposite Side
Now work back toward the beginning of the foundation chain.
Work:
Sc in each of the next 43 unused loops.
When you reach the first chain position—the place corresponding to your very first single crochet—work:
2 sc into that chain.
You should now have:
92 stitches total.
Do not turn the work.
The long narrow foundation should resemble a very slim oval. One side was worked in one direction, the second side was worked back toward the starting point, and the extra stitches at both ends created smooth curves.
Beginner tip:
Count all 92 stitches before continuing. Fixing the count now is much easier than correcting it after ten rounds.
Common mistake to avoid:
Crocheting twice into random side loops. Try to work one stitch into each visible unused chain position so both sides remain balanced.
Step 5: Build the Pencil Pouch Body in Continuous Rounds
Place a locking stitch marker in the first stitch of the next round.
From this point onward:
Rounds 2–22: Sc in each of the 92 stitches around. Do not turn.
Move the stitch marker into the first stitch every time you begin a new round.
Because the body is worked in a continuous spiral, there is no slip-stitch join at the end of each round and no turning chain.
After several rounds, the oval foundation will begin curling upward naturally. This is exactly what you want. Continue crocheting until the pouch measures approximately 3.5 inches high, or until it reaches your preferred height.
Beginner tip:
Stop every three or four rounds and recount your stitches. You should still have 92.
Common mistake to avoid:
Crocheting into the stitch marker itself or accidentally skipping the first stitch of a new round. Always remove the marker, work the marked stitch, and immediately replace the marker in the new first stitch.
Step 6: Add Optional Color Stripes
A single-color pouch is the easiest version, but small stripes make this project an excellent stash-buster.
For a sage, cream, and terracotta version, try:
- Rounds 1–8: Sage
- Rounds 9–10: Cream
- Rounds 11–14: Sage
- Round 15: Terracotta
- Rounds 16–22: Sage
To change color cleanly:
- Begin the final single crochet of the old color.
- Insert hook and pull up a loop.
- Before the final yarn-over, drop the old color.
- Yarn over with the new color.
- Pull the new color through the two loops.
The next stitch is now ready to be made entirely with the new color.
For very narrow stripes, you may carry unused yarn loosely up the inside. For larger sections, cut the old yarn and weave in the tail later.
Beginner tip:
Do not pull carried yarn tightly. Tight floats can pucker the fabric.
Step 7: Finish the Top Edge
Once the pouch reaches your preferred height, complete the final round.
For a smoother finish in a continuous spiral:
- Make one single crochet in the next stitch.
- Make one slip stitch in the following stitch.
- Cut the yarn, leaving a 6-inch tail.
- Pull the tail completely through the final loop.
Use a tapestry needle to weave the tail through several stitches on the wrong side.
Do not trim the tail immediately. Weave in one direction, reverse direction, and then trim close to the fabric.
Step 8: Check the Pouch Before Adding the Zipper
Lay the empty pouch flat.
Check:
- Both sides are approximately equal in height.
- The top opening lies flat.
- The foundation is not badly twisted.
- The pouch fits your longest pencil.
- Your zipper is shorter than or approximately equal to the opening.
Place your pencils inside temporarily. If the pouch feels too shallow, add more body rounds before finishing.
Step 9: Hand-Sew the Zipper in Place
A zipper gives the pencil pouch a practical, secure finish.
Open the zipper.
Center it inside the top opening so approximately the same amount of crochet fabric extends beyond both zipper ends.
The zipper teeth should sit just above the crochet edge while the zipper tape remains inside.
Use sewing pins or clips to hold the zipper in place.
Thread a small sewing needle with matching polyester thread. Beginning at one end, use small backstitches or neat running stitches to sew the zipper tape to the crochet fabric.
Try to:
- Keep stitches small.
- Avoid pulling the thread so tightly that the edge puckers.
- Keep the zipper teeth centered.
- Check frequently that the zipper still opens and closes freely.
After sewing the first side, close the zipper and inspect the alignment before securing the second side.
Beginner tip:
Use ordinary sewing thread rather than yarn for attaching the zipper. It creates a less bulky seam.
Common mistake to avoid:
Sewing too close to the zipper teeth. The zipper slider needs room to move freely.
Step 10: Add an Optional Fabric Lining
A lining is not essential, but it gives the pouch a polished interior and prevents sharp pencil tips from catching between crochet stitches.
Place the finished crochet pouch on folded cotton fabric.
Cut the fabric slightly larger than the pouch, allowing approximately:
- 1/2 inch at each side.
- 1/2 inch at the bottom.
- Enough extra at the top to fold under a clean seam allowance.
With right sides of the fabric together:
- Sew the two side seams.
- Sew the bottom edge.
- Turn the lining right side out.
- Insert it inside the crochet pouch.
- Fold the raw upper fabric edge inward.
- Hand-sew it neatly to the zipper tape or just below the crochet opening.
Avoid sewing through the zipper teeth.
Pattern Notes or Stitch Notes
Turning-chain rule
No turning chain is used once the body begins because the pouch is worked in continuous rounds.
Stitch count
After the foundation round:
92 stitches
Maintain 92 stitches in every plain body round.
Repeat
For the body:
Sc in each stitch around.
Repeat until the desired height is reached.
Right side and wrong side
The side facing outward while you crochet is the right side. The interior is the wrong side.
Size adjustment
For a longer or shorter pouch, modify the starting chain.
A practical method is:
- Measure the longest object you want to store.
- Make a relaxed chain approximately that length.
- Remember that the rounded ends will add a small amount of extra finished length.
For a taller pouch, simply crochet additional body rounds.
For a shorter case for crayons or cosmetics, use fewer starting chains and fewer height rounds.
Common Beginner Mistakes
1. Making the foundation chain too tight
Problem: The foundation bows or is difficult to work into.
Fix: Remake the chain with more relaxed tension or temporarily use a hook 0.5 mm larger for the chain only.
2. Losing track of the first stitch
Problem: The pouch gradually gains or loses stitches.
Fix: Place a locking stitch marker in the first stitch of every round and move it immediately when starting the next round.
3. Adding too many corner stitches
Problem: The ends flare or become wavy.
Fix: Follow the specified corner count and recount the full first round before continuing.
4. Missing stitches along the opposite side of the foundation
Problem: One long edge becomes shorter than the other.
Fix: Work methodically into each unused foundation-loop position and count before proceeding.
5. Pulling yarn too tightly around the curves
Problem: The ends become stiff or pinch inward.
Fix: Relax your tension when working several stitches into the same chain.
6. Choosing a zipper before measuring the crochet opening
Problem: The zipper is too long or too short.
Fix: Crochet the pouch first, flatten the opening, measure it, and then confirm zipper length.
7. Sewing the zipper thread too tightly
Problem: The upper edge puckers.
Fix: Keep the sewing thread secure but relaxed, and inspect the edge after every few stitches.
How to Customize This Crochet Project
Change the yarn
Cotton is excellent for structure, but you can use acrylic or a cotton blend.
Avoid extremely fuzzy yarn for your first version because the individual stitches and chain loops are harder to see.
Change the colors
Try:
- One solid neutral color.
- School colors.
- Rainbow stripes.
- Two-color color blocking.
- Sage and cream.
- Terracotta and ivory.
- Navy and soft gray.
Change the size
For crochet hooks or long art pencils, increase the foundation chain.
For crayons, lip balms, or small accessories, make a shorter starting chain.
Add texture
Once comfortable with the basic construction, try substituting another dense stitch pattern, provided you understand how that stitch behaves in rounds.
Good future variations include:
- Moss stitch.
- Waistcoat stitch.
- Back-loop-only ribbing.
- Simple alternating color stripes.
Add a decorative border
Before inserting the zipper, add one contrasting single-crochet round around the opening.
Avoid bulky scallops around a zipper because they can interfere with smooth opening and closing.
Turn it into a gift
Fill the finished pouch with:
- Colored pencils.
- Fine liners.
- Crochet hooks.
- Small art supplies.
- Makeup brushes.
- School stationery.
It can work well as a handmade back-to-school gift, teacher gift, stocking filler, or practical beginner crochet project.
Finishing Instructions
After all crochet and sewing are complete:
- Check the inside for loose yarn tails.
- Weave each tail through several stitches.
- Reverse direction once for extra security.
- Trim the excess.
- Check that the zipper opens freely from end to end.
- Gently shape the pouch with your hands.
Heavy blocking is usually unnecessary for a small structured cotton pouch. A light mist and gentle shaping may help if the fabric is slightly uneven.
Always follow the care instructions on your yarn label. If the pouch has a zipper and sewn fabric lining, hand washing and air drying are generally gentler than aggressive machine washing.
Quick Printable-Style Summary
Skill level: Beginner to Easy
Finished size: Approximately 8.5 × 3.5 inches
Yarn: DK/lightweight cotton
Hook: 3.5 mm / E-4
Stitches: Chain, single crochet, slip stitch
Starting method: Ch 46
Foundation round: Work around both sides of the starting chain to create a narrow oval.
Foundation stitch count: 92 sts
Body: Sc in each of 92 sts around until approximately 3.5 inches high.
Construction: Seamless crochet tube built upward from an oval foundation.
Closure: 8-inch zipper
Optional: Cotton fabric lining
Finishing: Fasten off, weave in ends, hand-sew zipper, add lining if desired.
FAQ
Is a crochet pencil pouch a good beginner project?
Yes. This version uses chains, single crochet, slip stitches, basic counting, and continuous rounds. The main new skill for many beginners is learning to crochet around both sides of one foundation chain.
What yarn is best for a crochet pencil pouch?
A smooth cotton yarn is a strong choice because it creates visible stitches and a relatively sturdy fabric. DK or medium-weight cotton can both work, but changing yarn thickness will change the finished dimensions.
Can I make this pencil pouch without a zipper?
Yes. You can create a flap by extending one side and adding a button loop, use snaps, add a drawstring, or simply leave the top open. A zipper provides the most secure closure for loose pencils and pens.
How do I make the pouch longer?
Add more chains to the foundation. Measure the relaxed chain against the longest object you plan to store before beginning the first round.
Why is my pencil pouch getting wider as I crochet?
You are probably adding stitches unintentionally. Use a stitch marker in the first stitch of every round and regularly verify that you still have 92 stitches.
Why does my foundation curl?
Slight curling is normal at first, especially when forming an oval. Severe curling may indicate that the chain is too tight, your first-round tension is inconsistent, or the corner stitch count is incorrect.
Can I use acrylic yarn instead of cotton?
Yes. Acrylic can work, especially for a soft pencil pouch. However, very stretchy acrylic may produce a less structured case. Consider using a slightly smaller hook if your fabric feels too loose, provided the stitches remain comfortable to work.
Conclusion
This easy crochet pencil pouch pattern turns a few foundational crochet techniques into a finished project you can actually use every day. The key is to take your time with the first round: identify the foundation loops clearly, count carefully, shape both ends evenly, and mark the beginning of every body round.
Once you understand this construction, the same method can become much more than a pencil case. Change the dimensions and you can make crochet hook cases, makeup pouches, glasses cases, small tool organizers, or travel accessories.
The first version is worth keeping simple. Use one sturdy cotton yarn, maintain an even 92-stitch count, add enough rounds for your preferred height, and finish with a zipper. Then use your second version to experiment with stripes, contrasting borders, different dimensions, or a fabric lining.





