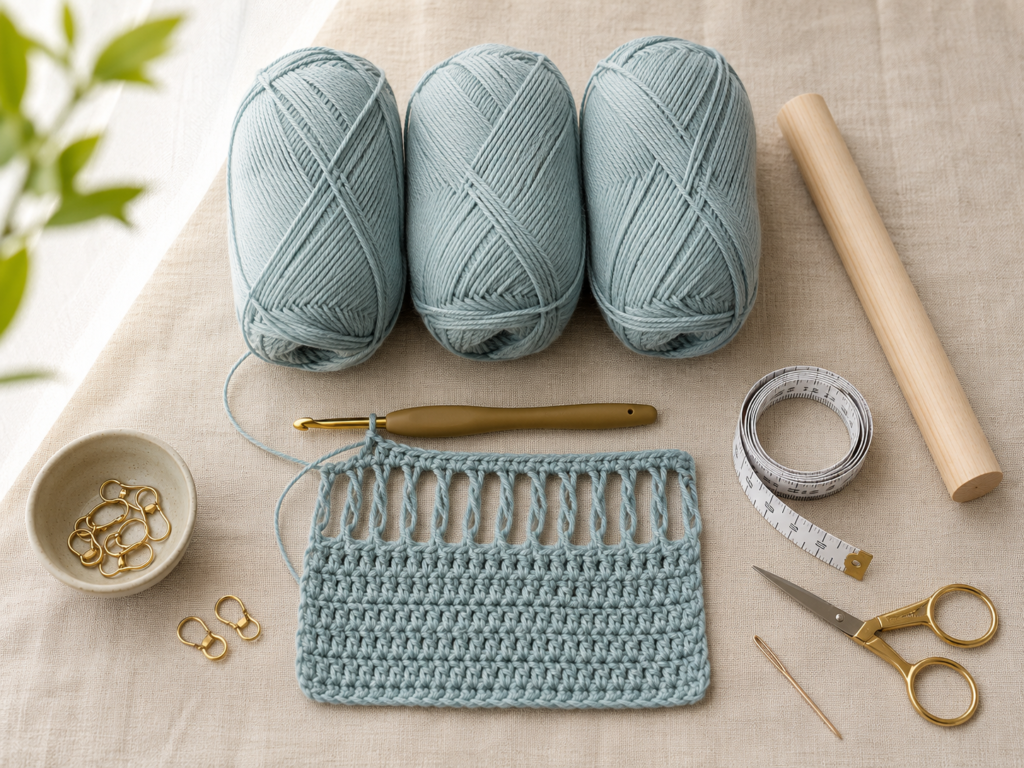
An airy crochet top may look complicated when you first see its long, open stitches. However, this project is built from simple ideas: two rectangles, basic half double crochet, two decorative mesh bands, a shallow neckline, and a few straight seams.
The special openwork is created with elongated loops. Instead of trying to hold every loop at the same height by eye, you place them over a wooden dowel, thick knitting needle, or another smooth cylindrical tool. That tool acts as a temporary measuring guide, helping the loops stay even.
This tutorial does not rely on one fixed set of garment sizes. You will make a swatch, measure your body, calculate the width of each panel, and crochet until the fabric reaches your preferred length. That makes the top easier to customize and prevents the frustration of choosing between two standard sizes.
The finished piece has a relaxed, slightly boxy fit. Wear it over a camisole, fitted tank, bandeau, swimsuit, or long-sleeved shirt depending on the season.
What You’ll Learn
- How to calculate the width of a made-to-measure crochet top
- How to work front-loop half double crochet
- How to create elongated drop-loop mesh with a dowel
- How to keep the open loops even
- How to make two matching garment panels
- How to form a simple boat neckline
- How to seam the shoulders and sides
- How to adjust the length, fit, mesh placement, and armholes
Materials You’ll Need
Yarn
Choose a smooth sport-weight or light DK yarn with good drape. Cotton, bamboo, cotton-bamboo, and smooth plant-fiber blends are excellent choices because they produce visible stitches without making the finished top too stiff.
Approximate yardage will vary according to your measurements, chosen length, yarn thickness, and the amount of mesh included. As a general planning range:
- XS–S: approximately 700–950 yards
- M–L: approximately 900–1,200 yards
- XL–2XL: approximately 1,100–1,500 yards
- 3XL and above: approximately 1,350 yards or more
These are planning estimates, not guaranteed quantities. Purchase an extra skein when possible, especially when working with hand-dyed yarn or a discontinued color.
Tools
- 4.5–5.5 mm crochet hook
- Smooth wooden dowel or thick knitting needle, approximately 20–30 mm in diameter
- Scissors
- Yarn needle
- Locking stitch markers
- Flexible measuring tape
- Rustproof pins or blocking wires
- Blocking mat or clean towels
The selected reference project uses two matching panels and employs a cylindrical tool to form consistent elongated loops.
Crochet Abbreviations Used
- ch = chain
- hdc = half double crochet
- sl st = slip stitch
- st/sts = stitch/stitches
- rep = repeat
- FLO = front loop only
- RS = right side
- WS = wrong side
- DLO = drop-loop stitch
US and UK Terminology Note
This tutorial uses US crochet terms.
A US half double crochet is called a half treble crochet in UK terminology. Check the terminology of every pattern before beginning because the same stitch name can describe different techniques in US and UK instructions.
Before You Start
Make a Useful Swatch
Do not make only a tiny square of solid crochet. Your top contains two different fabrics, so your swatch should include both.
Create a swatch that is at least 6 inches wide:
- Crochet 8–10 rows of half double crochet.
- Work one complete drop-loop mesh section.
- Add 3–4 more solid rows.
- Steam or wet block the swatch.
- Allow it to dry before measuring.
The mesh may relax after blocking. Measuring only the unblocked fabric could give you a top that becomes wider or longer after washing.
Measure Your Stitch Gauge
Lay the swatch flat without stretching it. Count how many stitches fit across 4 inches.
Example:
- 17 stitches measure 4 inches.
- Divide 17 by 4.
- Your gauge is 4.25 stitches per inch.
You will use this number to calculate the foundation chain.
Choose the Finished Ease
Measure around the fullest part of your bust while wearing the layer you expect to place under the top.
Then choose the fit:
- Close fit: body measurement plus 0–2 inches
- Relaxed fit: body measurement plus 3–5 inches
- Oversized fit: body measurement plus 6–10 inches
For a beginner garment, approximately 4 inches of positive ease usually creates a comfortable top that is neither tight nor extremely oversized.
Calculate the Width of Each Panel
Use this formula:
Finished chest circumference ÷ 2 = width of one panel
Example:
- Bust measurement: 38 inches
- Desired positive ease: 4 inches
- Finished circumference: 42 inches
- 42 ÷ 2 = 21 inches per panel
Now multiply the panel width by your stitches per inch:
- 21 × 4.25 = 89.25 stitches
Round to a whole stitch that works comfortably with your construction. For this measurement-based design, an exact stitch multiple is not required because each stitch produces one elongated loop.
Count the First and Last Stitch
Place a marker in the first and last stitch of every row. This small habit prevents accidental increases and decreases.
The turning chain does not count as a stitch in this tutorial. Therefore, place the first half double crochet in the first stitch of the row unless the instructions specifically say otherwise.
Step-by-Step Crochet Tutorial
Step 1: Crochet the Foundation Chain
Make a slip knot and chain the number calculated from your blocked stitch gauge.
Keep the chain relaxed. A tight foundation chain can pull the hem inward even when the rows above it are worked correctly.
Turn the chain sideways and examine the back bumps. Working into the back bumps creates a tidy lower edge, although you may work into the top loops when that feels easier.
Beginner tip
Use a hook 0.5 mm larger for the foundation chain, then switch to your main hook for Row 1. This helps prevent a tight hem.
Common mistake to avoid
Do not measure the loose chain to determine the top’s width. The chain changes length after stitches are worked into it. Base your sizing on the blocked gauge swatch instead.
Step 2: Build the Solid Lower Body
Work one half double crochet in the second chain from the hook and in every remaining chain.
For the following row:
- Chain 1 and turn.
- Work one half double crochet through the front loop of each stitch.
- Work the final stitch carefully so the edge remains straight.
- Count your stitches.
Continue in front-loop half double crochet until the panel reaches the height where you want the first mesh band to begin.
For a standard-length top, the first mesh band can begin approximately 10–14 inches above the lower hem. For a cropped top, begin it after 6–9 inches.
Working in one loop creates subtle horizontal ridges. It also gives the solid fabric more flexibility than dense half double crochet worked through both loops.
Beginner tip
Measure from the lower edge in several places. If one side is longer, you may be adding stitches along that edge.
Common mistake to avoid
Many beginners accidentally work into the turning chain at the end of a row. Mark the real final stitch so that the stitch count stays unchanged.
Step 3: Start the First Drop-Loop Row
Place the dowel parallel to the top edge of your panel.
Chain 1. Pull that loop upward until it can slide over the dowel. Tighten the base gently so the loop sits snugly around the tool without squeezing it.
For the next stitch:
- Insert the hook into the stitch.
- Yarn over.
- Pull up a loop.
- Chain 1.
- Enlarge that chain loop.
- Place it over the dowel.
- Tighten the base of the loop.
Each foundation stitch creates one long loop. The selected technique tutorial similarly forms each loop over a consistent cylindrical guide before the row is completed.
Beginner tip
Keep the dowel close to the top of the fabric. Holding it several inches away makes the working yarn difficult to control.
Common mistake to avoid
Do not tighten the yarn around the dowel so firmly that the loops cannot slide. The bases should be secure, but the tops need to move along the tool.
Step 4: Continue the Long Loops Across the Row
Repeat the drop-loop process in every stitch.
Pause after every 8–10 loops and inspect them from the side. All loops should wrap around the widest, most even part of the dowel.
When the dowel becomes crowded, slide the completed loops gently toward the opposite end. Do not let the first loops fall off prematurely.
Your loop count should equal the number of stitches in the previous solid row.
Beginner tip
Say the sequence quietly while working: “Insert, pull through, chain, lengthen, place, tighten.” Repeating the same rhythm makes the technique easier to remember.
Common mistake to avoid
Do not skip a stitch hidden behind the dowel. Tilt the dowel slightly upward so you can see the top edge of the panel.
Step 5: Slide the Loops Off Safely
When all loops have been formed, pinch the base of the final loop between your thumb and forefinger.
Slide the remaining loops off the dowel slowly. Do not pull the dowel upward because that can stretch the bottom knots unevenly.
Continue holding the final loop. It remains adjustable until you begin the return row.
Turn the work while keeping the open loops spread across the table.
Beginner tip
Count the loops before removing the dowel. Correcting a missed stitch is much easier while the loops are still supported.
Common mistake to avoid
Letting go of the last loop may allow it to lengthen or shrink. Keep its base pinched until the hook is inserted into it.
Step 6: Crochet Across the Open Loops
Insert the hook through the first open loop while still holding its base.
Yarn over and pull through. Chain 1 to secure the edge.
Work one half double crochet into the first loop. Continue with one half double crochet in every remaining open loop.
Do not combine several loops into one stitch. This tutorial uses one solid stitch per elongated loop, keeping the vertical strands separate.
At the end of the row, count the stitches. The count should match the original panel width.
The long loops become stable after a solid return row is worked into them, creating a horizontal band of vertical mesh.
Beginner tip
Spread the loops across your lap or table before crocheting into them. This reduces twisting and helps you identify the next loop.
Common mistake to avoid
Make sure the hook passes through the whole loop rather than catching only one strand. A split loop can look weak or uneven after blocking.
Step 7: Add the Solid Center Band and Second Mesh Row
After securing the first open row, work 4–8 rows of front-loop half double crochet.
A narrow center band gives the top a more open appearance. A wider center band provides more coverage and places the second mesh row closer to the neckline.
Repeat Steps 3–6 to create a second drop-loop band.
Check that:
- Every mesh row has the same number of loops.
- Both bands use the same dowel diameter.
- The solid rows between the bands remain straight.
- The second band is positioned at a comfortable height.
Hold the panel against your body before proceeding. The openwork should sit where you are comfortable wearing it over your chosen underlayer.
Beginner tip
Record the number of solid rows between the mesh bands. You must repeat the same number on the second panel.
Common mistake to avoid
Changing dowels between mesh rows can produce noticeably different loop lengths. Use the same cylindrical tool throughout both panels.
Step 8: Form the Upper Yoke and Boat Neck
After the second mesh band, crochet 3–6 solid rows.
Now decide how deep you want the neckline.
For the easiest beginner construction, divide the final row into three sections:
- Left shoulder
- Center neck opening
- Right shoulder
A simple starting proportion is:
- 25–30% for the left shoulder
- 40–50% for the neck opening
- 25–30% for the right shoulder
Place markers at the boundaries.
Simplified Shoulder Method
Instead of reproducing a specialized short-row neckline, make each shoulder separately:
- Crochet from the outside edge to the first neck marker.
- Turn and work only across that shoulder.
- Continue until the shoulder section measures approximately 1½–3 inches tall.
- Fasten off.
- Join yarn at the second neck marker.
- Crochet the opposite shoulder to the same height.
This creates a shallow rectangular boat opening. Blocking and shoulder seaming will soften the inner corners.
For a rounded opening, decrease one stitch at the neck edge on the first two or three shoulder rows. Keep the outer shoulder edge straight.
Beginner tip
Try the panel against your upper body before cutting the yarn. The opening should pass comfortably over your head.
Common mistake to avoid
A very wide neckline may slide off the shoulders after the garment stretches. Start slightly narrower because blocking and wear can enlarge the opening.
Step 9: Make the Second Matching Panel
Repeat all previous steps for the second panel.
Use your written notes rather than relying only on measurements. Record:
- Foundation stitch count
- Number of lower body rows
- Number of rows between mesh bands
- Number of upper-yoke rows
- Neck-opening stitch count
- Shoulder stitch count
- Shoulder height
Lay the second panel over the first after every major section. The lower edges, side edges, mesh bands, and shoulders should align.
You may make the front and back necklines identical for a reversible top. Alternatively, make the back neckline one or two rows higher for more coverage.
Beginner tip
Do not wait until the end to compare the panels. Compare them after the lower body, first mesh band, second mesh band, and neckline.
Common mistake to avoid
Counting ridges instead of actual rows can create confusion. One horizontal ridge may not represent one complete row. Count the edge stitches or maintain a written row tally.
Step 10: Seam the Shoulders
Place the panels together with the right sides facing inward.
Match the neckline corners and outside shoulder edges. Secure each shoulder with stitch markers.
Thread a yarn needle with a length of matching yarn. Seam across one shoulder using whip stitch or mattress stitch. Repeat on the other shoulder.
Avoid pulling the seam too tightly. The shoulder seam should flex with the crochet fabric.
Turn the top right side out and try it over your head before seaming the sides. Widen the neckline now when necessary.
Beginner tip
Use a separate yarn strand for each seam. This makes one seam easier to remove without disturbing the others.
Common mistake to avoid
Do not seam across the neck opening. Mark the beginning and end of each shoulder before picking up the needle.
Step 11: Mark and Seam the Sides
Turn the top wrong side out again.
Align the lower hems and mesh bands. Place markers along both side edges.
Try the top on carefully or place it over a well-fitting shirt. Mark the bottom of each armhole.
A practical armhole depth is often between 7 and 10 inches, but your preferred depth depends on your upper-arm measurement, shoulder width, garment ease, and layering plans.
Begin at the lower hem and seam upward. Stop at the armhole marker. Repeat on the other side.
The primary source likewise assembles two body panels at the shoulders and side edges while leaving an opening for each armhole.
Beginner tip
Before finishing the second seam, turn the garment right side out and test the fit. Increase the armhole depth when it feels restrictive.
Common mistake to avoid
Do not stretch one panel while seaming it to the other. Match row ends gradually and use markers every few inches.
Pattern and Stitch Notes
Turning Chain
Chain 1 at the beginning of solid half-double-crochet rows. The turning chain does not count as a stitch.
Stitch Count
Maintain the same stitch count across all full-width rows.
For the drop-loop row:
- One foundation stitch produces one elongated loop.
- One elongated loop receives one half double crochet on the return row.
- The stitch count should therefore remain unchanged.
Right Side and Wrong Side
Choose the side of the ridged fabric that you prefer as the right side. Mark it with a locking stitch marker.
Place both right sides together before seaming so the bulk of the seams remains inside the garment.
Repeat Pattern
A flexible upper-body repeat is:
- Solid body rows
- One drop-loop row
- One stabilizing half-double-crochet row
- Four to eight solid rows
- One drop-loop row
- One stabilizing row
- Three to six solid upper-yoke rows
- Neck and shoulder shaping
Size Adjustment Notes
To make the top wider, increase the foundation stitch count according to your blocked gauge.
To make it longer, add rows before the first mesh band.
To make it more cropped, reduce the lower-body rows.
To provide more bust coverage, place the first mesh band higher or use only one mesh band near the shoulders.
To create a deeper neck, begin the shoulder separation earlier or work additional decreases at the neck edges.
Common Beginner Mistakes
1. Using Yarn That Hides the Mesh
Fuzzy, boucle, eyelash, or highly textured yarn can obscure the long loops and make them difficult to work into.
Fix: Choose smooth yarn with an even thickness and visible stitch definition.
2. Skipping the Blocked Swatch
Unblocked mesh can change after washing or steaming.
Fix: Include both solid and mesh sections in your swatch, block it, and measure only after it dries.
3. Making Uneven Long Loops
Placing some loops on the narrow end of a knitting needle and others on the thicker section changes their length.
Fix: Use a straight dowel or keep every loop on the same-diameter portion of the needle.
4. Losing a Loop
A hidden loop can be skipped while working the return row.
Fix: Count the loops before removing the dowel and count the half double crochets afterward.
5. Pulling the Return Row Too Tight
Tight stitches across the loop tops can draw the mesh inward.
Fix: Relax your grip or use a hook 0.5 mm larger for the stabilizing row.
6. Creating Unequal Panels
Two panels can differ even when they begin with the same chain.
Fix: Record every row and compare the panels after each section.
7. Making the Neck Opening Too Wide
Openwork garments often relax after blocking and wear.
Fix: Start with a conservative neck width and widen it only after testing.
8. Seaming the Armholes Too High
A shallow armhole can pull under the arm and lift the entire top.
Fix: Baste the sides loosely, try on the top, and adjust before making permanent seams.
How to Customize This Crochet Project
Change the Yarn
Cotton creates crisp stitches and a cool fabric. Bamboo adds softness and drape. Linen may feel firm at first but often softens with washing.
When changing fiber or yarn weight, make a new blocked swatch and recalculate the stitch count.
Use a Different Color Plan
Try:
- One solid color for a modern minimalist top
- A contrasting color for each mesh band
- A dark body with pale openwork
- A gradient that becomes lighter toward the neckline
- Scrap-yarn stripes in the solid sections
Carry yarn only when the floats will not show through the open mesh. Otherwise, fasten off and weave in the ends securely.
Add More Mesh Bands
Create three narrow bands instead of two. Keep at least 3–4 solid rows between them so each open section remains stable.
Make a Solid Version
Replace each long-loop section with additional front-loop half double crochet. The construction remains the same, although the finished top may require more yarn.
Create a Beach Cover-Up
Add substantial length to both panels. Use a larger hook and a plant-fiber yarn with good drape.
For a tunic silhouette, begin with a wider hem and decrease one stitch at each side every few rows until the panel reaches the chest width.
Add Sleeves
After seaming, join yarn at the bottom of an armhole and work evenly around the opening.
Use half double crochet for simple sleeves or alternate solid rounds with drop-loop mesh. Check that the stitch count allows the sleeve to move comfortably.
Add a Border
Finish the neckline, armholes, or lower edge with:
- One round of single crochet
- Reverse single crochet
- Small picots
- Narrow ribbing
- Simple shell edging
Test the border on a swatch because a tight edging can distort an otherwise well-fitting garment.
Gift and Styling Ideas
The top can be made as:
- A handmade summer birthday gift
- A lightweight beach cover-up
- A festival layering top
- A sleeveless transitional sweater
- A matching top-and-bag set
- A garment worn over dresses or collared shirts
Finishing Instructions
Fasten Off
After completing each seam, secure the yarn without forming a bulky knot. Leave a tail long enough to weave through several stitches.
Weave In the Ends
Use a blunt yarn needle.
Weave each tail in one direction, change direction, and pass it through several more stitches. Avoid weaving across the open mesh because the tail may remain visible.
Inspect the Seams
Turn the garment right side out and examine:
- Shoulder alignment
- Neckline symmetry
- Mesh-band alignment
- Side-seam tension
- Armhole depth
- Lower-hem alignment
Correct any twisting before blocking.
Block the Top
Check the yarn label before applying heat.
For washable plant fibers:
- Soak the garment in cool or lukewarm water.
- Press out excess water without wringing.
- Roll it inside a towel.
- Lay it flat to the planned measurements.
- Straighten each mesh loop gently.
- Allow it to dry completely.
For steam-safe yarn, hover the steamer above the fabric rather than pressing an iron directly onto the stitches.
The reference tutorial specifically notes that steaming helps straighten long drop-loop stitches.
Washing and Care
Follow the care instructions on the yarn label.
Store the top folded rather than hanging it for long periods. Hanging can stretch the shoulders and lengthen an openwork garment.
Quick Printable-Style Summary
Skill level: Confident beginner
Construction: Two matching bottom-up rectangular panels
Recommended yarn: Smooth sport-weight or light DK cotton, bamboo, or blended yarn
Hook: 4.5–5.5 mm or size needed for suitable drape
Additional tool: Smooth 20–30 mm dowel or thick knitting needle
Main stitches: Chain, half double crochet, front-loop half double crochet, slip stitch, drop-loop mesh
Starting method: Calculate the panel width from a blocked swatch and desired finished chest measurement
Basic sequence:
- Crochet solid lower body.
- Form one drop-loop mesh row.
- Crochet into every open loop.
- Add solid center rows.
- Repeat the mesh section.
- Crochet the upper yoke.
- Separate the shoulders for the neckline.
- Make a second matching panel.
- Seam shoulders and sides.
- Weave in ends and block.
Repeat rule: One foundation stitch creates one elongated loop; one half double crochet is worked into each loop.
Finishing: Seam with matching yarn, weave ends into solid sections, and block flat.
Frequently Asked Questions
Is a crochet mesh top suitable for a beginner?
Yes, provided the crocheter already understands chaining, turning rows, and half double crochet. The elongated-loop technique is unusual, but the dowel controls the loop height and makes the repetition manageable.
What should I wear under a crochet mesh top?
Common options include a fitted tank, camisole, bandeau, swimsuit, bralette, T-shirt, or long-sleeved shirt. Choose an underlayer that provides the coverage and contrast you prefer.
What yarn is best for an airy crochet top?
Smooth cotton, bamboo, cotton-bamboo, linen blends, and other drapey plant fibers work well. Avoid very fuzzy yarn because it can hide the mesh structure and make the open loops difficult to identify.
How do I make all the mesh loops the same length?
Place every loop around the same dowel or the same-diameter portion of a knitting needle. Tighten the base of each loop consistently and avoid changing tools midway through the project.
Can I make this top without the wooden dowel?
A thick knitting needle, smooth cardboard tube, large crochet hook, or another even cylindrical object can work. It must be smooth enough for the loops to slide off without snagging.
How can I make the mesh less revealing?
Use a smaller-diameter dowel, make only one mesh band, place the openwork near the shoulders, or replace some mesh rows with solid half double crochet.
Why is my mesh row narrower than the solid fabric?
The return stitches may be too tight, some loops may have been skipped, or the elongated loops may not have been loosened after blocking. Count the stitches, relax the return-row tension, and block the fabric gently.
Conclusion
This crochet mesh top turns a distinctive-looking garment into a series of manageable steps. Once you understand how to lengthen each loop over the dowel and secure it with a return row, the openwork becomes rhythmic rather than intimidating.
Take time with the swatch, write down the measurements for the first panel, and compare both panels frequently. Those three habits will do more for the finished fit than rushing to complete extra rows.
Save the tutorial with your project notes so you can reuse the made-to-measure calculations for future mesh tops, tunics, beach cover-ups, and lightweight sweaters.





