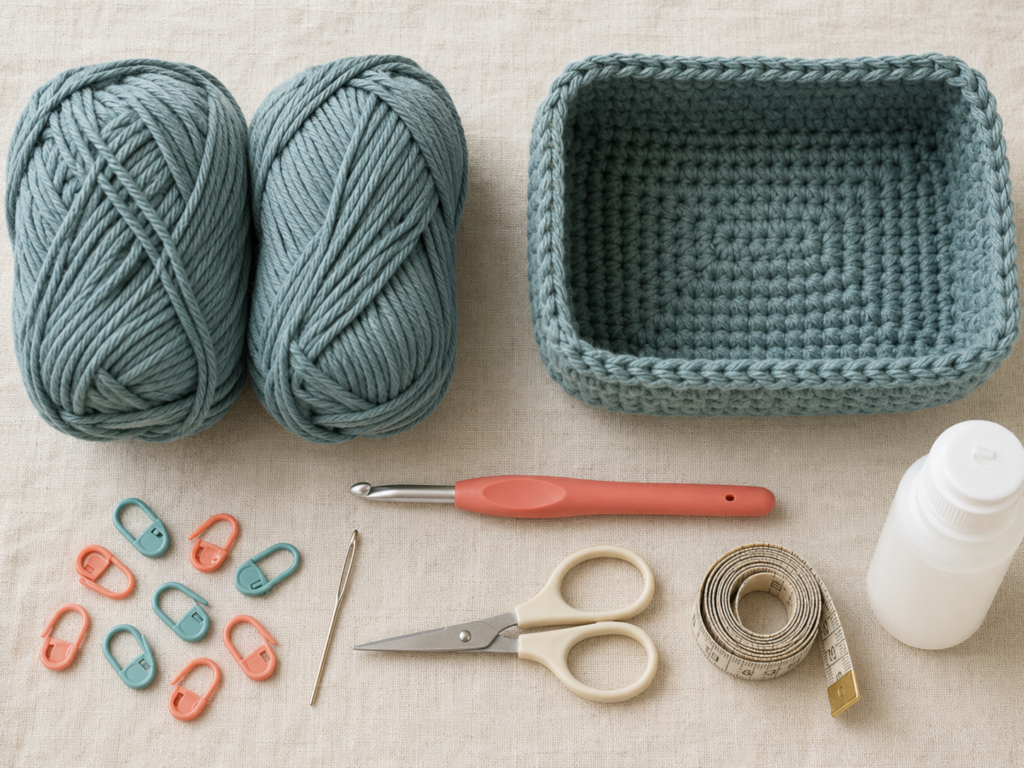
A tidy desk is easier to maintain when every little item has a proper place. This easy crochet desk organizer pattern gives your pens, scissors, crochet hooks, sticky notes, stitch markers, and measuring tape a soft but structured home.
The organizer begins as a simple rectangle made with single crochet. After adding a border, you work one back-loop-only round to turn the fabric upward and form the sides. The remaining wall rounds are straightforward single crochet, so there is no complicated shaping to memorize.
Two strands of cotton yarn are held together to make the fabric thicker than an ordinary crochet swatch. You can leave the finished basket open or add the optional divider to create separate sections for tall tools and smaller desk supplies.
This is a practical beginner project, but it also teaches several transferable crochet skills: keeping a consistent stitch count, recognizing the first and last stitch, crocheting evenly around a rectangle, marking corners, working through the back loop, and sewing crochet pieces together neatly.
What You’ll Learn
- How to make a flat rectangular crochet base
- How to keep single crochet edges straight
- How to add a counted border around a rectangle
- How to mark and shape four corners
- How to create a crisp base-to-wall fold with BLO stitches
- How to crochet sturdy joined rounds
- How to add an optional organizer divider
- How to finish and shape a crochet basket professionally
Project Details
Tutorial type: Original pattern-style project tutorial
Skill level: Easy beginner
Finished size: Approximately 8 inches long, 5½ inches wide, and 4 inches high
Estimated time: 4–6 hours
Construction: Flat rectangular panel, border round, upright joined rounds
Terminology: Written in US crochet terms
The finished dimensions may vary slightly with your yarn, hook, and tension. Since this is a storage project rather than a fitted garment, matching the exact gauge is less important than producing a firm fabric.
Materials You’ll Need
- Approximately 300–360 yards of medium-weight #4 cotton yarn
- Two matching yarn balls or one center-pull ball divided into two smaller balls
- 6.0 mm J/10 crochet hook
- Four locking stitch markers
- Tapestry needle
- Scissors
- Measuring tape
- Optional removable fabric or plastic-canvas base insert
- Optional water-based fabric stiffener
- Optional contrasting yarn for the top border
Cotton is recommended because it gives the organizer a clean stitch definition and is generally less stretchy than many soft acrylic yarns. The Craft Yarn Council classifies worsted and aran yarns as medium #4 and lists 5.5–6.5 mm as a general crochet-hook range for this yarn category. Treat that range as guidance and adjust your hook when your personal tension produces fabric that is too loose or too rigid.
For this project, two strands are held together. Your finished fabric should feel dense enough to support small desk tools without becoming painful to crochet.
Crochet Abbreviations Used
- ch = chain
- sc = single crochet
- sl st = slip stitch
- st/sts = stitch/stitches
- rep = repeat
- BLO = back loop only
This pattern uses standardized US-style abbreviations. Be aware that a US single crochet is called a double crochet in UK terminology. The Craft Yarn Council maintains a complete list of US abbreviations and US/UK terminology differences.
Before You Start
Hold two strands together
Use two strands of the same cotton yarn as though they were one thick strand. You can work from two separate yarn balls or divide one large ball into two.
Do not twist the strands deliberately. Allow them to run naturally beside each other and insert the hook beneath both strands whenever you form a stitch.
Check your fabric
Make a small test swatch before beginning the organizer. Aim for approximately:
12 single crochet stitches and 12 rows = 4 inches
Your swatch does not need to match perfectly. Use it to judge the fabric:
- If it is floppy and you can easily see large spaces between stitches, try a 5.5 mm hook.
- If the stitches are extremely difficult to enter, try a 6.5 mm hook.
- If your hands become tired after only a few rows, loosen your grip before changing hook sizes.
- If the fabric is firm but still flexible, continue with the 6.0 mm hook.
Count every row
Each base row has 18 stitches. Place a locking marker in the first stitch and another in the last stitch while you are learning the pattern.
The turning chain does not count as a stitch. Therefore, the first single crochet goes into the first actual stitch at the edge.
Keep the edges straight
Most accidental increases happen when a beginner works into the turning chain. Most accidental decreases happen when the final stitch is overlooked.
At the end of every row:
- Count 18 stitches.
- Check that both markers are still in the edge stitches.
- Compare the current edge with the row below it.
Avoid curling
A slight curl is normal when working dense cotton stitches. Severe curling usually means the foundation chain was made too tightly.
Make the chain with relaxed loops. You can also make the chain with a 6.5 mm hook and switch to the 6.0 mm hook for the first row.
Right and wrong sides
Single crochet looks similar on both sides. For this project, the side facing you during the final base row will be treated as the right side. Mark it with a removable marker so you can keep the construction consistent.
Step-by-Step Crochet Tutorial
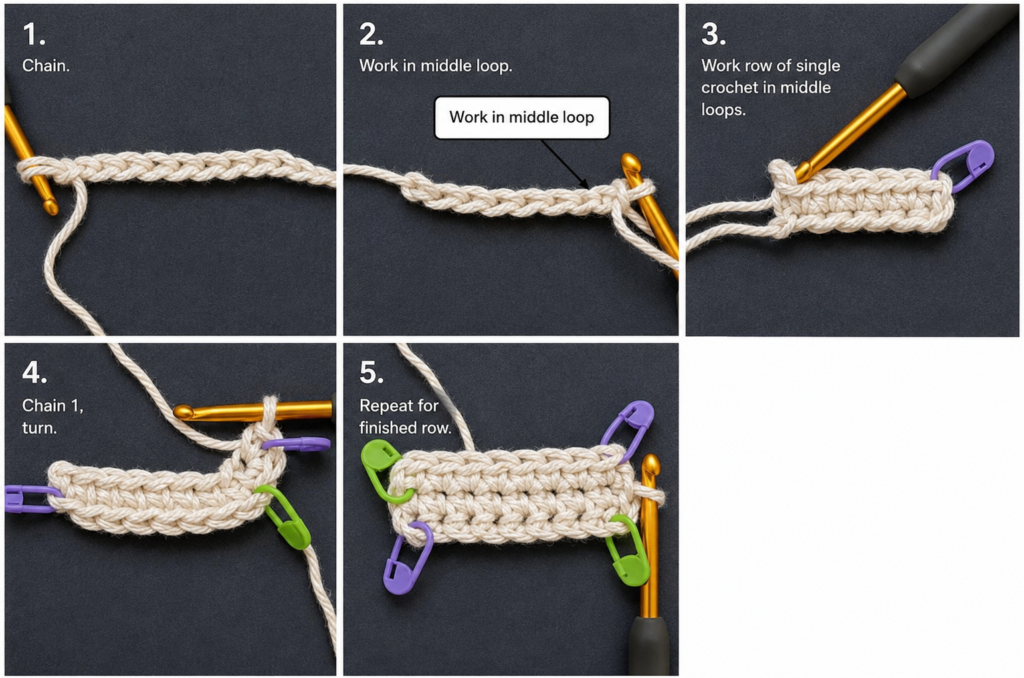
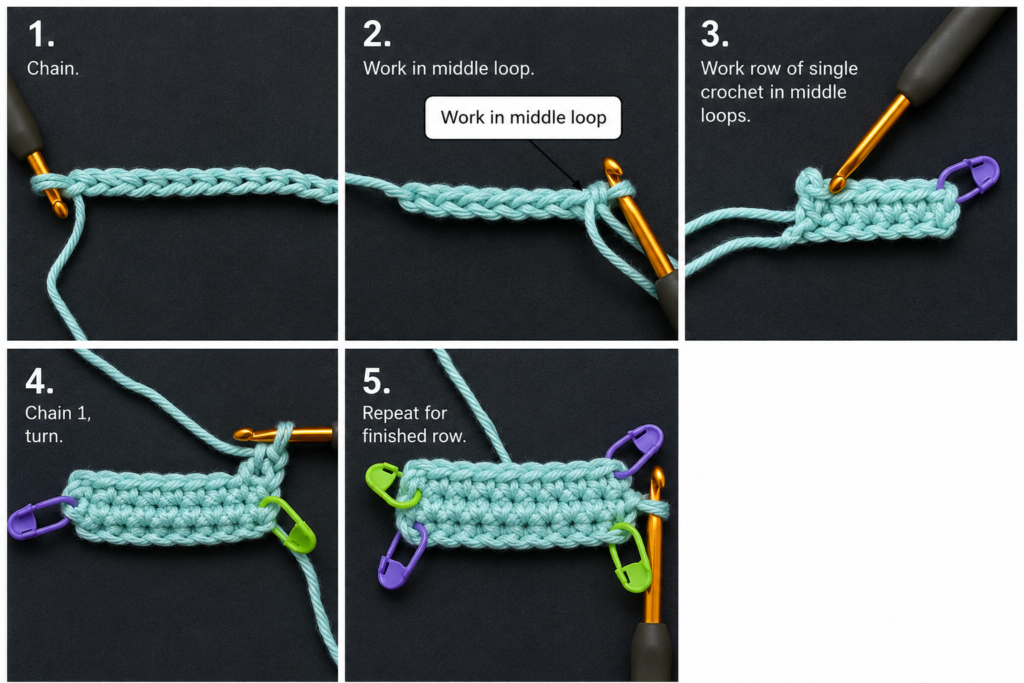
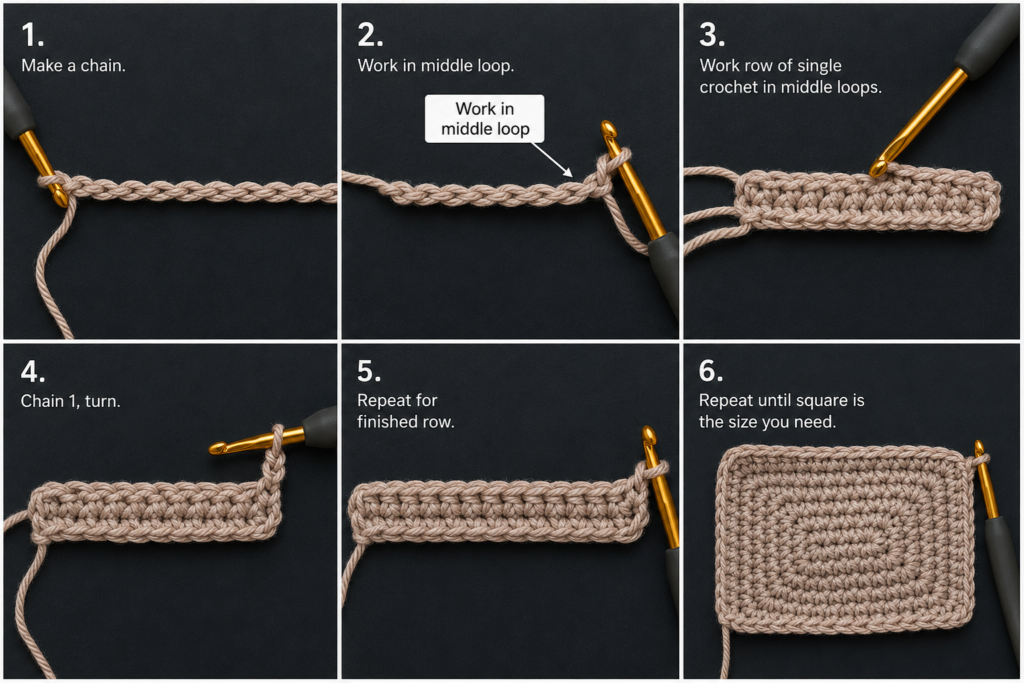
Step 1: Make the Foundation Chain and First Row
With two strands of dusty teal yarn held together, make a slip knot.
Foundation: Ch 19.
Do not count the loop on your hook as a chain. Count the V-shaped chain stitches below the hook until you have 19.
Row 1: Insert the hook into the second chain from the hook. Work 1 sc in that chain and 1 sc in every remaining chain across.
Stitch count: 18 sc
Ch 1 and turn.
Beginner tip
After completing the first row, stretch it gently from side to side. The row should relax into a straight strip. If it bends into a tight crescent, the foundation chain was probably too tight.
Common mistake to avoid
Do not crochet into the first chain directly below the hook. That chain functions as the turning space. Beginning in it would give you 19 stitches rather than 18.
Step 2: Crochet the Rectangular Base
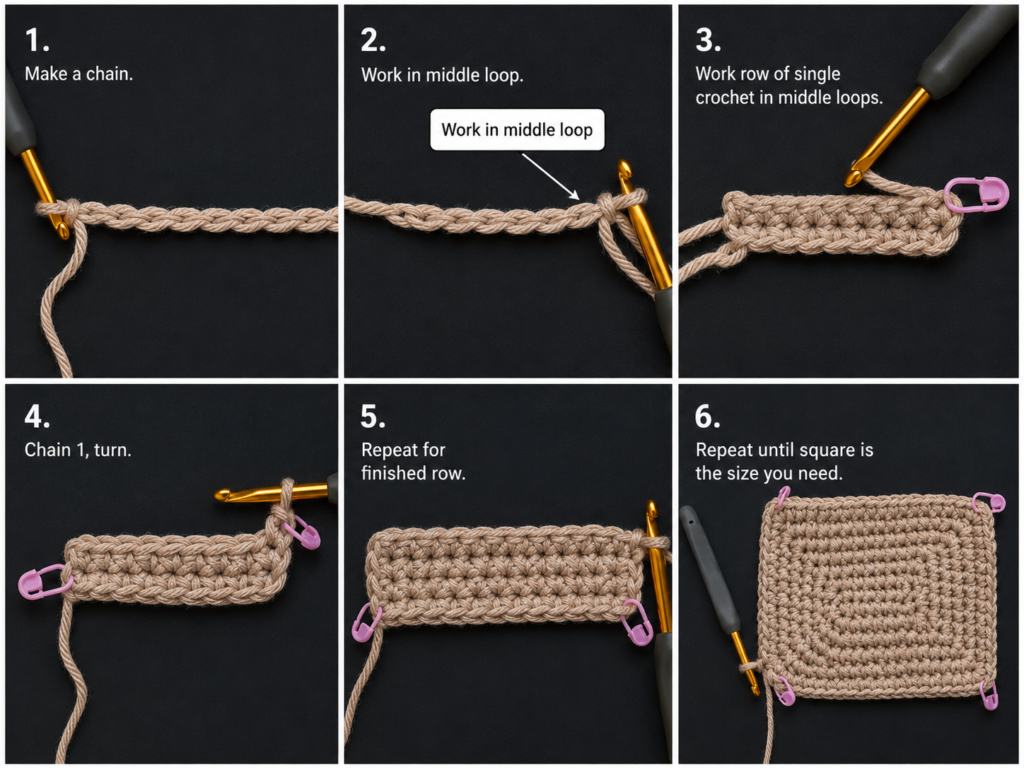
Rows 2–14: Sc in each of the 18 stitches across. Ch 1 and turn after every row.
Continue counting after every row. The completed rectangle should measure approximately 6 inches by 4½ inches before the border is added.
Do not fasten off immediately. Lay the rectangle flat and inspect it.
The two long edges should be parallel. The two short ends should be the same height. A difference of one-eighth inch is usually harmless, but a visibly angled edge indicates a missed or added stitch.
Beginner tip
Move the edge markers upward every two or three rows. This takes only a few seconds and prevents you from spending time correcting a slanted base later.
Common mistake to avoid
Do not pull the turning chain tightly. A tight turning chain compresses the edge and makes the rectangle curve inward.
Step 3: Check and Prepare the Completed Base
After Row 14, fasten off and weave in the starting tail. Leave the finishing tail temporarily if it helps you identify the last corner.
Place the rectangle right side up.
Mark all four corners. Each corner marker should pass through the final stitch at the end of a long edge.
Check the measurements:
- Long edge: approximately 6 inches
- Short edge: approximately 4½ inches
- Stitch count across: 18
- Total rows: 14
A small variation is acceptable. More important than the exact measurement is having matching opposite edges.
Beginner tip
Photograph the flat base before adding the border. If the finished basket seems uneven later, the photograph will help you determine whether the problem began in the base or in the wall rounds.
Common mistake to avoid
Do not stretch the base while measuring. Let it rest naturally on the table.
Step 4: Crochet Around the Base
Join the doubled yarn in any marked corner.
Border Round:
- Ch 1. The chain does not count as a stitch.
- Work 3 sc into the first corner.
- Work 16 sc across the first long edge.
- Work 3 sc into the next corner.
- Work 12 sc evenly along the first short edge.
- Work 3 sc into the next corner.
- Work 16 sc across the second long edge.
- Work 3 sc into the final corner.
- Work 12 sc evenly along the second short edge.
- Join with a sl st to the first sc.
Total: 68 sc
Place one marker in the center stitch of every three-stitch corner group. You should have four marked corner stitches.
Why the border count matters
Opposite edges must contain the same number of stitches:
- 16 stitches on each long edge
- 12 stitches on each short edge
- 3 stitches in each corner
That symmetry keeps the finished organizer balanced.
Beginner tip
When working down a row-end edge, insert the hook beneath enough yarn to create a secure stitch. Avoid working around only one thin strand because it may stretch into a visible hole.
Common mistake to avoid
Do not place multiple stitches randomly along one short side. Spread the 12 stitches evenly from corner to corner.
Step 5: Turn the Base into Upright Walls
The first wall round is worked through the back loops only.
Wall Round 1: Ch 1. BLO sc in every stitch around. Join with a sl st to the first sc.
Stitch count: 68 sc
The unused front loops create a horizontal ridge around the base. This ridge encourages the fabric to fold upward instead of continuing to spread flat.
After completing the round, press the base flat with one hand and gently lift the new row with the other. Define each corner with your fingertips.
Beginner tip
Look at the top of the next stitch. You will see two loops forming a V. Insert the hook only under the loop farthest from you.
Common mistake to avoid
Do not work under both loops during this round. Missing several BLO stitches will make the fold line inconsistent.
Step 6: Build the Organizer Walls
Continue working in joined rounds.
Wall Rounds 2–12: Ch 1. Sc in each stitch around. Join with a sl st to the first sc.
Stitch count: 68 sc per round
The chain at the beginning of each round does not count as a stitch.
Move a marker into the first single crochet of each round. This helps prevent you from accidentally working into the joining slip stitch.
After every third round:
- Count the stitches.
- Place the organizer on a flat surface.
- Check that the joining seam is traveling vertically.
- Shape the corners with your fingertips.
- Compare the height of all four walls.
Optional texture variation
For subtle horizontal ridges, work Rounds 5 and 9 through the back loops only. Work all other wall rounds through both loops.
This variation is decorative and does not change the stitch count.
Beginner tip
Rotate the entire basket as you crochet rather than twisting your wrist around the corners. This makes dense, double-stranded stitches more comfortable.
Common mistake to avoid
Do not crochet into the joining slip stitch. It is not part of the 68-stitch count. Working into it adds one stitch every round and causes the walls to flare.
Step 7: Finish the Top Edge
After Wall Round 12, inspect the organizer’s height. Add or remove rounds before finishing if necessary.
Top Round 1: Ch 1. Sc in every stitch around. Join.
Top Round 2: Sl st loosely in every stitch around. Join and fasten off.
The slip-stitch round creates a clean upper line and reduces stretching. Keep these stitches relaxed. Tight slip stitches will pull the opening inward.
Weave the yarn tail horizontally through several stitches on the inside wall. Change direction once before trimming the remaining end.
Beginner tip
Use a hook one size larger for the final slip-stitch round if your slip stitches are normally tight.
Common mistake to avoid
Do not force the slip stitches to match the tightness of the single crochet fabric. They should sit smoothly on top of the edge.
Step 8: Make the Optional Divider
The organizer can be used without a divider. Add one when you want a narrow compartment for pens or crochet hooks and a wider compartment for sticky notes or small tools.
With two strands held together:
Foundation: Ch 13.
Divider Row 1: Sc in the second chain from the hook and in each chain across.
Stitch count: 12 sc
Divider Rows 2–10: Ch 1, turn, and sc in each stitch across.
Fasten off, leaving a sewing tail approximately 30 inches long.
Lay the panel inside the basket. It should reach from one long wall to the opposite long wall without buckling.
Add rows if it is too short vertically. Remove one or two rows if it rises above the basket.
Beginner tip
Pin the divider into position with locking stitch markers before sewing. Fill both compartments temporarily with the items you plan to store. This helps you choose the most useful divider position.
Common mistake to avoid
Do not make the divider wider than the interior. A divider under excessive tension will pull the outer walls inward.
Step 9: Attach the Divider
Thread the long divider tail through a tapestry needle.
Position the divider where you want the compartments separated. Check that it is vertical and perpendicular to the base.
Begin at one lower corner.
- Pass the needle through the edge of the divider.
- Catch the inner surface of the basket wall without pushing the needle completely through the outer fabric.
- Repeat upward with small whip stitches.
- Secure the top corner.
- Run the remaining tail down through the divider stitches.
- Sew the bottom edge lightly to the base.
- Continue to the opposite wall.
- Sew the second divider edge from bottom to top.
- Knot only if necessary, then bury the tail inside the dense stitches.
The seam does not need to be extremely tight. It needs to prevent the divider from tipping when tools are removed.
Beginner tip
Use matching yarn for nearly invisible seams. Use a contrasting yarn only when you want the construction stitches to become a deliberate decorative detail.
Common mistake to avoid
Do not pull each sewing stitch as tightly as possible. Excess tension wrinkles the outside wall and distorts the base.
Pattern Notes and Stitch Notes
Turning-chain rule
The beginning ch 1 does not count as a stitch in rows or rounds.
Work the first sc into the first actual stitch. In joined rounds, join to that first sc rather than joining to the chain.
Stitch counts
- Base rows: 18 sc
- Base rows worked: 14
- Border round: 68 sc
- Wall rounds: 68 sc
- Divider rows: 12 sc
Stop and recount whenever a round contains more or fewer than 68 stitches. Correcting the count immediately is easier than disguising an increase several rounds later.
Joined-round seam
The join may lean slightly. Keep the first stitch marker in place and avoid crocheting into the slip stitch.
For a less noticeable seam, position it at the center of one short side rather than at a prominent front corner.
Right side and wrong side
Keep the right side of the original base facing outward. The back-loop-only ridge should remain visible around the lower outside edge.
Size adjustment
To make the organizer longer, add foundation chains in pairs.
To make it wider from front to back, add base rows.
After changing the base, do not rely on the 68-stitch border count. Work evenly around the new rectangle, place three sc in each corner, and ensure opposite edges have matching stitch counts.
To change only the height, add or remove wall rounds.
Common Beginner Mistakes
1. The base becomes narrower
Cause: The last stitch of one or more rows was missed.
Fix: Mark the first and last stitches. Every base row must contain 18 sc.
2. The base becomes wider
Cause: The turning chain was treated as a stitch.
Fix: Ignore the chain and work only into the 18 visible stitch tops.
3. One border edge looks crowded
Cause: Too many stitches were placed along one row-end side.
Fix: Remove the border round and distribute exactly 12 stitches along each short edge.
4. The corners are rounded inconsistently
Cause: The three-stitch corner groups were not placed in matching positions.
Fix: Mark the middle stitch of each corner group immediately after completing the border.
5. The walls flare outward
Cause: Extra stitches were added at the joining seam.
Fix: Mark the first single crochet and skip the joining slip stitch when beginning the next round.
6. The walls lean inward
Cause: The top slip-stitch round is too tight or the wall tension became progressively tighter.
Fix: Redo the final round loosely or use a larger hook for that round.
7. The basket is too floppy
Cause: Loose tension, a soft yarn, or a hook that is too large.
Fix: Try a smaller hook, use two strands of cotton, add a plastic-canvas base insert, or apply a light fabric stiffener.
8. The divider pulls the walls inward
Cause: The divider is too wide or was sewn under excessive tension.
Fix: Remove one or two divider stitches or loosen the attachment seam.
How to Customize This Crochet Project
Change the yarn
Cotton creates the cleanest, most structured result. Cotton-blend yarn can also work when it contains enough cotton to limit stretching.
T-shirt yarn produces a heavier organizer but may require a larger hook and fewer stitches.
Acrylic yarn is usable, but choose a firm acrylic rather than a soft, draping variety.
Change the color placement
Try one of these arrangements:
- Solid dusty teal
- Cream base with teal walls
- Teal walls with a coral top border
- Two wall rounds in each leftover yarn color
- Neutral basket with a brightly colored divider
- Dark lower walls and lighter upper walls
When changing colors in joined rounds, complete the final yarn-over of the last single crochet with the new color.
Add more compartments
Use two narrow dividers to create three compartments. Place them only after testing the organizer with your intended desk supplies.
Avoid adding too many narrow sections. Crochet walls occupy more space than plastic dividers, so very small compartments may not be useful.
Make a removable base insert
Cut a piece of plastic canvas or washable interfacing slightly smaller than the interior base. Cover it with fabric or crochet two thin rectangles and sandwich the insert between them.
A removable insert improves structure while allowing the basket itself to be washed.
Add a decorative border
Replace the final slip-stitch round with:
- Reverse single crochet
- A contrasting single crochet round
- Surface slip stitches
- Small picots placed several stitches apart
- A simple chain-and-slip-stitch loop border
Keep decorative borders compact. Large scallops can catch on scissors, pens, or hook handles.
Add handles
Mark the center six stitches on both short sides.
During the second-to-last wall round, chain 6 and skip 6 stitches at each marked side. On the next round, work 6 sc around each chain space.
Small handles are useful when the organizer will be moved between a desk and a craft table.
Gift ideas and uses
This organizer can be adapted for:
- A teacher’s pencil holder
- A crochet-hook basket
- Sewing notions
- Makeup brushes
- Remote controls
- Charging cables
- Small bathroom supplies
- Children’s coloring tools
- A dorm-room desk
- A home-office gift basket
Fill it with coordinated pens, sticky notes, clips, or crochet accessories before gifting.
Finishing Instructions
Fasten off
Complete the final stitch, cut the working yarn with an 8-inch tail, and pull the tail through the active loop.
Weave in the ends
Thread both yarn strands through the tapestry needle together when possible.
Run the tail horizontally through at least five dense stitches. Change direction and pass through several more stitches before trimming.
Keep tails on the inside of the organizer.
Shape the basket
Place the organizer on a flat surface.
Use your hands to:
- Press the base flat
- Square the four lower corners
- Straighten the long walls
- Open the top evenly
- Position the divider vertically
Leave it filled lightly with folded towels or clean paper for several hours if it needs help holding its shape.
Blocking
Cotton can be lightly damp-blocked.
Mist the organizer with water rather than soaking it. Shape it around a similarly sized waterproof container and allow it to dry completely.
Do not apply high heat unless the yarn label explicitly permits it.
Optional stiffening
Apply a small amount of diluted fabric stiffener to the lower wall and base. Test the product on a leftover swatch first because some stiffeners alter the yarn’s color or texture.
Washing and care
Follow the care symbols printed on the yarn label. When gifting the organizer, include the yarn label or write down its care instructions. The Craft Yarn Council recommends retaining yarn-label care information so handmade items can be washed appropriately.
Remove plastic canvas, cardboard, or other inserts before washing.
Reshape the basket while damp and allow it to dry flat.
Quick Printable-Style Summary
Project: Rectangular crochet desk organizer with optional divider
Skill level: Easy beginner
Finished size: Approximately 8 × 5½ × 4 inches
Yarn: Medium-weight #4 cotton held double
Hook: 6.0 mm J/10
Main stitches: Chain, single crochet, slip stitch, BLO single crochet
Starting method: Ch 19
Base: Work 18 sc across for 14 rows
Border: 16 sc on each long edge, 12 sc on each short edge, and 3 sc in each corner; 68 sts total
Wall transition: One BLO sc round
Walls: Continue in joined sc rounds until the organizer reaches the desired height
Divider: Ch 13, work 12 sc across for approximately 10 rows, and sew inside
Finishing: Add a loose slip-stitch border, weave in ends, shape, and lightly block
FAQ
What yarn is best for a crochet desk organizer?
Firm cotton yarn is the most reliable choice because it gives the stitches definition and does not stretch as readily as many soft yarns. Holding two strands of medium-weight cotton together makes the organizer considerably more structured.
Can I use one strand instead of two?
Yes, but the fabric will be thinner. Use a smaller hook and consider adding a plastic-canvas insert. You may also need more stitches and rows to obtain the same finished dimensions.
How do I stop a crochet basket from becoming floppy?
Use dense stitches, firm cotton, a smaller hook, or two strands held together. A removable insert or light fabric stiffener can provide additional support. Avoid very tall walls unless the base and yarn are sufficiently firm.
Why are my organizer walls getting wider?
You are probably adding stitches near the joining seam. Mark the first single crochet and do not work into the turning chain or joining slip stitch.
Can I make this organizer without the divider?
Yes. The open basket is suitable for notepads, charging cables, remote controls, yarn scraps, or larger tools. The divider is entirely optional.
How do I make a larger crochet desk organizer?
Increase the foundation chain for additional length and add base rows for additional width. Crochet evenly around the resized base, placing three single crochets in every corner. Maintain matching stitch counts on opposite edges.
Can I wash the finished organizer?
That depends on the yarn and structural inserts. Follow the yarn label. Remove cardboard, plastic canvas, or other inserts first. Reshape the basket while damp and let it dry completely before refilling it.
Conclusion
This crochet desk organizer is a useful next project after basic washcloths and scarves because it turns familiar single crochet stitches into a three-dimensional object.
The flat base gives you time to establish an even rhythm. The marked border teaches controlled corner shaping. The back-loop round creates a clear structural fold, and the simple wall rounds let you practice maintaining a constant stitch count.
Use the organizer for writing supplies, crochet tools, sewing notions, or small electronics. Once you understand the construction, you can change its length, width, height, color placement, top border, and compartment layout without learning an entirely new pattern.
Save the tutorial with your organization projects so you can make matching baskets for other workspaces.





