A dorm room has to work unusually hard. The same small space may serve as a bedroom, study area, dressing room, snack station and place to relax. That makes decorative storage especially useful: it adds personality without occupying valuable floor or desk space.
This beginner-friendly crochet dorm room wall organizer is designed for exactly that purpose. It has three shallow pockets for pens, charging cables and small accessories, plus two deeper pockets for notebooks, toiletries or a glasses case. A wooden dowel keeps the top edge straight, while dense Trinity stitch fabric helps the organizer retain its shape.
The tutorial below is an original project inspired by the instructional flow of the selected wall-organizer source. It uses different dimensions, stitch counts, assembly details, styling and explanatory structure. It is not a transcription of the reference pattern.
You will begin by practicing the textured stitch, crochet a large back panel, make two separate pocket strips and assemble everything with simple hand sewing. The construction is flat and easy to inspect, so you can correct alignment before the organizer is hung.
What You’ll Learn
- How to crochet Trinity stitch in rows.
- How to maintain straight edges in textured crochet.
- How to make three matching rectangular panels.
- How to attach crochet fabric to a wooden dowel.
- How to divide one strip into two pockets and another into three.
- How to reinforce a hanging cord.
- How to adjust the organizer for different dorm-room needs.
Skill Level
Easy / Confident Beginner
You should be comfortable making chains and single crochet stitches. The single crochet three together technique is explained carefully before it is used in the project.
Finished Size
Approximately:
- Width: 13–13½ inches
- Height: 17 inches, excluding hanging cord
- Upper pockets: Three pockets, approximately 4¼ inches wide
- Lower pockets: Two pockets, approximately 6½ inches wide
- Dowel: 14 inches long
The finished size can vary slightly with yarn, hook size and tension.
Estimated Time
Approximately 6–8 hours, including assembly.
Materials You’ll Need
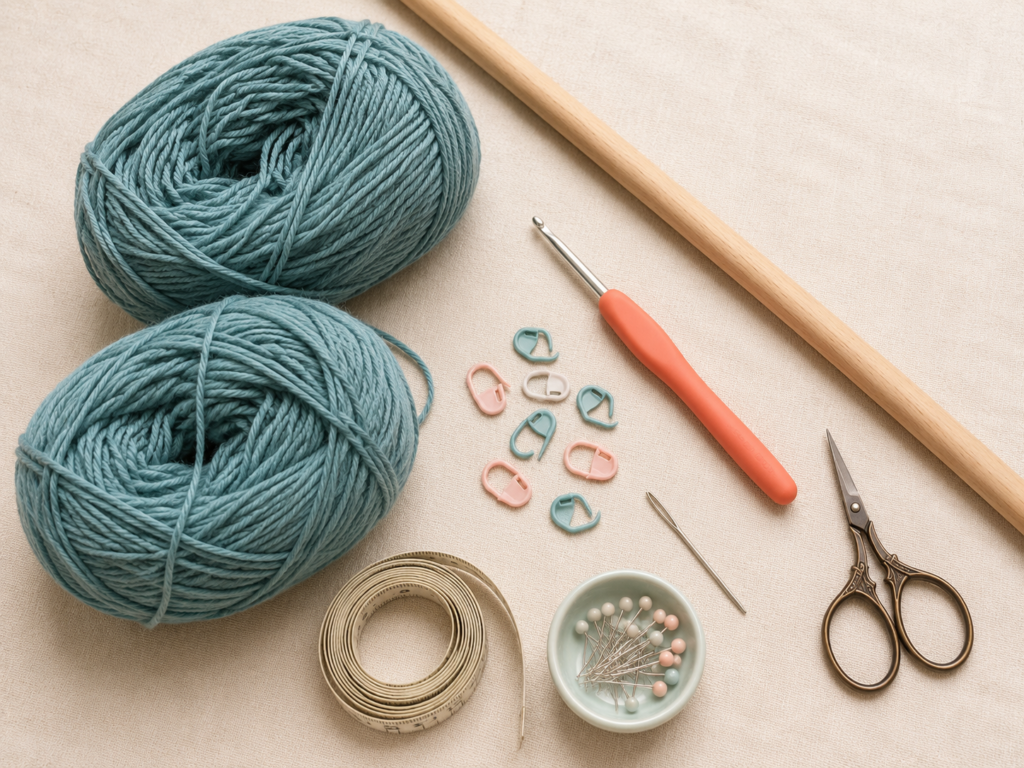
- 450–550 yards of medium-weight, category 4 cotton yarn
- 5.5 mm crochet hook
- 14-inch wooden dowel, approximately ⅜–½ inch thick
- Scissors
- Blunt tapestry needle
- 8–12 locking stitch markers
- Measuring tape
- Rust-resistant blocking pins
- Blocking mat or folded towel
- Optional removable wall hook rated for more than the organizer’s loaded weight
Cotton is recommended because it creates a firmer, less elastic fabric than many soft acrylic yarns. Avoid a yarn that stretches noticeably when you pull it, because loaded pockets can lengthen over time.
Hook lettering varies between manufacturers, so the millimeter measurement is the most reliable reference. The Craft Yarn Council lists a 5.5 mm hook in the I-9 range and recommends checking gauge rather than relying only on the letter printed on the package.
Crochet Abbreviations Used
- ch = chain
- sc = single crochet
- sc3tog = single crochet three together
- sl st = slip stitch
- st/sts = stitch/stitches
- rep = repeat
- RS = right side
- WS = wrong side
- yo = yarn over
The Craft Yarn Council maintains an industry abbreviation list and notes that crochet terminology differs between US and UK patterns.
US/UK Terminology Note
This tutorial uses US terminology.
- US single crochet = UK double crochet
- US sc3tog = UK dc3tog
- Chain and slip stitch use the same basic names in both systems
Before You Start
Make a Small Practice Swatch
Trinity stitch is built by drawing up loops from three adjacent stitch positions and closing those loops together. Although the movement is simple, it feels different from ordinary single crochet.
Practice with a chain of 14 before beginning the full panel. Work four or five rows. Your swatch should feel dense but still flexible.
Trinity stitch traditionally begins with an even number of chains. The first single crochet anchors the row, while each cluster shares one insertion point with the cluster before it. The final cluster is closed without a chain one, followed by a single crochet at the edge.
Gauge
Approximate gauge after light blocking:
- 7 Trinity clusters = 4 inches
- 11 rows = 4 inches
Gauge is not as critical as it would be for a fitted garment. However, a very loose fabric can sag once the pockets are filled.
A useful test is to hold the swatch by its top edge. If it lengthens dramatically under its own weight, change to a smaller hook or firmer cotton yarn.
How to Count the Pattern
For this project:
- The beginning chain contains an even number of chains.
- Each full cluster advances across two previously unused stitch positions.
- Each row begins with one single crochet.
- Each row ends with one final single crochet.
- The turning chain does not count as a stitch.
Place a marker in the first and last single crochet of every row. This makes it much easier to find the true edges.
How to Prevent Curling
A small amount of curling during the first several rows is normal. Strong curling usually comes from one of three causes:
- The foundation chain is much tighter than the stitches above it.
- The cluster stitches are pulled too tightly.
- The chain-one spaces are unusually loose or unusually tight.
Make the foundation chain with relaxed, even loops. You can use a 6 mm hook for the chain and return to the 5.5 mm hook for Row 1.
Choosing Dorm-Friendly Colors
A single medium or dark color hides everyday wear better than white. Dusty teal, olive, rust, navy, plum and charcoal work well in frequently handled storage.
For a brighter organizer, use a neutral back panel and contrasting pocket strips. Keep the pocket dividers in the same color as the pocket strip so the seams blend into the fabric.
Dorm-Room Placement Note
Use the organizer for lightweight supplies only. Follow your residence hall’s rules for removable hooks and wall attachments. Avoid placing a loaded organizer directly above a bed, pillow, computer or other area where falling objects could cause injury or damage.
Step-by-Step Crochet Tutorial
Step 1: Make the Foundation Chain
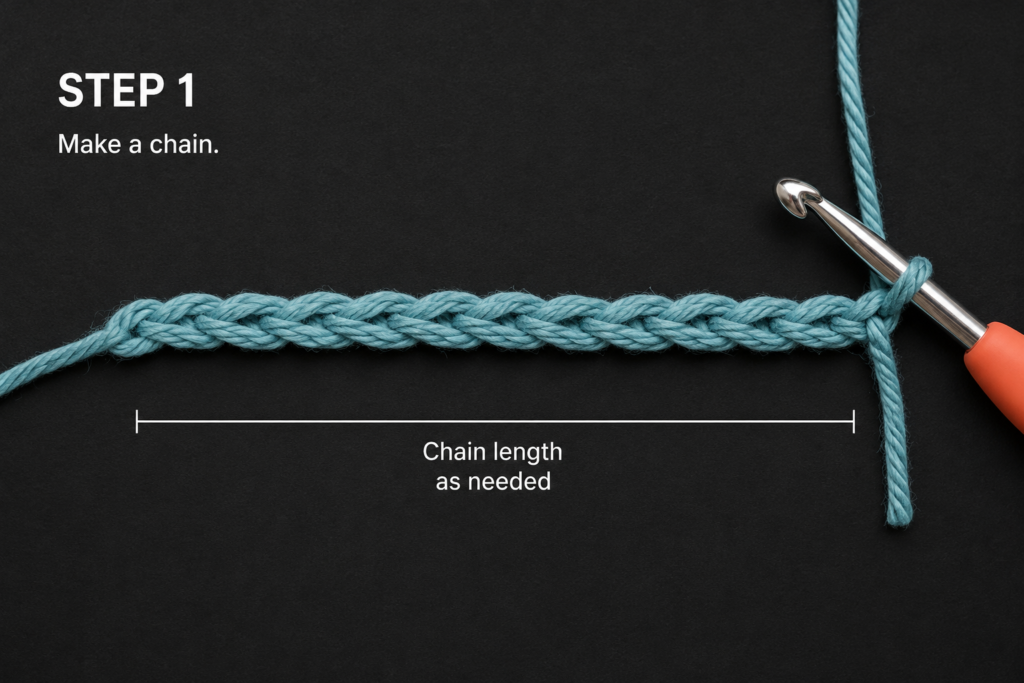
Create a slip knot, place it on your 5.5 mm hook and chain 46.
Lay the chain flat before counting. Count the V shapes along the front of the chain and do not include the active loop on the hook.
The chain should measure approximately 13½–14 inches without being stretched.
Beginner tip:
Place a marker after every tenth chain while counting. Remove the temporary markers before beginning Row 1.
Common mistake to avoid:
Do not tighten the chain by pulling the working yarn after every stitch. A rigid chain can make the bottom edge narrower than the rest of the panel.
Step 2: Crochet the First Trinity Stitch Row
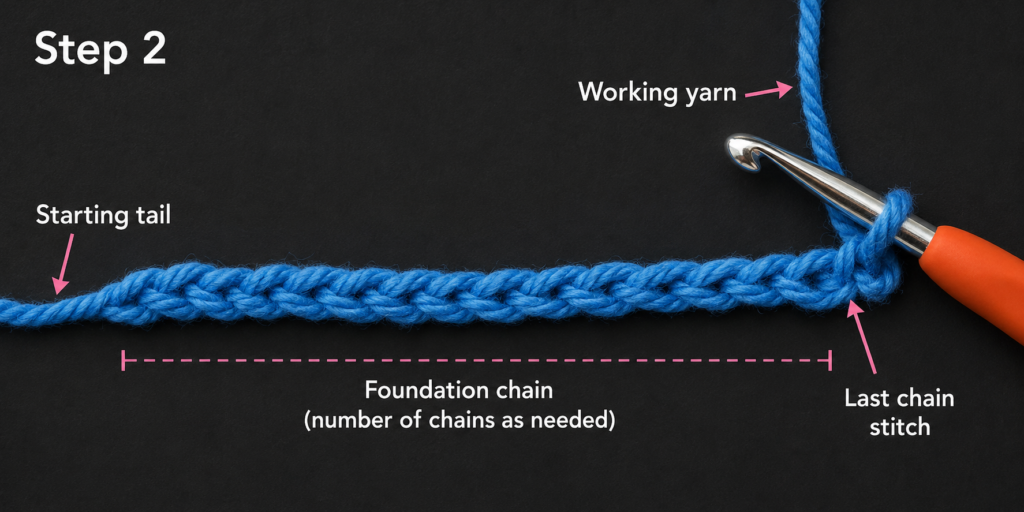
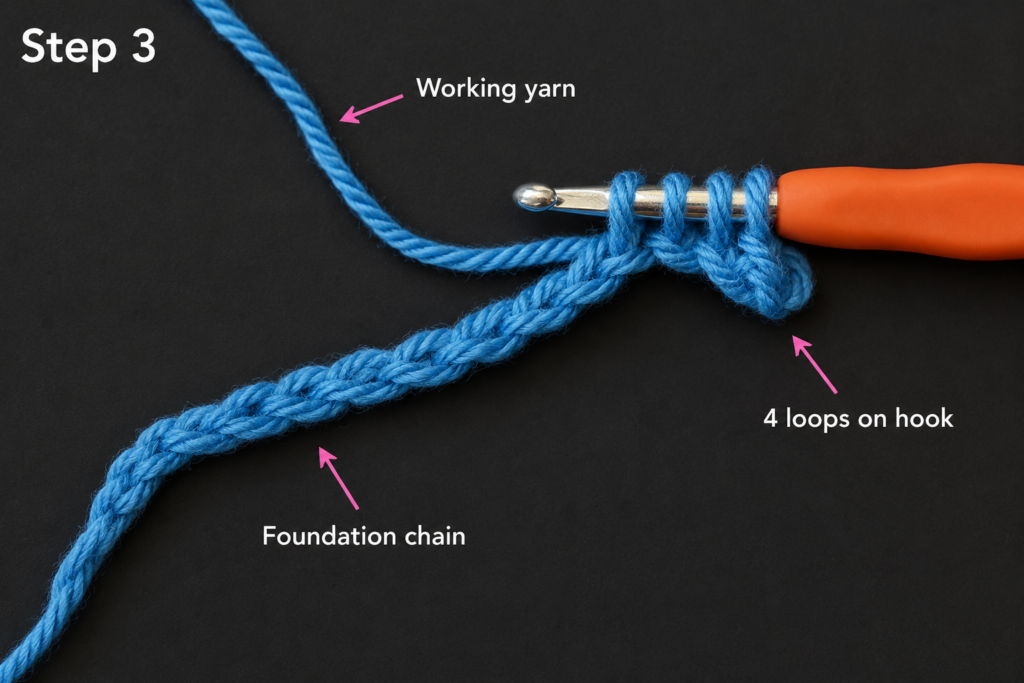
Work one single crochet into the second chain from the hook.
To begin the first cluster:
- Insert the hook back into the same chain that holds the single crochet.
- Yarn over and pull up a loop.
- Insert the hook into the next chain and pull up another loop.
- Insert the hook into the following chain and pull up another loop.
You should now have four loops on the hook.
Yarn over and pull through all four loops. Chain one to complete the cluster.
For the next cluster, begin in the same chain that held the third loop of the previous cluster. Pull up one loop there, then pull up one loop from each of the next two chains. Yarn over and pull through all four loops. Chain one.
Continue across the foundation chain.
For the final cluster, pull through all four loops but do not chain one. Work one single crochet into the same final chain used by the last leg of the cluster.
Chain one and turn. The turning chain does not count as a stitch.
Beginner tip:
Think of each cluster as overlapping the previous cluster. The first insertion point of the new cluster is the final insertion point of the previous cluster.
Common mistake to avoid:
Do not skip the shared insertion point. Skipping it creates large gaps and gradually reduces the panel’s width.
Step 3: Work the Trinity Stitch Repeat Row
After turning, work one single crochet into the first stitch.
Begin the next cluster in that same first stitch. Pull up one loop there, then pull up a loop from each of the next two visible stitch positions. Treat the cluster tops and chain-one spaces as insertion points as they appear across the row.
Yarn over and pull through all four loops. Chain one.
Repeat across. On the final cluster, omit the chain one and finish with a single crochet in the last edge stitch.
Chain one and turn.
Repeat this row throughout the project.
Edge Check
At the end of each row:
- The first and last stitches should both be single crochets.
- Both side edges should remain vertical.
- The clusters should sit in staggered groups without large open holes.
- The number of clusters should remain unchanged.
Beginner tip:
Move the edge markers upward after every row. Do not rely on visual guessing once the textured fabric becomes deeper.
Common mistake to avoid:
The last single crochet is easy to miss because it sits close to the final cluster. Missing it causes one side to slope inward.
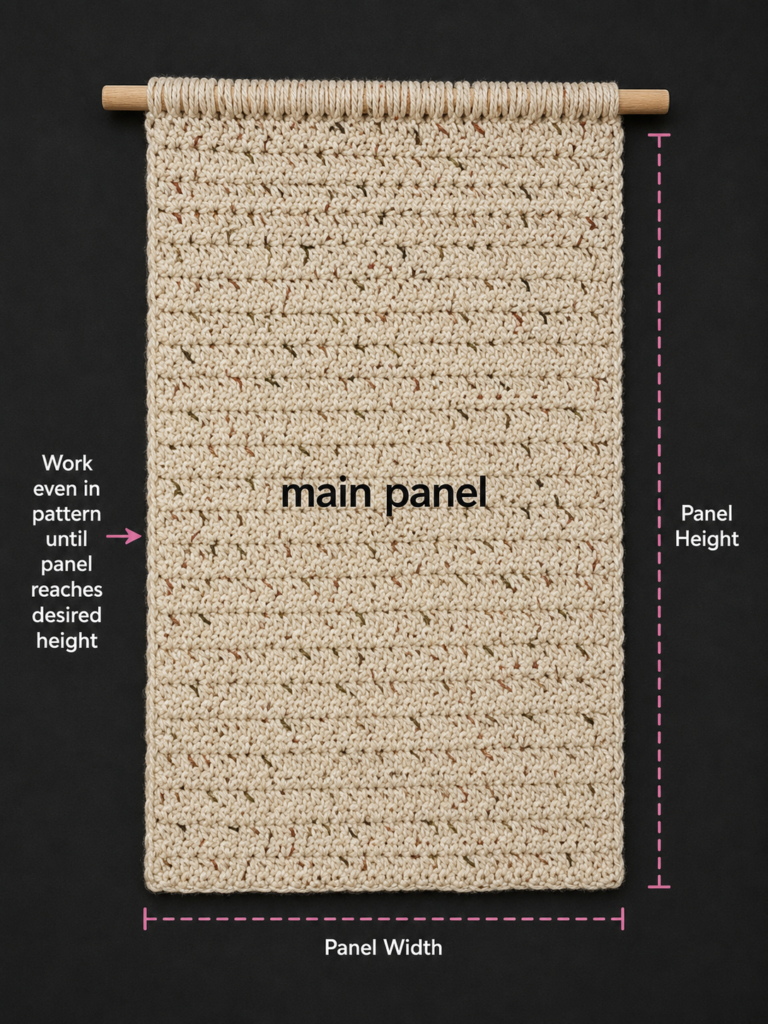
Step 4: Crochet the Main Back Panel
Continue repeating the Trinity stitch row until the panel measures approximately 17 inches from the foundation edge.
This will usually require approximately 46–49 rows, but measure the fabric instead of relying only on row count.
Do not fasten off immediately. Place the panel flat and check that:
- The upper and lower edges are similar in width.
- The two side edges are straight.
- The panel reaches the intended 17-inch length.
- The wooden dowel extends approximately ¼ inch or more beyond each side.
If the panel is too wide for the dowel, use a longer dowel rather than compressing the crochet fabric.
When the panel is complete, cut the yarn while leaving a tail approximately four times the width of the panel. This tail will be used to secure the top edge to the dowel.
Beginner tip:
Measure after every eight to ten rows. Cotton fabric can relax slightly as the piece becomes heavier.
Common mistake to avoid:
Do not stretch the panel while measuring. Lay it flat and smooth it lightly with your hands.
Step 5: Make the Two Pocket Strips
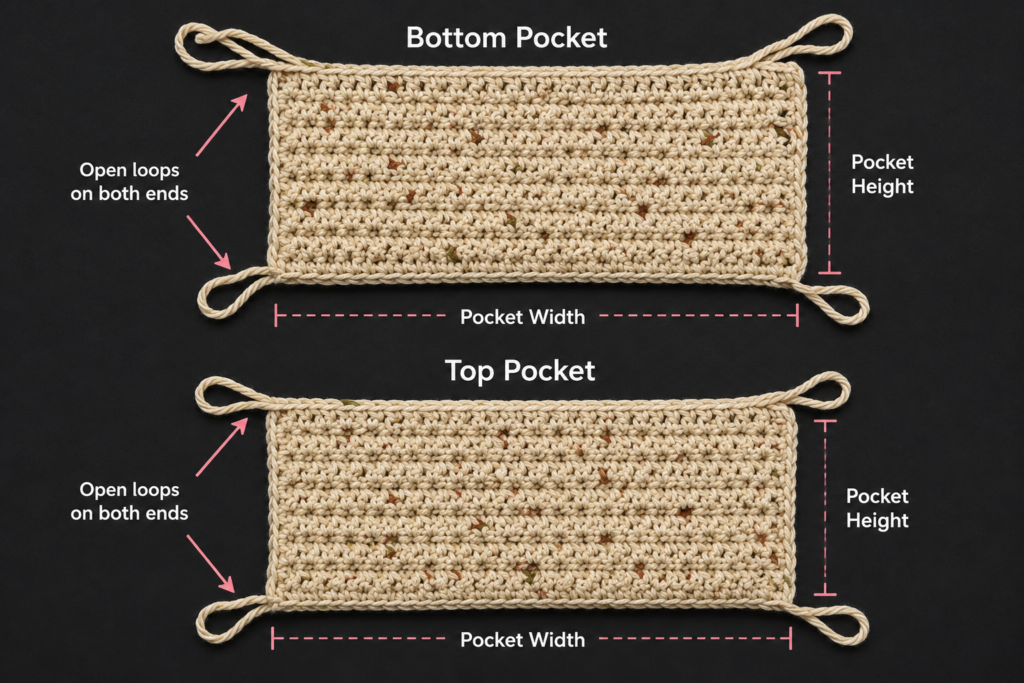
Both pocket strips begin with the same foundation chain as the main panel so their widths match.
Lower Pocket Strip
Chain 46.
Work the Trinity stitch foundation row and repeat row until the strip measures approximately 5½ inches high, usually about 15 rows.
Finish with a single crochet row across the top edge if you want a firmer pocket opening:
- Chain one and turn.
- Work one single crochet in each visible stitch position across.
- Fasten off, leaving a tail approximately three times the strip’s perimeter.
Upper Pocket Strip
Chain 46.
Work Trinity stitch until the strip measures approximately 3¾ inches high, usually about 10 rows.
Add the optional single crochet stabilizing row across the pocket opening.
Fasten off with a long sewing tail.
The three components should now include:
- One 17-inch back panel.
- One deep lower pocket strip.
- One shallow upper pocket strip.
Beginner tip:
Compare each pocket strip to the back panel after the first two rows. If the strip is clearly wider or narrower, correct the tension before completing it.
Common mistake to avoid:
Do not substitute a larger hook for the pocket strips. Looser pockets may sag even when the back panel remains firm.
Step 6: Attach the Main Panel to the Dowel
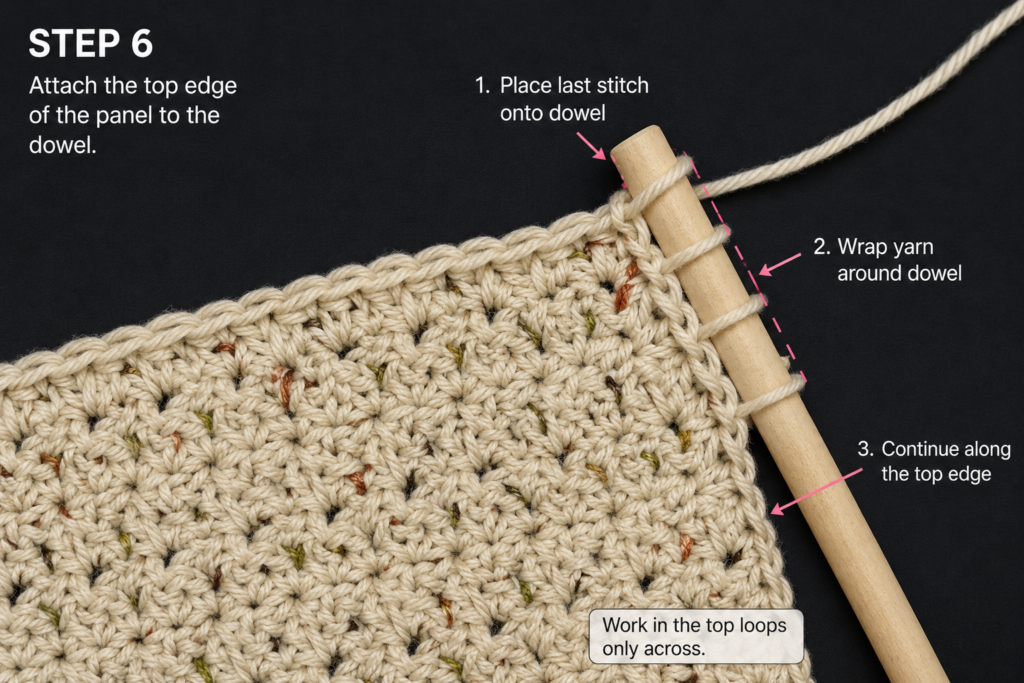
Center the wooden dowel along the top edge of the back panel. Leave an equal amount of dowel extending from each side.
Thread the long top tail through the tapestry needle.
Starting at one corner, pass the yarn through the first top-edge stitch and wrap it over the dowel. Bring the needle behind the dowel, pass it through the next top-edge stitch and wrap again.
Continue across the full top edge. Keep the wraps close enough to support the panel without crowding them together.
For extra strength, reverse direction and work a second pass through the same top-edge stitches.
Secure the yarn at the back with several small stitches and weave the remaining tail into the panel.
Beginner tip:
Place a marker at the center of the panel and another at the center of the dowel before sewing. Match the two markers first.
Common mistake to avoid:
Do not pull the wrapping stitches so tightly that the top edge bunches or narrows.
Step 7: Attach the Lower Pocket Strip
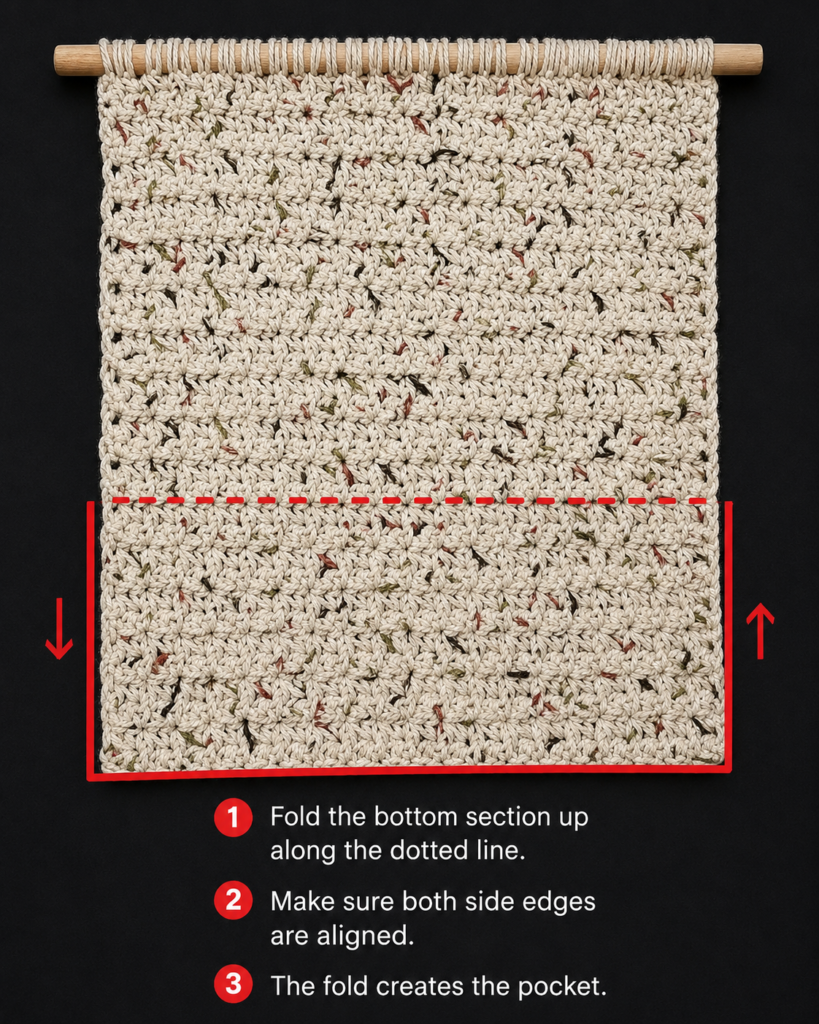
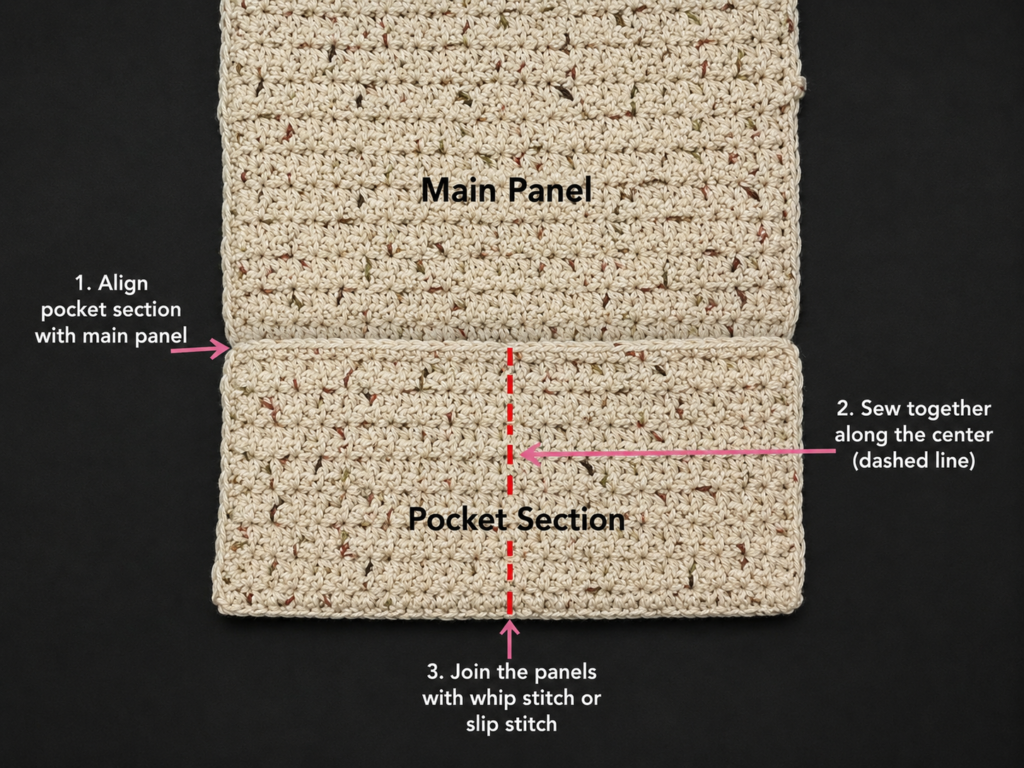
Lay the back panel flat with the right side facing upward.
Position the deep pocket strip along the bottom of the panel. Match the lower corners and side edges.
Use locking markers to hold:
- Both lower corners
- Both upper corners of the strip
- The midpoint of the lower edge
- The midpoint of each side
Thread the long sewing tail through the tapestry needle.
Sew from one upper corner down the side, across the bottom and up the opposite side. Leave the upper edge open.
Use a whipstitch or mattress-style seam. Insert the needle beneath substantial yarn strands on both pieces rather than splitting individual fibers.
The strip should lie flat while empty. It will naturally open forward when an item is inserted.
Beginner tip:
Stop after every few inches and check the back of the panel. The seam should not gather or twist the background.
Common mistake to avoid:
Do not sew across the upper edge. That edge must remain open to form the pockets.
Step 8: Divide the Lower Strip into Two Pockets
Measure the lower strip from side to side and mark the center.
For a 13-inch strip, the center will be approximately 6½ inches from either side. Follow the nearest straight column between the textured clusters rather than forcing the seam through the middle of a raised cluster.
Cut a piece of yarn approximately three times the height of the lower pocket.
Beginning at the bottom edge, sew vertically through both the pocket strip and back panel. Use small, evenly spaced running stitches or a neat backstitch.
At the pocket opening, make two reinforcing stitches in the same location. This point receives extra stress when items are inserted.
Knot discreetly at the back and weave the yarn tail into the background panel.
You now have two deeper lower pockets.
Beginner tip:
Insert a ruler vertically under the intended seam line before sewing. It provides a temporary straight visual guide without marking the yarn.
Common mistake to avoid:
Do not divide the strip by counting only surface clusters unless both halves measure equally. Slight tension variation can shift cluster placement.
Step 9: Attach and Divide the Upper Pocket Strip
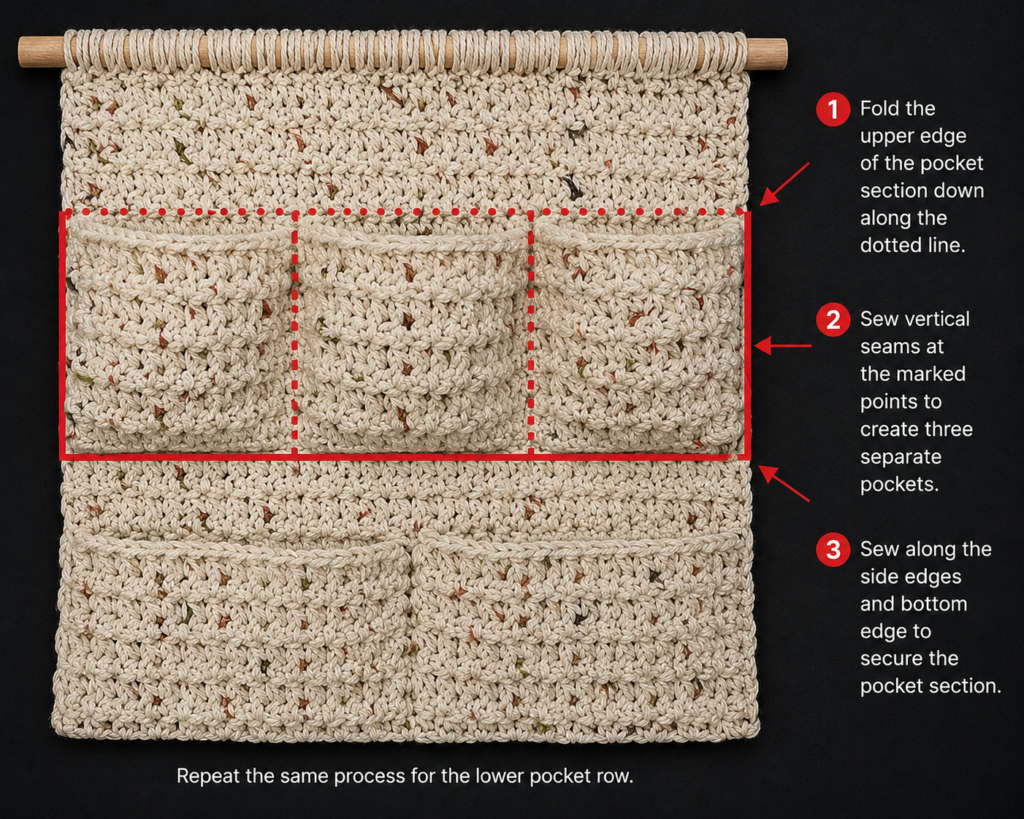
Measure approximately 2 inches above the lower pocket opening and mark a horizontal placement line with stitch markers.
Center the shallow pocket strip on this line. Keep it parallel to the bottom strip.
Attach it by sewing down one side, across the lower edge and up the other side. Leave the top edge open.
Measure the strip into three equal sections. For a 13-inch width, place divider markers at approximately:
- 4⅓ inches from the left edge
- 8⅔ inches from the left edge
Adjust each marker slightly so its seam follows a natural vertical channel in the stitch texture.
Sew two vertical divider seams from the bottom of the pocket strip to its upper opening. Reinforce each opening with an extra stitch.
Beginner tip:
Place pens or similar lightweight objects inside the sections before permanently knotting the divider yarn. This confirms that the pocket widths suit their intended use.
Common mistake to avoid:
Do not place the upper strip so close to the lower strip that neither pocket can open comfortably.
Step 10: Make a Reinforced Hanging Cord
A simple chain can stretch, so this tutorial uses a reinforced chain-and-slip-stitch cord.
Leave a starting tail approximately 12 inches long.
Hold two strands of yarn together and chain 55, or continue until the chain measures approximately 22 inches.
Starting in the second chain from the hook, slip stitch through every chain back to the beginning. Keep the slip stitches relaxed so the cord does not twist.
Fasten off with another 12-inch tail.
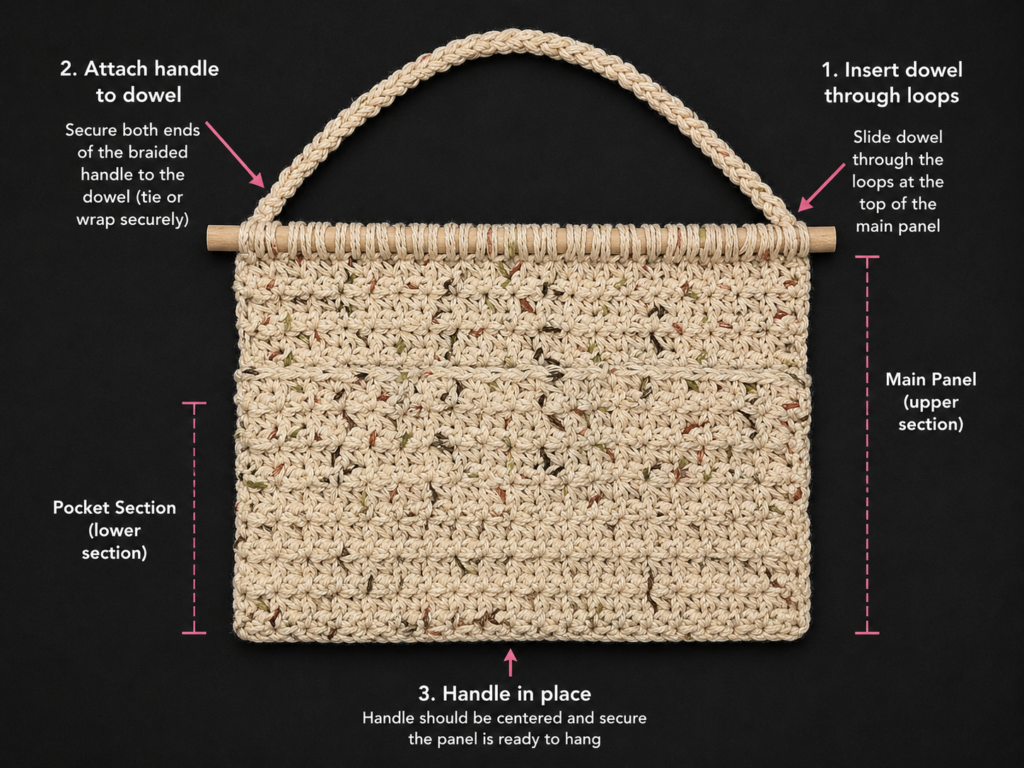
Tie one end securely around the left side of the dowel and the other end around the right side. Before weaving in the tails, lift the organizer and check that the panel hangs level.
Wrap each tail around the base of the cord several times, knot it at the back and weave it through the cord.
Beginner tip:
Count the same number of dowel wraps at both ends so the organizer hangs symmetrically.
Common mistake to avoid:
Do not attach the cord only to the crochet fabric. Attach it directly around the wooden dowel so the dowel carries the load.
Pattern and Stitch Notes
Turning Chain
Chain one at the end of each row. This chain raises the hook to the correct height but does not count as the first stitch.
Place the first single crochet directly into the first actual stitch.
Starting Chain
Each rectangular component begins with an even number of chains.
The sample uses:
- Back panel: chain 46
- Lower pocket strip: chain 46
- Upper pocket strip: chain 46
To change the width, add or remove chains in multiples of two.
Stitch Count
The sample chain produces approximately 22 Trinity clusters across the row, bordered by one single crochet at each edge.
The exact visual count may depend on how you identify cluster tops and chain spaces. The most important checks are:
- The row begins and ends correctly.
- The number of clusters remains constant.
- The panel width does not change.
- The side edges stay straight.
Right Side and Wrong Side
Trinity stitch produces an attractive texture on both sides. Choose the side with the cleaner, more defined clusters as the right side.
Keep the chosen right sides facing outward when attaching the pocket strips.
Size Adjustments
To make the organizer wider:
- Add foundation chains in multiples of two.
- Use a dowel at least ½ inch longer than the finished panel.
- Divide the pocket widths by measurement, not by guessing.
To make it taller:
- Add rows to the back panel.
- Keep at least 2 inches between pocket openings.
- Avoid making the organizer so long that it hangs against a desk surface or floor.
Common Beginner Mistakes
1. Losing the Shared Insertion Point
Problem: Large gaps appear between clusters, and the row becomes narrower.
Fix: Begin each new cluster in the same stitch position used for the final loop of the previous cluster.
2. Forgetting the Last Single Crochet
Problem: One edge slopes inward every few rows.
Fix: Place a locking marker in the final single crochet immediately after making it. Move the marker upward on every row.
3. Adding Chain One After the Final Cluster
Problem: The edge develops a loose loop or extra space.
Fix: Chain one between clusters, but omit it after the final cluster. Finish that final cluster with a single crochet in the last edge position.
4. Making a Tight Foundation Chain
Problem: The bottom of the panel is narrower and curls strongly.
Fix: Remake the chain with looser tension or use a hook 0.5 mm larger for the chain only.
5. Mixing Up Cluster Tops and Chain Spaces
Problem: The texture appears uneven and clusters lean unpredictably.
Fix: Slow down and identify the visible insertion points before pulling up loops. Use a contrasting scrap of yarn to mark the chain-one spaces during the practice swatch.
6. Stretching the Pocket Strips During Assembly
Problem: The background panel gathers after the pocket is sewn on.
Fix: Lay both pieces flat and use several markers before sewing. Do not pull either piece to force the corners to match.
7. Placing Uneven Pocket Dividers
Problem: One compartment is noticeably narrower than the others.
Fix: Measure the total width and mark the divider locations before sewing. Confirm the measurements from both edges.
8. Using Soft, Stretchy Yarn
Problem: The pockets droop after being filled.
Fix: Use firm cotton, cotton-blend cord or another low-stretch yarn. A smaller hook can also create a denser fabric.
9. Pulling Dowel Wraps Too Tightly
Problem: The top edge bunches in the center.
Fix: Wrap firmly enough to support the fabric but allow the panel to remain at its natural width.
10. Overloading the Organizer
Problem: The cord stretches, the pockets deform or the wall attachment loosens.
Fix: Store pens, cables, light toiletries, washcloths and small notebooks rather than heavy books, filled bottles or electronic equipment.
How to Customize This Crochet Project
Change the Yarn
A firm category 4 cotton yarn provides the best balance of texture and structure.
Other possibilities include:
- Recycled cotton
- Cotton-linen blend
- Firm cotton-acrylic blend
- Lightweight macramé cord
- Two strands of category 3 cotton held together
Always make a swatch before substituting yarn. Yarn-weight categories are guidelines rather than guarantees of interchangeability, and the Craft Yarn Council recommends checking gauge when replacing one yarn with another.
Change the Colors
Minimal Dorm Palette
- Warm cream back panel
- Sage green pocket strips
- Natural wooden dowel
Color-Blocked Palette
- Navy back panel
- Rust lower pockets
- Mustard upper pockets
Soft Pastel Palette
- Dusty lavender back panel
- Blush pink pocket strips
- Pale wooden dowel
School-Color Version
Use a neutral background and make each pocket strip in one of the college’s colors.
Change the Pocket Layout
Four Equal Pockets
Make two identical pocket strips and divide each strip in half.
Six Small Pockets
Divide both strips into three compartments. This layout works well for pens, crochet hooks, makeup brushes and cables.
One Large Lower Pocket
Leave the lower strip undivided for a small notebook, rolled scarf or lightweight tablet sleeve. Do not place an unprotected tablet directly in the organizer.
Bedside Organizer
Make the lower strip deeper and use it for tissues, an eye mask and a small paperback. Confirm that the wall attachment and dorm rules permit the intended location.
Add a Border
After completing the back panel, work one round of single crochet around the outer edge before attaching the pockets.
Place:
- One single crochet in each stitch across horizontal edges.
- Approximately one single crochet per row along vertical edges.
- Three single crochets in each corner.
A contrasting border can frame the organizer and make the edges more stable.
Add a Label Loop
Crochet a small chain loop and sew it above one pocket. Thread a removable paper or fabric label through the loop.
Avoid gluing permanent labels directly onto the crochet fabric because adhesive can stiffen or discolor cotton.
Add Decorative Details
Possible additions include:
- Small crochet flowers
- Flat stars
- Initial appliqués
- Tassels attached to the dowel ends
- A narrow surface-crochet line
- Small wooden beads on the hanging cord
Keep embellishments flat and lightweight so they do not interfere with the pocket openings.
Gift Ideas and Uses
The finished organizer can be adapted for:
- College move-in gift
- Graduation gift
- Craft-room storage
- Small bathroom organizer
- Entryway accessory caddy
- Nursery supply organizer
- Home-office pen and cable storage
Finishing Instructions
Weave In Every End
Thread each yarn tail through the tapestry needle.
Weave the tail horizontally through the dense back of several clusters, change direction and pass through another section. Trim only after the tail feels secure.
Avoid cutting directly beside a knot.
Light Blocking
Place the empty organizer on a blocking mat or folded towel.
Shape the panel into a rectangle and align the pocket openings horizontally. Pin the outer corners and pocket corners without overstretching the fabric.
Lightly mist cotton yarn with water and allow it to dry completely.
Blocking helps straighten the panel and settle the seams, but the yarn label’s care instructions should determine the safest method. Lion Brand likewise recommends checking the yarn-care directions before choosing a blocking process.
Test the Hanging Cord
Hang the empty organizer first. Confirm that:
- The dowel is level.
- The cord is centered.
- The panel hangs flat.
- The wall attachment remains secure.
Add lightweight items one at a time. Stop if the cord stretches noticeably or the panel pulls away from the wall.
Washing and Care
Remove the wooden dowel if the construction allows it.
Hand wash or machine wash only according to the yarn label. Reshape the organizer while damp and dry it flat.
Do not hang the organizer while wet because the added water weight can stretch the fabric.
Quick Printable-Style Summary
Project: Five-Pocket Crochet Dorm Room Wall Organizer
Skill level: Easy / Confident Beginner
Finished size: Approximately 13–13½ inches wide by 17 inches tall
Yarn: 450–550 yards of medium-weight cotton
Hook: 5.5 mm
Additional material: 14-inch wooden dowel
Stitches: Chain, single crochet, sc3tog, slip stitch, Trinity stitch
Starting method: Chain 46 for each of the three panels
Back panel: Work Trinity stitch to approximately 17 inches
Lower strip: Work Trinity stitch to approximately 5½ inches
Upper strip: Work Trinity stitch to approximately 3¾ inches
Pocket layout: Three upper pockets and two lower pockets
Hanging cord: Two strands held together, chain 55, slip stitch back across the chain
Finishing: Weave in ends, lightly block, attach to a suitable removable wall hook and load only with lightweight items
FAQ
Is this crochet dorm room decor pattern suitable for an absolute beginner?
A beginner who already understands chains and single crochet can complete it, but making a small Trinity stitch swatch first is strongly recommended. The project contains no shaping, increases or complicated rounds. Most of the work consists of repeating one textured row.
Why is cotton yarn recommended for the wall organizer?
Cotton generally produces a firm fabric with less bounce than many soft acrylic yarns. That structure helps the background remain flat and reduces pocket stretching. A cotton blend can also work if it does not lengthen substantially when pulled.
Can I use acrylic yarn?
Yes, but choose a firm acrylic rather than a soft, draping yarn. Use a smaller hook if necessary and avoid placing heavy objects in the pockets. Make a swatch and hang it vertically overnight to see how much it stretches.
How can I make the organizer wider?
Increase every foundation chain by the same multiple of two. For example, you could change all three panels from chain 46 to chain 54.
Measure the resulting width before buying or cutting the dowel. The dowel should extend beyond both sides of the panel.
Can I make the project without a wooden dowel?
A dowel is the most reliable way to keep the top edge straight. A smooth wooden clothes hanger or lightweight metal rod may work, but check that it has no sharp areas that could damage the yarn.
Hanging the organizer from crochet loops alone can cause the upper corners to stretch inward.
How much weight can the organizer hold?
There is no universal weight rating because capacity depends on the yarn, seams, cord, dowel and wall attachment. Treat it as lightweight storage rather than a shelf.
Pens, cables, washcloths, lightweight toiletries and a thin notebook are reasonable examples. Avoid heavy books, large filled bottles, glass containers and valuable electronics.
How do I stop the pocket openings from stretching?
Work one single crochet row across each pocket opening. You can also surface crochet a slip-stitch line across the upper edge after assembly.
Use a smaller hook for the stabilizing row if the edge remains loose.
Why is my Trinity stitch panel becoming narrower?
The most common reasons are:
- Missing the shared first insertion point of a cluster
- Forgetting the final single crochet
- Skipping a chain-one space
- Beginning the next row in the wrong stitch
Mark the first and last single crochet of every row and count the clusters regularly.
Can I sell organizers made from this tutorial?
This article presents an original project design and does not restrict the sale of handmade finished organizers. Use your own finished-project photography and product wording. Do not reuse or republish the copyrighted reference images from the selected source.
Conclusion
A wall organizer is one of the most practical crochet dorm room decor patterns because it adds handmade texture while creating storage in otherwise unused vertical space. Once you understand the overlapping Trinity stitch clusters, the three panels become a relaxing repetition project.
Keep the first version simple, test the pockets with lightweight supplies and then adapt the dimensions or color layout for a desk area, bathroom corner or bedside wall. Save the tutorial with your back-to-school crochet ideas so the measurements, image plan and assembly sequence are easy to find later.





