A handmade pumpkin may look like a shaped amigurumi project, but this beginner version starts with something much simpler: one flat rectangle.
You will crochet the rectangle in back-and-forth rows, join its short ends to make a tube, gather the bottom, add stuffing, and close the top. A few shaping stitches create the familiar pumpkin lobes, and a small green rectangle becomes the stem.
There are no increases, decreases, magic rings, or complicated round counts in the pumpkin body. You only need to recognize basic stitches, count to 18, and keep the edges of a rectangle reasonably straight.
The ribbed texture comes from working half double crochet stitches through the back loop only. That technique leaves one loop visible on the surface and forms raised lines that naturally resemble pumpkin sections.
This crochet pumpkin pattern for beginners includes guidance for every stage, from choosing yarn and counting the foundation chain to controlling the stuffing and securing the stem.
What You’ll Learn
By completing this project, you will practice how to:
- Make and count a foundation chain
- Crochet half double crochet in rows
- Identify the front and back loops of a stitch
- Work through the back loop only
- Keep a consistent stitch count
- Measure a crochet rectangle
- Sew a simple whip-stitch seam
- Gather a crochet edge with running stitches
- Stuff a soft sculpture evenly
- Shape pumpkin lobes
- Make and attach a small crochet stem
- Fasten off and conceal yarn ends
Finished Size
Using the recommended yarn and hook, the finished pumpkin should measure approximately:
- Height without stem: 4–4.5 inches
- Width at the fullest point: 5–5.5 inches
- Stem height: Approximately 1.5–2 inches
The final measurements will vary slightly according to yarn thickness, tension, and the amount of stuffing.
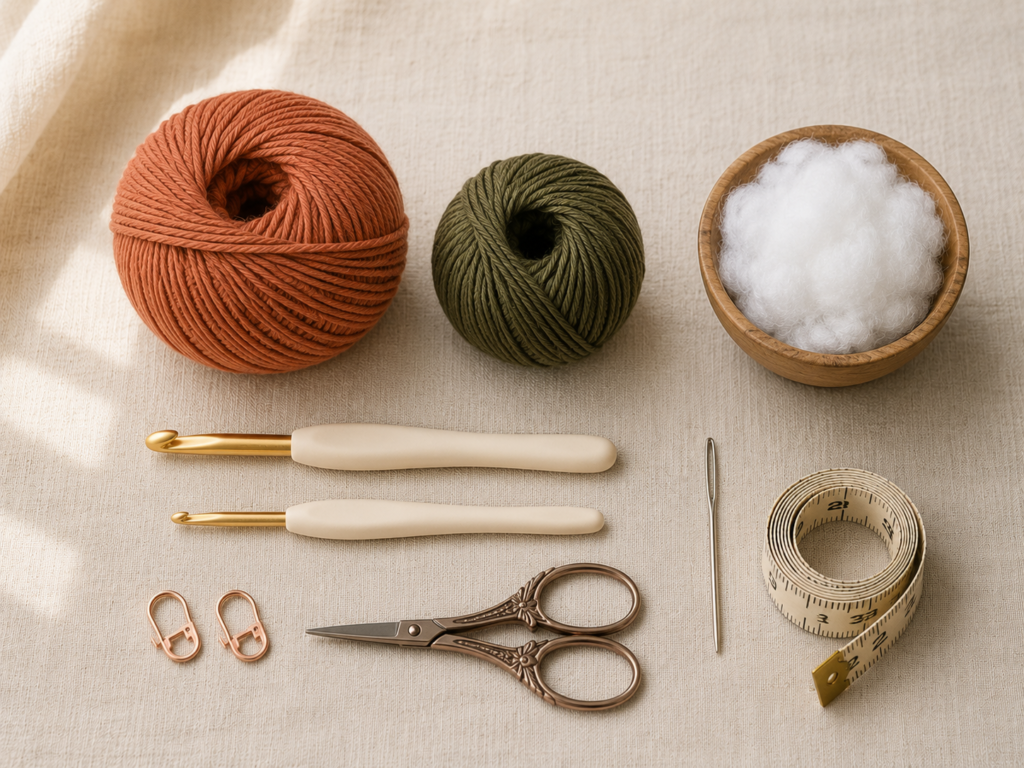
Materials You’ll Need
Pumpkin body
- Approximately 90–120 yards of category 4 medium-weight yarn
- Muted terracotta, burnt orange, cinnamon, cream, or another pumpkin color
- 5 mm crochet hook
Stem
- Approximately 8–12 yards of category 4 yarn in olive, brown, sage, or dark green
- 4 mm crochet hook for a slightly firmer stem
Additional supplies
- Polyester fiberfill
- Blunt tapestry needle
- Small scissors
- Flexible measuring tape
- Two locking stitch markers
- Optional straight pins for positioning the stem
Category 4 yarns fall within the medium yarn-weight family, although the exact hook required depends on the fiber, construction, and desired fabric. For this stuffed project, the 5 mm hook creates a slightly firmer fabric than a loose accessory would normally require.
Crochet Abbreviations Used
This tutorial uses US crochet terminology.
- ch = chain
- hdc = half double crochet
- sc = single crochet
- sl st = slip stitch
- st/sts = stitch/stitches
- BLO = back loop only
- rep = repeat
- RS = right side
- WS = wrong side
In UK terminology, US half double crochet is called half treble crochet, and US single crochet is called double crochet. The Craft Yarn Council maintains a terminology comparison and standardized abbreviation list.
Before You Start
Gauge and tension
Exact gauge is not critical because this is a stuffed decoration rather than a fitted garment. What matters is producing fabric that is:
- Firm enough to hide the stuffing
- Flexible enough to gather at the top and bottom
- Even enough that the rectangle does not flare outward
A useful target is approximately 13–14 half double crochet stitches across 4 inches, but your rectangle’s physical measurements are more important than matching that number exactly.
When you stretch the fabric gently, you should not see large openings between the stitches. Switch to a 4.5 mm hook if the fabric is too loose. Move to a 5.5 mm hook if your hands feel strained or the rectangle becomes unusually stiff.
How to count the stitches
Each half double crochet has a V shape at the top. Count those V shapes rather than the vertical posts on the front of the fabric.
Your turning chain does not count as a stitch in this pattern. After every row, you should still have 18 half double crochet stitches.
Place one marker in the first stitch and another in the final stitch of the row. Move the markers upward after each row until you can recognize both edge stitches confidently.
How to keep the edges straight
The most common reason a beginner rectangle narrows is accidentally missing the last stitch. That stitch may lean toward the side and look smaller than the others.
Before turning, count all 18 stitch tops. After turning, work into the first actual stitch directly below the hook. Do not place a half double crochet into the turning chain.
How to avoid excessive curling
A small amount of curling is normal in back-loop-only crochet. Severe curling usually comes from:
- Pulling the foundation chain too tightly
- Using a hook that is too small
- Crocheting the turning chain very tightly
- Changing tension between rows
Make the foundation chain loosely. You can also make the chain with a 5.5 mm hook and switch to the 5 mm hook for Row 1.
Choosing colors
Classic orange is not required. Soft neutral pumpkins work especially well in modern fall decor. Suitable combinations include:
- Terracotta body with olive stem
- Oatmeal body with dark brown stem
- Mustard body with forest-green stem
- Dusty blue body with tan stem
- Cream body with rust stem
- Sage body with cinnamon stem
Select one body color and one contrasting stem color so the construction remains clear in your tutorial photography.
Step-by-Step Crochet Tutorial
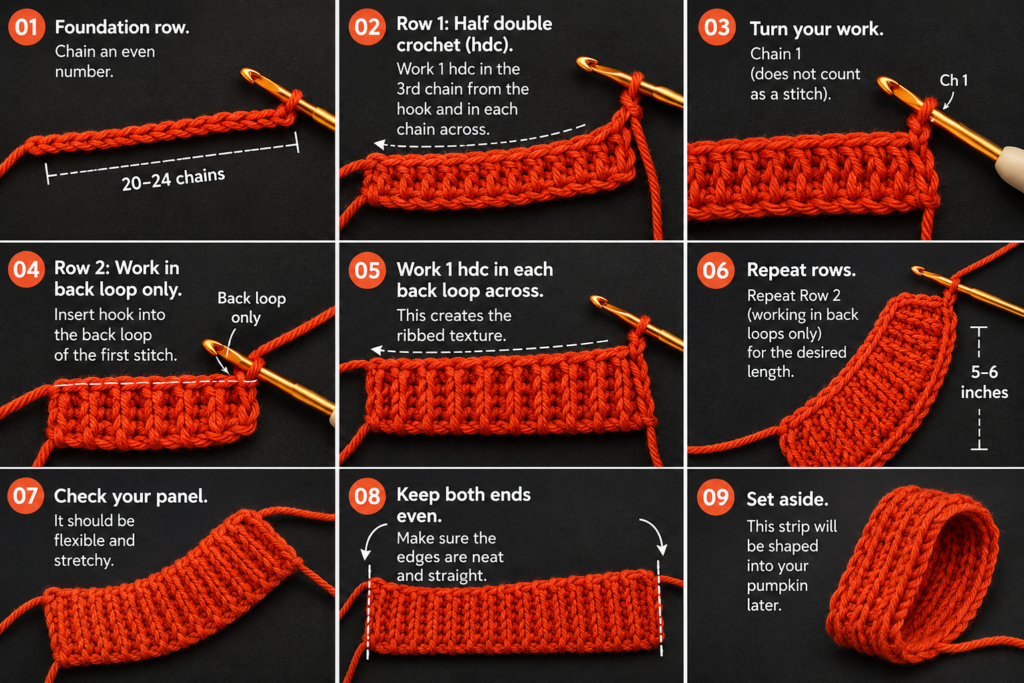
Step 1: Make the Foundation Chain
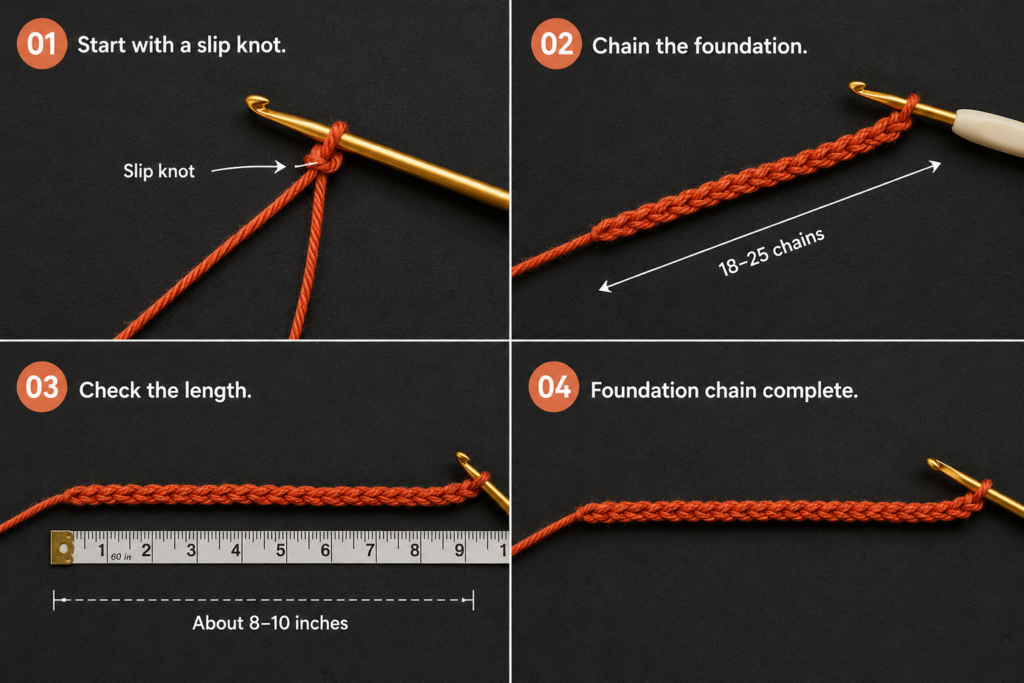
Leave a yarn tail approximately 30–36 inches long before making your slip knot. You will use this long tail later to gather one end of the pumpkin.
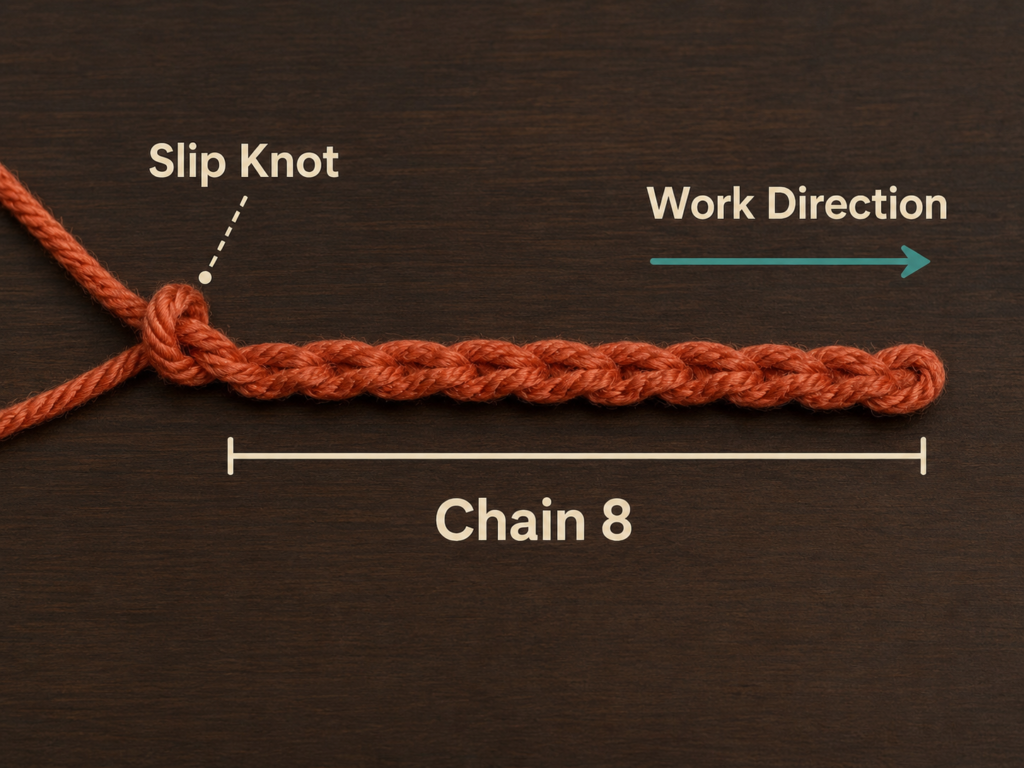
With the 5 mm hook, chain 19.
Do not count the loop currently on the hook as a chain. Beginning at the hook, count the V shapes down the chain until you have 19.
Hold the chain horizontally and check that it is not twisted. It should resemble a loose cord rather than a tight braid.
Beginner tip:
Keep the working loop large enough to move smoothly along the hook shaft. A loop squeezed tightly around the narrow hook throat makes every following chain harder to form.
Common mistake to avoid:
Do not tighten the foundation chain by pulling forcefully on the working yarn after every chain. A tight foundation creates a stiff edge that may distort the rectangle.
Step 2: Crochet the First Row
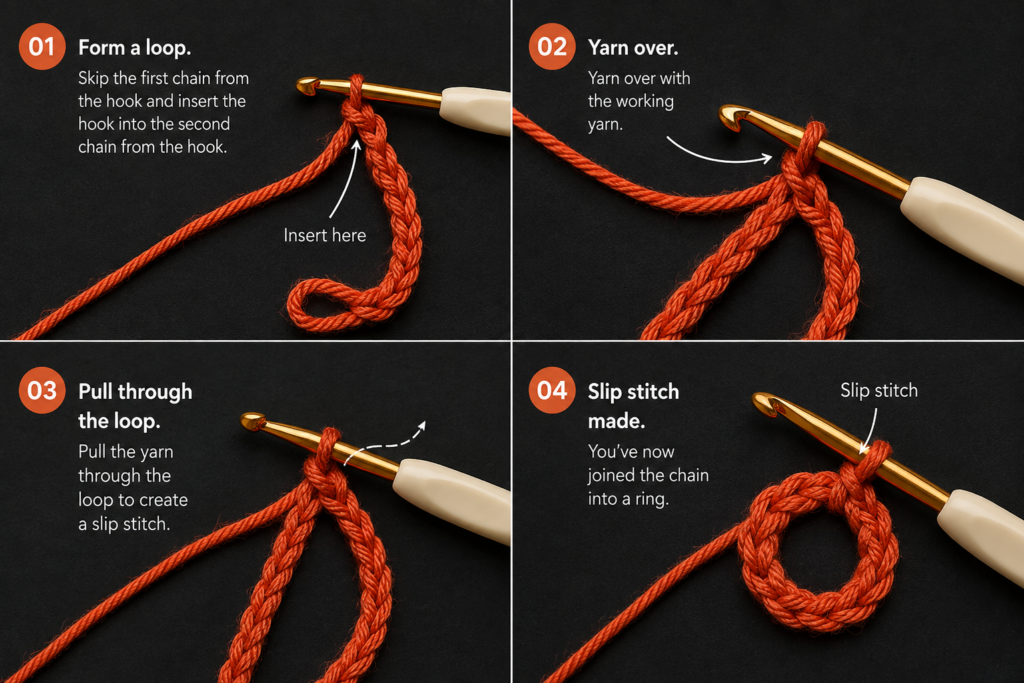
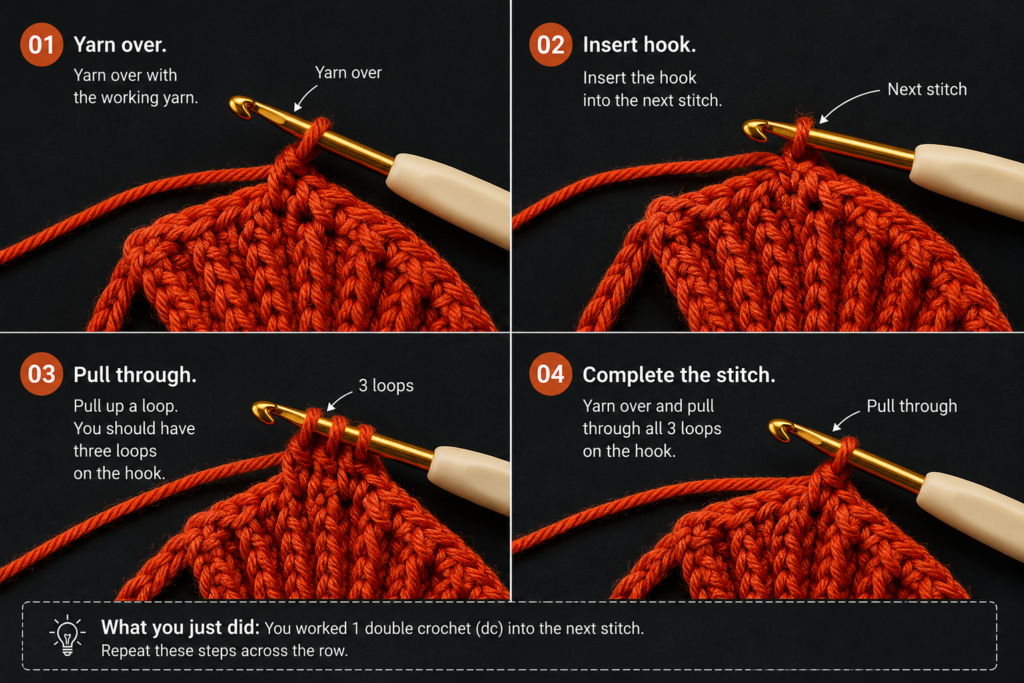
Yarn over once.
Insert the hook into the second chain from the hook. Yarn over and pull up a loop. You should now have three loops on the hook.
Yarn over again and draw the hook through all three loops. You have completed one half double crochet.
Work one half double crochet into each remaining chain.
At the end of the row, count 18 hdc.
This first row forms one short side of the finished rectangle. Its width will become the approximate height of the pumpkin.
Beginner tip:
Turn the chain slightly toward you so you can see each target chain clearly. Work slowly across the first row because this is usually the most awkward row of the project.
Common mistake to avoid:
Do not work into the loop on the hook. Begin in the second actual chain below the hook.
Step 3: Begin the Back-Loop Ribbing
Chain 1 and turn the work. The chain 1 lifts the hook to the correct working height, but it does not count as a stitch.
Look at the top of the first half double crochet. You will see two loops:
- The front loop is nearest you.
- The back loop is farthest from you.
Yarn over, insert the hook through the back loop only, and complete a half double crochet.
Continue working one hdc BLO in every stitch across.
Count 18 hdc BLO.
Working into only the back loop leaves the front loop visible. As you repeat the row, these unused loops create raised horizontal ridges across the rectangle. Once the rectangle is assembled, those ridges become vertical pumpkin ribs.
Beginner tip:
Tilt the top edge toward the camera or toward your eyes. The separation between the two loops becomes much easier to see.
Common mistake to avoid:
Do not insert the hook beneath both top loops. That creates a normal half double crochet and interrupts the ribbing.
Step 4: Continue the Ribbed Rows
Repeat the following row:
Chain 1, turn, hdc BLO in each stitch across. — 18 sts
Continue until the rectangle measures approximately 13 inches long.
Depending on your row gauge, this may require approximately 28–34 rows. Measure the fabric instead of relying only on the row number.
Move your stitch markers into the first and last stitches after each row. Count periodically so a missed edge stitch does not remain unnoticed for several rows.
The rectangle may appear lightly accordion-shaped. That is desirable. The ridges should be distinct but not so stiff that the fabric cannot be gathered.
Beginner tip:
Pause every five rows and compare the two long edges. They should remain parallel.
Common mistake to avoid:
Do not accidentally work into the turning chain at the end of a row. Doing so increases the stitch count and causes one edge to flare.
Step 5: Check the Rectangle Proportions
Lay the rectangle flat without stretching it.
The recommended dimensions are approximately:
- Short edge: 5–5.5 inches
- Long edge: 12.5–13.5 inches
A useful sizing rule is to make the long edge approximately 2.3–2.5 times the short edge.
For example:
- A 4-inch short edge needs a long edge of about 9.5–10 inches.
- A 6-inch short edge needs a long edge of about 14–15 inches.
- An 8-inch short edge needs a long edge of about 19–20 inches.
A slightly longer rectangle creates a fuller, wider pumpkin. A shorter rectangle creates a narrower pumpkin.
After reaching the correct length, fasten off and leave another 30–36-inch yarn tail. You should now have one long tail at each end of the rectangle.
Beginner tip:
Measure along the center of the rectangle instead of a curled outer edge.
Common mistake to avoid:
Do not stretch the ribs flat while measuring. Measure the fabric in its relaxed state.
Step 6: Join the Rectangle Into a Tube
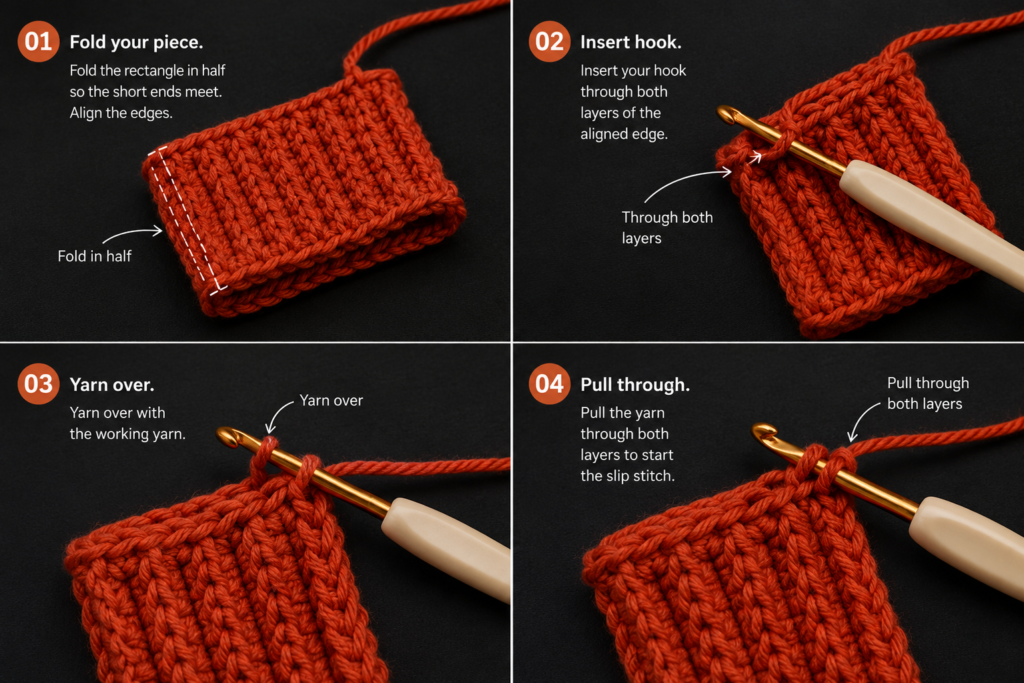
Place the rectangle with the ribbed right side facing upward.
Bring the two short ends together. Fold the rectangle so the right side is inside and the wrong side faces outward.
Thread one long tail onto the tapestry needle.
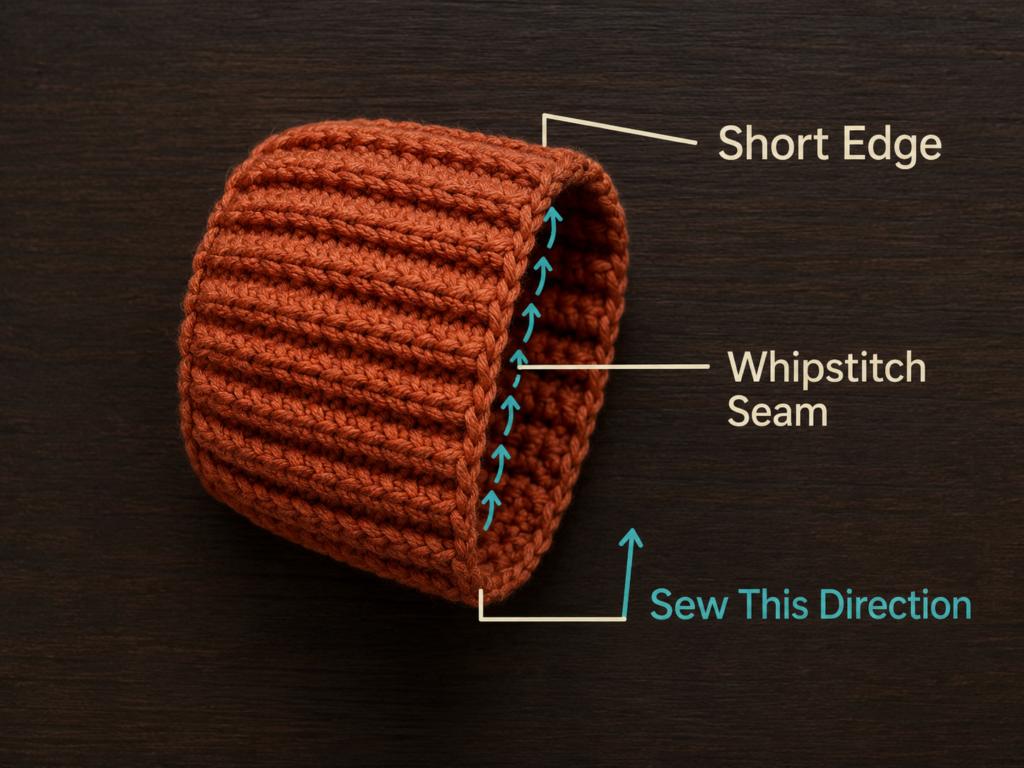
Beginning at one long edge, sew the short ends together with a whip stitch. Pass the needle through one row-end loop on the front layer and the corresponding row-end loop on the back layer.
Continue across the seam, matching the rows as evenly as possible.
Pull each stitch until the edges meet, but do not pull so tightly that the seam puckers.
Secure the yarn with two small stitches at the end. Do not cut the remaining tail.
You now have an open crochet tube.
Beginner tip:
Place a locking marker through the first pair of corners and another through the last pair. This prevents the edges from shifting while you sew.
Common mistake to avoid:
Do not offset the two short edges by one or two rows. Misaligned rows create a spiral seam and uneven ribs.
Step 7: Gather and Close the Bottom
Keep the tube wrong side out.
Use the same yarn tail and sew a running stitch around the nearest open edge. Place the needle approximately ¼ inch below the edge and pass it in and out through every one or two row-end spaces.
Continue until you return to the starting point.
Pull the tail gradually. The edge will gather into small pleats.
Once the opening is nearly closed, pass the needle across the center several times, catching opposite sides of the gathered edge. Pull securely and make two small anchoring stitches.
A tiny remaining hole is acceptable because it will be hidden at the bottom.
Weave the tail through the inside of the fabric, but do not trim it extremely close to the knot.
Turn the tube right side out.
Beginner tip:
Pull the gathering yarn in several small stages. This distributes the pleats more evenly and places less stress on the yarn.
Common mistake to avoid:
Do not sew the running stitches directly through loose edge fibers. Pass through substantial row-end spaces so the gathering yarn cannot tear free.
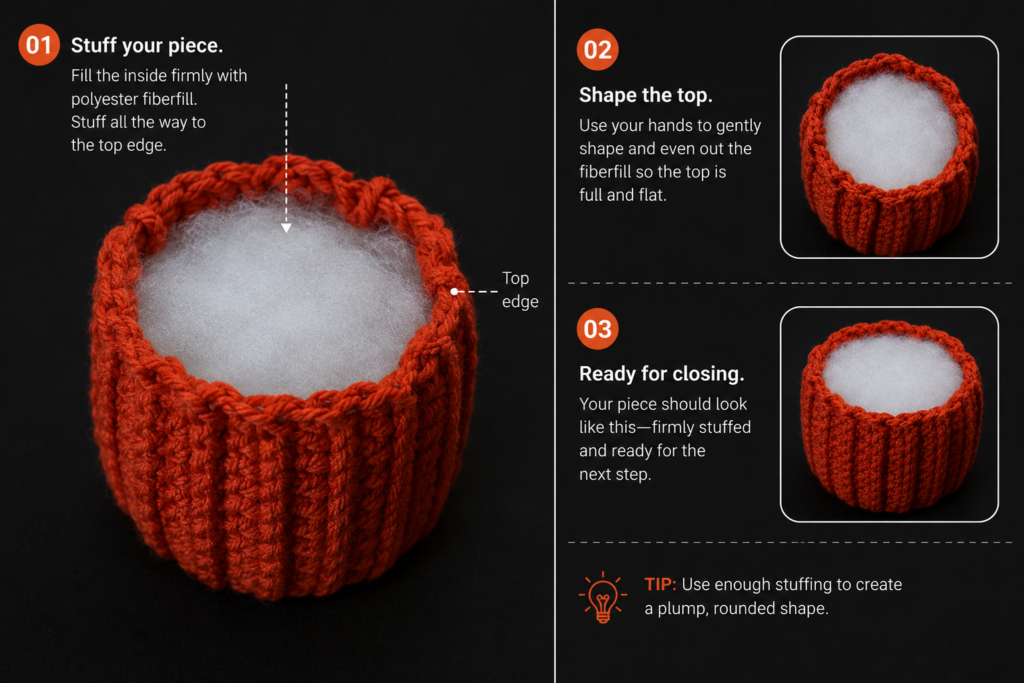
Step 8: Add the Stuffing
Begin with small pieces of fiberfill.
Place the first pieces against the closed bottom and outer walls. Continue adding small tufts around the sides before filling the center.
Rotate the pumpkin as you work so the stuffing remains evenly distributed.
The body should feel plump and hold its shape when placed on the table. It should not feel as hard as a ball. Overstuffing stretches the stitch openings and makes the top difficult to close.
Before closing the pumpkin, check for:
- Empty pockets near the bottom
- A flat side near the seam
- Lumps caused by large stuffing pieces
- Visible white fiber between stitches
Remove or redistribute the filling as needed.
Beginner tip:
Use the blunt end of the crochet hook to guide small pieces into shallow corners. Do not push the metal hook tip aggressively into the fabric.
Common mistake to avoid:
Do not insert the entire amount of stuffing as one compact clump. Separate it into thin, airy pieces first.
Step 9: Gather and Close the Top
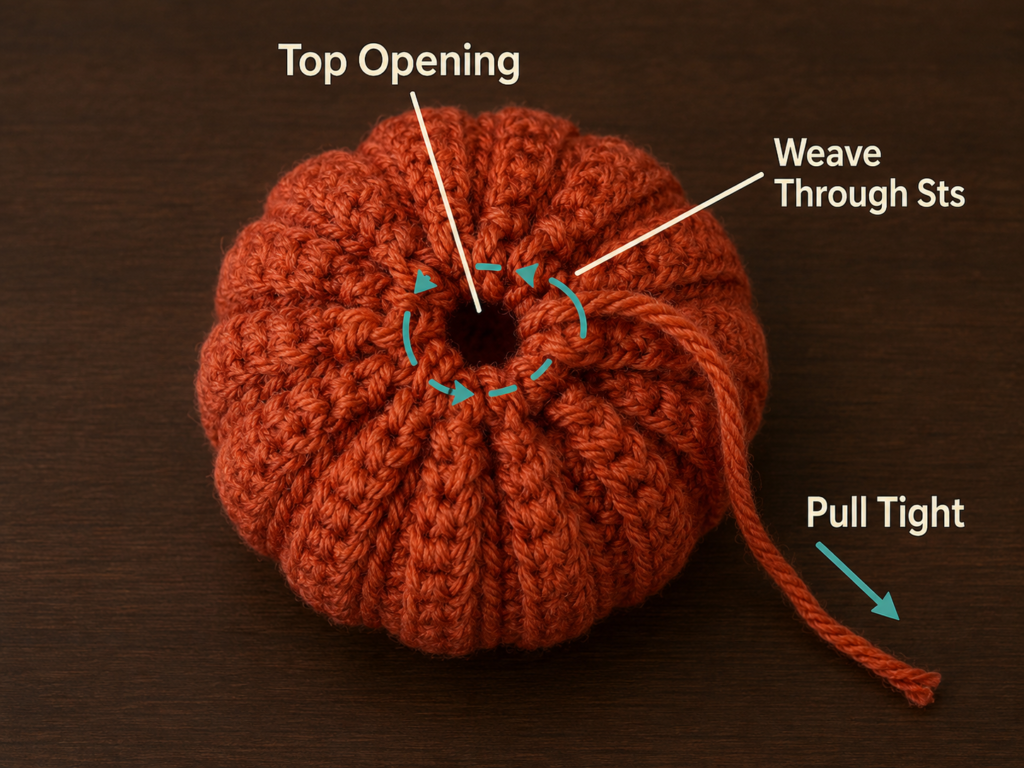
Thread the second long tail onto the tapestry needle.
Sew a running stitch around the open top using the same method as the bottom. Keep the stitches even and approximately ¼ inch below the edge.
Before pulling the yarn completely, check the stuffing one final time.
Pull the gathering yarn until the opening is approximately ½ inch wide. Leave enough space to insert the stem.
Pass the needle across the gathered opening two or three times to stabilize it. Do not permanently close the hole.
Anchor the yarn on the underside of the gathered edge.
Beginner tip:
Keep the stem opening centered. Adjust the gathered folds with your fingers before securing the yarn.
Common mistake to avoid:
Do not leave a large opening and expect the stem to hide it. The stem should sit inside a small stable center rather than cover a loose gap.
Step 10: Shape the Pumpkin Sections
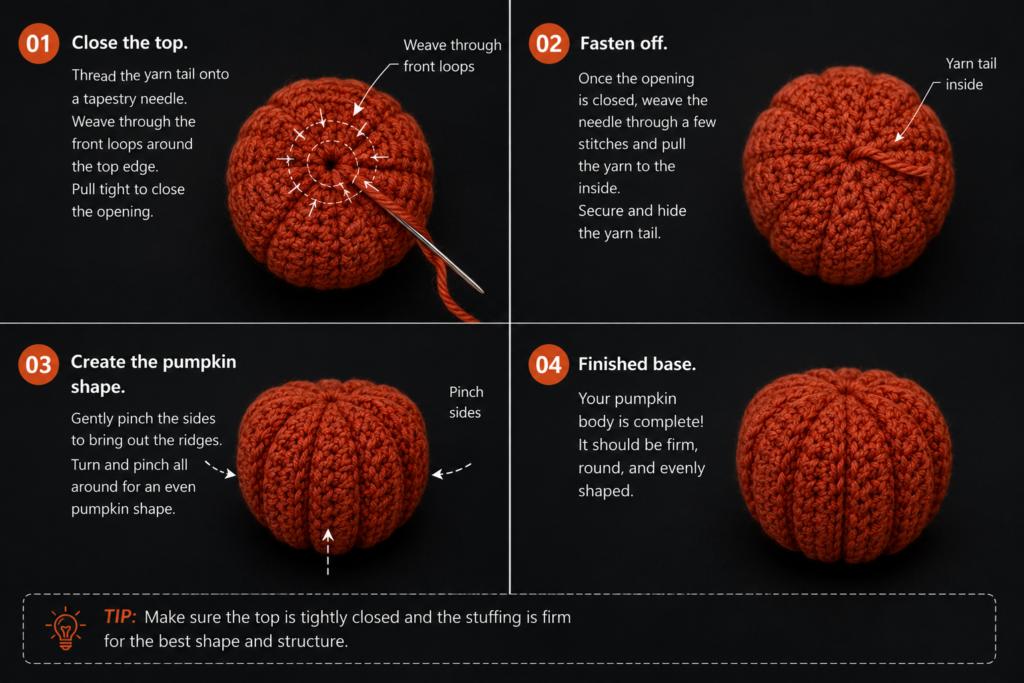
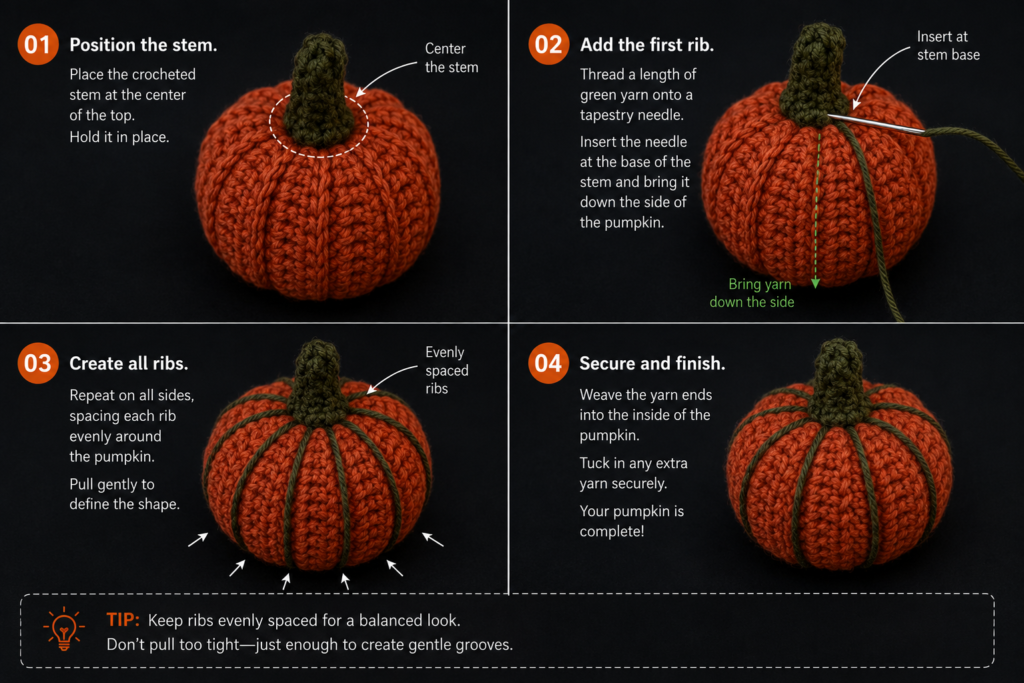
The ribbed fabric already suggests natural pumpkin sections, but shaping strands create a stronger pumpkin silhouette.
Cut approximately 60 inches of matching terracotta yarn and thread it onto the tapestry needle. Knot the end securely.
Insert the needle through the bottom center and bring it out through the top center.
Lay the yarn along one rib groove on the outside of the pumpkin. Insert the needle through the bottom center again and bring it out through the top.
Pull gently until the strand settles into the rib groove and creates a shallow indentation.
Repeat around the pumpkin to create five or six sections. Space the shaping strands evenly.
Do not pull each strand as tightly as possible. The goal is a rounded pumpkin with shallow grooves, not a hard segmented ball.
After the final section, pass the needle from top to bottom one more time. Secure the yarn at the bottom and bury the tail inside the pumpkin.
Massage the stuffing between the sections until the lobes appear balanced.
Beginner tip:
Use the visible rib lines as placement guides. This keeps the shaping yarn hidden naturally.
Common mistake to avoid:
Do not pull one section much tighter than the others. Compare the shape after every pass.
Step 11: Crochet the Stem
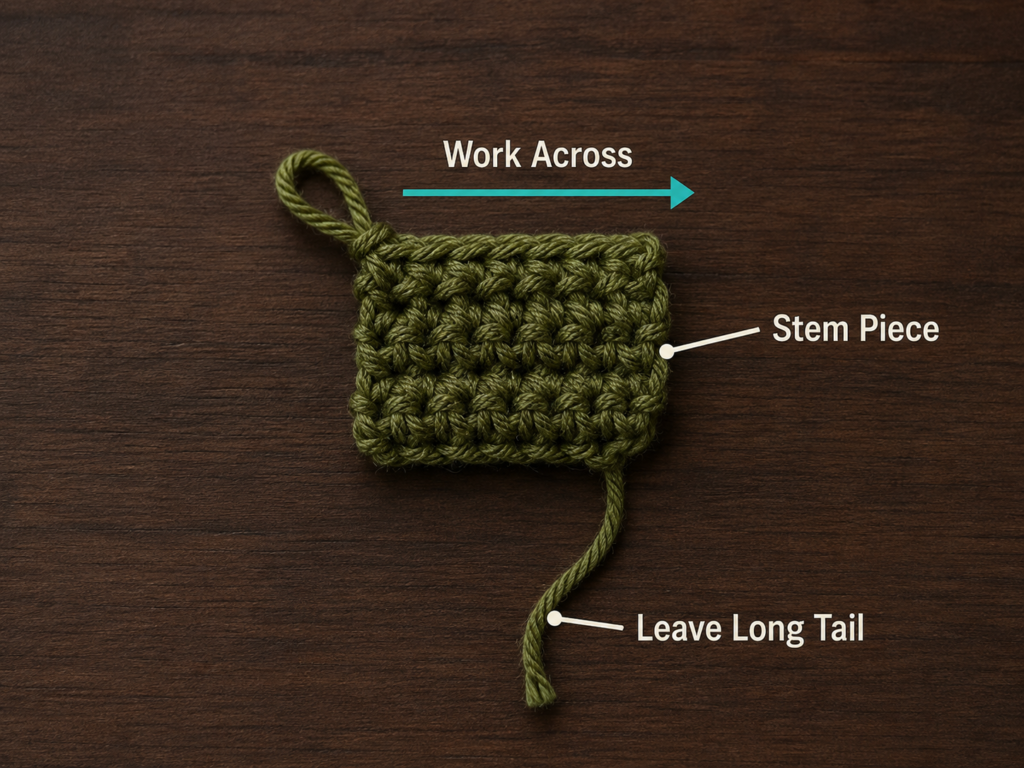
Switch to deep olive-green yarn and a 4 mm hook.
Leave a 15-inch starting tail and chain 6.
Stem Row 1
Work one single crochet in the second chain from the hook and in each remaining chain.
You should have 5 sc.
Stem Rows 2–4
Chain 1 and turn.
Work one single crochet in each stitch across.
You should have 5 sc after every row.
Fasten off and leave another 15-inch tail.
The small rectangle should feel firmer than the pumpkin body. If it is very soft, use a 3.5 mm hook or add one more row.
Beginner tip:
Count the five stitch tops before beginning each new row. Small pieces can lose edge stitches easily.
Common mistake to avoid:
Do not make the stem too wide. A large stem can overwhelm the pumpkin and may be difficult to secure inside the gathered opening.
Step 12: Fold and Attach the Stem
Fold the green rectangle in half lengthwise so the long edges meet.
Thread one tail onto the tapestry needle. Whip stitch the long edges together to form a narrow folded stem.
You can leave the bottom open. If the stem collapses, insert a small roll of green yarn scraps. Avoid inserting wire if the pumpkin may be handled by children.
Place the open base of the stem into the ½-inch opening at the top of the pumpkin.
Use one stem tail to sew around the base. Pass the needle alternately through the pumpkin’s gathered edge and the bottom of the stem.
Rotate the pumpkin as you work and make small stitches on every side.
Use the second tail for another round of attachment stitches. This prevents the stem from leaning loosely to one side.
Secure both tails and bury them inside the pumpkin.
Bend the upper part of the stem gently to create a natural curve.
Beginner tip:
Pin the stem temporarily in position before sewing. Look at the pumpkin from the front and side to confirm the angle.
Common mistake to avoid:
Do not attach the stem with only one large stitch through the center. Several small stitches around the base are much more stable.
Pattern Notes and Stitch Notes
Turning chain
Chain 1 at the beginning of every half double crochet or single crochet row.
The chain 1 does not count as a stitch.
Pumpkin stitch count
Maintain 18 half double crochet stitches in every pumpkin-body row.
If your count changes:
- Seventeen stitches means an edge stitch was probably missed.
- Nineteen stitches means the turning chain may have been treated as a stitch.
- An uneven edge can also result from placing two stitches in the same edge stitch.
Rectangle repeat
After Row 1, repeat:
Ch 1, turn, hdc BLO in every stitch across. — 18 sts
Continue until the long edge measures approximately 2.3–2.5 times the short edge.
Right side and wrong side
The ribbing looks similar on both sides. Choose the cleaner-looking surface as the right side before sewing.
The visible assembly seam should remain on the inside when the tube is turned right side out.
Size adjustment
To make a different size:
- Chain until the foundation is slightly taller than the desired finished pumpkin.
- Complete the first row.
- Measure the short edge.
- Continue rows until the long edge measures roughly 2.3–2.5 times the short edge.
- Assemble using the same method.
For a flatter, wider pumpkin, increase the long-edge ratio to approximately 2.6–2.8.
For a taller pumpkin, reduce the ratio to approximately 2–2.2.
Common Beginner Mistakes
1. The rectangle becomes narrower
Cause: The final stitch is being skipped.
Fix: Mark the first and last stitch of every row. Count 18 stitches before turning.
2. One edge becomes wider
Cause: The turning chain is being worked as an extra stitch.
Fix: Remember that chain 1 does not count. Work the final hdc in the final marked stitch, not in the turning chain.
3. The ribbing disappears in places
Cause: Some stitches were worked beneath both loops.
Fix: Tilt the fabric toward you and identify the back loop before inserting the hook. A few normal stitches will not ruin the pumpkin, but consistent BLO work produces clearer ribs.
4. White stuffing shows through
Cause: The fabric is too loose or the pumpkin is overstuffed.
Fix: Remove some filling. For the next pumpkin, use a hook 0.5 mm smaller.
5. The gathered bottom has a large hole
Cause: The gathering stitches were placed too far apart or the yarn was not secured across the center.
Fix: Make several additional passes between opposite sides of the opening and pull them closed gradually.
6. The pumpkin looks like a cylinder
Cause: The top and bottom are not indented, or the shaping strands are too loose.
Fix: Add five or six controlled top-to-bottom shaping passes. Pull only until shallow grooves appear.
7. The pumpkin is lumpy
Cause: The stuffing was inserted in large compact pieces.
Fix: Open the top if necessary, remove the stuffing, separate it into smaller tufts, and refill the outer edges gradually.
8. The stem falls sideways
Cause: The stem was attached only at one point.
Fix: Sew several small stitches around its complete base. Use both yarn tails for additional stability.
How to Customize This Crochet Project
Change the yarn
Category 4 yarn creates a medium tabletop pumpkin. Other yarns can produce very different effects:
- DK yarn creates a smaller, more delicate pumpkin.
- Bulky yarn creates a larger pumpkin quickly.
- Chenille yarn creates a soft plush texture but can hide stitch anatomy.
- Wool-blend yarn provides strong stitch definition.
- Cotton-blend yarn creates firm, structured ribs.
- Tweed yarn adds rustic flecks without changing the stitch pattern.
When substituting yarn, choose a hook that creates dense fabric rather than relying only on the label recommendation.
Change the color
Create a coordinated set instead of making every pumpkin orange.
A modern fall palette could include:
- Cream
- Oatmeal
- Muted terracotta
- Dusty sage
- Mustard
- Caramel
- Cocoa brown
Use the same stem yarn for the complete collection to unify the group.
Change the size
Use the rectangle formula instead of a fixed row count.
A mini pumpkin could begin with approximately 11–13 chains in DK yarn. A large pumpkin could begin with 27–31 chains in bulky yarn.
Always measure the rectangle before assembly because different yarns and crocheters produce different row gauges.
Add a leaf
Crochet a small oval leaf in olive yarn and sew it beside the stem. A simple leaf can be made around both sides of a short foundation chain using progressively taller stitches toward the center.
Add a tendril
Chain 18–25 with green yarn. Work two or three single crochet stitches into every chain. The strip will curl naturally.
Attach it beneath the stem.
Try a different texture
Once you understand the rectangle construction, experiment with:
- Single crochet BLO for tighter ribs
- Slip-stitch ribbing for dense knit-like fabric
- Alternating normal hdc and hdc BLO rows
- Herringbone half double crochet
- Waistcoat stitch for a firmer surface
Avoid very open lace stitches because the stuffing will remain visible.
Gift and decor ideas
Use the finished pumpkins as:
- Thanksgiving place-card holders
- Autumn mantel decorations
- Tiered-tray decor
- Teacher appreciation gifts
- Craft-fair products
- Housewarming gifts
- Fall table-centerpiece elements
- Pumpkin-themed baby-shower decorations
For a place card, tie a paper name tag around the stem with cotton cord.
Finishing Instructions
Fastening off
After the stem is secure, inspect the pumpkin for visible tails.
Thread each remaining tail onto the tapestry needle. Pass it beneath several nearby stitches, change direction, and pass it beneath another group of stitches.
Trim the tail close to the fabric without cutting the actual crochet stitches.
Final shaping
Place the pumpkin on a flat surface.
Press lightly around the bottom until it sits steadily. Rotate the lobes and distribute the stuffing with your fingers.
The pumpkin does not need to be perfectly symmetrical. Small variations make the finished piece look handmade and organic.
Blocking
Wet blocking is usually unnecessary for a stuffed pumpkin.
Before assembly, a severely curled rectangle can be lightly steam-blocked if the fiber permits it. Never press a hot iron directly onto acrylic yarn because the heat can permanently flatten or damage the fibers.
Washing and care
Follow the care instructions printed on the yarn label. Retaining the label is especially useful when the finished project will be given as a gift. The Craft Yarn Council also provides a guide to common yarn-care symbols.
For general decorative use:
- Spot-clean small marks.
- Use cool water if full washing is permitted by the yarn label.
- Avoid twisting or wringing the pumpkin.
- Press water out gently with a towel.
- Reshape the lobes while damp.
- Air-dry completely.
- Do not store the pumpkin while damp.
Safety note
This pumpkin is intended primarily as decor.
When making it for a young child:
- Do not insert wire, sticks, cinnamon stems, beads, buttons, or other rigid pieces.
- Secure the crochet stem with multiple stitches.
- Check all seams and yarn tails.
- Supervise use if the project is treated as a soft toy.
Quick Printable-Style Summary
Skill level: Beginner
Finished size: Approximately 4–4.5 inches tall and 5–5.5 inches wide
Pumpkin yarn: Category 4 medium-weight yarn
Stem yarn: Small amount of category 4 yarn
Hooks: 5 mm for body; 4 mm for stem
Additional materials: Fiberfill, tapestry needle, scissors, measuring tape, stitch markers
Stitches: Chain, half double crochet, back-loop-only half double crochet, single crochet
Starting chain: Chain 19
Pumpkin Row 1:
Hdc in second chain from hook and each chain across. — 18 hdc
Pumpkin repeat:
Ch 1, turn, hdc BLO in every stitch across. — 18 sts
Rectangle size:
Approximately 5–5.5 inches by 12.5–13.5 inches
Assembly:
Join short ends, gather bottom, turn right side out, stuff, gather top, shape five or six lobes.
Stem:
Ch 6. Sc in second chain and across. Continue for four total rows. Fold, seam, and attach.
Finishing:
Secure all tails, adjust stuffing, shape the base, and follow the yarn-label care instructions.
FAQ
Is this crochet pumpkin pattern suitable for a complete beginner?
Yes. The pumpkin body consists of a rectangular piece made with repeated half double crochet rows. The assembly requires basic hand sewing, but there are no increases, decreases, magic circles, or continuous rounds.
Practicing half double crochet for a few rows before starting can make the project more comfortable.
Can I make the pumpkin with single crochet?
Yes. Single crochet worked through the back loop creates dense, narrow ribs.
Because single crochet rows are shorter than half double crochet rows, you will need more rows to reach the correct rectangle length. Continue until the long edge is approximately 2.3–2.5 times the short edge.
Why does my crochet pumpkin look too tall?
The foundation chain determines the pumpkin’s height. A long foundation combined with a relatively short rectangle creates a tall cylindrical shape.
You can improve the existing pumpkin by adding more shaping strands and pressing the top and bottom inward. For the next pumpkin, begin with fewer chains or crochet a longer rectangle.
How much yarn does one crochet pumpkin use?
A medium pumpkin generally uses approximately 90–120 yards of medium-weight yarn, although exact consumption depends on tension, yarn construction, rectangle dimensions, and stem size.
Small pumpkins are excellent for using partial skeins.
Can I use chunky yarn?
Yes. Chunky yarn makes a larger pumpkin quickly and emphasizes the ribs.
Use a hook that produces fabric dense enough to conceal the stuffing. Begin with fewer chains than the medium-weight version and use the rectangle proportion formula rather than the original stitch count.
Do I have to add the external shaping strands?
No. The gathered ribbed body will still resemble a pumpkin.
The shaping strands create deeper divisions and pull the top and bottom slightly inward. For a softer round pumpkin, omit them or use only four very loose shaping passes.
What can I use instead of polyester stuffing?
Clean yarn scraps can be used for a small decorative pumpkin, although they create a heavier and less even result.
You can also place yarn scraps in the center and surround them with polyester fiberfill. Avoid materials that absorb moisture easily or break into fine particles.
Conclusion
This beginner crochet pumpkin begins with a skill you can reuse in dozens of future projects: making a straight, evenly ribbed rectangle.
The transformation happens during assembly. A simple seam creates the tube, two gathered edges form the body, and a few shaping strands turn the soft cylinder into a recognizable pumpkin.
After making the first one, change the rectangle dimensions, yarn weight, and color to create an entire handmade pumpkin patch. Save the tutorial with your fall crochet ideas so you can return to the sizing formula whenever you have leftover yarn to use.





