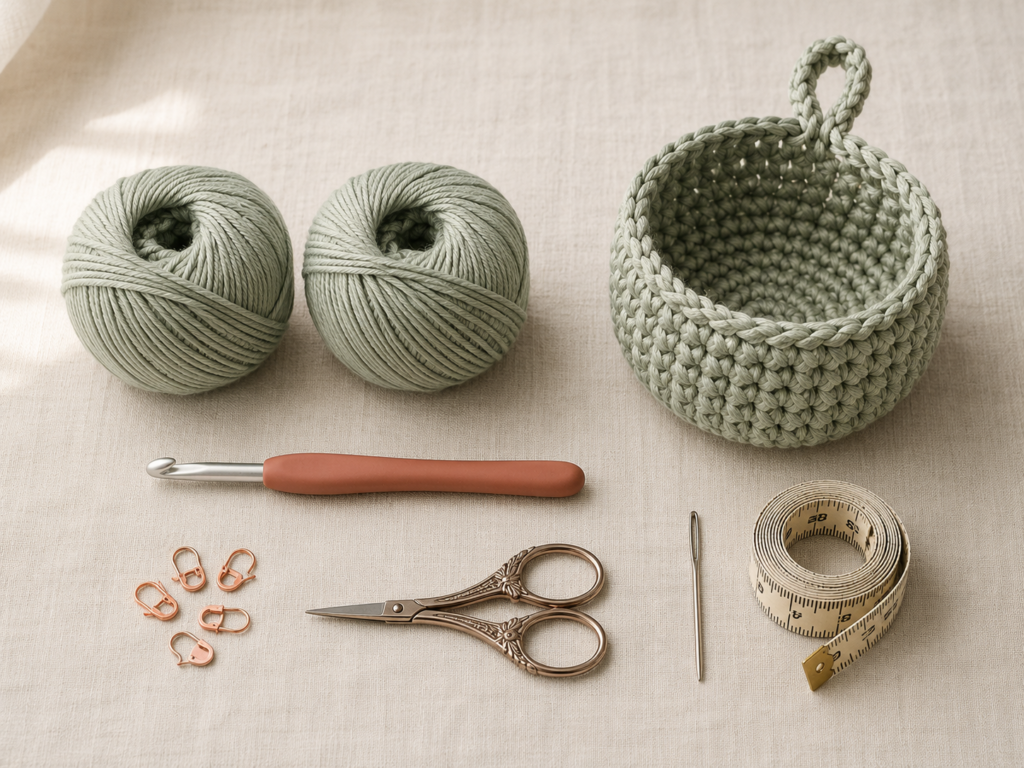
A handmade hanging basket is one of those small crochet projects that quickly earns a permanent place in your home. Hang it beside the front door for sunglasses, use it near your desk for charging cables, place it in a craft room for yarn scraps, or fill it with rolled washcloths in the bathroom.
This beginner-friendly crochet hanging basket pattern starts with a simple circle. Once the base is wide enough, you crochet straight upward to create a sturdy container. A tapered panel raises the back of the basket, while a covered chain forms the hanging loop.
The construction may look shaped and decorative, but every part uses basic crochet techniques. You will work single crochet stitches, simple increases, back-loop stitches, and single crochet decreases. The step-by-step guidance also explains where to place markers, how to count the rounds, and how to prevent the finished basket from stretching.
The written pattern below is an original construction created for this tutorial. The source photographs listed in the image plan are used only to study the visual progression of a hanging-basket project; the source’s stitch counts and complete pattern have not been reproduced.
What You’ll Learn
- How to crochet a flat circular basket base
- How to work in continuous rounds without an obvious seam
- How to use a back-loop round to turn the basket walls upward
- How to separate the front opening from the raised back section
- How to shape a tapered panel with paired decreases
- How to make and reinforce a hanging loop
- How to edge the opening without causing puckering
- How to finish and weave in the ends securely
Project Details
Pattern type: Functional home-decor project
Skill level: Confident beginner
Finished size: Approximately 8 inches wide, 9½ inches high at the back, plus a 3-inch hanging loop
Estimated time: 2–3 hours
Construction: Base and body in continuous rounds; upper back in turned rows
Terminology: US crochet terms
Materials You’ll Need
- Two balls of category 4 medium-weight cotton yarn
- Approximately 110 yards from each ball, or 220 yards total
- Yarn color: dusty sage or another medium-light solid color
- 8.0 mm crochet hook
- One locking stitch marker for the round beginning
- Two additional stitch markers for dividing the opening
- Scissors
- Tapestry needle
- Measuring tape
- Optional removable hook or peg for testing the finished loop
Hold one strand from each ball together throughout the project. The doubled yarn behaves more like a bulky strand and makes a denser basket than one strand of medium yarn.
Cotton is recommended because it creates a defined stitch texture and generally stretches less than soft acrylic. Cotton-acrylic blends can also work, but very soft or loosely spun yarn may produce a basket that droops when filled.
Crochet Abbreviations Used
- BLO = back loop only
- ch = chain
- dec = decrease
- inc = increase
- pm = place marker
- rep = repeat
- rnd/rnds = round/rounds
- sc = single crochet
- sc2tog = single crochet two stitches together
- sl st = slip stitch
- st/sts = stitch/stitches
This tutorial uses US terminology. A US single crochet is called a double crochet in standard UK terminology. The Craft Yarn Council maintains a complete abbreviation list and a US-to-UK terminology comparison.
Special Stitches
Single Crochet Increase
Work two single crochet stitches into the same stitch.
One stitch from the previous round becomes two stitches in the new round.
Single Crochet Decrease
Insert the hook into the next stitch and pull up a loop. Insert the hook into the following stitch and pull up another loop. Yarn over and draw through all three loops on the hook.
Two stitches become one stitch.
Back-Loop-Only Single Crochet
Look at the top of the next stitch. You will see two horizontal loops forming a small “V.” Insert the hook under the loop farthest from you and complete a single crochet.
The unused front loop creates a decorative ridge.
Before You Start
Gauge and tension
Using two strands of category 4 cotton held together and an 8 mm hook, approximately nine single crochet stitches and nine rows should measure 4 inches.
Exact gauge is not critical for a storage basket, but it affects the final size and stiffness. A looser gauge produces a larger, softer basket. A tighter gauge produces a smaller, firmer basket.
The Craft Yarn Council lists 6.5–9 mm hooks as a common guideline for category 5 bulky yarn. Two medium-weight strands often create a similar working thickness, although the exact result depends on the individual yarns. Always judge the actual fabric rather than relying only on the label.
How to count continuous rounds
Place a marker in the first stitch of every round. When you reach the marker:
- Remove it.
- Work the marked stitch.
- Replace the marker in the new first stitch.
Do not add a slip stitch or turning chain unless the pattern specifically instructs you to do so.
How to keep the circle flat
The base should lie mostly flat after every increase round.
- If it forms a bowl too early, your tension may be tight or an increase may be missing.
- If the edge ripples, an extra increase may have been added or the tension may be loose.
- Count the stitches before beginning the next round.
A slight wave usually settles once the basket walls are added. A strongly ruffled circle should be corrected before continuing.
Right side and wrong side
The side facing you as you work the continuous rounds is treated as the right side. When the fabric begins to curve, allow the right side to remain on the outside of the basket.
Turning chains
The chain 1 used at the beginning of each back-panel row does not count as a stitch. Place the first single crochet in the first actual stitch.
Yarn-color advice
A solid, medium-light color is easiest for a beginner because the stitch tops remain visible. Very dark yarn can make decreases and back loops difficult to identify. Highly variegated yarn may hide the shape of the upper panel.
Step-by-Step Crochet Tutorial
Step 1: Make the Magic Ring and First Two Rounds
Create a magic ring with both strands held together.
Round 1: Work 6 sc into the magic ring. Pull the yarn tail until the center closes. Place a marker in the first sc. [6 sts]
Round 2: Work 2 sc in every stitch around. [12 sts]
Before continuing, count all 12 stitches. The active loop on your hook does not count as a stitch.
Beginner tip:
Do not pull the magic-ring tail with sudden force. Cotton can create friction. Pull slowly while holding the stitches near the center.
Common mistake to avoid:
Do not crochet over only one of the two working strands. Treat the doubled yarn as one thick strand every time you insert the hook or yarn over.
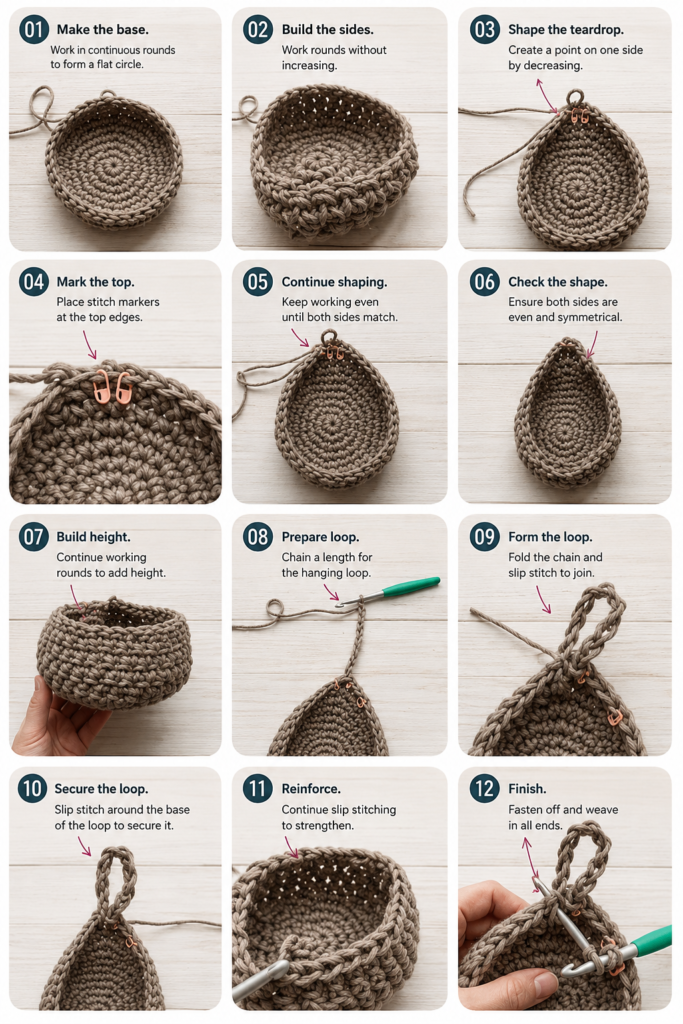
Step 2: Expand the Circular Base
The next four rounds add six stitches per round. Place every increase directly above an increase section from the previous round.
Round 3: Rep (sc in next st, inc in next st) six times. [18 sts]
Round 4: Rep (sc in next 2 sts, inc in next st) six times. [24 sts]
Round 5: Rep (sc in next 3 sts, inc in next st) six times. [30 sts]
Round 6: Rep (sc in next 4 sts, inc in next st) six times. [36 sts]
Lay the circle on the table. It should measure approximately 5½–6 inches across, depending on your yarn and tension.
Beginner tip:
Pause after every pattern repeat and check that you completed the correct number of ordinary single crochets before the increase.
Common mistake to avoid:
An increase means two complete single crochet stitches in one stitch. Do not work one extra chain or place the second stitch in the next stitch.
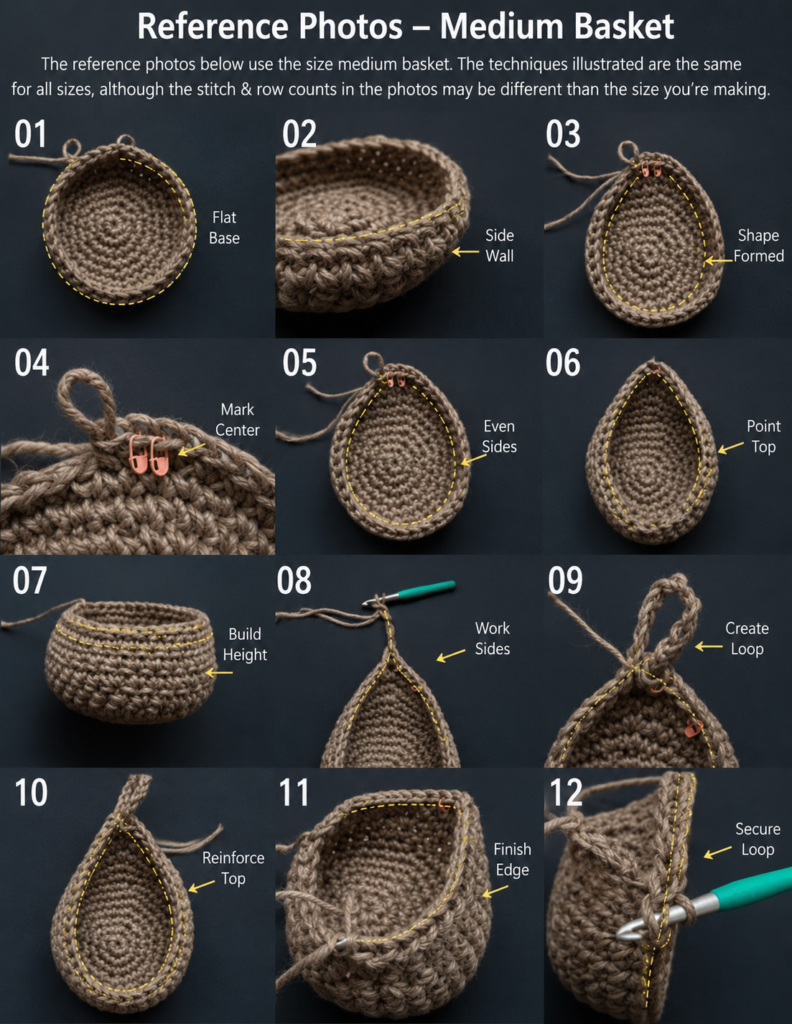
Step 3: Turn the Base Upward
The next round creates a visible ridge and changes the direction of the fabric.
Round 7: Working in the back loop only, sc in every stitch around. [36 sts]
Do not increase in this round.
As you work, gently push the circular base downward and encourage the new round to rise around it. You should see a line of unused front loops outlining the base.
Beginner tip:
Rotate the basket toward you when necessary. The back loop should remain visible behind the front loop before you insert the hook.
Common mistake to avoid:
Do not insert the hook under both loops. If you accidentally work a few ordinary single crochets, undo them so the ridge remains continuous.
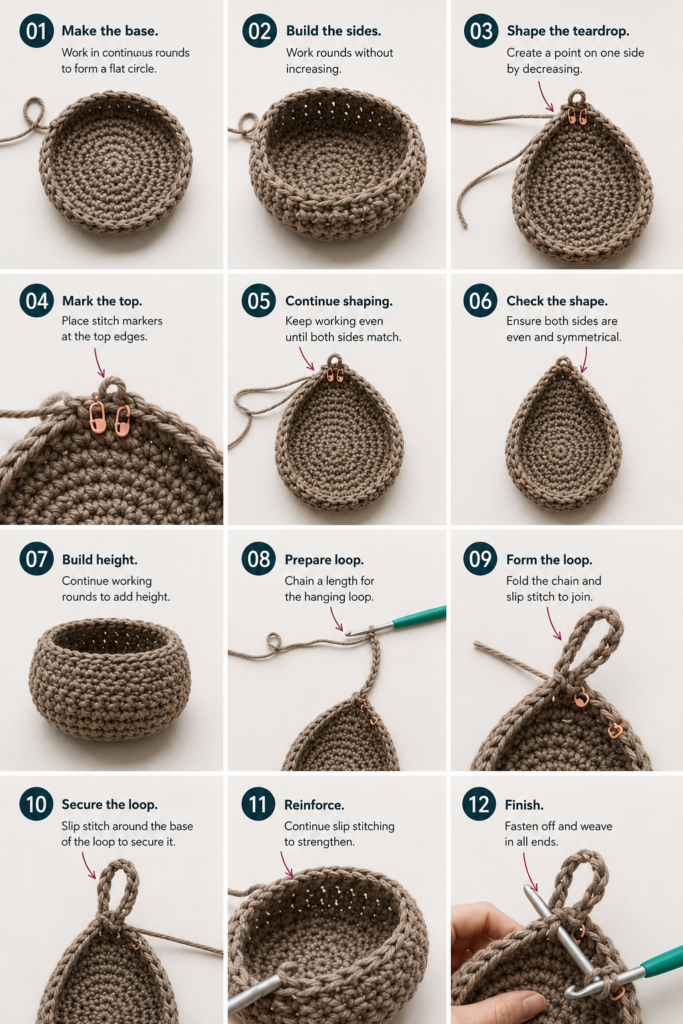
Step 4: Crochet the Straight Basket Walls
Rounds 8–13: Sc in every stitch around. [36 sts per round]
Continue moving the marker at the beginning of each round.
After Round 13, the wall should measure approximately 3–3½ inches from the back-loop ridge. The basket will resemble a low round container.
Fasten off after Round 13, leaving a 6-inch tail.
Beginner tip:
Count after Rounds 9, 11, and 13. You do not need to count every round when your marker is secure, but regular checkpoints prevent a small error from affecting the final opening.
Common mistake to avoid:
Do not work an extra stitch in the small gap before the marked stitch. Continuous rounds often create a visual gap, but that gap is not an additional stitch.
Step 5: Divide the Front and Back
Lay the basket on the table and flatten it gently. Position the end of Round 13 near the center back.
The 36 upper-edge stitches will now be divided into:
- 18 stitches for the raised back panel
- 18 unworked stitches for the lower front opening
Count 18 consecutive stitches across the back half and mark the first and last stitches.
Join the doubled yarn in the first marked stitch.
Back Panel Row 1: Ch 1, sc in the same stitch and in the next 17 stitches. [18 sts]
Stop at the second marker. Do not continue around the front.
Beginner tip:
Before joining the yarn, place the empty basket against a wall. This helps confirm which side you want to become the back.
Common mistake to avoid:
Make sure Row 1 contains exactly 18 stitches. An uneven division will make the hanging loop sit to one side.
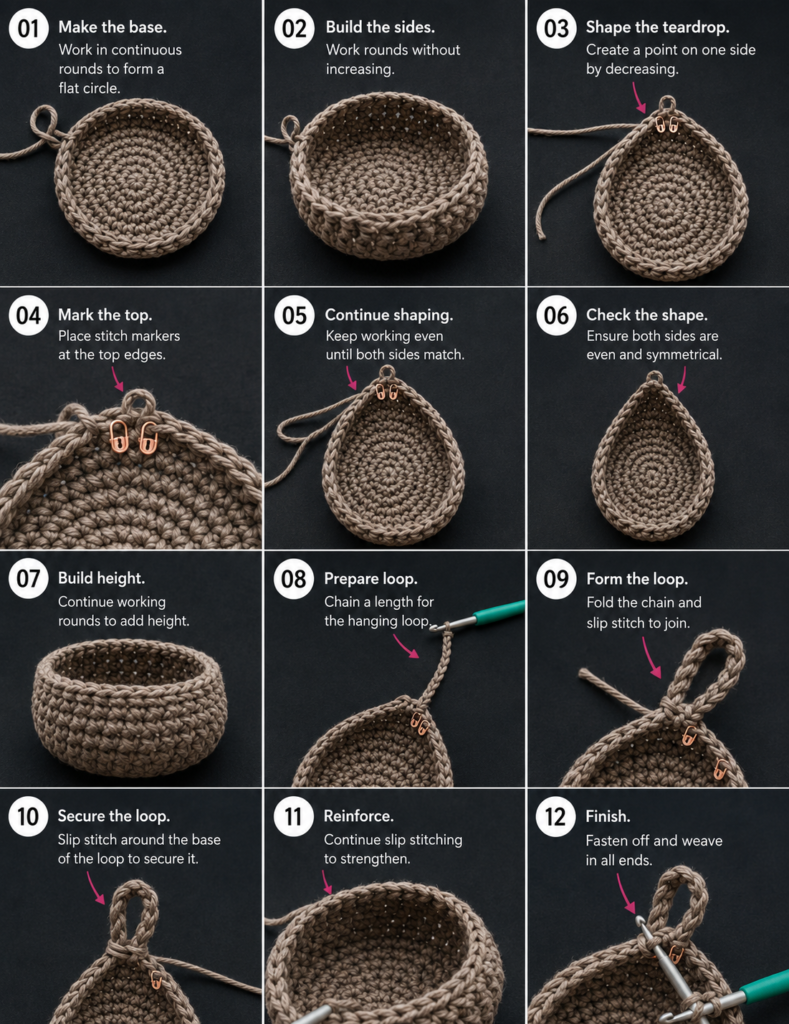
Step 6: Shape the Raised Back Panel
The upper section is worked in turned rows. Decrease once at both ends of each shaping row.
Row 2: Ch 1 and turn. Sc2tog, sc in next 14 sts, sc2tog. [16 sts]
Row 3: Ch 1 and turn. Sc2tog, sc in next 12 sts, sc2tog. [14 sts]
Row 4: Ch 1 and turn. Sc2tog, sc in next 10 sts, sc2tog. [12 sts]
Row 5: Ch 1 and turn. Sc2tog, sc in next 8 sts, sc2tog. [10 sts]
Row 6: Ch 1 and turn. Sc2tog, sc in next 6 sts, sc2tog. [8 sts]
Row 7: Ch 1 and turn. Sc in each stitch across. [8 sts]
The panel should now rise several inches above the front edge. Its sides will slope inward, creating the recognizable hanging-basket profile.
Beginner tip:
Count immediately after every decrease row. The count should fall by two stitches each time.
Common mistake to avoid:
Do not skip the first stitch after turning. The first stitch is included in the opening sc2tog decrease.
Step 7: Make the Reinforced Hanging Loop
At the end of Row 7, chain 16 loosely.
Bring the chain across the top of the panel. Check that it is not twisted.
Slip stitch into the first stitch of Row 7 to close the loop.
Chain 1. Work approximately 20 single crochet stitches evenly around the chain loop rather than into the individual chain stitches. Slide the stitches together as needed so the chain is fully covered.
Slip stitch at the handle base and fasten off, leaving a 10-inch tail.
The finished loop should lie flat and feel firm without becoming stiff.
Beginner tip:
Make the 16 chains with relaxed tension. A tight foundation chain can pull the top of the basket inward.
Common mistake to avoid:
Inspect the loop from the side before joining it. Once the covering stitches are added, a twisted chain is difficult to correct.
Step 8: Edge the Basket Opening
The raw sides of the turned back panel need a simple border.
With the outside of the basket facing you, join the doubled yarn at the right handle base.
- Work sc stitches evenly down the first sloping side.
- Place one extra sc in the lower corner.
- Work one sc in each of the 18 unworked front-edge stitches.
- Place one extra sc in the second lower corner.
- Work sc stitches evenly up the opposite sloping side.
- Slip stitch at the other handle base.
Fasten off with an 8-inch tail.
The exact edging count is less important than the spacing. Both sloping sides should contain the same number of stitches.
If the edge puckers, there are too few stitches along the row ends. If it flares, there are too many.
Beginner tip:
Start with one stitch in each row end. Add a second stitch only at a corner or wherever a visible gap would otherwise form.
Common mistake to avoid:
Do not pull the edging yarn tightly. The basket opening needs enough flexibility for your hand to enter comfortably.
Step 9: Reinforce the Handle Bases
Thread one of the long handle tails onto the tapestry needle.
Pass the tail through the dense stitches at the first handle base two or three times. Do not pull so tightly that the top corner gathers.
Repeat at the opposite handle base using the second available tail or a separate piece of matching yarn.
This reinforcement distributes the basket’s weight over several stitches instead of concentrating it in one slip stitch.
Beginner tip:
After reinforcing the first base, hang the empty basket temporarily. Check that the handle sits centrally before securing the second side.
Common mistake to avoid:
Do not knot the tails on the visible outside surface. Secure and hide them inside the basket.
Pattern Notes and Stitch Notes
Round beginnings
Rounds 1–13 are continuous. Do not join them with slip stitches.
The marker always identifies the first stitch of the current round.
Turning-chain rule
The chain 1 at the beginning of Back Panel Rows 1–7 does not count as a stitch.
Stitch-count checkpoints
- Round 1: 6 stitches
- Round 2: 12 stitches
- Round 3: 18 stitches
- Round 4: 24 stitches
- Round 5: 30 stitches
- Round 6: 36 stitches
- Rounds 7–13: 36 stitches
- Back Panel Row 1: 18 stitches
- Row 2: 16 stitches
- Row 3: 14 stitches
- Row 4: 12 stitches
- Row 5: 10 stitches
- Rows 6–7: 8 stitches
Repeat pattern
The base follows a standard six-section increase structure. Each new increase round contains one additional ordinary single crochet between increases.
Right and wrong sides
The right side remains outside during the continuous rounds. The turned back panel alternates right-side and wrong-side rows.
Seam placement
Because the lower basket is worked continuously, the beginning of the rounds may shift slightly. Place that transition near the back before dividing the opening.
Load and use
This is a soft storage basket, not a structural container. Use it for lightweight items such as yarn, washcloths, scarves, nursery accessories or craft supplies. Do not use it for breakable objects, heavy plant pots or items that could injure someone if they fall.
Use a wall hook that is suitable for the combined weight of the basket and its contents.
Common Beginner Mistakes
1. The base becomes a bowl during the increase rounds
Likely cause: A missing increase or unusually tight tension.
Fix: Count the current round. If the count is correct, move up to an 8.5 or 9 mm hook for the base.
2. The base develops strong ruffles
Likely cause: Extra increases or very loose stitches.
Fix: Confirm the round count. If it is correct, use a smaller hook or tighten the working loop slightly.
3. The basket walls lean outward
Likely cause: Accidental increases during Rounds 8–13.
Fix: Check that every body round contains 36 stitches. Remove any extra stitches before continuing.
4. The round beginning has a visible diagonal line
Likely cause: This is often the natural result of continuous spiral rounds rather than an error.
Fix: Position the round beginning at the center back before starting the upper panel. It will be less visible when the basket hangs.
5. The back panel leans to one side
Likely cause: The original 18 stitches were not centered, or a decrease was missed on one edge.
Fix: Count each row and confirm that one decrease appears at both ends.
6. The handle twists
Likely cause: The chain rotated before it was joined.
Fix: Lay the chain flat and trace its top ridge from the hook to the attachment point before making the slip stitch.
7. The opening border puckers
Likely cause: Too few stitches were placed into the side row ends.
Fix: Undo the edging and add one or two stitches along each slope. Keep both sides symmetrical.
8. The opening flares outward
Likely cause: Too many edging stitches.
Fix: Remove several stitches, especially from the sloping sides. The border should follow the edge rather than stretching it.
9. The basket stretches when filled
Likely cause: The yarn is highly elastic, the fabric is loose, or the contents are too heavy.
Fix: Use cotton or cotton cord, reduce the hook size, or line the inside with fabric. Keep the contents light.
10. The center hole reopens
Likely cause: The magic-ring tail was cut before being secured.
Fix: Thread the tail through the backs of the first-round stitches in two directions before trimming it.
How to Customize This Crochet Project
Change the yarn
For a firmer basket, replace the doubled medium cotton with:
- Category 5 bulky cotton
- Braided cotton cord
- Recycled textile yarn
- Firm macramé cord that can be crocheted comfortably
Make a small swatch first. Some cords are abrasive and may require a smooth metal hook.
Change the color
A single neutral color emphasizes the basket’s shape. Other practical combinations include:
- Cream body with a sage border
- Terracotta body with a natural handle
- Charcoal body with a mustard edging
- Two similar colors held together for a marled effect
To create a contrasting edge, change yarn when joining for Step 8.
Make the basket wider
Continue the base increase pattern for one additional round:
Additional increase round: Rep (sc in next 5 sts, inc in next st) six times. [42 sts]
Then work the back-loop round over all 42 stitches.
For the opening, use approximately 20–22 stitches for the back panel and leave the remaining stitches for the front.
Make the basket deeper
Add two to four straight body rounds before dividing the front and back.
Remember that a deeper soft basket may stretch more when filled.
Make the back taller
Repeat the final eight-stitch row once or twice before adding the handle.
For a longer teardrop shape, begin with a slightly wider panel and add another decrease row.
Adjust the handle
For a small wall hook, reduce the handle to 12 chains.
For a doorknob or wider peg, increase it to 20–24 chains. Cover the longer chain with enough single crochet stitches to keep the loop firm.
Add texture
Simple texture options include:
- Alternate BLO and ordinary single crochet body rounds
- Work the edging in reverse single crochet
- Add a surface-slip-stitch line around the base ridge
- Use a marled two-color yarn combination
Avoid very open lace stitches when the basket will hold small items.
Add a fabric lining
A lining helps prevent pens, hooks or small accessories from pushing through the crochet fabric.
Trace the flattened basket body onto cotton fabric, add a seam allowance, sew the fabric pouch, and hand-stitch it just below the crochet edging.
Gift and storage ideas
Use the finished basket for:
- Rolled washcloths
- Nursery socks or bibs
- Crochet hooks and notions
- Charging cords
- Sunglasses and keys
- Lightweight winter accessories
- Dog-walking bags and a lightweight leash
- Small craft supplies
- Hair accessories
- A reusable gift container
Finishing Instructions
Thread each remaining tail onto a tapestry needle.
Weave the tail under four or five stitches on the inside of the basket. Reverse direction and pass it under several adjacent stitches. This change of direction helps prevent the tail from working free.
For the magic-ring tail, weave around part of the first round before reversing direction.
Trim the tails only after gently stretching the fabric.
Shaping and blocking
Cotton baskets usually need only light shaping.
- Mist the basket lightly with clean water.
- Place a folded hand towel inside.
- Shape the base and opening with your hands.
- Arrange the handle so it lies flat.
- Allow the basket to dry completely before hanging it.
Do not stretch the front edge while wet.
Washing and care
Follow the care directions on the yarn label. The Craft Yarn Council explains that yarn labels and universal care symbols indicate appropriate washing, drying, ironing and professional-care methods. Keeping the original label is especially useful when the basket will be given as a gift.
When the yarn permits washing, place the basket in a mesh laundry bag and use a gentle cycle. Reshape it while damp and dry it flat rather than hanging it while wet.
Quick Printable-Style Summary
Pattern: Sage Loop Crochet Hanging Basket
Skill level: Confident beginner
Yarn: Two strands of category 4 cotton held together
Hook: 8.0 mm
Finished size: Approximately 8 inches wide and 9½ inches high, excluding loop
Main stitches: sc, inc, sc2tog, BLO sc, ch, sl st
Starting method: 6 sc in a magic ring
Base: Increase by six stitches per round to 36 stitches
Walls: One BLO round followed by six straight sc rounds
Back panel: Work over 18 stitches and decrease at both ends to 8 stitches
Handle: Ch 16, join, and cover with approximately 20 sc
Edging: Sc evenly around the two slopes and 18-stitch front opening
Finishing: Reinforce handle bases, weave in tails, lightly shape and dry flat
Frequently Asked Questions
Is this crochet hanging basket pattern suitable for a complete beginner?
It is suitable for someone who already knows how to make a chain and single crochet. The increases, decreases and back-loop stitches are explained, but practicing them on a small swatch first can make the project easier.
Can I use one strand of worsted-weight yarn?
You can, but the basket will be smaller, thinner and more flexible. Use two strands held together or choose a bulky yarn if you want the basket to hold its shape.
Can I use acrylic yarn?
Yes, but choose a firm acrylic rather than a very soft, stretchy yarn. Moving to a smaller hook can make the fabric denser. Keep the basket’s contents lightweight.
Why is my crochet hanging basket floppy?
Common reasons include loose tension, a hook that is too large, elastic yarn, or insufficiently reinforced handle bases. Try a smaller hook, cotton cord or a fabric lining.
How do I make a larger crochet hanging basket?
Add one or two increase rounds to the circular base, then crochet additional straight body rounds. Divide approximately half of the top stitches for the raised back panel. A larger basket should have a wider and more strongly reinforced handle.
Can I put a plant pot inside this basket?
Only use a very lightweight pot or an unbreakable nursery pot, and confirm that the hook, yarn and handle can safely support it. Remove the plant before watering so moisture does not remain trapped against the yarn. A separate waterproof saucer is essential.
How do I stop the basket from stretching?
Use cotton or firm cord, crochet at a dense gauge, reinforce the handle attachments and avoid heavy contents. A fitted fabric lining can also reduce distortion.
Do I have to make a magic ring?
No. Chain 2 and work the six Round 1 stitches into the second chain from the hook. This may leave a slightly more visible center hole, but it is a useful alternative when the magic ring feels difficult.
Why does the beginning of my continuous rounds move diagonally?
Spiral rounds naturally shift because every stitch sits slightly offset from the stitch below. This is usually not a mistake. Position the transition at the back before beginning the upper panel.
Can I sell baskets made from this tutorial?
The written construction in this article is original. Before selling finished items, check any applicable local requirements and use your own project photography, product description and branding. Do not reuse the source website’s photographs.
Conclusion
This crochet hanging basket pattern turns basic single crochet into practical storage with only a few shaping techniques. The circular base creates room for small items, the tapered back gives the basket its hanging profile, and the covered loop adds strength without requiring separate hardware.
Make the first basket in a light solid yarn so the stitches remain easy to see. Once the construction feels familiar, experiment with marled colors, braided cotton cord, contrasting borders or a washable fabric lining.





