A crochet maple leaf is small enough to finish in one sitting but interesting enough to teach several useful shaping techniques. Instead of crocheting separate pieces and sewing them together, this leaf grows from one circular center. Short stitches create the low valleys, tall stitches build the lobes, and tiny picots sharpen the five recognizable maple points.
This beginner-friendly tutorial guides you through the complete process: making the center ring, expanding the foundation, forming a narrow stem, shaping five lobes, creating clean valleys, weaving in the ends, and blocking the leaf so that every point lies neatly.
The instructions below are an original motif construction. They do not reproduce the selected reference pattern. The reference photographs are used only to plan a logical visual sequence for the tutorial.
What You’ll Learn
- How to begin a flat motif with a magic ring
- How to expand a round evenly without making it cup
- How short and tall crochet stitches create shaped edges
- How to make a small picot point
- How to divide one round into five leaf lobes
- How to create clear valleys with slip stitches
- How to fasten off and hide the yarn tails
- How to block a crochet leaf into a crisp, symmetrical shape
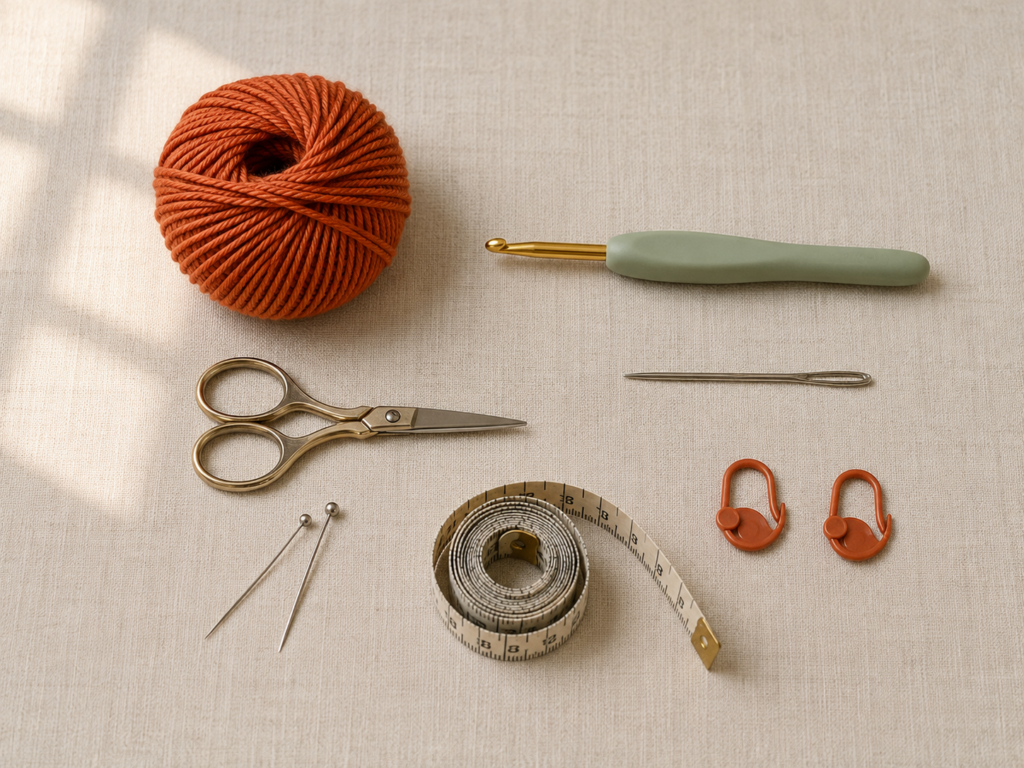
Materials You’ll Need
- Approximately 15–20 yards or 14–18 meters of DK cotton yarn
- 3.5 mm crochet hook
- Small scissors
- Blunt tapestry needle
- Two stitch markers, optional
- Blocking mat or folded towel
- Rustproof blocking pins
- Measuring tape, optional
- Spray bottle containing clean water, optional
Smooth cotton is particularly helpful for this motif because it displays the tall stitches and pointed edges clearly. Acrylic also works, but it may require steam or careful wet blocking to hold the points as firmly.
A solid autumn shade such as rust, pumpkin, mustard, burgundy, olive, or dark red makes the leaf shape easy to recognize. Variegated yarn can produce an attractive changing-leaf effect, although highly contrasting color changes may hide some of the stitch definition.
Crochet Abbreviations Used
This tutorial uses US crochet terminology.
- mr = magic ring
- ch = chain
- sl st = slip stitch
- sc = single crochet
- hdc = half double crochet
- dc = double crochet
- tr = treble crochet
- dtr = double treble crochet
- st/sts = stitch/stitches
- rep = repeat
- inc = increase by placing more than one stitch in the same base stitch
A bracketed instruction such as [hdc, dc] means that every stitch inside the brackets is worked into the same base stitch.
US and UK Terms
- US single crochet = UK double crochet
- US half double crochet = UK half treble crochet
- US double crochet = UK treble crochet
- US treble crochet = UK double treble crochet
- US double treble crochet = UK triple treble crochet
Special Stitch: Small Picot
For a chain-2 picot:
- Chain 2.
- Insert the hook into the second chain from the hook.
- Yarn over and pull through the chain and the active loop.
For the taller center point, you will use a chain-3 picot:
- Chain 3.
- Insert the hook into the first chain made, which is the third chain from the hook.
- Yarn over and pull through the chain and active loop.
Do not pull the slip stitch too tightly. The picot needs a little space to remain pointed after blocking.
Before You Start
Gauge and Finished Size
Exact gauge is not essential because this is a decorative motif rather than a fitted garment.
With DK cotton yarn and a 3.5 mm hook, the blocked leaf should measure approximately:
- 4¼ inches or 11 cm wide
- 4–4½ inches or 10–11.5 cm tall, including the stem
A thicker yarn and larger hook will produce a larger leaf. A sport-weight yarn and 3 mm hook will create a smaller appliqué.
How to Count the Foundation Stitches
Round 2 ends with 24 half double crochet stitches. Those stitches are the anchors for the stem, lobes, and valleys.
Count only the actual half double crochet stitches. Do not count the joining slip stitch or beginning chain as separate stitches.
Place a stitch marker in the first stitch of Round 2. This makes it easier to identify the stem position when you begin shaping.
How to Prevent Cupping
The foundation should lie reasonably flat before the lobes are added.
If the circle forms a bowl:
- Relax your tension.
- Increase the hook size by 0.5 mm.
- Make sure you worked two half double crochet stitches in every Round 1 stitch.
- Confirm that the finished count is 24.
A slight wave around the edge is acceptable. The shaping round and blocking will redistribute the fabric.
How to Keep the Points Sharp
The maple points depend on three things:
- A tall central stitch group
- A picot at the top
- A low slip-stitch valley beside each lobe
Avoid making the slip-stitch valleys loose. They should pull the fabric downward slightly and create visible separation between the lobes.
Beginner Note
Before starting the final leaf, practice one treble crochet, one double treble crochet, and one chain-2 picot using spare yarn. The entire motif becomes easier once those three techniques feel familiar.
Step-by-Step Crochet Tutorial
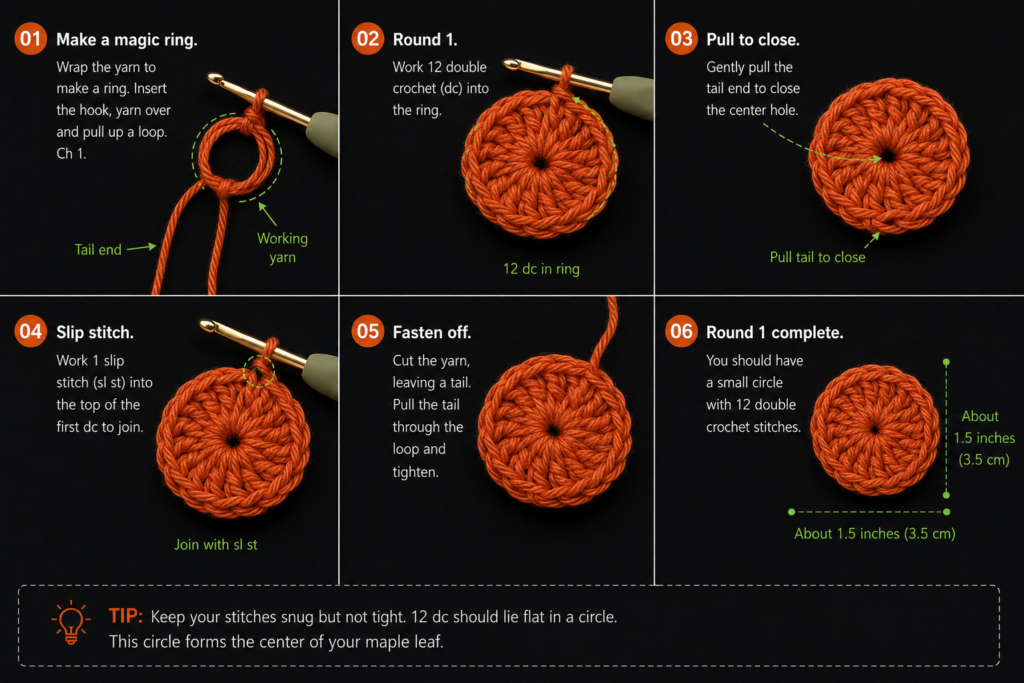
Step 1: Make the Center Ring
Create a magic ring, leaving a tail of at least 5 inches or 13 cm.
Chain 3. For this tutorial, the beginning chain counts only as height and is not included in the final stitch count.
Work 12 double crochet stitches into the magic ring.
Pull the yarn tail carefully until the center closes. Join with a slip stitch to the top of the first true double crochet.
Stitch count: 12 double crochet stitches
Do not close the center so tightly that the yarn strains. A small neat opening is acceptable, and you can tighten it again during finishing.
Beginner tip: Count the stitches before joining. It is much easier to correct the first round now than after the leaf points have been added.
Common mistake to avoid: Do not join into the top of the beginning chain. Join into the first actual double crochet so the stitch count remains clear.
Step 2: Expand the Foundation Circle
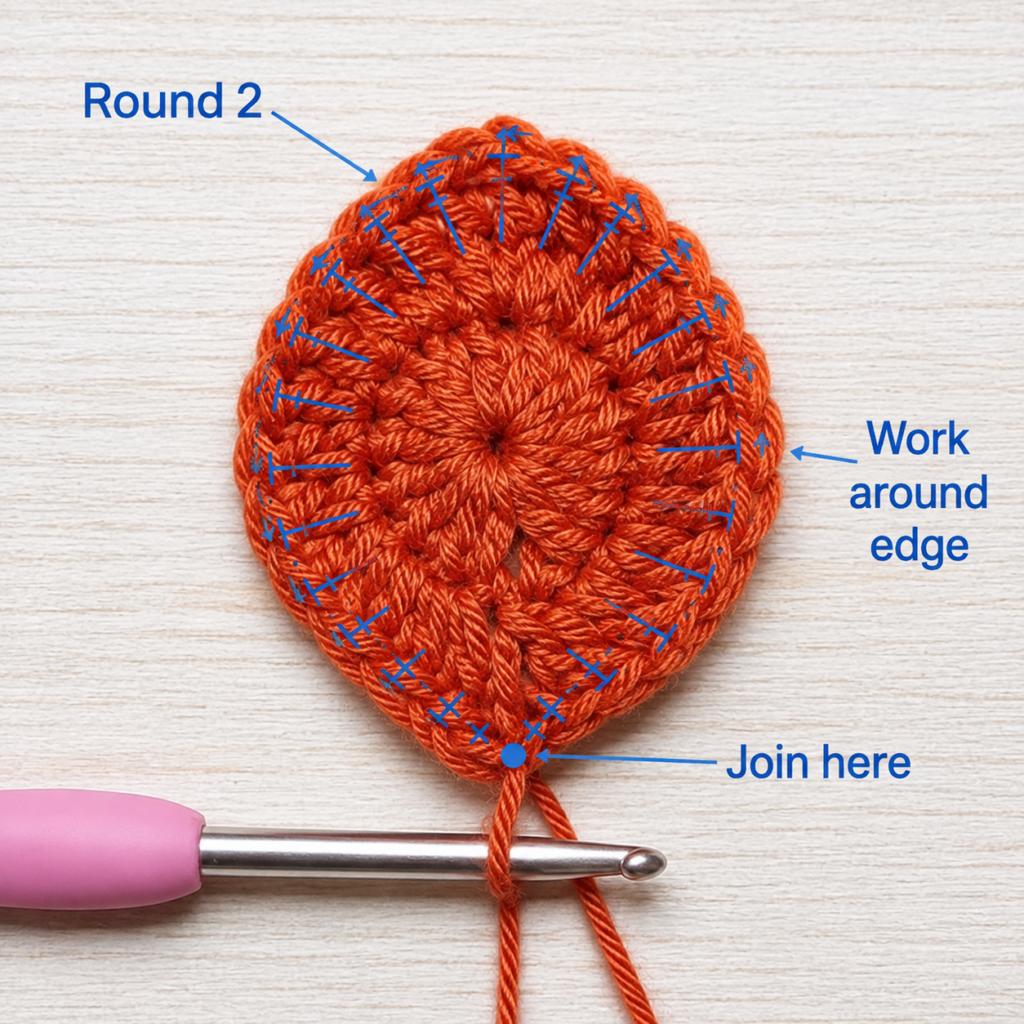
Chain 1. This chain does not count as a stitch.
Work 2 half double crochet stitches in every stitch around.
When you reach the beginning, join with a slip stitch to the first half double crochet.
Stitch count: 24 half double crochet stitches
The circle should now be wide enough to support five lobes. It may look plain at this stage, but the individual points will be created entirely in the next round.
Beginner tip: Pause after every four base stitches and count eight completed half double crochet stitches. This prevents missed increases.
Common mistake to avoid: Do not work into the joining slip stitch from Round 1. Work only into the 12 actual double crochet stitches.
Step 3: Crochet the Stem
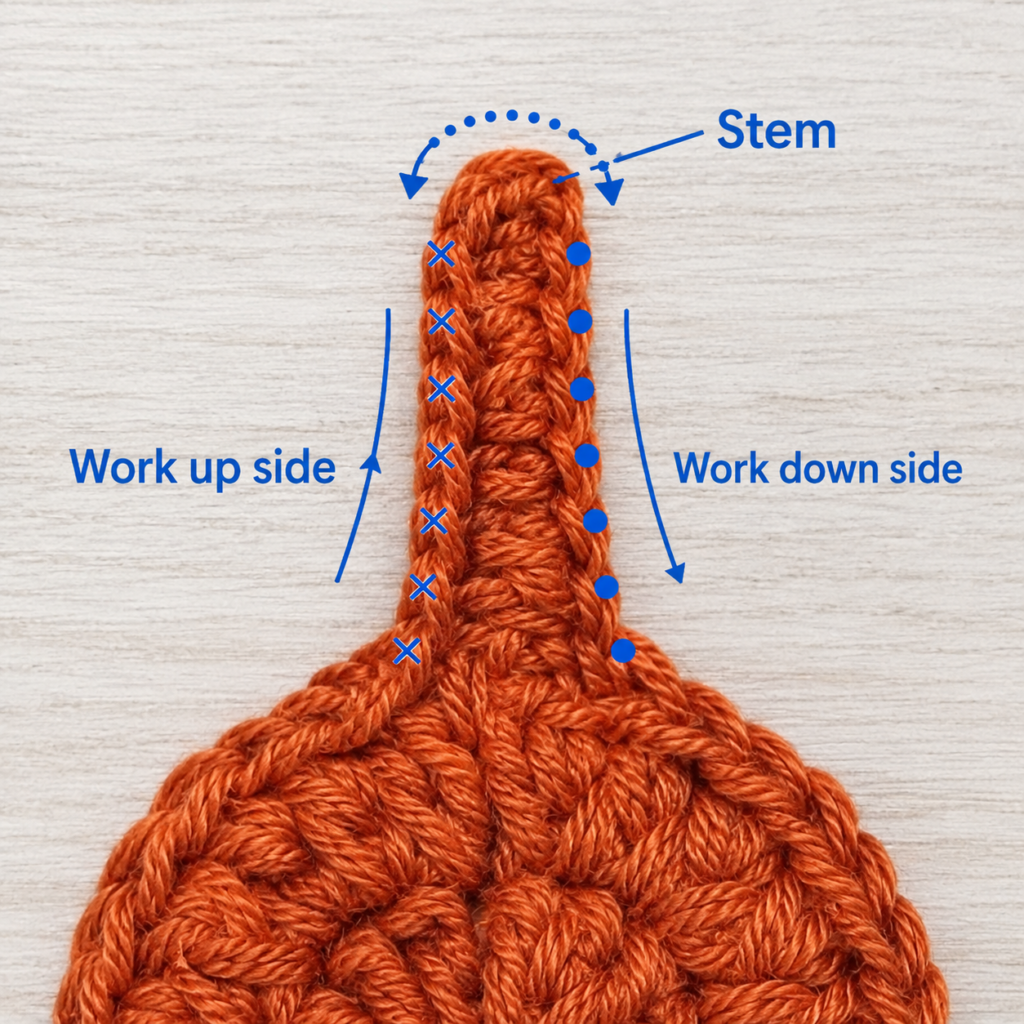
The first stitch of Round 2 becomes the stem anchor.
Chain 8.
Beginning in the second chain from the hook, work one slip stitch in each of the next seven chains. This takes you back toward the foundation circle.
Slip stitch into the same base stitch from which the chain began.
You have now used Foundation Stitch 1.
The stem may curl slightly while you are working. Do not force it straight yet. It will relax after the motif is blocked.
Beginner tip: Insert the hook under one loop of each chain when working back toward the base. This keeps the stem flexible and prevents it from becoming bulky.
Common mistake to avoid: Avoid pulling the slip stitches tightly. An overly tight stem can twist or become much shorter than expected.
Step 4: Form the First Small Lower Lobe
Continue into the next foundation stitches:
- Foundation Stitch 2: Work 1 sc.
- Foundation Stitch 3: Work
[hdc, dc, chain-2 picot, dc, hdc]in the same stitch. - Foundation Stitch 4: Work 1 sc.
- Foundation Stitch 5: Work 1 sl st.
The stitch group in Foundation Stitch 3 forms the first small point. The slip stitch in Foundation Stitch 5 creates the low valley between this point and the next lobe.
Check that the picot is positioned at the top of the group rather than leaning toward the front or back.
Beginner tip: After making the picot, rotate it gently between your fingertips before working the second double crochet.
Common mistake to avoid: Every stitch inside the brackets belongs in Foundation Stitch 3. Moving the second half of the group into the next stitch will flatten the point.
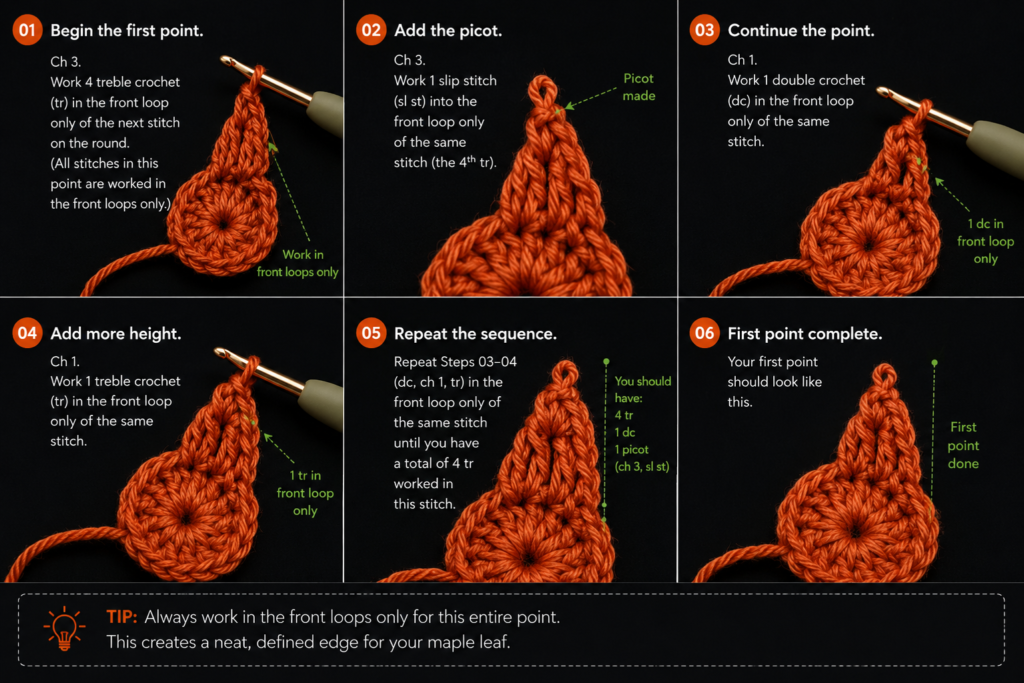
Step 5: Form the First Large Side Lobe
Work across the next five foundation stitches:
- Foundation Stitch 6: Work 1 sc.
- Foundation Stitch 7: Work
[hdc, dc]. - Foundation Stitch 8: Work
[tr, dtr, chain-2 picot, dtr, tr]. - Foundation Stitch 9: Work
[dc, hdc]. - Foundation Stitch 10: Work 1 sl st.
This lobe is taller than the first because it contains treble and double treble crochet stitches.
The sequence rises gradually:
sc → hdc → dc → tr → dtr
It then descends in reverse order. That gradual height change creates a smooth leaf edge rather than a sudden vertical bump.
Beginner tip: When making the double treble crochet, yarn over three times before inserting the hook. Work the loops off two at a time until one loop remains.
Common mistake to avoid: Do not replace the valley slip stitch with a single crochet. Even one extra row of height can make the two lobes blend together.
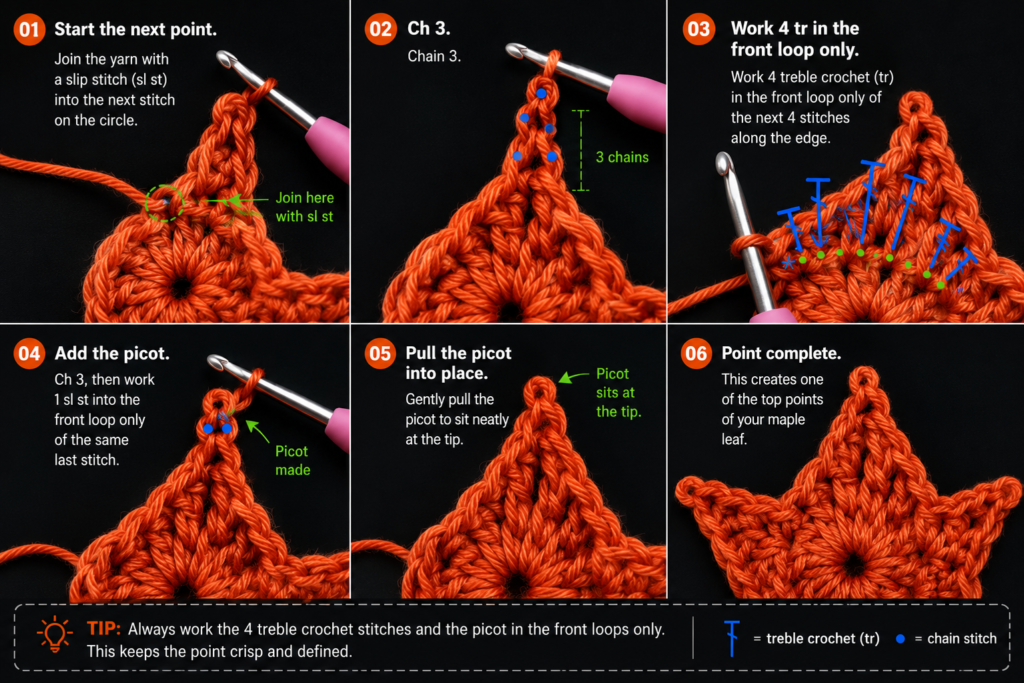
Step 6: Crochet the Tall Center Lobe
The center lobe is the tallest and most prominent point.
Work as follows:
- Foundation Stitch 11: Work
[sc, hdc]. - Foundation Stitch 12: Work 1 dc.
- Foundation Stitch 13: Work 1 tr.
- Foundation Stitch 14: Work
[dtr, chain-3 picot, dtr]. - Foundation Stitch 15: Work
[tr, dc, hdc, sc]. - Foundation Stitch 16: Work 1 sl st.
Take your time with Foundation Stitch 14. Both double treble crochet stitches and the center picot belong in that one stitch.
The chain-3 picot is slightly taller than the chain-2 picots used on the side lobes. This gives the center point visual emphasis.
After completing Foundation Stitch 15, the edge should slope downward into the valley at Foundation Stitch 16.
Beginner tip: Hold the base of each tall stitch between your thumb and middle finger. This keeps the stitch from stretching while you pull through the yarn-over loops.
Common mistake to avoid: Count the yarn overs before starting a tall stitch:
- Treble crochet: two yarn overs
- Double treble crochet: three yarn overs
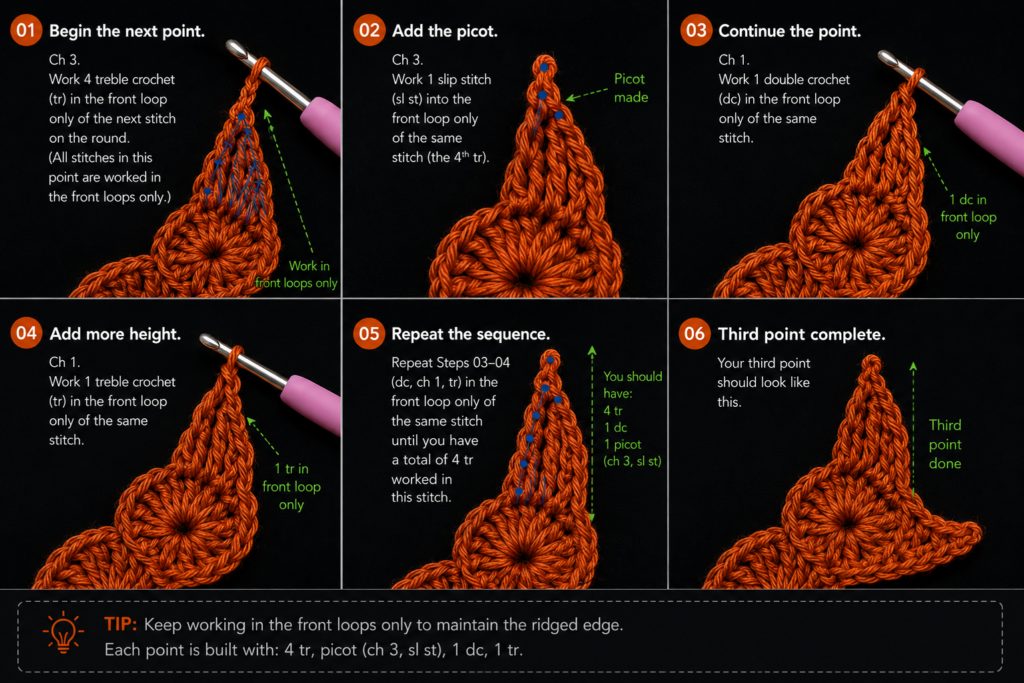
Step 7: Make the Second Large Side Lobe
The second large lobe mirrors the first.
Work:
- Foundation Stitch 17: Work
[hdc, dc]. - Foundation Stitch 18: Work
[tr, dtr, chain-2 picot, dtr, tr]. - Foundation Stitch 19: Work
[dc, hdc]. - Foundation Stitch 20: Work 1 sc.
- Foundation Stitch 21: Work 1 sl st.
The lobe should angle naturally away from the center point. Do not pull it outward while crocheting. Its final angle will be adjusted during blocking.
Beginner tip: Compare the height of the two large lobes before continuing. If the second looks much shorter, check whether you accidentally made a double crochet instead of a double treble.
Common mistake to avoid: Do not skip Foundation Stitch 20. That single crochet creates a gradual descent before the slip-stitch valley.
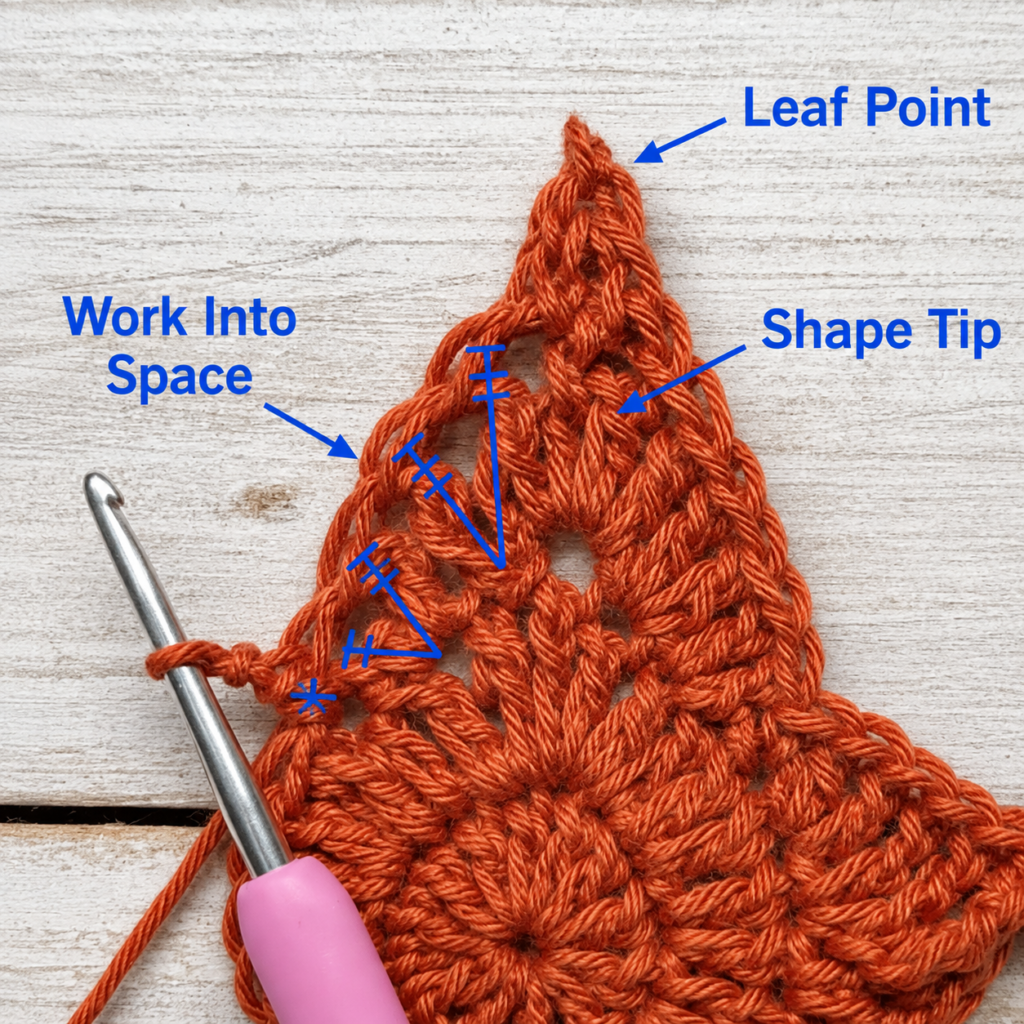
Step 8: Complete the Final Small Lobe
Finish the remaining foundation stitches:
- Foundation Stitch 22: Work 1 sc.
- Foundation Stitch 23: Work
[hdc, dc, chain-2 picot, dc, hdc]. - Foundation Stitch 24: Work 1 sc.
Slip stitch into the same base stitch where the stem began.
The shaping round is complete.
Count the visible points:
- Small lower-left point
- Large upper-left point
- Tall center point
- Large upper-right point
- Small lower-right point
Do not worry if the leaf looks uneven immediately after the final join. Tall stitches often twist while they are being handled. The shape becomes much clearer after the yarn tails are secured and the motif is blocked.
Beginner tip: Lay the leaf on the table and identify each valley before fastening off. If two lobes have merged, check for a missing slip stitch.
Common mistake to avoid: Do not add extra stitches to fill a perceived gap near the stem. The lower edge is intentionally more open than the center.
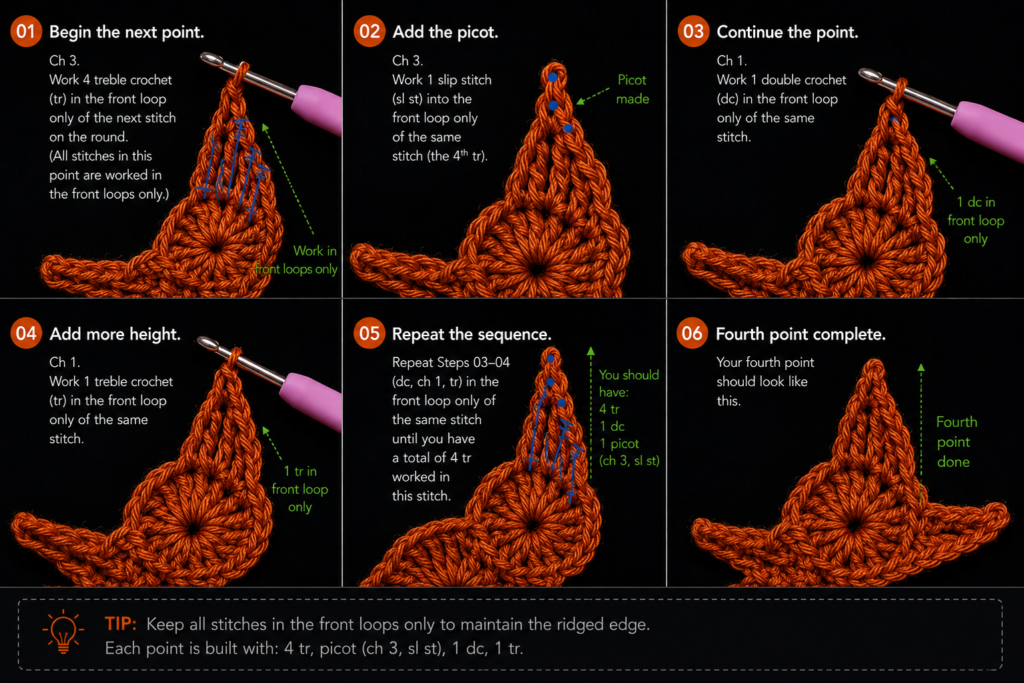
Pattern Notes and Stitch Notes
Turning Chain Rules
The motif is worked continuously in joined rounds and is not turned.
The beginning chains are used only to establish height unless the instructions explicitly state otherwise. They are not included in the stitch counts.
Stitch Counts
- Round 1: 12 dc
- Round 2: 24 hdc
- Shaping round: One stem plus five lobes worked across all 24 foundation stitches
Only the foundation rounds require a strict numerical stitch count. The shaping round is easier to check by confirming that all 24 foundation stitches were assigned.
Leaf-Shape Repeat
The leaf is not constructed from one identical repeat. Its shape follows this sequence:
stem → small lobe → valley → large lobe → valley → center lobe → valley → large lobe → valley → small lobe
The large lobes mirror each other. The two small lobes also mirror each other.
Right Side and Wrong Side
The side facing you while you work the final shaping round is the right side.
The reverse side will show more yarn bars and joins. When using the leaf as an appliqué, position the wrong side against the fabric or project being decorated.
Size Adjustments
The easiest way to change the leaf size is to change the yarn and hook rather than alter the stitch distribution.
Suggested combinations:
- Fingering yarn with 2.5–3 mm hook: small appliqué
- Sport yarn with 3–3.25 mm hook: ornament or gift tag
- DK yarn with 3.5–4 mm hook: standard decoration
- Worsted yarn with 4.5–5 mm hook: coaster or large garland leaf
- Bulky yarn with 6–7 mm hook: oversized wall or wreath decoration
The Craft Yarn Council classifies DK and light worsted as Category 3 yarn and provides general hook ranges, but individual yarn behavior and 08531search0turn908531search1
Common Beginner Mistakes
1. The Center Will Not Close
Cause: The magic-ring tail was trapped, split, or worked over incorrectly.
Fix: Hold the center stitches firmly and pull the tail slowly. When using cotton, alternate between pulling and gently moving the stitches around the ring.
For a simpler start, chain 4, join with a slip stitch to form a ring, and work Round 1 into the chain ring.
2. The Foundation Circle Forms a Bowl
Cause: Tight tension, missed increases, or fewer than 24 stitches in Round 2.
Fix: Count Round 2 again. Every Round 1 stitch should contain two half double crochet stitches. Increase the hook size if the stitch count is correct but the circle still cups severely.
3. The Foundation Circle Is Very Wavy
Cause: Loose tension or accidental extra increases.
Fix: Confirm that Round 2 contains exactly 24 stitches. A small amount of movement is acceptable, but pronounced ruffling usually indicates more than two stitches in one or more base stitches.
4. The Lobes Blend Together
Cause: A valley slip stitch was skipped, replaced with a taller stitch, or worked too loosely.
Fix: Locate the missing valley and undo the stitches back to that point. Make the slip stitch snug but not so tight that it becomes impossible to work into later.
5. A Leaf Point Looks Rounded
Cause: The picot is too loose, the slip stitch was placed in the wrong chain, or the picot has folded behind the tall stitches.
Fix: Pinch the picot forward and tighten its slip stitch slightly. During blocking, place a pin immediately beyond the picot to emphasize the point.
6. One Large Lobe Is Shorter Than the Other
Cause: A treble or double treble stitch was replaced by a shorter stitch.
Fix: Count the yarn overs. Treble crochet begins with two yarn overs; double treble begins with three.
7. The Stem Twists
Cause: The return slip stitches were made extremely tightly or through inconsistent chain loops.
Fix: Remake the stem with relaxed tension. Use the same loop of every chain while working back toward the leaf.
8. There Is a Gap Near the Round Join
Cause: The final slip stitch is loose or has been worked into the joining slip stitch rather than the original stem anchor.
Fix: Join into the same Round 2 stitch used to begin the stem. Tighten the working loop before fastening off.
How to Customize This Crochet Project
Change the Yarn Fiber
Cotton: Produces crisp points and clear stitch definition. It is ideal for garlands, appliqués, and table decorations.
Acrylic: Lightweight, affordable, and available in many autumn colors. It may require careful steam blocking.
Wool: Creates a warm, textured leaf that works well for wreaths and felted projects.
Raffia or paper yarn: Produces a firm, rustic leaf, but the tall stitches may be more difficult for beginners.
Create Autumn Color Variations
Make a coordinated collection using:
- Deep burgundy
- Rust orange
- Golden mustard
- Olive green
- Chocolate brown
- Muted terracotta
- Burnt red
For a natural changing-leaf appearance, use a subtly variegated yarn with short color transitions. Long color transitions may produce leaves that are mostly one shade.
Add a Contrasting Border
A border is optional because it makes the leaf heavier and may soften the sharp silhouette.
For a subtle outline, join a contrasting color near the stem and work loose surface slip stitches around the outer edge. Add one chain at each picot so the points remain flexible.
Add Surface Veins
Thread a tapestry needle with a lighter or darker yarn.
Embroider one long running stitch from the stem toward the center point. Add two shorter diagonal lines toward the large side lobes.
Keep the embroidery loose enough that it does not pull the leaf into a cup.
Turn the Leaf Into an Appliqué
Leave a 12-inch or 30 cm finishing tail instead of cutting the yarn short.
Use the tail to sew the leaf onto:
- A tote bag
- A blanket corner
- A fall pillow
- A child’s cardigan
- A beanie
- A fabric napkin ring
- A handmade journal cover
Sew around the circular center and selected lobe edges. Avoid stitching through every point because that can flatten the leaf.
Make a Garland
Crochet 7–15 leaves in coordinating colors.
Arrange the leaves before attaching them so that the colors are balanced. Thread them onto a long chain or sew them to cotton cord, leaving approximately 3–5 inches between leaves.
Use the Leaf as a Gift Decoration
Attach one small leaf to:
- Kraft-paper gift wrap
- A reusable cotton gift bag
- A jar of homemade treats
- A fall place card
- A Thanksgiving napkin tie
- A teacher appreciation gift
Make a Coaster
Use worsted cotton yarn and a 4.5 or 5 mm hook.
Because the finished shape has pointed edges and small openings, it works best beneath a mug rather than a narrow drinking glass.
Finishing Instructions
Fasten Off
After joining beside the stem, cut the yarn and leave a 5–6 inch tail.
Pull the cut end completely through the active loop and tighten it gently.
Weave In the Ends
Thread the finishing tail onto a tapestry needle.
On the wrong side:
- Pass the needle beneath four or five nearby stitch backs.
- Change direction and pass under several stitches again.
- Avoid pulling tightly enough to distort the nearest lobe.
- Trim the excess yarn.
Use the center tail to close any remaining opening in the magic ring. Weave it through the backs of several center stitches before trimming.
Block the Leaf
Blocking is strongly recommended because the tall stitches and picots may twist during crocheting.
For cotton or washable acrylic:
- Dampen the leaf with clean water.
- Press it between a folded towel to remove excess moisture.
- Place it right side up on a blocking mat.
- Straighten the stem.
- Pin the tall center point first.
- Pin both large side points at matching angles.
- Pin both small lower points.
- Add pins near the valleys only when necessary.
- Allow the leaf to dry completely before removing it.
Place each pin just beyond the picot rather than splitting the yarn.
For acrylic, do not place a hot iron directly on the leaf. Excessive heat can permanently flatten or melt synthetic fibers. The Craft Yarn Council’s blocking guidance distinguishes wet blocking from other methods and recommends considering the fiber and project cons531search22turn908531search24
Washing and Care
Follow the care instructions printed on the yarn label.
For decorative cotton leaves, gentle hand washing is usually the safest method:
- Use cool or lukewarm water.
- Avoid aggressive rubbing.
- Press water out in a towel.
- Reshape the points while damp.
- Dry flat.
Keep the original yarn label when giving the project as a gift so the recipient knows the correct fiber-care instructions. The Craft Yarn Council also recommends preserving yarn-label care i8531search9turn908531search25
Quick Printable-Style Summary
Skill level: Easy advanced beginner
Finished size: Approximately 4¼ inches wide with DK yarn and a 3.5 mm hook
Materials: DK cotton yarn, 3.5 mm hook, scissors, tapestry needle, blocking pins
Stitches: mr, ch, sl st, sc, hdc, dc, tr, dtr, picot
Starting method: Magic ring
Round 1: 12 dc in magic ring
Round 2: 2 hdc in each stitch around; 24 sts
Shaping order: Stem, small lobe, large lobe, center lobe, large lobe, small lobe
Stem: Ch 8, sl st back along 7 chains
Lobe method: Increase stitch height toward each point, make a picot, then decrease stitch height toward a slip-stitch valley
Repeat: Make additional leaves by changing yarn color or yarn weight rather than altering the 24-stitch foundation
Finishing: Fasten off, weave in both tails, damp block and pin all five points
FAQ
Is this crochet maple leaf pattern suitable for a complete beginner?
It is best for an advanced beginner who already knows how to chain, slip stitch, and make basic crochet stitches. The pattern introduces treble, double treble, and picot stitches, but each is explained before the shaping begins.
A complete beginner can still make the leaf after practicing the tall stitches with scrap yarn.
Can I start without a magic ring?
Yes. Chain 4 and join with a slip stitch to form a small ring. Work the 12 double crochet stitches of Round 1 into that ring.
This method may leave a slightly larger center opening, but the leaf will still hold its shape.
Why does my crochet maple leaf curl?
Mild curling is common before blocking because several tall stitches are concentrated in the lobe points.
Severe curling usually indicates tight tension, an undersized hook, or too few stitches in the foundation. Confirm that Round 2 contains 24 half double crochet stitches.
Which yarn is best for a maple leaf appliqué?
Smooth DK cotton is one of the most practical choices. It shows the stitch structure clearly, blocks neatly, and remains relatively flat when sewn onto another project.
Sport-weight cotton creates a smaller leaf. Worsted cotton creates a larger, sturdier decoration.
How can I make the maple leaf smaller?
Use thinner yarn and a smaller compatible hook without changing the pattern.
Try fingering-weight yarn with a 2.5–3 mm hook for a small appliqué or gift-tag embellishment.
How can I make the leaf points sharper?
Make sure each picot is correctly closed, keep the valley slip stitches low, and block the leaf.
During blocking, place one pin immediately beyond every picot and pull only enough to define the point. Overstretching can make the center thin and uneven.
Can I use this maple leaf as a coaster?
Yes, particularly when made with worsted cotton yarn and a 4.5–5 mm hook.
The pointed silhouette works best beneath mugs, candles in protective holders, or small decorative dishes. Keep crocheted fibers away from open flames and very hot cookware.
Conclusion
This crochet maple leaf turns a simple round foundation into a detailed autumn motif using stitch height rather than complicated assembly. The small lobes establish the lower silhouette, the taller side lobes add width, and the central double treble stitches produce the characteristic maple point.
Make one leaf to use as an appliqué or work a complete set in rust, mustard, olive, red, and brown. Once the stitch sequence becomes familiar, each additional leaf will work up more quickly.
Save the tutorial with your fall crochet projects so you can return to the stitch-count checkpoints, lobe sequence, and blocking guide whenever you need another leaf.






Fabulous ! I LOVED making this maple leaf. This pattern is the easiest pattern I have ever followed. Thank you.