A tiny crochet mushroom is one of those projects that looks detailed but does not require a long list of complicated techniques. Once you can make a chain, work basic stitches, and sew two crochet pieces together, you can create this flat mushroom applique in less than an afternoon.
This beginner tutorial divides the mushroom into two manageable components. First, you will crochet a rounded terracotta cap. Next, you will make a narrow cream stem with a gently widened base. A few embroidered spots give the cap its recognizable woodland look, and simple hand stitching connects everything without glue.
The finished applique can be sewn onto a tote bag, cardigan pocket, blanket, pencil pouch, wall hanging, headband, or handmade card. Because the design is flat and lightweight, it is easier to attach securely than a stuffed mushroom.
The pattern below is an original construction written in standard US crochet terminology. It does not reproduce the row or round sequence from the visual reference source.
What You’ll Learn
- How to begin a semicircular crochet shape with a magic ring
- How to increase evenly without creating a ruffled cap
- How to combine single, half double, and double crochet stitches
- How to crochet a flat stem in turned rows
- How to create a wider stem base with increases
- How to embroider simple mushroom spots
- How to assemble an applique without visible bulky seams
- How to block and attach the finished mushroom
Project Details
Tutorial type: Round or motif-style project tutorial
Skill level: Easy beginner
Finished size: Approximately 8 cm wide and 9 cm tall
Estimated time: 35–60 minutes
Construction: Two flat crochet pieces, embroidered details, sewn assembly
Terminology: US crochet terms
Your finished measurements may change depending on the yarn fiber, hook, and personal tension.
Materials You’ll Need
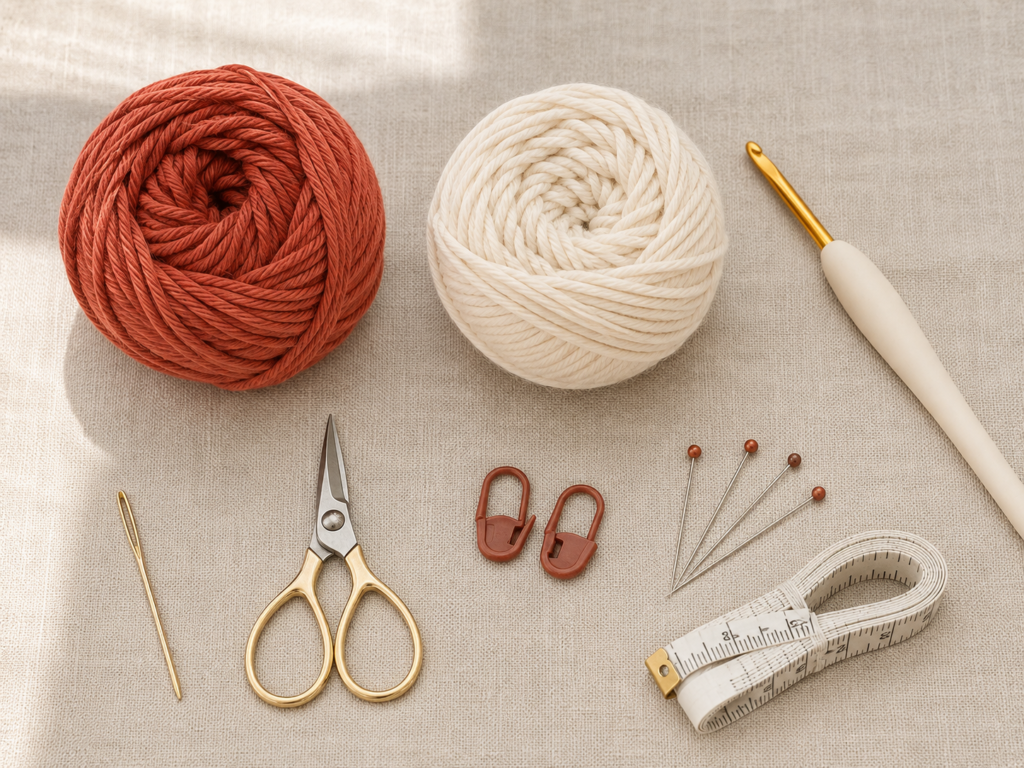
- Approximately 8–10 yards of muted terracotta DK-weight cotton yarn for the cap
- Approximately 5–7 yards of warm cream DK-weight cotton yarn for the stem and spots
- 3.5 mm crochet hook
- Blunt tapestry needle
- Small embroidery scissors
- One or two locking stitch markers
- Rust-resistant sewing pins
- Measuring tape
- Optional blocking mat and T-pins
- Matching sewing thread when attaching the applique to woven fabric
Smooth cotton is particularly helpful for this project because it gives the small motif clear stitch definition. Acrylic can also be used, although the finished cap may feel softer and less crisp.
Crochet Abbreviations Used
- ch = chain
- dc = double crochet
- hdc = half double crochet
- inc = increase by working two stitches into one stitch
- sc = single crochet
- sl st = slip stitch
- st/sts = stitch/stitches
- RS = right side
- WS = wrong side
These abbreviations follow commonly used US crochet terminology. The Craft Yarn Council maintains a broader reference list and also explains the differences between US and UK terminology. :contentReference[oaicite:3]{index=3}
US and UK Term Note
This tutorial uses US terms.
The main differences relevant to this project are:
- US single crochet = UK double crochet
- US half double crochet = UK half treble crochet
- US double crochet = UK treble crochet
Before You Start
Gauge and Tension
An exact gauge is not essential because the mushroom does not need to fit the body. Consistency is still important.
Aim for firm, even stitches that lie flat without becoming stiff. Your hook should enter each stitch without force. If the cap curls tightly inward, move up to a 3.75 mm or 4 mm hook. If the stitches appear loose and the spaces between them are obvious, move down to a 3.25 mm hook.
Metric hook measurements are the safest point of comparison because letter and number labels can vary among manufacturers. :contentReference[oaicite:4]{index=4}
How to Count the Cap Stitches
The turning chain does not count as a stitch anywhere in this pattern.
After turning:
- Locate the first complete V-shaped stitch directly below the hook.
- Work the first stitch into that V.
- Count each V across the row.
- Do not work into the turning chain at the opposite edge.
Place a stitch marker in the first stitch when you are learning. This makes the edges easier to identify.
How to Prevent Curling
A small amount of curving before blocking is normal. Strong curling usually has one of three causes:
- The hook is too small.
- The foundation stitches are being pulled too tightly.
- One or more stitches were missed near the row edges.
Relax your grip and slide the loops onto the full shaft of the hook before completing each stitch.
Choosing the Colors
A traditional toadstool can be made with a red cap and white stem, but a softer muted palette often photographs beautifully. Terracotta, rust, burgundy, mustard, dusty rose, forest green, lavender, or warm brown can all work for the cap.
Use a light contrasting yarn for the spots so they remain visible.
Beginner Alternative to the Magic Ring
The magic ring gives the cap a clean center, but it is not mandatory.
Instead:
- Chain 3.
- Join the first chain with a slip stitch to form a small ring.
- Work the first-row stitches into the center of that ring.
The center may be slightly more open, but the finished shape will still work.
Step-by-Step Crochet Tutorial
Step 1: Begin the Rounded Mushroom Cap
Use the muted terracotta yarn.
Create a magic ring, but do not close it immediately.
Cap Row 1
- Chain 2. The chain does not count as a stitch.
- Work 8 half double crochet stitches into the magic ring.
- Pull the yarn tail until the center is closed neatly.
- Turn the work.
Stitch count: 8 hdc
The stitches should form a small fan rather than a completed circular round. Do not join the first and last stitches.
Beginner tip:
Hold the base of the stitches between your thumb and middle finger while tightening the ring. This keeps the first row from twisting.
Common mistake to avoid:
Do not count the beginning chain 2 as a half double crochet. Counting it will cause the next row to contain too many stitches.
Step 2: Increase the Width of the Cap
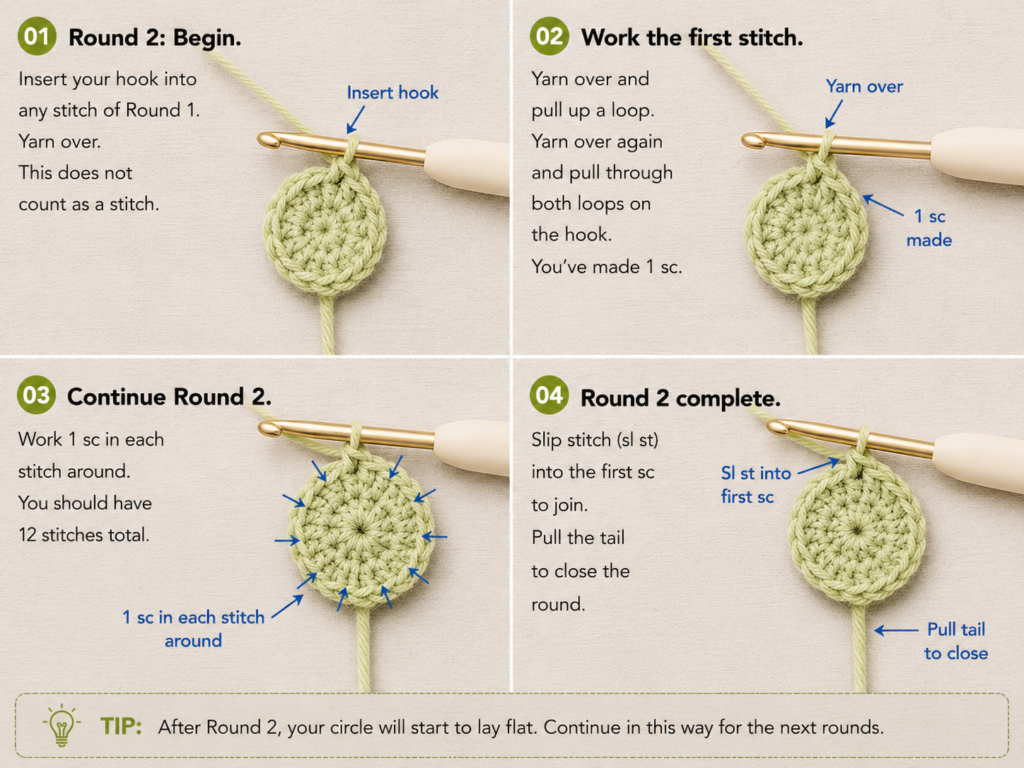
The second row turns the small fan into a wider semicircle.
Cap Row 2
- Chain 2 and turn.
- Work 2 half double crochet stitches in the first stitch.
- Continue working 2 half double crochet stitches in every stitch across.
- Turn.
Stitch count: 16 hdc
Before continuing, count the visible V shapes across the top of the row. You should have exactly 16.
The edge may look slightly angular while it is still on the hook. The next rows will soften the profile.
Beginner tip:
After working the first half double crochet of an increase, insert the hook into the same V again. Do not move to the next stitch until both stitches of the increase are complete.
Common mistake to avoid:
If the cap has fewer than 16 stitches, an increase was probably skipped. If it has more than 16, the turning chain may have been mistaken for a stitch.
Step 3: Shape and Finish the Cap
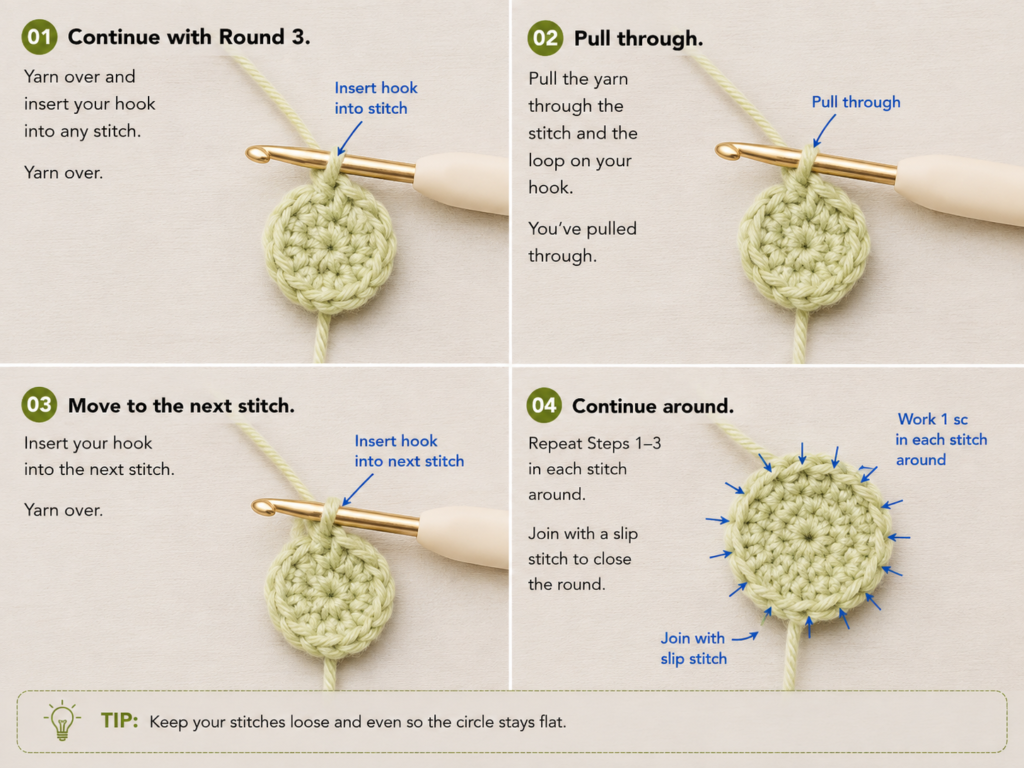
The next row uses stitches of different heights. Short stitches at the sides and taller stitches through the center create a broad mushroom silhouette.
Cap Row 3
- Chain 1 and turn.
- Single crochet in each of the first 2 stitches.
- Half double crochet in each of the next 2 stitches.
- Double crochet in each of the next 8 stitches.
- Half double crochet in each of the next 2 stitches.
- Single crochet in each of the final 2 stitches.
- Turn.
Stitch count: 16 sts
Cap Row 4
- Chain 1.
- Single crochet in every stitch across.
- Fasten off, leaving a 25 cm tail for later attachment.
Stitch count: 16 sc
Row 4 creates a firmer horizontal edge along the bottom of the cap. Lay the piece flat and gently spread the stitches with your fingers.
The first and last corners should sit at approximately the same height. A small difference can be corrected during blocking.
Beginner tip:
When changing from single crochet to taller stitches, continue using the same relaxed tension. Pulling the double crochet stitches tightly defeats the shaping created by their height.
Common mistake to avoid:
Do not add stitches along the sides of the cap. The cap is complete after the fourth row.
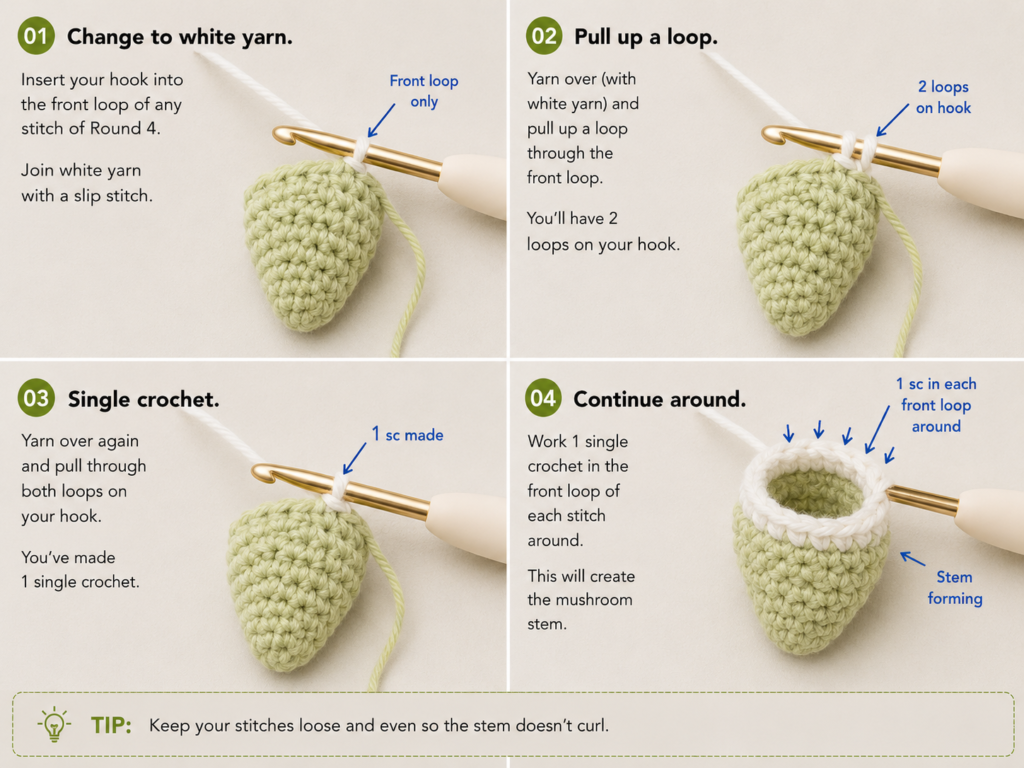
Step 4: Crochet the Narrow Upper Stem
Switch to the warm cream yarn.
Stem Foundation
- Chain 6.
- Turn the chain so that the back bumps are facing you when possible.
Stem Row 1
- Single crochet in the second chain from the hook.
- Single crochet in each remaining chain.
- Turn.
Stitch count: 5 sc
Stem Rows 2–4
- Chain 1 and turn.
- Single crochet in each stitch across.
- Turn after each row.
Stitch count: 5 sc per row
The turning chain does not count as a stitch. At the end of Row 4, the piece should look like a narrow rectangle.
Beginner tip:
Place a marker in the first stitch of each row. Move it upward as you work so that neither edge stitch is accidentally skipped.
Common mistake to avoid:
Do not work into the side of the previous row. Insert the hook beneath the two top loops of the next V-shaped stitch.
Step 5: Widen the Bottom of the Stem
A mushroom stem usually looks more balanced when its base is slightly wider than its neck.
Stem Row 5
- Chain 1 and turn.
- Work 2 single crochet stitches in the first stitch.
- Single crochet in each of the next 3 stitches.
- Work 2 single crochet stitches in the final stitch.
- Turn.
Stitch count: 7 sc
Stem Row 6
- Chain 1.
- Single crochet in every stitch across.
- Fasten off, leaving a 30 cm sewing tail.
Stitch count: 7 sc
Gently stretch the stem lengthwise, then smooth the widened base. The top should remain narrow enough to disappear partly behind the cap.
For a rounder lower edge, use the yarn tail to make one small securing stitch between the bottom two corners. Do not pull tightly; the goal is only to soften the rectangular line.
Beginner tip:
When increasing into the first stitch, make both single crochet stitches before moving the marker.
Common mistake to avoid:
Do not increase in every stitch. Only the first and last stitches are increased.
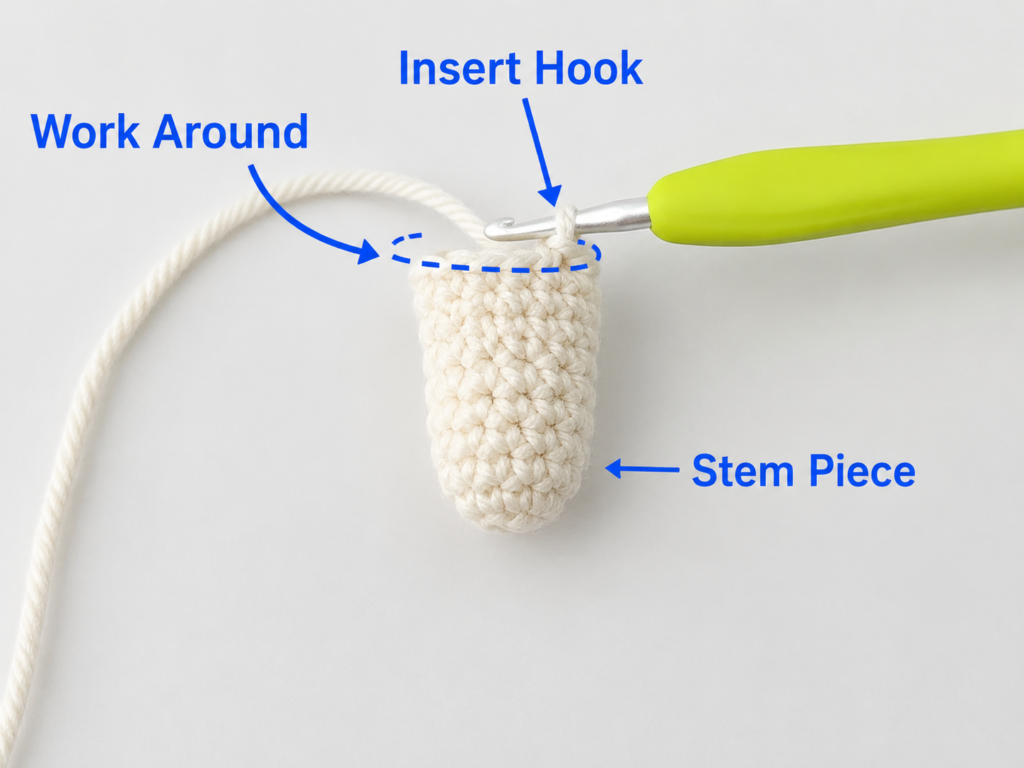
Step 6: Add the Mushroom Spots
Cut approximately 45 cm of cream yarn and thread it through the tapestry needle.
Place the cap right-side up. Decide where the spots will sit before making the first stitch. Five spots usually look balanced on a cap of this size:
- One near the upper center
- Two across the middle
- Two closer to the lower corners
Avoid arranging them in exact rows. A slightly irregular arrangement looks more natural.
Simple Straight-Stitch Spot
- Bring the needle from the wrong side to the right side between two crochet stitches.
- Move horizontally across one stitch.
- Insert the needle into the next gap.
- Bring it back through the original area a second time when you want a thicker spot.
- Move to the next position along the wrong side.
Do not knot the yarn tightly against the back of the cap. Weave the beginning and ending tails beneath several stitches instead.
For rounder dots, make a French knot by wrapping the yarn around the needle two or three times before inserting it close to the exit point. Straight stitches are easier for complete beginners and sit flatter on washable projects.
Beginner tip:
Check the front after every spot. It is much easier to remove one stitch than to undo all five later.
Common mistake to avoid:
Do not pull the embroidery yarn hard enough to pucker the cap. The cap should remain flat.
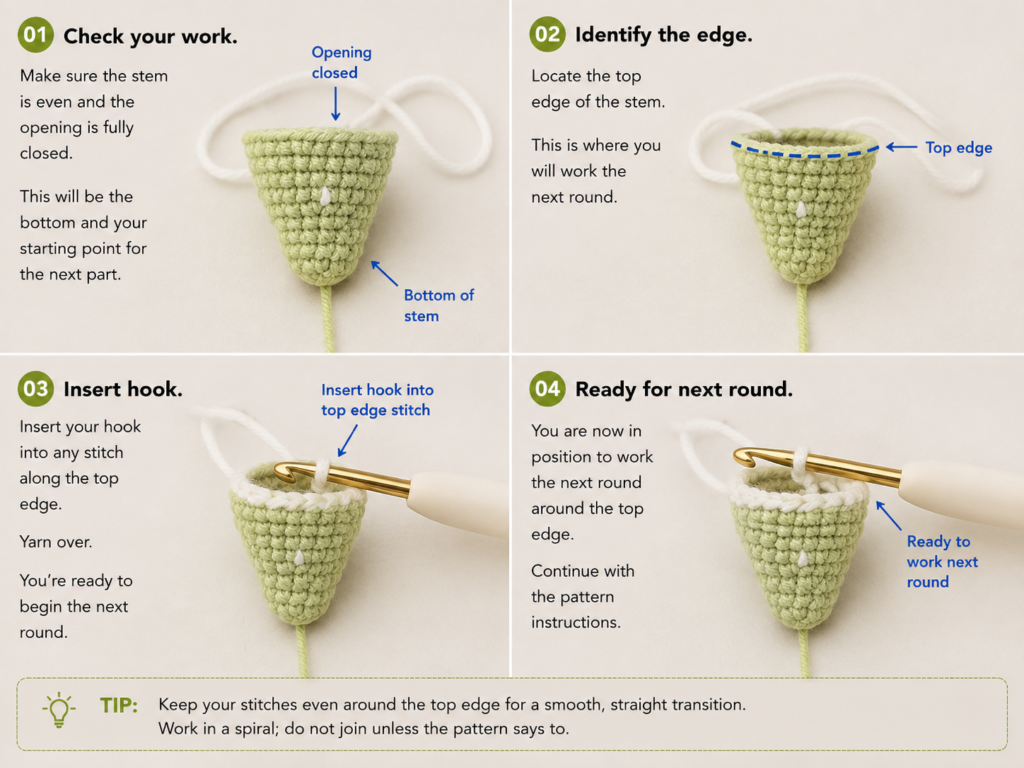
Step 7: Sew the Stem to the Cap
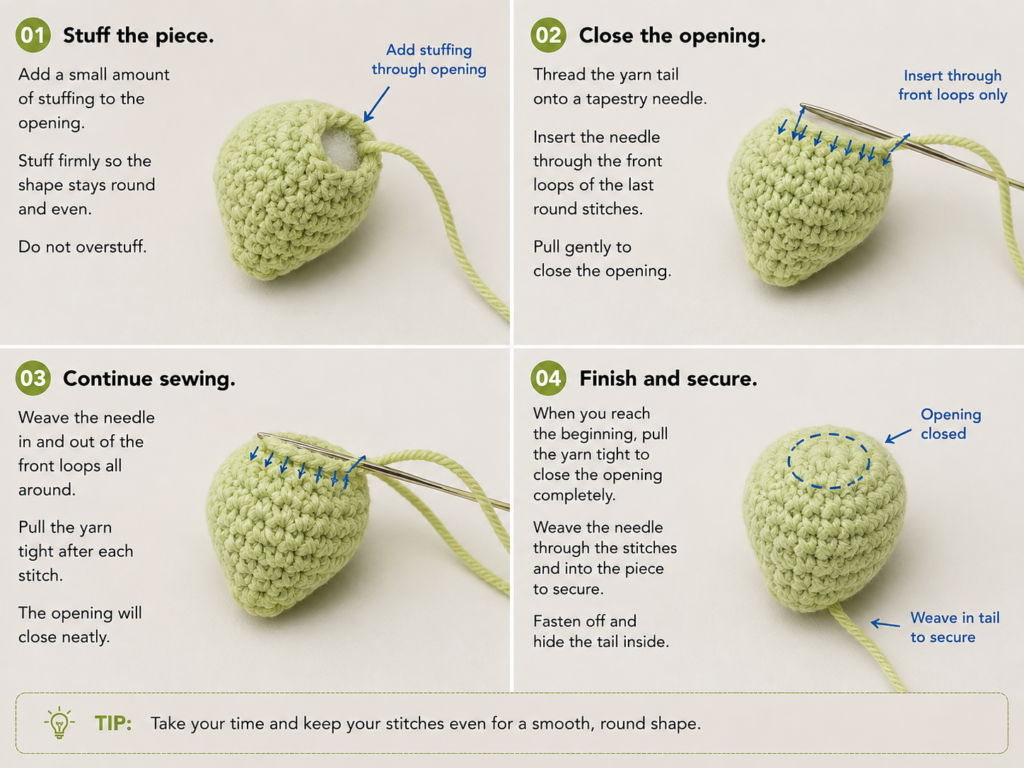
Lay the cap right-side down. Place the cream stem right-side down over it.
Slide approximately 6 mm of the narrow stem top beneath the straight lower edge of the cap. Center it by counting the cap stitches. With 16 stitches across the cap, the center falls between Stitches 8 and 9.
Pin the pieces together temporarily.
Thread the cream stem tail through the tapestry needle.
- Begin on the wrong side.
- Pass the needle beneath a cream edge stitch.
- Catch only the back loop or back ridge of the terracotta cap.
- Return through the stem.
- Repeat across the overlapping area.
- Make a second pass when the applique will be attached to a frequently washed item.
- Weave the remaining cream tail through the wrong side of the stem.
Turn the applique over and inspect the front. The stem should emerge from the middle of the cap without visible cream stitches on the terracotta surface.
Beginner tip:
Use small stitches and matching yarn. Long sewing stitches can pull the cap downward and distort its straight edge.
Common mistake to avoid:
Do not sew through both layers to the front unless the stitching is intended to be decorative.
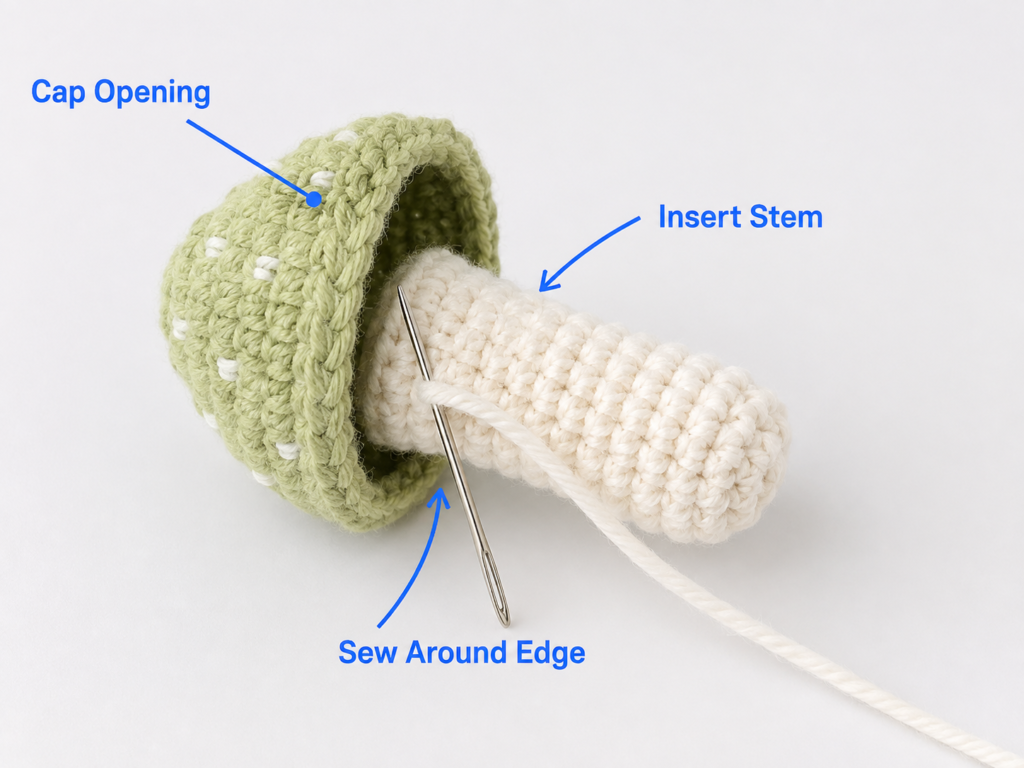
Step 8: Shape and Inspect the Applique
Place the assembled mushroom right-side up.
Check the following:
- The cap lies flat.
- The straight cap edge is horizontal.
- The stem is centered.
- The stem base is wider than the neck.
- The decorative spots do not pull the fabric.
- No tails are visible from the front.
Gently stretch the cap from side to side. Then smooth the stem downward.
When one side of the cap is higher, dampen only that area and pin it into shape. Avoid pulling the opposite side unnecessarily.
Pattern Notes or Stitch Notes
Turning Chain Rules
The beginning chain does not count as a stitch.
Work the first stitch into the first complete stitch below the hook. Do not work into the turning chain at the end of the row.
Stitch Counts
Cap
- Row 1: 8 hdc
- Row 2: 16 hdc
- Row 3: 16 sts
- Row 4: 16 sc
Stem
- Row 1: 5 sc
- Rows 2–4: 5 sc
- Row 5: 7 sc
- Row 6: 7 sc
Stop and count at the end of every row. Small motifs show missing stitches more clearly than large projects.
Repeat Pattern
There is no long repeating sequence. The only repeated instructions are:
- Two half double crochet stitches in every stitch across Cap Row 2
- One single crochet in every stitch across the straight stem rows
Right Side and Wrong Side
For this applique, the right side is the surface where the stitch texture looks cleanest and the cap spots are visible.
The wrong side contains:
- Embroidery tails
- Stem attachment stitches
- Woven yarn ends
Choose the right side after completing the cap and mark it temporarily.
Size Adjustment Notes
To make a smaller applique:
- Use sport-weight yarn and a 3 mm hook.
- Work 6 hdc in Cap Row 1 and 12 hdc in Row 2.
- Begin the stem with 5 chains instead of 6.
To make a larger applique:
- Use worsted-weight yarn and a 4.5 mm hook.
- Keep the same stitch counts.
- Add one additional even row to the stem before widening its base.
Changing the yarn and hook together is easier than redesigning the cap increases.
Common Beginner Mistakes
1. Accidentally Joining the Cap Into a Round
Problem: The cap begins forming a cup or complete circle.
Fix: Do not slip stitch the first and last stitches together. Turn after each cap row.
2. Counting the Turning Chain
Problem: The stitch count grows unexpectedly and one edge sticks outward.
Fix: Treat every turning chain as height only. Place the first stitch in the first complete V below the hook.
3. Missing the First Stem Stitch
Problem: The stem gradually becomes narrower before the planned increases.
Fix: Mark the first stitch immediately after making it.
4. Pulling the Magic Ring Too Tightly Too Soon
Problem: The first-row stitches become crowded and difficult to identify.
Fix: Leave the ring slightly open until all eight half double crochet stitches are complete. Tighten it afterward.
5. Making the Embroidery Spots Too Tight
Problem: The cap puckers around the cream stitches.
Fix: Pull only until the cream yarn rests on the cap. Do not cinch the surrounding terracotta stitches.
6. Placing the Stem on Top of the Cap
Problem: The assembly seam remains visible from the front.
Fix: Overlap the stem behind the cap and sew from the wrong side.
7. Using Too Much Yarn for the Spots
Problem: The cap becomes heavy or stiff.
Fix: Use one or two short passes for each spot. Avoid large knots unless the project will not be washed frequently.
8. Cutting the Sewing Tails Too Short
Problem: The pieces are difficult to assemble and the tail may escape during washing.
Fix: Leave at least 25–30 cm when fastening off.
How to Customize This Crochet Project
Yarn Changes
Cotton produces a crisp applique that is easy to sew onto bags and garments. Acrylic creates a softer patch suitable for blankets. Wool can be lightly felted for a denser woodland decoration.
Match the fiber to the item receiving the applique. A cotton patch sewn onto a cotton tote will usually behave more predictably during washing than a wool patch attached to cotton.
Color Changes
Try these combinations:
- Brick red cap with ivory stem
- Mustard cap with oatmeal stem
- Dusty rose cap with soft beige stem
- Forest green cap with cream stem
- Lavender cap with pale gray stem
- Chocolate cap with camel stem
- Rust cap with sage spots
Use two or three cap colors to create a woodland set.
Size Changes
Using a heavier yarn and larger hook enlarges the motif without adding more rows.
A lightweight yarn and smaller hook create a miniature mushroom suitable for:
- Hair clips
- Bookmarks
- Gift tags
- Brooches
- Small garlands
Keep the fabric firm enough that the stem does not fold over.
Border Options
For a more outlined appearance, join a darker contrasting yarn at one cap corner and slip stitch loosely around the curved edge.
Do not place the slip stitches too tightly. A tight border can cause the cap to cup.
Texture Options
Replace the final cap row with back-loop-only single crochet for a subtle ridge.
You can also embroider:
- Tiny lines instead of round spots
- French knots
- Small stars
- A curved line under the cap
- A simple smiling face
For baby items, use yarn embroidery instead of beads, buttons, or glued decorations.
Gift Ideas and Uses
Attach the applique to:
- A crochet tote bag
- A child’s cardigan pocket
- A pencil pouch
- A fall garland
- A woodland baby blanket
- A fabric bookmark
- A mug cozy
- A market bag
- A handmade greeting card
- A crochet wall hanging
- A beanie or bucket hat
- A reusable gift bag
Finishing Instructions
Fastening Off
After the final stitch, cut the yarn while leaving the specified tail. Pull the cut end completely through the active loop.
Do not knot the tail against the last stitch. A knot can form a visible bump on such a small applique.
Weaving In Ends
Thread each tail through a tapestry needle.
On the wrong side:
- Pass the needle beneath four or five stitch backs.
- Change direction.
- Pass beneath several neighboring stitches.
- Trim the tail close to the fabric.
Changing direction helps prevent the tail from sliding out.
Blocking
Cotton applique:
- Lightly mist the mushroom with water.
- Position it on a blocking mat.
- Pin the cap corners, crown, stem neck, and base.
- Check that the stem is centered.
- Allow it to dry completely before removing the pins.
Acrylic applique:
Use gentle steam from a safe distance without pressing a hot iron directly onto the yarn. Excessive heat can flatten or damage synthetic fibers.
Attaching the Applique
Pin the mushroom onto the receiving fabric.
Use matching yarn for crochet fabric or strong matching sewing thread for woven fabric. Sew around:
- The curved cap edge
- Both cap corners
- The lower cap edge where accessible
- Both stem sides
- The stem base
Use small stitches and check the reverse side regularly.
For children’s clothing or baby blankets, sew the applique securely around its complete perimeter. Avoid relying on fabric glue, beads, or loosely attached decorative pieces.
Washing and Care
Follow the care instructions from the yarn label and from the item receiving the applique. When giving a handmade item as a gift, retaining or sharing the yarn-label care information helps the recipient clean it correctly. :contentReference[oaicite:5]{index=5}
Place delicate embellished items in a mesh laundry bag when machine washing is permitted. Reshape the applique while damp and dry it flat when necessary.
Quick Printable-Style Summary
Skill level: Easy beginner
Finished size: Approximately 8 cm wide × 9 cm tall
Materials:
- DK cotton in terracotta and cream
- 3.5 mm hook
- Scissors
- Tapestry needle
- Stitch marker
- Pins
Stitches: ch, sc, hdc, dc, inc
Starting method: Magic ring worked as an open fan
Cap:
- Row 1: 8 hdc
- Row 2: Increase in every stitch to 16 hdc
- Row 3: Short stitches at sides, taller stitches across center
- Row 4: 16 sc
Stem:
- Chain 6
- Work four rows of 5 sc
- Increase at both ends to 7 sc
- Complete one even row
Decoration: Add five small cream embroidered spots.
Assembly: Place the stem behind the cap with approximately 6 mm overlap and whipstitch from the wrong side.
Finishing: Weave in ends, lightly block, and sew securely to the chosen project.
FAQ
Is this crochet mushroom applique suitable for a complete beginner?
Yes. The pattern uses basic stitches and simple sewing. A beginner should already know how to make a chain and complete a single crochet. The magic ring can be replaced with a small chain ring.
Can I make the mushroom without a magic ring?
Yes. Chain 3, slip stitch into the first chain, and work the first eight half double crochet stitches into the small chain ring.
Why is my mushroom cap curling?
The most common causes are tight tension, a hook that is too small, or missed stitches. Confirm that Cap Row 2 contains 16 stitches and move up one hook size when necessary.
Can I crochet the cap and stem as one piece?
It is possible, but separate pieces give beginners more control over the shape. The stem can also be repositioned before sewing, which makes centering easier.
What yarn is best for a crochet mushroom applique?
Smooth DK cotton provides clear stitches and a stable flat shape. Sport-weight cotton creates a smaller mushroom, while worsted cotton or acrylic produces a larger one.
How do I attach the applique to a bag or sweater?
Pin it in place and sew around the perimeter with matching yarn or sewing thread. Add extra stitches at the cap corners, stem neck, and stem base because these areas receive more movement.
Can this mushroom applique be used on baby items?
It can be used when it is sewn securely around its full perimeter. Use embroidered yarn details rather than beads or buttons, and inspect the applique regularly for loose threads.
Conclusion
This crochet mushroom applique is small enough for an evening project but includes several useful crochet skills: working into a magic ring, increasing a semicircle, shaping with different stitch heights, maintaining straight row edges, embroidering details, and assembling separate motifs.
After completing the first mushroom, try making a second one with a smaller hook or a contrasting cap color. A group of mushrooms in rust, mustard, burgundy, and forest green can become a coordinated autumn garland, woodland blanket detail, or collection of handmade patches.
Save the tutorial with your easy crochet patterns so you can return to the stitch counts and image sequence when making your next mushroom.





