Tiny crochet projects are ideal when you want to practice amigurumi without committing to a large stuffed animal. This crochet ghost keychain is small enough to finish in an evening, but it still teaches several useful techniques: shaping a rounded crown, working continuous rounds, separating the front and back loops, crocheting a scalloped edge, closing a stuffed form, and attaching durable keychain hardware.
The ghost is worked from the top down as one main piece. Its curved lower edge is crocheted directly onto the body, so there are no separate arms or skirt pieces to sew. Once the ghost has been stuffed and closed, you can add a simple face and connect a split keyring to the crown.
This is a newly written project designed specifically for a compact keychain. It is not a transcription of the visual reference source.
What You’ll Learn
- How to begin a small amigurumi project with a magic ring
- How to increase evenly without creating a pointed crown
- How to maintain twenty-four stitches in continuous rounds
- How to distinguish the front loop from the back loop
- How to crochet an eight-scallop ghost hem
- How to make and place invisible decreases
- How much stuffing a small keychain needs
- How to close the underside cleanly
- How to embroider child-safe facial features
- How to connect a split keyring without relying on a weak yarn tail
Finished Size
Using DK yarn and a 3.25 mm hook, the finished ghost should measure approximately:
- Height without hardware: 6–7 cm
- Width across the hem: 5–6 cm
- Total hanging length with keyring: Approximately 10 cm
Your finished measurement will vary with yarn thickness and personal tension.
Materials You’ll Need
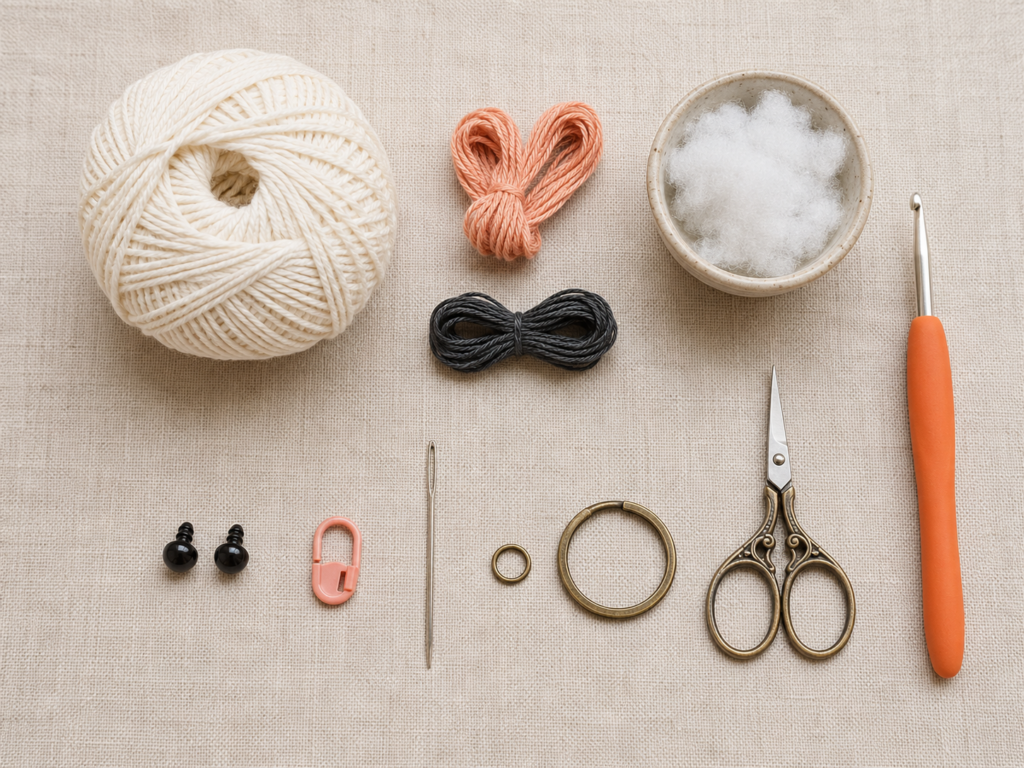
- Approximately 15–20 yards of DK or light worsted yarn in ivory, white, cream, lavender, mint, or another ghost color
- 3.25 mm crochet hook
- Small amount of charcoal or black yarn for embroidered eyes and mouth
- Small amount of peach or pink yarn for optional cheeks
- Polyester fiberfill
- Locking stitch marker
- Blunt tapestry needle
- Small scissors
- 25 mm split keyring
- One sturdy 8–10 mm jump ring
- Two jewelry pliers for opening the jump ring
- Optional: two 7–8 mm safety eyes
Smooth cotton or cotton-blend yarn creates clearly defined stitches and is less likely to become fuzzy after rubbing against keys. Acrylic also works, although a very soft acrylic may stretch more around the hardware.
For a keychain that could reach a baby, young child, or pet, omit safety eyes and metal hardware. Embroider every facial feature instead. The selected visual source also warns that safety eyes can create a choking risk and recommends yarn, felt, or embroidery for baby items.
Crochet Abbreviations Used
This tutorial uses standard US crochet terminology.
- MR = magic ring
- ch = chain
- sc = single crochet
- dc = double crochet
- sl st = slip stitch
- st/sts = stitch/stitches
- inc = work 2 single crochet stitches in the same stitch
- dec = single crochet 2 stitches together; invisible decrease recommended
- FLO = front loop only
- BLO = back loop only
- rep = repeat
- FO = fasten off
In UK terminology, a US single crochet is called a double crochet, while a US double crochet is called a treble crochet. The Craft Yarn Council provides a complete comparison of US and UK crochet terms.
Before You Start
Gauge and tension
You do not need to match an exact gauge measurement. You do need fabric dense enough to conceal the stuffing.
Make the first four rounds and gently stretch the circle between your fingers. Change to a smaller hook when you can see obvious spaces between stitches. Change to a slightly larger hook when inserting the hook is painful or the fabric feels stiff enough to resist shaping.
How to count the rounds
This ghost is worked in a continuous spiral. Do not join each round with a slip stitch.
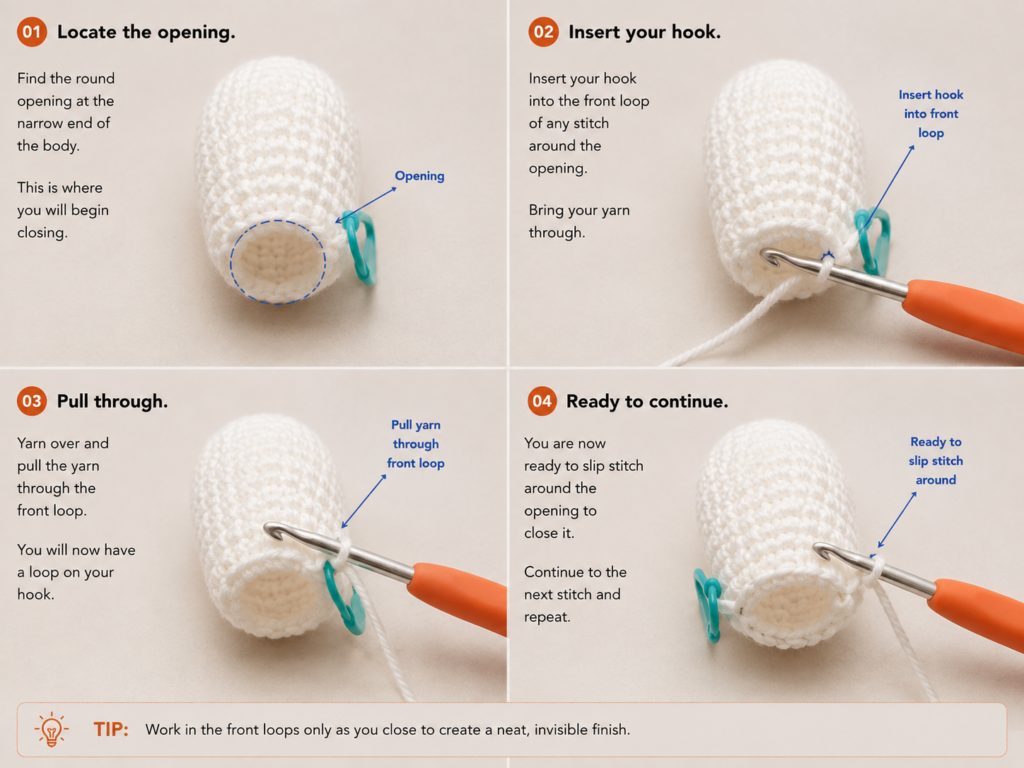
Place a locking marker in the first stitch of every round. Move it upward after completing each round. When the marker is removed, the next stitch immediately after it is the beginning of the new round.
How to recognize the two loops
Look at the top of a crochet stitch. It resembles a small horizontal V.
- The loop closest to you is the front loop.
- The loop farthest from you is the back loop.
The scalloped edge will use the front loops. The underside of the ghost will later be closed through the back loops that remain behind that edge.
How tightly should the ghost be stuffed?
The crown should feel softly rounded rather than hard. Excess stuffing can stretch the stitches, distort the eyes, and push the lower closure beneath the scallops.
Use several small pieces of fiberfill instead of forcing one large ball into the body.
Step-by-Step Crochet Tutorial
Step 1: Make the Magic Ring and Crown
Wrap the ivory yarn around two fingers to make an adjustable loop. Insert the hook through the loop, yarn over, and pull up a working loop.
Work the following rounds:
- Round 1: Work 6 sc into the MR. Pull the yarn tail to close the center. (6 sts)
- Round 2: Inc in every stitch around. (12 sts)
- Round 3: Repeat 1 sc, inc around. (18 sts)
- Round 4: Repeat 1 sc in each of the next 2 sts, inc around. (24 sts)
The completed crown should lie almost flat but may curve slightly at the edge. That shallow curve is desirable because it will become the top of the ghost.
Beginner tip:
Count the stitches at the end of every increase round. Correcting an error here is much easier than discovering it after the body is complete.
Common mistake to avoid:
Do not place the first stitch of the new round into the same stitch that already contains the final stitch of the previous round. Use the marker to separate those two positions.
Step 2: Crochet the Straight Body Rounds
Continue without increasing:
- Rounds 5–10: Sc once in every stitch around. (24 sts per round)
After the first two even rounds, the edge should begin to turn downward. By Round 10, the piece should resemble a tiny rounded cup or short capsule.
Pause after each round and count twenty-four stitches. A missed stitch can create a leaning body. An accidental increase can make the ghost flare before you reach the decorative hem.
Beginner tip:
Let the hook do the work. Insert it beneath both loops without pulling the fabric tightly downward. A relaxed grip creates more consistent stitches.
Common mistake to avoid:
Do not add or remove a stitch at the marker. The marker occupies a stitch; it is not an extra loop to crochet into.
Step 3: Crochet the Wavy Ghost Hem
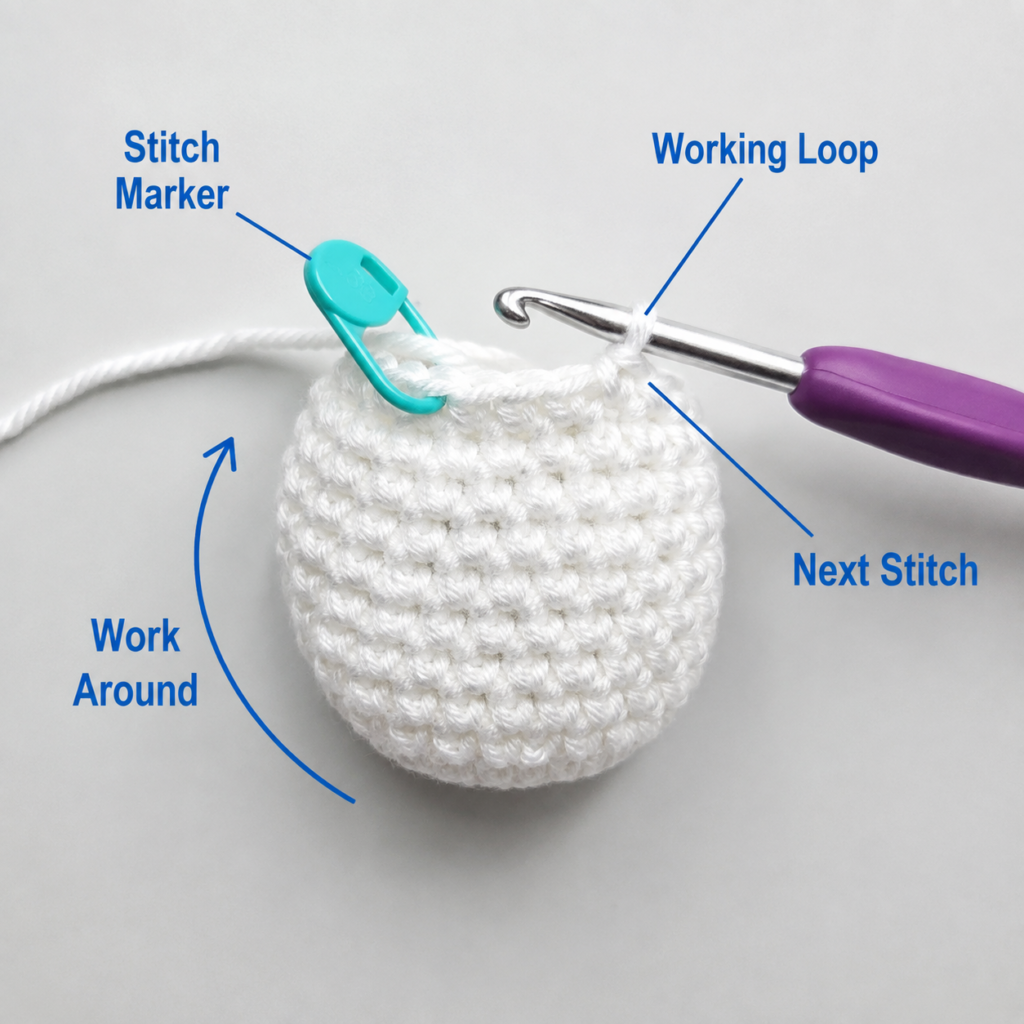
The next round creates eight rounded scallops. Work only through the front loops of Round 10.
- Round 11, FLO: Repeat sl st in the next front loop, 4 dc in the next front loop, sl st in the next front loop eight times. (8 scallops)
After the final slip stitch, cut the yarn and fasten off. Leave a 10 cm tail that can be woven behind the decorative edge.
Each repeat uses three front loops:
- The first slip stitch pulls the fabric inward.
- Four double crochet stitches create the rounded center.
- The second slip stitch pulls the fabric inward again.
Beginner tip:
After every scallop, count the unused front loops. You should use exactly three loops per scallop.
Common mistake to avoid:
Do not insert the hook beneath both loops. You need the back loops to remain available for the closing rounds.
Step 4: Position the Eyes and Face
Decide which side of the ghost will be the front. The small spiral offset at the back of the body can help you choose.
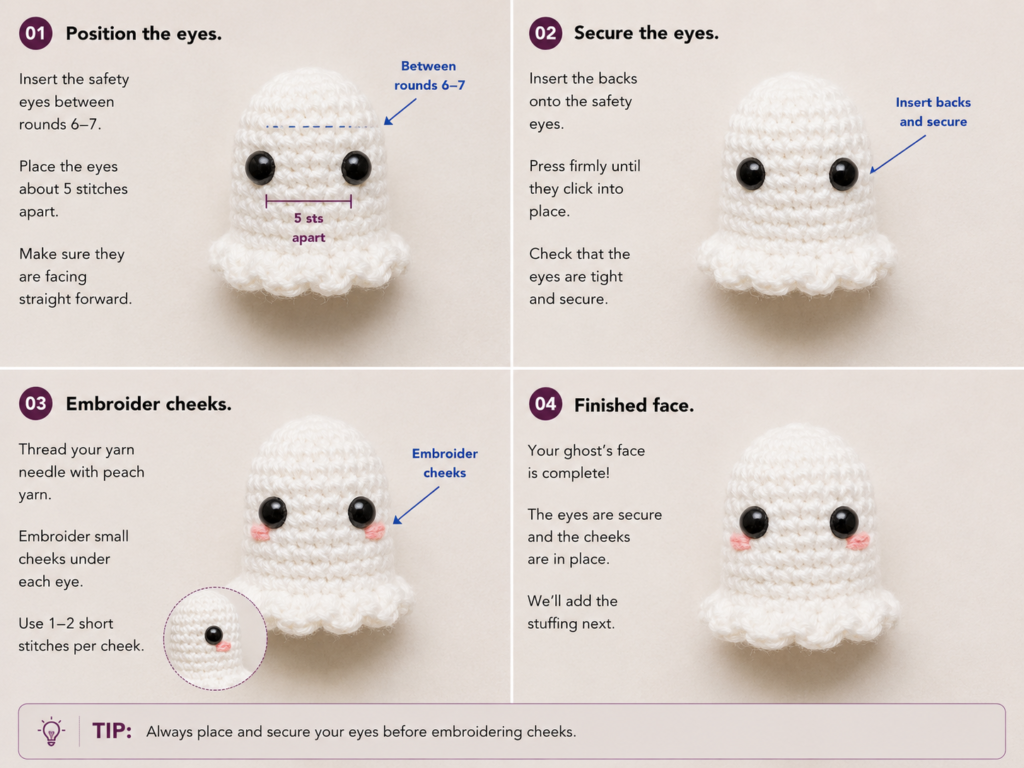
For safety eyes, insert the posts between Rounds 6 and 7. Leave approximately five stitches between the inner edges. Look at the ghost from the front before attaching the washers.
The eyes should be:
- At the same height
- Centered above the scallops
- Far enough apart to leave room for a small mouth
- Low enough that the crown still looks rounded
For embroidered eyes, wait until the ghost has been stuffed and closed. The fabric will be easier to evaluate once it has its final shape.
Beginner tip:
Photograph the temporary placement with your phone. Asymmetry can be easier to notice in a photograph than while holding the piece.
Common mistake to avoid:
Do not permanently attach safety-eye washers until you have inspected the front, both sides, and the top.
Step 5: Return to the Back Loops
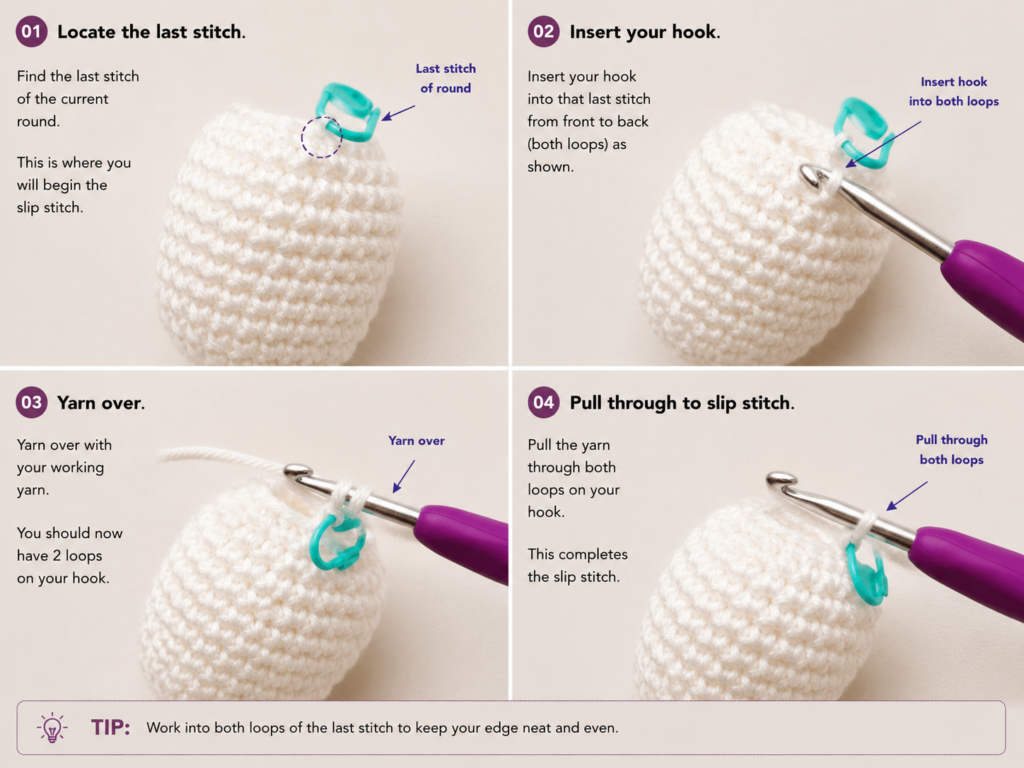
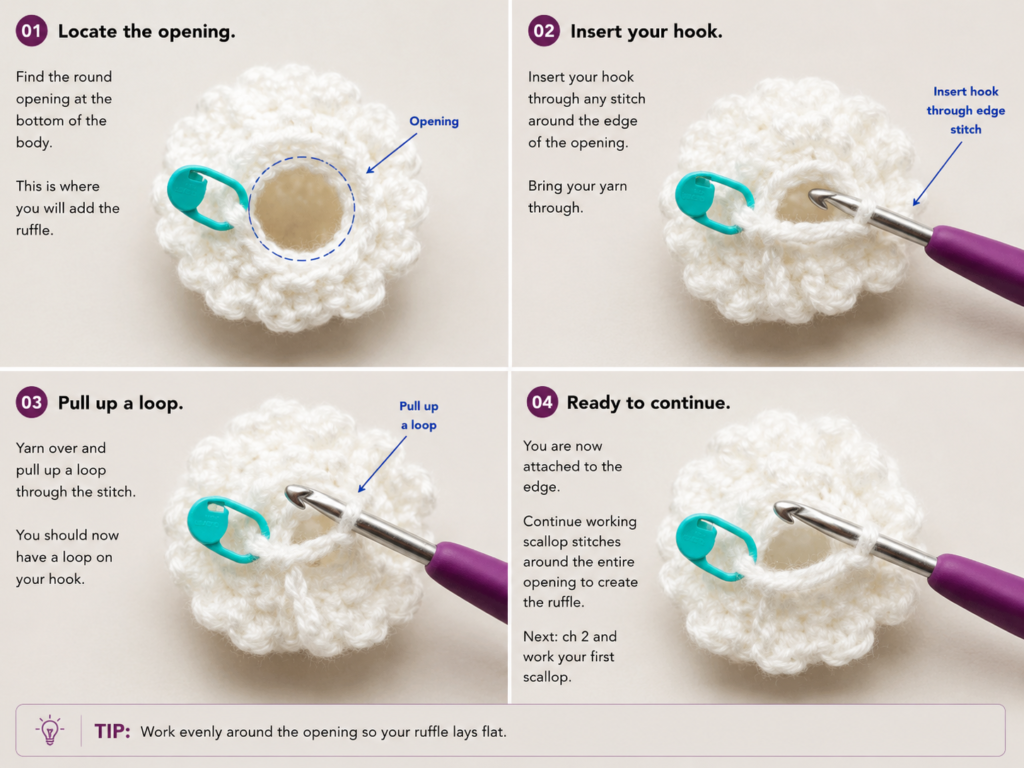
Turn the ghost upside down. Fold the scallops outward so you can see the ring of unused loops behind them.
Make a slip knot and place it on the hook. Join the yarn with a slip stitch in any unworked back loop of Round 10. Choose a loop near the center back of the ghost so the join will not be visible from the front.
Do not work into the double crochet stitches of the scallops. You are returning to the twenty-four loops belonging to the body round beneath them.
Step 6: Decrease and Stuff the Ghost
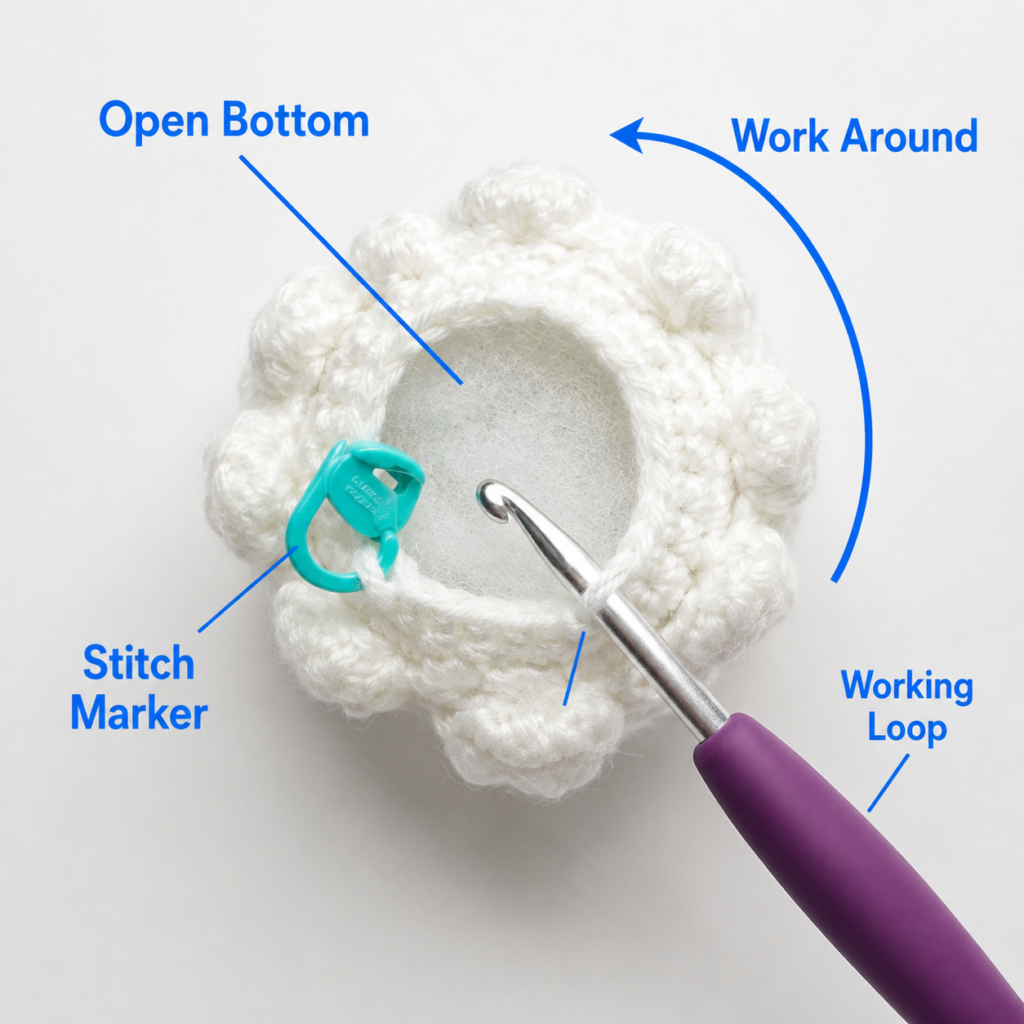
Work into the back loops:
- Round 12: Repeat dec, 1 sc eight times. (16 sts)
- Pause to add stuffing.
- Round 13: Dec eight times. (8 sts)
Use an invisible decrease when possible:
- Insert the hook under the front loop of the next stitch.
- Insert it under the front loop of the following stitch.
- Yarn over and pull through the first two loops.
- Yarn over and pull through the remaining two loops.
Add small pieces of stuffing between the two decrease rounds. Fill the crown first, followed by the sides. Keep the lower center comparatively soft.
Beginner tip:
Use the blunt end of the crochet hook or a stuffing tool to move fiberfill into the crown. Do not push with the hook tip because it can split the yarn.
Common mistake to avoid:
Overstuffing makes the closure difficult and can cause the scallops to point upward.
Step 7: Close the Bottom
Cut the yarn, leaving a tail approximately 20 cm long. Pull the tail completely through the active loop.
Thread the tail onto a tapestry needle. Pass the needle through the front loop of each of the remaining eight stitches. Pull gradually until the opening closes.
Insert the needle through the center of the closed circle and bring it out through the side of the body. Pull gently, cut the yarn close to the surface, and massage the fabric so the end retracts inside.
Beginner tip:
Pull the opening closed in two or three stages instead of tugging it shut in one motion.
Common mistake to avoid:
Do not tie a large knot beneath the ghost. A knot can create a hard bump that pushes the scallops out of alignment.
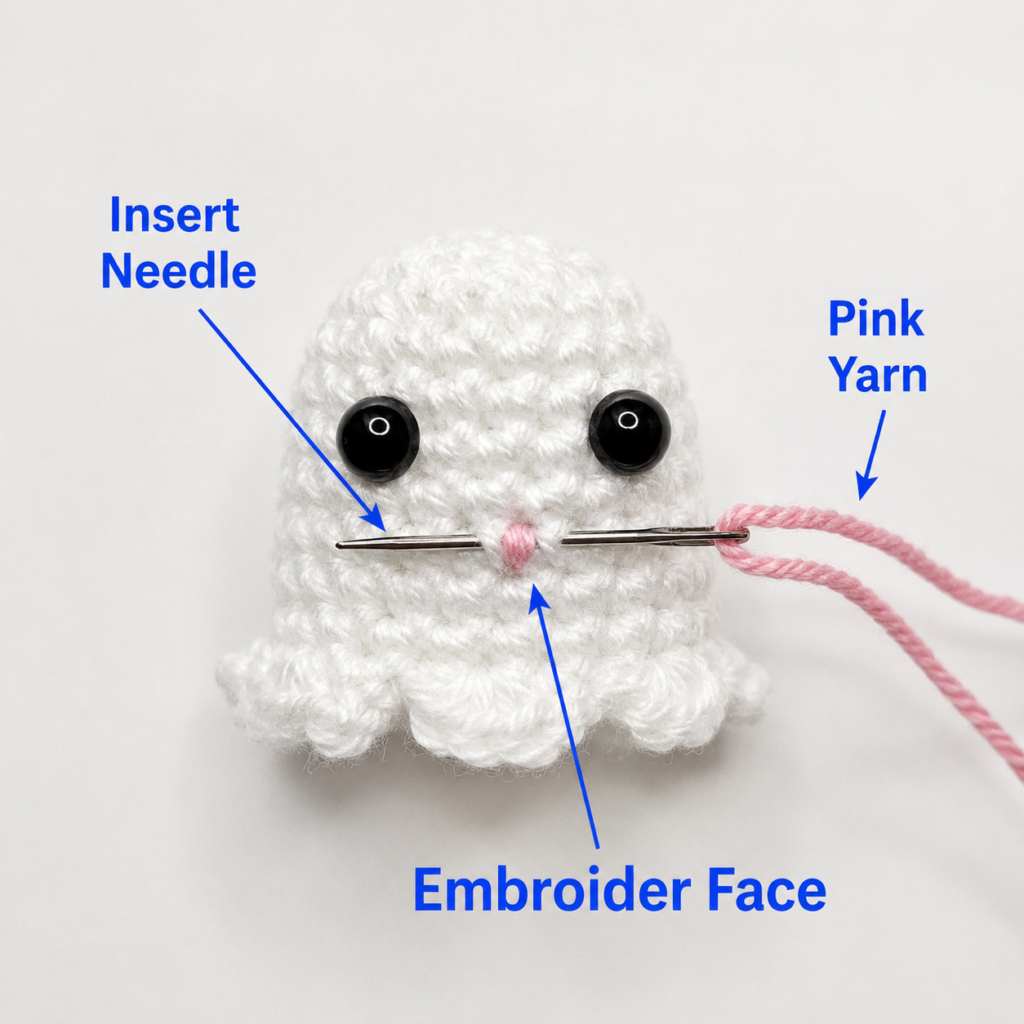
Step 8: Embroider the Cheeks and Mouth
Thread the tapestry needle with approximately 30 cm of peach yarn.
Bring the needle out one stitch below and slightly outside the first eye. Make two or three short horizontal passes over the same area. Keep the cheek small enough that it does not touch the eye.
Repeat beneath the second eye. Carry the yarn through the stuffing between the two cheek positions rather than across the outside.
For the mouth, use one strand of charcoal yarn. Choose one of these simple expressions:
- One short vertical stitch for a surprised ghost
- A tiny horizontal stitch for a calm expression
- Two angled stitches forming a shallow V
- A small curved smile made with two short stitches
To embroider eyes instead of using plastic eyes, make four or five vertical stitches over approximately one crochet stitch. Repeat on the second side and compare their height before securing the yarn.
Beginner tip:
Pull embroidery yarn only until it rests against the fabric. Pulling too tightly creates dents.
Common mistake to avoid:
Avoid long loose stitches. Keys and zipper pulls can catch beneath them.
Step 9: Attach the Keychain Hardware
A loose yarn loop can wear through after repeated contact with keys. A jump ring installed through several stitch bars creates a more durable connection.
Locate the exact center of the crown. Choose two adjacent stitches spanning the center. Insert the jump ring beneath at least two complete stitch bars rather than through one thin strand of yarn.
To open the ring correctly:
- Hold one side with each pair of pliers.
- Twist one side toward you and the other away from you.
- Do not pull the ring outward into a wider circle.
- Pass it beneath the selected stitch bars.
- Add the split keyring.
- Twist the jump ring closed until both ends meet cleanly.
Check that no sharp gap remains. A gap can catch fibers and slowly damage the crown.
For additional reinforcement, thread a 15 cm piece of ivory yarn through the two crown stitches before installing the ring. Knot the ends inside the body with a surgeon’s knot and hide them in the stuffing.
Beginner tip:
Place the ring slightly behind the exact visual center. The ghost will hang facing forward instead of tilting backward.
Common mistake to avoid:
Do not attach the ring through only the magic-ring center. Concentrating all the strain in one small opening may enlarge it
Pattern and Stitch Notes
Turning chain rules
There are no turning chains because the body is worked continuously in the round.
The double crochet scallops are also worked as one continuous round. Do not chain before the first double crochet group.
Stitch-count checkpoints
- End of Round 1: 6 stitches
- End of Round 2: 12 stitches
- End of Round 3: 18 stitches
- End of Round 4: 24 stitches
- Rounds 5–10: 24 stitches
- Scalloped edge: 8 scallops over 24 front loops
- First closing round: 16 stitches
- Final closing round: 8 stitches
Repeat pattern
Each scallop uses three front loops:
sl st, 4 dc in one loop, sl st
Repeat eight times.
Right side and wrong side
The outside of the ghost is the right side. The inside, which contains the stuffing, is the wrong side.
Keep the right side facing outward throughout the project. Avoid turning the body inside out before working the hem.
Size adjustment
The simplest way to change the size is to change yarn thickness rather than rewrite the stitch counts.
- Use fingering yarn and a 2.25–2.5 mm hook for a tiny zipper charm.
- Use worsted yarn and a 3.75–4 mm hook for a larger bag charm.
- Use bulky chenille and a 5–6 mm hook for a small plush ghost rather than a keychain.
Check that your keyring hardware remains proportional to the finished ghost.
Common Beginner Mistakes
1. The crown becomes pointed
Cause: Increases were stacked directly above one another, or the first rounds were worked too tightly.
Fix: Massage the crown into shape. On the next ghost, keep the increase rounds relaxed and stagger the starting position slightly.
2. The body leans to one side
Cause: One or more stitches were accidentally skipped near the marker.
Fix: Count every even round. When the error is only one round below, unravel and restore the missing stitch.
3. The stuffing shows through
Cause: The hook is too large for the yarn or the stitches are being pulled upward.
Fix: Change to a hook 0.25–0.5 mm smaller and keep the yarn comfortably tensioned.
4. There are fewer than eight scallops
Cause: A scallop consumed too many front loops or one slip stitch was omitted.
Fix: Each repeat must use exactly three base loops. Place a temporary marker after every completed scallop.
5. The back loops are difficult to find
Cause: The hem was worked beneath both loops instead of through the front loops only.
Fix: Inspect the top of the stitch before inserting the hook. The unused back loop should remain as a visible horizontal strand behind the scallop.
6. The bottom bulges below the hem
Cause: Too much stuffing was placed near the opening.
Fix: Remove a small amount of fiberfill and move the remaining stuffing toward the crown.
7. The ghost hangs at an angle
Cause: The jump ring was installed too far forward or to one side.
Fix: Reopen the ring and move it one stitch toward the back or center.
How to Customize This Crochet Project
Change the yarn color
White is traditional, but a ghost keychain also works in:
- Pale lavender
- Dusty mint
- Soft peach
- Glow-in-the-dark yarn
- Heather gray
- Black with white embroidered eyes
- Candy-corn stripes
When changing colors, keep the face high-contrast enough to remain visible.
Change the expression
Create a collection with different faces:
- Surprised open mouth
- Sleepy embroidered eyes
- Small smile
- One wink
- Tiny fangs
- Pink heart-shaped cheeks
Change the hem
For a simpler hem, replace each four-double-crochet shell with three double crochet stitches.
For a more dramatic wave, use five double crochet stitches in the center front loop. A larger shell may flare more and require additional shaping.
Add texture
Work Rounds 8–10 in back loop only to create subtle horizontal ridges. Avoid heavily textured stitches near the eyes because they can make facial placement difficult.
Add accessories
Small additions can be sewn securely to the body:
- Mini felt witch hat
- Crocheted bow
- Tiny pumpkin applique
- Embroidered stars
- Short striped scarf
- Small bell attached to the keyring rather than the yarn
Gift and use ideas
The finished ghost works as:
- Halloween party favor
- Backpack charm
- Pencil-case zipper pull
- Teacher gift
- Market-stall item
- Trick-or-treat bag decoration
- Handmade gift tag
- Seasonal handbag charm
- Addition to a Halloween crochet gift basket
Finishing Instructions
Weave every yarn end through at least three different directions inside the crochet fabric. Changing direction helps prevent the end from working loose.
Shape the ghost with your fingers:
- Roll the crown gently between your palms.
- Press the front and back lightly to create an oval profile.
- Pull each scallop outward.
- Rotate the ghost while checking that the hem remains level.
- Adjust the stuffing through the fabric with your fingertips.
Blocking is usually unnecessary for stuffed amigurumi. Do not apply a hot iron. Heat can flatten acrylic yarn and damage plastic eyes or polyester filling.
For cleaning:
- Spot clean with cool water and mild detergent.
- Blot with a clean towel.
- Reshape the crown and scallops.
- Allow the ghost to air dry completely.
- Check the jump ring before returning it to a bag or keys.
Remove detachable hardware before washing whenever possible.
Quick Printable-Style Summary
Skill level: Beginner
Finished size: Approximately 6–7 cm tall without hardware
Yarn: DK or light worsted cotton or cotton blend
Hook: 3.25 mm
Additional materials: Fiberfill, stitch marker, tapestry needle, embroidery yarn, jump ring, split keyring
Stitches: MR, sc, inc, dec, sl st, dc, FLO, BLO
Starting method: 6 single crochet stitches in a magic ring
Crown: Increase evenly to 24 stitches
Body: Work 6 even rounds of 24 single crochet stitches
Hem: Repeat one slip stitch, four double crochet stitches in the next front loop, and one slip stitch eight times
Closure: Return to the remaining back loops, decrease from 24 to 16 and then to 8
Finishing: Stuff lightly, gather the final stitches, embroider the face, and install the jump ring beneath two crown stitch bars
Frequently Asked Questions
Can a complete beginner make this crochet ghost keychain?
Yes, provided the beginner can make a chain, single crochet, and double crochet. The most unfamiliar techniques will probably be the magic ring, invisible decrease, and working in one loop only.
Practice the magic ring with scrap yarn before beginning the final ghost.
Can I start without a magic ring?
Yes. Chain 2 and work the six stitches of Round 1 into the second chain from the hook. This method may leave a slightly larger center opening, so use the beginning tail to sew it closed securely before adding hardware.
What yarn is best for a ghost keychain?
Smooth cotton or cotton-blend yarn is particularly practical because the stitches remain visible and the finished fabric resists fuzzing. A smooth acrylic yarn also works.
Avoid loosely spun yarn that separates easily when rubbed against keys.
Should I use safety eyes or embroidered eyes?
Safety eyes create a glossy amigurumi appearance, but embroidered eyes are safer for items that may reach children or pets. Embroidery is also less likely to scratch a phone or other objects inside a bag.
Why is my ghost wider than the expected size?
Your yarn may be thicker, your hook may be larger, or your tension may be looser. The pattern can still work as long as the fabric is dense and the proportions remain balanced.
Use a smaller hook for the next ghost when you want a more compact keychain.
Can I make the ghost without stuffing?
You can use a very small amount of stuffing for a flatter charm. A completely unstuffed body may collapse and cause the eyes to tilt inward.
Another option is to place a small circle of felt inside the body before closing it.
How do I stop the jump ring from damaging the yarn?
Pass the ring beneath two or more complete stitch bars and make sure the ring closes without a gap. Avoid attaching it through one individual strand.
Inspect heavily used keychains periodically. Replace a rough or rusted ring before it weakens the crochet fabric.
Conclusion
This crochet ghost keychain combines a small amount of yarn with several valuable amigurumi techniques. The rounded crown provides practice with increases, the straight body develops stitch-count control, and the divided-loop construction creates a decorative hem without sewing on separate pieces.
Make the first ghost in ivory so the stitch structure is easy to see. Once the construction feels familiar, try a lavender ghost, a glow-in-the-dark version, or a complete set with different embroidered expressions.
Save the tutorial with your Halloween crochet ideas so you can return to the stitch counts, image plan, and finishing instructions when making matching backpack charms or party favors.





