A jewelry tray is one of those small crochet projects that is useful almost immediately. Put one beside your bed for earrings, on a dresser for rings, beside your keys, or on your craft table for stitch markers and you suddenly have a home for all those tiny things that normally disappear.
This crochet jewelry tray pattern is designed to be approachable for someone who already knows the basic crochet motions but wants to make something more dimensional than a washcloth or coaster.
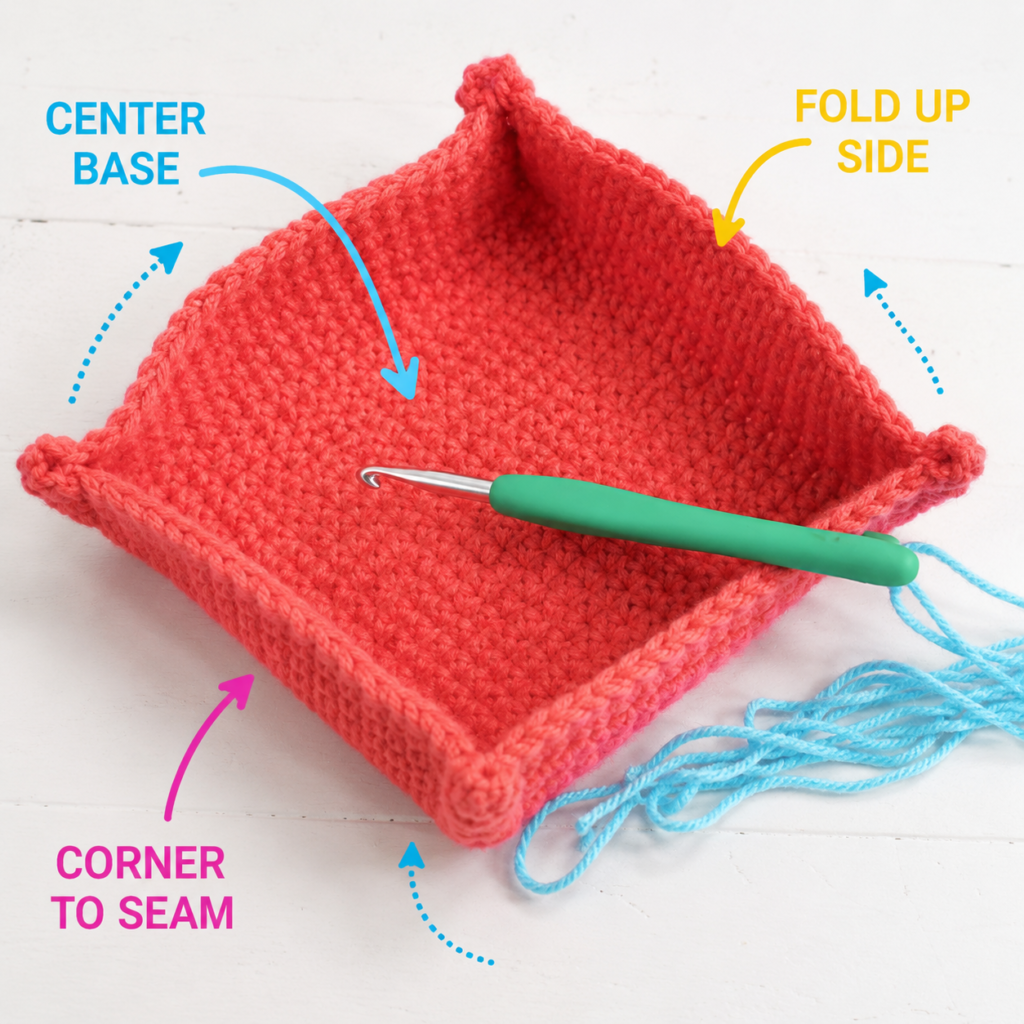
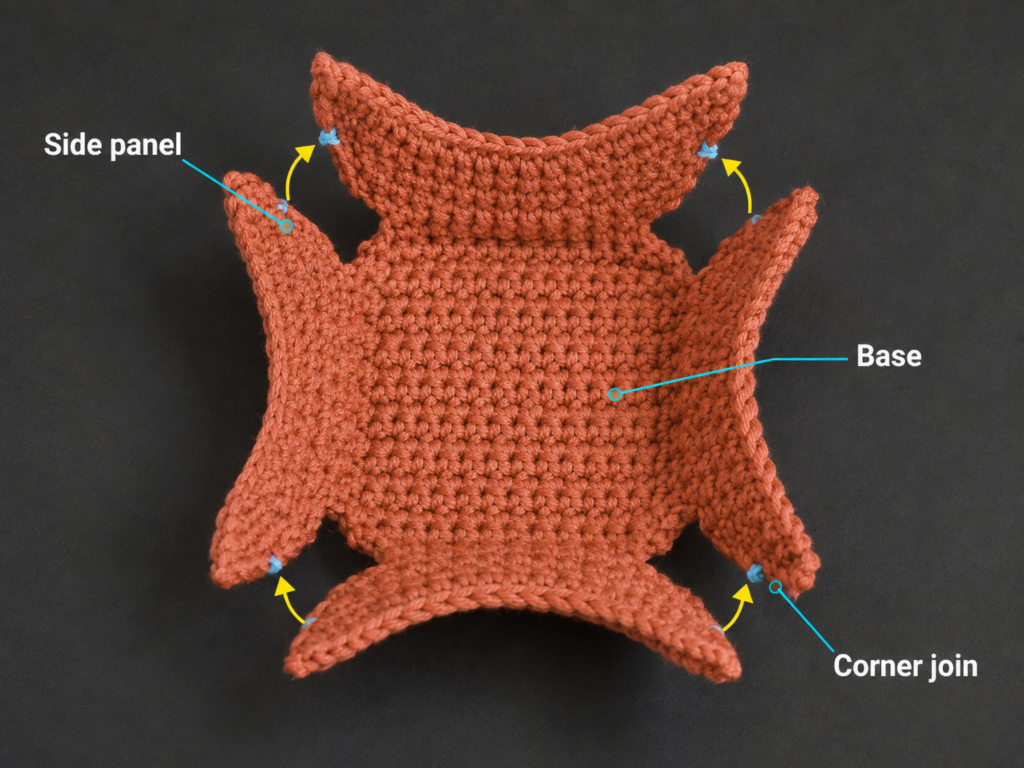
The project begins as a flat hexagon. Instead of crocheting complicated upright walls, you create the tray shape afterward by bringing together matching stitches beside each corner. Six small seams transform the completely flat crochet piece into a shallow catchall tray.
The sample uses dusty sage cotton with tiny warm ivory seam accents. Cotton is particularly useful here because a compact crochet fabric gives the finished tray enough body to keep its shape.
The result is a small handmade organizer that works well for rings, earrings, bracelets, keys, stitch markers and other lightweight accessories.
What You’ll Learn
By making this tray, you will practice:
- working crochet in joined rounds;
- making a magic ring;
- increasing evenly;
- creating six intentional corner spaces;
- recognizing the top loops of crochet stitches;
- maintaining even tension;
- counting stitches around a geometric shape;
- sewing matching crochet stitches together;
- shaping a flat crochet piece into a three-dimensional tray;
- weaving in ends neatly.
Materials You’ll Need
For the sample tray:
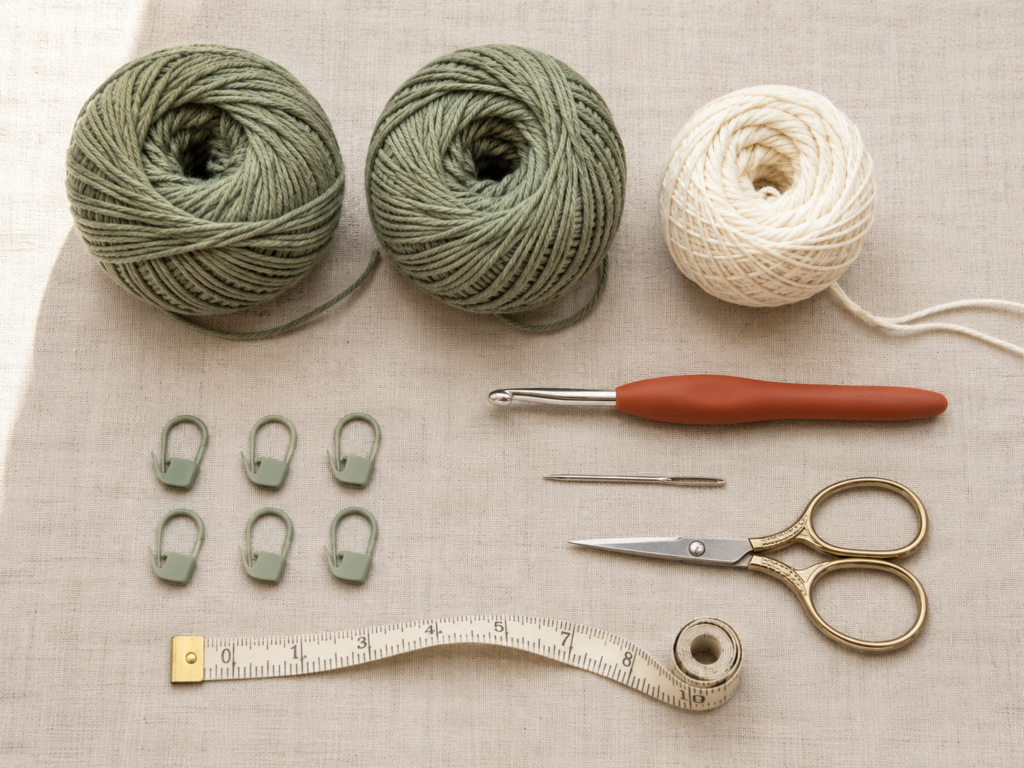
- 90–120 yards total of medium-weight #4 100% cotton yarn, divided into two strands and held together;
- dusty sage for the main tray;
- approximately 3 yards of warm ivory cotton for the corner seams;
- 5.0 mm crochet hook;
- blunt tapestry needle;
- scissors;
- six locking stitch markers;
- measuring tape.
Holding two strands together creates a denser, firmer tray. If this feels uncomfortable on your hands, try a 5.5 mm hook instead.
The Craft Yarn Council classifies medium/worsted yarn as weight category 4, although actual gauge and fiber characteristics can vary between yarns.
Crochet Abbreviations Used
This pattern uses US crochet terminology:
- ch = chain
- hdc = half double crochet
- sc = single crochet
- sl st = slip stitch
- st / sts = stitch / stitches
- sp = space
- rep = repeat
- rnd = round
The Craft Yarn Council’s standardized terminology confirms that US sc corresponds to UK dc, while US hdc corresponds to UK htr.
Before You Start
Gauge and tension
Gauge is not as critical here as it would be for a fitted garment, but fabric density is important.
Aim for roughly:
11 hdc = 4 inches / 10 cm in dense fabric
Your exact gauge may differ.
What matters more is that the tray base feels firm rather than loose and floppy.
If you can easily see large gaps between the stitches, try a smaller hook. If getting the hook through each stitch is difficult or your hands become uncomfortable, go up 0.5 mm.
How to count the stitches
Look at the top edge of your crochet. Each regular stitch forms a small V.
The chain space at each corner is not counted as a regular hdc. Keep the corner spaces visually separate from the side stitches.
Preventing curling
A little waviness during construction is manageable.
A severe bowl shape usually means your fabric needs more increases or your tension is significantly tighter than expected.
Strong rippling usually means the fabric is gaining width too quickly.
Spread the hexagon on the table after every round. It should lie reasonably flat when gently smoothed.
Beginner note
Put a locking stitch marker into the first actual stitch of each round. This makes it much easier to identify where the round ends.
Step-by-Step Crochet Tutorial
Step 1: Make the Center of the Tray
Hold two strands of dusty sage yarn together and treat them as one working strand.
Make a magic ring.
Chain 1. This chain is only for height and does not count as a stitch.
Work 6 hdc into the magic ring.
Pull the tail until the center closes.
Slip stitch into the first hdc to join.
Stitch count: 6 hdc
Your work will look tiny at this point. That is exactly right.
Beginner tip:
Do not pull the magic-ring tail excessively until after the six stitches are complete. A little space makes it easier to insert the hook.
Common mistake to avoid:
Do not accidentally count the beginning chain as one of the six stitches.
Step 2: Expand the Center
For Round 2:
Chain 1.
Work 2 hdc into every stitch around.
Join with a slip stitch to the first hdc.
Stitch count: 12 hdc
This round doubles the stitch count and starts creating the flat center of your tray.
Before continuing, spread the work gently with your fingers. You should have a small, reasonably flat circle.
Beginner tip:
Count immediately after finishing the round. Fixing a missed increase now is much easier than discovering it three rounds later.
Common mistake to avoid:
Do not work into the joining slip stitch. Only crochet into the 12 actual half double crochet stitches.
Step 3: Establish the Six Hexagon Corners
Now we will stop making a circle and establish six permanent corners.
Chain 1.
Repeat the following around:
1 hdc in next stitch, then (1 hdc, ch 1, 1 hdc) in next stitch.
Repeat that sequence six times.
Join to the first hdc.
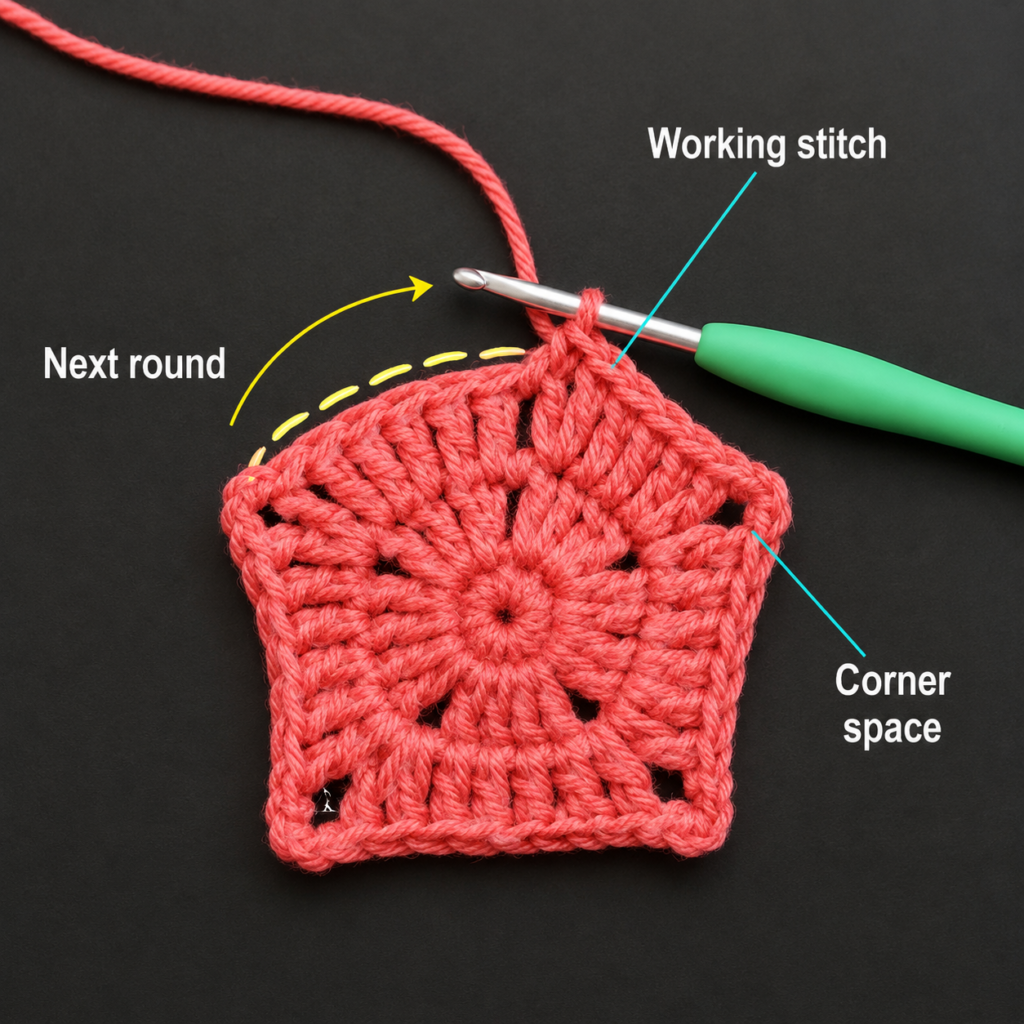
You should now see six chain-1 corner spaces.
Stitch count: 18 hdc + 6 ch-1 spaces
Those chain spaces are important. From this point forward, every future corner increase will be worked into those spaces.
Step 4: Grow the Hexagon Base
For the remaining base rounds, use the same simple rule:
- work 1 hdc into every normal hdc;
- in every ch-1 corner space, work (1 hdc, ch 1, 1 hdc).
Each completed growth round adds two stitches at each of the six corners.
Continue until your flat hexagon measures approximately 7–7½ inches / 18–19 cm from one point to the opposite point.
For the sample, this is usually reached after approximately Round 6.
Approximate checkpoint counts are:
- Round 3: 18 hdc
- Round 4: 30 hdc
- Round 5: 42 hdc
- Round 6: 54 hdc
Each round also has six ch-1 corner spaces.
Do not worry if your measurements differ slightly. Yarn thickness and tension affect the final dimensions.
Beginner tip:
After every round, count the six corner spaces rather than trying to count every stitch first. If you have six evenly spaced corners, the geometry is probably still on track.
Common mistake to avoid:
Never place your corner increase into an ordinary side stitch. Always place it inside the previous round’s chain-1 corner space.
Step 5: Add a Firm Outer Edge
When the hexagon is large enough, work one compact edging round.
Chain 1.
Work 1 sc into every hdc.
At each ch-1 corner space, work 2 sc into the corner space.
Join with a slip stitch.
Fasten off, leaving a tail long enough to weave securely into the back of the fabric.
This final single-crochet edge gives the outer perimeter slightly more firmness.
Lay the piece flat.
At this stage, it should still look like a flat crocheted hexagon—not a tray.
Step 6: Mark the Six Pinch Points
This step controls the finished wall height, so take your time.
Start at one pointed corner.
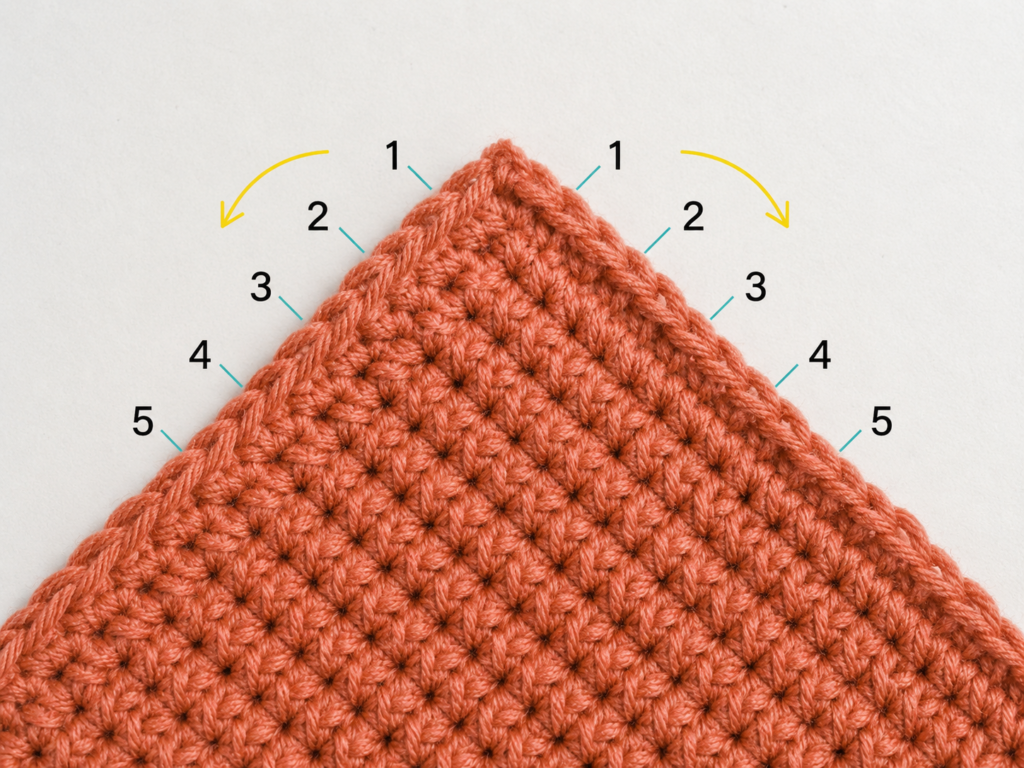
Count four regular stitches down the first side and place a marker.
Return to the same corner and count four regular stitches down the opposite side.
Place a second marker.
The two markers should be approximately the same distance from the corner.
Repeat around all six points.
You should finish with 12 stitch markers total—two for every corner.
If your tray is slightly smaller than the sample, count only three stitches down. For a deeper tray, move the markers farther from the corner.
Step 7: Sew the First Corner
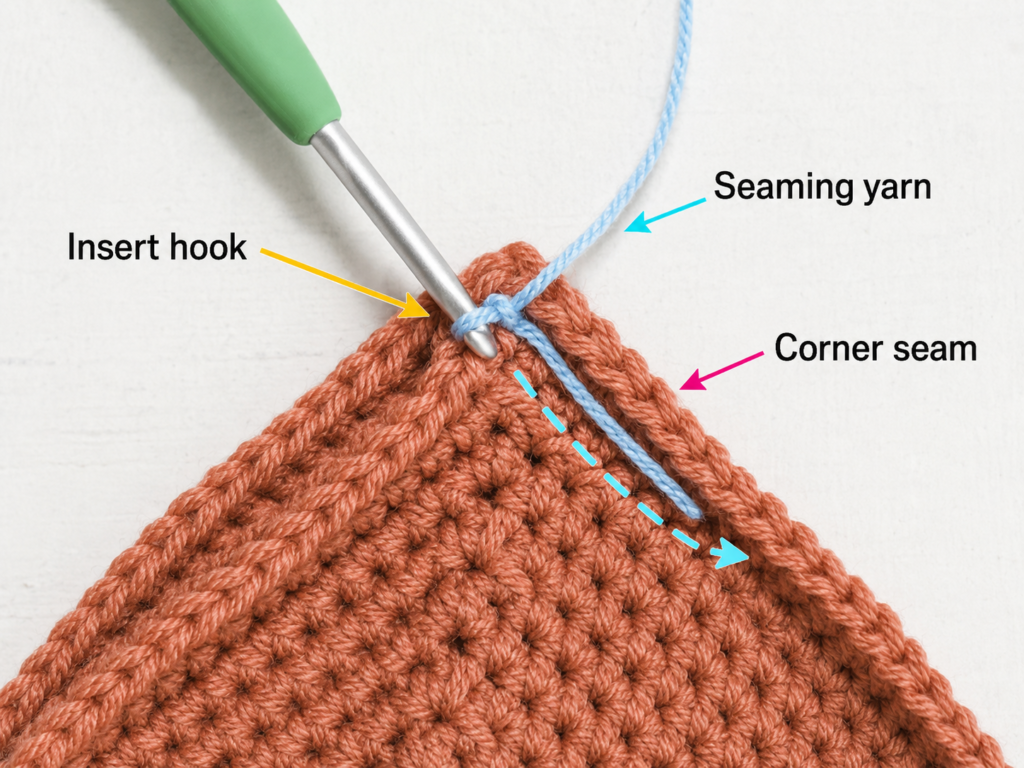
Cut approximately 18 inches / 45 cm of warm ivory yarn and thread it through your tapestry needle.
Bring the two marked stitches beside one corner together.
They do not need to overlap. Simply align them so their top edges touch.
Insert the tapestry needle through both marked stitches.
Pull most of the yarn through, leaving a short tail.
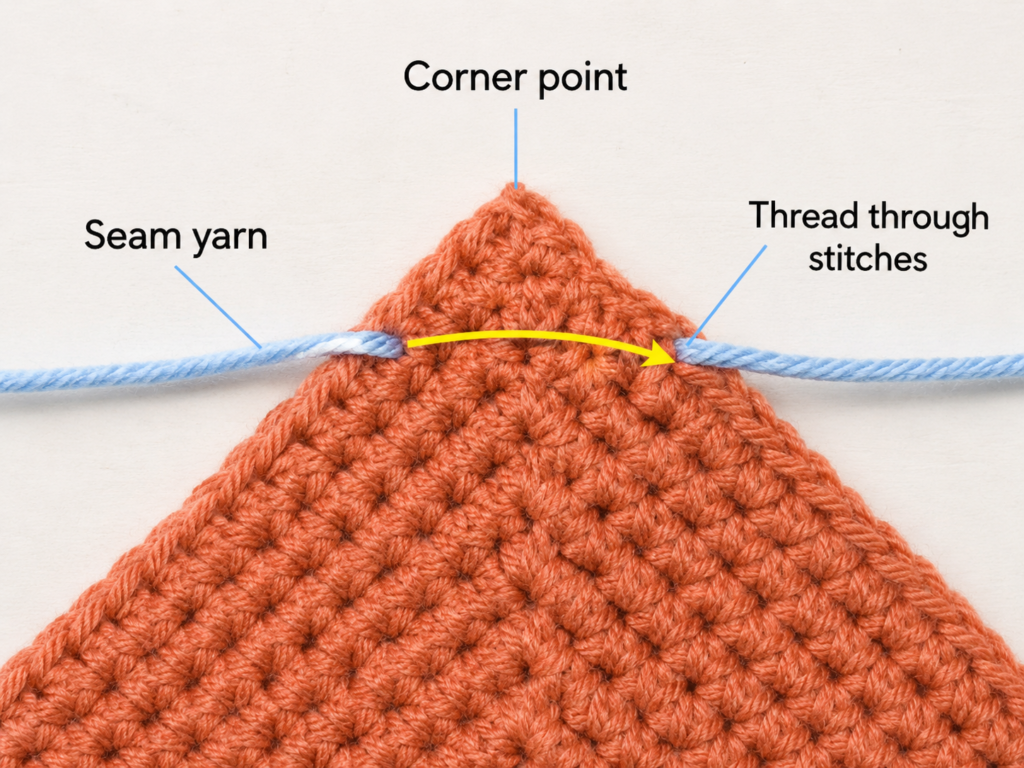
Pass through the same stitch pair again.
Then pull gently.
As the seam tightens, the point between the markers will rise and the fabric on either side will begin forming shallow walls.
Stop tightening once the walls stand roughly 1–1¼ inches / 2.5–3 cm high.
You want structure—not a hard puckered knot.
Beginner tip:
Put the tray on the table while tightening. This makes it much easier to judge the actual wall height.
Common mistake to avoid:
Do not pull the seam as tightly as possible. Excessive tension can twist the base and make the walls uneven.
Step 8: Secure the Corner and Repeat
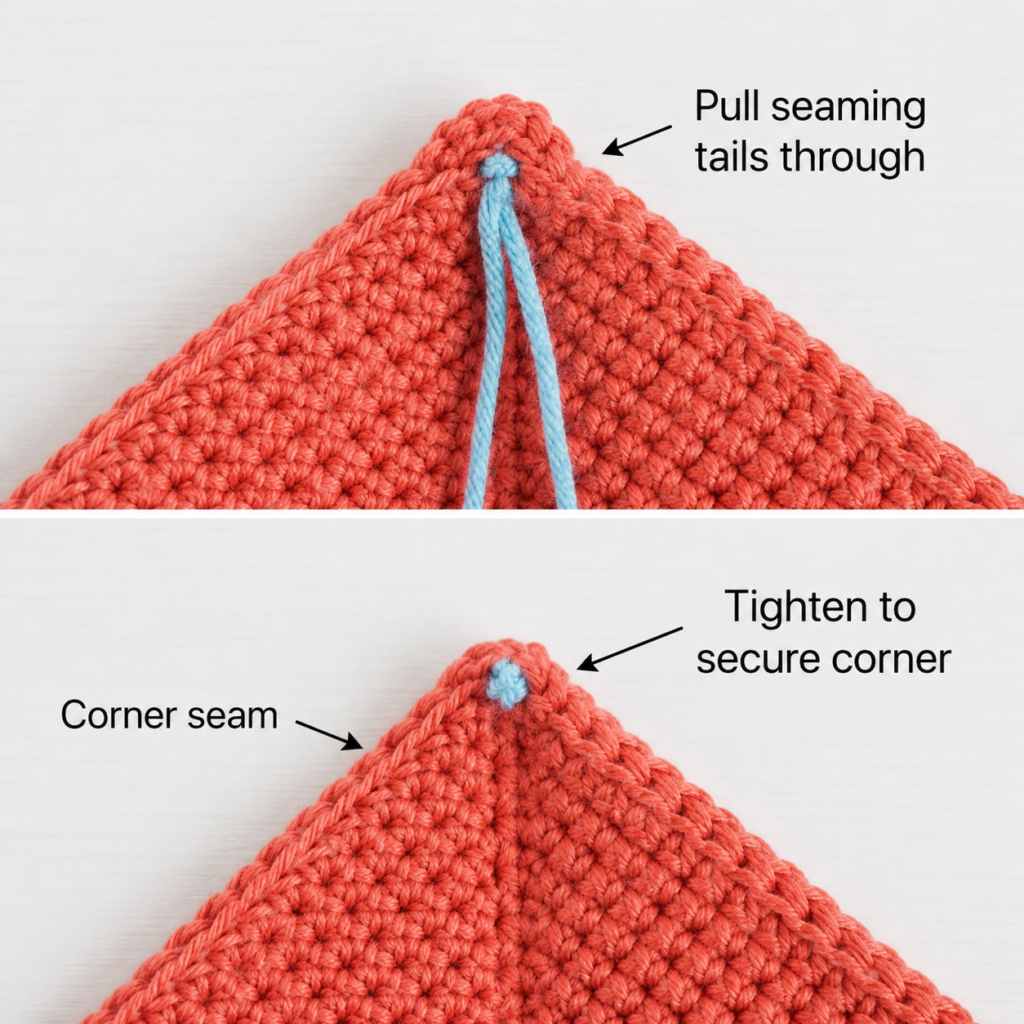
Once you like the first corner shape, pass the needle through the paired stitches three or four times.
These repeated passes act like a tiny reinforced seam.
Tie the two ivory ends together discreetly on the inside of the tray.
Thread each end through nearby crochet stitches and weave it in for about 1½ inches before trimming.
Now repeat the same process at the remaining five corners.
Check the wall height after every corner.
It is much easier to adjust a seam immediately than to discover at the end that one corner sits much higher than the others.
Step 9: Shape and Block the Tray
Once all six corners are secured, put the tray on a flat surface.
Use your fingers to:
- flatten the center;
- push each wall outward slightly;
- straighten each side;
- make all six corner points symmetrical;
- check that the tray sits flat without rocking.
If the center still looks slightly wavy, damp blocking can help.
Lightly wet the cotton or mist it with clean water.
Smooth the base into shape.
Place a flat, waterproof object inside the tray that is slightly smaller than the base. A small food-storage container or flat plastic lid can work well.
Allow the tray to dry completely.
Always follow the care instructions for your specific yarn. The Craft Yarn Council likewise emphasizes that yarn category alone does not guarantee two yarns will behave identically, so fiber and manufacturer instructions still matter.
Step 10: Finish and Fill Your Tray
After the tray is completely dry, inspect every corner.
Trim any visible fuzzy yarn ends carefully.
Run your fingers around the upper edge and gently correct any sections that lean inward.
Now add your jewelry.
The shallow shape works particularly well for:
- rings;
- stud earrings;
- bracelets;
- watches;
- hair clips;
- stitch markers;
- small keys.
Avoid placing very heavy objects in the tray because the crocheted walls are intentionally flexible.
Pattern Notes or Stitch Notes
Turning chain
The chain 1 at the beginning of a round is used only to bring the hook to working height.
It does not count as a stitch.
Joining rounds
Join every round with a slip stitch into the first actual stitch.
Avoid joining into the beginning chain.
Corner rule
After the six corners have been established, every corner is worked the same way:
(1 hdc, ch 1, 1 hdc) into the corner ch-1 space.
Repeat rule
Between corners, work 1 hdc into each hdc.
Stitch-count progression
The main growth rounds increase by 12 hdc each time because every one of the six corners gains two stitches.
Right side and wrong side
The pattern can be worked with either side facing outward because the fabric is fairly simple.
For the sample, keep the side facing you during the final edging as the right side of the finished tray.
Size adjustment
To make a larger tray, work more hexagon growth rounds before adding the final single-crochet edging.
To make a smaller ring dish, stop one round sooner.
Remember that adding rounds increases both the amount of yarn required and the distance between opposite corners.
Common Beginner Mistakes
1. Losing a corner
If your hexagon suddenly has only five visible points, you probably skipped a corner increase.
Fix: Count your chain-1 spaces after every round. You should always have six.
2. Accidentally increasing on a side
Placing (hdc, ch 1, hdc) into a normal side stitch creates an unwanted seventh point.
Fix: Work the corner group only into existing corner chain spaces.
3. Making the fabric too loose
A very loose crochet fabric produces soft walls that collapse under jewelry.
Fix: Use a smaller hook or hold two strands together.
4. Pulling the corner seams too tightly
Over-tightening can distort the center and make the finished tray rock on the table.
Fix: Tighten only until the wall reaches the intended height.
5. Marking different distances at each corner
If one corner is pinched three stitches from the point and another is pinched five stitches away, the walls will have different heights.
Fix: Count carefully and place stitch markers before sewing anything.
6. Skipping the final shaping
Crochet naturally has some flexibility. Even a correctly made tray may not immediately look perfectly symmetrical.
Fix: Shape it with your fingers and damp-block it before deciding something is wrong.
7. Cutting the seam ends too short
Short ends are difficult to weave securely.
Fix: Leave at least 4–5 inches after tying so you have enough yarn to weave back through the fabric.
How to Customize This Crochet Project
Change the yarn
For a softer tray, use one strand of worsted cotton.
For more structure, try cotton cord or another firm basket yarn and adjust the hook accordingly.
The Craft Yarn Council recommends treating millimeter hook measurements as the most reliable hook-size reference because letter/number sizing can vary between manufacturers.
Change the colors
Try:
- dusty rose + cream;
- terracotta + ivory;
- charcoal + natural;
- sage + blush;
- navy + camel;
- lavender + soft white.
You can also crochet the main piece in one neutral color and use contrasting seam yarn for small pops of color.
Make a ring dish
Stop the hexagon one growth round earlier.
Use three stitches from each point for the corner seams.
This creates a compact tray that works nicely beside a sink or bedside table.
Make a larger vanity tray
Add one or two extra growth rounds.
Before committing to the seams, put your jewelry on the flat hexagon and check whether the usable center is large enough.
Add decorative edging
Instead of plain single crochet, try a reverse single-crochet/crab-stitch edge after you are comfortable with the basic version.
For beginners, the plain edge is easier to keep even.
Gift ideas
A handmade tray can be paired with:
- earrings;
- a necklace;
- handmade stitch markers;
- hair accessories;
- a small bottle of perfume;
- a personalized jewelry card.
It also makes an easy housewarming, Mother’s Day, birthday or bridesmaid gift.
Finishing Instructions
When the final corner has been sewn:
- weave each ivory seam end through several nearby stitches;
- weave the main dusty-sage yarn tail into the underside;
- trim only after the yarn feels secure;
- dampen the tray lightly if shaping is needed;
- flatten the center;
- straighten the six walls;
- allow the project to dry completely.
For normal care, gentle hand washing is the safest option unless your specific yarn label recommends otherwise.
After washing, reshape the tray while damp and dry it flat.
Do not place the project in a hot dryer unless the yarn manufacturer specifically permits it.
Quick Printable-Style Summary
Project: Crochet Jewelry Tray
Skill level: Easy / advanced beginner
Finished size: About 5–6 inches across after shaping
Yarn: Medium #4 cotton, held double
Hook: 5.0 mm
Accent yarn: Small amount of warm ivory cotton
Stitches: ch, hdc, sc, sl st
Starting method: Magic ring with 6 hdc
Construction: Flat hexagon + six sewn corner pinches
Corner growth: (hdc, ch 1, hdc) in each corner space
Base repeat: Hdc in each side stitch; increase at all six corners
Shaping: Mark matching stitches beside each point and sew them together
Finishing: Secure seams, weave ends, shape and damp block
FAQ
Is a crochet jewelry tray suitable for beginners?
Yes, especially if you already know how to chain and make basic crochet stitches. The only slightly unusual part is shaping the corners, and stitch markers make that process much easier.
What yarn is best for a crochet jewelry tray?
Cotton is an excellent option because it can produce a firm, defined fabric. This tutorial uses medium-weight cotton held double to create additional structure.
Why is my crochet tray floppy?
Your stitches may be too loose, your hook may be too large, or your chosen yarn may have a lot of drape.
Try using a smaller hook or a firmer cotton yarn.
Can I make the tray with acrylic yarn?
Yes, but the result may feel softer.
If using acrylic, consider decreasing the hook size slightly to produce a compact fabric.
How can I make the jewelry tray larger?
Continue the hexagon growth pattern for additional rounds before adding the final edging.
Always maintain the six corner spaces.
Why is my hexagon curling?
Slight waviness is usually manageable.
Strong cupping may indicate unusually tight tension, while excessive rippling can indicate too much width.
Check your corner placement and gently flatten the work after each round.
Can I wash a crochet jewelry tray?
Usually, yes, but follow the care instructions printed on your yarn label.
After washing, reshape the tray and allow it to dry flat so the base and walls retain their form.
Conclusion
This crochet jewelry tray pattern is a useful introduction to shaping crochet without complicated decreases or separate wall pieces.
You begin with a simple flat shape, learn how controlled corner increases build a hexagon, then turn that fabric into a functional three-dimensional object with six small seams.
Once you’ve made the first tray, the construction is easy to modify. Make a tiny ring dish, a larger vanity organizer, a neutral catchall for keys, or a matching set in different colors.
And because the finished project is small, it is also a practical way to use leftover cotton yarn while practicing accurate stitch counting and finishing techniques.
Save the pattern for the next time you want a quick crochet project that is both decorative and genuinely useful.





