A good study pillow should do more than look cute on a chair.
For this project, we are making a comfortable crochet study pillow with a large front storage pocket that can hold a paperback, notebook, e-reader, reading glasses, or a few pens. It works especially well on a bed, reading chair, dorm-room floor cushion, or homework nook where you want the things you are using to stay close at hand.
The construction is deliberately simple. Instead of complicated shaping, you will crochet several flat rectangles and join them around a standard 16-inch pillow insert. The front is mostly basic half double crochet, while the removable envelope back means the pillow form does not have to be permanently trapped inside the cover.
The project is inspired by the practical construction flow of crochet reading pillows, but the pattern below is an original beginner version with different stitches, measurements, color arrangement, pocket design, and assembly details.
What You’ll Learn
By completing this study pillow, you will practice:
- Making straight crochet rows.
- Counting half double crochet stitches.
- Crocheting rectangular panels to measurements.
- Changing yarn colors for simple stripes.
- Creating an envelope-style removable pillow cover.
- Adding a functional crochet storage pocket.
- Creating an optional pen compartment.
- Joining several layers with single crochet.
- Adjusting a pillow pattern for other cushion sizes.
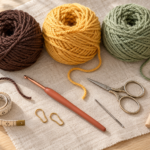
Materials You’ll Need
For one approximately 16-inch square study pillow:
- Approximately 850–950 yards of #4 worsted-weight yarn
- Main color: dusty sage
- Pocket color: warm cream
- Accent color: muted terracotta
- 5.0 mm crochet hook
- 16 × 16 inch pillow insert
- Tapestry needle
- Scissors
- Stitch markers or locking markers
- Measuring tape
- Optional blocking mats and rustproof pins
Choose yarn that can handle regular use. A smooth acrylic or cotton-acrylic yarn works especially well because the pillow may be placed on beds, desks, floors, or reading chairs and will probably need washing occasionally.
The Craft Yarn Council classifies medium yarn as weight category 4 and recommends checking the individual yarn label and gauge rather than assuming every yarn in one weight category behaves identically.
Crochet Abbreviations Used
This tutorial uses US crochet terminology.
- ch = chain
- hdc = half double crochet
- sc = single crochet
- sl st = slip stitch
- st/sts = stitch/stitches
- rep = repeat
- RS = right side
- WS = wrong side
- FO = fasten off
These abbreviations follow common US crochet terminology. The Craft Yarn Council maintains a standardized crochet abbreviation list for pattern readers.
US/UK terminology note
If you normally use UK terms:
- US single crochet = UK double crochet
- US half double crochet = UK half treble crochet
- Slip stitch remains slip stitch
Finished Size
Approximately:
16 inches wide × 16 inches tall
The front storage pocket will be approximately:
16 inches wide × 8–8.5 inches deep
There is also an optional narrow pen compartment approximately 3 inches wide.
Gauge
Aim for approximately:
14 hdc stitches × 11 rows = 4 inches / 10 cm
Gauge does not have to be garment-level perfect, but it matters enough that you should make a small swatch.
A cover that is dramatically too loose will sag around the insert. One that is too small can overstretch the stitches and distort the pocket.
Metric hook sizing is particularly helpful because letter and number hook sizing can vary between manufacturers; the Craft Yarn Council recommends relying on the millimeter measurement and adjusting hook size to obtain the required gauge.
Before You Start
Count your stitches
The easiest way to create straight pillow panels is to count every row for the first several inches.
Our main panels use 57 stitches.
Place a stitch marker in the first and last stitch if you have trouble identifying row edges.
Keep your turning chain simple
Chain 1 before each half double crochet row.
The chain does not count as a stitch.
Work your first real hdc directly into the first stitch.
This helps reduce the gaps that can develop at the sides of beginner crochet projects.
Watch your width
Measure the panel after several rows.
It should remain close to 16 inches wide.
If it gradually becomes narrower, you are probably skipping the last stitch.
If it becomes wider, you may be crocheting into the turning chain by mistake.
Prevent curling
A little curling at the beginning is normal.
Strong curling usually means your foundation chain is considerably tighter than the rest of your stitches.
Restart with a looser chain or use a hook 0.5 mm larger for the foundation chain only.
Plan the colors before crocheting
For a calm study-room appearance, use one main color for most of the pillow and save stronger colors for the pocket.
This tutorial uses:
- Dusty sage body
- Warm cream pocket
- Muted terracotta accent
- Small sage stripes within the pocket
Step-by-Step Crochet Study Pillow Tutorial
Step 1: Crochet the Starting Chain
Using dusty sage yarn and your 5.0 mm hook:
Ch 58.
Work slowly enough that the chain remains relaxed.
You do not want loose loops, but the chain should stretch comfortably when you gently pull it sideways.
For the first row:
Work 1 hdc into the second chain from the hook and then 1 hdc into every remaining chain.
You should have:
57 hdc.
Beginner tip
Turn the foundation chain slightly toward you before inserting your hook. This makes it easier to distinguish each chain from the next.
Common mistake to avoid
Do not accidentally crochet into the loop currently sitting on your hook. That working loop is not one of your foundation chains.
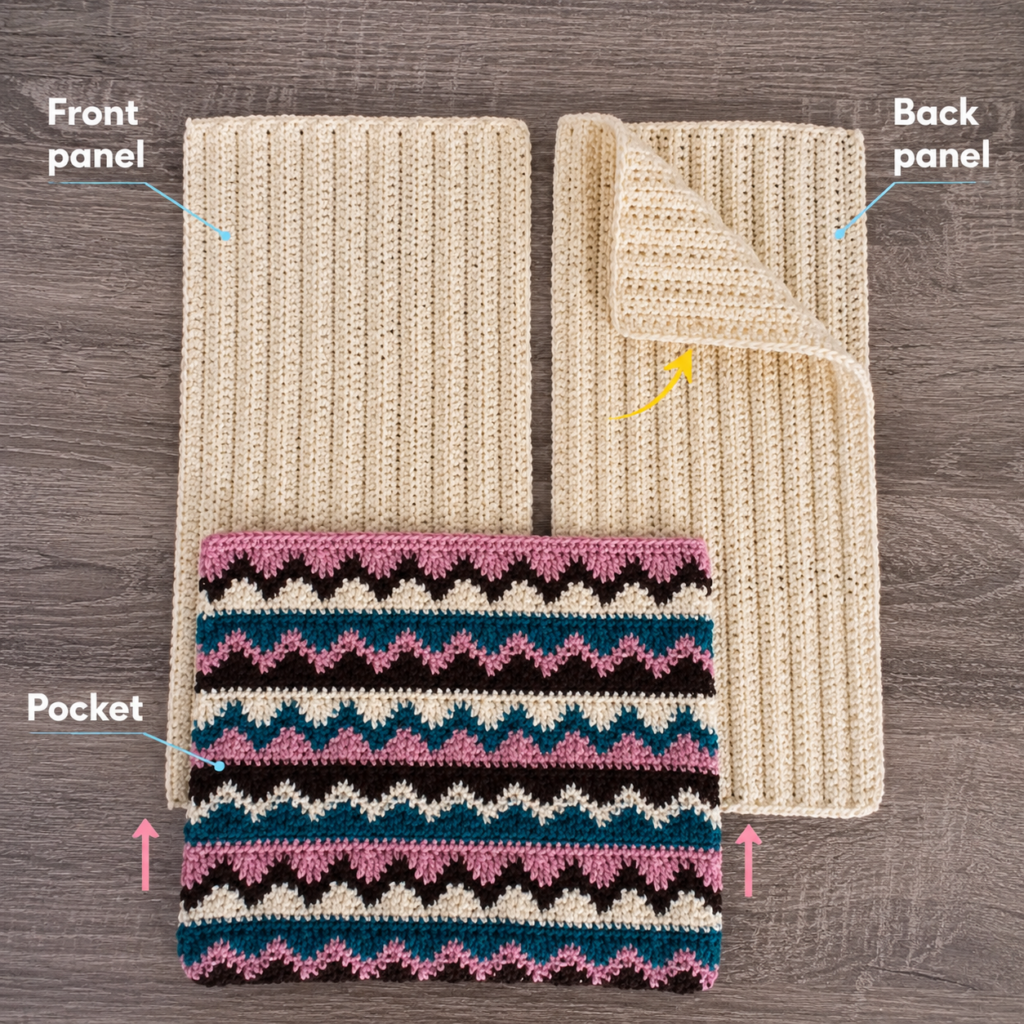
Step 2: Crochet the Front Pillow Panel
Turn your work.
Ch 1.
Work 1 hdc into the first stitch and every stitch across.
57 hdc.
Turn.
Repeat this row until your panel measures approximately 16 inches tall.
With the suggested gauge, this will be around 44 rows, but your actual row count may differ slightly.
Measurement is more important than matching an arbitrary row number.
Check the width every few inches.
You are aiming for a square approximately 16 × 16 inches.
Fasten off, leaving an ordinary tail for weaving in.
Beginner tip
Move your stitch markers up every few rows if you find the edge stitches difficult to recognize.
Common mistake to avoid
Do not add a stitch into the chain-1 turning chain. The chain is only there to bring the yarn to the correct height.
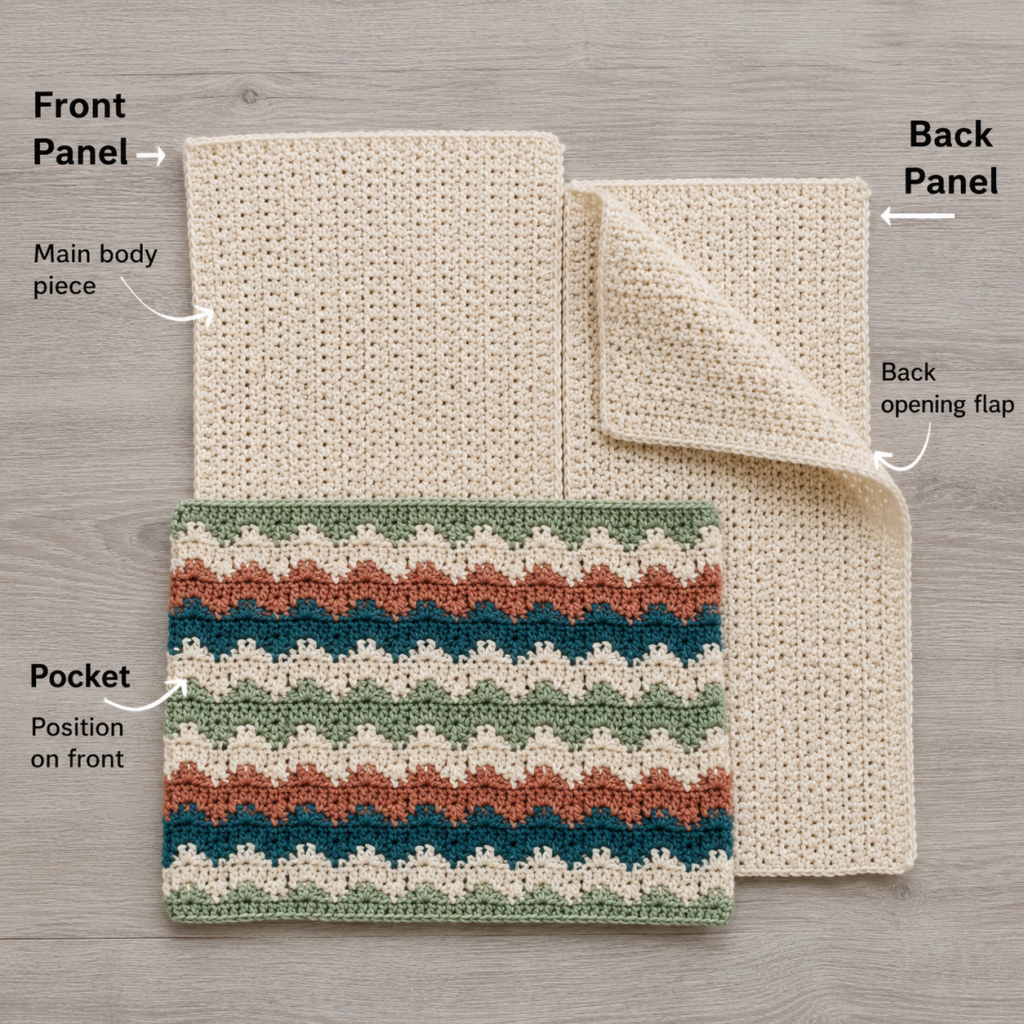
Step 3: Crochet Two Envelope Back Panels
The envelope back makes the study pillow easier to wash because you can remove the cushion insert.
Make two identical rectangles.
For each back panel:
Ch 58.
Row 1: Hdc in second chain from hook and every chain across.
57 hdc.
Row 2: Ch 1, turn. Hdc in every stitch across.
57 hdc.
Repeat Row 2 until the rectangle measures approximately 10 inches tall.
Fasten off.
Make the second panel exactly the same way.
When both 10-inch rectangles overlap across a 16-inch pillow back, you get approximately 4 inches of overlap.
That is enough to cover the pillow insert securely without requiring buttons or a zipper.
Beginner tip
Lay the back panels over your finished front square before assembly. This is the fastest way to check that you have a comfortable overlap.
Common mistake to avoid
Do not make each envelope panel exactly half of the pillow height. Two 8-inch pieces would meet in the middle but would not overlap, leaving the pillow insert exposed.
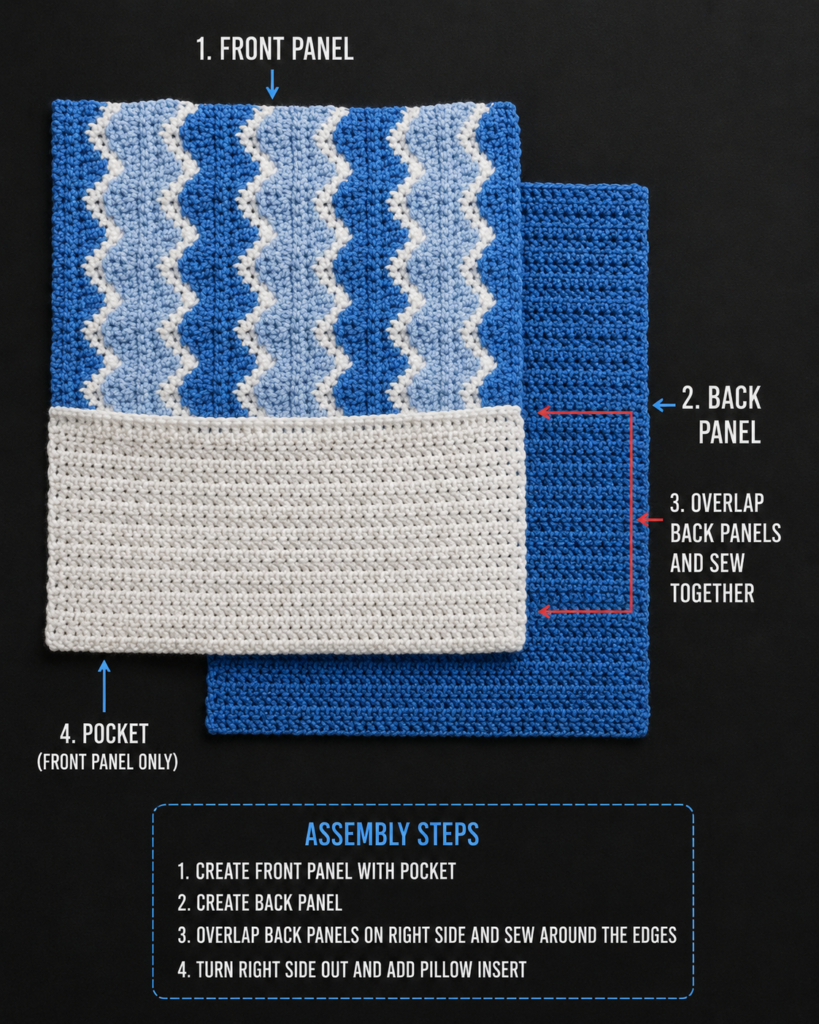
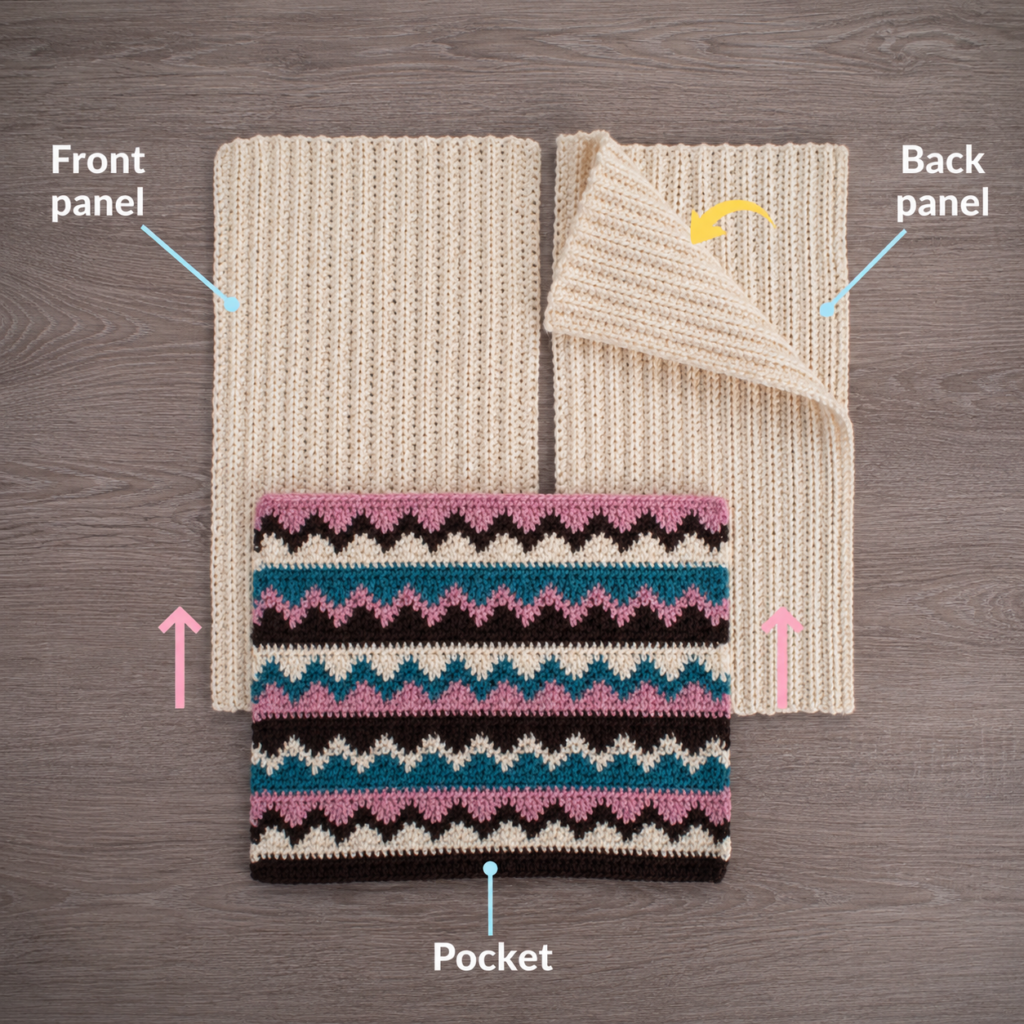
Step 4: Crochet the Front Study Pocket
Now make the feature that turns an ordinary pillow into a useful study pillow.
Using warm cream yarn:
Ch 58.
Row 1: Hdc in second chain from hook and across.
57 hdc.
Row 2: Ch 1, turn, hdc across.
Continue working hdc rows until the pocket is approximately 8–8.5 inches tall.
You can keep the pocket completely cream, or add simple stripes.
An easy color sequence is:
- 4 rows cream
- 2 rows muted terracotta
- 4 rows cream
- 2 rows dusty sage
- Continue in cream
For a neater pocket opening, finish with one row of single crochet along the top edge.
Fasten off.
Beginner tip
Change colors at the end of a row rather than halfway across. This keeps the pattern looking organized and avoids unnecessary ends inside the pocket.
Common mistake to avoid
Do not make the pocket much deeper than half the pillow height. A very deep pocket can hide too much of the book and may sag when filled.
Step 5: Add an Optional Pen Pocket Divider
This small detail makes the pillow much more useful for homework or journaling.
Place the pocket on top of the front square with:
- Bottom edges aligned
- Side edges aligned
- Pocket RS facing outward
Measure approximately 3 inches from the right-hand side of the pocket.
Mark a straight vertical line with several stitch markers.
Thread a long piece of matching cream yarn onto your tapestry needle.
Beginning at the bottom, sew through the pocket and front panel only along the marked vertical line.
Use small whip stitches or running stitches.
Secure the yarn firmly at the top and weave the tail into the wrong side.
You now have:
- One large compartment for a paperback, notebook, or tablet
- One slim compartment for pens, pencils, crochet hooks, or reading glasses
Beginner tip
Insert a pen before permanently tying off. If the compartment is too narrow, move your seam slightly toward the center.
Common mistake to avoid
Do this before attaching the back panels. Otherwise you may accidentally sew the pocket to the back of the pillow.
Step 6: Measure and Prepare the Panels
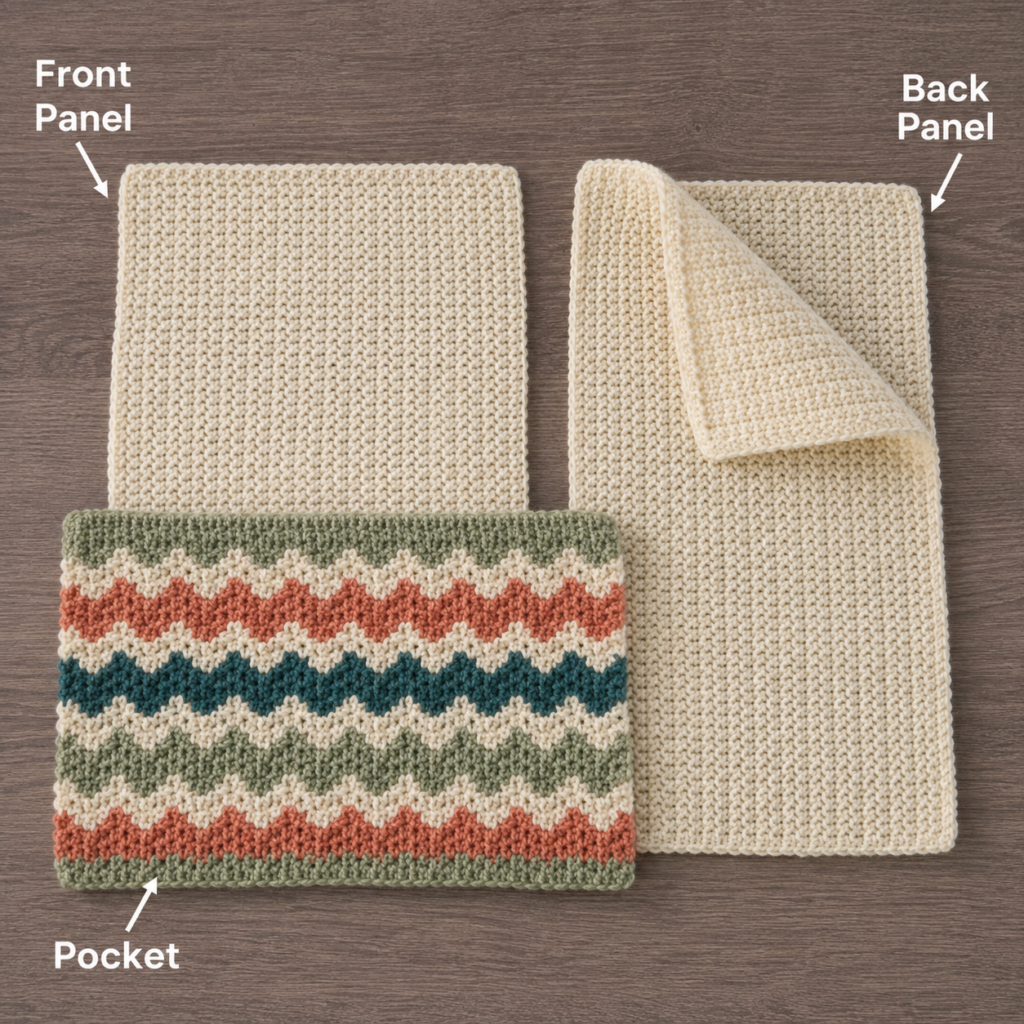
Before joining anything, spread every piece flat.
You should have:
- One 16-inch front panel
- Two approximately 16 × 10 inch envelope-back panels
- One approximately 16 × 8.5 inch front pocket
Light blocking is useful if your rectangles are slightly curled.
You do not need aggressive blocking.
For acrylic yarn, follow the manufacturer’s recommended care method and avoid excessive direct heat.
For cotton or cotton blends, damp blocking often works well.
Always follow your yarn label’s washing and drying instructions. Standard care symbols and their meanings are available from the Craft Yarn Council.
Step 7: Layer the Pillow Pieces
Place the front square flat with the right side facing upward.
Place the pocket on the lower half with its right side also facing outward.
Align:
- Lower edges
- Left edge
- Right edge
Clip the pocket to the front panel.
Now turn the work over.
Place one back rectangle across the upper part of the pillow.
Place the second back rectangle across the lower part so the two pieces overlap in the middle by approximately 4 inches.
Keep the right sides facing outward.
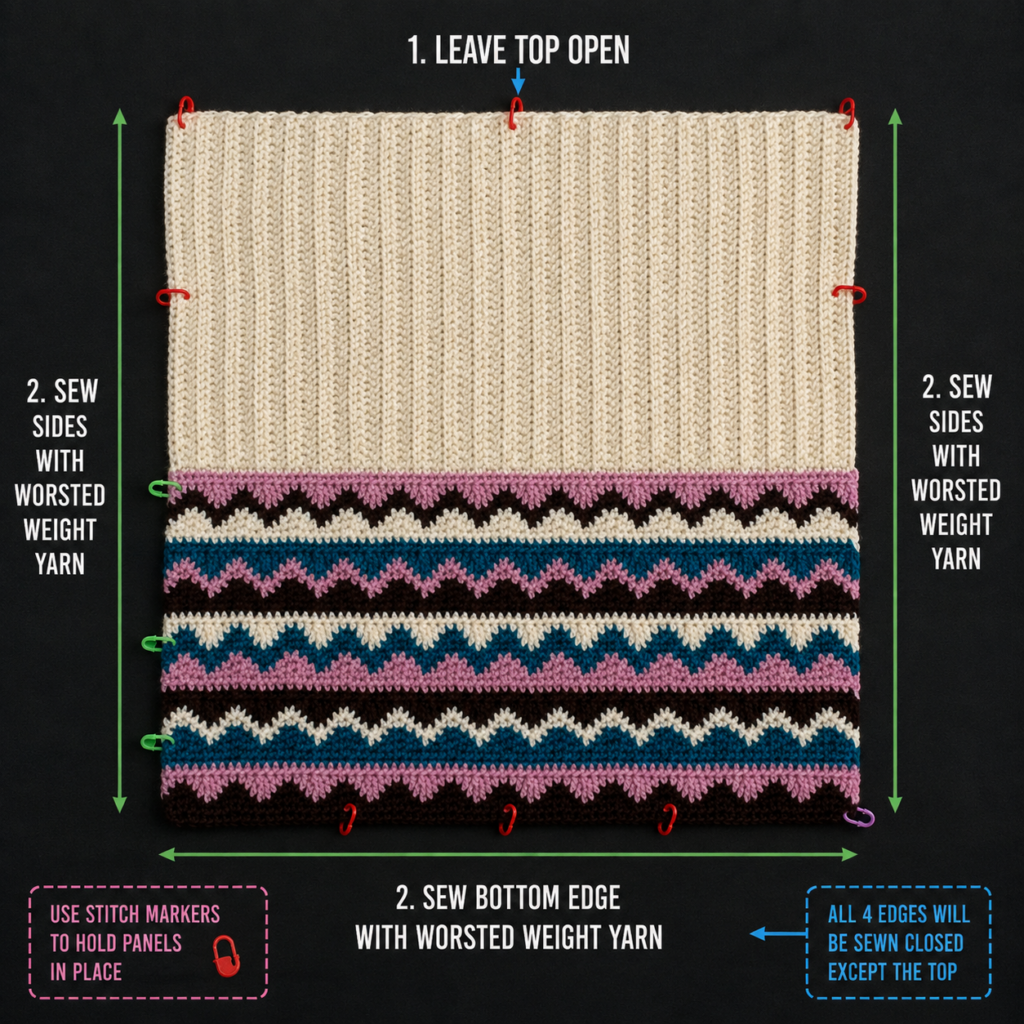
Use stitch markers approximately every 2 inches around the complete outside edge.
Spend a minute checking the corners.
At the bottom half of the front, your joining stitch needs to pass through:
- Front panel
- Back panel
At areas above the pocket, you will normally join:
- Front panel
- Back panel
Beginner tip
Add more stitch markers than you think you need. Crochet fabric stretches easily while joining, and extra markers prevent one panel from shifting ahead of another.
Step 8: Single Crochet Around the Pillow
Join dusty sage yarn at one corner.
Chain 1.
Work single crochet evenly around the entire outside edge, passing through every required layer.
Along the horizontal chain/stitch edges, you can usually work approximately one sc per stitch.
Along vertical row-end edges, distribute stitches evenly rather than forcing one stitch into every visible space.
The exact number along the side is less important than keeping the edge:
- Flat
- Smooth
- Free from ruffles
- Free from puckering
At each corner, work approximately 3 sc into the corner space so the edging can turn naturally.
Continue all the way around.
Join to the first sc with a slip stitch.
Fasten off.
Beginner tip
Stop after each side and place the pillow flat.
If the edge pulls inward, your joining stitches are too sparse or tight.
If it ruffles, you are adding too many stitches.
Common mistake to avoid
At the pocket sides and lower edge, make sure your hook passes through the pocket as well as the front and back layers. Missing the pocket layer will leave an opening.
Step 9: Insert the Pillow Form
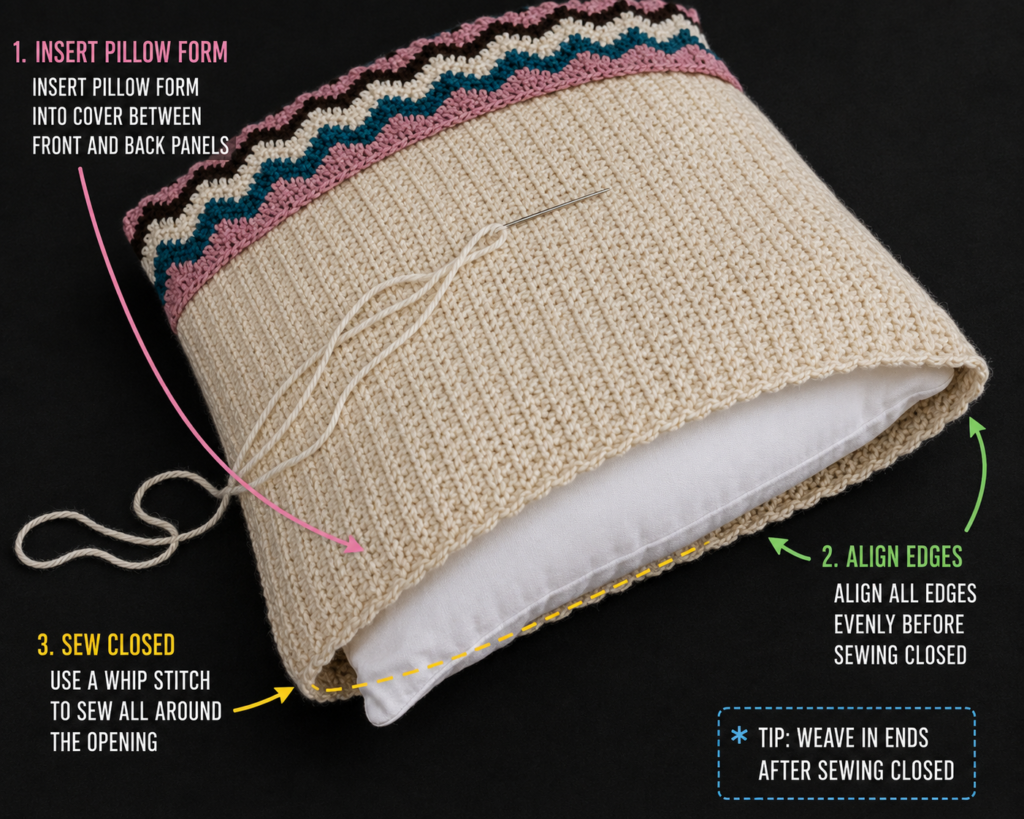
Open the envelope back.
Fold or compress one corner of the pillow form and gently push it through the opening.
Work the opposite corner into place.
Repeat for the remaining corners.
Once inserted, smooth the edges and lightly shape the pillow with your hands.
Do not pull hard on individual crochet stitches while positioning the insert.
The finished cover should look comfortably filled rather than stretched tight.
Step 10: Test the Study Pocket
Place a paperback or medium notebook inside the large compartment.
Add one or two pens to the narrow compartment.
Check the pocket opening.
The book should sit securely without pulling the pocket dramatically forward.
If you intend to hold heavier textbooks, consider making the pocket in single crochet rather than half double crochet. The denser fabric stretches less.
A study pillow is best for everyday items such as:
- Paperback books
- Small journals
- Reading glasses
- E-readers
- Pens
- Highlighters
- A slim notebook
- Crochet pattern printouts
Avoid repeatedly overloading it with several heavy hardcover books.
Pattern Notes
Turning chain
Chain 1 at the beginning of every hdc or sc row.
It does not count as a stitch.
Stitch count
The main panels use:
57 stitches per row.
Check periodically so accidental increases or decreases do not distort the pillow.
Repeat pattern
The basic body repeat is simply:
Ch 1, turn, hdc across.
That makes this project accessible to crocheters who know only the basic stitches.
Right side and wrong side
Half double crochet looks attractive from either side.
Choose the side you like best as your RS and keep that choice consistent during assembly.
Size adjustment
Do not rely entirely on the 58-chain number when changing yarn, hook, or pillow size.
Instead calculate:
Desired width × stitches per inch = approximate required stitch count
For example, with a gauge of 3.5 hdc per inch:
18 inches × 3.5 = approximately 63 stitches.
Add one chain for the starting chain if following the same construction.
Work the front panel until its height approximately matches its width.
For envelope-back panels, make each back piece approximately 60–65% of the finished pillow height so the two pieces overlap comfortably.
Common Beginner Mistakes
1. Losing the last stitch
Problem: Your panel gets narrower.
Fix: Place a marker in the first and last stitch of each row until you can recognize them easily.
2. Adding stitches at the edge
Problem: Your square becomes wider toward the top.
Fix: Remember that the chain-1 turning chain does not count as a stitch.
3. Making the foundation chain too tight
Problem: The bottom edge curves upward.
Fix: Relax your tension or make the starting chain with a 5.5 mm hook before returning to the 5.0 mm hook.
4. Making the envelope overlap too shallow
Problem: The white pillow form shows through the back.
Fix: Make the two back rectangles longer. For a 16-inch pillow, approximately 10 inches per panel gives a practical overlap.
5. Missing the pocket during assembly
Problem: One side of the pocket remains open.
Fix: At the lower sides and bottom, visually check that the hook enters all required layers before completing each single crochet.
6. Overfilling the pocket
Problem: The pillow front becomes distorted.
Fix: Keep the pocket for one book or notebook plus lightweight study accessories rather than several heavy textbooks.
7. Skipping gauge completely
Problem: Your 58-chain panel ends up 14 inches or 19 inches wide.
Fix: Crochet a gauge swatch first. If your stitches are too large, use a smaller hook. If too small, use a larger hook.
How to Customize This Crochet Project
Change the yarn
A washable acrylic yarn gives good durability and usually keeps the project affordable.
Cotton produces firmer stitch definition but may make the finished pillow heavier.
A cotton-acrylic blend offers a useful compromise.
Avoid extremely fuzzy yarn for your first version because it makes individual stitches and seam placement harder to see.
Change the colors
For a classroom or dorm room, try:
- Navy + cream + mustard
- Forest green + beige + rust
- Lavender + ivory + dusty rose
- Charcoal + cream + denim blue
- Terracotta + oatmeal + sage
You can also match school colors.
Make a bigger pillow
The same construction works with an 18-inch or 20-inch insert.
Increase the starting stitches based on your gauge rather than simply adding a random number of chains.
Add a different border
Instead of one round of single crochet, try:
- Reverse single crochet
- Crab stitch
- One round sc + one round slip stitch
- Simple contrasting sc border
Keep the border relatively flat so it does not interfere with the pocket.
Make the pocket sturdier
Use single crochet instead of hdc.
It will take more rows and slightly more yarn, but the fabric will be denser and less stretchy.
Add more dividers
Turn the large pocket into an organizer.
Possible arrangement:
- 10-inch notebook compartment
- 3-inch pen compartment
- 3-inch phone or glasses compartment
Sew the dividers before the final pillow assembly.
Gift ideas
This study pillow works well as:
- Back-to-school gift
- College dorm gift
- Teacher reading-corner accessory
- Book-lover birthday gift
- Library-themed gift
- Homework station accessory
- Children’s reading pillow
- Journaling gift
- Crochet gift paired with a new novel
Finishing Instructions
Inspect the entire outside seam.
Check especially around:
- Four corners
- Pocket lower edge
- Pocket side edges
- Envelope overlap
Use a tapestry needle to weave each tail through several neighboring stitches on the wrong side.
Change direction once or twice so the yarn tail is less likely to work loose.
Trim only after the end feels secure.
Remove the pillow insert before washing the crochet cover.
Follow the care instructions printed on your yarn label. If the yarn is machine washable, use a gentle cycle when appropriate and reshape the cover before drying.
If the cover begins to stretch from use, removing the pillow form and reshaping the cover after washing can help restore the square shape.
Quick Printable-Style Summary
Project: Crochet Study Pillow With Front Book Pocket
Skill level: Easy / confident beginner
Finished size: Approximately 16 × 16 inches
Yarn: #4 worsted weight
Hook: 5.0 mm
Main stitches: ch, hdc, sc, sl st
Gauge: Approximately 14 hdc × 11 rows = 4 inches
Front panel:
Ch 58. Work 57 hdc per row until approximately 16 inches square.
Back:
Make 2. Ch 58 and work 57 hdc per row until each piece is approximately 10 inches tall.
Pocket:
Ch 58. Work 57 hdc per row until approximately 8–8.5 inches tall. Add optional stripes.
Optional divider:
Sew a vertical line approximately 3 inches from one side to form a pen pocket.
Assembly:
Align front, pocket, and overlapping back panels. Secure with stitch markers and single crochet evenly around the complete perimeter.
Finishing:
Weave in ends and insert a 16-inch pillow form through the envelope back.
FAQ
Is the crochet study pillow pattern beginner-friendly?
Yes. The main fabric uses repeated half double crochet rows, while the edging uses basic single crochet. A beginner should be comfortable making chains, hdc, sc, and turning rows before starting.
What is a crochet study pillow?
For this tutorial, a study pillow is a crochet cushion with a front organizer pocket that can hold lightweight study or reading supplies such as a notebook, paperback, e-reader, pens, or reading glasses.
It is essentially a study-oriented variation of the familiar reading-pocket pillow concept.
Can I use chunky yarn?
You can, but you will need a different stitch count.
Crochet a gauge swatch, calculate the number of stitches needed for your pillow width, and work to the finished measurements rather than following the 58-chain starting number.
Can I make this without an envelope back?
Yes.
You can crochet a second full-size square, place it behind the front panel, join three sides, insert the pillow form, and then close the fourth side.
The disadvantage is that removing the insert for washing becomes more difficult unless you add buttons or a zipper.
Can the pocket hold a school textbook?
A small lightweight textbook may be fine, but the crochet fabric can stretch under heavy loads.
For heavier books, work the pocket in single crochet and consider using cotton or another firm yarn.
What yarn is best for a study pillow?
A smooth, washable #4 yarn is the easiest choice.
Anti-pilling acrylic is practical for frequent use, while cotton or cotton blends create a firmer pocket.
How can I turn this into a reading pillow for a child?
Use cheerful colors, omit the narrow pen divider if desired, and place a favorite paperback or picture book in the front pocket.
For a children’s room, make sure all yarn ends and attached decorations are secured appropriately and avoid loose decorative pieces for very young children.
Conclusion
A crochet pillow becomes much more useful when the front panel doubles as storage.
This easy crochet study pillow pattern keeps the construction beginner-friendly—mostly rectangles and half double crochet—but adds enough practical detail to make the finished project useful beside a bed, desk, reading chair, or dorm-room study area.
Once you understand the basic construction, you can change almost everything: the pillow size, yarn colors, pocket depth, number of organizer compartments, border, and stitch texture.
Save the project when you are planning back-to-school crochet, book-lover gifts, or simple handmade room decor, and use the same construction method later for reading pillows, remote-control pillows, or bedside organizer cushions.