A small crochet project can be much more satisfying when you know it will actually get used. This crochet college keychain pattern turns two school-inspired yarn colors into a sturdy little wristlet that can clip onto keys, an ID pouch, a backpack, or a campus tote.
The project is also a manageable introduction to two-color tapestry crochet. Instead of making a large bag or complicated graph, you’ll practice the technique on a narrow strip using a simple repeating checker pattern. You’ll learn how to form the keychain loop around the hardware, carry the unused yarn inside your stitches, change colors cleanly, and keep the strap firm enough for everyday handling.
This tutorial uses an original 80-stitch foundation and seven-round color sequence. Make it in your own college colors, neutral shades, team-inspired colors, or any two colors that look good together.
What You’ll Learn
- How to size a crochet wristlet keychain.
- How to join a long foundation chain without twisting it.
- How to place D-ring or lobster-clasp hardware into the construction.
- How to crochet continuously in the round.
- How to work a compact modified single crochet.
- How to carry a second yarn color inside the fabric.
- How to make clean color changes.
- How to crochet an easy two-color college-style checker motif.
- How to prevent puckering and twisted straps.
- How to securely finish a frequently handled crochet accessory.
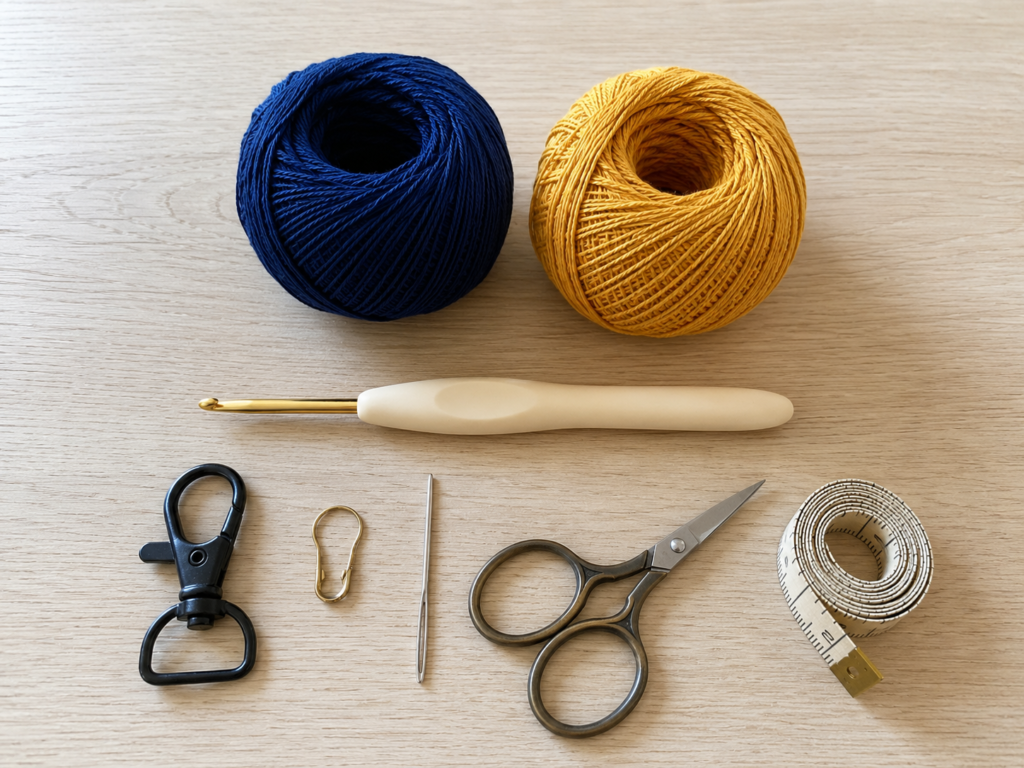
Materials You’ll Need
For one keychain:
- Color A: approximately 15–20 yd / 14–18 m fine or sport-weight cotton in your main college color.
- Color B: approximately 8–12 yd / 7–11 m cotton in your contrast color.
- 2.5 mm crochet hook.
- 1-inch / 25 mm D-ring, lobster clasp, or similar flat keychain hardware.
- Locking stitch marker.
- Tapestry needle.
- Small scissors.
- Measuring tape.
- Optional split key ring or small charm.
Smooth cotton is especially useful here because the stitches are easy to see and the finished strap can be worked firmly. If your chosen yarn is significantly thicker than the yarn described here, increase the hook size and reduce the starting chain rather than trying to force the exact numbers.
The Craft Yarn Council provides standardized yarn-weight categories if you need help comparing yarn thicknesses.
Crochet Abbreviations Used
This tutorial is written in US crochet terminology. Standard crochet abbreviations and the differences between US and UK terminology are documented by the Craft Yarn Council.
- ch = chain
- sc = single crochet
- sl st = slip stitch
- st/sts = stitch/stitches
- rep = repeat
- BLO = back loop only
- msc = modified single crochet, defined below
Modified Single Crochet
For this tutorial:
- Insert the hook into the back loop only of the next stitch.
- Yarn over.
- Pull up one loop.
- Yarn under instead of yarning over.
- Pull through both loops.
Using a yarn-under motion on the final pull-through helps produce a compact stitch that works well for small tapestry designs.
Finished Size
Using fine/sport cotton and a 2.5 mm hook:
- Wrist loop circumference: approximately 9–10 in / 23–25 cm
- Strap width: approximately 1 in / 2.5 cm
Your exact measurement depends on yarn thickness and tension.
For a larger wristlet, add foundation chains in multiples of 4.
For a smaller loop, remove chains in multiples of 4.
Before You Start
Gauge and tension
Exact gauge is less critical for a keychain than for a fitted garment. What matters is that your fabric feels firm rather than floppy.
A useful target is approximately 8–9 compact stitches per inch, but check the actual loop around your hand before you begin the colorwork.
If the wristlet stretches excessively, move down one hook size.
If the stitches are so tight that inserting your hook becomes difficult, move up by 0.25–0.5 mm.
Keep the foundation loose
The starting chain determines the length of the entire wristlet. Do not pull each chain tight around the hook.
Count before joining
The pattern begins with 80 chains. Because the color motif uses groups of four stitches, your stitch count must remain divisible by four.
Watch for twisting
A twisted chain is one of the most frustrating problems with this construction because the error becomes increasingly difficult to correct after several rounds.
Before joining, place the chain on the table and follow the row of V-shaped chain tops all the way around.
Right side and wrong side
The keychain is worked continuously in one direction. The right side stays facing you.
You do not turn after each round.
Step-by-Step Crochet Tutorial
Step 1: Make the Foundation Chain
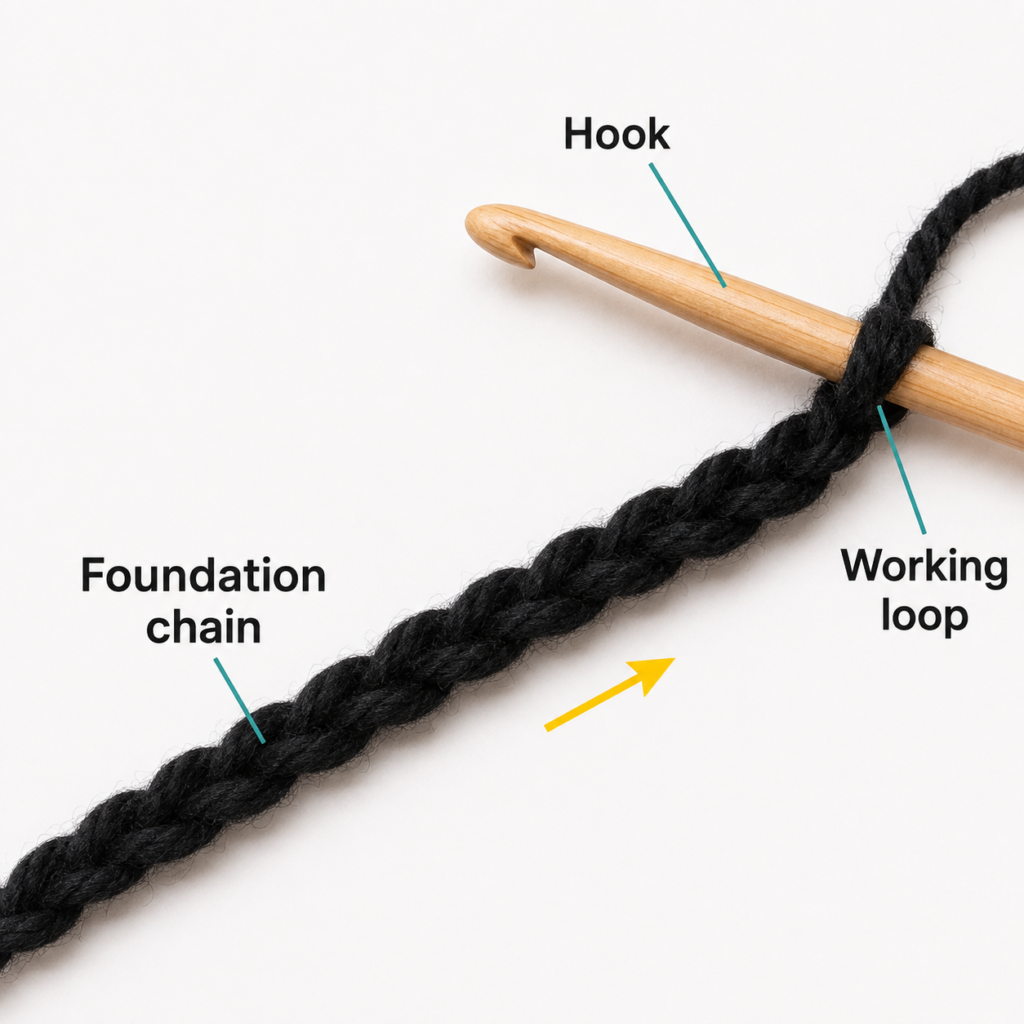
With Color A, make a slip knot and chain 80.
Do not count the slip knot as a chain.
After making several chains, consciously relax your grip. The chain should bend easily when you lay it down.
Before continuing, loosely wrap the chain around your wrist. Remember that the finished fabric will be slightly thicker and firmer than the bare foundation chain.
If you want to change the size, add or remove chains in multiples of four.
Beginner tip: Count the chain in groups of 10 and place temporary stitch markers at 20, 40, 60, and 80. This makes recounting much easier.
Common mistake to avoid: Do not stretch the chain while measuring it. A stretched foundation can make the completed wristlet unexpectedly small.
Step 2: Slide the Hardware Onto the Chain
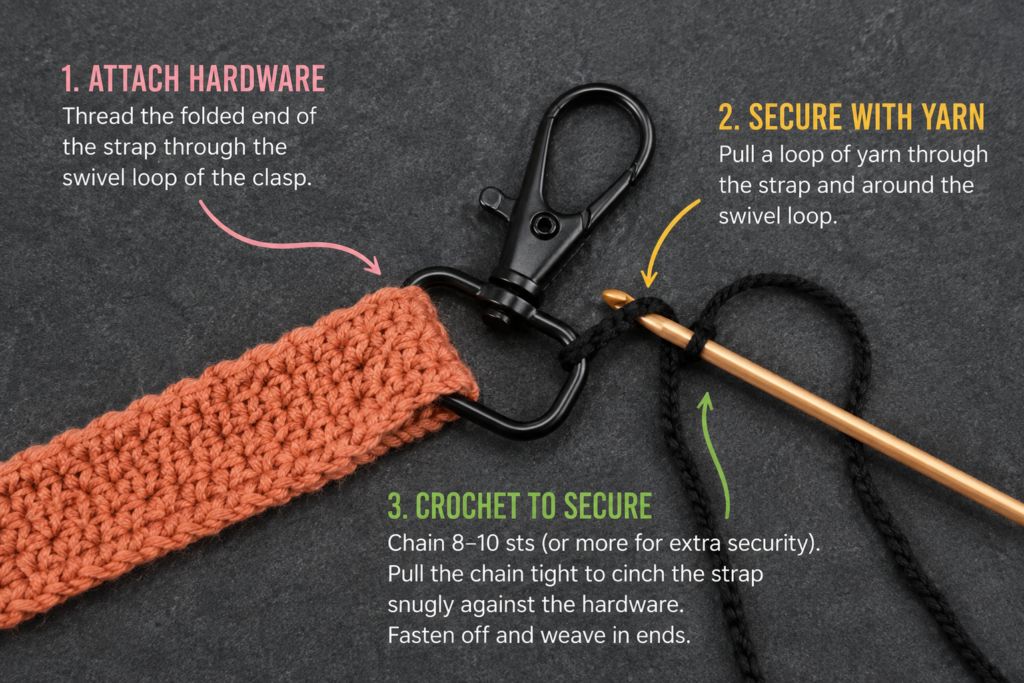
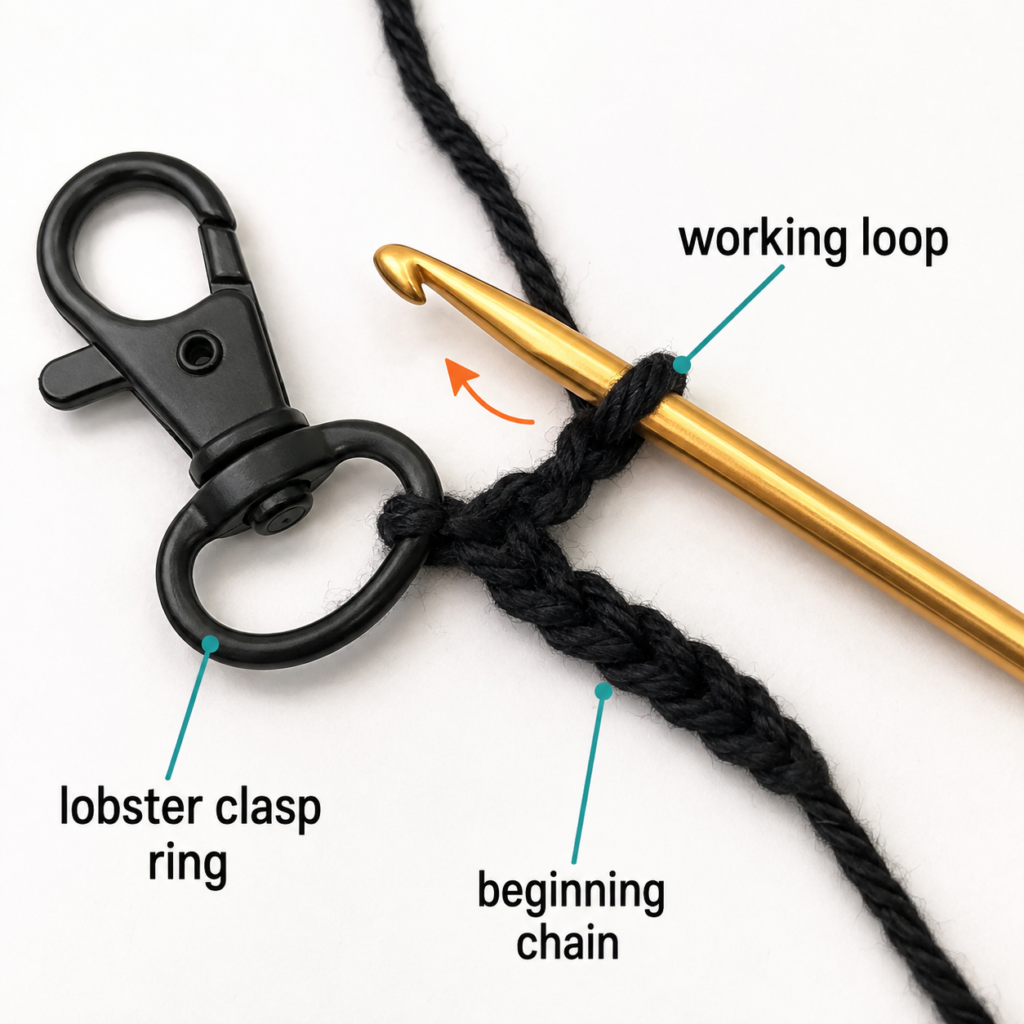
Take your D-ring or flat-bottom lobster clasp and pass the foundation chain through the straight section of the hardware.
Do this before joining the chain.
The hardware should now sit freely around the chain loop rather than being permanently fixed to one stitch.
Lay the entire chain flat.
Follow the V-shaped stitches from your hook all the way back to the beginning. Every V should point in the same direction.
Beginner tip: If your working yarn and beginning tail look crossed, untangle them before inserting your hook into the first chain.
Common mistake to avoid: Do not join first and then discover that you forgot the hardware. Unless your clasp can open at the D-ring itself, you would have to undo the join.
Step 3: Join the Chain Into a Loop
Keeping the chain completely flat, insert your hook into the first chain.
Slip stitch to join.
Before tightening the slip stitch, check the chain one final time for twists.
Move the hardware close to the join. This is useful because any small transition between rounds can later be positioned near the hardware where it will attract less attention.
Place a stitch marker so you know where the round begins.
Beginner tip: Lay the chain on the tabletop rather than holding the entire loop in the air. It is much easier to see a twist when the chain is flat.
Common mistake to avoid: A single half twist creates a permanent Möbius-style loop. If that happens, undo the join now. Do not try to fix it several rounds later.
Step 4: Crochet the Foundation Round
Chain 1. This chain is only for height and does not count as a stitch.
Working around the chain loop, make 1 sc into the back bump of each chain.
You should finish with 80 sc.
Instead of joining with a slip stitch at the end, begin working continuously in a spiral.
Move your marker into the first stitch of the new round.
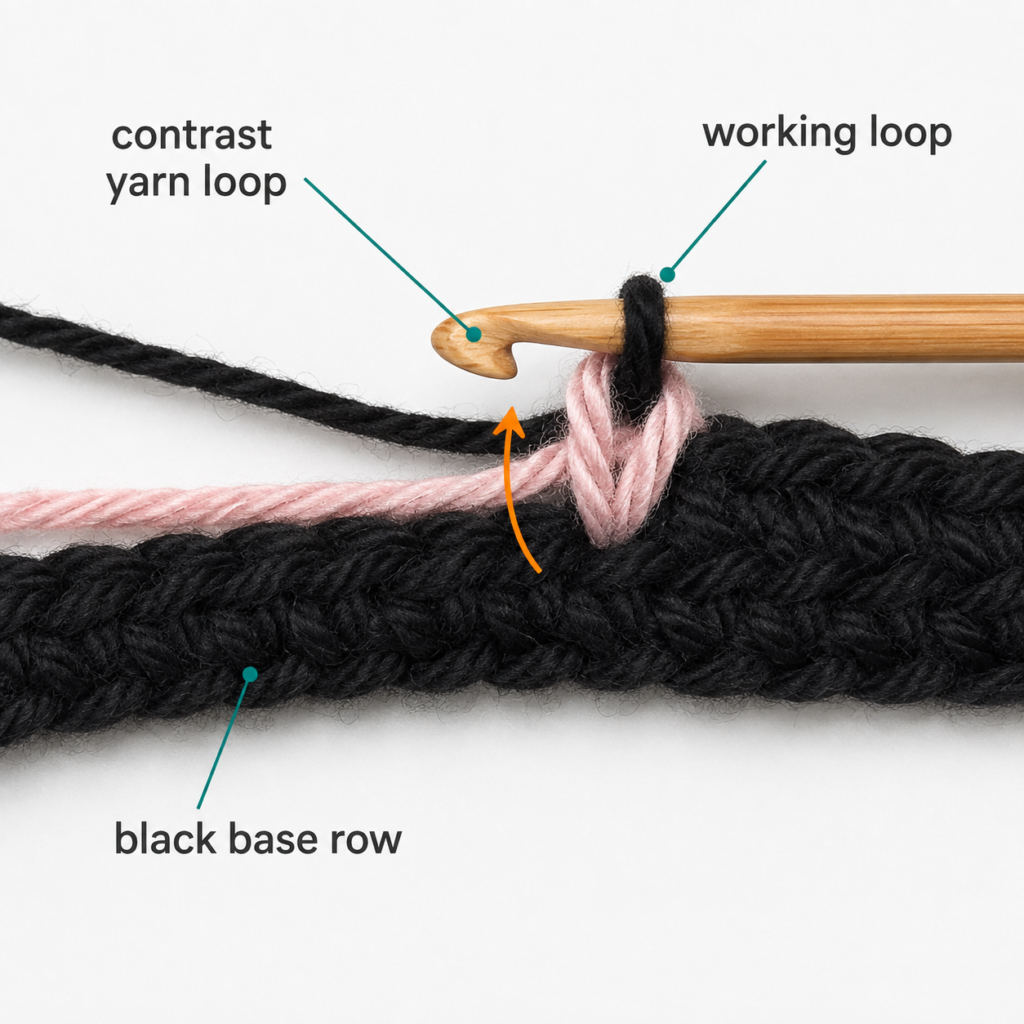
While you work Round 1, place Color B along the inside edge of your stitches and crochet over it. This allows the contrast yarn to be ready when the checker pattern begins.
Beginner tip: Stop every 15–20 stitches and gently slide the hardware along the strap. It should move freely.
Common mistake to avoid: If the first round cups inward like a bowl, your foundation chain is probably too tight relative to your single crochet stitches.
Step 5: Learn the Modified Single Crochet
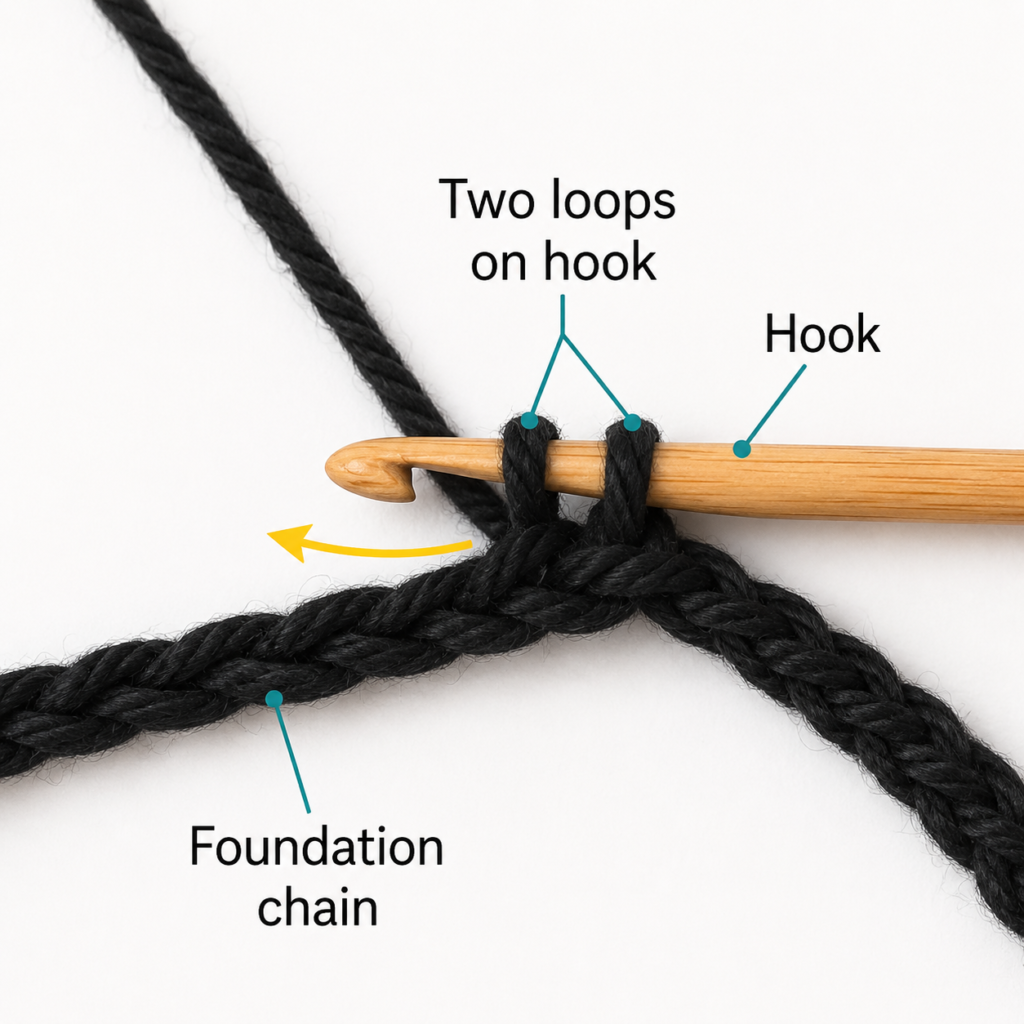
From this point onward, work into the back loop only.
For each msc:
- Insert the hook under the back loop.
- Yarn over.
- Pull up a loop.
- Bring the working yarn under the hook.
- Pull through both loops.
This small change creates a compact stitch and helps the colored blocks look more upright.
Keep Color B lying along the top of the previous round while you work over it with Color A.
Do not pull the carried yarn tightly. It should simply travel inside the stitches.
Beginner tip: Every few inches, gently stretch the strap lengthwise. If the carried yarn is too tight, the fabric will refuse to flatten.
Common mistake to avoid: Do not leave the unused color hanging loose behind the work for long distances. This can create floats that catch on keys or fingers.
Step 6: Practice a Clean Color Change
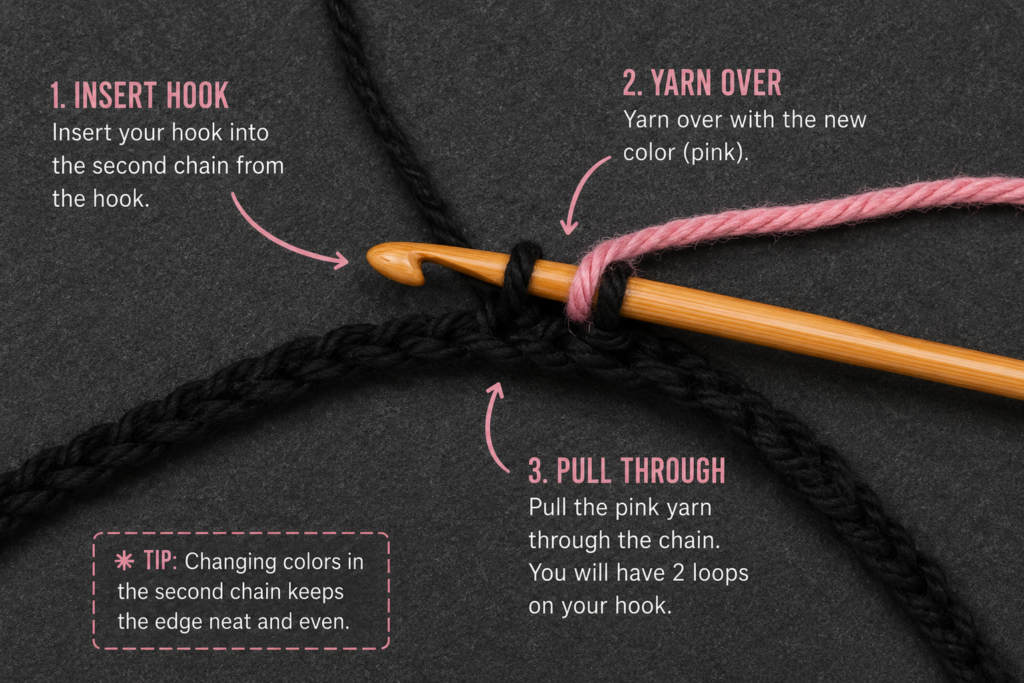
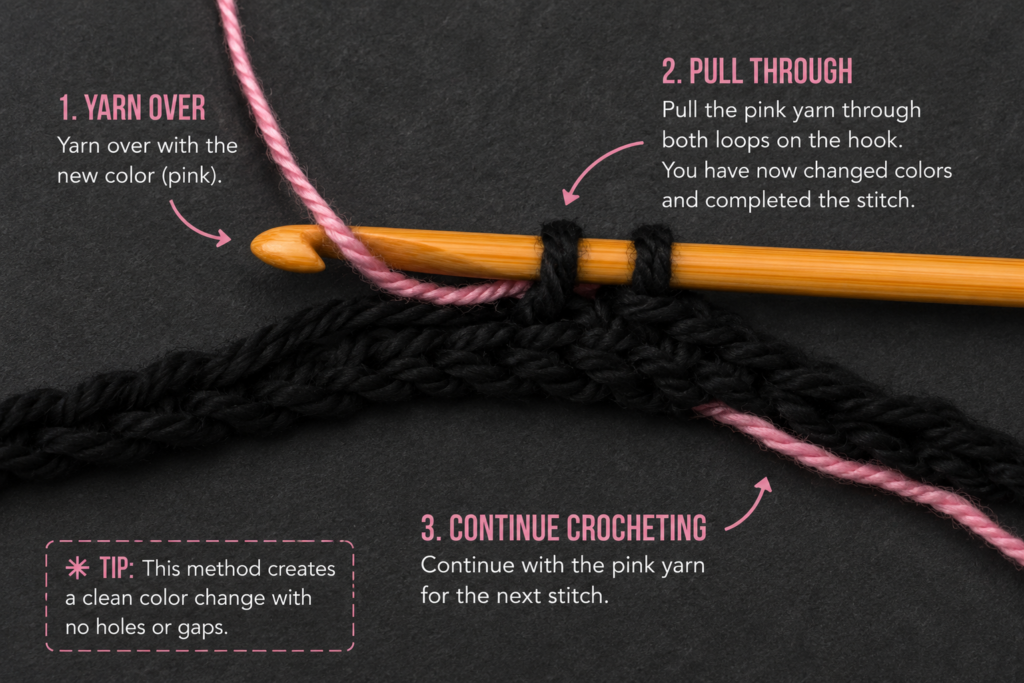
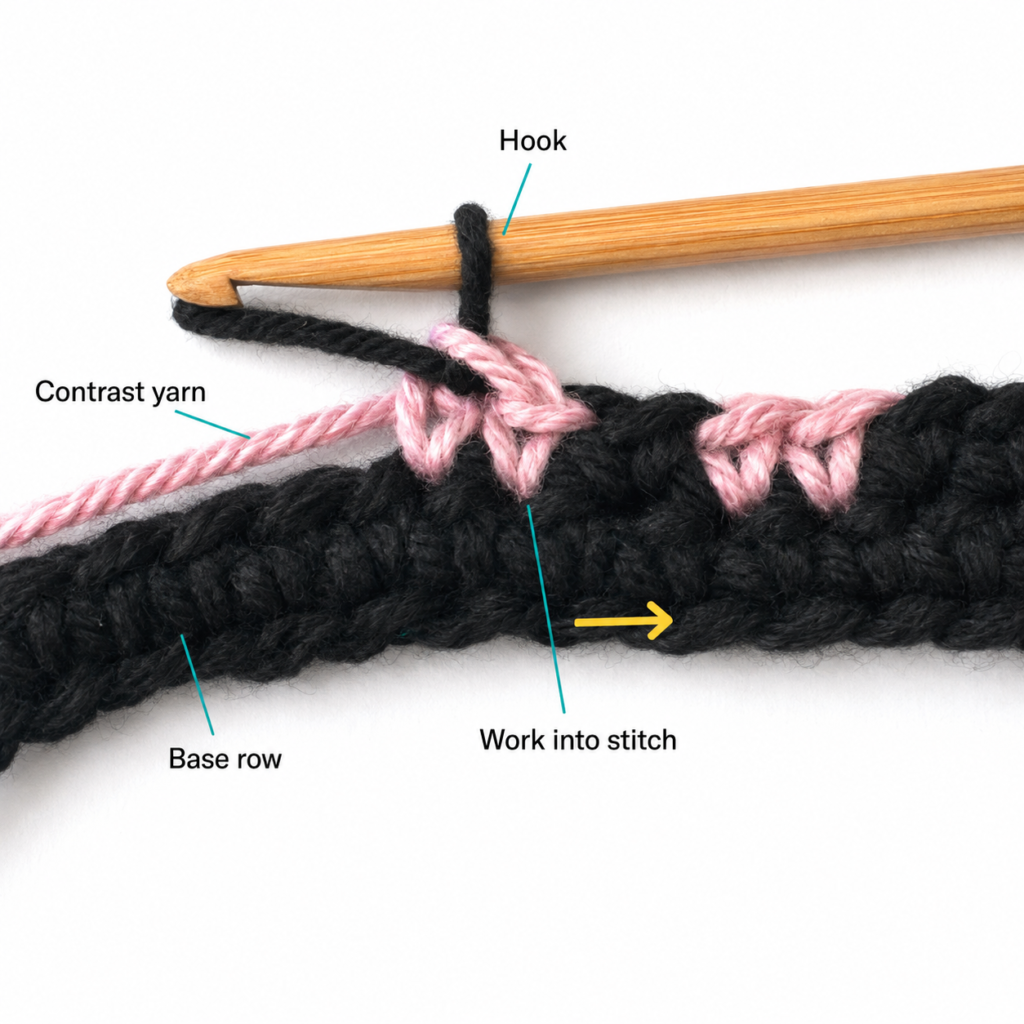
The secret to neat tapestry crochet is changing colors before the old stitch is completely finished.
Suppose you are crocheting with navy and the next stitch needs to be gold.
Begin the final navy stitch normally.
When two loops remain on the hook, stop.
Bring the gold strand into working position.
Use gold for the final yarn-under and pull-through.
The navy stitch is now complete, but the loop on your hook is gold. Your next stitch therefore begins in the correct color.
Use the same method when switching back to navy.
Beginner tip: Think of the final pull-through as belonging to the next stitch’s color.
Common mistake to avoid: If you finish the entire navy stitch in navy and only pick up gold afterward, a small navy cap will appear above the first gold stitch.
Step 7: Crochet the School-Color Checker Pattern
You now have 80 stitches and two yarn colors ready to use.
Continue in msc BLO.
Round 2
Repeat:
2 Color A, 2 Color B
around the entire loop.
Round 3
Repeat the same sequence:
2 Color A, 2 Color B
Round 4
Reverse the blocks:
2 Color B, 2 Color A
Round 5
Repeat:
2 Color B, 2 Color A
Round 6
Return to:
2 Color A, 2 Color B
This gives you a small alternating checker effect without needing a complicated graph.
Each four-stitch repeat is worked 20 times around an 80-stitch loop.
Keep your marker at the beginning of every round.
Beginner tip: Say the colors quietly as you crochet: “navy, navy, gold, gold.” It sounds simple, but it prevents many color-placement errors.
Common mistake to avoid: Do not drop the inactive color. Continue carrying it inside the stitches so it is available for the next color block.
Step 8: Keep the Strap Flat and Even
After several rounds, stop and inspect the entire loop.
You are looking for three things:
- The strap should lie reasonably flat.
- The colored blocks should remain approximately the same width.
- The carried strand should not create puckers.
If the edge is pulling inward, loosen the inactive strand before continuing.
If the colored stitches look taller or wider than the main-color stitches, check whether your tension changes when you switch yarns.
You can gently slide your fingers along the strap to distribute any extra slack in the carried strand.
The small visual step created by working continuously can be positioned close to the hardware.
Beginner tip: Checking your work now is faster than undoing three completed rounds later.
Common mistake to avoid: Do not pull the unused yarn after every stitch. That is one of the fastest ways to make tapestry crochet curl.
Step 9: Add the Final Solid Round
For Round 7, work one full round of msc in Color A only.
Continue crocheting over Color B for the first few inches so it is securely trapped inside the fabric.
Then cut Color B, leaving a 4–5 inch / 10–13 cm tail.
Continue working over that tail for several more stitches.
The solid final round visually frames the checker motif and gives the outer edge a clean finish.
At the end of the round, slip stitch loosely into the next stitch.
Cut Color A, leaving a 6-inch / 15 cm tail.
Pull the tail through the final loop.
Pattern Notes or Stitch Notes
Starting chain
The standard sample uses 80 chains.
To resize, use any multiple of 4.
Stitch count
Maintain 80 stitches per round.
You are not increasing or decreasing.
Turning chain
There are no turning chains because the strap is worked in continuous rounds.
Color repeat
The main checker sequence is:
- Round 2: 2 A, 2 B
- Round 3: 2 A, 2 B
- Round 4: 2 B, 2 A
- Round 5: 2 B, 2 A
- Round 6: 2 A, 2 B
Round 1 and Round 7 are worked in Color A.
Right side/wrong side
Keep the right side facing out throughout.
Adjusting width
For a wider keychain, add one or two additional msc rounds before the final solid-color round.
For a narrower keychain, omit one checker round.
Common Beginner Mistakes
1. Joining a twisted foundation chain
Problem: The loop turns over itself permanently.
Fix: Lay the chain flat before joining and trace every chain V from start to finish.
2. Making the starting chain too tight
Problem: The first round bows or puckers.
Fix: Make the foundation chain with relaxed tension or use a hook 0.5 mm larger only for the chain.
3. Pulling the carried yarn too tightly
Problem: The strap shortens and curls.
Fix: Allow the unused strand to lie naturally inside the stitches. Do not tension it like the working yarn.
4. Changing colors too late
Problem: Tiny spots of the old color appear at the top of the new-color section.
Fix: Switch colors during the final pull-through of the stitch immediately before the new color.
5. Losing the beginning of the round
Problem: The checker blocks stop lining up.
Fix: Move a locking stitch marker into the first stitch every round.
6. Accidentally changing stitch count
Problem: The motif no longer fits evenly around the strap.
Fix: Count after every round. You should always have 80 stitches unless you intentionally resized the pattern.
7. Using very loose stitches
Problem: The strap feels stretchy and carried yarn is visible between stitches.
Fix: Try a smaller hook or slightly tighter tension.
How to Customize This Crochet Project
Use actual school colors
The obvious choice is to use your college or university colors.
You can also avoid exact branded colors and simply choose combinations with a collegiate feel:
- Navy + gold
- Burgundy + cream
- Forest green + white
- Purple + silver
- Orange + navy
- Red + charcoal
Make a simple striped version
If frequent color changes feel intimidating, ignore the checker sequence.
Try:
- Rounds 1–2 in Color A
- Round 3 in Color B
- Round 4 in Color A
- Round 5 in Color B
- Rounds 6–7 in Color A
You still get a two-color school keychain with much less yarn management.
Make it longer
Add foundation chains in multiples of four.
A longer loop can clip to a backpack and make keys easier to find inside a large bag.
Make a mini lanyard
Instead of wrist size, make a substantially longer starting chain and test the loop around your neck before joining.
For safety, a neck lanyard should ideally use purpose-designed breakaway hardware rather than a fixed loop.
Add an initial charm
Attach a small alphabet charm to the split ring after the crochet work is complete.
Avoid stitching heavy metal pieces directly to the fabric because they can distort the strap.
Add a tassel
A small tassel in the contrast color looks especially good beside the clasp.
Keep the tassel short if the keychain will spend most of its time inside a backpack.
Make graduation gifts
Use the graduate’s school colors and attach a small year charm or tassel.
Because the project uses relatively little yarn, making several matching wristlets for roommates, teammates, classmates, or club members is practical.
Finishing Instructions
Thread the Color A tail onto a tapestry needle.
Run it through the inside of several matching stitches.
Change direction once and weave through another short section.
Trim the excess yarn close to the fabric without cutting a crochet stitch.
Repeat for any remaining tail.
Slide the D-ring until the small beginning-of-round transition is positioned near the hardware.
Gently flatten the strap with your fingers.
If the cotton needs shaping, lightly dampen the crochet portion, arrange it flat, and let it air dry.
Avoid leaving coated metal hardware soaking in water unnecessarily.
If you add a split key ring, open it with a proper split-ring motion rather than pulling the ring sideways.
Before using the keychain, tug firmly on the crochet loop and hardware to check that all yarn ends and metal connections are secure.
Safety note: A crochet keychain with detachable metal hardware is an accessory, not a baby toy. Keep loose hardware and small charms away from infants and young children.
Quick Printable-Style Summary
Skill level: Confident beginner
Finished size: Approximately 9–10 in / 23–25 cm wrist-loop circumference and 1 in / 2.5 cm wide
Materials: Fine/sport cotton in two colors, 2.5 mm hook, 1-inch D-ring or lobster clasp, stitch marker, tapestry needle, scissors
Stitches: ch, sl st, sc, msc BLO
Starting method:
With Color A, ch 80. Pass the chain through the hardware and join to the first chain without twisting.
Foundation round:
Work 80 sc around.
Color repeat:
- R2: 2 A, 2 B around
- R3: 2 A, 2 B around
- R4: 2 B, 2 A around
- R5: 2 B, 2 A around
- R6: 2 A, 2 B around
- R7: Color A around
Work Rounds 2–7 in modified single crochet BLO.
Size adjustment: Add or subtract foundation chains in multiples of four.
Finishing: Fasten off, weave tails securely, shape flat, check hardware, and attach optional split ring or charm.
FAQ
Is a crochet college keychain pattern suitable for beginners?
Yes, if you already know how to chain and make a single crochet. The main new skills are working continuously around a loop and changing between two colors.
If you have never crocheted before, practice a small single-crochet swatch first.
What yarn is best for a crochet keychain?
A smooth cotton yarn is a strong option for this design because it creates clearly defined stitches and a firm strap. Fine or sport-weight yarn also prevents the wristlet from becoming excessively bulky.
Yarn-weight terminology varies by manufacturer, so the Craft Yarn Council’s standardized weight system can help when comparing labels.
Can I make this with worsted-weight yarn?
Yes, but the finished strap will be thicker.
Use a larger hook appropriate to the yarn and make fewer starting chains until the foundation loop fits comfortably around your wrist.
Keep the stitch count divisible by four if you want to use the checker repeat.
How do I stop tapestry crochet from puckering?
The most common cause is pulling the carried yarn too tightly.
Lay the unused strand inside the stitches without stretching it. Periodically flatten your work and slide your fingers along the strap to redistribute tension.
Can I use three college colors?
Yes.
For beginners, however, two colors are much easier to manage.
Once you are comfortable carrying two strands, you could introduce a third accent color for one checker block or a narrow stripe.
How long should a crochet wristlet keychain be?
There is no single correct measurement because hand size varies.
For this project, aim for a finished loop circumference around 9–10 inches / 23–25 cm and test the foundation around your hand before joining.
The loop should slide over your hand without needing to stretch aggressively.
Can I sell finished college keychains?
You can sell items made from this original tutorial, but be cautious about using protected university names, official logos, mascots, or trademarked graphics in your product branding. A generic two-color college-inspired wristlet avoids needing to reproduce school logos.
Conclusion
A crochet college keychain pattern is a useful way to practice tapestry crochet without committing to a large colorwork project. Once you understand how to carry the unused strand and switch colors during the last pull-through, the little checker blocks become surprisingly repetitive.
Start with two colors you already have in your stash, make the 80-chain wristlet, and concentrate on maintaining relaxed yarn tension rather than trying to crochet quickly.
Once you’ve completed the first one, the same construction can be turned into graduation keychains, roommate gifts, backpack charms, teacher gifts, team-color wristlets, or simple neutral everyday key fobs.