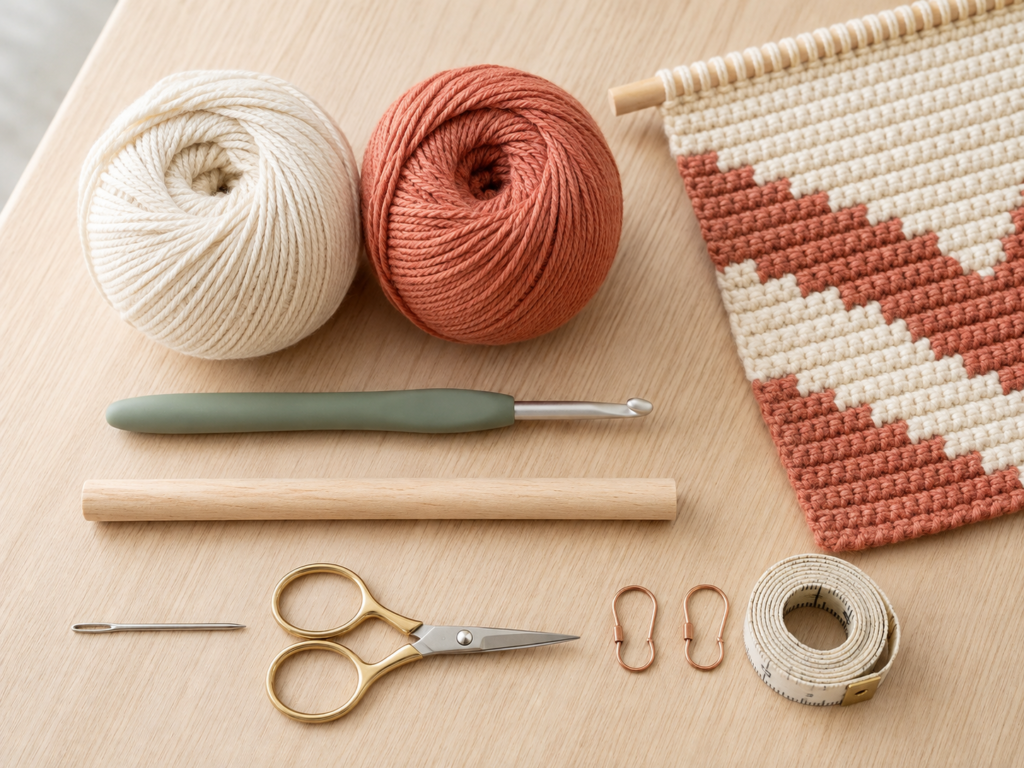
A crochet wall tapestry does not need to be large, complicated, or packed with dozens of color changes. If you can chain and make a single crochet, this mini project is a manageable way to learn how tapestry crochet actually works.
In this tutorial, you will crochet a small rectangular wall hanging in warm ivory with a simple terracotta diamond in the center. The entire design is worked in single crochet, so you can concentrate on the skill that matters most: changing colors cleanly and carrying one yarn strand inside the stitches.
The finished piece is small enough to complete in an afternoon, uses little yarn, and gives you a practical introduction to crochet colorwork without committing to a blanket, bag, or complicated graph.
The construction is worked flat from the bottom upward. Once the panel is finished, you will block it, attach it to a wooden dowel, add fringe, and finish it with a hanging cord.
The photo placements throughout the tutorial are designed to show exactly what a beginner needs to see: the foundation, the two loops before a color change, how the unused yarn sits inside your stitches, the developing motif, the back of the work, the dowel attachment, and the fringe.
Project Details
Tutorial type: Pattern-style project tutorial
Skill level: Beginner to easy
Finished crochet panel: Approximately 6¾–7 inches wide × 6 inches tall
Finished length with fringe: Approximately 9–10 inches
Dowel: Approximately 9 inches long
Estimated crochet time: 2–3 hours
Construction: Worked flat from bottom to top
Yarn weight: Category 4 medium cotton
Hook: 4.5 mm
Primary stitch: Single crochet
Terminology: U.S. crochet terms
What You’ll Learn
- How to make an even foundation chain.
- How to count single crochet stitches accurately.
- How to work flat tapestry crochet.
- How to introduce a second yarn color.
- How to change colors without creating a visible step.
- How to carry unused yarn inside your stitches.
- How to keep a geometric motif centered.
- How to prevent a tapestry panel from narrowing.
- How to inspect the wrong side for tension problems.
- How to block a small crochet panel.
- How to attach crochet fabric to a dowel.
- How to add simple fringe.
Materials You’ll Need
For this tutorial, use two strongly contrasting colors. Cotton is particularly useful for wall décor because its stitch definition helps geometric shapes stay crisp.
You will need:
- Color A: approximately 70–90 yards of category 4 medium cotton yarn in warm ivory.
- Color B: approximately 25–35 yards of the same yarn in muted terracotta.
- 4.5 mm crochet hook.
- 9-inch smooth wooden dowel, approximately ¼–½ inch thick.
- Blunt yarn needle.
- Scissors.
- Two locking stitch markers, optional but helpful.
- Measuring tape.
- Blocking mat or folded towel.
- Rustproof pins.
- Spray bottle with water.
Using yarns of the same fiber and thickness makes the colorwork easier because one shade will not dominate the other.
The Craft Yarn Council classifies worsted and Aran yarns as category 4 medium yarn. Hook recommendations are guidelines rather than rigid rules, and gauge remains the deciding factor. For this dense tapestry project, the suggested 4.5 mm hook is intentionally on the firm side so the carried yarn stays better concealed. If the fabric feels painfully tight, use a 5.0 mm hook.
Crochet Abbreviations Used
This tutorial uses standard U.S. crochet terminology.
- ch = chain
- sc = single crochet
- sl st = slip stitch
- st/sts = stitch/stitches
- RS = right side
- WS = wrong side
- rep = repeat
The Craft Yarn Council lists ch, sc, sl st, and st among standard crochet abbreviations. It also notes the important terminology difference that U.S. single crochet corresponds to U.K. double crochet.
US/UK terminology note
Every instruction below uses U.S. terms.
If you use U.K. terminology:
U.S. single crochet = U.K. double crochet.
Before You Start
Gauge
Aim for approximately:
16 single crochet stitches × 17 rows = 4 inches / 10 cm
Perfect gauge is less critical for wall décor than for clothing, but it still affects how your motif looks.
A very loose gauge can cause:
- the terracotta carried yarn to show through the ivory stitches;
- the panel to stretch on the dowel;
- the geometric diamond to look less defined.
A very tight gauge can cause:
- sore hands;
- curling;
- difficulty inserting the hook;
- a stiff, puckered motif.
You want a dense but flexible fabric.
How to count the stitches
Every row in this project contains 27 single crochet stitches.
The turning chain does not count as a stitch.
At the end of each row, count the small V shapes across the top. There should always be 27.
If you regularly lose your last stitch, place a locking marker in the first stitch of every row. When you return to that edge, the marker tells you exactly where your final stitch belongs.
Right side and wrong side
Treat Row 1 as the right side.
Odd rows will therefore be RS rows and even rows WS rows.
Because the diamond is symmetrical, the color sequence itself is easy to read in either direction. Still, paying attention to RS and WS helps you control where the carried yarn sits.
How to avoid curling
Small tapestry crochet panels sometimes curl because the stitches are dense.
To reduce curling:
- Do not make your foundation chain excessively tight.
- Avoid pulling the inactive yarn strand hard while carrying it.
- Check the width every few rows.
- Block the finished panel before attaching the dowel.
Choosing yarn colors
The easiest beginner combination is one light background and one medium or dark motif color.
For example:
- warm ivory + terracotta;
- cream + sage;
- oatmeal + rust;
- pale beige + dusty blue;
- soft gray + mustard.
Avoid using two nearly identical shades for your first tapestry. High contrast lets you see every color change.
Step-by-Step Crochet Tutorial
Step 1: Make the Foundation Chain and First Four Rows
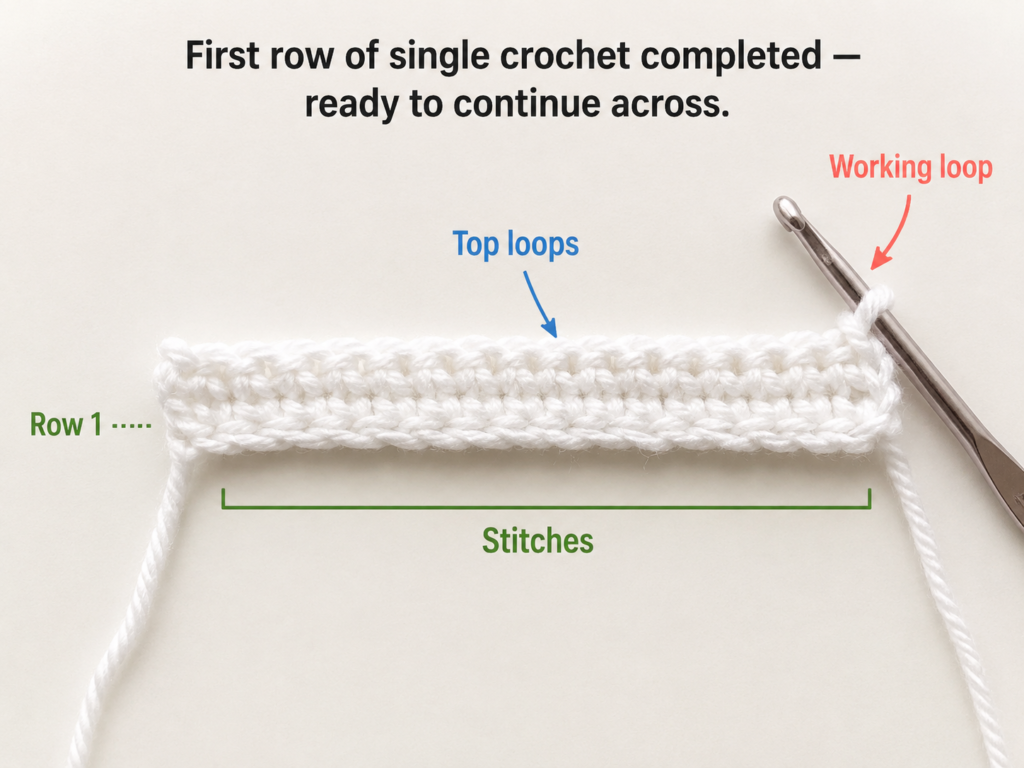
With Color A — warm ivory, make a slip knot.
Chain 28.
The extra chain is your turning setup; the finished row will contain 27 stitches.
Row 1
Insert the hook into the second chain from the hook.
Make one single crochet.
Continue working one single crochet in every chain across.
Stitch count: 27 sc
Chain 1 and turn.
Rows 2–4
Work one single crochet in every stitch across.
Chain 1 and turn after each row.
Stitch count after every row: 27 sc
You now have a short rectangular foundation with four solid ivory rows.
Beginner tip
If your foundation chain is much tighter than your single crochet rows, unravel it and remake the chain more loosely. A tight lower edge can make the finished tapestry curve inward.
Common mistake to avoid
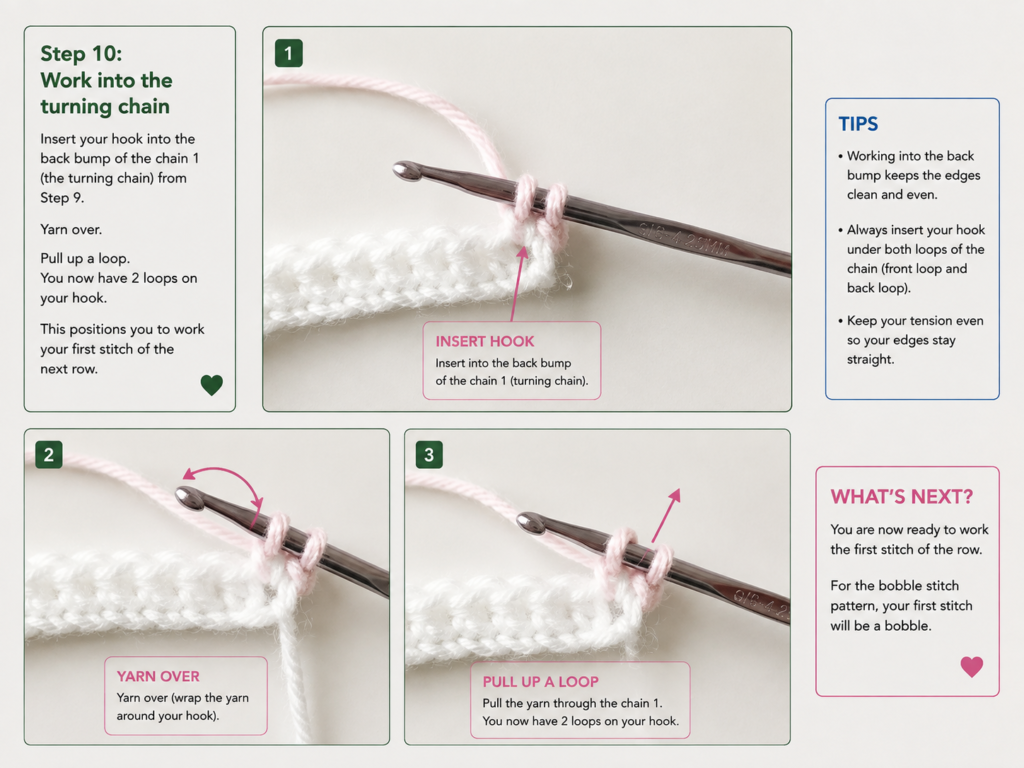
Do not accidentally work into the turning chain at the end of the row. Your turning chain does not count as a stitch in this pattern.
Step 2: Begin the Terracotta Diamond
The motif begins in Row 5.
The row sequence is:
13 ivory, 1 terracotta, 13 ivory
Start the row normally with Color A.
Make 12 complete ivory single crochet stitches.
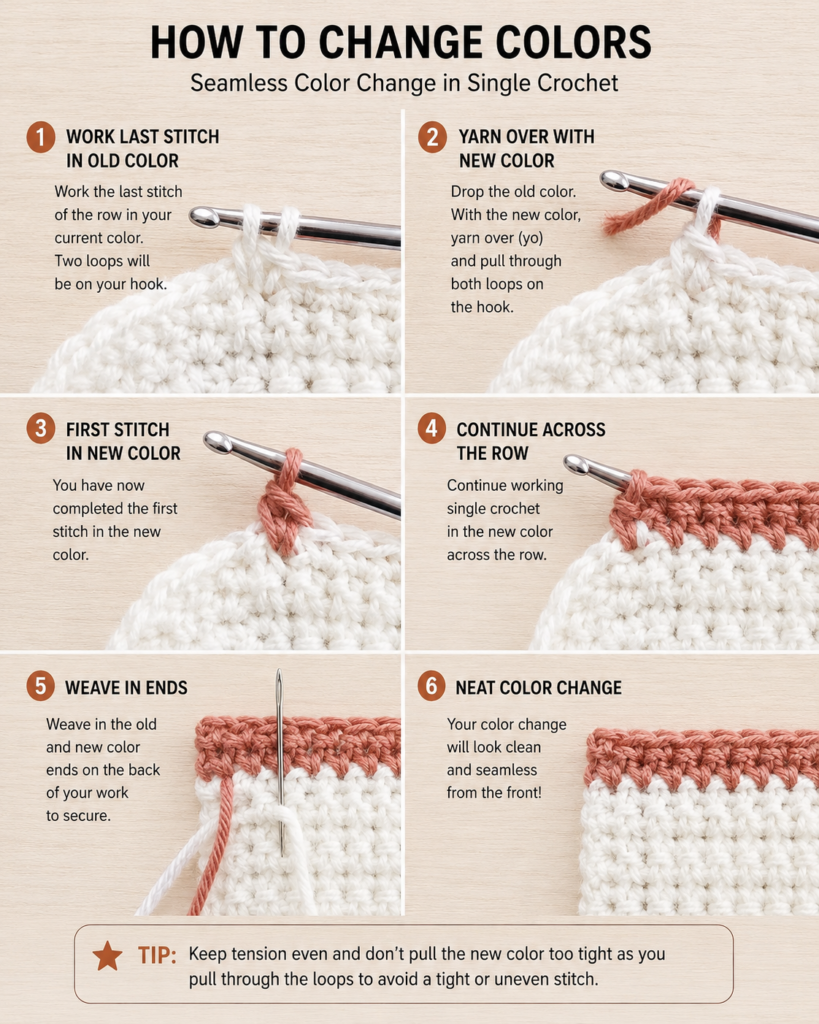
Begin the 13th ivory stitch, but do not complete the final yarn over.
Stop when you have two loops on your hook.
This is the moment when the color change happens.
Why change color here?
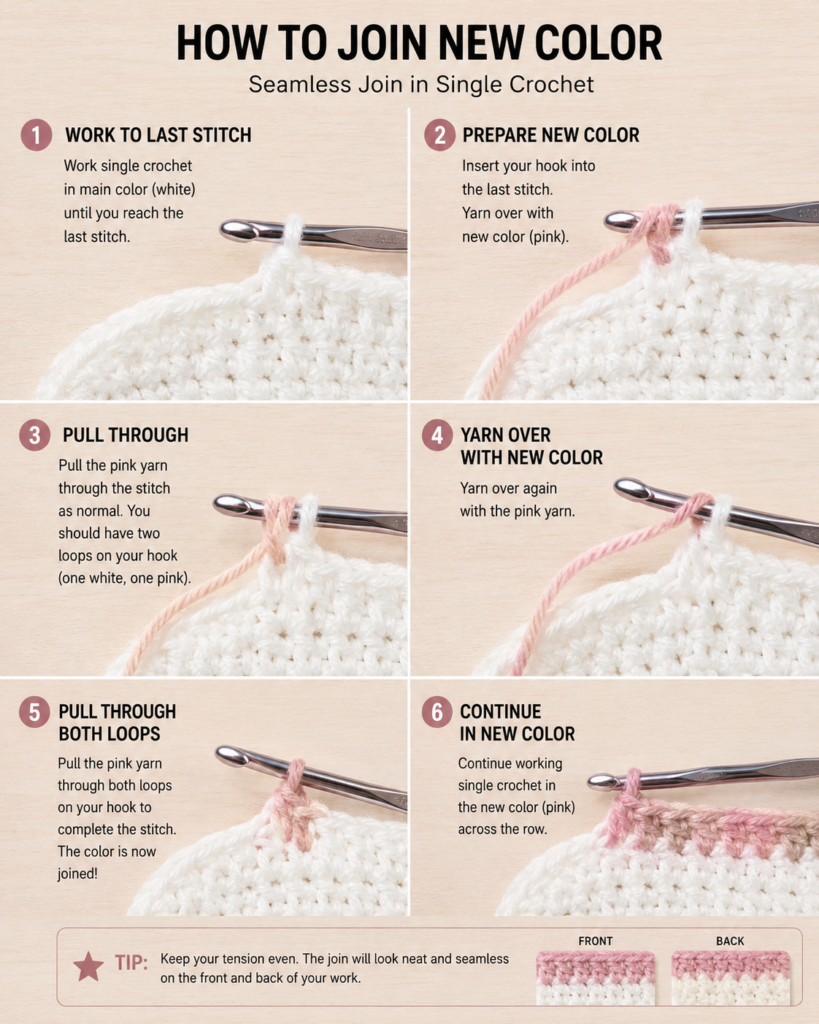
If you complete the entire 13th stitch in ivory and then introduce terracotta, the top of your first motif stitch will still appear ivory.
Instead, the new color completes the old stitch. That gives the next stitch a clean terracotta top.
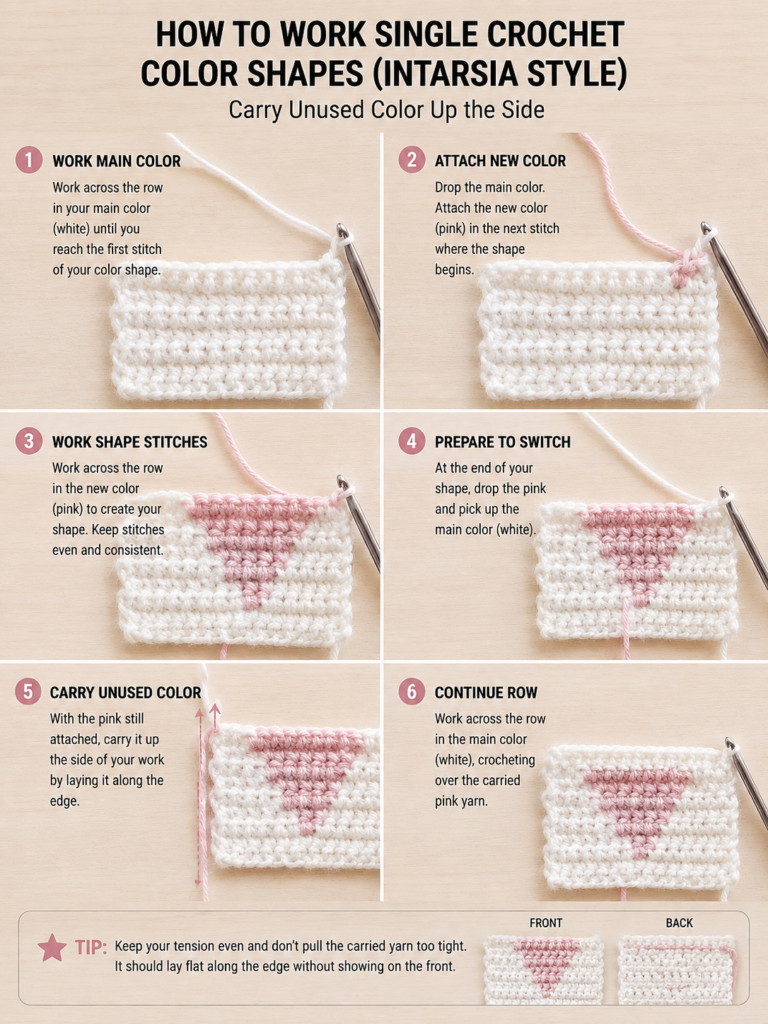
The primary photo tutorial demonstrates this same principle: stop before the final pull-through and use the incoming color to complete the previous stitch.
Beginner tip
Before pulling in Color B, leave a 5–6 inch terracotta tail. That is plenty to weave in later.
Common mistake to avoid
Do not knot the two yarn colors together. A hard knot can create a visible bump in the flat tapestry.
Step 3: Complete the First Color Change
Pick up Color B — muted terracotta.
Yarn over with terracotta.
Pull the terracotta yarn through both ivory loops on your hook.
You now have one terracotta loop on the hook.
Work one single crochet in the next stitch using terracotta.
Because Row 5 contains only one terracotta stitch, you will immediately change back to ivory.
Begin that terracotta single crochet normally:
- Insert the hook.
- Yarn over with terracotta.
- Pull up a loop.
- Stop with two terracotta loops on the hook.
- Yarn over using ivory.
- Pull ivory through both loops.
You now have an ivory loop ready to finish the row.
Work 13 ivory single crochet stitches across.
Row 5 complete: 13A, 1B, 13A — 27 sts
Beginner tip
Think of every color change as happening one stitch earlier than it looks on paper. The new color enters during the final pull-through of the last stitch in the old color.
Step 4: Learn to Carry the Inactive Yarn
From Rows 5–21, you will keep both yarn colors attached.
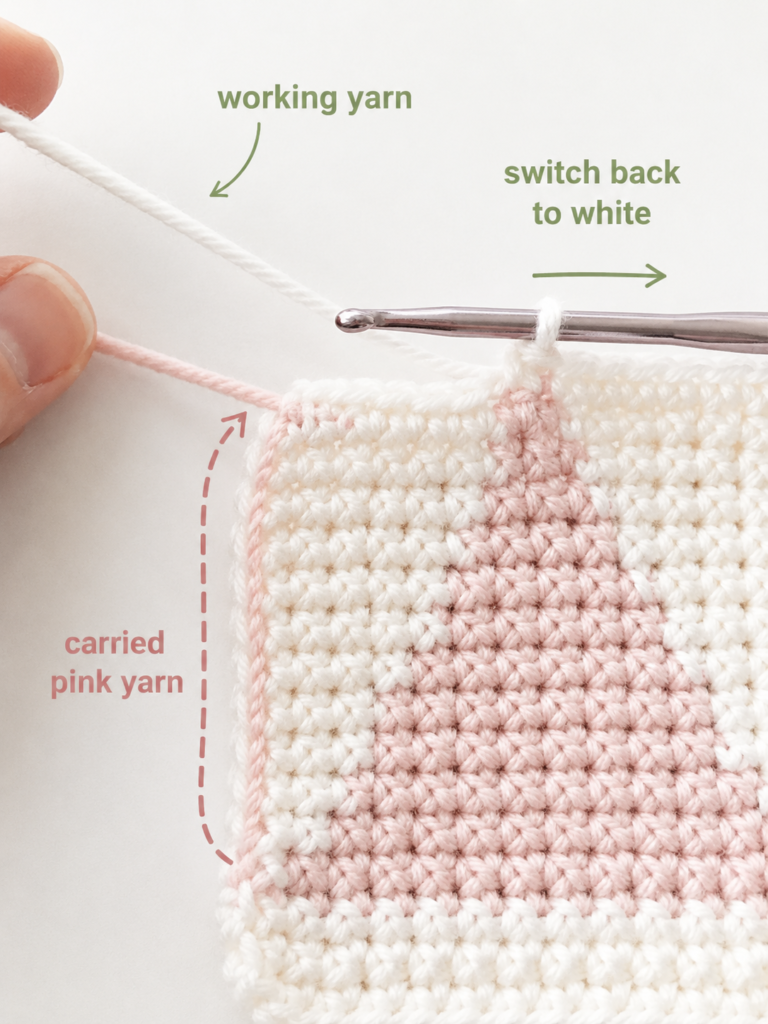
Instead of cutting and rejoining terracotta every row, lay the unused strand along the top of the previous row and crochet around it.
For example, while working terracotta:
- Lay the ivory strand horizontally along the top edge of the stitches below.
- Insert your hook beneath the ivory strand and into the next stitch.
- Yarn over with terracotta.
- Pull up a loop.
- Finish the single crochet normally.
The ivory strand becomes trapped inside the terracotta stitch.
When you return to ivory, reverse the roles.
This technique is what gives tapestry crochet its dense, integrated structure rather than leaving long floats across the back. The primary tutorial specifically demonstrates crocheting around the inactive strand as the new color is worked.
How tightly should you pull the carried strand?
The carried yarn should lie straight but relaxed.
After completing several stitches, gently pull the inactive strand only until excess slack disappears.
Do not pull until the fabric gathers.
Your tapestry should remain approximately the same width from bottom to top.
Beginner tip
After every color section, spread the stitches gently along the row with your fingers. If the fabric immediately cups inward, loosen the carried strand slightly.
Common mistake to avoid
A beginner often pulls the inactive strand tightly because they want to hide it. That usually makes the panel narrower and creates puckering.
Hiding the yarn comes from crocheting around it—not from pulling it hard.
Step 5: Crochet the Growing Half of the Diamond
Now continue the geometric motif.
Each row contains 27 stitches.
Use:
- A = warm ivory
- B = muted terracotta
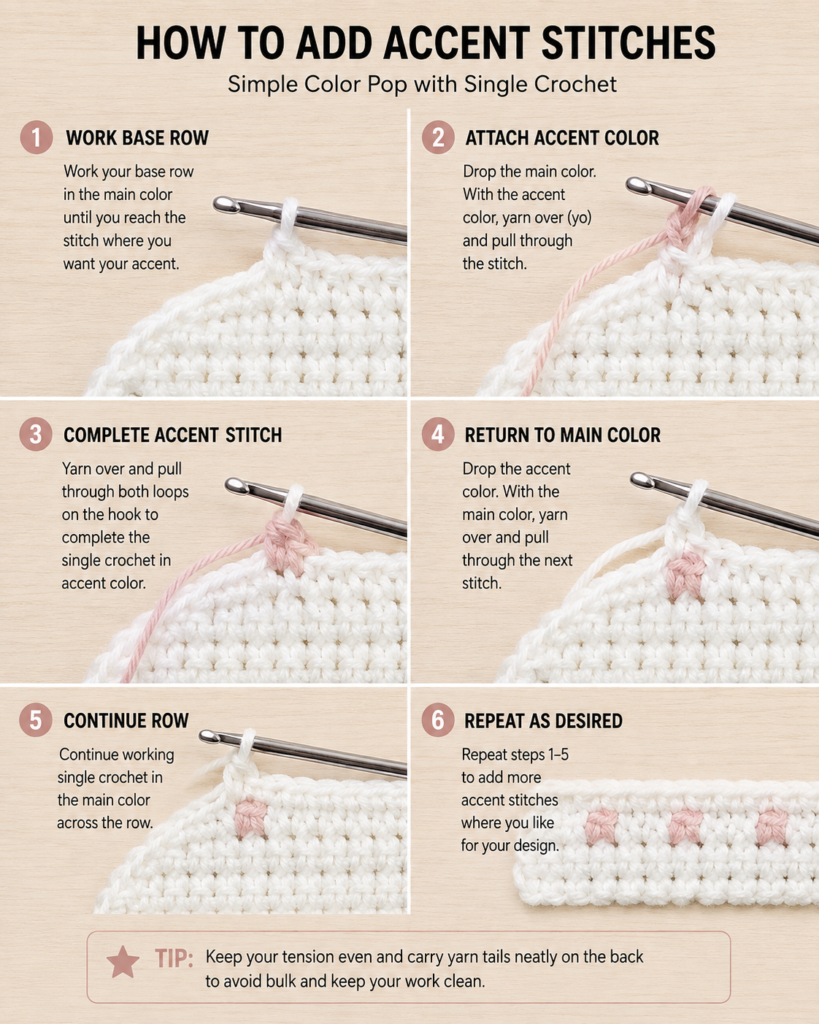
Rows 5–13
Row 5: 13A, 1B, 13A
Row 6: 12A, 3B, 12A
Row 7: 11A, 5B, 11A
Row 8: 10A, 7B, 10A
Row 9: 9A, 9B, 9A
Row 10: 8A, 11B, 8A
Row 11: 7A, 13B, 7A
Row 12: 6A, 15B, 6A
Row 13: 5A, 17B, 5A
At Row 13, the diamond reaches its widest point.
You should still have exactly 27 stitches.
How to read each row
Take Row 9 as an example:
- Crochet 9 ivory stitches.
- On the ninth stitch, complete the final pull-through with terracotta.
- Crochet 9 terracotta stitches while carrying ivory.
- On the ninth terracotta stitch, finish with ivory.
- Crochet the final 9 ivory stitches while carrying terracotta.
- Chain 1 and turn.
Beginner tip
Write each row on a sticky note and cross it out when completed. This greatly reduces accidental row repetition.
Common mistake to avoid
Do not count the active loop on your hook as a stitch.
Your count comes from the completed V shapes across the row.
Step 6: Turn Without Creating Messy Floats
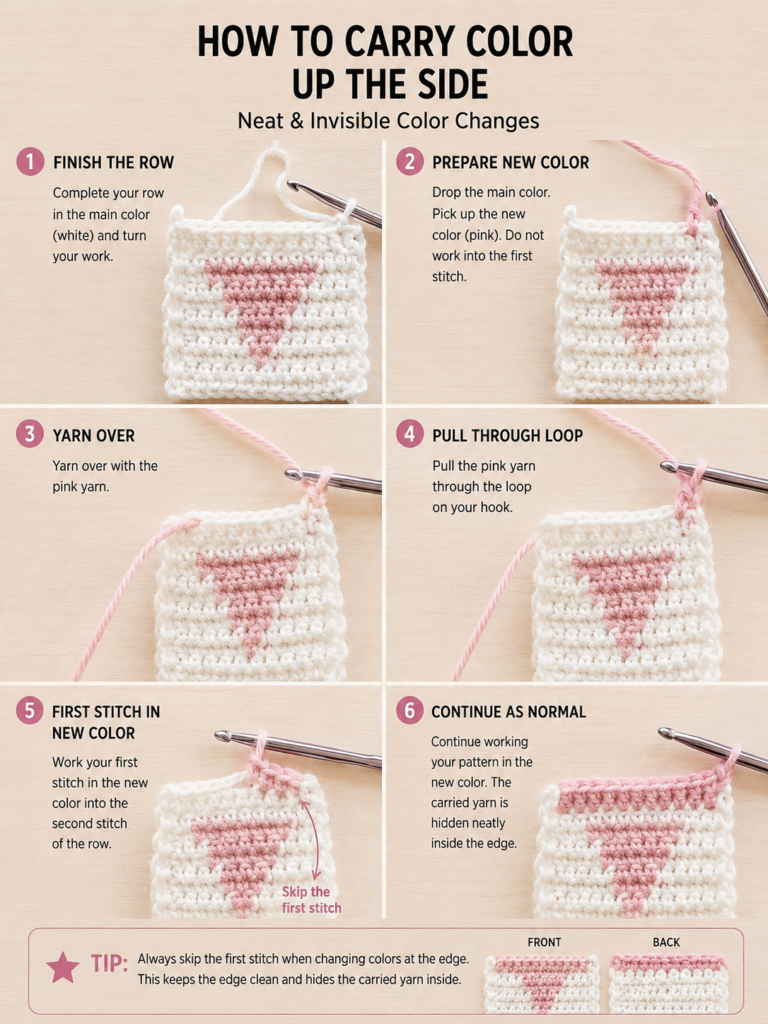
Flat tapestry crochet is worked back and forth, so every second row places the wrong side toward you.
After turning:
- Keep both yarn strands untangled.
- Position the inactive strand along the top of the previous row.
- If necessary, move it slightly toward the wrong side of the fabric.
- Insert the hook into the first stitch.
- Work around the inactive strand.
The goal is not to create a perfectly identical front and back. This is a wall hanging, so the front matters most.
However, you should not have long loose strands stretching across the back.
Beginner tip
If your two yarn balls twist around one another, pause at the end of a row and rotate the project rather than repeatedly rotating the yarn balls.
Common mistake to avoid
Do not leave a several-inch float behind the motif just because the back will face the wall.
Long floats can catch while blocking or hanging and may pull the colorwork out of shape.
Step 7: Check the Middle of Your Tapestry
Once Row 13 is finished, put the hook down and lay the panel flat.
Check four things.
1. Is the diamond centered?
You should have five ivory stitches on either side of the widest terracotta row.
2. Is the panel still approximately the same width?
Measure the lower foundation edge and the current top edge.
A difference of a few millimeters is normal.
A dramatic decrease means your carried strand is too tight.
3. Are the side edges straight?
Each row must still contain 27 stitches.
If one side gradually slopes inward, you have probably skipped the final stitch on some rows.
4. Is the color sufficiently hidden?
A tiny amount of terracotta may peek between ivory stitches because the yarn is physically inside the fabric.
That is normal.
Large streaks of the inactive color generally mean:
- your stitches are too loose;
- the carried yarn is sitting in front rather than inside;
- or your two yarn colors are extremely high contrast.
Step 8: Narrow the Top Half of the Diamond
The second half mirrors the first.
Continue:
Row 14: 6A, 15B, 6A
Row 15: 7A, 13B, 7A
Row 16: 8A, 11B, 8A
Row 17: 9A, 9B, 9A
Row 18: 10A, 7B, 10A
Row 19: 11A, 5B, 11A
Row 20: 12A, 3B, 12A
Row 21: 13A, 1B, 13A
Your diamond should now have a clear point at the top.
After the final terracotta stitch of Row 21, switch back to ivory.
You no longer need Color B.
Cut the terracotta yarn, leaving a 5–6 inch tail.
Rows 22–25
Using only ivory:
Work one single crochet in every stitch across.
Chain 1 and turn after Rows 22–24.
After Row 25, do not chain again.
Stitch count: 27 sc per row
Beginner tip
Do not cut the terracotta yarn until you are sure the top point of your diamond is complete.
Common mistake to avoid
When narrowing a symmetrical motif, it is easy to repeat a row accidentally.
If your diamond develops a flat or lopsided top, compare your last few rows against the sequence before continuing.
Step 9: Inspect the Back Before Finishing
Before fastening off, turn the panel over.
The back does not have to be as visually perfect as the front, but it should be structurally clean.
Look for:
- no long loose yarn floats;
- no loops hanging several stitches away from the fabric;
- no areas where the terracotta strand has pulled the ivory stitches together;
- no missed stitches;
- no untrimmed knots.
If a carried yarn section appears loose, gently distribute the slack through several neighboring stitches rather than pulling one point hard.
If the panel is slightly rippled, blocking will usually improve it.
If the panel is dramatically narrower in the center, blocking will not completely correct excessive carried-yarn tension. It may be better to unravel that section now.
Pattern Notes or Stitch Notes
Turning chain
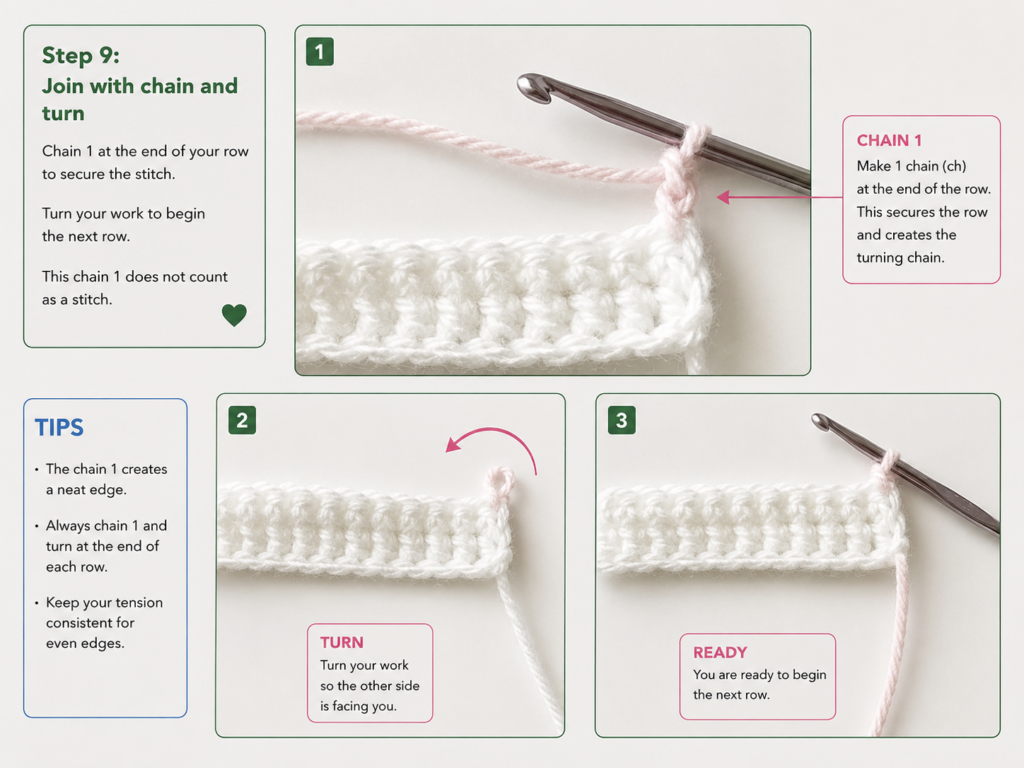
Chain 1 at the end of each row.
The turning chain does not count as a stitch.
Stitch count
Every row contains:
27 single crochet stitches
If your count changes, fix the row before continuing. Accurate stitch count is more important than working quickly.
Color sequence
The panel begins with four solid ivory rows.
Rows 5–21 form the diamond.
Rows 22–25 return to solid ivory.
Right side / wrong side
Row 1 is designated the right side.
Odd rows are RS rows.
Even rows are WS rows.
Repeat pattern
The motif is deliberately symmetrical.
It increases by two terracotta stitches per row until the center, then decreases by two stitches per row.
Size adjustment
To make the tapestry wider without changing the motif, add an even number of ivory stitches to the foundation.
For example, adding 6 stitches gives you 3 additional background stitches on each side.
To make the project taller, add extra solid ivory rows above and below the motif.
For a larger diamond, continue increasing the B section by two stitches per row while decreasing the A sections evenly.
Common Beginner Mistakes
1. Changing colors after the stitch is already complete
Problem: A visible dot or horizontal step appears at the color boundary.
Fix: Introduce the new yarn during the final pull-through of the previous stitch.
2. Pulling the carried yarn too tightly
Problem: The tapestry narrows or puckers around the diamond.
Fix: Lay the inactive yarn straight across the row without stretching it. After several stitches, gently spread the fabric back to its natural width.
3. Carrying yarn too loosely
Problem: Loops of unused yarn appear along the back or edges.
Fix: Remove only the obvious slack from the carried yarn before continuing. Do not yank it tight.
4. Losing the final stitch of a row
Problem: One edge slopes inward.
Fix: Place a locking stitch marker in the first stitch of every row. When you return, that marked stitch is the last one you must work into.
5. Accidentally crocheting into the turning chain
Problem: The project gains stitches and becomes wider.
Fix: Remember that the chain 1 is for height only. Your first single crochet always goes into the first actual stitch.
6. Letting the two yarn balls twist continuously
Problem: The yarn becomes tangled and slows down every color change.
Fix: Untwist the working yarn at the end of each row. Move the project rather than repeatedly moving both yarn balls.
7. Using a hook that makes the fabric painfully stiff
Problem: Your fingers become sore and the hook is difficult to insert.
Fix: Move up by 0.5 mm. The fabric should be firm, not rigid.
How to Customize This Crochet Project
The simple rectangle-and-diamond construction is intentionally flexible.
Change the yarn colors
Try:
- ivory + sage green for botanical décor;
- cream + dusty blue for coastal décor;
- oatmeal + burnt orange for autumn;
- blush + burgundy for a warmer bedroom palette;
- black + cream for modern graphic décor.
Make the tapestry larger
Add more ivory stitches equally to both sides.
For example:
- 27 stitches = approximately 7 inches.
- 35 stitches = approximately 9 inches, depending on gauge.
- 43 stitches = approximately 11 inches.
Keep the motif centered by adding the same number of background stitches to the left and right.
Add a second diamond
Work several solid background rows after the first diamond, then repeat the motif.
A longer vertical tapestry with two stacked diamonds can work well beside a narrow bookshelf or entryway.
Try a stripe instead
If color changes inside rows still feel intimidating, work complete rows in Color B.
That produces a striped mini tapestry while allowing you to practice the same dowel and fringe finishing.
Add a border
For a more finished edge, join ivory yarn after blocking and work one round of slip stitch or single crochet around the sides and bottom.
Do not make the border too tight or it can pull the corners inward.
Change the fringe
Options include:
- all ivory;
- alternating ivory and terracotta;
- grouped fringe every second stitch;
- twisted cord fringe;
- uneven boho fringe;
- no fringe at all.
Gift ideas
A mini tapestry makes a useful handmade gift because it does not require sizing.
Consider it for:
- dorm-room décor;
- teacher gifts;
- housewarming gifts;
- nursery décor;
- office décor;
- gallery walls;
- craft-room decoration.
Finishing Instructions
1. Fasten off
After completing Row 25, cut the ivory yarn but leave approximately 30–36 inches of tail.
Pull the yarn completely through the active loop.
The long tail can be used to attach the dowel.
2. Weave in the terracotta ends
Thread each terracotta tail onto a blunt yarn needle.
Weave through several stitches of the same color whenever possible.
Change direction once and weave through another short section.
Trim the remaining yarn.
Avoid dragging a terracotta tail through the ivory background where it may show.
3. Block the panel
Lay the tapestry flat on a blocking mat.
Measure the sides and gently shape the rectangle.
Pin the corners first.
Then add pins along the edges.
Mist the cotton lightly with water until damp but not soaked.
Let it dry completely before removing the pins.
Blocking is particularly helpful for tapestry crochet because color changes can create small tension differences.
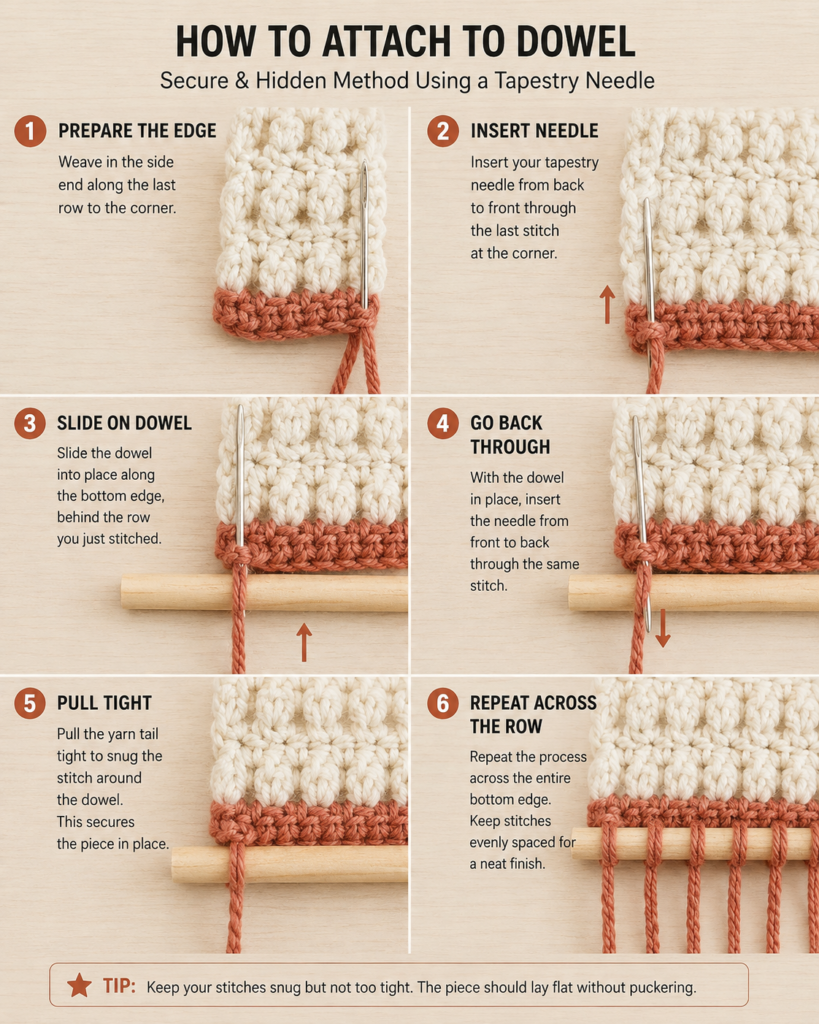
4. Attach the wooden dowel
Position the dry panel with the right side facing you.
Place the dowel directly above the top row.
Thread the long ivory tail through your yarn needle.
Starting at one corner:
- Bring the needle through the first top stitch.
- Wrap the yarn over and around the wooden dowel.
- Insert the needle through the next top stitch.
- Wrap around the dowel again.
- Continue across all 27 stitches.
Keep every wrap similarly sized.
Do not pull so tightly that the top edge gathers.
The Happy Heartsy wall-tapestry tutorial uses this same general finishing concept: the yarn is threaded through the upper edge and wrapped around the wooden dowel across the panel.
5. Add the fringe
Cut 27 pieces of ivory yarn, each approximately 8 inches long.
For each bottom stitch:
- Fold one strand exactly in half.
- Insert your crochet hook through the bottom stitch.
- Catch the folded midpoint.
- Pull the folded loop partly through the stitch.
- Remove the hook if convenient.
- Pass both yarn tails through the loop.
- Pull gently to secure.
Repeat across the entire lower edge.
The Happy Heartsy reference similarly demonstrates folding a strand, pulling its center through a lower stitch, then passing the tails through the loop to secure the fringe.
6. Trim the fringe
Hang the tapestry from the dowel before trimming.
Gravity changes how the strands fall.
Use sharp scissors to cut the fringe into a straight horizontal line.
For a softer handmade look, leave the bottom slightly uneven.
7. Add the hanging cord
Cut approximately 18–20 inches of ivory yarn.
Tie one end securely around the left side of the dowel.
Tie the second end around the right side.
Move the knots until the tapestry hangs level.
Weave or trim the short ends.
Washing and care
Because this is decorative wall art, frequent washing should not be necessary.
For dust:
- gently shake the tapestry outdoors;
- use a low-suction vacuum attachment from a safe distance;
- or lint-roll carefully.
If washing becomes necessary, follow the care label for your yarn.
Cotton pieces can often be hand washed in cool water, reshaped, and dried flat, but always follow the specific yarn manufacturer’s instructions.
Quick Printable-Style Summary
Project: Mini Diamond Crochet Wall Tapestry
Skill level: Beginner to easy
Finished panel: Approximately 6¾–7 inches wide × 6 inches tall
Finished length: Approximately 9–10 inches including fringe
Yarn: Category 4 cotton
Colors: Warm ivory A + muted terracotta B
Hook: 4.5 mm
Stitches: Chain and single crochet
Starting method: Chain 28; single crochet in second chain from hook for 27 stitches
Foundation: Rows 1–4 = 27A
Diamond:
- Row 5: 13A, 1B, 13A
- Row 6: 12A, 3B, 12A
- Row 7: 11A, 5B, 11A
- Row 8: 10A, 7B, 10A
- Row 9: 9A, 9B, 9A
- Row 10: 8A, 11B, 8A
- Row 11: 7A, 13B, 7A
- Row 12: 6A, 15B, 6A
- Row 13: 5A, 17B, 5A
- Row 14: 6A, 15B, 6A
- Row 15: 7A, 13B, 7A
- Row 16: 8A, 11B, 8A
- Row 17: 9A, 9B, 9A
- Row 18: 10A, 7B, 10A
- Row 19: 11A, 5B, 11A
- Row 20: 12A, 3B, 12A
- Row 21: 13A, 1B, 13A
Top background: Rows 22–25 = 27A
Turning chain: Ch 1; does not count as a stitch
Stitch count: 27 stitches every row
Finishing: Block, attach to 9-inch dowel, add 27 fringe strands and hanging cord
FAQ
Is a crochet mini wall tapestry pattern suitable for beginners?
Yes. A small tapestry using only single crochet and two colors is one of the more approachable ways to learn flat crochet colorwork. You should already be comfortable making a chain and ordinary single crochet stitches before beginning.
What stitch is best for crochet tapestry wall hangings?
Single crochet is particularly useful because it creates a dense surface and short stitches, which makes pixel-style or geometric motifs easier to define.
Do I cut the yarn every time I change colors?
Not in this project. During Rows 5–21, both colors remain attached. The inactive color is carried inside the active stitches. Once the final terracotta stitch is completed in Row 21, Color B can be cut.
Why can I see the carried yarn through my stitches?
Some minor color peeking is normal, especially when using very contrasting shades. If it is excessive, try slightly firmer tension or a slightly smaller hook. Also check that the inactive strand is sitting directly inside the stitch rather than across the front surface.
Why is my crochet tapestry getting narrower?
The most common cause is pulling the inactive yarn too tightly. Lay the carried yarn flat and only remove obvious slack. Also verify that you still have 27 stitches after every row.
Can I use acrylic yarn instead of cotton?
Yes. Acrylic can work, particularly if that is what you already own. Cotton is recommended here because its crisp stitch definition and lower elasticity work well for small wall décor.
Can I make this crochet mini wall tapestry without fringe?
Absolutely. The fringe is decorative. You can leave the bottom edge plain, add a single crochet border, or attach small tassels only at the corners.
Conclusion
This crochet mini wall tapestry pattern is designed to give you a complete first experience with tapestry crochet rather than just a practice swatch.
You begin with ordinary single crochet, introduce one contrasting color, learn to carry the inactive yarn through the stitches, build a symmetrical geometric motif, and then turn the finished fabric into actual wall décor with a dowel and fringe.
Once you understand the color-change method, the same technique can be used for letters, checkerboards, hearts, flowers, mountains, abstract shapes, and larger graph-based wall hangings.
Save the tutorial so you can return to the color-change photographs while you work, and use this small diamond as a practice project before moving on to more detailed tapestry crochet graphs.





