A handmade pair of crochet mittens is one of those little projects that feels especially rewarding when the weather turns cold. They are practical, comfortable, and small enough to finish without committing to weeks of crocheting.
If you have already learned how to make a chain and a few basic stitches, you are closer to crocheting your first pair of mittens than you might think.
In this crochet mittens pattern tutorial, we’ll explore a cozy, textured mitten constructed with bulky yarn and simple crochet techniques. You’ll learn how to create a flexible fabric, shape a thumb, form a rounded fingertip, and finish the mitten with a tidy seam.
The featured construction uses crochet worked sideways in rows instead of traditional rounds. This creates an interesting knit-like texture and makes it easier to understand how individual rows contribute to the final shape.
The guide includes detailed explanations, photo-reference placements, beginner tips, common mistakes, and advice for adjusting the fit.
What You’ll Learn
By the end of this tutorial, you’ll understand how to:
- Choose suitable yarn and a crochet hook for warm winter mittens.
- Measure a hand before starting a wearable project.
- Crochet back-loop-only slip stitches for a flexible, ribbed texture.
- Use short rows to shape a thumb and rounded fingertip.
- Build a mitten sideways and prepare the fabric for seaming.
- Join the thumb and hand edges neatly.
- Adjust the size, yarn, and appearance of your mittens.
This is best approached as a confident-beginner project. Basic stitches are easy to learn, but short-row shaping requires attention to stitch placement.
Materials You’ll Need
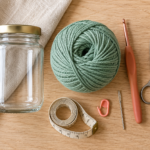
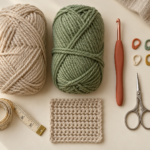
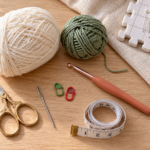
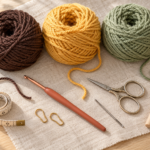
Recommended supplies for one pair
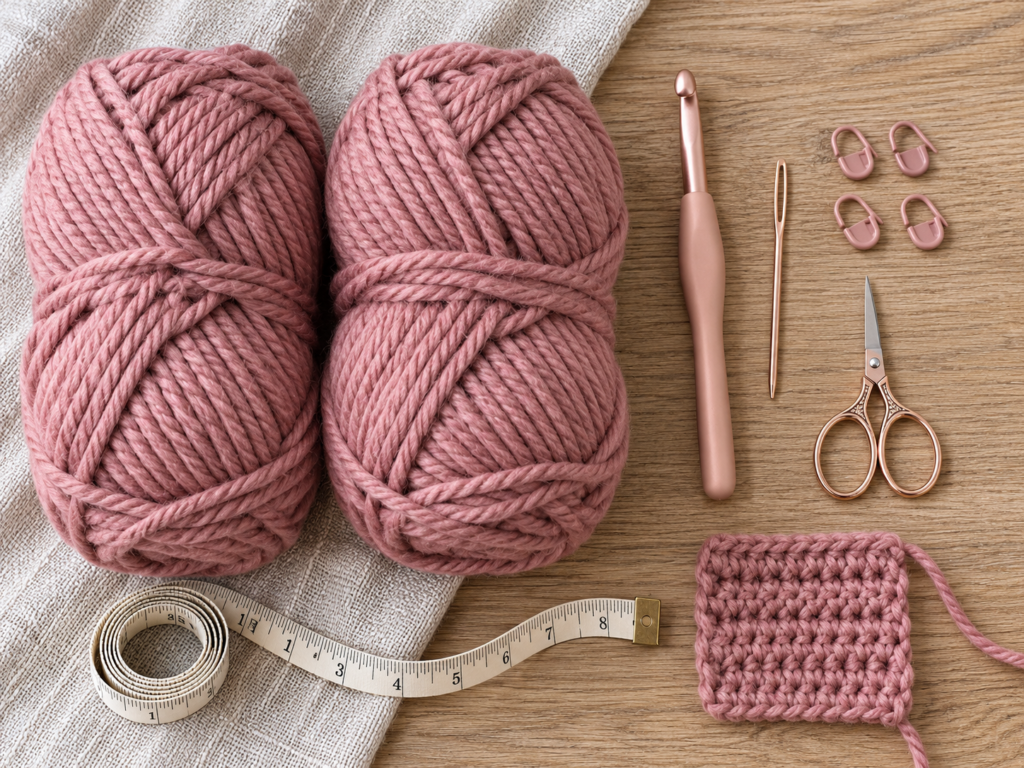
- Approximately 125–160 yards (115–146 meters) of bulky-weight #5 yarn, allowing extra for a gauge swatch and adjustments.
- One 8 mm crochet hook, or a size appropriate for your yarn and tension.
- A blunt tapestry needle for sewing the finished sections.
- Small, sharp scissors.
- Four removable stitch markers.
- A measuring tape.
- Optional: a small notebook for tracking rows and measurements.
A soft acrylic-wool blend works particularly well. Acrylic provides durability and makes the project easier to care for, while wool can add warmth and elasticity.
Choose a relatively smooth yarn rather than one with heavy fuzz or dramatic color changes. When you’re learning how to follow short rows, seeing the individual stitch loops makes a considerable difference.
Dusty rose, soft sage, oatmeal, charcoal, and warm beige are all excellent choices for winter accessories.
Crochet Abbreviations Used
This tutorial uses US crochet terminology.
| Abbreviation | Meaning |
|---|---|
| ch | Chain |
| sl st | Slip stitch |
| st / sts | Stitch / stitches |
| BLO | Back loop only |
| FLO | Front loop only |
| RS | Right side |
| WS | Wrong side |
| rep | Repeat |
| yo | Yarn over |
You may also encounter inverse slip stitch in the original visual reference. This means inserting the hook from the opposite direction from a standard slip stitch.
In UK terminology, chains and slip stitches retain their usual names. The basic techniques discussed here do not rely on US single or double crochet conversions.
Before You Start
1. Measure your hand
Mittens should feel comfortably fitted without squeezing the fingers or pulling across the thumb.
Take three measurements:
- Hand circumference: Wrap the measuring tape around the widest part of your palm, excluding the thumb.
- Hand length: Measure from your wrist to the tip of your middle finger.
- Thumb length: Measure from the base of your thumb to its tip.
Use these measurements as your fitting guide, rather than assuming every adult-sized mitten will fit equally well.
The Craft Yarn Council provides the following reference hand circumferences for women.

Welcome to the Craft Yarn Council
| Size | Hand Circumference |
|---|---|
| Small | 7 in / 18 cm |
| Medium | 7.5 in / 19 cm |
| Large | 8 in / 20.5 cm |
These are body measurements, not finished mitten measurements. The amount of ease needed depends on the stretchiness of the crocheted fabric.
2. Make a gauge swatch
A gauge swatch is a small sample of crocheted fabric used to measure your stitch size.
With bulky yarn and your 8 mm hook, crochet a small back-loop slip-stitch sample at least 5 inches wide and 5 inches high.
Measure a central 4-inch section without stretching the fabric. Count the stitches and rows.
Record these numbers so you can use them to adjust the mitten dimensions.
If your stitches are very tight, try a slightly larger hook. If the fabric is loose and full of holes, test a smaller hook.
For the precise gauge and size-specific counts associated with the photographed Frosty Air design, consult the original pattern.
3. Learn how to count slip stitches
Slip stitches can be difficult to count because they are shorter than most other crochet stitches.
Look for the small V-shaped loops running along the top of your work.
Every completed slip stitch produces one stitch. The loop currently on your hook is not an additional stitch.
Place a marker in the first or last stitch of a row if you often lose your place.
4. Understand the construction
Imagine unfolding a finished mitten so that the crochet fabric lies flat.
Instead of working from the wrist toward the fingertips in circular rounds, the selected construction builds the mitten sideways.
The thumb section is shaped first. The larger hand section is added afterward. Short rows help create the curves that eventually become the mitten’s rounded top.
Finally, the flat fabric is folded and sewn into a wearable mitten.
This makes the construction different from a conventional two-panel mitten or a mitten worked entirely in rounds.
5. Choose your right side
If you prefer one side of your stitch texture, mark it as the right side with a removable stitch marker.
Keep this consistent through the project. When you assemble the mitten, make sure the appearance of the two finished mittens matches.
Step-by-Step Crochet Tutorial
Step 1: Make the Foundation Chain
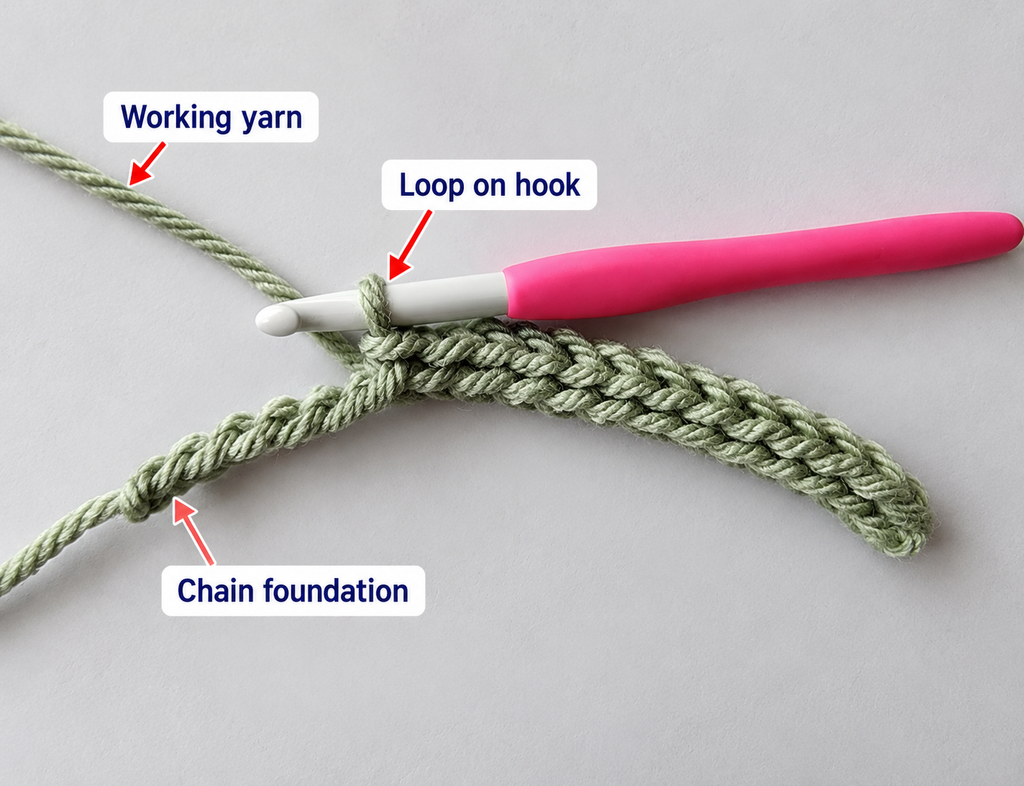
Start by making a slip knot and placing it on your crochet hook.
Hold the yarn comfortably in your non-dominant hand. The hook should slide through your stitches without having to force the yarn.
To make a chain:
- Bring the working yarn over the hook.
- Pull the yarn through the loop already on the hook.
- Repeat until the chain reaches the required length for the thumb-and-gusset section.
For a measurement-led practice sample, make 18 chains with bulky yarn. This is a technique sample, not a substitute for the size-specific foundation count of the finished reference pattern.
Spread the chain gently on the table. Check that it is not twisted and that the stitches are approximately the same size.
Beginner tip: Do not pull the chains tight immediately after making them. Your foundation should be flexible enough for the next row.
Common mistake to avoid: Making the initial chains much tighter than the rest of the crochet creates a stiff edge and makes the first row difficult.
Step 2: Practice Back-Loop-Only Slip Stitches
This technique is responsible for much of the flexible, knit-like texture.
A normal crochet stitch has two upper loops. When you crochet through both loops, the stitch fabric becomes relatively firm.
Working through the back loop leaves the front loop unworked, creating a visible horizontal ridge.
To make a BLO slip stitch:
- Find the V at the top of the next stitch.
- Identify the loop farthest away from you.
- Insert your hook through that back loop.
- Yarn over and pull the yarn through both the stitch and the loop already on your hook.
That’s one BLO slip stitch.
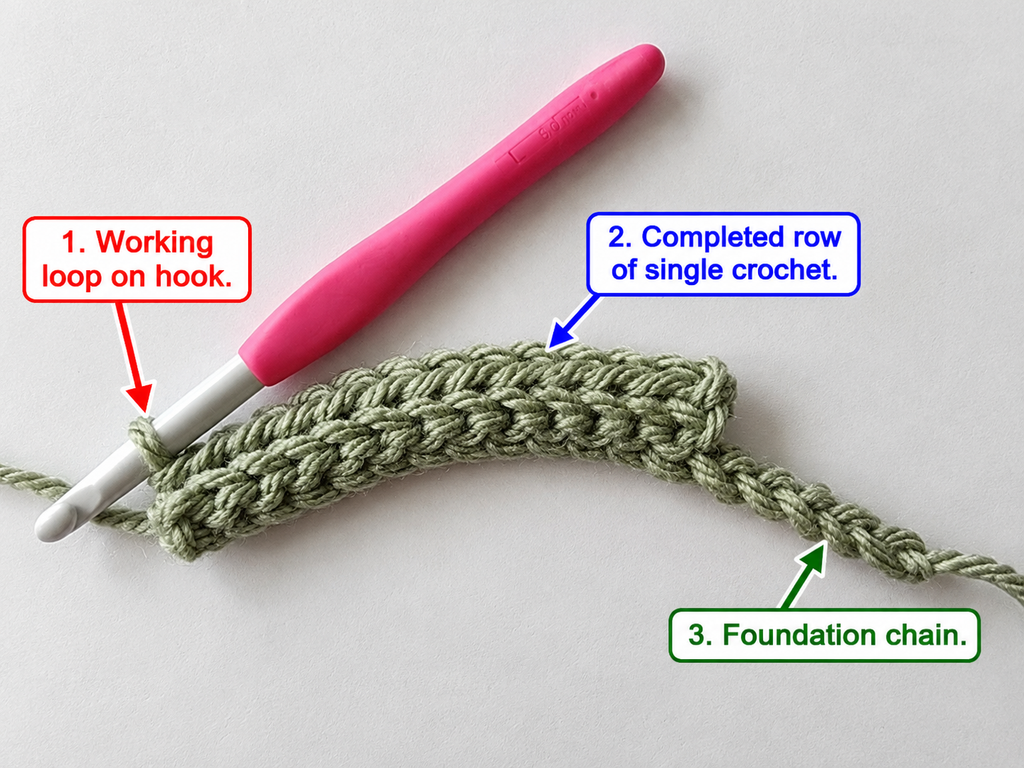
For a practice swatch, work slip stitches across a foundation chain beginning in the second chain from the hook. Chain one, turn, and work BLO slip stitches across the next row.
Continue until you’ve completed several rows.
You should begin to see neat ridges forming.
Beginner tip: A slip stitch should be snug enough to keep the fabric tidy but loose enough to accept your hook on the next row.
Common mistake to avoid: Working through both loops by accident will interrupt the ribbed texture. If you notice the mistake immediately, undo the stitch and work into the back loop.
Step 3: Understand Short-Row Shaping
The thumb of a mitten is not a simple straight rectangle. It needs extra width near the base and a narrower shape toward the tip.
This is where short rows become useful.
A short row is a row that stops before reaching the full width of the existing fabric.
The next row begins from that turning point rather than from the original edge.
Try the following exercise on a separate 16-stitch slip-stitch swatch:
- Row 1: Work 16 slip stitches across.
- Row 2: Chain one, turn, and work 12 BLO slip stitches. Leave four stitches unworked.
- Row 3: Chain one, turn, and work 12 BLO slip stitches back.
- Row 4: Chain one, turn, and work across the 12 stitches and then the four previously unworked stitches, returning to 16 stitches.
This creates a small stepped section.
Your first attempt might look uneven. That is normal while learning.
The important idea is that short rows add fabric to one area without adding it everywhere.
When used thoughtfully, they can help create gentle curves without obvious increases or decreases.
Beginner tip: Use a removable marker at the last worked stitch of a short row. This helps you recognize the point where full-length crochet resumes.
Common mistake to avoid: Do not treat skipped stitches as permanently abandoned. Many short-row constructions return to those stitches later.
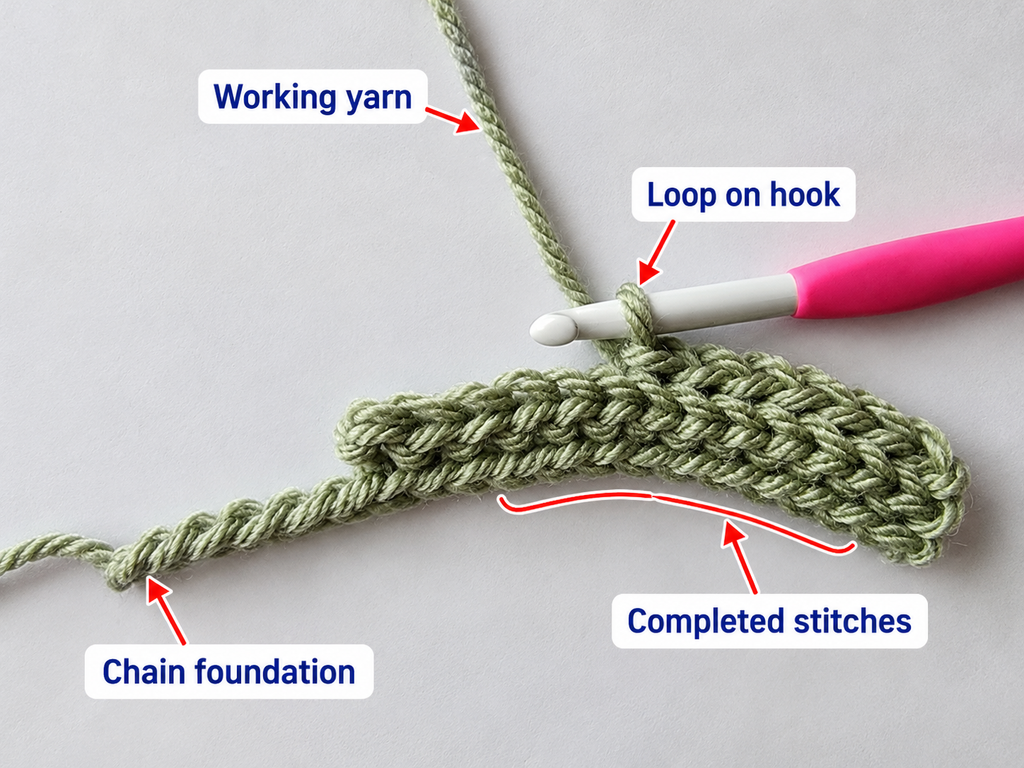
Step 4: Shape the Thumb Gusset
A gusset is the area that creates extra room where the thumb joins the hand.
Without enough space at this point, the mitten may feel tight whenever you spread your fingers or move your thumb.
The sideways construction uses varying row lengths to create this shape.
First, identify where the thumb will sit in relation to the hand.
Next, work the required short rows so that the thumb portion remains narrower than the gusset at its base.
As you work, lay the fabric flat occasionally. You should see a gently changing width rather than one completely straight strip.
For a wearable mitten, the row lengths, turning points, and gauge must agree with one another. Follow your chosen size in the primary source for its exact thumb-gusset sequence.
While learning, concentrate on making each turning point smooth and keeping the working yarn relaxed.
Beginner tip: Mark the widest edge of the gusset before continuing. It is helpful to remember which section connects to the palm.
Common mistake to avoid: Do not add arbitrary stitches to make the thumb wider. Short-row positioning and extra stitches are different shaping techniques, and mixing them without recalculating the pattern can distort the fit.
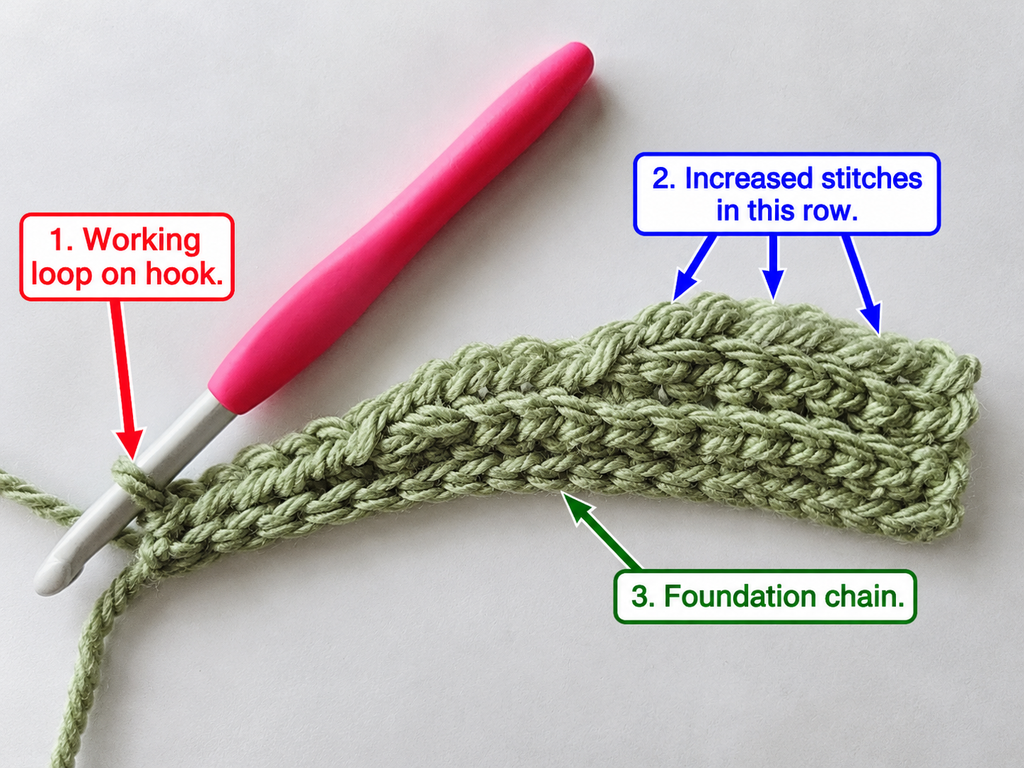
Step 5: Check the Finished Thumb Section
Once the gusset is complete, stop and examine the fabric.
The narrow section should correspond to the thumb, while the wider area should provide space for the base of the thumb.
Gently fold the piece to see how it will eventually sit against the mitten.
Check that the fabric stretches comfortably across the thumb without pulling the stitches into large gaps.
You can place your thumb beside the crocheted piece to compare its length and width.
If it is clearly too short, review the foundation length and gauge. If it is much too wide, examine your row tension and short-row shaping.
Don’t make large adjustments to one part without considering how it will connect to the hand.
Beginner tip: Measure your thumb piece while it is relaxed, not stretched. A flexible fabric should fit comfortably without relying on maximum stretch.
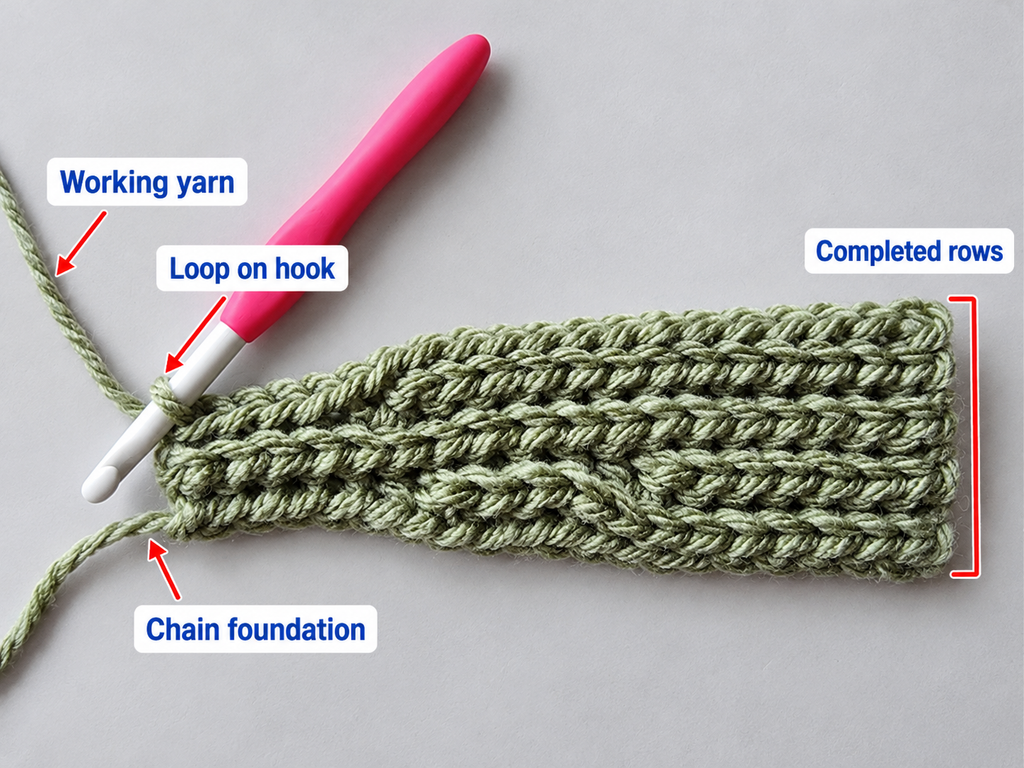
Step 6: Begin the Main Hand Section
The next stage is to build the part of the mitten that covers the palm and fingers.
In a sideways construction, the hand is not simply a tube rising from the wrist.
Instead, the fabric grows outward from the thumb-and-gusset section.
A new foundation chain extends the working area, making room for the hand.
This is an important point to check your measurements. The length of the new section should account for the fingers, while the continuing rows will contribute to the mitten’s overall width.
Hold the unfinished fabric against your hand to visualize where the rounded fingertip will eventually sit.
Before continuing, check:
- The foundation chain is not twisted.
- The connection between the hand section and thumb is secure.
- You can identify the wrist edge and fingertip edge.
- The intended finger length matches your measurements.
Beginner tip: Place one marker at the wrist edge and another at the fingertip edge. This is especially useful when both ends of the work look similar.
Common mistake to avoid: Don’t begin the hand section from the wrong end of the gusset. Doing so can put the thumb at an uncomfortable angle.
Step 7: Crochet the Main Hand Fabric
With the foundation established, continue building the hand fabric using the stitch sequence for your mitten construction.
Keep the yarn tension consistent. This is especially important with slip stitches because a sudden change in tension can significantly alter the fabric’s width.
As the hand section grows, you will begin to recognize its shape.
The fabric should be wide enough to cover the palm and fingers comfortably, with a little room for movement.
Periodically lay the mitten beside your hand.
Look at the distance from the wrist to the fingertip and compare it with your original measurement.
If the work seems too short, don’t assume additional rows will solve the problem. In a sideways pattern, the direction of growth matters. Adding rows may increase circumference rather than finger length.
Beginner tip: Work several rows before judging the appearance of the stitch pattern. Crochet fabric often looks more regular after it has a little depth.
Common mistake to avoid: Stretching your work during every measurement can make it appear larger than it really is. Let it relax before checking the fit.
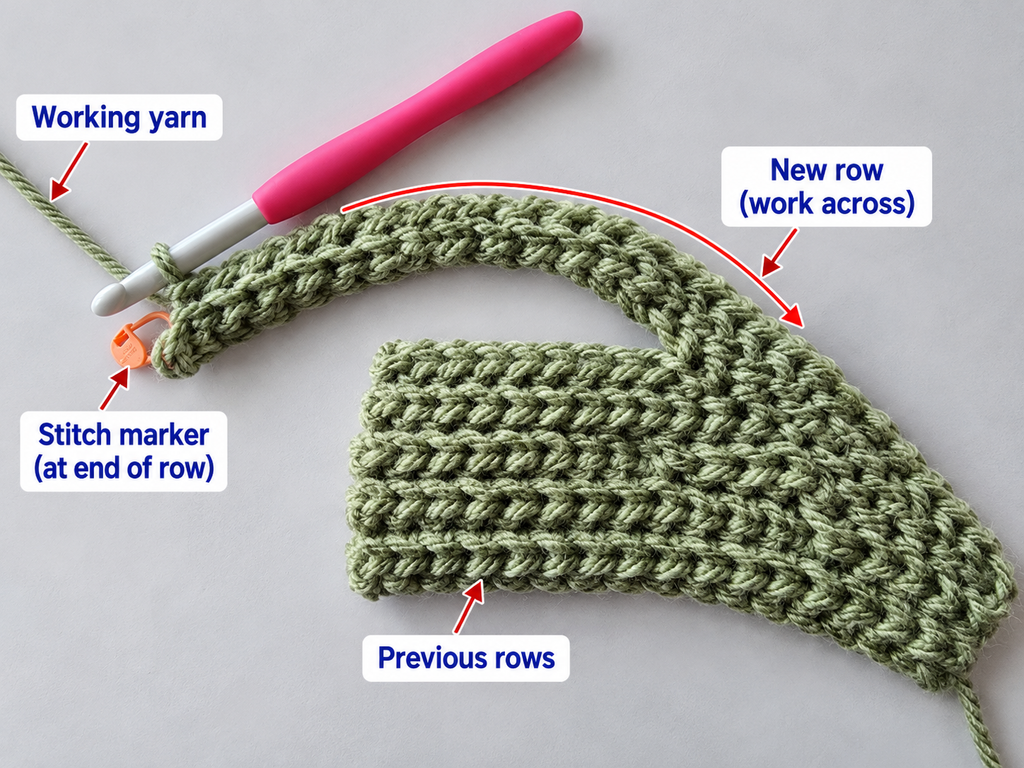
Step 8: Shape the Rounded Fingertips
A comfortable mitten needs a rounded top.
A flat, rectangular fingertip section can leave uncomfortable corners, while excessively aggressive shaping can make the mitten too narrow.
Short rows are helpful here because they create additional fabric in selected areas.
The principle is similar to the thumb-gusset exercise, although the shape and arrangement are different.
In the mitten’s fingertip area, the pattern uses short sections of crochet to gradually develop a curved edge.
Study the fabric as the shape develops.
The ends of the rows should create a gradual transition. When folded, the fingertip should appear softly rounded rather than sharply pointed.
Take your time with this section.
Beginner tip: Work slowly at row transitions and count before turning. A misplaced turn can affect the overall silhouette.
Common mistake to avoid: Don’t accidentally work an extra stitch into a turning chain. That can create bumps along the edge.
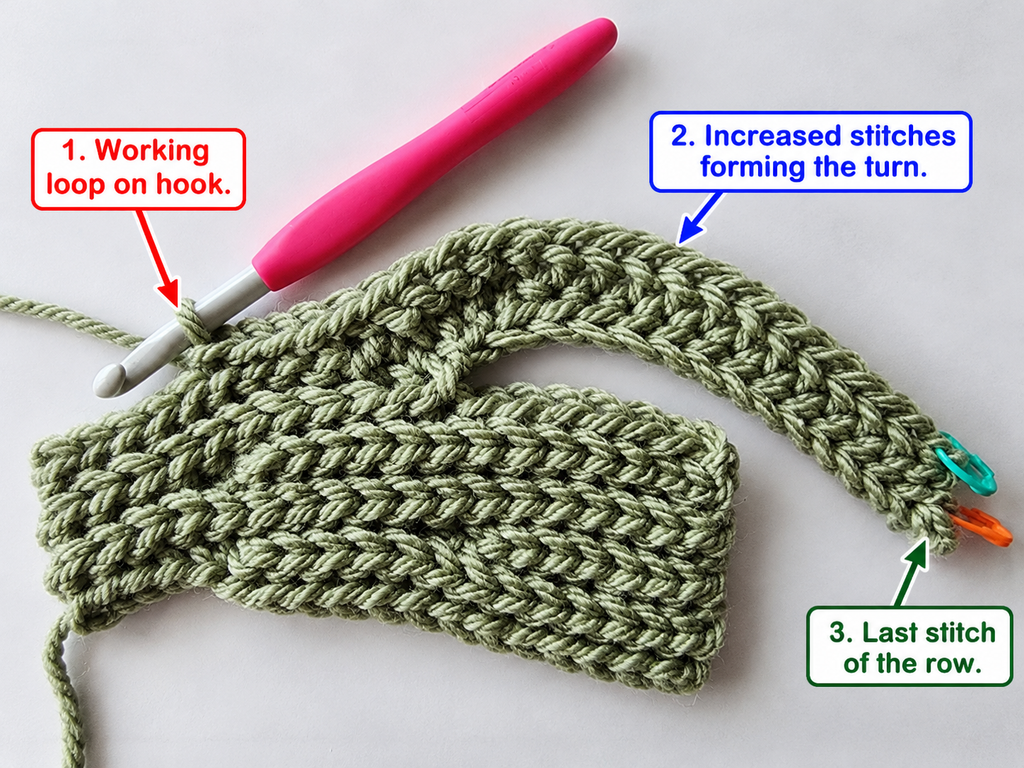
Step 9: Examine the Mitten Before Sewing
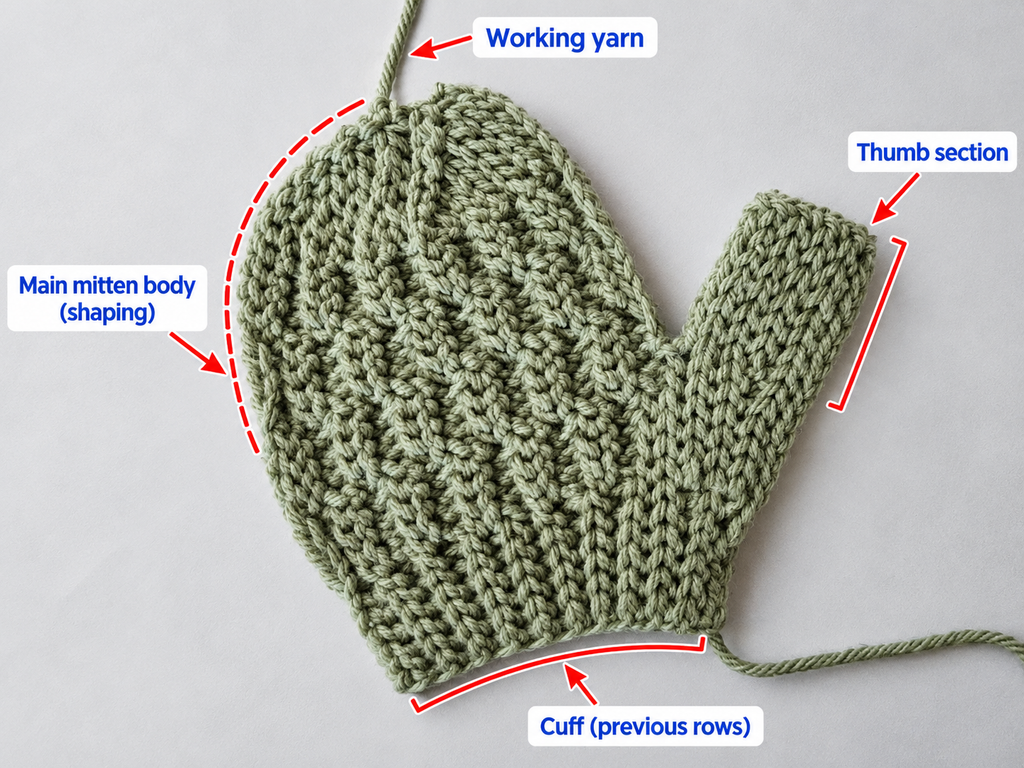
When the crocheted fabric is complete, place it flat on a clean surface.
You should be able to identify the thumb extension, the wider hand section, the rounded fingertip, and the wrist edge.
Before fastening off permanently, inspect the entire project.
Are the stitches reasonably even? Does the thumb seem to sit at the correct height? Are the edges that will be sewn together approximately the same length?
This is also a good time to look for dropped or missed stitches.
A small mistake may be hidden by the final seam, but a large difference in edge length can make the fabric twist.
Use removable stitch markers to identify where each seam begins and ends.
Beginner tip: Photograph your unfinished piece before folding it. If you have difficulty assembling the second mitten, the photograph can serve as a useful personal reference.
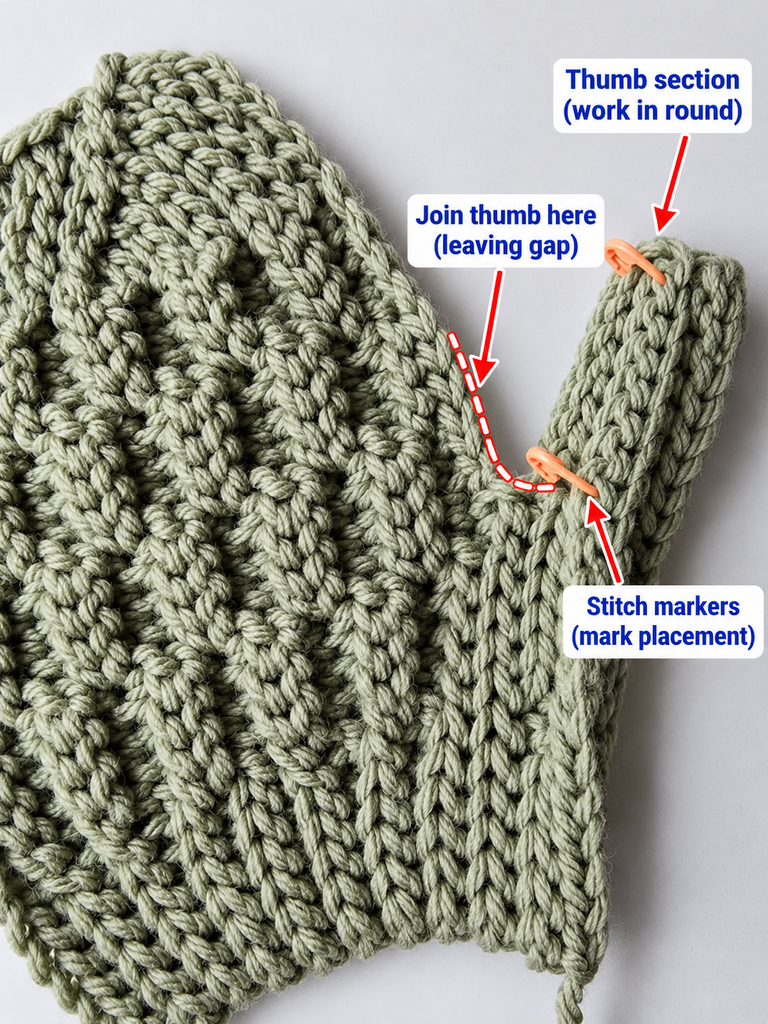
Step 10: Sew the Thumb Seam
The thumb is one of the most important finishing areas because it moves frequently during wear.
A bulky or uneven seam can feel uncomfortable, even when the rest of the mitten fits well.
Fold the thumb section into its intended shape, making sure the outer edges align.
Use stitch markers to hold the section in place.
Thread a tapestry needle with matching yarn.
To make a simple whipstitch seam:
- Insert the needle through the edge loops of both fabric layers.
- Pull the yarn through gently.
- Move to the next corresponding pair of edge loops.
- Repeat until the seam is complete.
Keep the stitches firm enough to hold the fabric together without pulling the edges into tight gathers.
At the thumb tip, close any remaining small opening securely. Weave in the yarn end on the inside.
Check that the thumb can move naturally and that the seam doesn’t create a large lump.
Beginner tip: Sew a few stitches, then stop and examine the seam before continuing.
Common mistake to avoid: Pulling the sewing yarn excessively tight will remove stretch from the thumb.
Step 11: Finish the Main Mitten Seam
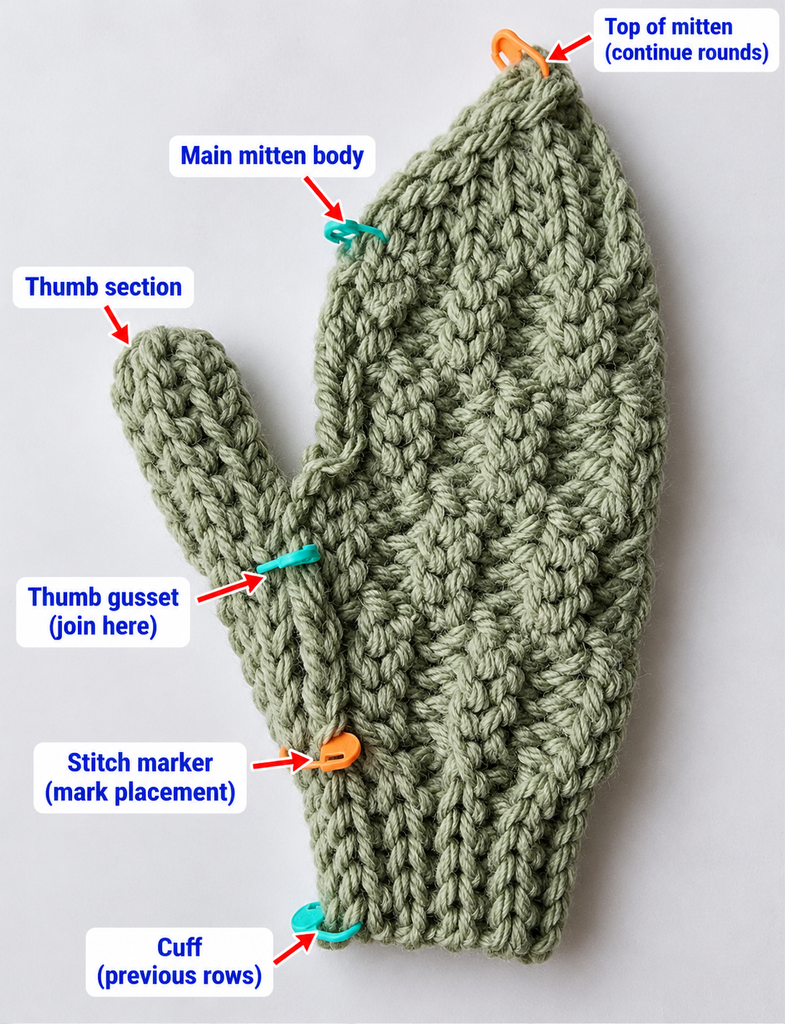
Now fold the main hand section into its final mitten shape.
Line up the corresponding edges carefully.
Start by placing stitch markers at important points, including the wrist and fingertip areas. Additional markers can help prevent the fabric from shifting while you sew.
Work along the side seam with matching yarn and your tapestry needle.
Keep the seam consistent and avoid bunching.
As you approach the curved fingertip, check that both sides still align.
When you finish sewing, gently turn the mitten so the intended right side is facing out.
Try it on.
The fingers should have enough room to curl slightly, and the thumb should move without pulling the hand section out of place.
Beginner tip: If the mitten feels tight only at the seam, the sewing tension may be too firm.
Common mistake to avoid: Don’t make large sewing stitches with gaps between them. Small, regular stitches help produce a more durable finish.
Step 12: Make the Second Mitten
The second mitten should match the first in size, yarn tension, and stitch appearance.
Keep your first finished mitten nearby as you work.
Measure the thumb length, hand length, and wrist opening of the first mitten. These measurements are often more useful than simply counting completed rows.
If you changed hooks or yarn during the first mitten, use the same setup for the second.
Pay particular attention to the thumb position and to which side of the fabric faces outward.
The source construction uses the same general shaped sections for both mittens. Follow its assembly guidance carefully so the thumb placement works for each hand.
When both are complete, place the mittens beside each other and compare their shapes.
A minor difference in size may disappear after wearing, but noticeable differences should be corrected before finishing.
Beginner tip: Write down every adjustment you made to the first mitten so the second one is easier to reproduce.
Pattern Notes and Stitch Notes
Turning chains
A turning chain provides enough height or movement to begin the next row.
In simple slip-stitch rows, a chain one is often used before turning.
Do not automatically count the turning chain as a completed stitch. Check the specific instruction for each technique.
Stitch counts
Even though short rows intentionally use different numbers of stitches, those counts still matter.
If a row is supposed to contain fewer stitches, stop at the designated turning point instead of continuing automatically to the end.
Marking this point can save time and reduce mistakes.
Short-row repeats
Short-row patterns are not always simple repetitions of identical rows.
A common sequence involves a shorter row, a return row, and a later full-length row that works back across previously unworked stitches.
Always establish which stitches remain available before attempting to repeat the sequence.
Right side and wrong side
A crochet mitten may have a visibly textured right side and a flatter wrong side.
For matching mittens, keep the same side facing outward unless your design intentionally uses a reversible texture.
Size adjustments
Adjusting the size of sideways mittens is different from changing a mitten worked in the round.
Changes in foundation length can affect hand or thumb length, while adding or removing rows can affect width or circumference.
For accurate alterations, use your measured gauge and check which direction the fabric is growing.
Common Beginner Mistakes
1. Making slip stitches too tight
Problem: Your hook becomes difficult to insert, and the fabric feels stiff.
Fix: Relax your yarn tension. Try a larger hook if needed, and practice several back-loop rows before beginning the actual mitten.
2. Losing track of short-row turning points
Problem: The thumb or fingertip becomes uneven.
Fix: Place a marker at each important turning point and count the stitches before turning.
3. Working in the wrong stitch loop
Problem: The ribbed texture suddenly changes.
Fix: Look for the V at the top of the stitch and carefully identify the required front or back loop.
4. Making the thumb too narrow
Problem: The thumb pulls against the mitten when you move your hand.
Fix: Recheck the thumb measurement and gauge. Do not rely on stretching the finished fabric to compensate for insufficient width.
5. Making the mitten too long
Problem: There is excess fabric above the fingertips.
Fix: Compare the hand length with the construction measurements before finishing. Correct the dimensions in the appropriate direction rather than adding or removing unrelated rows.
6. Sewing the seams too tightly
Problem: The crochet fabric stretches, but the seam does not.
Fix: Undo the tight section and resew with more relaxed tension.
7. Making two mittens with different tension
Problem: One mitten fits better than the other.
Fix: Use the same hook, yarn, and stitch technique. Measure the first mitten and compare your progress while making the second.
How to Customize This Crochet Project
Try different yarn colors
A single neutral color can make the texture stand out beautifully. Dusty rose is soft and classic, while forest green, charcoal, and navy are practical winter shades.
For a more playful pair, try two coordinating colors.
The cuff could be darker than the main hand section, or each mitten could feature a small contrasting detail.
Whenever you change yarn color, join the new color at a suitable edge and weave the ends securely.
Change the yarn
Bulky yarn creates a warm, textured finish and helps the project work up faster than finer yarns.
If you prefer lighter mittens, try a medium-weight yarn with a matching hook and recalculated gauge.
Do not simply substitute thinner yarn into the same stitch counts. The finished mitten will usually become smaller.
Adjust the length
For longer mittens, plan additional length at the wrist or hand according to the direction of construction.
A longer wrist section can help keep cold air out when worn beneath a coat sleeve.
Add decorative details
Once the mittens are finished, you can add a small embroidered heart, initials, or a simple decorative line.
Keep embellishments away from areas that experience frequent stretching or friction.
Small buttons and decorative pieces should be attached securely, especially if the mittens are intended as a gift.
Make a winter gift set
A matching crochet hat or cowl makes a lovely companion project.
Use the same yarn and repeat one or two design details to create a coordinated look without making every piece identical.
A handmade pair of mittens also makes a thoughtful winter birthday gift or seasonal gift for a friend.
Finishing Instructions
After sewing, trim the remaining yarn tails, leaving enough length to weave them in securely.
Thread each end into a yarn needle and pass it through several stitches on the inside of the mitten.
Change direction once or twice to help prevent the end from slipping out.
Trim only after the yarn is properly secured.
Place the mittens flat on a clean towel and gently arrange the cuffs, fingertips, and thumbs.
If necessary, lightly block them using a method appropriate for the yarn fiber.
Do not apply a hot iron directly to crochet fabric. Excessive heat can permanently damage some synthetic fibers.
For washing, follow the yarn manufacturer’s care label. Many acrylic blends can be washed gently, while wool blends may need hand washing or more delicate handling.
Dry the mittens in the shape you want them to retain.
Quick Printable-Style Summary
Chunky Crochet Mittens – Project Summary
| Skill level | Confident beginner |
| Yarn | Bulky #5 |
| Hook | 8 mm, or size for gauge |
| Techniques | Chains, slip stitches, BLO, short rows, whipstitch |
| Construction | Sideways, worked flat and seamed |
| Starting method | Foundation chain for thumb/gusset |
| Sequence | Thumb → gusset → hand → fingertip shaping → seams |
| Finishing | Weave in ends, check fit, gently shape |
The precise stitch counts and row repeats for the photographed wearable design remain in the original designer’s free Frosty Air pattern. This summary covers the construction method rather than replacing that pattern.
Crochet Mittens Pattern FAQ
1. Are crochet mittens easy for beginners?
Yes, especially if you already know how to make chains and basic crochet stitches.
The biggest challenge is usually shaping the thumb and maintaining a comfortable fit.
Beginners may find a basic mitten worked in rounds easier than a sideways short-row design. However, short rows are a valuable technique to learn once you feel confident with stitch counting.
2. What is the best yarn for crochet mittens?
Soft wool blends and acrylic blends are popular choices because they are comfortable and practical.
Wool can provide warmth and resilience, while acrylic may offer easier care.
Choose yarn that feels pleasant against your skin and produces a fabric without excessive holes.
3. How much yarn do I need for crochet mittens?
The amount depends on yarn weight, mitten size, hook size, and stitch pattern.
For a chunky adult pair, budgeting approximately 125–160 yards is a reasonable planning estimate.
Check the original pattern and your yarn label before purchasing supplies, especially if you are making a larger size.
4. Why do my crochet mittens feel stiff?
Tight tension is a common cause.
Slip-stitch fabrics can become particularly dense if the hook is too small or the yarn is pulled tightly.
Try a slightly larger hook and practice making relaxed stitches.
5. How do I make crochet mittens bigger or smaller?
Start by measuring the hand and checking your gauge.
Then determine which part of the construction controls the length and which controls the circumference.
Adjust the relevant foundation or rows, and check the thumb opening separately.
For major size changes, use a graded pattern rather than simply increasing every stitch count by the same percentage.
6. Can I crochet mittens without sewing?
Yes. Some mitten patterns are worked continuously in joined or spiral rounds with little sewing beyond closing small openings.
The sideways design featured here uses seams intentionally, so it is not a completely no-sew project.
7. What is the difference between crochet mittens and fingerless gloves?
Mittens cover the fingers together in one enclosed section, with a separate thumb.
Fingerless gloves leave the fingertips exposed.
Mittens are particularly useful in colder weather because the fingers share space inside the fabric, while fingerless gloves allow easier use of phones and other small objects.
Conclusion
Making crochet mittens is an enjoyable way to move beyond simple scarves and washcloths while learning practical shaping techniques.
You don’t need a large collection of complicated stitches to make something useful. With comfortable yarn, careful measurements, and a little patience, you can create a pair of warm handmade accessories that you’ll enjoy wearing throughout the colder months.
Take your time with the thumb, check the fit before sewing, and keep notes so your second mitten matches the first.
Once you’ve finished, consider using the same yarn to make a matching crochet hat or a simple winter cowl.
Save this tutorial for your next cozy crochet session, especially if you want to practice short rows and textured stitches.