A handmade teacher gift does not need to be complicated to feel thoughtful. Some of the best crochet teacher gifts are small, practical, personal, and quick enough to make even when the end of the school year or Teacher Appreciation Week suddenly appears on the calendar.
This easy crochet apple mug cozy is designed for exactly that situation.
It uses a simple rectangular base, a separate button loop, one small leaf, one small stem, and optional embroidered details. The cozy wraps around a reusable coffee cup or teacher mug, then closes with a button near the handle. It looks like a cheerful little apple, but it still functions as a useful coffee sleeve.
This project is beginner-friendly because the main cozy body is worked in flat rows. You do not need to crochet in the round. You do not need advanced shaping. You do not need to read a complicated chart. The only shaping appears in the small leaf and stem, and those pieces are quick enough to remake if the first try is not perfect.
The selected visual reference for this tutorial is Winding Road Crochet’s apple coffee cup cozy, which is also positioned as a quick teacher gift and includes instructional photos, materials, sizing information, and a video tutorial. This article uses that source only to study the kind of photo sequence a good teacher-gift mug cozy tutorial needs. The written pattern below is original.
What You’ll Learn
In this tutorial, you will learn how to:
- Measure a mug before starting.
- Crochet a flat rectangular cozy base.
- Use simple stitch texture to create a sturdy fabric.
- Keep side edges straight.
- Make a separate crochet button loop.
- Sew on a button securely.
- Crochet a small apple stem.
- Crochet a simple green leaf.
- Attach appliqué details neatly.
- Add optional embroidered face details.
- Finish and package the cozy as a teacher gift.
Materials You’ll Need
For one apple mug cozy:
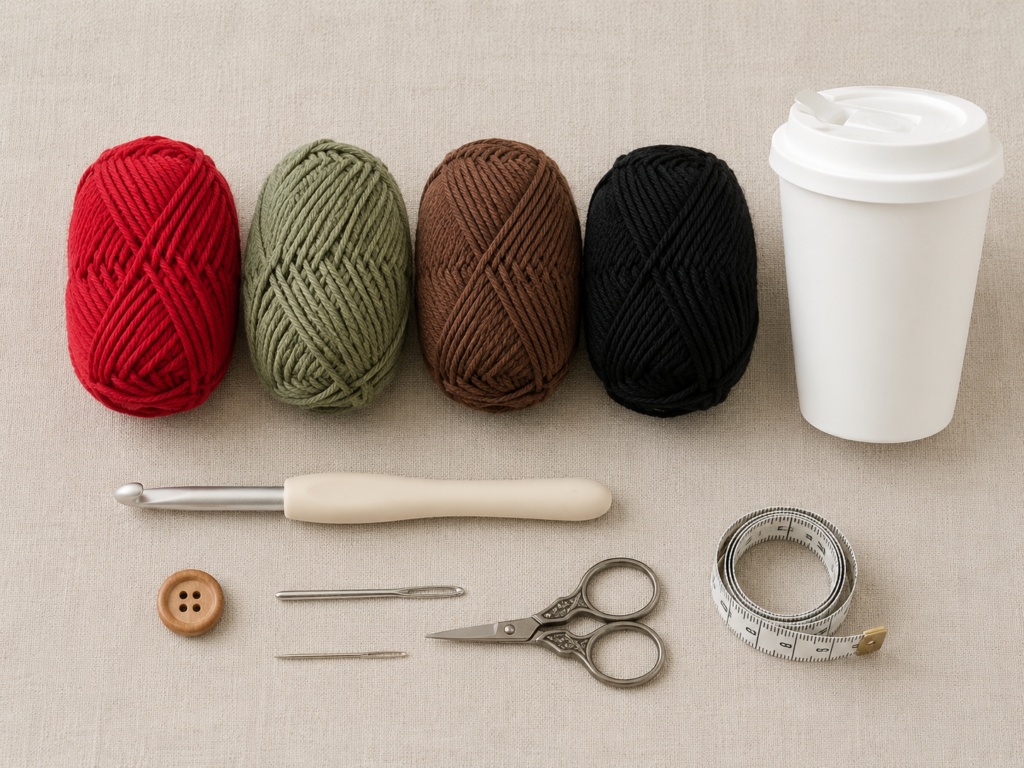
- Medium #4 cotton or cotton-blend yarn in apple red
- Small amount of medium #4 yarn in sage green
- Small amount of medium #4 yarn in soft brown
- Small amount of black yarn or embroidery floss for optional face details
- 5 mm / H-8 crochet hook
- One ¾-inch to 1-inch wooden or plastic button
- Tapestry needle
- Embroidery needle
- Scissors
- Measuring tape
- Stitch marker or scrap yarn
- Reusable coffee cup or mug for checking fit
- Optional gift card, kraft tag, or teacher thank-you card for packaging
The source tutorial uses medium #4 yarn and a 5 mm hook for its apple coffee cup cozy. The Craft Yarn Council’s hook chart also identifies 5 mm as a U.S. H-8 hook size.
For a mug cozy, cotton or a cotton blend is especially practical because it gives good stitch definition and structure. Acrylic can also work, but it may feel stretchier and less heat-resistant around a warm drink cup.
Finished Size
This original cozy is designed to fit many standard reusable coffee cups and mugs.
Approximate finished measurements before buttoning:
- Length: 9.25–9.75 inches
- Height: 3–3.25 inches
- Button loop: Adjustable, based on button size
The source reference explains that cozy sizing can be adjusted by changing the starting chain according to the mug size. You will use the same basic idea here: measure first, then adjust the foundation chain if needed.
Crochet Abbreviations Used
This tutorial uses U.S. crochet terminology.
- ch = chain
- sc = single crochet
- hdc = half double crochet
- dc = double crochet
- sl st = slip stitch
- st/sts = stitch/stitches
- rep = repeat
- RS = right side
- WS = wrong side
These abbreviations are included in the Craft Yarn Council’s crochet abbreviation standards.
Before You Start
Measure the mug
Wrap a measuring tape around the area where the cozy will sit.
For most reusable coffee cups, the cozy sits around the middle of the cup, not directly at the rim and not at the bottom taper.
Your crocheted rectangle should be slightly shorter than the mug circumference because the button loop will bridge the remaining gap.
A good beginner target:
- Mug circumference: 10.25 inches
- Crochet rectangle length: 9.25–9.75 inches
- Button loop bridges the remaining space
Check your tension
This cozy should stretch slightly around the mug but should not sag.
If your fabric feels loose, use a smaller hook.
If your fabric feels stiff and hard to crochet, use a larger hook or relax your tension.
Choose safe finishing details
For a practical teacher gift, embroidered eyes and a stitched smile are more washable than plastic safety eyes. If the cozy may be used around children, avoid any small removable parts except the closure button, and sew that button very securely.
US/UK term note
This pattern is written in U.S. terms. A U.S. single crochet is not the same as U.K. single crochet terminology. Check your stitch guide before starting if you normally use U.K. patterns.
Step-by-Step Crochet Tutorial
Step 1: Make the Foundation Chain
With apple-red yarn, make a slip knot.
Ch 33.
This gives you 32 working stitches after Row 1.
The chain should be relaxed. Do not pull each chain tight against the hook. A tight starting chain makes the bottom edge stiff and can cause the cozy to curve.
Row 1
Sc in the second chain from the hook.
Sc in each chain across.
Stitch count: 32 sc
Ch 1 and turn.
Beginner tip:
Count the V-shapes in your starting chain before beginning Row 1. The loop on your hook does not count as a chain.
Common mistake to avoid:
Do not work into the first chain directly beside the hook. For this pattern, the first single crochet goes into the second chain from the hook.
Step 2: Build the Textured Cozy Fabric
This cozy uses a simple alternating stitch texture. It is easier than it looks because you only alternate single crochet and double crochet across the row.
Row 2
Ch 1 and turn.
Sc in the first stitch.
Dc in the next stitch.
Continue across the row:
*Sc in next st, dc in next st; rep from * across.
You should end with a dc.
Stitch count: 32 sts
Row 3
Ch 1 and turn.
Sc in the first stitch.
Dc in the next stitch.
Continue the same repeat across:
*Sc in next st, dc in next st; rep from * across.
Stitch count: 32 sts
Repeat this row until you have 12 textured rows total, including Rows 2 and 3.
The fabric will begin to look softly bumpy. That texture helps the cozy feel plush around the cup.
Beginner tip:
Keep the first and last stitch of every row clear. If your edges begin slanting inward, you are probably skipping the final stitch.
Common mistake to avoid:
Do not accidentally make two stitches in the first stitch unless the pattern tells you to. This version keeps the stitch count at 32 across every row.
Step 3: Check the Rectangle Size
After 12 textured rows, lay the rectangle flat.
Measure the height.
It should be about 2.75–3 inches tall.
Now wrap it around your mug.
The short edges should almost meet, leaving a small gap for the button loop.
If the rectangle is too short around the mug, add a few chains to the starting chain on your next version. If it overlaps too much, reduce the starting chain.
For this version, keep working only if the cozy sits comfortably around your cup.
Row 13
Ch 1 and turn.
Sc in each stitch across.
Stitch count: 32 sc
This final single-crochet row gives the top edge a clean finish.
Fasten off, leaving a 10-inch tail for weaving.
Beginner tip:
Try the cozy around the cup before you weave in all the ends. It is easier to adjust before finishing.
Common mistake to avoid:
Do not stretch the fabric aggressively when checking the fit. The cozy should sit snugly, but it should not need to be forced around the mug.
Step 4: Finish the Flat Cozy Base
Turn the cozy so the wrong side faces up.
Use the tapestry needle to weave in the starting tail and any remaining yarn ends.
Weave through the backs of several stitches, change direction, and pass through a few more stitches before trimming.
Now decide which short edge will hold the button and which short edge will hold the loop.
For a right-handed mug handle, it often looks cleanest when the button sits near the handle side and the apple leaf sits near the top front. Before sewing anything permanently, wrap the cozy around your mug and test the placement.
Beginner tip:
Use a stitch marker or scrap yarn to mark the button side before removing the cozy from the mug.
Common mistake to avoid:
Do not sew the button too close to the edge. Place it about ¾ inch from the short edge so the loop has something secure to pull against.
Step 5: Make and Attach the Button Loop
With apple-red yarn:
Ch 18.
Starting in the second chain from the hook, sl st in each chain across.
Fasten off, leaving a long tail at both ends.
Fold the cord into a loop.
Place both ends of the loop against one short edge of the cozy.
Use a tapestry needle to sew the loop ends securely to the wrong side of the cozy.
Check the loop around your button before knotting and trimming. It should fit over the button without being loose.
Now sew the button to the opposite short edge.
Wrap the cozy around the mug and fasten the loop over the button.
Beginner tip:
Test the button loop before final sewing. Different buttons need different loop lengths.
Common mistake to avoid:
Do not make the loop so large that the cozy slips open. A button loop should stretch just enough to pass over the button.
Step 6: Crochet the Apple Stem
With soft brown yarn:
Ch 7.
Starting in the second chain from the hook, work:
- Sl st in next ch
- Sc in next ch
- Hdc in next ch
- Sc in next ch
- Sl st in each of the last 2 chains
Fasten off, leaving a long sewing tail.
The small variation in stitch height creates a gentle natural curve.
Do not worry if the stem curls slightly. That actually works well for an apple shape.
Beginner tip:
Keep the slip stitches relaxed. Tight slip stitches can make the stem hard and twisted.
Common mistake to avoid:
Do not cut the yarn tail short. You need that tail to sew the stem to the cozy.
Step 7: Crochet the Leaf
With sage-green yarn:
Ch 8.
Starting in the second chain from the hook, work along the first side of the chain:
- Sc
- Hdc
- Dc
- Hdc
- Sc
- Sl st
- Sl st
Ch 1.
Rotate the chain so you can work along the unused loops on the opposite side.
Work:
- Sl st
- Sl st
- Sc
- Hdc
- Dc
- Hdc
- Sc
Join with a sl st near the beginning of the leaf.
Fasten off, leaving a long sewing tail.
This creates a small leaf with a wider middle and tapered ends.
Beginner tip:
Flatten the leaf gently with your fingers before sewing. This helps you see which end should point outward.
Common mistake to avoid:
Do not skip the second side of the foundation chain. The leaf needs both sides to look full.
Step 8: Sew the Stem and Leaf to the Cozy
Place the cozy flat with the right side facing up.
Position the stem near the top edge, slightly off-center.
Sew the lower part of the stem to the cozy using the brown yarn tail.
Now place the green leaf at an angle over the lower part of the stem.
Use the leaf tail to sew through the base of the leaf and a few center stitches. Leave the tip of the leaf slightly free so it has a soft dimensional look.
Weave all tails on the wrong side.
Beginner tip:
Try the cozy around the mug before attaching the leaf permanently. Make sure the leaf sits where it will be visible from the front.
Common mistake to avoid:
Do not sew the leaf too close to the button loop or button. The closure needs room to function.
Step 9: Add Optional Embroidered Face Details
This step is optional, but it makes the cozy feel more giftable and friendly.
With black yarn or embroidery floss, add:
- Two tiny vertical stitches for eyes, or
- Two small French knots, and
- One shallow curved smile.
To make a simple smile:
- Bring the needle up from the wrong side.
- Make a small V-shaped stitch.
- Do not pull too tightly.
- Secure the yarn on the wrong side.
For a more grown-up teacher gift, skip the face and keep the cozy as a simple apple sleeve.
Beginner tip:
Use a thinner black yarn or embroidery floss if your worsted yarn looks too bulky.
Common mistake to avoid:
Do not place the face too low. The middle front of the cozy is usually the best position.
Pattern Notes or Stitch Notes
Turning chain rules
The ch 1 at the beginning of each row does not count as a stitch.
Always work into the first real stitch of the row after turning.
Stitch count
The cozy body has 32 stitches per row.
If your stitch count changes, the side edges may slant.
Repeat pattern
For textured rows:
*Sc in next st, dc in next st; rep from * across.
Row notes
The cozy is worked flat in rows.
The button loop is made separately and sewn onto one short edge.
The button is sewn to the opposite edge.
Right side and wrong side
Choose the side with the cleanest texture as the right side before attaching the stem, leaf, and face.
All knots and woven tails should stay on the wrong side.
Size adjustment notes
For a larger mug:
- Add 2–4 chains to the foundation chain.
- Keep the stitch count even if you want the sc/dc texture to repeat cleanly.
For a smaller mug:
- Remove 2–4 chains from the foundation chain.
- Check the cozy around the mug before finishing the button loop.
For a taller cozy:
- Add 1–3 more rows before the final single-crochet row.
For a shorter cozy:
- Remove 1–2 textured rows.
Common Beginner Mistakes
1. The cozy is too loose
Cause: The rectangle is too long, the yarn is too stretchy, or the button loop is too large.
Fix: Move the button inward, shorten the loop, or reduce the starting chain on the next version.
2. The cozy is too tight
Cause: The foundation chain is too short or the tension is too firm.
Fix: Add a longer button loop first. If that does not solve it, remake the base with 2–4 extra chains.
3. The edges are slanted
Cause: Missing the first or last stitch of a row.
Fix: Count 32 stitches after each row until you can recognize the edge stitches easily.
4. The fabric feels thin
Cause: Hook is too large for the yarn or tension is too loose.
Fix: Try a 4.5 mm hook or switch to a firmer cotton yarn.
5. The button pulls through the fabric
Cause: Button is sewn loosely or placed too close to the edge.
Fix: Sew through the button several times and anchor it through multiple crochet stitches.
6. The leaf looks twisted
Cause: The starting chain was tight or one side was worked more tightly than the other.
Fix: Steam-shape lightly if the yarn allows, or remake the leaf with a looser starting chain.
7. The face looks uneven
Cause: Embroidery stitches were placed without checking alignment first.
Fix: Mark tiny guide points with removable stitch markers or sewing pins before stitching.
How to Customize This Crochet Project
Change the yarn
Cotton gives the most practical finish for a mug cozy. Acrylic works for decorative versions but may stretch more over time.
For a softer cozy, use an acrylic blend.
For a firmer cozy, use mercerized cotton or a tight-twist cotton yarn.
Change the colors
Classic teacher gift colors:
- Apple red, brown, green
- Deep burgundy, olive, tan
- Mustard apple with brown stem
- Green apple with cream button
- School colors with apple leaf detail
Make it a pencil cozy instead
Use stripes:
- Pink eraser top
- Gray metal band
- Yellow pencil body
- Cream wood section
- Black pencil tip
Use the same rectangle and button-loop method.
Make it a paper cozy
Use white yarn for the base.
Embroider horizontal pale-blue lines and one vertical pink margin line.
This version works well for a teacher who prefers neutral gifts.
Add a gift card pocket
Crochet a small flat rectangle and sew it to the back of the cozy on three sides.
Leave the top open so a coffee-shop gift card can slide in.
Keep the pocket shallow enough that the card peeks out.
Add a tag
Pair the cozy with:
- A reusable cup
- A coffee gift card
- Tea sachets
- A small chocolate bar
- A handwritten thank-you note
For a polished gift, place everything in a clear treat bag and tie it with cotton ribbon.
Finishing Instructions
Fastening off
After the last stitch, cut the yarn with a 6–10 inch tail.
Pull the tail through the loop on the hook.
Tighten gently.
Weaving in ends
Use a tapestry needle to weave each tail through the wrong side of the fabric.
Change direction once so the tail is less likely to slip out.
Trim only after the end feels secure.
Sewing the button
Use matching yarn or strong sewing thread.
Pass through the button several times.
Anchor the thread through multiple stitches on the cozy fabric.
Check that the button loop opens and closes smoothly.
Shaping
Lay the cozy flat.
Gently smooth the edges.
Shape the leaf with your fingers.
Light blocking can help the rectangle sit evenly, but heavy blocking is not usually necessary.
Washing and care
Hand washing is safest, especially if you use a wooden button or embroidery details.
Lay flat to dry.
Do not put the cozy in a hot dryer unless your yarn label and button material clearly allow it.
Quick Printable-Style Summary
Project: Crochet Apple Mug Cozy Teacher Gift
Skill level: Beginner to Easy
Finished size: Approximately 9.25–9.75 inches long by 3–3.25 inches tall
Yarn: Medium #4 cotton or cotton blend
Hook: 5 mm / H-8
Other supplies: Button, tapestry needle, scissors, mug for checking fit
Stitches: Ch, sc, hdc, dc, sl st
Starting chain: Ch 33
Base Row 1: Sc in second ch from hook and across. 32 sc.
Texture repeat: Ch 1, turn. Sc in first st, dc in next st, repeat across.
Base height: Work 12 textured rows, then 1 final sc row.
Closure: Make a separate ch-18 slip-stitch cord, fold into a loop, and sew to one short edge. Sew button to opposite edge.
Stem: Ch 7 and work a small shaped brown stem.
Leaf: Ch 8 and work around both sides of the chain with sc, hdc, dc, hdc, sc, and sl st shaping.
Finishing: Sew stem and leaf to the top edge, embroider optional face, weave in ends, check fit on mug.
FAQ
What are the best crochet teacher gifts for beginners?
Small practical projects are usually best. Mug cozies, bookmarks, coasters, keychains, pencil pouches, cup sleeves, and classroom appliqués are all good options because they are quick and easy to personalize.
Is this apple mug cozy a good last-minute teacher gift?
Yes. The base is a flat rectangle, and the details are small. A confident beginner can usually finish one in an evening.
Can I make this without a button?
Yes. You can seam the short edges together to make a tube. However, a buttoned version fits more mug shapes because it can open around a handle.
Can I use acrylic yarn?
Yes, but cotton or cotton blend is usually better for structure and durability. Acrylic can stretch more, especially if the cozy is pulled tightly around the cup.
How do I make the cozy fit a larger cup?
Add 2–4 chains to the foundation chain and check the rectangle around the mug before sewing the button loop.
Can I sell finished cozies from this tutorial?
For most handmade projects, selling your own finished item from an original tutorial is usually acceptable, but do not reuse another designer’s photos, wording, charts, or branding. Use your own photos and write your own listings.
Should I use safety eyes?
For a practical mug cozy, embroidered eyes are better. They are flatter, easier to wash, and less likely to catch on a bag or cup holder.
Conclusion
This easy apple mug cozy is one of the most practical crochet teacher gifts because it is quick, useful, and easy to personalize. The project starts with a simple flat rectangle, then turns into a cheerful apple with a small green leaf, brown stem, button closure, and optional embroidered face.
Make one for a single teacher, or batch several in different apple colors for multiple teachers, aides, tutors, librarians, or school staff. Add a reusable cup, tea bag, coffee gift card, or handwritten note, and the finished gift feels thoughtful without becoming complicated.
Save this tutorial for teacher appreciation season, back-to-school gifts, holiday classroom gifts, and last-minute handmade thank-you presents.





