A few coins, a folded bill, and a school lunch card do not need a full-size wallet. A small zippered crochet pouch is easier to tuck into a backpack pocket, and making one yourself means you can choose a bright color that is easy to spot when lunchtime arrives.
This crochet lunch money pouch pattern is designed as a practical beginner project rather than a decorative purse. The fabric is compact, the zipper keeps small items contained, and the size is large enough for folded cash, coins, or a cafeteria card without creating unnecessary bulk.
The most unusual part is also the part that makes the pouch particularly neat: instead of crocheting two rectangles and sewing a zipper between them afterward, you will create a foundation directly around the zipper tape and crochet the pouch downward from there. A professional zipper-pouch tutorial from Megmade with Love was selected as the visual research source because it photographs this construction from zipper preparation through the finished base.
The written pattern below is an original lunch-money-pouch adaptation. It uses different sizing, spacing, body stitches, texture options, finishing decisions, and beginner notes rather than reproducing the source instructions.
What You’ll Learn
By the end of this tutorial, you will know how to:
- prepare zipper tape for crochet;
- use a small pointed hook to pull yarn through zipper fabric;
- create an even crochet foundation around a zipper;
- change to your normal crochet hook;
- work a small pouch in continuous rounds;
- use a stitch marker correctly;
- keep the zipper from puckering;
- adjust the pouch depth;
- close the bottom neatly;
- weave in the ends securely;
- customize the pouch for lunch money, cards, or other small school essentials.
Project Details
Skill level: Easy / confident beginner
Finished size: Approximately 6¼ inches wide × 4 inches tall when using a 6-inch zipper.
Estimated time: 1½–2½ hours
Yarn weight: Medium #4
Recommended fiber: Cotton
Main hook: 4.0 mm
Zipper hook: Approximately 2.0 mm, preferably with a narrow pointed head
Construction: Top down from the zipper
Gauge: Approximately 17 half double crochet stitches × 12 rounds = 4 inches, but exact gauge is not critical. The zipper establishes the width, so focus more on producing a firm fabric than on matching an exact gauge.
The Craft Yarn Council classifies yarn weights and recommends hook ranges, but hook size can legitimately be adjusted when a denser fabric is required.
Materials You’ll Need
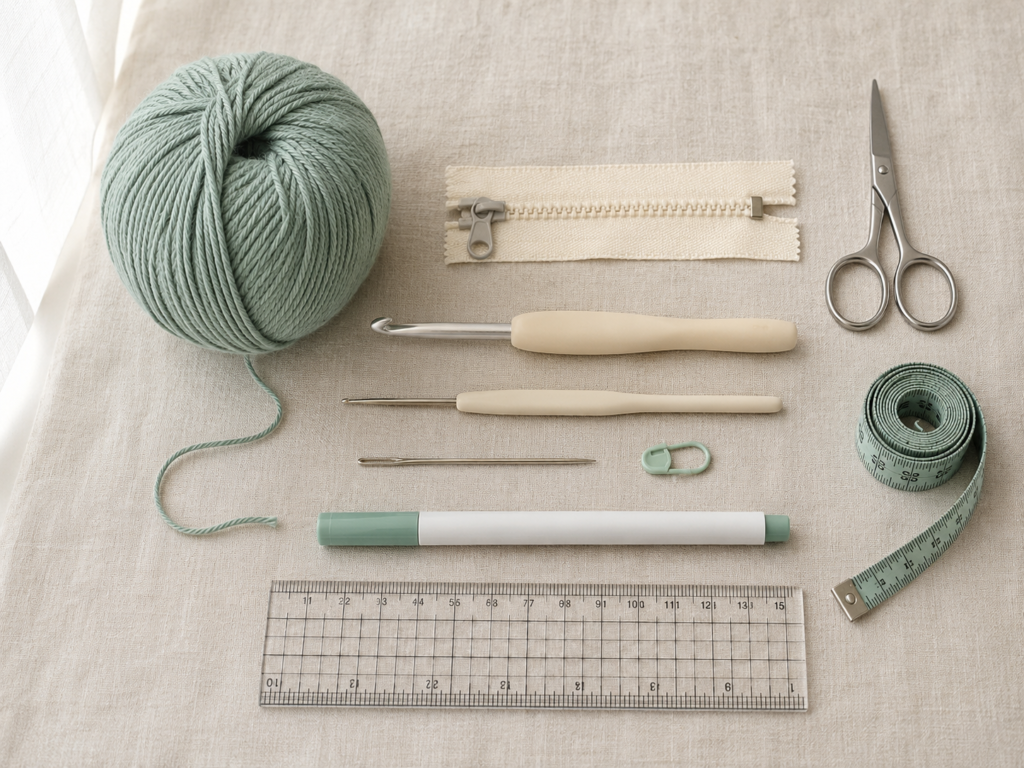
- Approximately 45–60 yards medium #4 cotton yarn
- One 6-inch polyester zipper
- 4.0 mm crochet hook
- Slim pointed crochet hook around 2.0 mm
- Removable stitch marker
- Yarn needle
- Scissors
- Small ruler
- Washable fabric marker or disappearing pen
- Measuring tape
- Optional hand-sewing needle and matching thread for securing loose zipper-tape ends
For a lunch pouch, cotton is particularly convenient because it produces a relatively firm fabric with clear stitch definition. Avoid extremely fuzzy yarn because the fibers can obscure the zipper area and make the first round harder to inspect.
Crochet Abbreviations Used
This tutorial uses US crochet terminology.
- ch = chain
- hdc = half double crochet
- sc = single crochet
- sl st = slip stitch
- st/sts = stitch/stitches
- rep = repeat
- BLO = back loop only
- rnd = round
Be careful when using a UK crochet resource: US single crochet corresponds to UK double crochet, while US half double crochet corresponds to UK half treble crochet. The Craft Yarn Council publishes a terminology comparison for US and UK patterns.
Before You Start
Choose the zipper first
The zipper determines the width of the pouch.
A 6-inch zipper works well for lunch money because the finished pouch remains compact while still accommodating:
- coins;
- folded bills;
- a cafeteria payment card;
- a student ID;
- a small key.
For a larger wallet-style pouch, use a 7- or 8-inch zipper and follow exactly the same construction logic.
Use a polyester zipper
A lightweight polyester zipper is easier to pierce than a very heavy zipper tape.
Do not force a regular thick crochet hook through the tape. That is why a second slim hook is used for the foundation.
Keep your stitches firm, but not tight
The stitches attached to the zipper should be secure without pulling the zipper tape into waves.
After every few stitches, lay the zipper flat.
If it begins curving sharply, loosen your yarn tension slightly.
How to count stitches
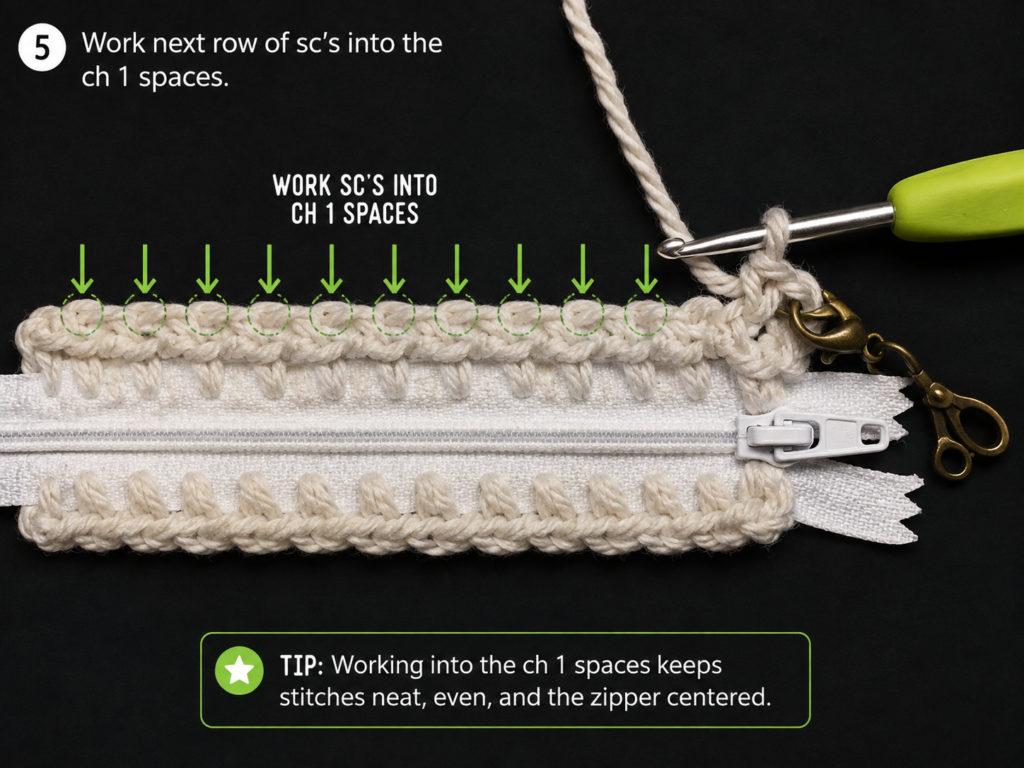
The first body round will be worked into the chain spaces you create around the zipper.
Count those spaces before beginning the main pouch.
Whatever number you have becomes your body stitch count.
For example:
42 chain spaces = 42 body stitches.
Keep that same number on every subsequent round unless you deliberately change the design.
Keeping continuous rounds straight
Place your stitch marker in the first stitch of each new round, not in the last stitch.
Move it upward every time you reach it.
This is the easiest way to avoid accidentally adding or losing stitches.
Step-by-Step Crochet Tutorial
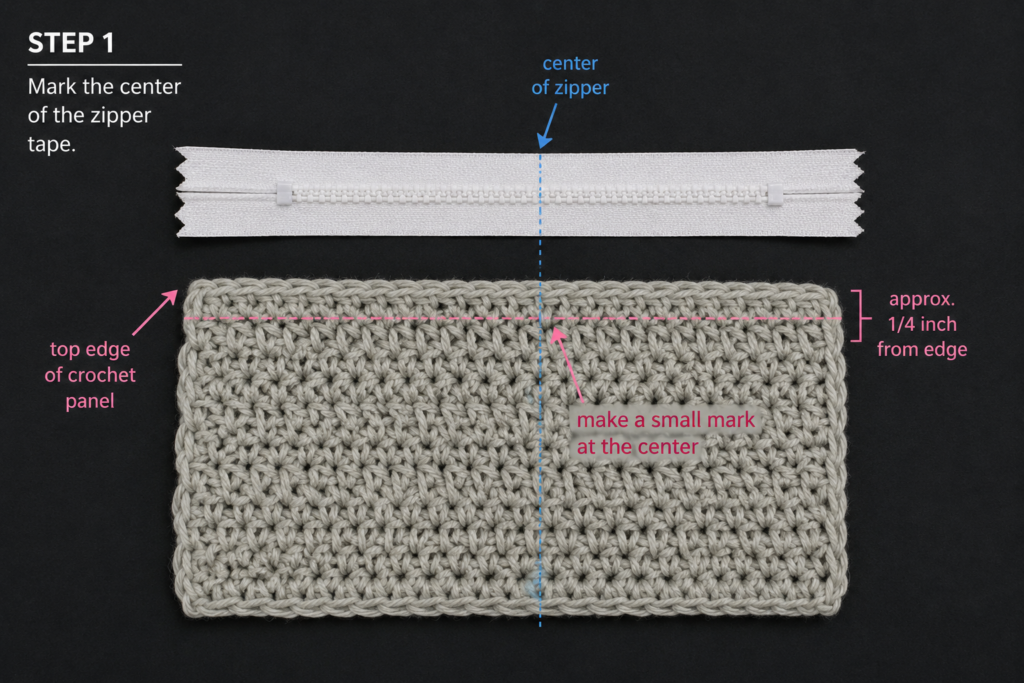
Step 1: Mark the Zipper Tape
Close the zipper and lay it completely flat.
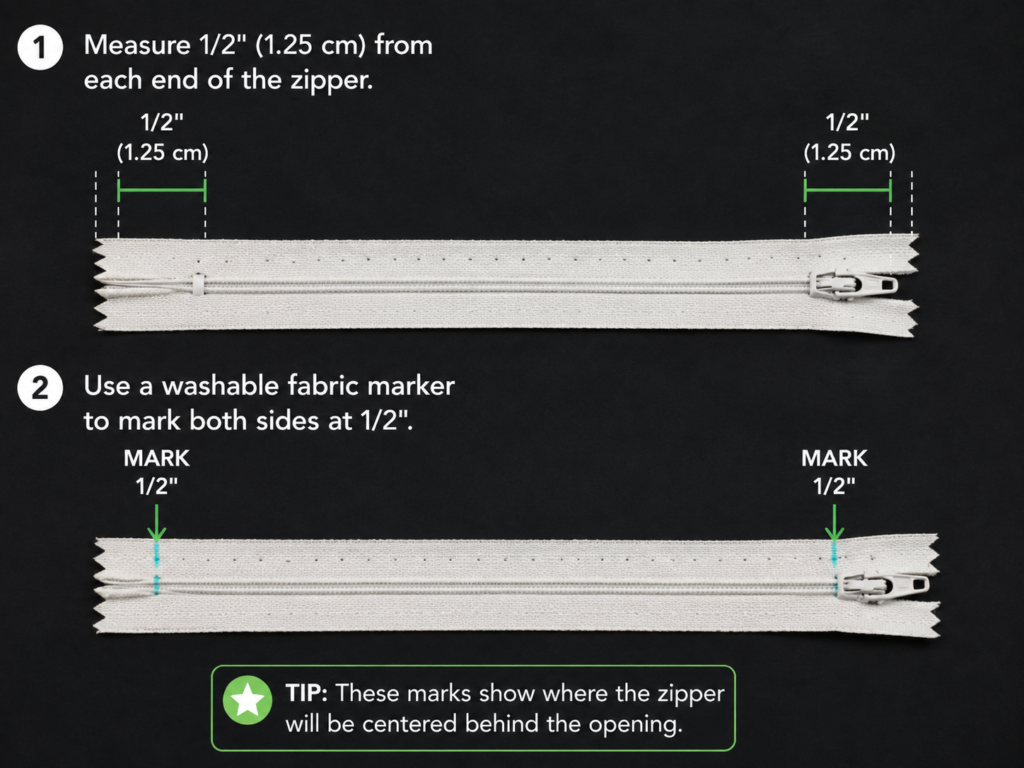
Use your ruler and washable marker to make small guide dots down one side of the zipper tape.
For this original version, space the marks approximately 7 mm apart.
Keep each mark roughly 3–4 mm away from the zipper teeth. You want enough fabric around the hole that the tape remains strong.
Start near the zipper stop rather than at the loose excess tape.
Make matching marks along the opposite side.
Try to end with the same number of marks on both sides.
Beginner tip: Count the marks once before beginning to crochet.
Common mistake to avoid: Do not place the holes directly beside the zipper teeth. You could weaken the fabric or interfere with the zipper slider.
Step 2: Check Both Rows of Marks
Before introducing the yarn, place the zipper horizontally in front of you.
Check that the dots on the upper and lower tape look reasonably symmetrical.
They do not have to be mathematically perfect. Handmade crochet can tolerate minor spacing variations.
However, one side should not contain several more attachment points than the other.
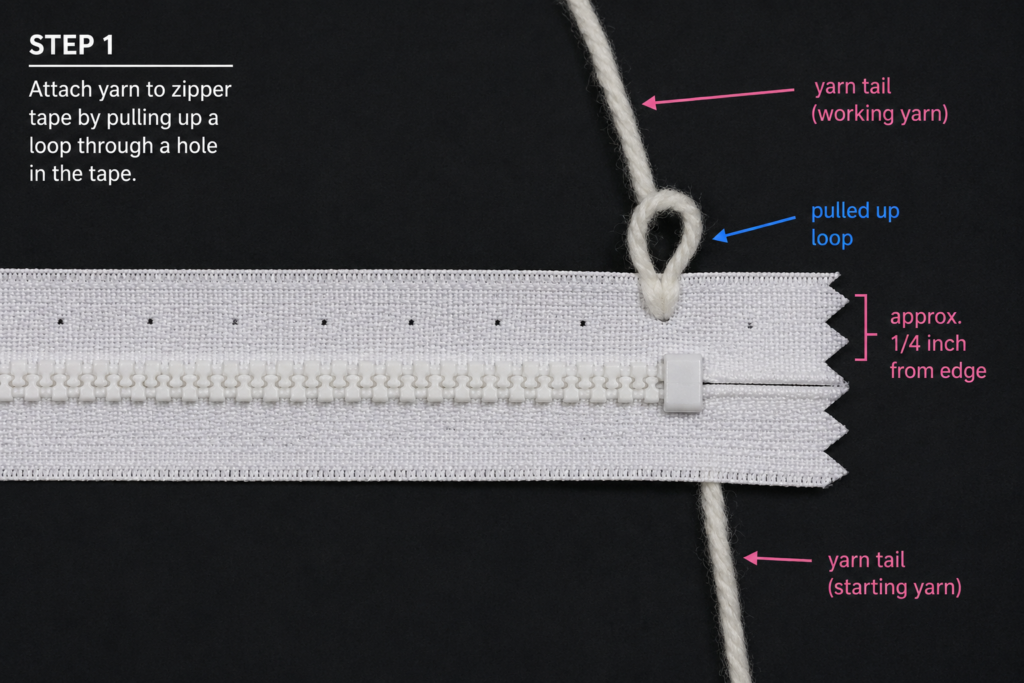
Step 3: Attach the Yarn Through the Zipper
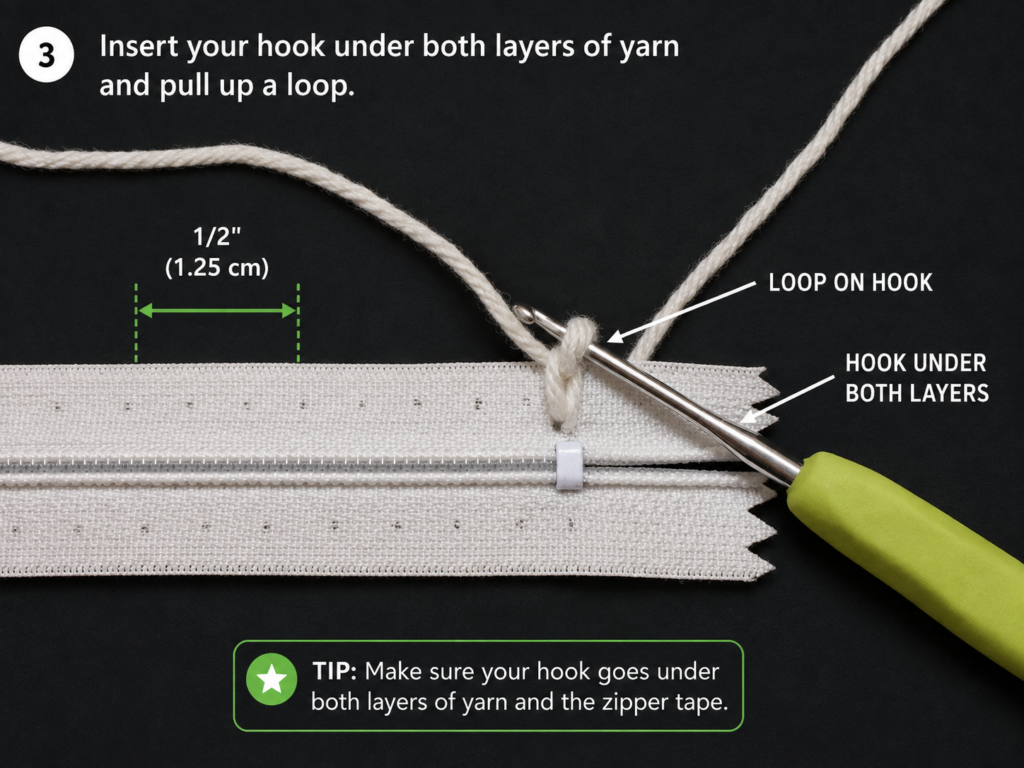
Take the smaller pointed hook.
Insert it carefully through the first marked point.
Catch the seafoam yarn and pull a loop through the zipper tape.
Chain 1 to secure the yarn.
Do not pull this first chain extremely tight.
The attachment should sit against the zipper without crushing the tape.
Beginner tip: If the hook does not pass through easily, gently wiggle the hook point. Do not stab aggressively at the zipper.
Common mistake to avoid: Never use scissors or a large sharp object to create oversized holes. Large holes can fray.
Step 4: Crochet Along the First Side
Move to the next mark.
Insert the small hook through the zipper tape.
Pull up a yarn loop.
Yarn over and pull through both loops to complete 1 sc.
Then ch 1.
At the next mark, work another sc, followed by another ch 1.
Continue:
sc in next marked point, ch 1
across the first long side.
The chain spaces are important because they create easy locations for the main body stitches later.
Beginner tip: Stop every four or five stitches and lay the zipper flat.
Common mistake to avoid: If the crochet edging is much shorter than the zipper, your chains are probably too tight.
Step 5: Crochet Around the First Zipper End
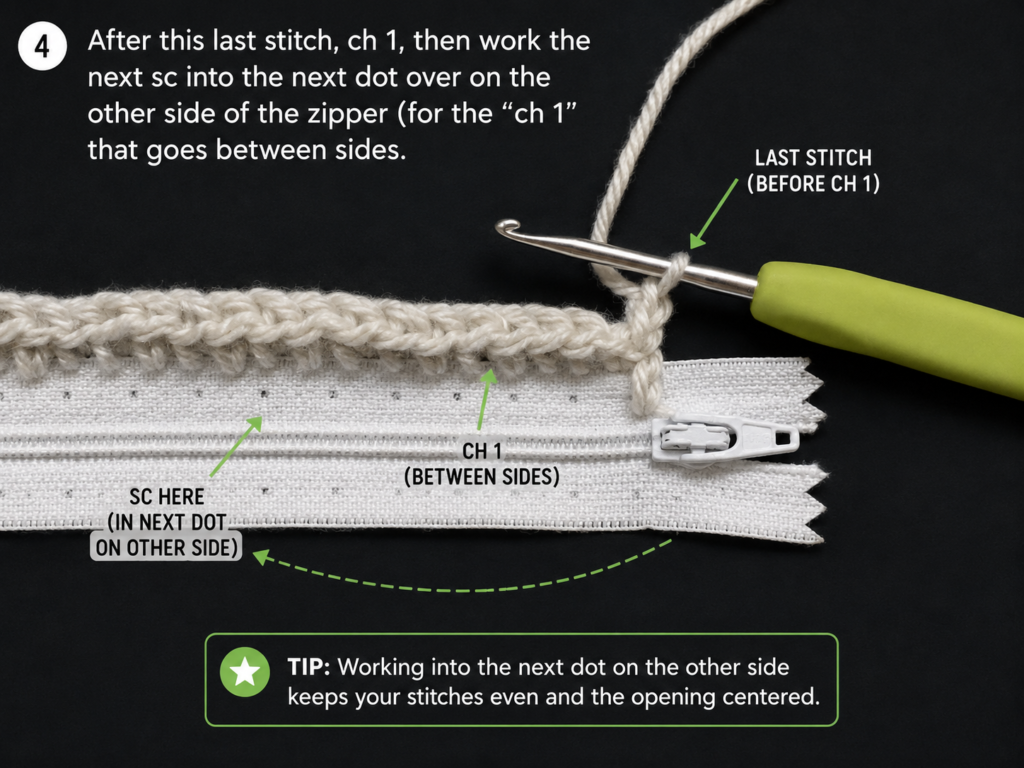
Once you reach the final marked point on the first side, work the last sc.
Make 1 snug ch across the narrow end of the zipper.
Rotate the work.
Insert the hook into the first mark on the opposite zipper tape and make the next sc.
The connecting chain should be firm enough to keep the two sides visually joined but loose enough that the end of the zipper does not curl inward.
Beginner tip: Think of this chain as a tiny bridge.
Common mistake to avoid: A very loose bridge creates a hole at the end of the finished pouch.
Step 6: Crochet Back Along the Second Side
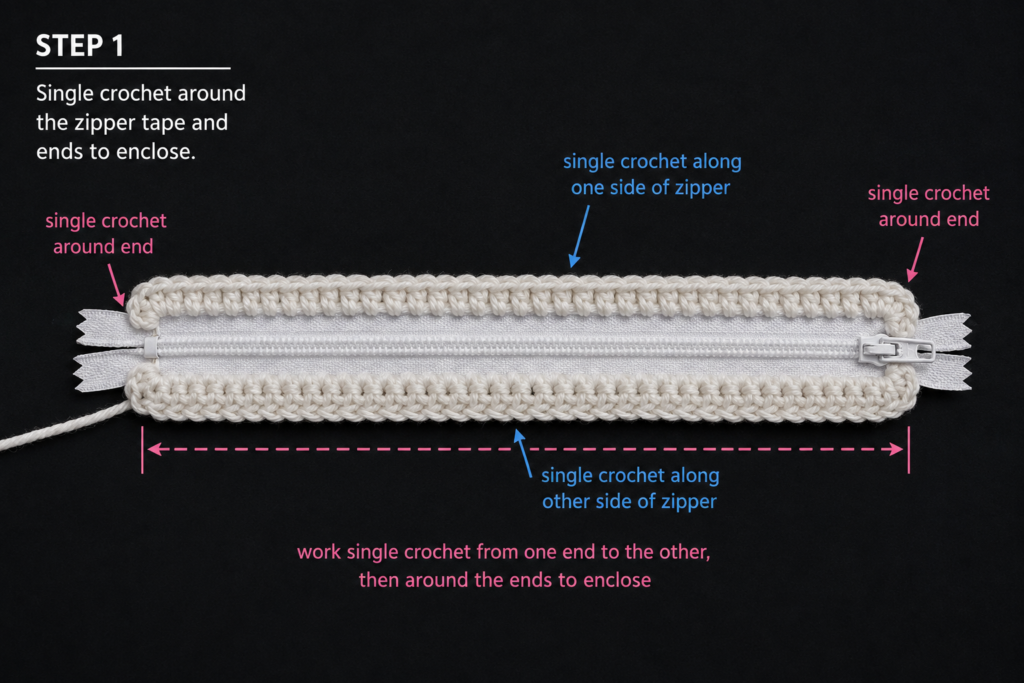
Continue the same sequence along the second long side:
sc in next marked point, ch 1
Repeat until you reach the starting end.
Now place the zipper flat.
Check three things:
- the zipper opens normally;
- the crochet is not pulling the zipper into a semicircle;
- both sides appear similar in length.
A tiny amount of waviness can usually be corrected by gently stretching the crochet edging lengthwise with your fingers.
If the zipper is severely buckled, undo the affected section and remake it with slightly looser chains.
Step 7: Join the Zipper Foundation
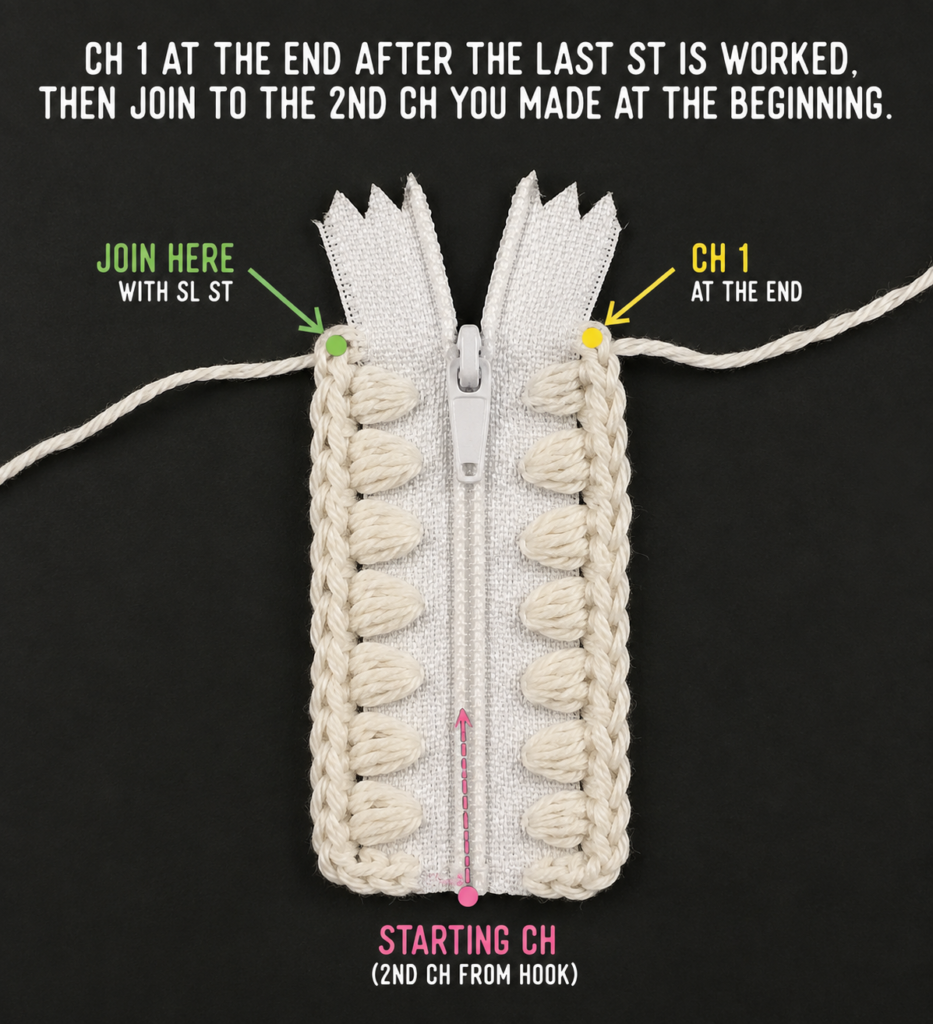
At the second end, make a snug chain across the end as before.
Join to the beginning of your foundation with a slip stitch.
Now count the visible chain spaces all the way around.
Write that number down.
For a typical 6-inch zipper marked at approximately 7 mm intervals, you may end up somewhere around the low-to-mid 40s, but your actual count is more important than a target number.
That number becomes your stitch count.
Step 8: Begin the Main Pouch Body
Put down the small hook and switch to the 4.0 mm hook.
Chain 1.
Work 1 sc into every ch-1 space around the zipper.
Place a stitch marker into the first sc.
When you reach the marker, do not join with a slip stitch.
Instead, begin working continuously.
Your stitch count after this round should equal the number of chain spaces you counted in Step 7.
For example:
- 42 chain spaces → 42 sc
- 44 chain spaces → 44 sc
Do not increase.
Step 9: Crochet the Half Double Crochet Body
From this point, the pattern becomes wonderfully repetitive.
Work:
1 hdc in every stitch around.
Move the stitch marker into the first stitch of each new round.
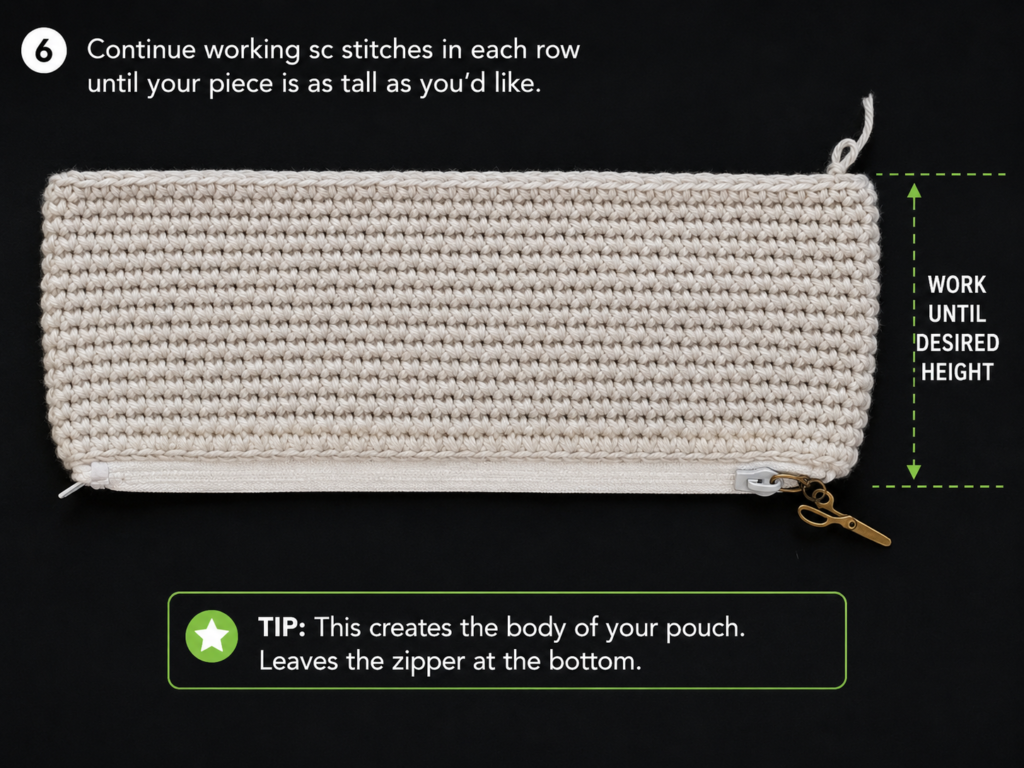
Continue working hdc rounds until the pouch measures approximately 3¾ inches from the crochet edge beside the zipper.
Depending on yarn and tension, your number of rounds may differ from another crocheter’s. Measuring is more useful than forcing everyone to work the same round count.
Optional textured ridge
When the pouch is approximately halfway to your desired depth, work one entire round of:
hdc in BLO around.
Then return to ordinary hdc for the following round.
This produces a subtle horizontal ridge without changing the overall construction.
Beginner tip: Count your stitches every three or four rounds.
Common mistake to avoid: Accidentally working twice into the first stitch after passing the marker will gradually make the pouch wider.
Step 10: Check the Depth Before Closing
Stop crocheting and temporarily remove the hook from the working loop.
Put several test items inside:
- folded bills;
- a few coins;
- lunch card.
Do not overfill it.
For most school uses, approximately 4 inches of total pouch height is comfortable.
If you want a more compact coin purse, stop closer to 3 inches.
For a small wallet, continue to 4½–5 inches.
The width does not need to change because the zipper already controls it.
Step 11: Close the Bottom
This version uses an inside seam so the finished exterior remains clean.
First, open the zipper at least halfway.
This is important because you will need the opening to turn the pouch right side out afterward.
Turn the pouch inside out.
Flatten it.
Adjust the fabric until both side folds are even and the zipper is centered over the bottom edge.
If your working yarn is not positioned at a corner, fasten off and rejoin it at one bottom corner.
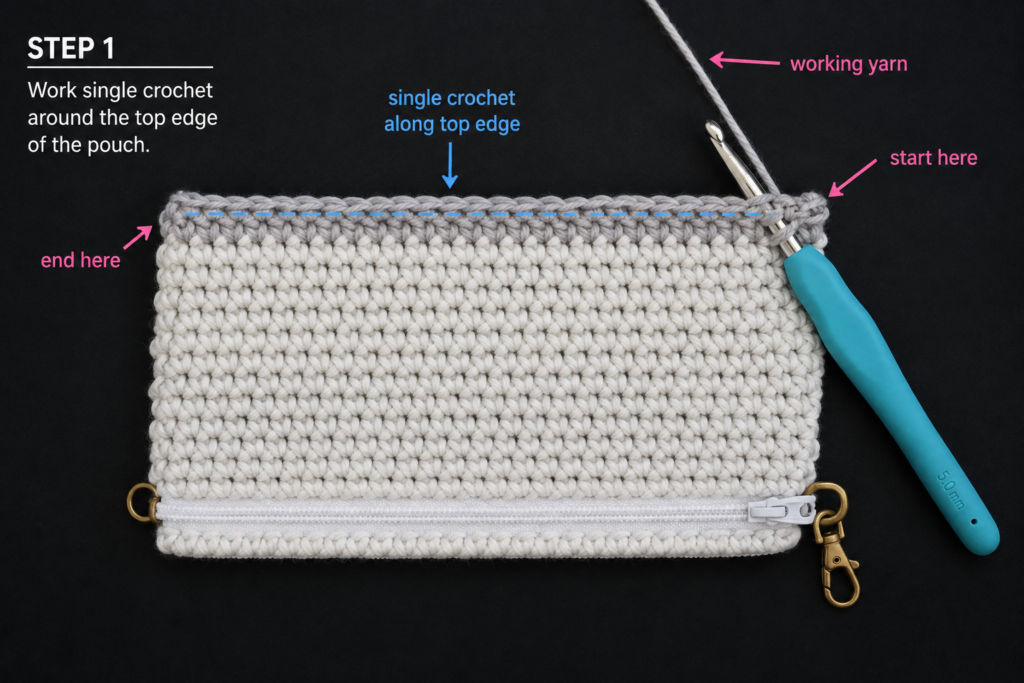
With the 4.0 mm hook:
- insert the hook through the first stitch on the front layer;
- insert through the corresponding stitch on the back layer;
- work 1 sc through both layers;
- repeat across the entire bottom.
Fasten off securely.
Because this seam remains inside, it can be functional rather than decorative.
Pattern Notes or Stitch Notes
Turning chain rules
There are no traditional turning chains because the pouch body is worked in continuous rounds.
The chain used when beginning the first main body round does not count as a stitch.
Stitch count
Your first body round determines the permanent stitch count.
If you create 44 chain spaces during the zipper foundation, maintain 44 stitches around.
The exact total may differ with zipper length and marking spacing.
Repeat pattern
Main body repeat:
hdc in each st around
Continue until desired depth.
Optional texture round:
hdc BLO in each st around
Right side and wrong side
The normal exterior of your crochet forms the right side.
The pouch is turned inside out only temporarily when creating the bottom seam.
Size adjustment
Wider pouch
Use a longer zipper.
Narrower pouch
Use a shorter zipper.
Deeper pouch
Work more body rounds.
Shallower coin-only pouch
Work fewer rounds.
This construction is especially useful because width and depth can be adjusted independently.
Common Beginner Mistakes
1. The zipper starts curling
Cause: Foundation stitches or chains are too tight.
Fix: Gently stretch the crochet first. If the zipper remains badly curved, undo a few stitches and remake them with slightly more relaxed tension.
2. The two zipper sides have different numbers of marks
Cause: The spacing drifted while measuring.
Fix: Correct the markings before crocheting. One small discrepancy can sometimes be compensated for, but symmetrical spacing produces a much neater result.
3. The hook will not pass through the zipper tape
Cause: The hook head is too large or blunt.
Fix: Use a narrow pointed hook approximately 2.0 mm for the zipper foundation and change to the larger hook afterward.
4. The pouch keeps getting wider
Cause: Extra stitches are being added near the stitch marker.
Fix: Count each round and move the marker immediately after making the first stitch of the new round.
5. The pouch becomes narrower toward the bottom
Cause: One or more stitches are being skipped.
Fix: Count frequently and inspect the last few stitches before the marker.
6. There is a hole at each zipper end
Cause: The connecting chain between the two zipper sides was too loose.
Fix: Make the end bridge snug without pulling the zipper into a curve.
7. The bottom seam looks twisted
Cause: The two layers were not aligned before joining.
Fix: Flatten the pouch first and make sure both side folds fall directly opposite each other.
How to Customize This Crochet Project
Yarn changes
A smooth cotton yarn is the most practical choice, but cotton blends can also work.
If you switch to DK yarn, expect a thinner, lighter pouch.
Bulky yarn is generally unnecessary for this small project because it can overwhelm the zipper and create a very thick wallet.
The Craft Yarn Council’s Standard Yarn Weight System is useful when comparing yarn categories.
Color changes
Back-to-school color ideas include:
- sage green;
- denim blue;
- mustard yellow;
- dusty rose;
- rust orange;
- navy;
- cream with a contrasting zipper.
You could also crochet the foundation in one color and change colors after the first body round.
Stripe option
Change color every three or four rounds.
Keep the zipper foundation neutral and work the body in two school colors.
Size changes
For younger children carrying only coins, use a shorter zipper and a shallower body.
For older students who need a card plus folded cash, keep the 6-inch zipper and work approximately 4 inches of depth.
Texture options
Replace some standard hdc rounds with:
- BLO hdc;
- single crochet;
- alternating rounds of sc and hdc.
Avoid very open lace stitches because coins can push through loose fabric.
Gift ideas
This pouch can become:
- lunch money wallet;
- small school-supply pouch;
- gift-card holder;
- coin purse;
- travel change pouch;
- backpack emergency-money pouch;
- teacher appreciation gift;
- small allowance wallet.
For a child, avoid adding dangling beads or small decorative pieces that may detach. The pouch is intended to store money and cards, not unpackaged food.
Finishing Instructions
After closing the bottom, cut the yarn leaving approximately a 6-inch tail.
Pull the tail completely through the final loop.
Use the yarn needle to weave the tail through several stitches on the inside of the pouch.
Reverse direction at least once before trimming the excess.
Repeat for any remaining yarn ends.
Turn the pouch right side out through the partially open zipper.
Use your fingers to gently push the two bottom corners into shape.
Open and close the zipper several times.
If the loose zipper-tape ends inside the pouch stick upward, tack them discreetly to the crochet fabric with matching sewing thread. The primary source likewise notes that loose zipper-tape ends may sometimes benefit from being secured.
For cotton yarn, gentle hand washing in cool water is the safest default when you are unsure of the zipper and yarn manufacturer’s care instructions. Reshape and dry flat.
Avoid aggressive heat around polyester zipper components.
Quick Printable-Style Summary
Project: Crochet Lunch Money Pouch
Skill level: Easy / confident beginner
Finished size: Approximately 6¼ × 4 inches
Yarn: Medium #4 cotton, approximately 45–60 yards
Zipper: 6-inch polyester zipper
Hooks:
2.0 mm pointed hook for zipper foundation
4.0 mm hook for crochet body
Stitches: ch, sc, hdc, sl st, optional hdc BLO
Starting method: Mark both sides of the zipper tape approximately 7 mm apart. Crochet a sc/ch-1 foundation around the zipper using the small hook.
Body setup: With the 4.0 mm hook, work 1 sc into every ch-1 space.
Body repeat: 1 hdc in every stitch around in continuous rounds.
Optional detail: One hdc BLO round halfway down the pouch.
Depth: Continue until approximately 3¾–4 inches deep.
Bottom: Open zipper halfway, turn pouch inside out, flatten and sc through both layers across the bottom.
Finishing: Fasten off, weave in ends, turn right side out and test the zipper.
FAQ
Can a beginner make a crochet lunch money pouch?
Yes, particularly if you are already comfortable with chain, single crochet, and half double crochet. The unfamiliar part is working through zipper tape, so use a slim pointed hook and work slowly.
What yarn is best for a crochet money pouch?
Smooth cotton yarn is an excellent option because it produces visible stitches and a relatively firm fabric. Medium #4 cotton works particularly well for this version.
How big should a lunch money pouch be?
Approximately 6 inches wide and 3½–4 inches tall is practical for folded bills, coins, and a typical card while remaining compact enough for a backpack pocket.
Can I crochet the pouch without working through the zipper?
Yes. Another construction method is to crochet separate panels and hand-sew the zipper afterward. This tutorial instead uses a zipper-first method because it creates a tidy integrated edge.
Why do I need two crochet hooks?
The small pointed hook passes through the woven zipper tape more easily. Once that foundation is complete, the 4.0 mm hook creates the main pouch fabric.
Can I make this without a zipper?
You could substitute a flap and button, but that changes the project construction. For coins and lunch money, a zipper gives more reliable containment.
How do I make the pouch larger?
Use a longer zipper to increase width and crochet additional body rounds to increase height. The foundation method can be adapted without needing a fixed starting chain.
Conclusion
A small crochet lunch money pouch is a useful way to practice practical construction without committing to a large bag. You learn how crochet can be attached directly to another material, how continuous rounds work, how stitch counts control shape, and how a simple bottom seam turns a crochet tube into a functional pouch.
Once you understand the zipper foundation, the same technique can be adapted for pencil cases, makeup pouches, travel wallets, crochet-hook cases, or small school-supply organizers.
Save the tutorial for your back-to-school crochet projects, and try the same construction again with a different zipper length once you are comfortable with the technique.





