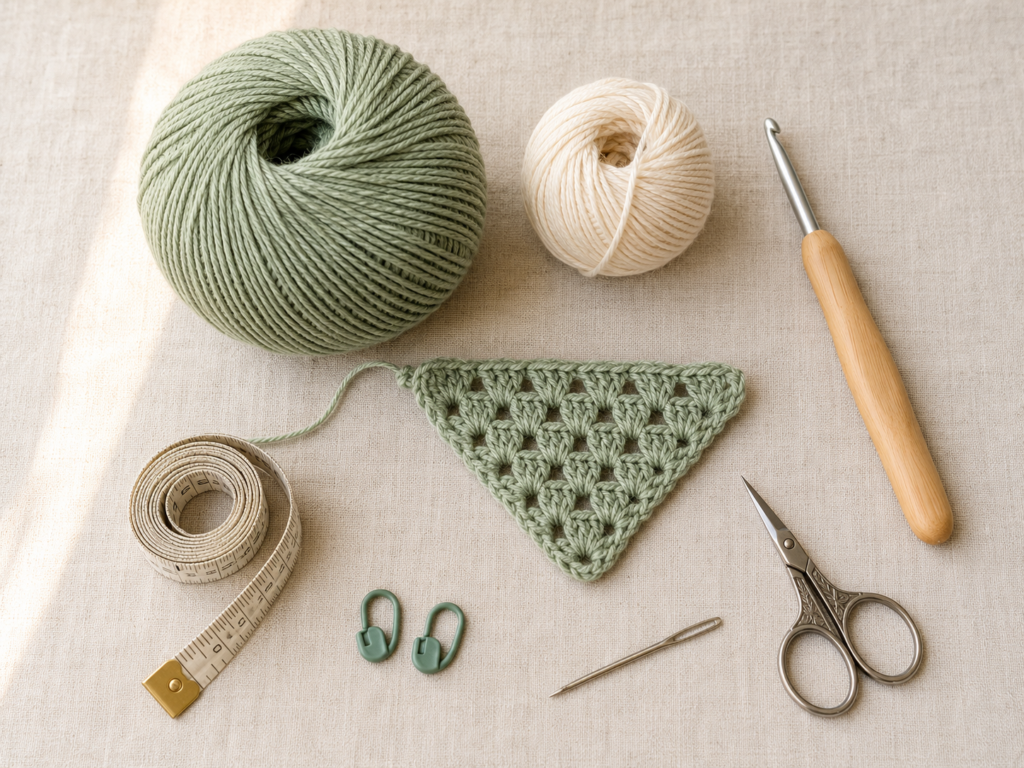
A crochet bandana is one of the most satisfying small wearable projects you can make. It is quick enough for a weekend, practical enough to wear, and simple enough that a confident beginner can finish it without needing advanced shaping skills.
This easy crochet bandana pattern is worked as a triangle. You start with a small center point, increase on both sides, build a lightweight granny-style fabric, and then finish the piece with a clean border and two tie straps. The result is a soft crochet headscarf that can be worn around the head, tied over loose hair, styled as a kerchief, or used as a lightweight summer accessory.
The tutorial below is written as a new original beginner version. It uses simple granny clusters instead of complicated lace. You only need chain stitches, double crochet, single crochet, and slip stitches. The photo plan follows one selected crochet bandana tutorial source for visual flow, but the wording, stitch structure, sizing, and image prompts here are original.
What You’ll Learn
- How to start a crochet bandana from a small ring.
- How to grow a triangle evenly.
- How granny clusters create lightweight fabric.
- How to recognize the center chain space.
- How to keep both sides symmetrical.
- How to add a simple top border.
- How to crochet tie straps.
- How to finish with a clean side border.
- How to adjust the size for adults, teens, or children.
- How to block and care for a wearable cotton bandana.
Materials You’ll Need
For one adult-size crochet bandana:
- DK/light cotton or cotton-blend yarn, approximately 120–150 yards
- 4.0 mm / G-6 crochet hook
- Scissors
- Tapestry needle
- Measuring tape
- 2 stitch markers, optional
- Blocking mat or clean towel, optional
- Rustproof pins, optional
Cotton is a strong choice for a bandana because it gives the fabric better stitch definition and a cooler feel for warm weather. The Craft Yarn Council yarn-weight system places DK/light worsted yarns in the light category, although individual yarn thickness can vary by brand.
Finished Size
Approximate finished size after light blocking:
- Width across top edge: 16–17 inches
- Depth from top edge to point: 8–9 inches
- Tie straps: 14–16 inches each
The pattern is easy to resize. Add more rows for a larger bandana or stop earlier for a smaller headscarf.
Crochet Abbreviations Used
This tutorial uses U.S. crochet terms:
- ch = chain
- sc = single crochet
- dc = double crochet
- sl st = slip stitch
- st/sts = stitch/stitches
- sp = space
- ch-sp = chain space
- rep = repeat
- RS = right side
- WS = wrong side
The Craft Yarn Council’s crochet abbreviation list confirms common U.S. terms such as ch, sc, dc, and sl st, and also explains that U.S. and U.K. crochet terminology differ.
Before You Start
Gauge and tension
Gauge is not strict for this project, but it affects size. A good target after four rows is approximately 4–4.5 inches wide across the top edge.
If your triangle is much smaller, your tension may be tight or your hook may be too small. If it is much wider, your tension may be loose or your hook may be too large.
How to count the center
Every row has one center chain space. This center space creates the point of the triangle. Treat it carefully. If you skip it, the bandana will lose its shape. If you add too many stitches into it, the center will ripple.
How to keep edges straight
At the start and end of each row, work into the correct edge stitch. Beginners often miss the final turning chain or accidentally work into the wrong space. Pause at the end of each row and check that both sides look balanced.
US/UK term note
This pattern is written in U.S. terms. A U.S. double crochet is called a treble crochet in U.K. terminology, so make sure your stitch reference matches the pattern language before starting.
Step-by-Step Crochet Tutorial
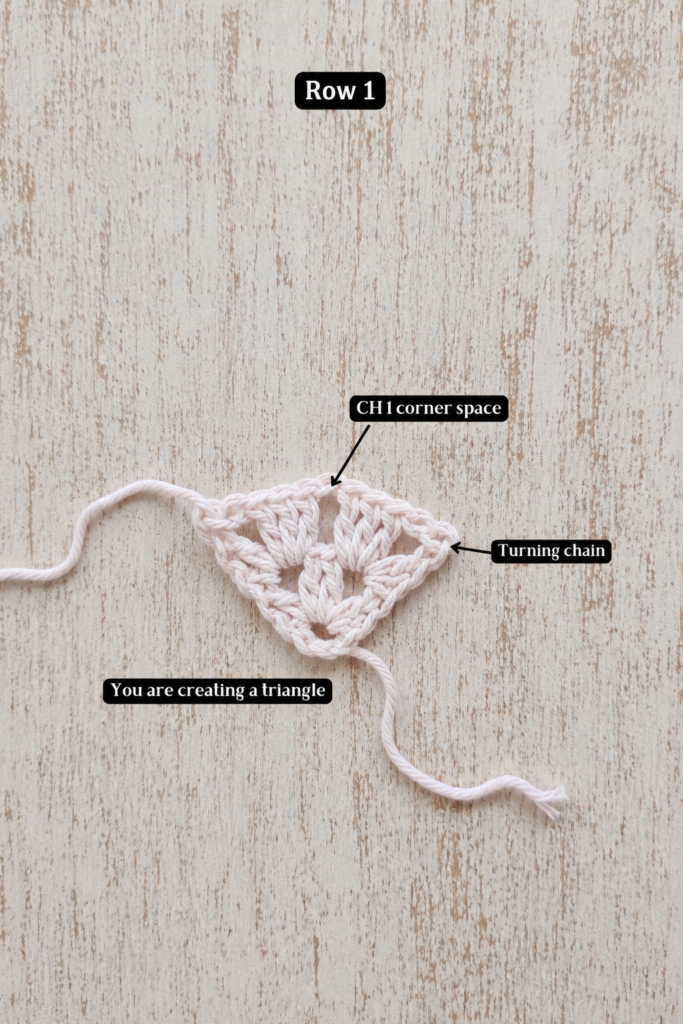
Step 1: Start the Triangle
Make a slip knot.
Ch 4.
Work into the first chain made:
- 2 dc
- ch 2
- 3 dc
Turn your work.
This creates two small clusters separated by a center chain space. That center space is the beginning of the triangle point.
Beginner tip: Pull the starting tail gently after the first row to neaten the small center opening.
Common mistake to avoid: Do not mistake the turning chain for a normal chain space. The center ch-2 space is the gap between the two clusters.
Step 2: Grow the First Few Rows
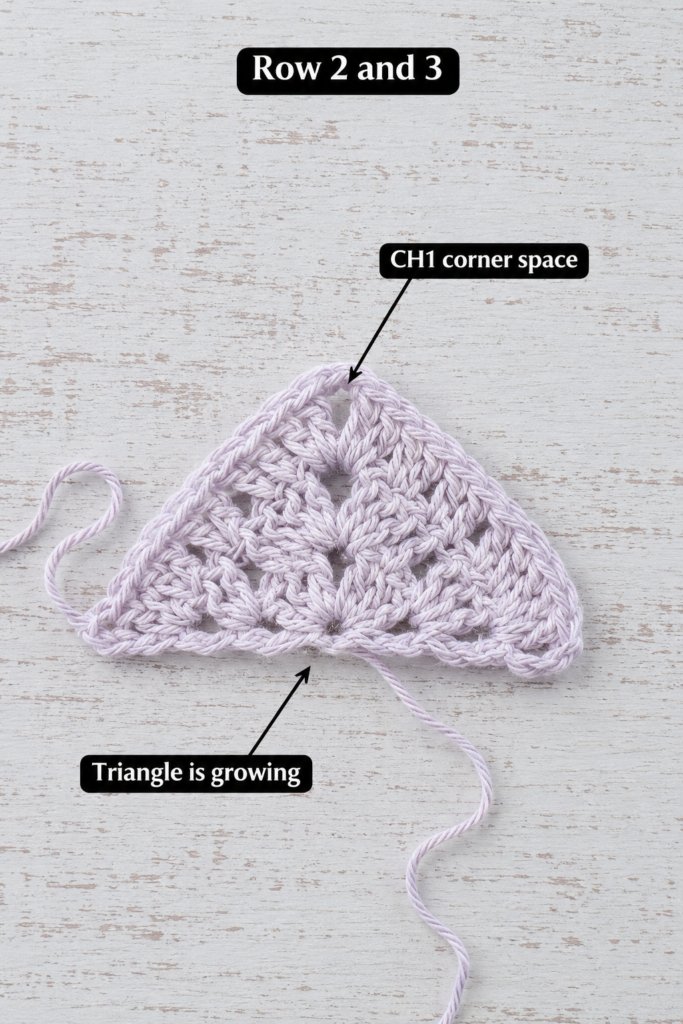
For Row 2:
Ch 3. This counts as your first dc.
Work 2 dc in the same first stitch.
Ch 1.
In the center ch-2 space, work:
- 3 dc
- ch 2
- 3 dc
Ch 1.
Work 3 dc in the last stitch.
Turn.
For Row 3, repeat the same idea, but work one 3-dc cluster into each ch-1 space before and after the center. The center always receives:
- 3 dc
- ch 2
- 3 dc
This is the basic triangle-growing formula.
Beginner tip: After each row, gently smooth the triangle flat and identify the center ch-2 space before beginning the next row.
Common mistake to avoid: Do not work the center increase into a side chain space. The center space is at the point of the triangle.
Step 3: Continue the Granny-Cluster Repeat
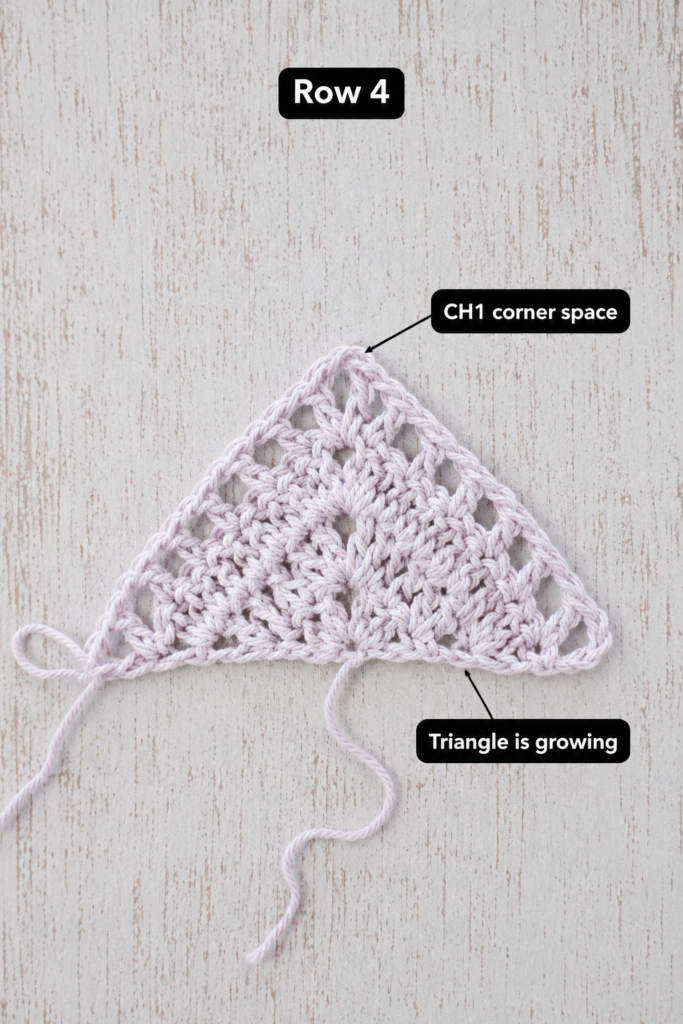
From Row 4 onward, follow this repeat:
- Ch 3.
- Work 2 dc in the first stitch.
- Ch 1.
- Work 3 dc in each ch-1 space until you reach the center.
- Ch 1.
- In the center ch-2 space, work 3 dc, ch 2, 3 dc.
- Ch 1.
- Work 3 dc in each ch-1 space across the second side.
- Ch 1.
- Work 3 dc in the last stitch.
- Turn.
Repeat this row until the triangle is the size you want.
For the sample, make 14 total rows.
Beginner tip: Count clusters instead of individual stitches. Each side should have the same number of granny clusters before the center.
Common mistake to avoid: If one side has more clusters than the other, undo the row and check where you added or skipped a chain space.
Step 4: Learn Where to Place Each Cluster
Look closely at the row below.
Each 3-dc cluster is worked into a chain space, not into the top of every stitch. This is what makes the bandana quick and airy.
The beginning and ending clusters are the only ones that anchor into the edge stitches. The center increase always goes into the center ch-2 space.
Beginner tip: Use a stitch marker in the center ch-2 space for the first few rows. Remove it before working into the space, then place it again in the new center.
Common mistake to avoid: Do not place three double crochets into every stitch. This will make the bandana dense, stiff, and much too wide.
Step 5: Keep Expanding the Triangle
Continue repeating the granny-cluster row.
As the bandana grows, the rows will take longer. This is normal because each new row adds more stitch spaces.
Pause after every two rows and check:
- Is the center point straight?
- Are both slanted sides even?
- Is the top edge widening smoothly?
- Is the fabric lying mostly flat?
A little movement or slight curling is not a problem. It can be improved with blocking later.
Beginner tip: If your triangle looks uneven, count the clusters on each side before pulling out the entire row.
Common mistake to avoid: Do not pull the first and last clusters too tightly. Tight edges can make the bandana curve upward.
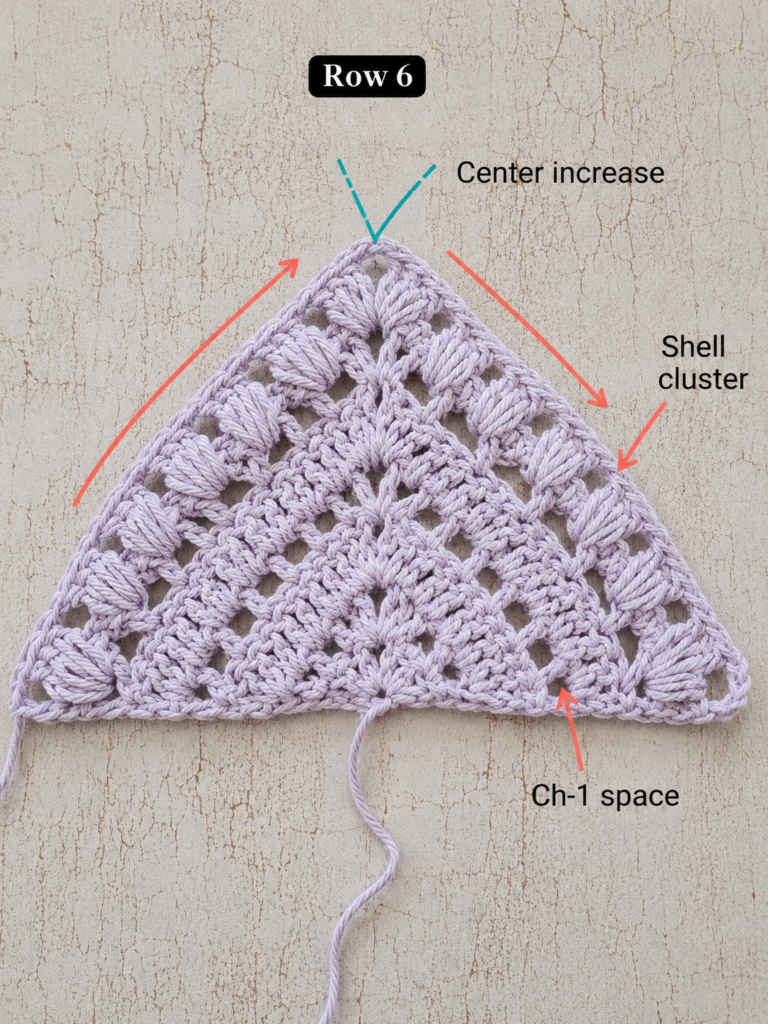
Step 6: Check the Size
After 10–12 rows, hold the bandana against your head or measure it.
For an adult fit, the triangle should reach roughly from behind one ear to behind the other when placed across the head.
For a smaller bandana, stop earlier.
For a larger bandana with more coverage, add one or two extra rows.
Beginner tip: It is better to check fit before adding the border and ties. The border will add a small amount of width.
Common mistake to avoid: Do not keep adding rows only because the triangle looks small on the table. Wearable bandanas stretch slightly when tied.
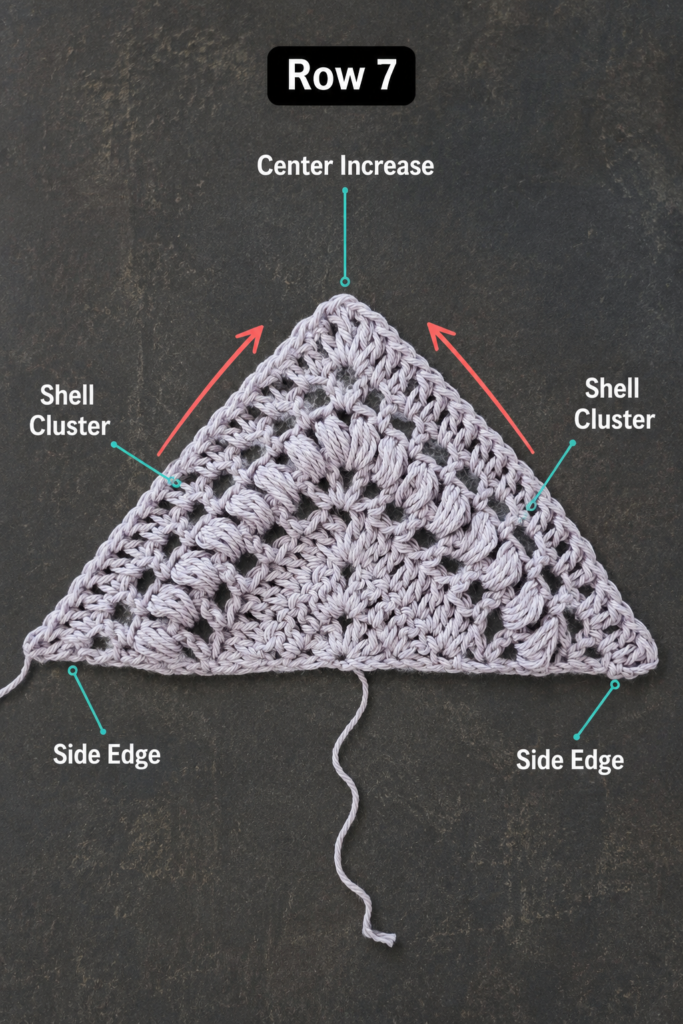
Step 7: Finish the Triangle Body
When your bandana reaches the desired size, complete the final row and do not fasten off.
For the sample, stop after 14 rows.
Lay the piece flat. The top edge should be the widest edge. The point should sit centered below it.
If the point leans to one side, you may have missed the center increase in one row. Small imperfections can be blocked, but a major lean should be fixed before adding the border.
Beginner tip: Photograph the triangle before edging. It helps you see symmetry more clearly.
Common mistake to avoid: Do not cut the yarn yet. You can continue directly into the first tie strap and border.
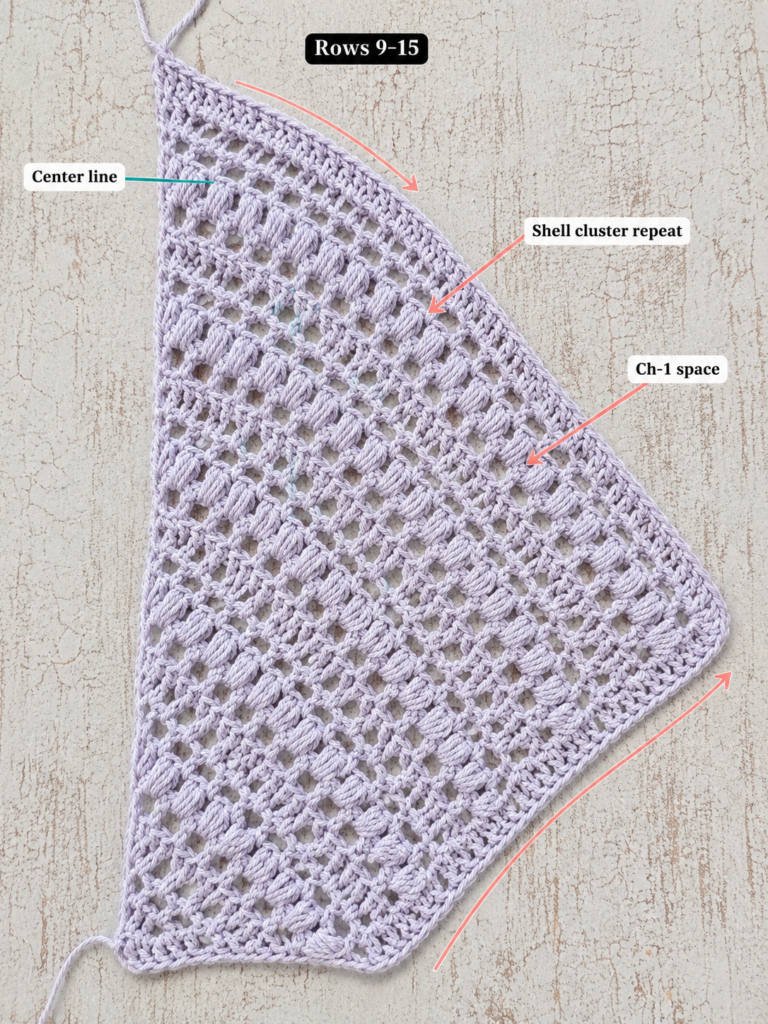
Step 9: Make the First Tie Strap
The first tie strap is already started from the chain you made before working across the top.
A slip-stitched chain creates a narrow, sturdy tie that is not too bulky.
After slip stitching back along the chain, make sure the strap is not twisted. It should curve softly but still feel secure.
Beginner tip: If slip stitching into chains feels difficult, make the strap with single crochet instead. It will be slightly thicker but easier to handle.
Common mistake to avoid: Do not make the straps too short. Longer straps are much easier to tie comfortably.
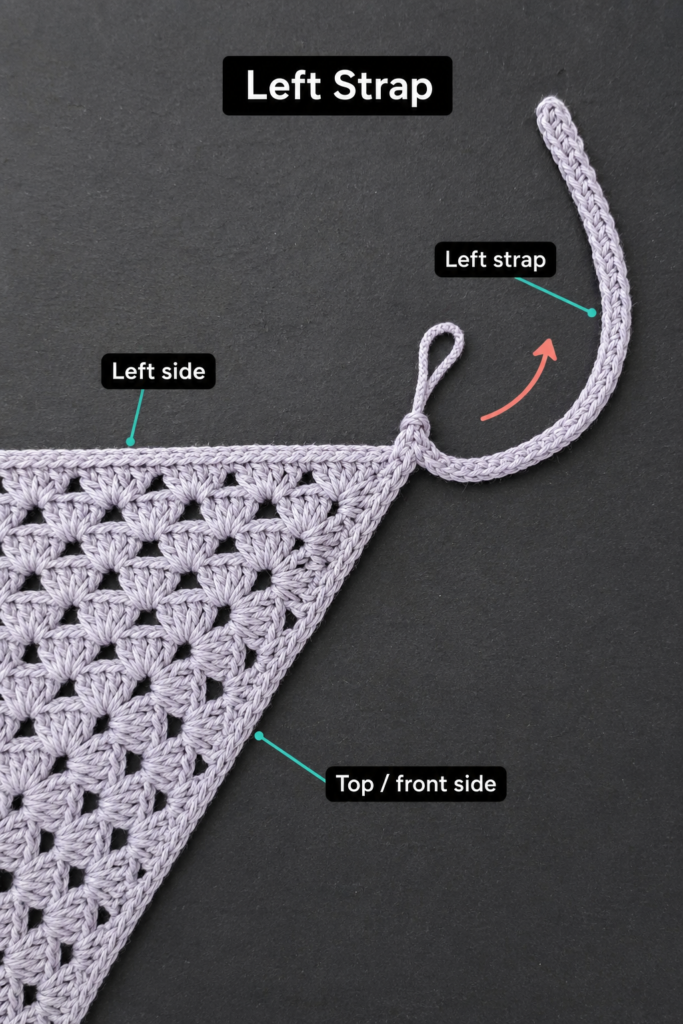
Step 10: Add the Side Border
After working across the top edge, ch 60 for the second tie strap.
Slip stitch back down the chain to return to the opposite upper corner.
Now continue around the two slanted edges of the triangle.
For the simplest beginner border:
- Work 1 sc evenly along the first slanted side.
- Work 3 sc into the bottom point.
- Work 1 sc evenly along the second slanted side.
- Join with a sl st near the first tie.
For a decorative edge, add a tiny picot every fourth single crochet:
- sc in next 3 edge spaces
- ch 3
- sl st into the first chain of that ch-3
- repeat along the slanted sides
Beginner tip: Plain single crochet is the safest first border. Add picots only if you feel comfortable.
Common mistake to avoid: Do not cram too many border stitches into the side edge. Too many stitches create ruffling.
Step 11: Finish the Second Strap
Once the second strap is complete and the side border is joined, fasten off.
Cut the yarn, leaving a 6-inch tail.
Pull the tail through the final loop and tighten gently.
Check both straps. They should be similar in length and thickness.
Beginner tip: Lay both straps side by side before weaving in ends. If one is much longer, you can remake it before finishing.
Common mistake to avoid: Do not trim yarn tails before weaving them securely through the stitches.
Pattern Notes or Stitch Notes
Turning chain rules
The beginning ch 3 counts as a double crochet in this pattern.
Keep that in mind when working the final stitch of each row.
Stitch count approach
This bandana is easier to track by cluster count than by individual stitch count.
Each row increases by one cluster on each side of the center.
Repeat pattern
The main repeat is:
- Edge cluster
- chain space
- granny clusters across side spaces
- center increase
- granny clusters across second side
- edge cluster
Right side and wrong side
Because the bandana is turned after each row, the texture looks similar on both sides. Choose the side you prefer as the right side before weaving in ends.
Size adjustment notes
For a smaller bandana, stop at 11–12 rows.
For an adult-size bandana, work 14 rows.
For a larger kerchief, work 15–16 rows, then check the fit before adding ties.
Common Beginner Mistakes
1. Losing the center chain space
Problem: The triangle begins leaning or the point disappears.
Fix: Mark the center ch-2 space with a stitch marker until the shape becomes easy to read.
2. Working into the wrong edge stitch
Problem: One side becomes shorter than the other.
Fix: At the beginning and end of each row, look for the turning chain and edge cluster before placing stitches.
3. Making the border too tight
Problem: The top edge pulls inward and feels uncomfortable.
Fix: Use relaxed single crochet stitches across the top edge.
4. Adding too many side-border stitches
Problem: The slanted edges ruffle.
Fix: Remove the border and use fewer stitches along the edge.
5. Making tie straps too short
Problem: The bandana is hard to tie.
Fix: Use at least 55–60 chains per strap for an adult size.
6. Using heavy yarn
Problem: The bandana feels bulky or too warm.
Fix: Use cotton DK, sport, or fingering-weight yarn for better drape.
How to Customize This Crochet Project
Yarn changes
Use cotton for summer wear, bamboo blends for drape, or acrylic for an inexpensive practice version.
Color changes
Try:
- Solid sage green
- Cream with terracotta edging
- Dusty blue with white straps
- Striped rows
- Variegated cotton yarn
- Two-tone border and ties
Size changes
Add or remove rows before edging.
Always check the triangle width before adding straps.
Border options
Good beginner border choices include:
- Plain single crochet
- Single crochet with picots
- Shell stitch edge
- Contrasting-color border
Texture options
Once you understand the basic construction, try replacing granny clusters with:
- V-stitches
- Shell stitches
- Mesh rows
- Puff stitches
- Solid double crochet rows
Gift ideas
A crochet bandana makes a good handmade gift for:
- Summer birthdays
- Beach trips
- Festival outfits
- Teen accessories
- Handmade market stock
- Crochet gift baskets
Finishing Instructions
Weave in all yarn tails using a tapestry needle.
Thread each tail through several stitches on the wrong side, change direction, and weave through a few more stitches before trimming.
For blocking:
- Lay the bandana flat on a clean towel or blocking mat.
- Smooth the triangle into shape.
- Pin the top edge straight.
- Pin the point gently.
- Lightly mist with water.
- Let it dry completely.
Blocking helps the triangle look neater and makes the edge sit more smoothly.
For care, follow the yarn label. Cotton bandanas are usually easy to care for, but hand washing and flat drying will help preserve the shape.
Quick Printable-Style Summary
Skill level: Beginner to Easy
Finished size: Approx. 16–17 inches across top edge, 8–9 inches deep
Materials: DK cotton yarn, 4.0 mm hook, scissors, tapestry needle, measuring tape
Stitches: ch, dc, sc, sl st
Starting method: Ch 4 and work into the first chain
Main repeat: Work granny clusters into chain spaces, increasing in the center ch-2 space on every row
Recommended body length: 14 rows for adult size
Ties: Ch 60 for each strap, slip stitch back along each chain
Border: Single crochet around edges; optional picot on slanted sides
Finishing: Weave in ends, block lightly, dry flat
FAQ
Is this crochet bandana pattern beginner-friendly?
Yes. This version uses basic stitches and a repeating triangle formula. The main skill is learning where to place the center increase.
What yarn is best for a crochet bandana?
Cotton or cotton-blend yarn is best for a lightweight wearable bandana. DK cotton gives enough structure without becoming too bulky.
Can I make the bandana larger?
Yes. Add more repeat rows before adding the border and straps. Check the fit before finishing.
Can I make the bandana smaller for a child?
Yes. Stop after fewer rows, then add shorter tie straps.
Do I have to block the bandana?
Blocking is optional, but it improves the shape and makes the point and edges look cleaner.
Can I use acrylic yarn?
Yes, but acrylic may feel warmer and less breathable than cotton. It is still useful for practice.
Can I skip the picot edge?
Yes. A plain single crochet border is easier and gives a clean finish.
Conclusion
This easy crochet bandana pattern is a practical beginner project because it teaches triangle shaping, granny clusters, edge finishing, and tie straps in one small wearable piece.
Start with one solid-color version first. Once you understand the construction, try stripes, contrast edging, picots, lighter yarn, or a larger kerchief shape.
The most important checkpoints are simple: keep the center space clear, count your clusters, check both sides for symmetry, and avoid making the border too tight. With those details in place, your finished crochet bandana will look clean, wearable, and handmade in the best way.





