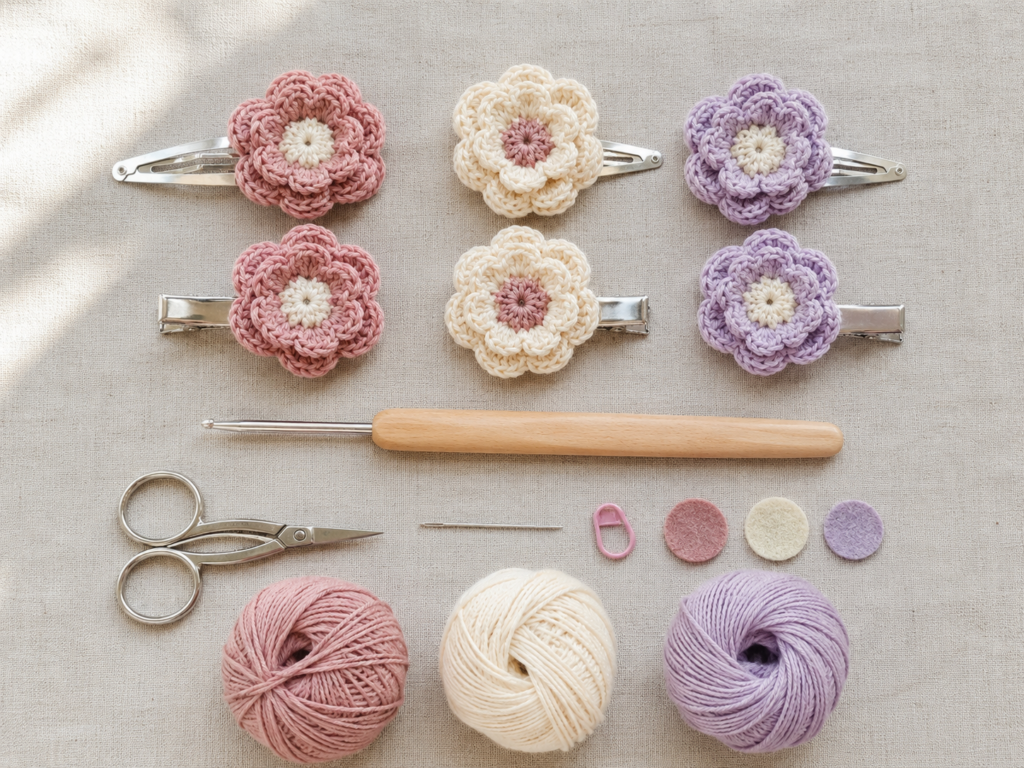
Crochet flower hair clips are small, pretty, quick to make, and useful enough to become one of those projects you repeat in every color. They work well as handmade gifts, craft fair items, back-to-school accessories, party favors, photo props, and matching outfit details.
This beginner-friendly crochet flower hair clips pattern teaches you how to make a small layered flower and attach it securely to a snap clip or alligator clip. The project uses basic crochet stitches, a small amount of shaping, and a simple finishing method.
The main flower is worked in rounds. First, you make a small center. Then you crochet a front layer of petals. After that, you work behind those petals to create a second layer. Finally, you add a small center detail and sew the flower to a hair clip with a backing piece.
This tutorial is written as a practical beginner version. The selected reference source uses crochet thread and small clips, and the original source includes both rose and layered flower hair clip styles. This article does not copy that pattern. Instead, it uses the same general project idea and photo-flow logic to create a new original flower clip tutorial with safer finishing options and clearer beginner checkpoints.
What You’ll Learn
- How to crochet a small flower center.
- How to make a first layer of rounded petals.
- How to work behind petals for a second layer.
- How to keep a tiny crochet flower flat.
- How to add an embroidered flower center.
- How to avoid unsafe loose embellishments.
- How to attach crochet securely to a snap clip or alligator clip.
- How to customize colors, size, backing, and finishing.
Materials You’ll Need
For one flower hair clip:
- Size 10 crochet thread, sport-weight cotton, or fingering-weight cotton.
- 2.25 mm–2.75 mm crochet hook.
- Small snap clip, alligator clip, or barrette blank.
- Tapestry needle.
- Sewing needle.
- Matching sewing thread.
- Small felt circle or felt oval for backing.
- Scissors.
- Optional stitch marker.
- Optional fabric glue or hot glue for adult-use clips only.
- Optional bead or pearl center for adult accessories only.
For a beginner, sport-weight cotton can be easier to handle than fine crochet thread. Once you understand the construction, size 10 crochet thread gives a more delicate, boutique-style hair clip.
The Craft Yarn Council lists crochet abbreviations as industry-standard pattern language, and it also explains that hook sizes are commonly shown in metric sizing alongside U.S. sizing.
Safety note: Avoid pearl beads, buttons, or any small detachable embellishments on clips intended for babies or children under 3. The selected source also notes that pearl beads are not recommended for children under 3. For children’s clips, use embroidered centers instead.
Crochet Abbreviations Used
This pattern uses U.S. crochet terms:
- ch = chain
- sc = single crochet
- hdc = half double crochet
- dc = double crochet
- sl st = slip stitch
- st/sts = stitch/stitches
- rep = repeat
- FLO = front loop only
- BLO = back loop only
U.S. and U.K. stitch names are not always the same, so use U.S. terminology for this tutorial.
Before You Start
Gauge and tension
Gauge is not strict for this project because the flower is decorative. What matters more is that your stitches are even and firm.
If your flower is floppy, use a smaller hook.
If your flower curls too much, loosen your tension slightly or use a slightly larger hook.
Finished size
With cotton thread and a 2.25 mm–2.5 mm hook, the flower will be about 1.5–2 inches wide.
With sport-weight cotton and a 2.75 mm hook, the flower may be closer to 2–2.5 inches wide.
Choosing the clip base
Use:
- Snap clips for children’s accessories.
- Alligator clips for craft fair-style hair clips.
- French barrettes for larger flowers.
- Bobby pins for very small thread flowers.
For the most secure finish, sew the flower to a felt backing around the clip instead of relying only on glue.
Step-by-Step Crochet Tutorial
Step 1: Make the Flower Center
Start with your flower color.
Make a magic ring.
Ch 1.
Work 8 sc into the magic ring.
Pull the beginning tail gently to close the center.
Join with a sl st to the first sc.
Stitch count: 8 sc
Do not fasten off.
This small center controls the whole shape of the flower. If the center is too loose, the petals may look uneven.
Beginner tip:
Before joining, count all 8 single crochets. Tiny thread stitches are easy to miss.
Common mistake to avoid:
Do not count the ch 1 as a stitch. It is only used to bring the yarn up to working height.
Step 2: Crochet the First Petal Layer
Work the first petal layer into the front loop only of each stitch from the center round.
In the FLO of the first stitch, work:
sl st, ch 2, 1 hdc, 1 dc, 1 hdc, ch 2, sl st
That creates one rounded petal.
Repeat the same petal sequence in the front loop of each remaining stitch.
You should have 8 small front petals.
Join carefully at the base of the first petal.
Do not pull the petals too tightly. The flower should stay open and soft.
Beginner tip:
After every two petals, pause and flatten the flower gently with your fingers.
Common mistake to avoid:
Do not work through both loops in this round. Leave the back loops unused because they will support the second layer.
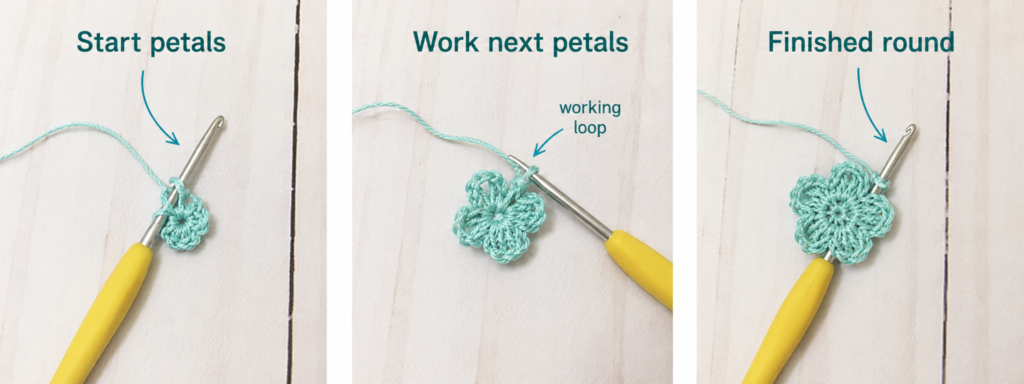
Step 3: Work Behind the Petals
Turn the flower slightly so you can see the unused back loops from the center round.
You will now make the base for the second petal layer.
Join the hook into one unused back loop.
Ch 3.
Sl st into the next unused back loop.
Repeat around:
ch 3, sl st into next back loop
When finished, you should have 8 small chain loops behind the front petals.
These chain loops lift the second petal layer slightly behind the first one, giving the flower more dimension.
Beginner tip:
Use the tip of the hook to separate the front petals from the back loops. Work slowly here. This is the trickiest part of the project.
Common mistake to avoid:
Do not accidentally work into the top of a front petal. You want the foundation loops behind the flower.
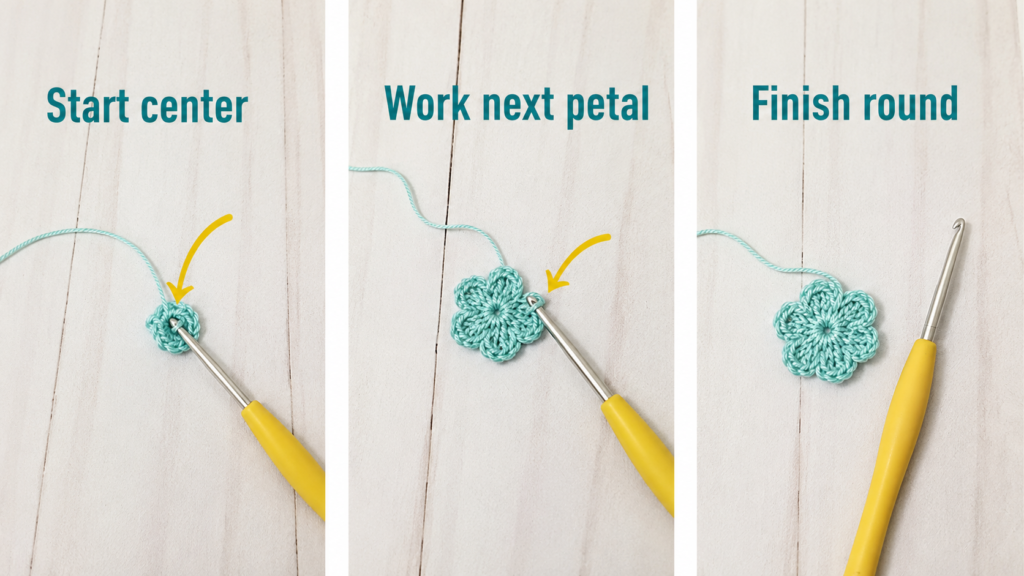
Step 4: Crochet the Second Petal Layer
Now work into each ch-3 loop behind the flower.
In the first ch-3 loop, work:
sl st, ch 2, 2 dc, 1 hdc, ch 2, sl st
Repeat in every ch-3 loop around.
You should have 8 larger back petals.
The second petal layer should sit slightly behind the first layer, making the flower look fuller without becoming bulky.
Fasten off, leaving a tail long enough for weaving in.
Beginner tip:
After each back petal, gently pull the front petals forward so the two layers do not flatten into one.
Common mistake to avoid:
Do not overfill the chain loops. Too many stitches in each loop will make the flower ruffle heavily and may hide the clip.
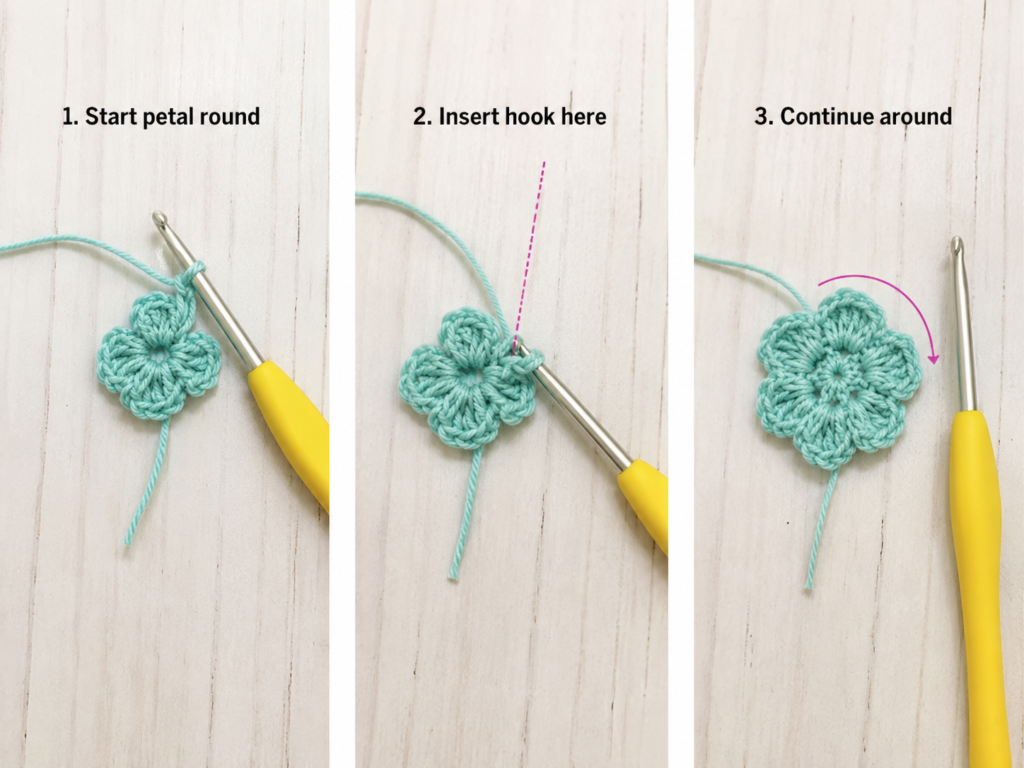
Step 5: Add the Center Detail
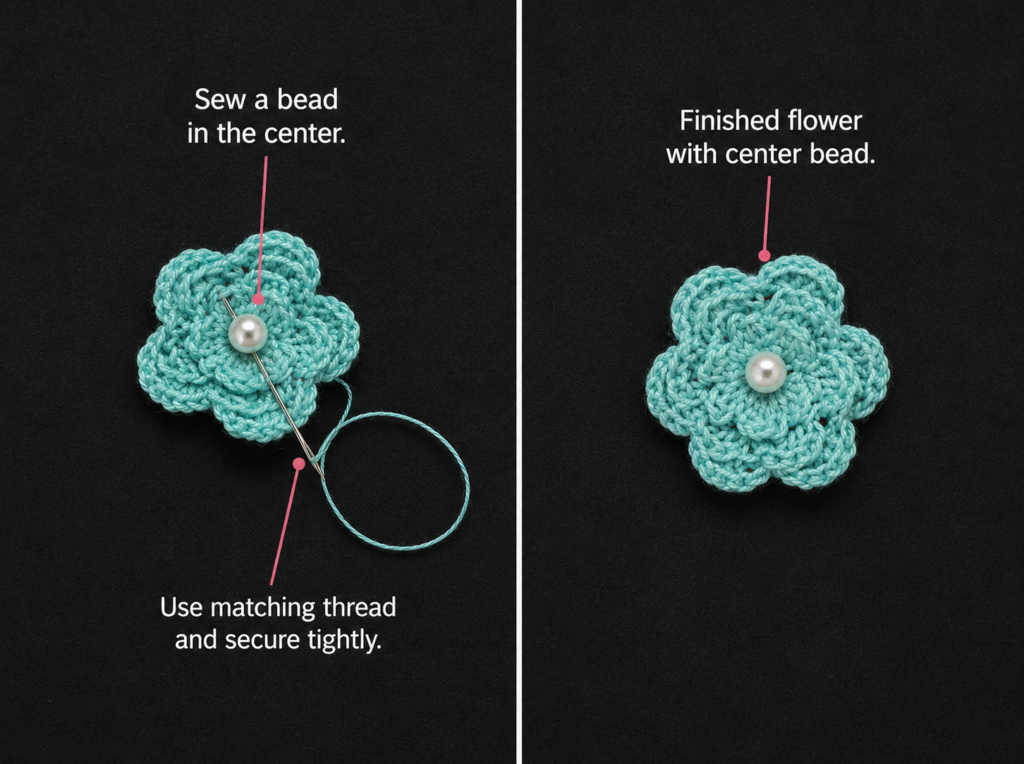
For the safest beginner version, use embroidery instead of a bead.
Thread a tapestry needle with cream or yellow cotton yarn.
Bring the needle up through the center of the flower.
Make 3–5 short stitches across the center, forming a tiny padded dot.
Secure the yarn on the back of the flower.
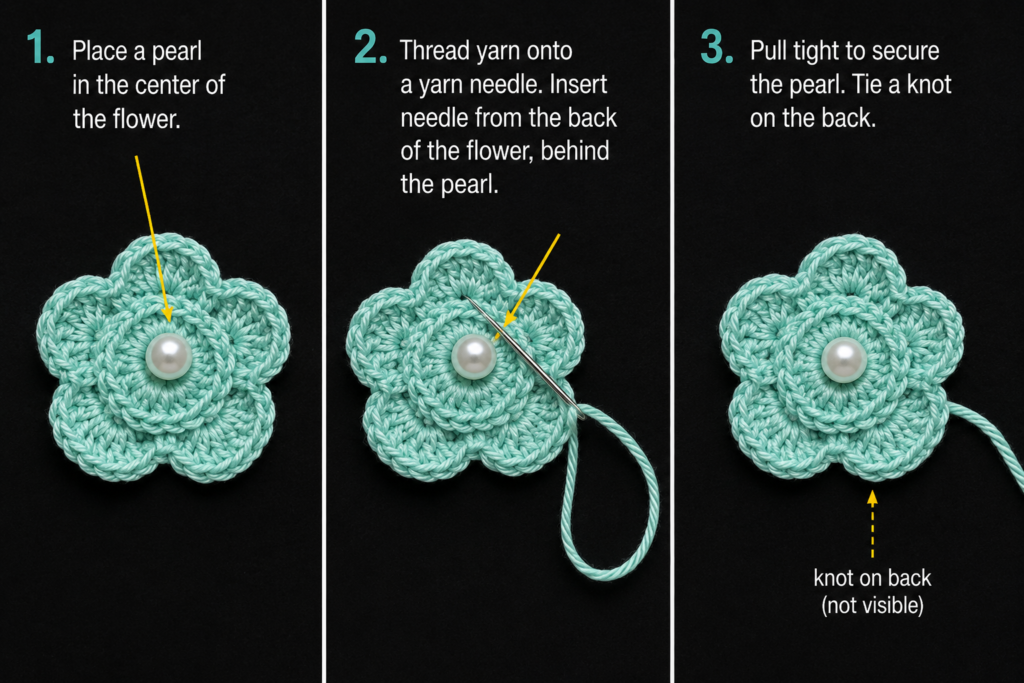
For adult-use clips only, you may sew on a small pearl bead instead. Do not use loose beads for baby or toddler accessories.
Beginner tip:
Use small stitches and pull gently. If you pull too hard, the flower center will pucker.
Common mistake to avoid:
Do not glue a bead only from the top if the clip will be used often. Sewing is more secure.
Step 6: Weave in the Ends and Shape the Flower
Turn the flower over.
Use a tapestry needle to weave each yarn tail through the back of nearby stitches.
Do not weave tails across the front of the flower.
After weaving, trim the ends close to the surface.
Now shape the petals with your fingers:
- Pull the front petals slightly upward.
- Let the back petals sit wider.
- Smooth the center.
- Check that the flower is balanced.
A small crochet flower does not need heavy blocking, but a light steam or gentle hand shaping can help if your yarn allows it.
Beginner tip:
Do not trim yarn tails before weaving. Short tails are much harder to secure.
Common mistake to avoid:
Do not block the flower completely flat if you want a dimensional hair clip.
Step 7: Attach the Flower to the Hair Clip
Cut a felt circle or oval slightly smaller than the back of the flower.
Place the clip on the wrong side of the flower.
Place the felt backing over the clip so the upper part of the clip remains usable.
Thread a sewing needle with strong matching thread.
Sew through:
- Felt backing.
- Crochet flower back.
- Around the solid part of the clip.
Repeat several times until the clip feels secure.
Tie off the thread firmly and hide the knot between the felt and crochet.
For adult-use accessories, a small amount of strong fabric glue may be added between the felt and the crochet. Sewing is still recommended for strength.
Beginner tip:
Open and close the clip before tying the final knot. Make sure you did not accidentally sew the clip shut.
Common mistake to avoid:
Do not attach the flower only at one tiny point. It may twist or pull away from the clip.
Pattern Notes or Stitch Notes
Turning chain rules
The ch 1 at the beginning of the center round does not count as a stitch.
The ch 2 sections in each petal are part of the petal shape.
Stitch count
Center: 8 sc.
First layer: 8 petals.
Back loops: 8 ch-3 spaces.
Second layer: 8 petals.
Repeat pattern
The main petal repeat is worked once into each available center stitch or back loop.
Round notes
The flower is worked in joined rounds. Join carefully at the end of each section so the flower remains neat.
Right side and wrong side
The petal side is the right side.
The side with woven ends and backing is the wrong side.
Size adjustment notes
For smaller flowers, use crochet thread and a 2.25 mm hook.
For larger beginner-friendly flowers, use sport cotton and a 2.75 mm or 3 mm hook.
Common Beginner Mistakes
1. The flower center has a hole
Fix: Pull the magic ring tail firmly before joining, then weave that tail securely through the back.
2. The petals look uneven
Fix: Count each stitch in the petal repeat. Uneven petals usually happen when one stitch is missed or one extra stitch is added.
3. The second layer is hard to find
Fix: Work the first petal layer into front loops only. The back loops must remain available.
4. The flower curls too much
Fix: Loosen your tension slightly or use a hook 0.25–0.5 mm larger.
5. The clip twists when worn
Fix: Add a felt backing and secure the flower across several points, not just the center.
6. The flower feels floppy
Fix: Use a smaller hook, cotton thread, or a light felt backing. You can also lightly starch adult-use flowers.
7. The center bead feels loose
Fix: Remove it and replace it with embroidery, especially for children’s clips.
How to Customize This Crochet Project
Yarn changes
Use size 10 crochet thread for delicate boutique clips.
Use sport cotton for a softer beginner version.
Use acrylic only if the flower still holds its shape well.
Color changes
Try:
- Pink flower with cream center.
- White flower with yellow center.
- Lavender flower with pearl-free embroidered center.
- Red flower for holiday clips.
- Pastel rainbow flower clip sets.
- School-color flower clips for back-to-school outfits.
Size changes
Make a smaller clip by using finer thread and fewer petal stitches.
Make a larger clip by using sport yarn or adding a third layer behind the second petal round.
Border options
For extra definition, work a tiny slip stitch border around the final petals in a contrast color.
Texture options
Add:
- Embroidered French-knot-style center.
- Two-color petals.
- Variegated thread.
- Felt leaf behind the flower.
- Tiny crochet leaf beside the flower.
Gift ideas
These clips work well for:
- Birthday party favors.
- Handmade stocking stuffers.
- Craft fair sets.
- Matching sibling accessories.
- Back-to-school gifts.
- Photo shoot props.
- Spring and Easter hair accessories.
Finishing Instructions
Fasten off every yarn tail cleanly.
Weave in all ends on the wrong side.
Check the back of the flower before attaching the clip.
Sew or glue a felt backing in place.
Secure the flower to the clip.
Open and close the clip several times to test it.
Check the center detail. If anything moves, resew it.
For adult-use thread flowers, light starch can help preserve the shape. For children’s clips, prioritize softness, comfort, and safety over stiffness.
Quick Printable-Style Summary
Skill level: Beginner to Easy
Finished size: About 1.5–2.5 inches wide, depending on yarn and hook.
Materials: Fine cotton yarn or crochet thread, 2.25–2.75 mm hook, snap clip or alligator clip, tapestry needle, felt backing, sewing thread, scissors.
Stitches: ch, sl st, sc, hdc, dc.
Starting method: Magic ring with 8 sc.
Flower repeat: Work front petals in the front loops, then make back chain loops and work larger petals behind them.
Center: Embroidered center recommended; bead only for adult-use clips.
Finishing: Weave in ends, shape flower, sew to clip with felt backing.
FAQ
Is this crochet flower hair clips pattern good for beginners?
Yes. The flower uses basic stitches and a small amount of shaping. The only slightly tricky part is working behind the first petal layer, but the step-by-step explanation makes it manageable.
Can I make crochet flower hair clips without a magic ring?
Yes. Ch 3 or 4, join into a ring, and work the first round into that ring. The center hole may be slightly more visible.
What yarn is best for crochet hair clips?
Cotton thread or fine cotton yarn works best because it gives clear stitch definition and holds the flower shape well.
Can I use hot glue?
You can use glue for adult accessories, but sewing plus felt backing is stronger and safer. For children’s clips, sew securely and avoid loose embellishments.
How do I make the flower smaller?
Use finer crochet thread and a smaller hook. You can also make only one petal layer.
How do I stop the flower from flopping?
Use a smaller hook, tighter cotton yarn, or add a felt backing. Light starch may help adult-use clips.
Are beads safe on children’s crochet hair clips?
Avoid beads, pearls, buttons, or any small detachable parts for babies and toddlers. Use embroidery instead.
Conclusion
This crochet flower hair clips pattern is a small project with a polished result. Once you understand the basic construction, you can make a full set in different colors, match them to outfits, prepare handmade gifts, or create simple craft fair inventory.
Start with one flower in sport cotton if you are a beginner. Then move to finer crochet thread when you want smaller, more delicate clips.
The most important finishing step is secure attachment. A pretty flower is not enough if the clip twists, pulls away, or has loose embellishments. Use a felt backing, sew firmly, and choose embroidered centers when safety matters.





