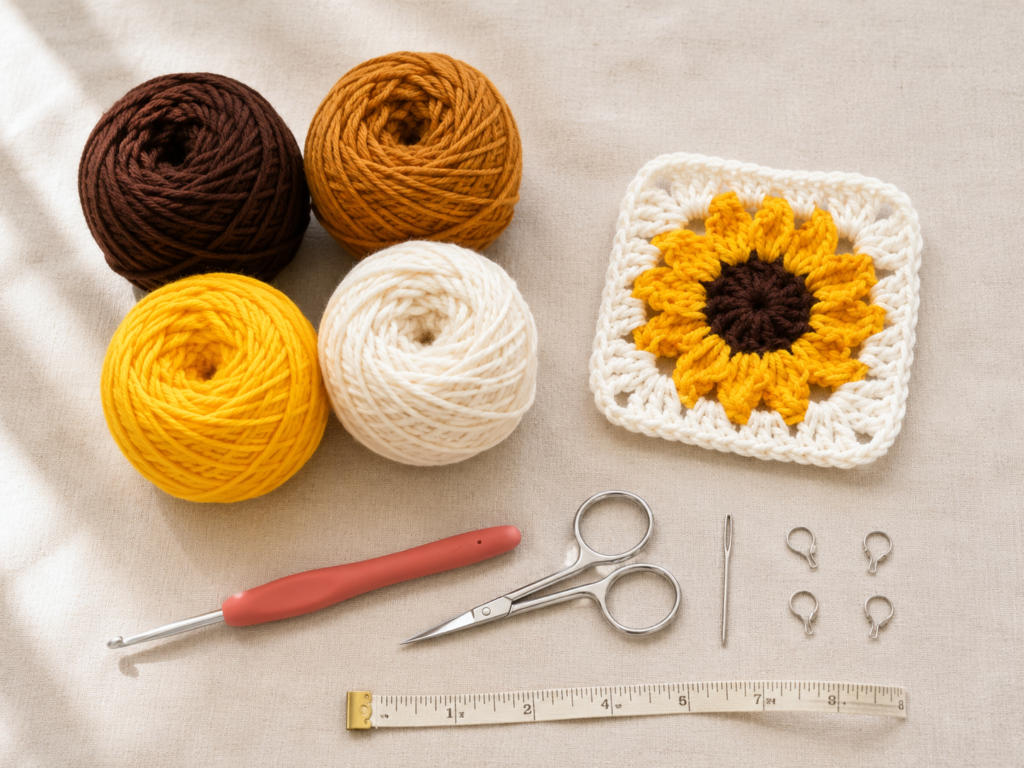
A sunflower granny square is one of those crochet motifs that looks detailed without requiring a large project commitment. You begin with a small brown circle, build two raised flower rounds, and then use carefully positioned tall stitches to transform the circular flower into a square.
This tutorial is designed for an advanced beginner who already recognizes basic crochet stitches but may be making puff stitches, clusters, or a flower-centered granny square for the first time.
The finished square has four distinct sections:
- A dense brown sunflower center
- A raised ochre ring that adds depth
- Twelve bright yellow petal clusters
- A soft cream border that converts the flower into a square
One square can become a coaster, wall decoration, pocket, bag panel, or cushion detail. A collection of matching squares can be joined into a blanket, cardigan, tote bag, table runner, or pillow cover.
The instructions below use US crochet terminology and include stitch counts, troubleshooting notes, customization options, and image placements for every major stage.
What You’ll Learn
In this tutorial, you will learn how to:
- Join a short foundation chain into a ring
- Work multiple stitches into a central opening
- Count stitch tops in a circular motif
- Attach a new yarn color cleanly
- Form raised puff stitches
- Crochet grouped petal clusters
- Identify and mark four evenly spaced corners
- Convert a circular motif into a square
- Add a stable single-crochet edging
- Fasten off and hide several color-change tails
- Block a crochet motif to an even size
Materials You’ll Need
- Medium or worsted-weight yarn in espresso brown
- Medium or worsted-weight yarn in muted ochre
- Medium or worsted-weight yarn in sunflower yellow
- Medium or worsted-weight yarn in cream
- 5 mm crochet hook
- Small scissors
- Blunt tapestry needle
- Four locking stitch markers
- Measuring tape or ruler
- Blocking mat and rust-resistant pins, optional
Use yarns that are similar in thickness and construction. A smooth yarn makes it easier to identify the tops of stitches and the open spaces between petals.
The Craft Yarn Council places worsted, afghan, and aran yarns in Category 4, although yarns in the same numbered category are not automatically interchangeable. Fiber, texture, loft, and gauge can still differ between brands.
Crochet Abbreviations Used
- ch = chain
- ch-sp = chain space
- dc = double crochet
- hdc = half double crochet
- rep = repeat
- rnd = round
- sc = single crochet
- sl st = slip stitch
- sp = space
- st/sts = stitch/stitches
- tr = treble crochet
- yo = yarn over
These abbreviations follow US terminology. The Craft Yarn Council’s abbreviation standards also document the differences between US, UK, and Canadian crochet terms.
Special Stitches
Puff Stitch
- Yarn over.
- Insert the hook into the indicated stitch.
- Yarn over and pull up a loop to approximately double-crochet height.
- Repeat Steps 1–3 twice more in the same stitch.
You should now have seven loops on the hook.
Yarn over and pull through all seven loops. Chain one to lock the puff.
The chain used to lock the puff is part of the puff construction. Any additional chain written after the puff creates the open space between two puffs.
Four-Double-Crochet Petal Cluster
- Yarn over and insert the hook into the indicated chain space.
- Yarn over and pull up a loop.
- Yarn over and pull through two loops.
- Leave the remaining loops on the hook.
- Repeat Steps 1–4 three more times in the same space.
You should now have five loops on the hook.
Yarn over and pull through all five loops. The four incomplete double crochets have now been joined into one petal cluster.
Before You Start
Finished Size
Using medium-weight yarn and a 5 mm hook, one blocked square should measure approximately 5–5.5 inches or 12.5–14 cm.
Your result may be smaller or larger depending on:
- Yarn thickness
- Hook construction
- Puff-stitch height
- Individual tension
- Blocking method
Make one sample square before calculating the number required for a large project.
Gauge and Tension
An exact garment-style gauge is not essential for a single decorative square. Consistency becomes important when several squares will be joined.
The flower should remain mostly flat after each round. A small amount of movement in the textured petal rounds is normal. Deep cupping or heavy ruffling usually indicates a tension or stitch-count issue.
How to Count the Center
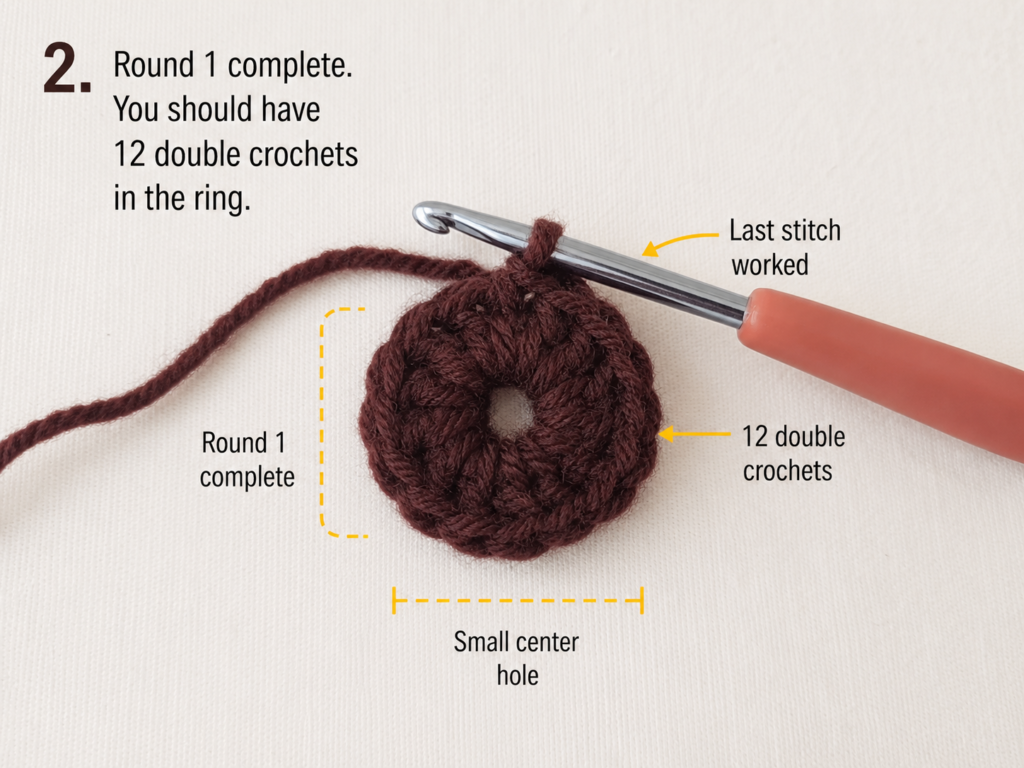
In the first round, count the V-shaped loops at the top of each half double crochet. Do not count the beginning chain as a stitch.
You should have 12 visible stitch tops before attaching the second color.
How to Count the Petals
At the end of Round 2, count 12 puff stitches.
At the end of Round 3, count:
- 12 yellow petal clusters
- 12 chain-two spaces
The cream square border is worked into the chain-two spaces, not through the tops of the yellow clusters.
How to Avoid Curling
- Keep all puff loops approximately equal in height.
- Do not pull the locking chains extremely tight.
- Count every round before fastening off.
- Use a larger hook when the motif forms a deep cup.
- Use a smaller hook when the flower develops excessive waves.
- Do not stretch the flower while adding the border.
Choosing Yarn Colors
For a traditional sunflower effect, use:
- Very dark brown for the center
- Gold or ochre for the inner raised round
- Clear yellow for the outer petals
- Cream, ivory, sage, pale blue, or white for the border
A small tonal difference between the two flower colors helps the texture remain visible.
Right Side and Wrong Side
Work every round with the right side facing you.
Do not turn the motif after joining a round. The puff and cluster texture should project toward the front.
US and UK Terminology
This tutorial uses US terms.
- US single crochet = UK double crochet
- US half double crochet = UK half treble crochet
- US double crochet = UK treble crochet
- US treble crochet = UK double treble crochet
Step-by-Step Crochet Tutorial
Step 1: Make the Foundation Ring
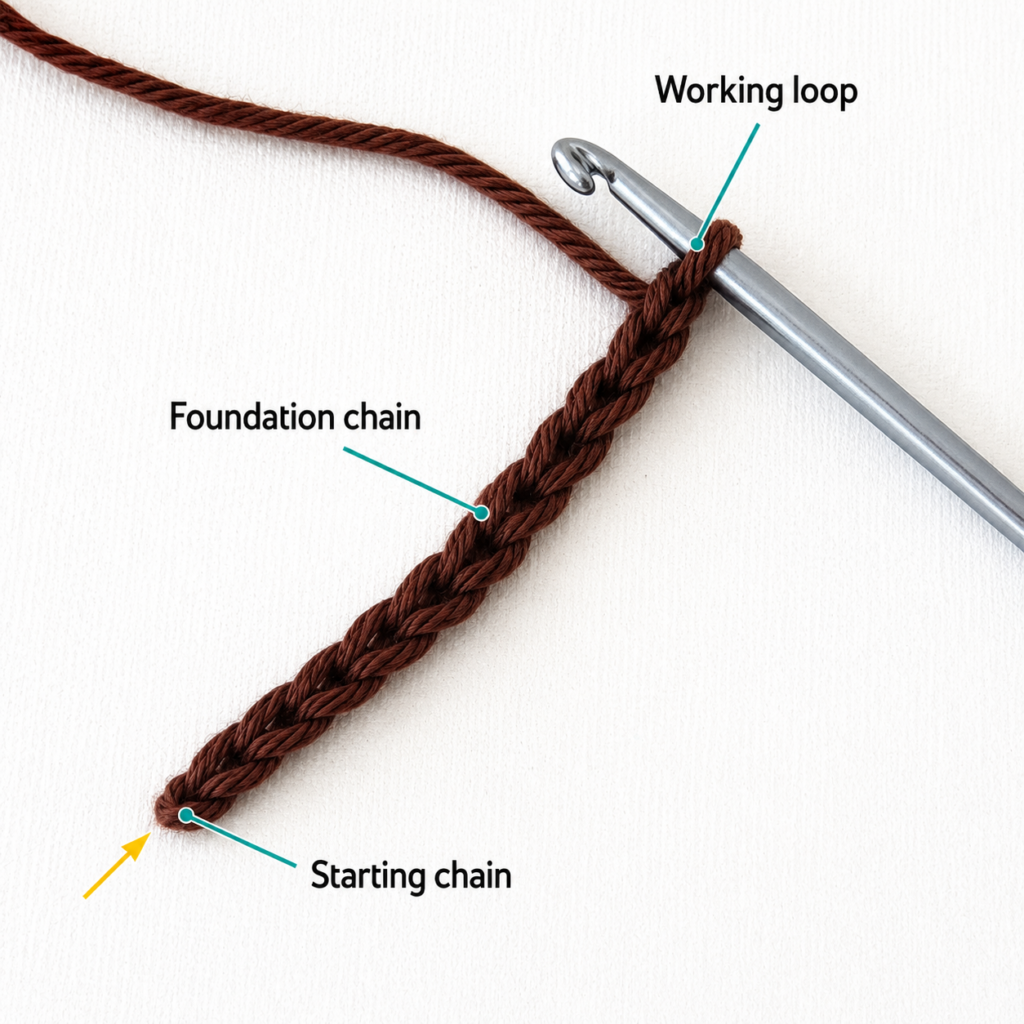
Using the espresso-brown yarn, create a slip knot and place it on the hook.
Chain four.
Hold the base of the chain between your thumb and middle finger. Bring the first chain toward the hook without twisting the chain.
Insert the hook into the first chain, yarn over, and pull the yarn through the chain and through the loop already on the hook. This slip stitch joins the chain into a small ring.
The opening may appear tight. Gently separate it with your fingers before beginning the first round.
Beginner tip:
Count four complete V-shaped chains below the loop on the hook. The working loop itself is not included in the chain count.
Common mistake to avoid:
Do not insert the hook into the slip knot. Join into the first completed chain made after the slip knot.
Step 2: Crochet the Brown Center
Chain two. This raises the hook to the correct working height but does not count as a stitch.
Work 12 half double crochet stitches into the center of the chain ring.
To make each half double crochet:
- Yarn over.
- Insert the hook through the central opening.
- Yarn over.
- Pull up a loop.
- Yarn over.
- Pull through all three loops on the hook.
Slide the completed stitches around the ring as necessary to create room.
After the twelfth half double crochet, locate the first actual half double crochet. Insert the hook through both top loops and join with a slip stitch.
Do not join into the beginning chain two.
Cut the brown yarn, leaving a tail of approximately 5–6 inches or 13–15 cm. Pull the cut tail through the final loop.
Stitch count: 12 hdc
Beginner tip:
Count the stitch tops before cutting the yarn. Correcting the count now is easier than removing several later rounds.
Common mistake to avoid:
Avoid working around only one strand of the starting chain ring. Insert the hook through the open center so the stitches enclose the complete ring.
Step 3: Attach the Ochre Yarn
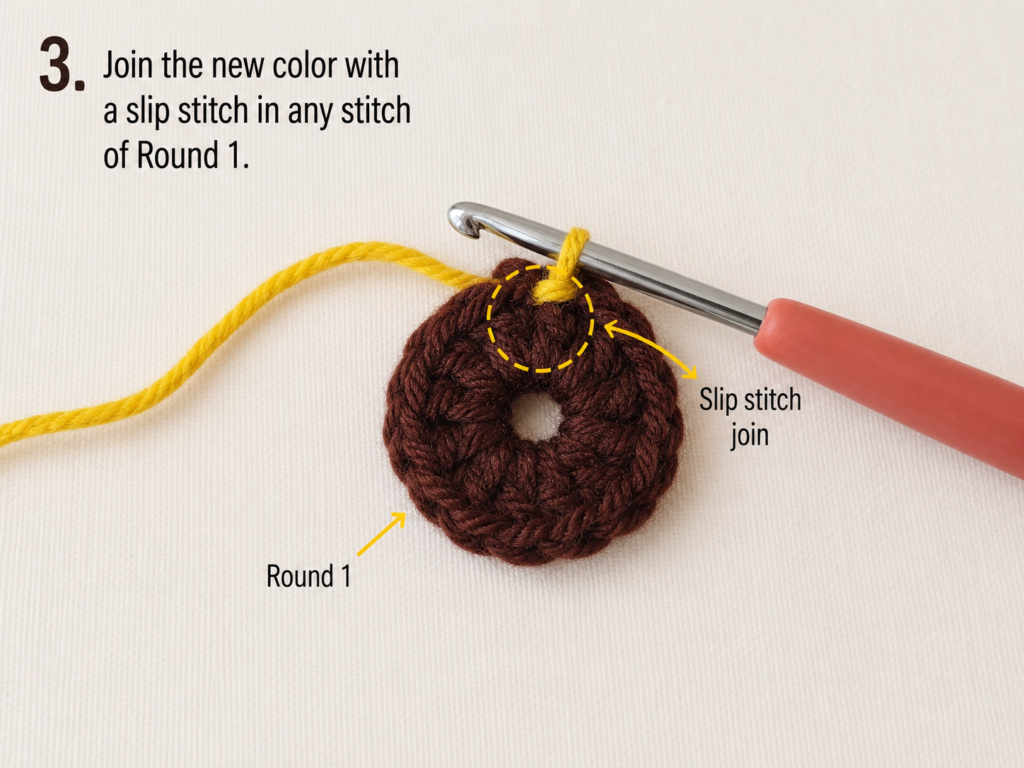
Place the brown center right-side up.
Make a slip knot with the muted ochre yarn and place it on the hook.
Insert the hook through both top loops of any brown half double crochet. Pull the ochre slip knot through the brown stitch.
Chain one to secure the new yarn. This chain does not count as a stitch.
Leave a tail long enough to weave in securely.
Beginner tip:
Attach the new yarn away from the brown round’s closing join. Separating the joins makes the back of the square less bulky.
Common mistake to avoid:
Do not work the new yarn around the vertical post of the brown stitch. Insert the hook beneath the two V-shaped loops at the top.
Step 4: Make the Puff-Stitch Round
Work one puff stitch in the same brown stitch where the ochre yarn was attached.
To form the puff:
- Yarn over.
- Insert the hook into the same brown stitch.
- Yarn over and pull up a tall loop.
- Yarn over and insert the hook into the same stitch again.
- Yarn over and pull up another tall loop.
- Repeat once more.
You should have seven loops on the hook.
Yarn over and pull through all seven loops. Chain one to lock the puff.
Chain one again to create the space between the first and second puff.
In the next brown stitch, make:
One puff stitch, chain one to lock, chain one for the space.
Continue around until one puff has been worked into each of the 12 brown stitches.
Join with a slip stitch to the top of the first puff.
Fasten off the ochre yarn.
Stitch count: 12 puff stitches and 12 ch-1 spaces
Beginner tip:
Pull every loop to approximately the same height. Consistent loop height produces evenly sized puffs.
Common mistake to avoid:
Do not count the loop already on the hook as one of the six loops pulled up through the stitch. The final total should be seven loops before closing.
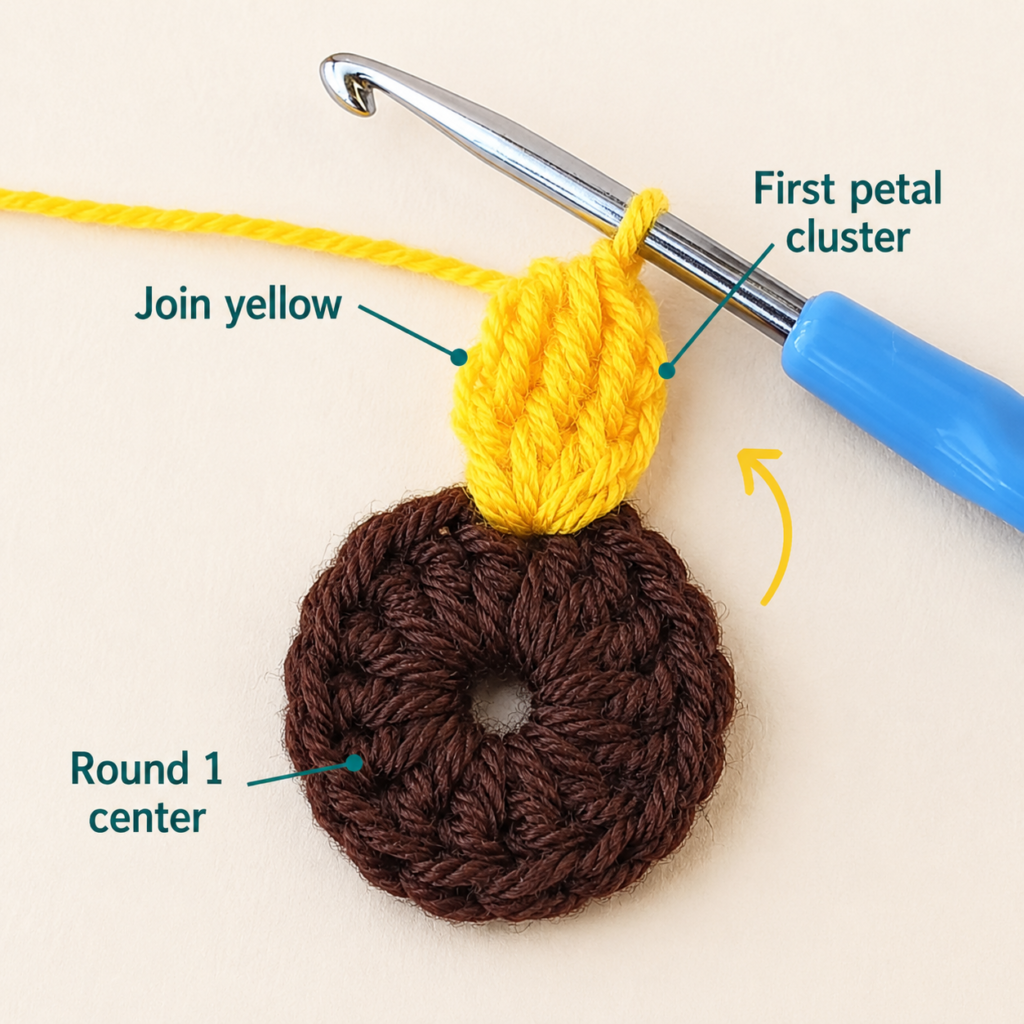
Step 5: Crochet the Yellow Petal Round
Place the flower right-side up.
Join the sunflower-yellow yarn in any chain-one space between two ochre puffs.
Chain two. This raises the yarn but does not count as a petal.
Work one four-double-crochet cluster in the same space:
- Make four incomplete double crochets in the space.
- Leave the final loop of each incomplete stitch on the hook.
- Yarn over.
- Pull through all five loops.
Chain two.
In every remaining chain-one space, work:
One four-double-crochet cluster, chain two.
Join with a slip stitch to the top of the first cluster.
Fasten off the yellow yarn.
Stitch count: 12 petal clusters and 12 ch-2 spaces
Spread the flower gently with your fingers. The raised rounds may not lie completely flat yet. The cream border will help distribute the fullness.
Beginner tip:
Count the petal clusters and chain spaces separately. You need 12 of each before beginning the border.
Common mistake to avoid:
Do not insert the hook into the top of an ochre puff. Each yellow cluster is worked into the open chain-one space between two puffs.
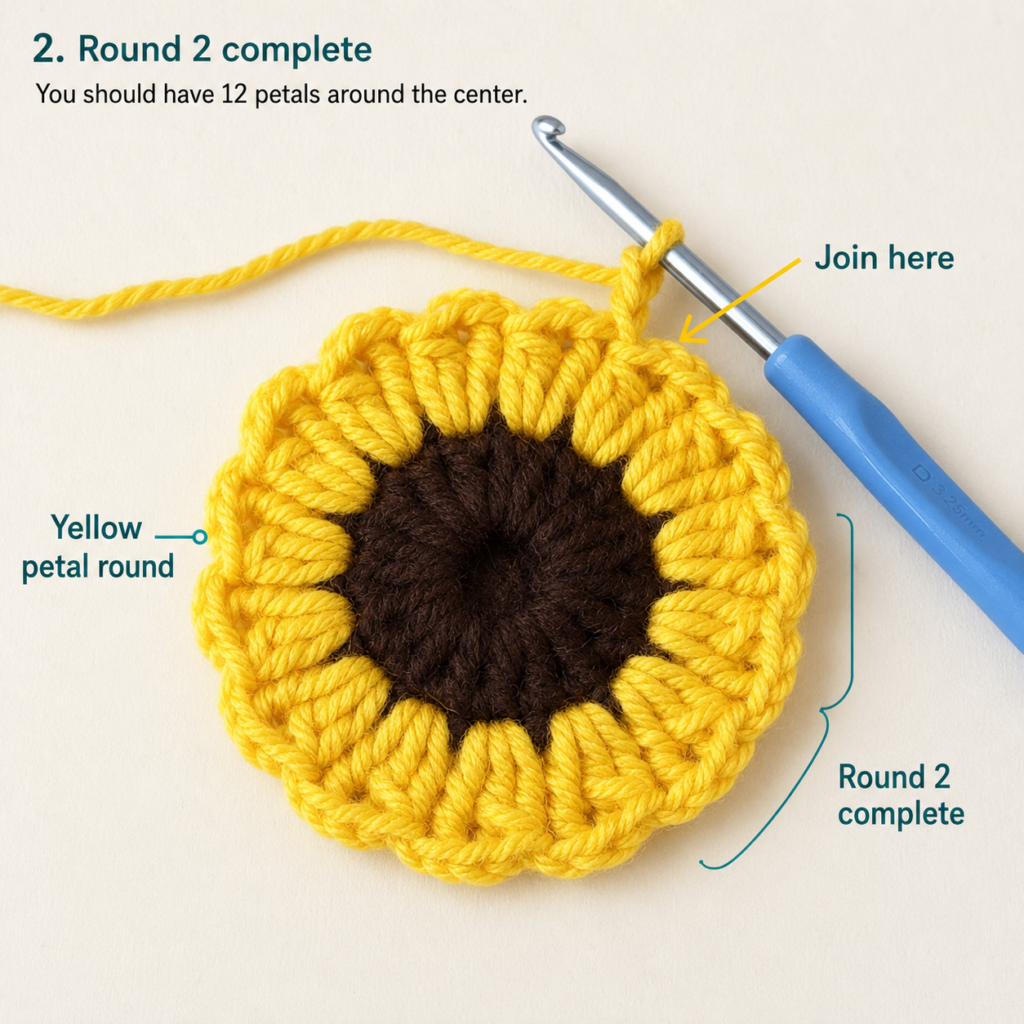
Step 6: Mark the Four Corner Spaces
Lay the flower flat with the right side facing upward.
Choose any chain-two space as the first corner and place a stitch marker in it.
Count three chain-two spaces around the flower, including the next marked position:
- Skip the next two spaces.
- Mark the third space.
Repeat until four spaces have been marked.
There should be exactly two unmarked chain-two spaces between every pair of corner markers.
The 12 spaces are now divided into:
- Four corner spaces
- Eight side spaces
- Two side spaces between each pair of corners
Beginner tip:
After placing the four markers, view the motif from above. The markers should appear at the top, right, bottom, and left of the flower.
Common mistake to avoid:
Do not mark every fourth open space after skipping three. Mark one corner, leave two spaces unmarked, and mark the next space.
Step 7: Form the First Cream Corner
Join the cream yarn in any marked corner space.
Chain four. The chain four counts as the first treble crochet.
Work two treble crochets into the same marked space.
Chain two.
Work three treble crochets into the same space.
The first corner is complete:
3 tr, ch 2, 3 tr
The tall treble crochets extend farther than the side stitches and create the outward reach required for a corner.
Beginner tip:
Pull the two groups of treble crochets gently apart after making the corner. The chain-two opening should be easy to see.
Common mistake to avoid:
Do not move to a second space after the first three treble crochets. Both groups belong in the same marked space.
Step 8: Complete the Cream Squaring Round
After the first corner, move to the next unmarked chain-two space.
Work three double crochets into that space.
Move to the following unmarked chain-two space and work three double crochets.
The next space should contain a marker. Work the next corner:
3 tr, ch 2, 3 tr
Continue around the flower using this repeat:
Corner in marked space, 3 dc in next space, 3 dc in next space.
After the fourth corner, work three double crochets in each of the final two side spaces.
Join with a slip stitch to the top of the beginning chain four.
Do not fasten off unless you want the final edging in another color.
Round 4 stitch count:
- Four corner spaces
- Six treble crochets in each corner
- Eight three-double-crochet side groups
- 24 treble crochets
- 24 double crochets
Beginner tip:
Stop after every corner and confirm that two side spaces remain before the next marker.
Common mistake to avoid:
Do not add chains between the side groups. The only chain spaces in this round are the four chain-two corners.
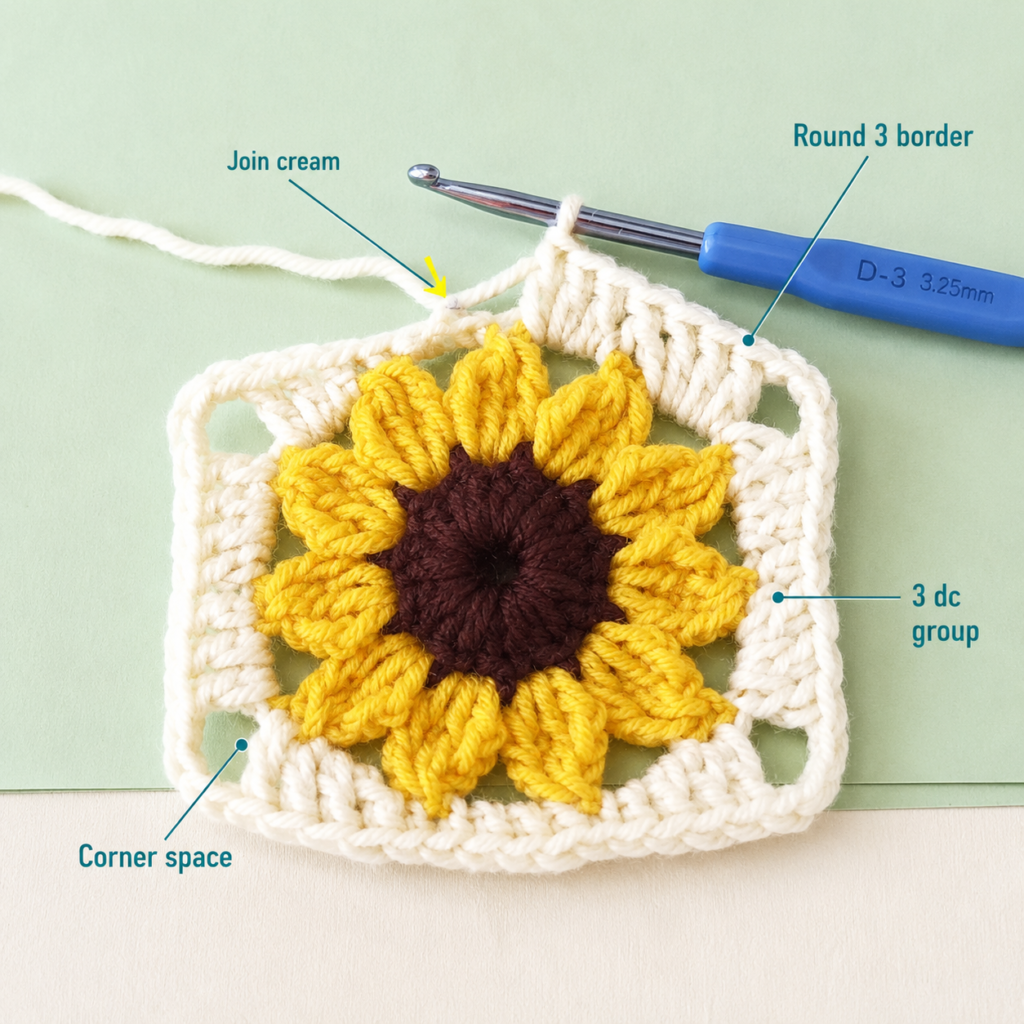
Step 9: Add the Final Single-Crochet Border
Slip stitch across the tops of the next stitches until the hook reaches a chain-two corner space.
Chain one. This chain does not count as a stitch.
In the corner space, work:
2 sc, ch 2, 2 sc
Work one single crochet into the top of every stitch along the next side.
In the following corner space, work:
2 sc, ch 2, 2 sc
Continue around the remaining sides.
Join with a slip stitch to the first single crochet.
Fasten off the cream yarn, leaving a 6-inch or 15-cm tail.
Approximate Round 5 stitch count:
- 64 single crochet stitches
- Four chain-two corner spaces
Each side should contain the same number of stitches.
Beginner tip:
Count one side before continuing. Use that number as the target for the remaining three sides.
Common mistake to avoid:
Do not place a single crochet in the closing slip stitch unless it has a normal V-shaped top and is part of the written side count.
Pattern Notes
Turning Chains
- Round 1 chain two does not count as a stitch.
- Round 2 joining chain does not count as a stitch.
- Round 3 chain two does not count as a petal.
- Round 4 beginning chain four counts as the first treble crochet.
- Round 5 beginning chain one does not count as a stitch.
Round Direction
All rounds are worked from the right side.
Do not turn after joining.
Round Counts
- Round 1: 12 hdc
- Round 2: 12 puff stitches and 12 ch-1 spaces
- Round 3: 12 petal clusters and 12 ch-2 spaces
- Round 4: 24 tr, 24 dc, four ch-2 corners
- Round 5: Approximately 64 sc and four ch-2 corners
Color Changes
Fasten off after each flower color rather than carrying the yarn behind the motif. Carrying brown or ochre yarn across the back can make dark strands visible through the yellow petal spaces.
Right Side and Wrong Side
The raised flower texture should face outward on the right side.
The wrong side will contain the fastening-off points and woven tails.
Size Adjustment
To enlarge the square, add another granny-style round outside the single-crochet edging.
In each corner, work:
3 dc, ch 2, 3 dc
Along each side, work evenly spaced groups of three double crochets. Keep the same number of groups on every side.
Measure after each additional round.
Common Beginner Mistakes
1. Joining the Starting Chain With a Twist
A twisted foundation chain makes the center awkward to fill.
Fix: Lay the four chains flat before inserting the hook into the first chain.
2. Accidentally Making 13 Center Stitches
This often happens when the beginning chain is counted as a stitch.
Fix: The chain two does not count. Make 12 complete half double crochets and join to the first actual stitch.
3. Pulling Puff Loops to Different Heights
Short and tall puffs create an uneven flower.
Fix: Draw every loop to approximately double-crochet height before closing the puff.
4. Forgetting the Space Between Puffs
Without open chain spaces, there is nowhere to place the yellow clusters.
Fix: After locking each puff, make the additional chain required for the space.
5. Working Yellow Petals Into Puff Tops
This makes the flower crowded and removes the spaces needed for the border.
Fix: Insert the hook into the open gap between two ochre puffs.
6. Creating Uneven Corners
Incorrect marker placement may produce a distorted square.
Fix: Use four markers and leave exactly two unmarked spaces between consecutive corners.
7. Adding Chains Between Side Groups
Extra chains can cause the cream round to ruffle.
Fix: Work the two three-double-crochet groups directly into their spaces without chains between them.
8. Using a Border Hook That Is Too Small
A tight border may pull the petals inward and create a cup.
Fix: Loosen the tall stitches or use a hook 0.5 mm larger for the cream rounds.
9. Trimming Yarn Tails Too Early
Short tails may loosen during use or washing.
Fix: Leave at least 5 inches and weave each tail in two or three directions before trimming.
10. Skipping Blocking
A fresh square may have rounded sides or uneven corners.
Fix: Shape it to equal measurements and allow it to dry completely before joining it to other squares.
How to Customize This Crochet Project
Change the Flower Palette
The same motif can represent other flowers simply by changing the colors.
Try:
- Burgundy center, dusty-rose puffs, blush petals
- Mustard center, cream puffs, white petals
- Plum center, lavender puffs, lilac petals
- Rust center, terracotta puffs, peach petals
- Olive center, sage puffs, ivory petals
Use Three Colors Instead of Four
Use the same yellow for Rounds 2 and 3.
The difference between the puff and cluster textures will still create depth even without a color change.
Change the Border Color
A cream border creates a soft traditional finish. Other options include:
- Sage green for a botanical appearance
- Black for high contrast
- Pale blue for a summer palette
- Rust for an autumn blanket
- Brown for a warm neutral design
- White for a clean classic project
Make the Flower Flatter
Replace each puff stitch with one half double crochet or one double crochet.
The motif will have less depth and may be easier to use in garments or bags that require a flatter surface.
Increase the Texture
Use a hook 0.5 mm larger for the puff and cluster rounds, then return to the original hook for the cream border.
Avoid making the loops excessively loose, as they may snag during use.
Enlarge the Square
Add one or more outer granny rounds.
Use the same border sequence and yarn color for every square that will be joined into the same project. Matching outer rounds simplify seaming.
Project and Gift Ideas
One sunflower square can become:
- A decorative pocket
- A small wall hanging
- A mug rug
- A coaster
- A bag flap
- A garment patch
- A framed fiber-art piece
Multiple squares can become:
- A tote bag
- A cushion cover
- A table runner
- A baby blanket
- A lap blanket
- A cardigan
- A vest
- A scarf
- A bed throw
For objects intended to handle hot cookware, select an appropriate heat-resistant fiber and construction rather than assuming every yarn is suitable for use as a potholder.
Finishing Instructions
Fastening Off
After the final slip stitch, cut the yarn approximately 6 inches from the hook.
Pull the cut end completely through the active loop.
Tighten gently. Do not pull so hard that the closing edge puckers.
Weaving In the Ends
Thread one tail through a blunt tapestry needle.
On the wrong side, pass the needle beneath the back portions of four or five stitches.
Change direction and weave beneath another group of stitches.
For additional security, change direction one more time before trimming.
Keep every tail inside stitches of the same color:
- Brown tails inside the brown center
- Ochre tails behind the puff round
- Yellow tails behind the petal round
- Cream tails inside the border
This prevents contrasting yarn ends from showing through the front.
Blocking
Place the square right-side up on a blocking mat or other pin-safe surface.
Measure all four sides.
Shape the corners until the square reaches even dimensions. Pin each corner and, when necessary, the center of each side.
Avoid stretching the raised flower completely flat.
Choose a blocking method appropriate to the fiber:
- Light misting may be sufficient for acrylic.
- Wet blocking can work well for many cotton yarns.
- Wool requires care appropriate to its label.
- Direct high heat can damage or flatten some synthetic fibers.
Allow the square to dry completely before removing the pins.
Washing and Care
Follow the care information printed on the yarn label. The Craft Yarn Council recommends retaining the label, particularly when the handmade item will be given as a gift, so the recipient knows how to wash and dry it correctly.
Quick Printable-Style Summary
Skill level: Advanced beginner
Finished size: Approximately 5–5.5 inches after blocking
Yarn: Medium or worsted-weight yarn in brown, ochre, yellow, and cream
Hook: 5 mm
Main stitches: Ch, sl st, sc, hdc, dc, tr, puff stitch, four-dc cluster
Starting method: Chain four and join into a ring
Round 1: Work 12 hdc in brown
Round 2: Work one ochre puff in each stitch, with a chain space between puffs
Round 3: Work one yellow four-dc cluster and ch 2 in every space
Round 4: Make four cream treble-crochet corners with two three-dc groups along every side
Round 5: Add an even single-crochet border with ch-2 corners
Finishing: Fasten off, weave in all tails, shape, and block
FAQ
Is this sunflower granny square suitable for a complete beginner?
The square is best for an advanced beginner who can already make chains, slip stitches, half double crochet, and double crochet. The puff and cluster stitches are explained step by step, but they require controlling several loops on the hook.
Can I use a magic ring instead of four chains?
Yes. Make a magic ring and work the 12 brown half double crochets directly into it. Tighten the center after joining the round.
Secure the magic-ring tail carefully because it supports the complete flower.
Why is my sunflower granny square curling?
Common causes include tight puff stitches, short chain spaces, a small hook, or a missing stitch.
Count every round first. When the counts are correct but the motif still cups, loosen the working tension or try a slightly larger hook.
Why is my flower ruffling?
Ruffling usually indicates excess width.
Check for:
- Extra center stitches
- Additional chain spaces
- More than 12 puff stitches
- More than 12 yellow clusters
- Chains accidentally added between cream side groups
Can I use DK yarn?
Yes. Choose a hook suitable for the yarn and expect a smaller, lighter square.
Make every square with the same yarn and hook when they will be joined.
How much yarn does one square use?
The amount varies with yarn weight, hook size, tension, and finished dimensions.
Make and weigh one complete sample square when you need an accurate estimate for a blanket or garment. Weigh the colors separately when precise purchasing quantities are required.
Do the squares need to be blocked?
Blocking is strongly recommended when multiple squares will be joined. It improves corner definition and helps bring the motifs to consistent dimensions.
Can I add more border rounds?
Yes. Add classic granny rounds, solid double-crochet rounds, or additional single-crochet edging.
Keep the increase pattern identical at all four corners and use equal stitch counts on every side.
Conclusion
This crochet sunflower granny square combines several valuable techniques in one compact motif: circular construction, color changes, raised stitches, cluster stitches, corner placement, and border shaping.
Make the first square slowly and count every round before fastening off. Once the location of the puffs, petals, and four corner spaces becomes familiar, the pattern becomes much easier to repeat.
Keep the first blocked square as your reference sample. Compare each new motif with it before joining the squares into a bag, cushion, blanket, or wearable project.





