A crochet notebook cover is one of the most practical small projects you can make when you want something useful, pretty, and beginner-friendly. It protects your notebook, adds handmade texture to your desk or school bag, and turns an ordinary journal into something personal.
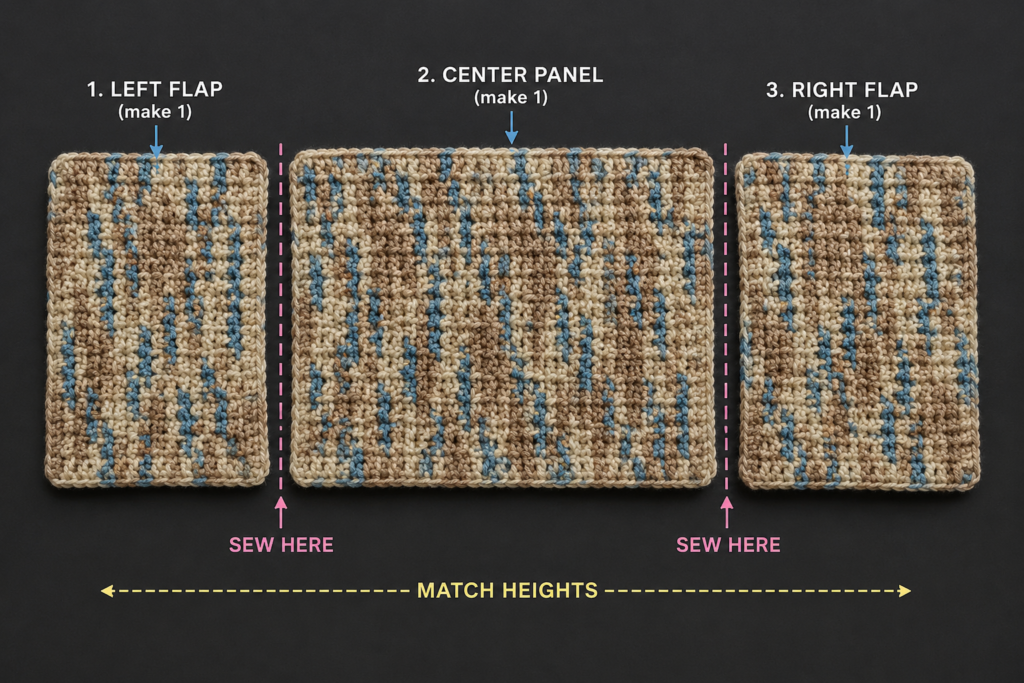
This tutorial shows you how to make a removable crochet cover for an A5 notebook, journal, planner, sketchbook, or reading notebook. The construction is simple: you crochet one flat rectangle, fold both short ends inward to make flaps, seam the top and bottom flap edges, and slide the notebook covers inside.
No complicated shaping is required. No zipper is needed. No lining is required. The project is built from beginner stitches and careful measuring.
This crochet notebook cover pattern is especially good if you want to practice:
- Making an even foundation chain.
- Crocheting straight rows.
- Counting stitches.
- Keeping edges neat.
- Measuring crochet against a real object.
- Folding and seaming crochet fabric.
- Adding a simple bookmark cord or button loop.
The selected source tutorial uses the same removable-cover concept with folded ends and seamed edges, and it includes multiple photos showing the finished cover, sizing, seams, optional strap, loop, and page-marker function. This new tutorial uses original instructions, a notebook-specific size, a different visual palette, and a simpler single-crochet fabric for beginners.
What You’ll Learn
In this tutorial, you will learn how to:
- Measure your notebook correctly before starting.
- Choose the right yarn for a notebook cover.
- Crochet a sturdy flat rectangle.
- Keep single crochet rows straight.
- Test the fit before seaming.
- Fold side flaps evenly.
- Seam the top and bottom edges.
- Add an optional bookmark cord.
- Add an optional loop or button closure.
- Customize the cover for different notebook sizes.
- Finish and care for the project.
Materials You’ll Need
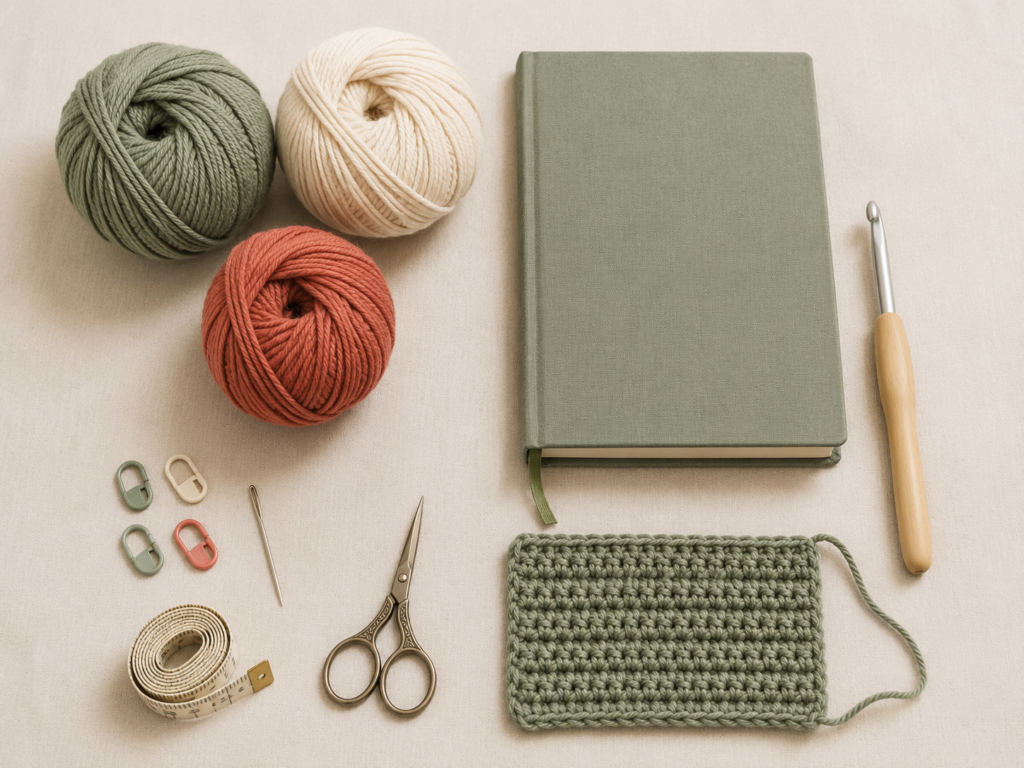
For one A5 notebook cover:
- DK or light worsted cotton yarn, approximately 120–180 yards.
- 4.0 mm / G-6 crochet hook.
- A5 hardcover notebook or journal.
- Tapestry needle.
- Scissors.
- Measuring tape.
- Four locking stitch markers or sewing clips.
- Optional small button.
- Optional contrast yarn for edging, bookmark cord, or tie closure.
Cotton or cotton-blend yarn is a smart choice for notebook covers because it stretches less than springy acrylic and helps the finished cover keep its shape. Briana K Designs makes the same practical point in a made-to-measure book-cover article, recommending cotton or cotton blend because it holds the book shape and creates crisp pocket folds.
For this tutorial, the sample palette is:
- Main color: soft sage green.
- Border color: warm cream.
- Bookmark or tie color: muted terracotta
Finished Size
This pattern is written for an A5 hardcover notebook measuring approximately:
- Height: 8.25 inches / 21 cm.
- Width of front cover: 5.75 inches / 14.5 cm.
- Spine: approximately 0.5–0.75 inch / 1.2–2 cm.
The finished flat rectangle before folding should measure approximately:
- Width: 17–18 inches.
- Height: 8.5–8.75 inches.
The final cover should fit snugly but still allow the notebook front and back covers to slide into the crochet flaps easily.
Crochet Abbreviations Used
This tutorial uses U.S. crochet terminology:
- ch = chain
- sc = single crochet
- sl st = slip stitch
- st/sts = stitch/stitches
- rep = repeat
- RS = right side
- WS = wrong side
The Craft Yarn Council lists these as standard crochet abbreviations in U.S. pattern writing.
U.S./U.K. note
This tutorial uses U.S. single crochet. In U.K. terminology, this stitch is called double crochet.
Before You Start
Measure your notebook
Close your notebook.
Use a soft measuring tape and measure:
- Across the front cover.
- Around the spine.
- Across the back cover.
Then add flap allowance.
For an A5 notebook, a practical beginner formula is:
Front cover width + spine width + back cover width + 6 inches for flaps = flat rectangle width
That means each side flap will be about 3 inches deep.
For example:
- Front cover: 5.75 inches.
- Spine: 0.75 inch.
- Back cover: 5.75 inches.
- Flap allowance: 6 inches.
Total target width:
5.75 + 0.75 + 5.75 + 6 = 18.25 inches
Crochet stretches slightly, especially with use, so a target width of about 17.5–18.25 inches works well for many A5 notebooks.
Gauge and tension
Gauge is not extremely strict because the cover is measured against your notebook as you work.
For the sample:
18 sc × 20 rows = 4 inches / 10 cm
The fabric should feel firm but flexible.
If your fabric is floppy, go down a hook size.
If it is stiff and difficult to fold, go up a hook size or relax your tension.
Beginner note
The most important part of this project is not memorizing numbers. The most important part is checking the crochet rectangle against the notebook before seaming.
Step-by-Step Crochet Tutorial
Step 1: Make the Foundation Chain
With sage-green yarn, make a slip knot.
Chain enough stitches to reach your flat rectangle width.
For many A5 notebooks with DK cotton and a 4.0 mm hook, start with:
Ch 76
This number is only a starting point. Lay the chain flat without stretching it. Compare it with the measurement around your closed notebook plus flap allowance.
If your chain is too short, add more chains.
If your chain is too long, remove a few chains.
Row 1
Sc in the second chain from the hook.
Sc in each chain across.
You should now have one fewer stitch than your beginning chain.
For example, if you chained 76, you will have 75 sc.
Beginner tip:
Keep the foundation chain relaxed. A tight chain can pull the bottom edge inward and make the cover curl.
Common mistake to avoid:
Do not stretch the chain when measuring. Crochet fabric relaxes after the first row, so measure gently.
Step 2: Crochet the Flat Rectangle
Continue in single crochet.
Row 2
Ch 1, turn.
Sc in each stitch across.
Rows 3 onward
Repeat Row 2 until the piece measures approximately the same height as your notebook plus a small allowance.
For an A5 notebook, aim for:
8.5–8.75 inches high
The cover should be just slightly taller than the notebook so the top and bottom edges are protected after seaming.
Beginner tip:
Count your stitches every few rows. If Row 1 has 75 stitches, every row should stay at 75 stitches.
Common mistake to avoid:
Missing the last stitch of the row. This is the most common reason beginner crochet rectangles become narrower.
To prevent this, place a stitch marker in the first and last stitch of every few rows.
Step 3: Check the Panel Size Before Folding
When the rectangle reaches the correct height, lay it flat.
Place your closed notebook in the center.
Fold one short end of the crochet rectangle over the front cover.
Fold the other short end over the back cover.
Each flap should be approximately 3 inches deep, but this can be adjusted.
The notebook should sit comfortably inside the folded crochet piece.
The cover should not be so tight that the notebook bends.
The cover should not be so loose that it slides around.
Beginner tip:
Use stitch markers or clips to hold the folded flaps temporarily. Do not seam yet.
Common mistake to avoid:
Seaming before test fitting. Always test the notebook inside the folded cover first.
Step 4: Fold the Side Flaps
Lay the rectangle with the wrong side facing up.
Fold the left short end inward by about 3 inches.
Fold the right short end inward by the same amount.
Place the notebook covers inside the two flaps to check the fit.
Adjust the flap depth if needed:
- If the cover feels loose, fold the flaps slightly deeper.
- If the cover feels too tight, fold the flaps slightly shallower.
- Keep both flap depths equal so the cover sits straight.
Use four stitch markers to secure:
- Top left flap corner.
- Bottom left flap corner.
- Top right flap corner.
- Bottom right flap corner.
Beginner tip:
Both folded flaps must point toward the inside of the cover. The wrong side of the crochet fabric should face the notebook.
Common mistake to avoid:
Making one flap deeper than the other. This can pull the notebook off center.
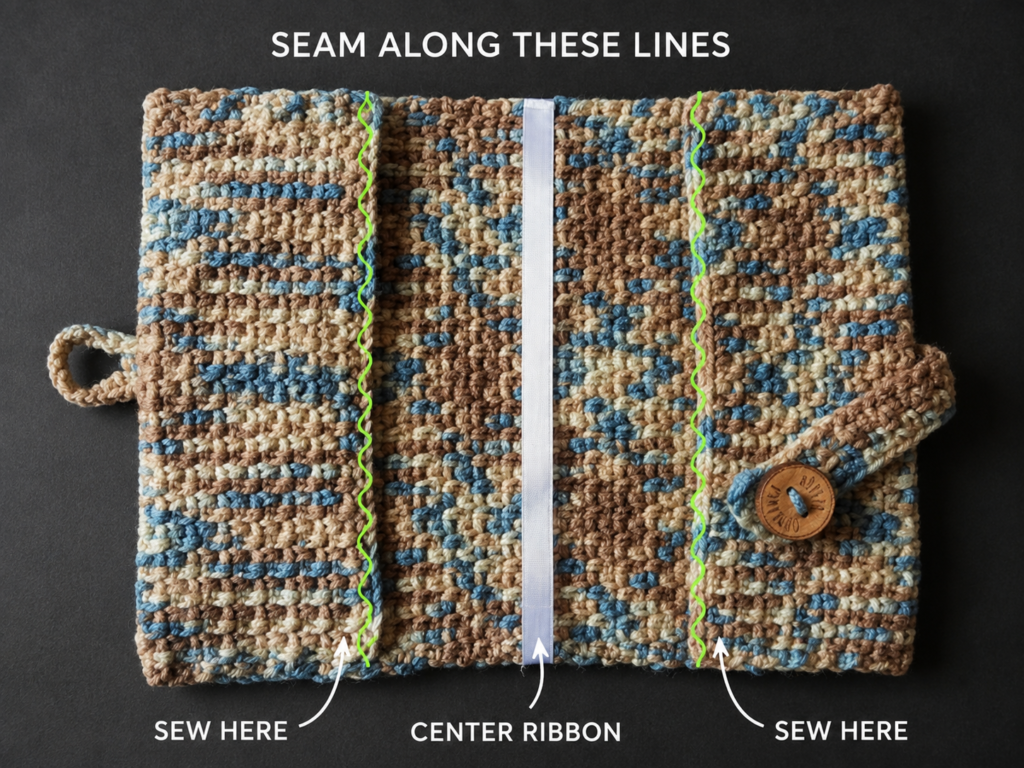
Step 5: Seam the Top and Bottom Edges
Remove the notebook before seaming.
Thread your tapestry needle with a long piece of sage yarn or warm cream contrast yarn.
Start at the top edge of one folded flap.
Sew through both layers along the flap area only.
Repeat for the bottom edge of the same flap.
Then seam the top and bottom edges of the opposite flap.
You are not closing the spine area. You are only securing the flap edges so the notebook front and back covers can slide into them.
A simple running stitch works well.
A whip stitch also works if you prefer a more visible handmade seam.
Beginner tip:
Keep your seam firm but not tight. If you pull the sewing yarn too tightly, the edge will pucker.
Common mistake to avoid:
Do not sew the entire side shut. The notebook cover must remain open enough for the notebook covers to slide into the flaps.
Step 6: Add an Optional Bookmark Cord
A bookmark cord is useful for planners, journals, reading notebooks, and school notebooks.
With muted terracotta yarn:
Ch 55–65, depending on notebook height.
For a firmer cord:
Sl st in the second chain from the hook and in each chain back across.
Fasten off, leaving a long tail.
Sew one end of the cord securely to the inside top edge near the spine.
The free end should hang down through the pages like a bookmark.
You can leave it plain or add a small tassel.
Beginner tip:
Test the cord length before sewing it permanently. It should reach past the bottom of the notebook by about 1 inch.
Common mistake to avoid:
Attaching the bookmark cord too close to the flap opening. It works best near the spine center.
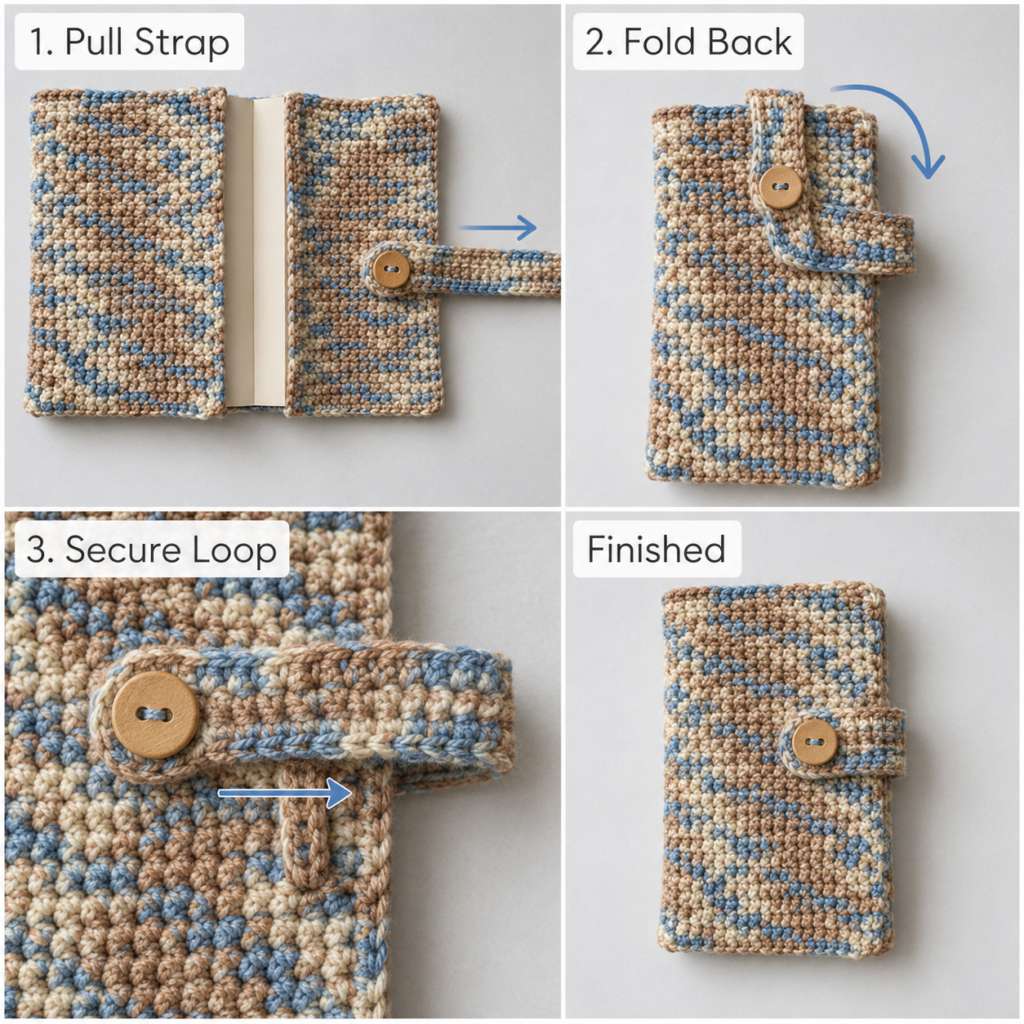
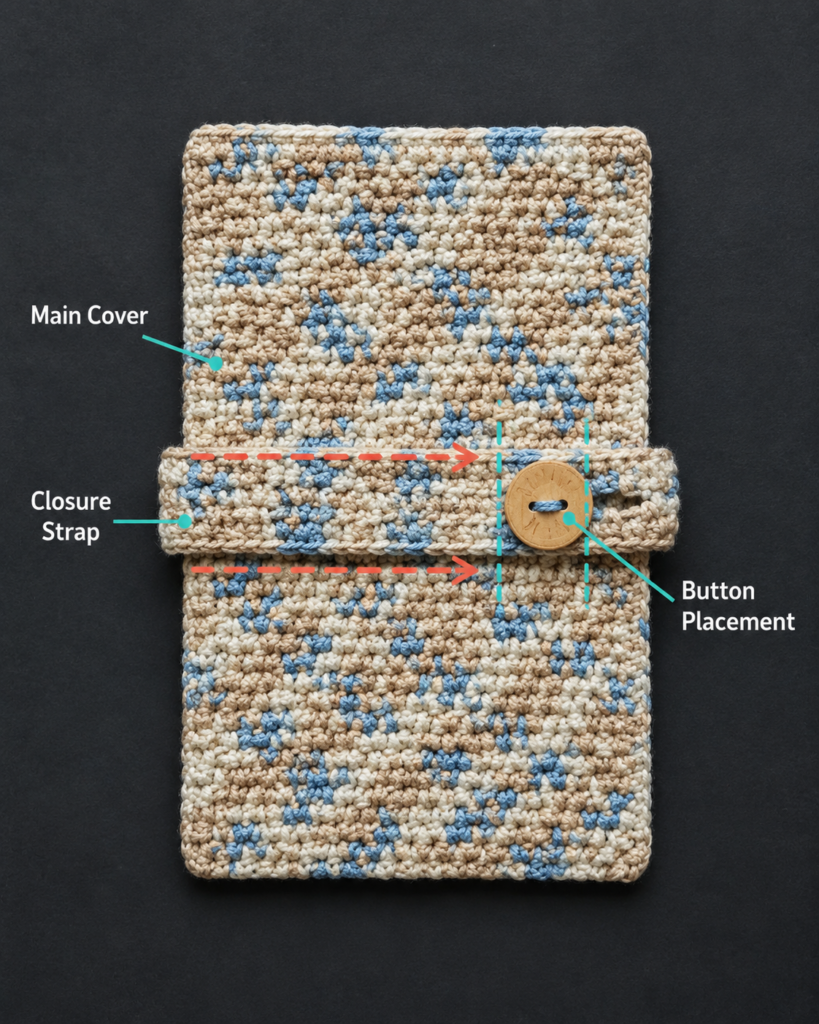
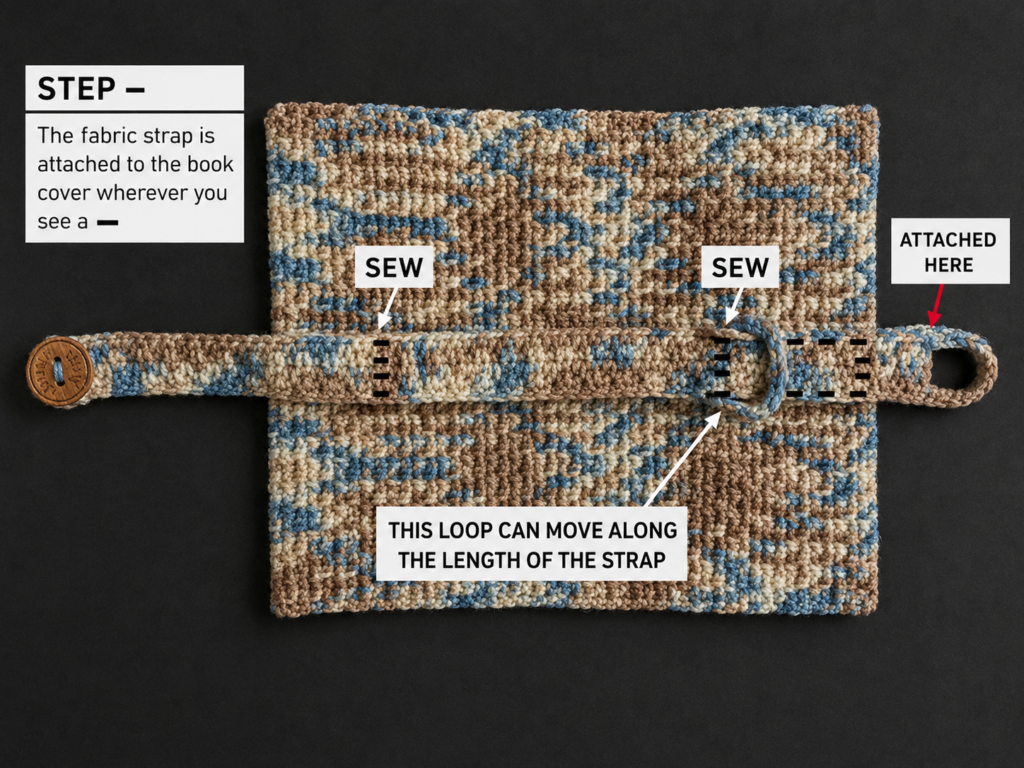
Step 7: Add a Simple Closure Loop
A closure is optional, but useful if the notebook travels in a bag.
For a button-loop closure:
- Choose the center of the front opening edge.
- Join warm cream yarn.
- Ch 10–14, depending on button size.
- Sl st back into the same edge area to form a loop.
- Fasten off and weave in ends.
- Sew a small button to the opposite edge.
For a tie closure:
- Crochet two chains, each 10–12 inches long.
- Sew one to the front opening edge.
- Sew one to the back opening edge.
- Tie them in a bow when the notebook is closed.
Beginner tip:
Before sewing on the button, wrap the loop around it to confirm the fit.
Common mistake to avoid:
Making the loop too long. A loose loop will not keep the notebook closed.
Step 8: Insert the Notebook and Check the Fit
Slide the front notebook cover into one crochet flap.
Slide the back notebook cover into the other flap.
Close the notebook.
Check the fit:
- The crochet should lie flat.
- The spine should not be pulled tight.
- The flaps should hold the notebook securely.
- The cover should not slide off when opened.
- The closure should reach comfortably.
If the cover is slightly snug, that is usually acceptable. Cotton often relaxes with use.
If the cover is too loose, remove the notebook and deepen the flaps slightly if possible.
If the cover is too tight, block it lightly or use it on a slightly smaller notebook.
Pattern Notes or Stitch Notes
Turning chain rules
The ch 1 at the beginning of each row does not count as a stitch.
Always work the first single crochet into the first stitch of the row.
Stitch count
If your first row has 75 sc, every row should have 75 sc.
Do not add stitches at the beginning or end of rows.
Repeat pattern
For the main body:
Ch 1, turn, sc in each stitch across.
Repeat until the rectangle reaches the notebook height.
Right side and wrong side
The right side is the side you want visible on the outside of the notebook.
When folding, place the wrong side facing the notebook.
Size adjustment notes
To make the cover wider, add more chains.
To make the cover taller, add more rows.
To make deeper flaps, fold in more than 3 inches on each side.
To make shallower flaps, fold in less than 3 inches on each side.
Common Beginner Mistakes
1. The rectangle narrows as you crochet
Cause: Missing the last stitch of some rows.
Fix: Use stitch markers in the first and last stitch until you can recognize the row edges easily.
2. The cover is too loose
Cause: The starting chain was too long, the hook was too large, or the flap depth was too shallow.
Fix: Deepen the folded flaps before seaming, or remake with a smaller hook.
3. The cover is too tight
Cause: The rectangle is too narrow or the flaps are folded too deeply.
Fix: Fold the flaps slightly shallower. If already seamed, use light blocking to relax the fabric.
4. The edges curl
Cause: Tight foundation chain, uneven tension, or too small a hook.
Fix: Use a relaxed chain, keep single crochet tension even, and block the rectangle before folding.
5. The flaps are crooked
Cause: One flap is deeper than the other.
Fix: Measure both folded flaps before seaming and mark all four corners.
6. The seaming puckers
Cause: Pulling the sewing yarn too tightly.
Fix: Sew firmly but gently. The seam should secure the flap without gathering the fabric.
7. The button loop is too loose
Cause: Too many chains in the loop.
Fix: Remove and remake the loop with fewer chains.
How to Customize This Crochet Project
Yarn changes
Cotton gives the cleanest structure.
Acrylic can work, but it may stretch more.
For a soft planner cover, try a cotton-acrylic blend.
For a firmer sketchbook cover, use worsted cotton with a slightly smaller hook.
Color changes
Try:
- Sage green with cream edging.
- Navy with mustard closure.
- Dusty pink with ivory border.
- Terracotta with oatmeal edging.
- School colors.
- Rainbow stripes.
- Neutral beige for a minimalist journal.
Size changes
This pattern can fit:
- A5 notebook.
- Composition notebook.
- Bullet journal.
- Planner.
- Sketchbook.
- Paperback book.
- Small reading journal.
Always measure the exact notebook first.
Border options
A border is optional, but it makes the cover look more finished.
Simple border idea:
Join contrast yarn at any corner.
Work single crochet evenly around the outer edge.
Place 3 sc in each corner.
Join with sl st and fasten off.
Texture options
After making the beginner version, try:
- Moss stitch.
- Back-loop-only single crochet.
- Herringbone half double crochet.
- Lemon peel stitch.
- Simple stripes.
- Surface slip-stitch lines.
Gift ideas
A crochet notebook cover makes a strong handmade gift for:
- Teachers.
- Students.
- Journal lovers.
- Readers.
- Writers.
- Planner users.
- Back-to-school gifts.
- Crochet market products.
Add a matching pencil pouch or bookmark for a complete set.
Finishing Instructions
After the notebook fits correctly:
- Weave in all yarn ends with a tapestry needle.
- Check the inside of both flaps for loose tails.
- Secure the bookmark cord and closure loop.
- Sew on the button if using one.
- Lightly block the cover if the edges curl.
- Let the cover dry completely before placing it on the notebook.
To block cotton, lightly mist the crochet fabric, shape it flat, and let it dry. Do not stretch the cover aggressively because it needs to remain fitted.
For washing, remove the cover from the notebook first. Hand wash gently in cool water, press out extra water in a towel, and dry flat. Avoid tumble drying unless your yarn label says it is safe.
Quick Printable-Style Summary
Project: Crochet Notebook Cover Pattern
Skill level: Beginner to Easy
Finished size: Custom fit for A5 notebook or journal
Yarn: DK or light worsted cotton/cotton blend
Hook: 4.0 mm / G-6
Stitches: Chain, single crochet, slip stitch
Starting method: Foundation chain measured to notebook wrap width plus flap allowance
Main repeat: Ch 1, turn, sc in each stitch across
Construction: One flat rectangle folded inward at both short ends
Flaps: Approximately 3 inches deep on each side
Seaming: Seam top and bottom of each folded flap
Optional details: Bookmark cord, tie closure, button loop, contrast border
Finishing: Weave in ends, test fit, block lightly, remove cover before washing
FAQ
Is a crochet notebook cover good for beginners?
Yes. This version is very beginner-friendly because the main body uses only chain and single crochet. The only extra skills are measuring, folding, seaming, and weaving in ends.
What yarn is best for a crochet notebook cover?
Cotton or cotton-blend yarn is best because it holds shape better than very stretchy yarn. A notebook cover needs structure so it does not sag or slide off.
Can I make this pattern for any notebook size?
Yes. Measure your notebook from front cover across the spine to the back cover, then add flap allowance. Crochet the rectangle to that width and to the notebook height.
Do I need a button closure?
No. The cover works without a closure if the flaps fit snugly. A button loop, tie closure, or bookmark cord is optional.
Why is my crochet cover too loose?
The starting chain may be too long, your hook may be too large, or the flaps may not be deep enough. Try folding the flaps deeper before seaming.
Why does my rectangle look crooked?
You may be adding or losing stitches at the row edges. Count each row and use stitch markers at the first and last stitches.
Can I sell finished crochet notebook covers from this tutorial?
Yes, you can sell finished items made from your own work. Do not republish this article, the source article, or any source images as your own pattern.
Conclusion
This crochet notebook cover pattern is simple, practical, and easy to customize. Once you understand the basic construction, you can make covers for school notebooks, journals, planners, sketchbooks, reading logs, and teacher gifts.
Start with one solid-color version so you can focus on measuring, straight edges, folding, and seaming. After that, try stripes, contrast borders, button loops, appliqués, embroidered initials, or a matching pencil pouch.
The key is fit. Measure carefully, test before seaming, keep both flaps equal, and do not rush the finishing. A cleanly fitted crochet notebook cover can turn a plain notebook into a handmade project you will actually use.





