A crochet spider web looks intricate, but the construction is surprisingly simple. Once you understand how the center, spokes, and chain arches work together, the web becomes a relaxing sequence of repeated stitches.
This beginner crochet spider web pattern starts with a small center ring. Twelve double crochet posts form the straight spokes, while increasingly long chain sections create the circular threads between them. You will work continuously outward in joined rounds, adding only two chains to each space as the web grows.
The result is a lightweight Halloween decoration that can be stretched across a window, pinned to a wall, used as a table accent, added to a wreath, or blocked into a freestanding motif.
This tutorial uses an original 12-spoke construction. Twelve spokes give the web a balanced, rounded appearance and provide plenty of attachment points for shaping.
What You’ll Learn
- How to make and close a magic ring
- How to crochet evenly spaced web spokes
- How to count long chain sections accurately
- How to join lace rounds without twisting them
- How to enlarge the web while preserving the repeat
- How to attach optional hanging strands
- How to block and shape open crochet lace
Project Details
Tutorial type: Round motif and decorative project
Skill level: Beginner
Finished size: Approximately 10–12 inches across when stretched
Estimated time: 60–90 minutes
Construction: Joined rounds worked from the center outward
Standard number of spokes: 12
Gauge: Not critical
Materials You’ll Need
Yarn
Use approximately 40–55 yards of smooth DK-weight yarn.
Cotton is an excellent choice when you want the web to hold a blocked shape. Acrylic also works well when the web will be tied directly to a window, doorway, wreath, or frame.
Avoid highly textured yarn for your first web. Bouclé, eyelash yarn, and thick fuzzy fibers can hide the stitch tops and make the long chain sections difficult to count.
Hook
Use a 4 mm/G-6 crochet hook.
A slightly larger hook creates looser, more open chains. A smaller hook creates a compact web that may require stronger blocking.
Additional Supplies
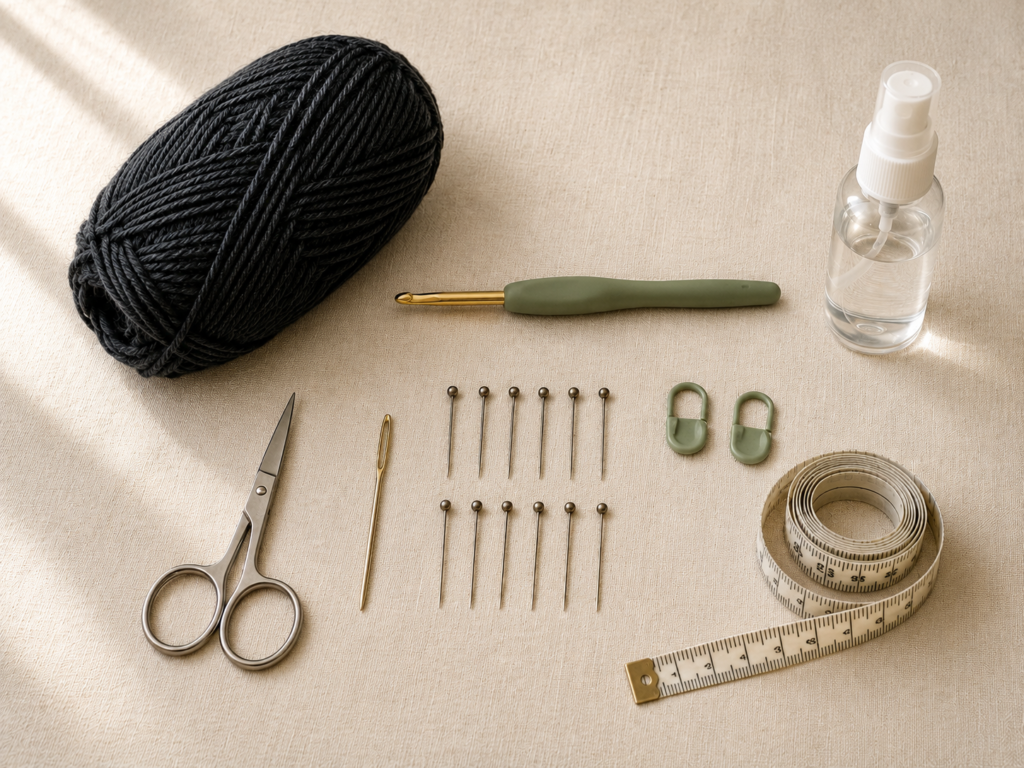
- Small scissors
- Blunt tapestry needle
- Two locking stitch markers
- Measuring tape
- Twelve rustproof blocking pins
- Blocking mat or folded towel
- Spray bottle of clean water
- Optional fabric stiffener
- Optional extra yarn for anchor ties
Crochet Abbreviations Used
This pattern uses US crochet terminology.
- ch = chain
- dc = double crochet
- rep = repeat
- rnd = round
- sc = single crochet
- sl st = slip stitch
- sp = space
- st/sts = stitch/stitches
US and UK Terminology Note
A US single crochet is called a UK double crochet.
A US double crochet is called a UK treble crochet.
The word “treble” is not used in the written pattern below. All instructions are written in US terms.
Before You Start
The Anatomy of the Web
This web has three basic parts:
- The compact single-crochet center
- Twelve double-crochet spokes
- Long chain sections connecting one spoke to the next
Every double crochet in a new round is worked directly into the double crochet below it. This vertical alignment keeps the spokes straight.
The chain sections become two chains longer in each new round:
- Round 2: chain 2
- Round 3: chain 4
- Round 4: chain 6
- Round 5: chain 8
- Round 6: chain 10
Gauge and Tension
Gauge is flexible because the web is decorative rather than fitted. Your tension still affects its appearance.
Keep the double crochet posts reasonably firm so the spokes remain straight. Work the chains with relaxed, even tension. Tight chain stitches can pull the spokes inward and produce a bowl-shaped motif.
When making a long chain, slide each completed chain onto the full shaft of the hook rather than tightening it around the narrow hook throat.
How to Count the Chains
Count the V-shaped links along the front of the chain.
For longer spaces, count in groups:
- Count four, pause
- Count the next four
- Add the remaining two if making a chain-10 space
A locking marker can be placed in the fifth chain of a chain-10 section while you learn the repeat.
How to Find the Next Spoke
Do not work into the large chain space.
Look for the solid vertical double crochet post from the previous round. Insert the hook under both top loops of that stitch.
Should the Beginning Chain Count as a Stitch?
Yes. The first three chains at the beginning of every open round count as the first double crochet. The remaining beginning chains form the first chain space.
For example:
- A beginning chain 5 equals one double crochet plus a chain-2 space.
- A beginning chain 9 equals one double crochet plus a chain-6 space.
Right Side and Wrong Side
Do not turn the work. Keep the same side facing you throughout the project.
The side facing you while crocheting is treated as the right side.
Beginner Note
A loose, ruffled, or flower-like web before blocking is normal. The structure becomes much clearer when the spokes are gently stretched outward.
Step-by-Step Crochet Tutorial
Step 1: Make the Center Ring
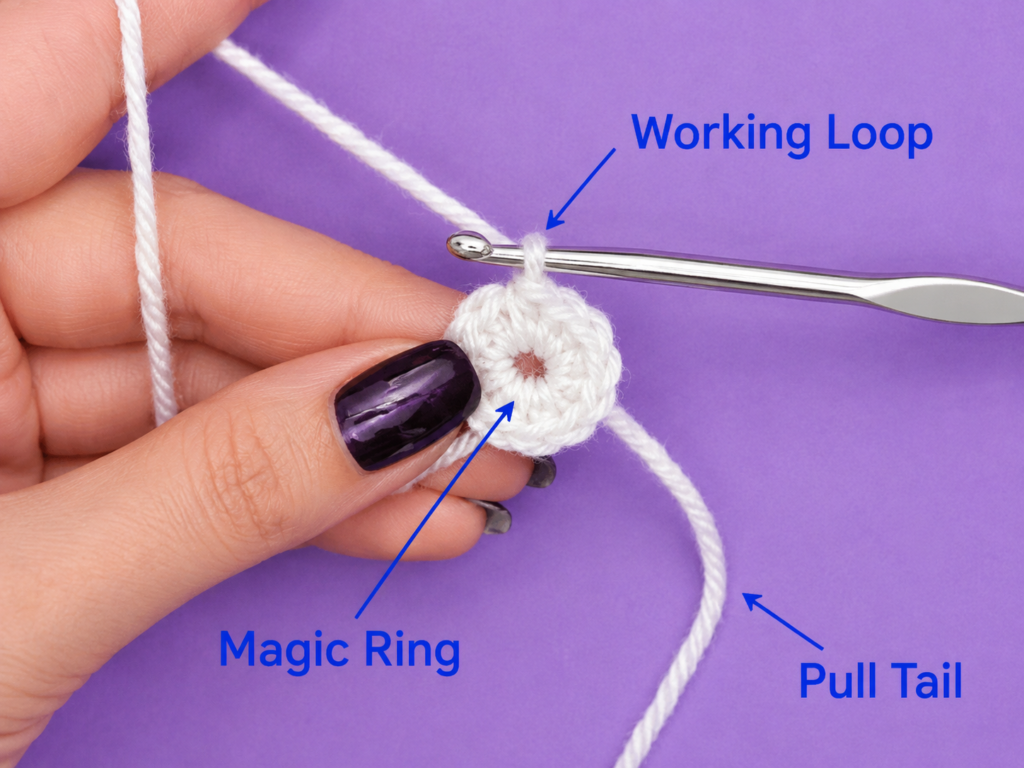
Form a magic ring.
Chain 1. This chain does not count as a stitch.
Work 12 single crochet stitches into the ring. Pull the yarn tail slowly until the center closes. Join with a slip stitch to the first single crochet.
Stitch count: 12 single crochet
Place a stitch marker in the first stitch before joining when the stitch tops are difficult to see.
Beginner tip:
Hold the base of the stitches between your thumb and index finger while tightening the tail. This keeps the single crochet stitches from twisting around the ring.
Common mistake to avoid:
Do not pull the center tail so aggressively that the yarn breaks. Close the ring gradually and stop when the opening disappears.
Step 2: Create the First Ring of Openings
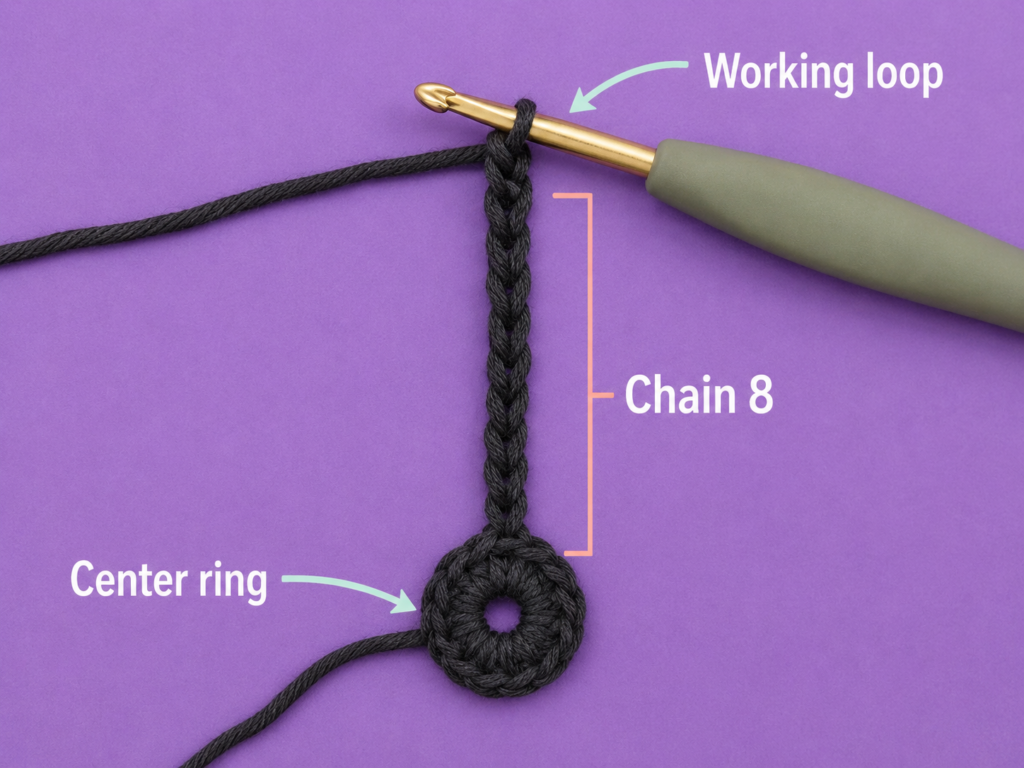
Chain 5.
The first three chains count as the first double crochet. The final two chains create the first chain-2 space.
Work one double crochet into the next single crochet. Chain 2.
Continue around:
Double crochet in the next single crochet, chain 2.
Repeat that sequence until every center stitch has a double crochet worked into it.
Join with a slip stitch to the third chain of the beginning chain 5.
Stitch count: 12 double crochet and 12 chain-2 spaces
The double crochet posts are the first visible spokes of the web.
Beginner tip:
Count the posts rather than the open spaces. You should see 12 solid posts, including the beginning chain that represents the first post.
Common mistake to avoid:
Do not work two double crochet stitches into one center stitch. Each of the 12 center stitches receives only one double crochet.
Step 3: Add the Chain-4 Round
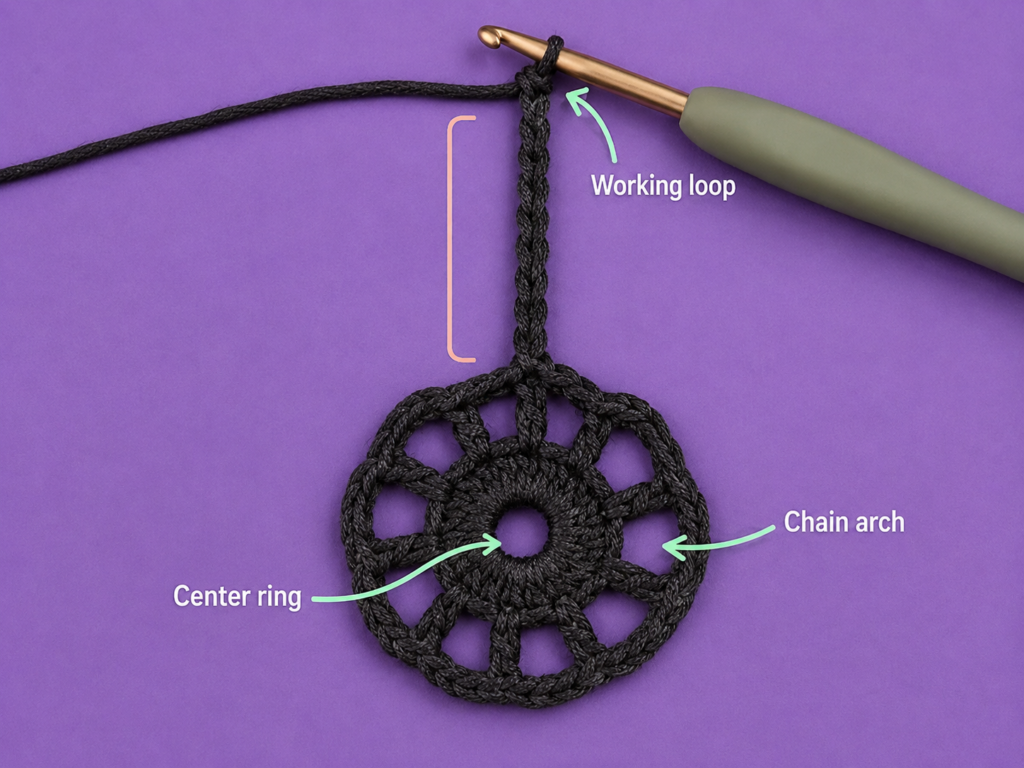
Chain 7.
The first three chains count as one double crochet, and the final four chains form the first chain-4 space.
Locate the next double crochet post from Round 2. Work one double crochet into the top of that post. Chain 4.
Continue around:
Double crochet in the next double crochet, chain 4.
Join with a slip stitch to the third chain of the beginning chain 7.
Stitch count: 12 double crochet and 12 chain-4 spaces
Check the alignment before continuing. Every new double crochet should sit directly above a double crochet from the previous round.
Beginner tip:
Spread the motif on the table after every three or four repeats. This makes it easier to notice a skipped spoke before the round is complete.
Common mistake to avoid:
Do not place the double crochet in the chain-2 spaces. Working into the spaces causes the spokes to drift sideways.
Step 4: Add the Chain-6 Round
Chain 9.
The first three chains count as a double crochet. The following six chains form the first chain space.
Work one double crochet into the next double crochet post. Chain 6.
Repeat around:
Double crochet in the next double crochet, chain 6.
Join with a slip stitch to the third chain of the beginning chain 9.
Stitch count: 12 double crochet and 12 chain-6 spaces
The web may begin to ripple slightly. Do not reduce the number of chains to make it lie flat. The longer chains are needed to provide enough width between the expanding spokes.
Beginner tip:
After joining, count the 12 spokes again. Catching a missing post now is easier than discovering it after two additional rounds.
Common mistake to avoid:
Avoid pulling the slip-stitch join too tightly. A tight join makes the first spoke shorter than the others.
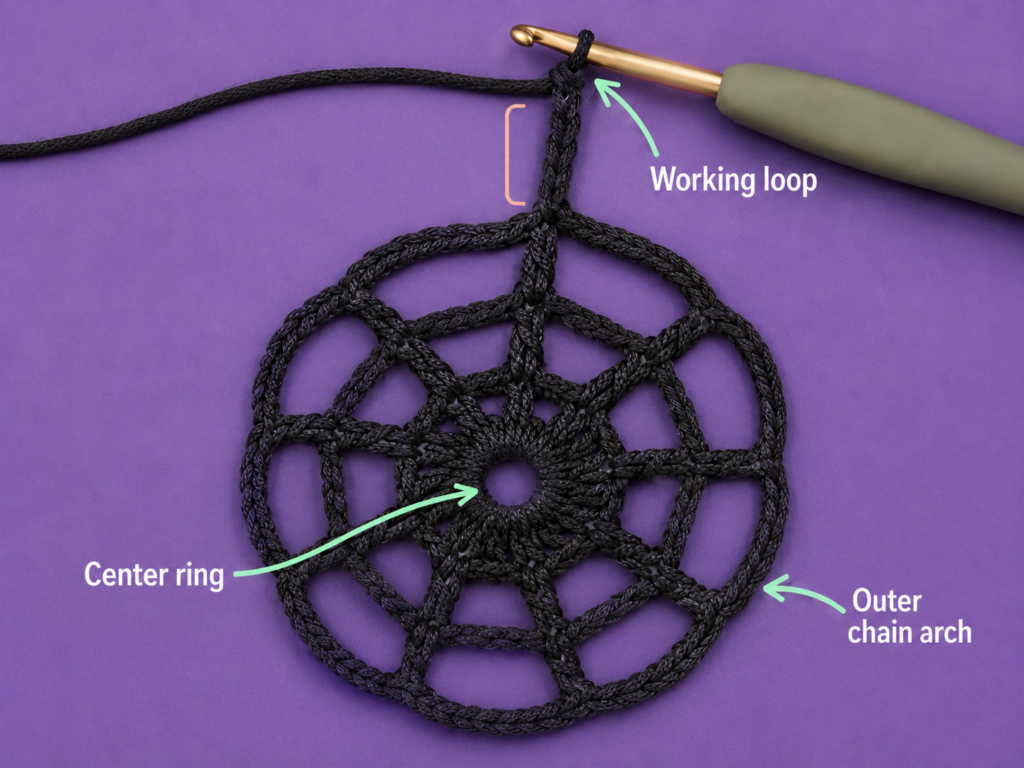
Step 5: Add the Chain-8 Round
Chain 11.
The first three chains count as the initial double crochet. The remaining eight chains form the first chain-8 space.
Work one double crochet in the next double crochet post. Chain 8.
Repeat around:
Double crochet in the next double crochet, chain 8.
Join with a slip stitch to the third chain of the beginning chain 11.
Stitch count: 12 double crochet and 12 chain-8 spaces
At this stage, the project should be recognizable as a web even though the chain sections remain relaxed.
Beginner tip:
Lay each chain section flat before working the next double crochet. Check that the chain has not twisted around itself.
Common mistake to avoid:
Do not tighten the eighth chain immediately before making the double crochet. That final chain needs the same height as the others.
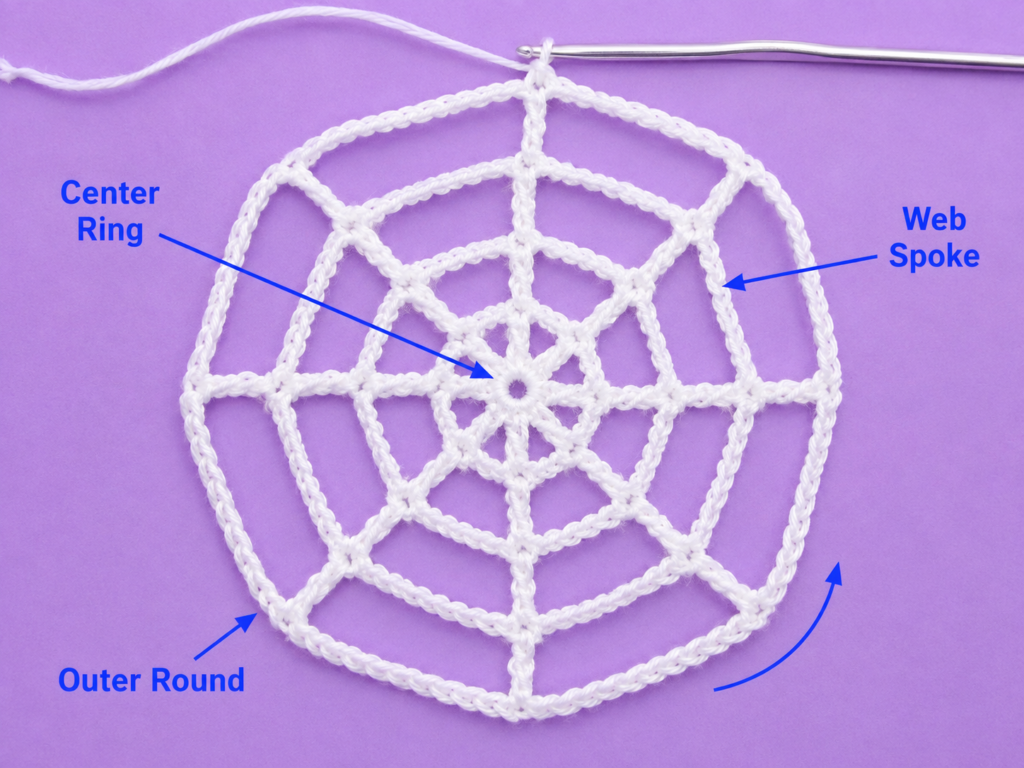
Step 6: Add the Chain-10 Round
Chain 13.
The first three chains count as the first double crochet. The final ten chains form the first chain-10 space.
Work one double crochet in the next double crochet post. Chain 10.
Continue around:
Double crochet in the next double crochet, chain 10.
Join with a slip stitch to the third chain of the beginning chain 13.
Stitch count: 12 double crochet and 12 chain-10 spaces
This completes the standard-size web.
Measure it without pulling first. It may look smaller than the expected finished measurement. The diameter increases once the spokes are stretched or blocked.
Beginner tip:
Count long chains in two groups of five. This is faster and more reliable than restarting the count from the hook each time.
Common mistake to avoid:
Do not accidentally insert the hook into the first chain of the chain section when making the next double crochet. Follow the spoke downward until you locate the solid stitch top.
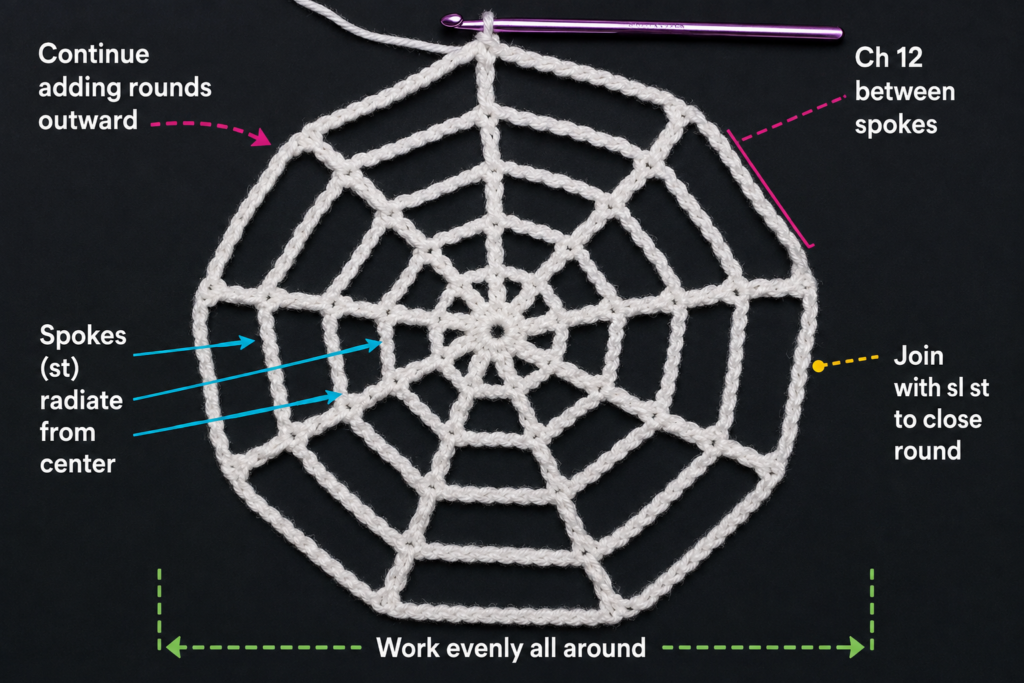
Step 7: Make the Web Larger
For a larger web, continue the same progression.
Optional Round 7
Chain 15. This counts as one double crochet and a chain-12 space.
Work one double crochet into the next double crochet. Chain 12.
Repeat around and join to the third chain of the beginning chain 15.
Stitch count: 12 double crochet and 12 chain-12 spaces
Optional Round 8
Chain 17. This counts as one double crochet and a chain-14 space.
Work one double crochet into the next double crochet. Chain 14.
Repeat around and join to the third chain of the beginning chain 17.
Continue adding two chains to each space for every new round.
A much larger web may need additional anchor points along the outer chain sections so the arches do not sag excessively.
Beginner tip:
Write the chain count for the current round on a removable stitch marker tag.
Common mistake to avoid:
Do not add more spokes in later rounds. The pattern remains at 12 double crochet posts regardless of the web’s diameter.
Step 8: Fasten Off and Secure the Ends
After joining the final round, cut the working yarn and leave a tail approximately 6 inches long.
Pull the cut end completely through the active loop. Tug gently to secure the final knot.
Thread the tail onto a tapestry needle. Weave it under several stitches along the nearest spoke. Reverse direction and weave through several additional stitches before trimming the excess.
Repeat with the center tail.
Do not weave the center tail through open chain sections. Hide it inside the compact single crochet center instead.
Beginner tip:
Weave in the ends before blocking. The stitches are easier to handle while the web remains relaxed.
Common mistake to avoid:
Do not cut the tail directly beside the fastening knot. A very short tail can slip free when the web is stretched.
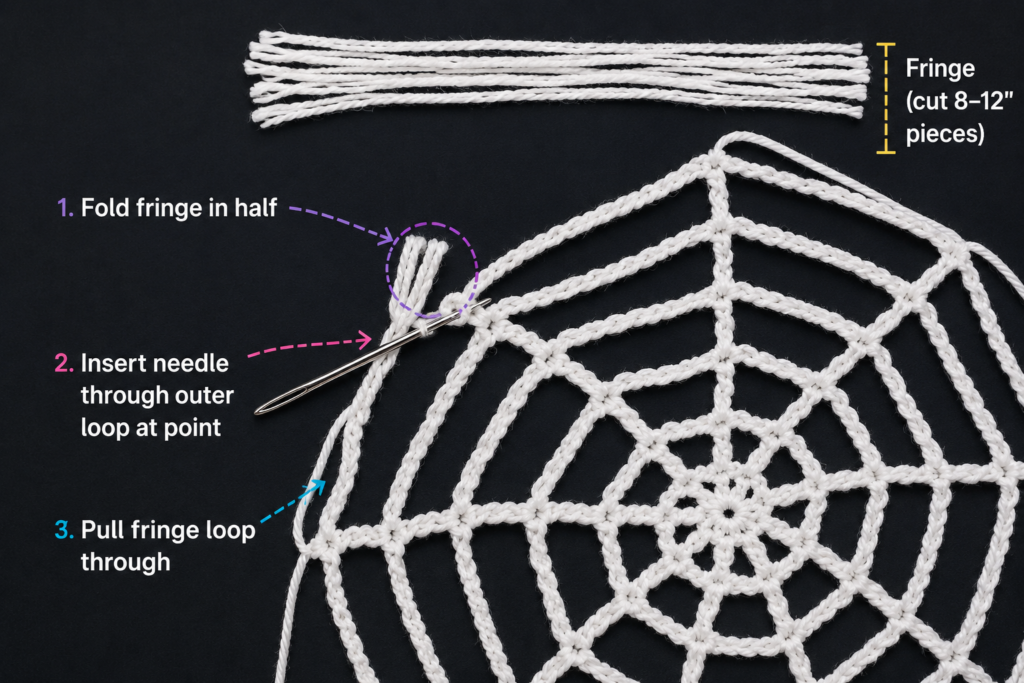
Step 9: Add Optional Anchor Strands
Anchor strands allow you to stretch the web across a window, frame, wreath, doorway, or wall.
Cut 12 yarn strands of equal length. A length of 12–18 inches works for most displays.
Attach one strand to the top of every outer double crochet post. Use a lark’s-head attachment or pass the strand through the post with a tapestry needle and tie a secure knot.
Keep all knots facing the back.
After attaching the first four strands, place them at approximately 12, 3, 6, and 9 o’clock. Add the remaining ties between those points.
Beginner tip:
Attach opposite strands in pairs. This keeps the web centered and prevents one side from becoming distorted.
Common mistake to avoid:
Do not attach an anchor strand to the middle of a long chain section unless the web is extremely large. Pulling directly on a chain can stretch individual stitches unevenly.
Step 10: Block or Stretch the Web
Method 1: Stretch It in Place
Tie four opposite anchor strands first. Apply gentle, equal tension.
Attach the remaining strands one pair at a time. Step back frequently and check that the center remains in the middle.
This method works well for windows, frames, and temporary Halloween displays.
Method 2: Wet Block It
Place the web in cool water and allow the fibers to become fully damp. Lift it without twisting.
Press it between two clean towels to remove excess water.
Place the web on a blocking mat. Pin the 12 outer double crochet posts at equal distances. Begin with four opposite points and then fill in the spaces between them.
Adjust the chain arches so each one follows a similar curve.
Allow the web to dry completely before removing the pins.
Optional Stiffening
For a freestanding ornament, apply a small amount of fabric stiffener according to its manufacturer’s instructions. Test the product on a yarn sample first, particularly when using dark or hand-dyed yarn.
Beginner tip:
Use a measuring tape to confirm that opposite points are the same distance from the center.
Common mistake to avoid:
Do not pull one anchor strand to its final tension before securing the opposite side. Uneven tension can permanently distort the center.
Pattern Notes or Stitch Notes
Beginning-Chain Rules
The first three chains of each open round count as one double crochet.
The chains after those first three form the first chain space:
- Chain 5 = double crochet plus chain 2
- Chain 7 = double crochet plus chain 4
- Chain 9 = double crochet plus chain 6
- Chain 11 = double crochet plus chain 8
- Chain 13 = double crochet plus chain 10
Join each round to the third chain, not to the topmost chain.
Stitch Count
Every open round contains:
- 12 double crochet posts
- 12 chain spaces
The number of stitches in each chain space changes, but the number of spokes does not.
Repeat Pattern
After the first open round, every standard round follows the same structure:
- Make a beginning chain that represents the first double crochet and first chain space.
- Work one double crochet into the next double crochet.
- Make the required number of chains.
- Repeat around.
- Join to the third beginning chain.
Round Direction
Work continuously in the same direction. Do not turn after joining.
Right and Wrong Side
Because the project is not turned, one side remains facing you. This is the right side.
The finished web can be displayed from either side once the yarn ends are hidden.
Size Adjustment
Add one new round for every additional 1½–2 inches of stretched diameter, depending on the yarn and tension.
Increase each new chain space by two chains.
For a smaller web, stop after Round 4 or Round 5.
Common Beginner Mistakes
1. Working Into a Chain Space Instead of a Spoke
Problem: The vertical lines lean or zigzag.
Fix: Undo the misplaced stitch and work the double crochet into the top of the solid double crochet post below.
2. Losing a Spoke
Problem: The round ends with only 11 double crochet posts.
Fix: Count the posts after every round. Remember that the beginning chain counts as one post.
3. Adding an Extra Spoke at the Join
Problem: The web has 13 posts and one narrow section near the join.
Fix: Do not work another double crochet into the base of the beginning chain unless the instructions explicitly require it.
4. Tight Chain Sections
Problem: The web curls inward or resembles a shallow bowl.
Fix: Relax the chain tension or use a hook 0.5 mm larger for the chain rounds.
5. Uneven Chain Counts
Problem: Some outer sections are noticeably shorter.
Fix: Count each chain section immediately after making it. Use a marker at the midpoint of long chain sections.
6. Joining to the Wrong Chain
Problem: The first spoke looks twisted or too tall.
Fix: Join to the third chain of the beginning chain, which represents the top of the first double crochet.
7. Pulling Too Hard During Blocking
Problem: The center becomes stretched and the surrounding rings lose their circular shape.
Fix: Add tension gradually and always adjust opposite points together.
8. Trimming Ends Before Testing the Shape
Problem: A short end begins to loosen when the web is stretched.
Fix: Leave at least 6 inches for weaving and test the finished tension before trimming closely.
How to Customize This Crochet Project
Change the Yarn
Crochet Thread
Use crochet thread and a small steel hook for delicate ornaments, earrings, greeting-card embellishments, or miniature window webs.
DK Yarn
DK yarn produces a lightweight decoration with clearly visible stitches. This is the recommended beginner option.
Worsted-Weight Yarn
Worsted yarn creates a bold, highly visible web for doors, large wreaths, classrooms, or outdoor covered displays.
Bulky Yarn
Bulky yarn can produce a dramatic installation, but the center may become heavy. Use a larger hook and stronger anchor ties.
Change the Color
Traditional colors include black, white, gray, and silver.
Other effective combinations include:
- Cream yarn for neutral fall decor
- Neon green for children’s Halloween decorations
- Deep purple for a gothic color palette
- Metallic silver for a frosted-web effect
- Glow-in-the-dark yarn for evening displays
- Rust orange for autumn wreaths
Change the Size
Stop after Round 4 for a small motif.
Complete Round 6 for a medium wall decoration.
Add two or more optional rounds for a large window web.
For an oversized web, add extra support strands to selected outer chain sections.
Add a Border
A border is optional because the open chain edge already suits the web shape.
Possible border treatments include:
- One slip stitch in every outer chain
- One single crochet in every outer chain
- Small picots at the 12 spoke points
- Contrasting-color single crochet around the outer edge
A dense border adds weight, so test it on a small web first.
Add Texture
For a raised center, work the first round in back-loop-only single crochet.
For thicker spokes, replace each spoke double crochet with a front-post double crochet around the post below. This is more suitable for intermediate crocheters.
For a sparkling effect, hold a thin metallic thread together with the main yarn.
Display and Gift Ideas
Use the completed web as:
- Window decor
- Halloween bunting
- A wreath insert
- Table decor
- A wall hanging
- A photo-booth backdrop element
- Classroom Halloween decor
- A gift topper
- A costume accessory
- A handmade party decoration
A small crochet spider can be sewn to one of the outer rings, but avoid using detachable small pieces on items intended for babies or young children.
Finishing Instructions
Fastening Off
Pull the cut yarn through the final loop and tighten it gently.
Weaving in Ends
Use a blunt tapestry needle.
Weave the outer tail back and forth through the nearest spoke. Weave the center tail through the compact single crochet stitches.
Changing direction while weaving helps secure a slippery yarn end.
Shaping
Choose between:
- Stretching with anchor strands
- Wet blocking with pins
- Blocking followed by fabric stiffener
Washing and Care
For washable yarn, hand wash the web in cool water. Support the entire motif when lifting it from the water.
Do not wring or twist it.
Reshape it on a blocking mat and allow it to dry flat.
A stiffened web may not be fully washable. Follow the stiffener manufacturer’s care instructions.
Storage
Store the web flat between sheets of clean tissue paper or loosely rolled around a cardboard tube. Avoid folding sharply across the center because repeated creasing can distort the spokes.
Quick Printable-Style Summary
Skill level: Beginner
Finished size: Approximately 10–12 inches stretched
Materials: DK yarn, 4 mm hook, scissors, tapestry needle, blocking pins
Stitches: Chain, single crochet, double crochet, slip stitch
Starting method: Magic ring with 12 single crochet
Round 2: 12 double crochet separated by chain-2 spaces
Round 3: 12 double crochet separated by chain-4 spaces
Round 4: 12 double crochet separated by chain-6 spaces
Round 5: 12 double crochet separated by chain-8 spaces
Round 6: 12 double crochet separated by chain-10 spaces
Repeat for larger size: Add two chains to every chain space in each additional round
Finishing: Fasten off, weave in ends, attach optional anchor ties, and block or stretch evenly
FAQ
Is this crochet spider web pattern suitable for complete beginners?
Yes. The project uses four basic techniques: chain, single crochet, double crochet, and slip stitch. A beginner should already know how to hold the yarn and make a basic chain before starting.
Why does my crochet spider web look like a flower?
The chain arches remain rounded and relaxed before tension is added. Stretching the spokes or blocking the motif changes the rounded arches into a more recognizable web structure.
Can I start without a magic ring?
Yes. Chain 4 and join with a slip stitch to form a small ring. Work the 12 single crochet stitches into that ring.
The chain-ring opening will be slightly larger than a tightly closed magic ring.
What yarn makes the most realistic spider web?
Smooth sport-weight, DK-weight, or crochet thread creates fine, clearly defined strands. Cotton holds its blocked shape particularly well, while acrylic is flexible and convenient for tied installations.
Can I make the spider web bigger?
Yes. Continue adding rounds while keeping 12 double crochet spokes.
Add two chains to each chain space in every new round:
- Chain 12
- Chain 14
- Chain 16
- Chain 18
Continue the progression until the web reaches the desired size.
Does the spider web have to be blocked?
Blocking is strongly recommended for a web that will lie on a table or hang without tension.
Blocking is optional when every outer spoke will be tied directly to a support. The anchor strands can shape the web while it is displayed.
How can I make a corner spider web?
Work only part of the circular repeat in turned rows.
Begin with a small ring and create five spokes rather than 12. Increase the chain length between the spokes in each new row. Pin the two straight edges into a right-angle corner and stretch the curved chains between them.
Why are my spokes not straight?
A spoke becomes crooked when a double crochet is worked into a chain space or into the wrong post. Each double crochet must be placed directly into the double crochet below it.
Conclusion
This crochet spider web pattern is built from a simple repeat: one double crochet on every spoke and increasingly long chains between the spokes. The construction stays consistent from the first open round to the final edge, making it easy to enlarge once the basic rhythm becomes familiar.
The project is also forgiving. A relaxed web that appears uneven on the hook can become clean and geometric after careful blocking or balanced tension from its anchor strands.
Use charcoal yarn for traditional Halloween decor, cream cotton for a softer autumn style, or metallic thread for a delicate ornament. Save the tutorial with your seasonal crochet patterns so the same structure can be adapted into small motifs, garlands, wreath inserts, and large window decorations.





