A pointed witch hat is one of those small crochet projects that instantly feels like Halloween. Even before you add a buckle, a spiderweb, or a crooked tip, the familiar cone-and-brim shape makes the project easy to recognize.
This beginner-friendly crochet witch hat pattern creates a freestanding miniature hat that you can use as an ornament, garland decoration, pumpkin topper, amigurumi accessory, party favor, or seasonal shelf decoration.
The design is worked from the pointed top downward. Slow, controlled increases form the cone without creating sudden bumps. A front-loop round then changes the direction of the fabric so that the brim extends outward instead of continuing downward. Finally, a separately crocheted band, an embroidered buckle, and an optional bent point give the hat its finished character.
The tutorial includes complete stitch counts, troubleshooting notes, customization guidance, and step-by-step image placements. The written pattern below is original and does not reproduce the row sequence from the visual reference article.
What You’ll Learn
By completing this project, you will practice:
- Starting a three-dimensional project with a magic ring
- Working single crochet in continuous rounds
- Marking and counting rounds accurately
- Distributing increases around a tapered shape
- Crocheting through the front loop only
- Using half double crochet to expand a brim
- Making a fitted crochet band
- Embroidering a simple rectangular buckle
- Bending and securing a whimsical crooked point
- Blocking a small crochet project into shape
Finished Size
Using category 4 medium-weight yarn and a 3.5 mm hook, the finished hat should measure approximately:
- Height: 5–5½ inches or 12.5–14 cm
- Brim diameter: 5–5½ inches or 12.5–14 cm
- Cone circumference at base: Approximately 6–6½ inches or 15–16.5 cm
Your result may be slightly larger or smaller depending on the yarn fiber and your tension.
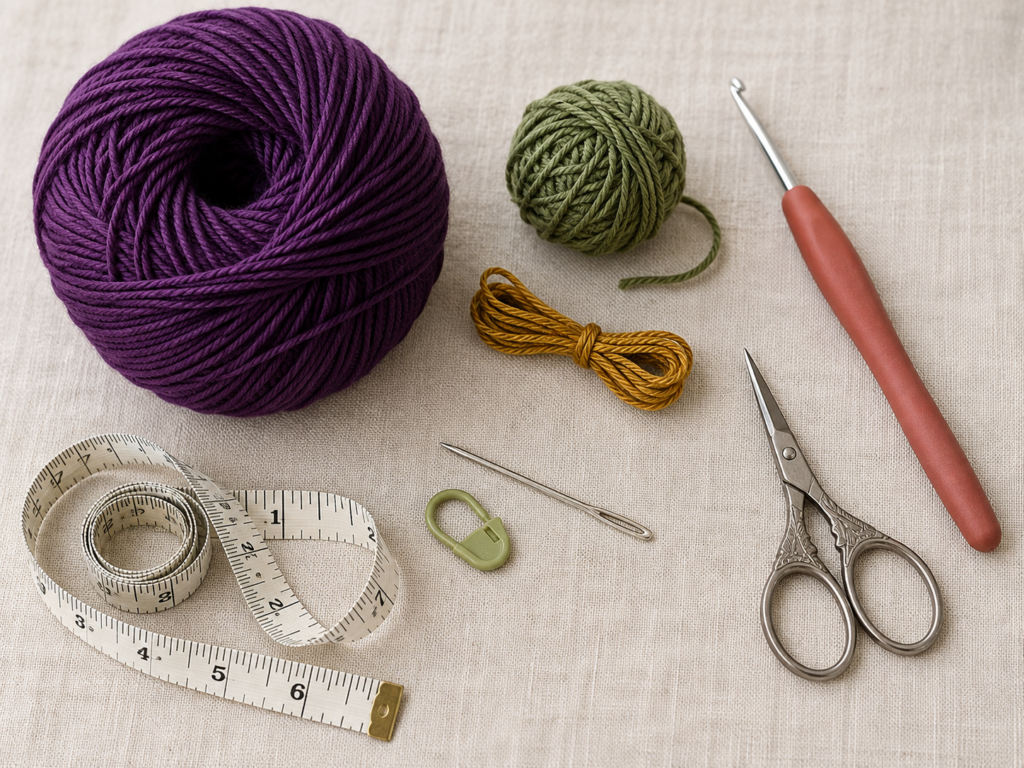
Materials You’ll Need
- Approximately 35–45 yards of category 4 medium-weight yarn for the hat
- Approximately 8–10 yards of contrasting yarn for the band
- A small amount of embroidery yarn for the buckle
- 3.5 mm crochet hook
- Locking stitch marker
- Blunt tapestry needle
- Embroidery scissors
- Measuring tape
- Rustproof pins and a blocking mat or folded towel
- Optional polyester fiberfill for temporarily supporting the cone during blocking
- Optional hanging cord, keyring, hair clip, or amigurumi attachment materials
A smooth cotton, mercerized cotton, or cotton-acrylic yarn will make the individual stitches easy to see. Acrylic also works, although it may produce a softer brim.
The hook recommendation in this tutorial is intentionally smaller than the typical general-purpose recommendation for many category 4 yarns. A smaller hook creates compact fabric that holds the pointed shape more effectively. The Craft Yarn Council notes that standardized yarn-weight hook ranges are guidelines and that gauge or project requirements may justify using another hook size.
Color Palette Used in This Tutorial
- Color A: Deep aubergine for the cone and brim
- Color B: Muted moss green for the band
- Color C: Antique gold for the embroidered buckle
Crochet Abbreviations Used
This pattern uses US crochet terminology.
- MR = magic ring
- ch = chain
- sc = single crochet
- hdc = half double crochet
- sl st = slip stitch
- st/sts = stitch/stitches
- inc = work two stitches into the same stitch
- FLO = front loop only
- rep = repeat
- rnd/rnds = round/rounds
In UK terminology, a US single crochet is called a double crochet, and a US half double crochet is called a half treble crochet. The Craft Yarn Council maintains a standardized list of crochet abbreviations and US/UK term differences.
Before You Start
Gauge and Tension
A precise garment-style gauge is not essential, but your fabric must be firm enough to stand without collapsing.
A useful target is approximately:
- 18 single crochet stitches = 4 inches or 10 cm
- 20 single crochet rounds = 4 inches or 10 cm
Test five or six small rounds before continuing. Spread the stitches gently with your fingers. If large spaces appear between them, switch to a smaller hook. If you cannot insert the hook comfortably, move up by 0.25–0.5 mm.
How to Count Continuous Rounds
This project is not joined at the end of each cone round.
Place a locking marker in the first stitch of every round. When you reach the marker:
- Remove it.
- Work the first stitch of the new round.
- Replace the marker in that new first stitch.
Count the complete round before moving to the next instruction. The narrow top contains very few stitches, so one missed increase can noticeably tilt the cone.
How to Recognize the Front Loop
Look at the top of a crochet stitch. You will see a small V.
- The strand nearest you is the front loop.
- The strand farthest from you is the back loop.
Working only through the front loop leaves the back loop unused. That unused loop forms a visible ridge and helps the brim change direction.
How to Prevent an Uneven Cone
Do not place every increase directly above the increase from the previous increase round. The pattern alternates ordinary rounds with increase rounds, which already helps distribute the shaping. You can also rotate the starting position slightly when necessary.
How to Reduce Brim Curling
A small amount of curling during the first brim round is normal. The brim should begin flattening after the following rounds.
Persistent curling usually means:
- The tension is too tight.
- An increase was missed.
- The hook is too small for the hdc rounds.
- The stitches are being worked through the wrong loops.
You may use a 3.75 mm hook for the brim only if your cone tension is comfortable but the brim remains too tight.
Beginner Note
Read one complete round before beginning it. Keep a pencil nearby and cross off every completed round. Do not rely only on the shape of the cone, because several consecutive rounds can look almost identical.
Step-by-Step Crochet Witch Hat Tutorial
Step 1: Start the Pointed Tip
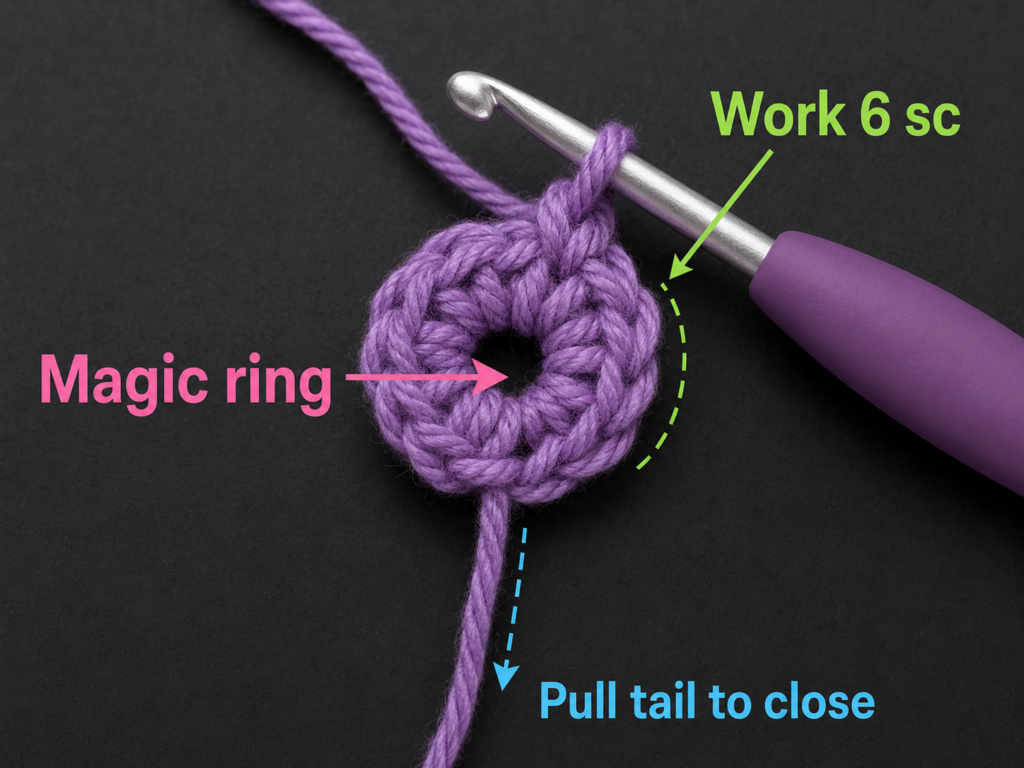
Using Color A, make a magic ring.
- Round 1: Work 4 sc into the magic ring. Pull the ring firmly closed. [4 sts]
- Round 2: Sc in the next 3 sts, inc in the final st. [5 sts]
- Round 3: Sc in every st. [5 sts]
- Round 4: Sc in the next 4 sts, inc in the final st. [6 sts]
- Round 5: Sc in every st. [6 sts]
The first five rounds form a very narrow tube. This is intentional. It will become the pointed top rather than a flat circle.
After Round 2, place the work over the end of your hook or tapestry needle and gently roll it between your fingers. This helps the right side turn outward.
Beginner tip:
When only four or five stitches are present, it is easy to work accidentally into the same stitch twice. Count the visible V shapes before starting each round.
Common mistake to avoid:
Do not insert the hook into the center hole after Round 1. Every later stitch must be worked into the top loops of a stitch from the previous round.
Step 2: Shape the Upper Cone
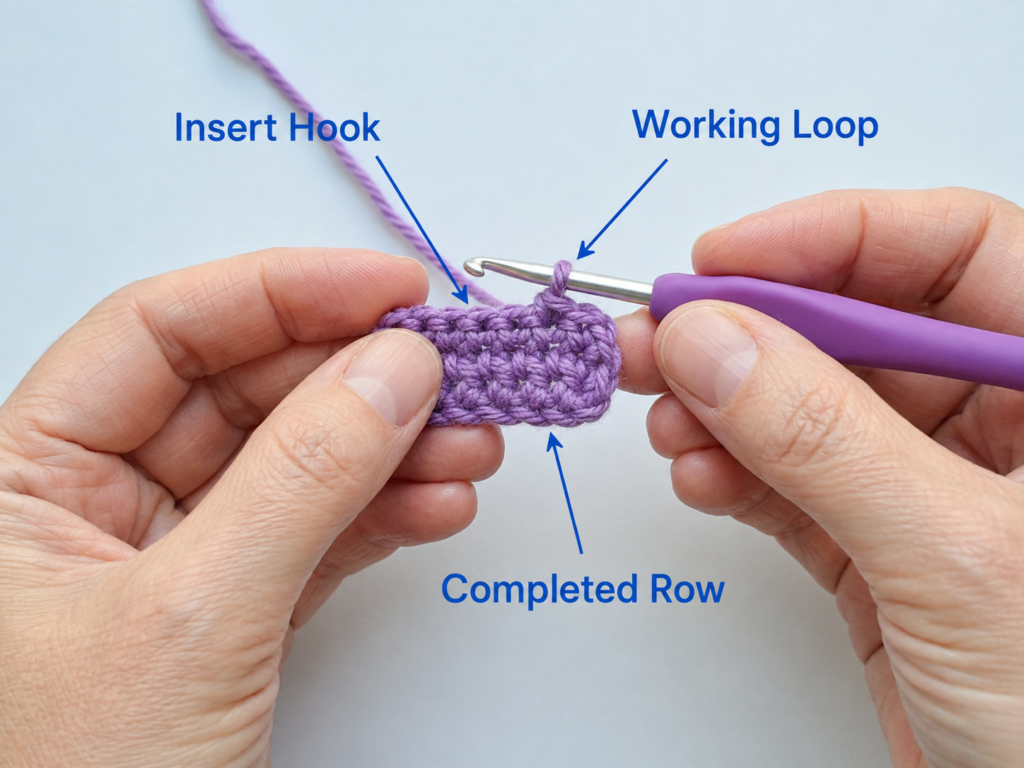
The next rounds widen the top gradually. Two increases are used on each increase round.
- Round 6: Repeat (sc in next 2 sts, inc) twice. [8 sts]
- Round 7: Sc in every st. [8 sts]
- Round 8: Repeat (sc in next 3 sts, inc) twice. [10 sts]
- Round 9: Sc in every st. [10 sts]
- Round 10: Repeat (sc in next 4 sts, inc) twice. [12 sts]
- Round 11: Sc in every st. [12 sts]
- Round 12: Repeat (sc in next 5 sts, inc) twice. [14 sts]
- Round 13: Sc in every st. [14 sts]
By Round 13, the piece should resemble a narrow cone rather than a tube. The sides should widen smoothly without a sharp shelf between increase rounds.
Beginner tip:
An increase means working two complete single crochet stitches into one stitch. Finish the first stitch normally, then insert the hook into that same stitch again.
Common mistake to avoid:
Do not count the active loop on the hook as a stitch. Count only the completed V shapes around the top edge.
Step 3: Continue the Tapered Cone
Continue alternating an increase round with a plain round.
- Round 14: Repeat (sc in next 6 sts, inc) twice. [16 sts]
- Round 15: Sc in every st. [16 sts]
- Round 16: Repeat (sc in next 7 sts, inc) twice. [18 sts]
- Round 17: Sc in every st. [18 sts]
- Round 18: Repeat (sc in next 8 sts, inc) twice. [20 sts]
- Round 19: Sc in every st. [20 sts]
- Round 20: Repeat (sc in next 9 sts, inc) twice. [22 sts]
- Round 21: Sc in every st. [22 sts]
Pause and examine the cone from the side.
The pointed top should remain narrow, while the middle should open gradually. If the cone twists slightly, massage it gently between your fingers. A subtle curve can contribute to the whimsical appearance, but a deep spiral crease usually indicates that the tension is too tight.
Beginner tip:
After finishing each increase round, count the stitches before working the plain round. Fixing an incorrect count immediately is easier than finding the error six rounds later.
Common mistake to avoid:
Avoid pulling the working yarn harder immediately after an increase. Uneven tension can create visible dents where the cone widens.
Step 4: Complete the Lower Cone
Finish widening the cone with three final increase rounds.
- Round 22: Repeat (sc in next 10 sts, inc) twice. [24 sts]
- Round 23: Sc in every st. [24 sts]
- Round 24: Repeat (sc in next 11 sts, inc) twice. [26 sts]
- Round 25: Sc in every st. [26 sts]
- Round 26: Repeat (sc in next 12 sts, inc) twice. [28 sts]
- Round 27: Sc in every st. [28 sts]
Do not fasten off. The brim will be crocheted directly from the final cone round.
Flatten the lower edge gently between your fingers. It should form a reasonably round opening. The two increase points may not be perfectly invisible, but they should not create pronounced corners.
Beginner tip:
Place a second removable marker in each increase from Round 26. This makes it easier to confirm that the two increases are separated evenly.
Common mistake to avoid:
Do not stuff the cone permanently. A freestanding hat needs an open underside. You may place a small amount of temporary fiberfill inside while blocking, but remove it afterward unless the hat is being attached to a stuffed figure.
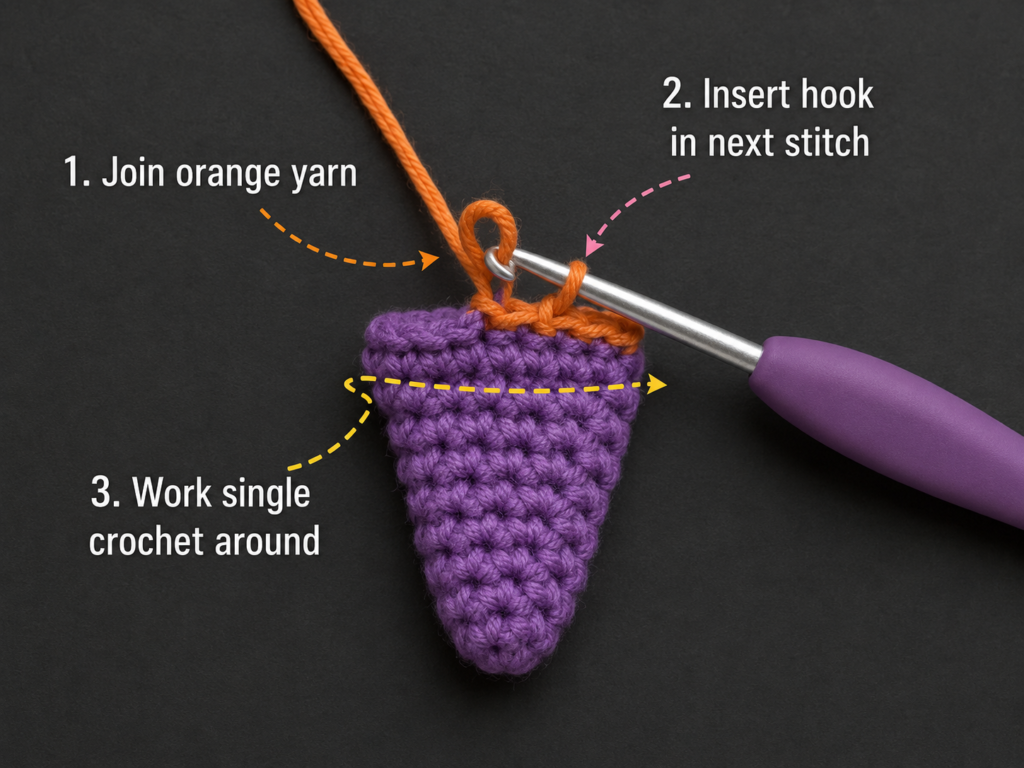
Step 5: Start the Brim in the Front Loops
The brim begins by increasing sharply and working through the front loops.
- Round 28: Working in FLO, repeat (sc in next st, inc in next st) 14 times. [42 sts]
As you work, allow the new fabric to fold outward. Do not force it downward along the cone.
The unused back loops from Round 27 create a subtle ridge at the base of the cone. This gives the brim a cleaner directional change and provides a useful line for positioning the hat band later.
Beginner tip:
Tilt the cone so that the top edge faces you. The front loops will then be easier to see.
Common mistake to avoid:
If you accidentally work through both loops for one or two stitches, undo those stitches and correct them. Switching randomly between front-loop and both-loop stitches can make the brim edge irregular.
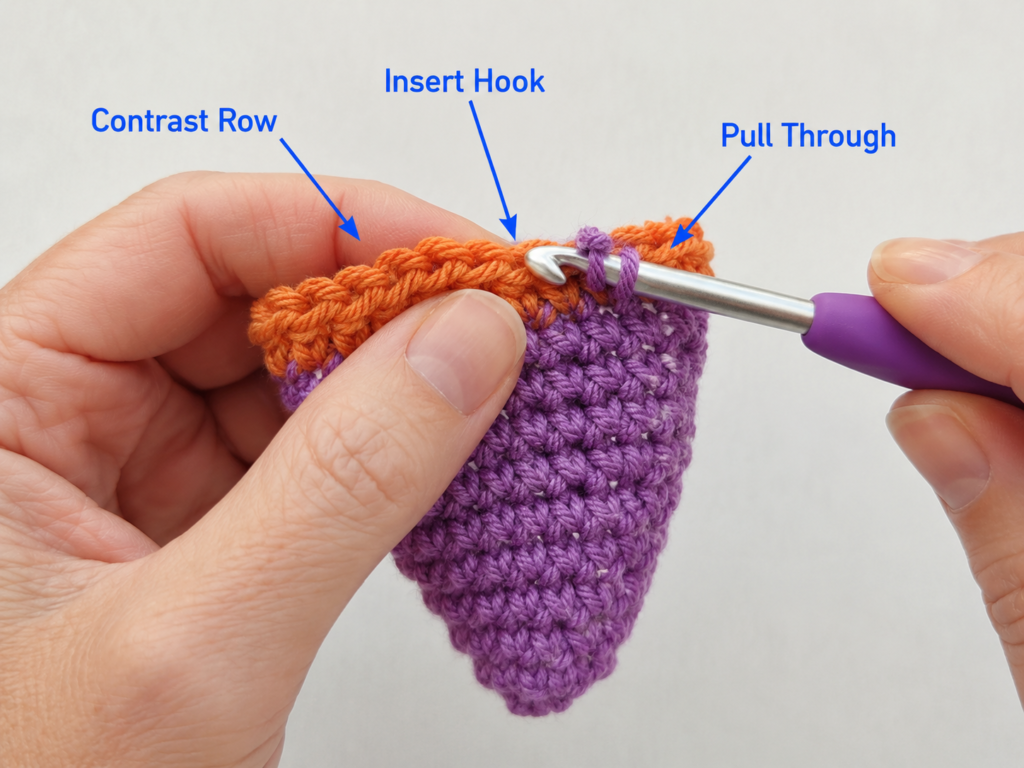
Step 6: Expand and Finish the Brim
The remaining rounds use half double crochet for a wider, softer brim.
- Round 29: Hdc in every st. [42 sts]
- Round 30: Repeat (hdc in next 2 sts, 2 hdc in next st) 14 times. [56 sts]
- Round 31: Hdc in every st. [56 sts]
- Round 32: Sl st loosely in every st. [56 sl sts]
Fasten off, leaving a 6-inch or 15-cm tail.
The final slip-stitch round firms the outside edge. Keep these slip stitches loose. Tight slip stitches can pull the brim upward and reduce its diameter.
Lay the hat on a flat surface. The brim may ripple slightly before blocking, but it should not form deep waves.
Beginner tip:
When making an hdc increase, work two complete hdc stitches into the same stitch. Do not add an extra chain between them.
Common mistake to avoid:
Do not count the beginning yarn-over as a stitch. Only completed hdc stitches count toward the total.
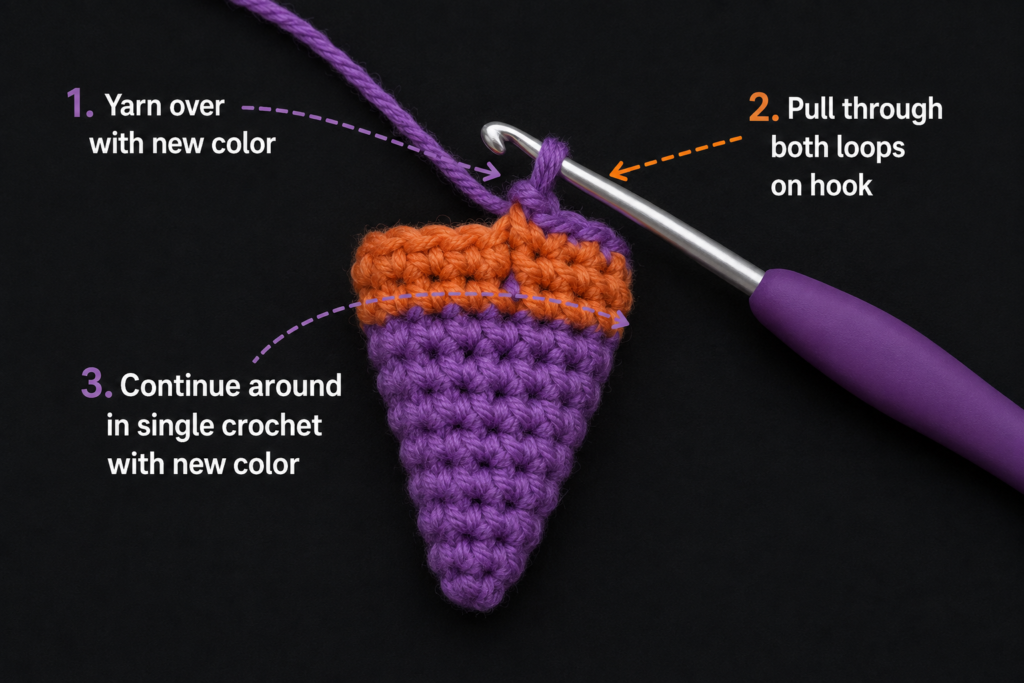
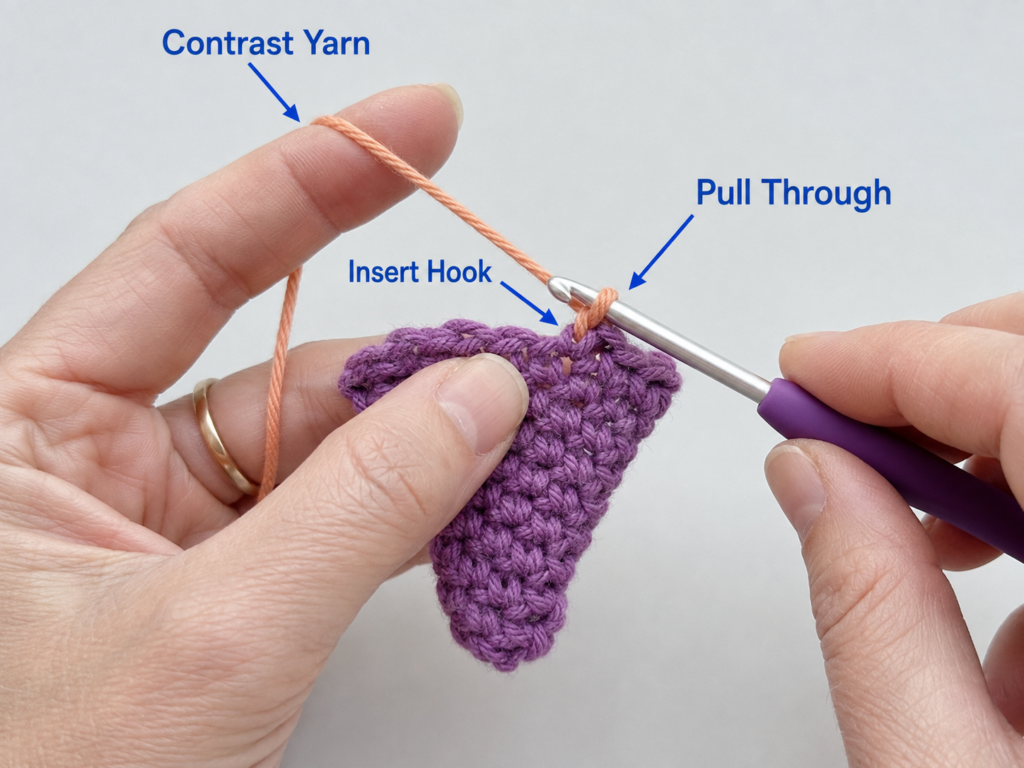
Step 7: Crochet the Hat Band
Using Color B:
- Chain 31.
- Beginning in the second chain from the hook, sc in each chain. [30 sc]
- Fasten off, leaving a 12-inch or 30-cm sewing tail.
Wrap the strip around the cone immediately above the front-loop ridge.
The ends should meet without overlapping. Because yarn and tension vary, adjust the starting chain when necessary:
- Remove chains if the strip is loose.
- Add chains if the strip stretches or distorts the cone.
- Keep the final stitch count even only for convenience; an odd count will also work.
Thread the long tail through a tapestry needle. Sew the two short ends together, then make several small stitches along the upper and lower edges of the band to anchor it to the cone.
Keep the securing stitches within the green band so that they are not visible on the purple fabric.
Beginner tip:
Pin the band temporarily at the front, back, and two sides before sewing. This keeps it level.
Common mistake to avoid:
Do not pull the sewing thread so tightly that the base of the cone narrows. The band should fit closely without gathering the hat.
Step 8: Embroider the Buckle
Cut approximately 24 inches or 60 cm of Color C.
Thread the yarn through a tapestry needle and bring it from inside the cone to the front center of the band.
Create a rectangular outline:
- Make three or four vertical passes along the left side.
- Carry the yarn behind the band.
- Make the same number of vertical passes on the right.
- Add three or four horizontal passes along the top.
- Repeat along the bottom.
Keep the center open so that the embroidery resembles a buckle frame rather than a solid patch.
Secure both ends inside the cone and weave them beneath several stitches.
For a thinner buckle, use embroidery floss instead of full yarn. For a bold cartoon-style buckle, use the same medium-weight yarn as the hat.
Beginner tip:
Use the crochet stitches as a grid. Count an equal number of stitches on each side of the buckle’s center.
Common mistake to avoid:
Avoid making very long, loose surface stitches. They can catch on other decorations or stretch out of shape.
Step 9: Create the Optional Crooked Point
A perfectly straight point gives the hat a classic look. A bent point creates a softer, storybook appearance.
To bend it:
- Fold the top 1½–2 inches of the cone gently toward one side.
- Thread a tapestry needle with matching aubergine yarn.
- Bring the needle through the inside of the cone near Round 12.
- Catch one or two stitches near Round 5 or 6.
- Return the needle to the lower anchoring point.
- Repeat once.
- Tie and conceal the ends inside the cone.
Do not flatten the point completely. The securing stitch should hold a relaxed curve.
You can bend the point forward, sideways, or slightly backward. For a garland, bend adjacent hats in different directions.
Beginner tip:
Pin the point temporarily and view the hat from the front before sewing it permanently.
Common mistake to avoid:
Do not pass the securing yarn through only one strand of one stitch. Catch a complete stitch or a small group of fibers so the point does not pull loose.
Pattern Notes and Stitch Notes
Continuous-Round Rule
Rounds 1–31 are worked as a spiral. Do not join or chain at the end of those rounds.
Round 32 is a slip-stitch edging round. Once it is complete, use an invisible-style finish or pull the tail through the final loop and weave it carefully into the underside of the brim.
Turning Chain Rule
There are no turning chains in the cone or brim because the project is worked in rounds.
The hat-band strip is worked in one row only, so it also requires no turning chain.
Stitch-Count Checkpoints
Important counts are:
- Round 1: 4 stitches
- Round 6: 8 stitches
- Round 12: 14 stitches
- Round 18: 20 stitches
- Round 24: 26 stitches
- Round 27: 28 stitches
- Round 28: 42 stitches
- Round 30: 56 stitches
Check the work at these points even when the cone appears correct.
Right Side and Wrong Side
The outside of the hat is the right side.
When single crochet is worked continuously, the right side usually shows tidy stacked V-shaped stitch fronts. The inside often displays small horizontal bars.
Turn the first few rounds right-side out as soon as the cone becomes large enough to handle.
Size Adjustment Notes
To make a taller cone without making it much wider, add one plain sc round after any two increase rounds.
To make a shorter cone, remove one or two plain rounds from the middle section. Do not remove several increase rounds unless you also want a narrower base.
To make a broader cone, continue the established increase system:
- Next increase round: (sc 13, inc) twice for 30 stitches.
- Work one plain round.
- Next increase round: (sc 14, inc) twice for 32 stitches.
Recalculate the first brim round so that it expands by approximately 50 percent.
Common Beginner Mistakes
1. Losing the Beginning of the Round
Problem: The stitch marker is removed and not replaced.
Fix: Before removing the marker, complete the stitch immediately before it. Work the first stitch of the next round and replace the marker immediately.
2. Creating a Blunt or Flat Tip
Problem: Too many increases are made in the first rounds.
Fix: Confirm that Round 1 contains only four stitches. The first increase rounds add only one stitch at a time before the two-increase sequence begins.
3. Producing Gaps in the Cone
Problem: The yarn is loose or the hook is too large.
Fix: Tighten each completed single crochet gently. If the spaces remain, use a smaller hook rather than pulling excessively hard.
4. Making a Lopsided Cone
Problem: An increase was missed or added in the wrong round.
Fix: Return to the last known checkpoint count. Compare the two sides of the cone and undo the incorrect rounds when necessary.
5. Crocheting the Brim Downward
Problem: Round 28 was worked through the wrong loops or the new stitches were pushed down the cone.
Fix: Work through the front loops only and fold the new fabric outward as the round develops.
6. Creating a Wavy Brim
Problem: Too many increases were added.
Fix: Count Round 28 and Round 30. A mild wave can be blocked; deep folds normally require undoing the incorrect round.
7. Creating a Bowl-Shaped Brim
Problem: An increase was missed, or the outer slip stitches are too tight.
Fix: Verify that Round 30 has 56 stitches. Redo Round 32 with relaxed slip stitches.
8. Making the Band Slide Down
Problem: The band is too long or was attached only at the seam.
Fix: Shorten the strip and tack it to the hat at four or more evenly spaced points.
How to Customize This Crochet Project
Change the Yarn
For a smaller ornament, use sport-weight yarn with a 2.5–3 mm hook.
For a larger shelf decoration, use bulky yarn with a hook small enough to create firm fabric. Expect the finished dimensions and yardage to change.
Plush yarn creates a soft hat but hides the stitch structure. It is better suited to an amigurumi accessory than a sharply defined ornament.
Change the Colors
Try:
- Black hat, purple band, silver buckle
- Charcoal hat, orange band, gold buckle
- Moss-green hat, black band, copper buckle
- Plum hat, dusty pink band, cream buckle
- Midnight-blue hat, gray band, silver stars
Use a solid main color if this is your first attempt. Variegated yarn can make the increase placement harder to see.
Change the Brim
For a narrower brim, stop after Round 29 and add the slip-stitch edging.
For a wider brim, add another increase round after Round 31:
- Repeat (hdc in next 3 sts, 2 hdc in next st) around.
Block the larger brim carefully because additional width makes it softer.
Add Texture
Ideas include:
- Work the final cone round in back loop only to create a ridge.
- Surface-slip-stitch a spiral around the cone.
- Embroider small stars.
- Add a simple black spiderweb.
- Sew on a tiny crochet flower.
- Add a soft chain loop to the point.
Avoid beads, buttons, bells, or detachable decorations when the hat will be handled by a child under three.
Change the Hat Band
Instead of a straight single crochet band, try:
- A narrow chain wrapped twice around the cone
- A velvet ribbon
- A foundation single crochet strip
- A surface-slip-stitch line
- A twisted two-color cord
Gift and Use Ideas
The finished hat can become:
- A Halloween tree ornament
- Part of a witch-hat garland
- A pumpkin topper
- A party-place decoration
- A costume accessory for a crochet doll
- A seasonal keychain
- A hair-clip decoration
- A mug topper
- A gift-bag embellishment
- A miniature table centerpiece
For a keychain or hair clip, sew the hardware securely through several stitches rather than attaching it to a single yarn strand.
Finishing Instructions
Fastening Off
After the final slip stitch, cut the yarn while leaving a 6-inch or 15-cm tail. Pull the tail through the active loop.
Thread the tail through a tapestry needle and pass it beneath the underside stitches of the brim. Change direction once before trimming the remainder. Reversing direction makes the end less likely to work loose.
Weaving in Ends
Weave each end through stitches of the same color.
Avoid carrying green or gold ends through the purple fabric because they may remain visible. Keep all knots and direction changes inside the cone or beneath the brim.
Blocking the Brim
Check the yarn label before adding water or heat.
For wet blocking:
- Dampen the hat lightly with cool water.
- Roll it in a towel to remove excess moisture.
- Place the brim on a blocking mat.
- Pin the outer edge into a circle.
- Shape the cone with your fingers.
- Add a small amount of temporary fiberfill if the cone collapses.
- Allow it to dry completely.
- Remove the pins and temporary filling.
Do not iron acrylic yarn directly. Excessive heat can flatten or melt synthetic fibers. Follow the care instructions printed on the yarn label; the Craft Yarn Council recommends retaining or sharing the label so the finished item can be cared for according to the fiber manufacturer’s symbols.
Shaping
Once dry:
- Curve the point gently.
- Flatten the brim with your palm.
- Straighten the band.
- Confirm that the buckle is centered.
- Trim any visible fibers only after checking that they are not structural yarn ends.
Washing and Care
For a decorative hat, spot cleaning is usually sufficient.
When full washing is necessary:
- Follow the yarn label.
- Place the hat in a mesh laundry bag if machine washing is permitted.
- Reshape it while damp.
- Dry it flat rather than hanging it from the point.
Safety Note
This pattern produces a decoration rather than a protective or functional hat.
When attaching it to an amigurumi intended for a young child:
- Embroider decorations instead of using beads or buttons.
- Do not add a keyring, clip, bell, or long hanging loop.
- Sew the hat to the toy at multiple secure points.
- Check regularly for loose yarn or hardware.
Quick Printable-Style Summary
Project: Mini decorative crochet witch hat
Skill level: Beginner to easy
Finished size: Approximately 5–5½ inches tall with a 5–5½-inch brim
Main materials:
- Category 4 medium-weight yarn
- 3.5 mm crochet hook
- Stitch marker
- Tapestry needle
- Scissors
Stitches:
- Magic ring
- Chain
- Single crochet
- Half double crochet
- Slip stitch
- Increase
- Front loop only
Starting method:
Four single crochet stitches in a magic ring
Cone construction:
Work continuously from the top down, alternating controlled increase rounds with plain single crochet rounds.
Cone stitch count before brim:
28 stitches
Brim construction:
Increase to 42 stitches in front loops, then use half double crochet and increase to 56 stitches.
Band:
Chain 31 and work 30 single crochet stitches. Fit and sew the strip above the brim ridge.
Buckle:
Embroider a small rectangular outline over the front of the band.
Finishing:
Weave in ends, wet block the brim, shape the cone, and bend the point if desired.
Frequently Asked Questions
Is this crochet witch hat wearable?
No. This version is designed as a miniature decoration or amigurumi accessory. A wearable witch hat requires a measured head opening, more yarn, stronger brim construction, and a separate sizing calculation.
Can I make the hat without a magic ring?
Yes. Chain two and work the four starting single crochet stitches into the second chain from the hook. This may leave a slightly more visible opening at the tip. Close it later with the starting tail.
Why does my cone look like a tube?
The increases may have been missed. Check that the stitch count grows from 4 to 5, 6, 8, 10, and so on. A cone must become gradually wider as it becomes taller.
Why does my brim curl upward?
Confirm that the first brim round was worked through the front loops and that all required increases were completed. Tight slip stitches in the final round can also pull the edge upward.
Can I use worsted acrylic yarn?
Yes. Smooth acrylic works well and is widely available. It may produce a softer brim than firm cotton. Use blocking and a compact gauge to improve the shape.
Do I need to stuff the witch hat?
No. The finished hat is hollow. Temporary fiberfill can support the cone while it dries, but permanent stuffing is optional and is most useful when the hat will be sewn to a stuffed toy.
How can I make the brim stiffer?
Use cotton yarn, maintain firm tension, and block the brim thoroughly. For an adult-only decoration, a narrow piece of covered craft wire can be sewn around the outer edge, but the wire ends must be joined, covered, and secured carefully.
Conclusion
This mini crochet witch hat turns a few basic stitches into a complete Halloween project with a defined pointed cone, flat brim, contrasting band, and embroidered buckle.
The most important parts are accurate stitch counting and a clear front-loop transition at the brim. Once those elements are correct, the remaining details are easy to personalize. Make the point straight or crooked, change the band color, widen the brim, add embroidery, or create several coordinating hats for a garland.
Save the tutorial with your Halloween crochet ideas so the stitch counts and finishing notes are ready when you begin your next hat.





