A cardboard tissue box is useful, but it rarely looks as polished as the rest of a carefully decorated room. This crochet tissue box cover pattern turns that everyday box into a simple handmade home accessory using beginner-friendly stitches and straightforward rectangular pieces.
You do not need to crochet complicated shaping, work in the round, or memorize a decorative stitch repeat. The cover is built from five flat pieces: two long sides, two short sides, and one top panel with an opening for the tissues.
That construction also makes this project particularly useful for beginners. You can concentrate on keeping your stitches even and your rectangles straight before learning how to assemble the pieces into a three-dimensional object.
The pattern below is written for a common rectangular tissue box measuring approximately 9 inches long × 4.75 inches wide × 3.5 inches high. Because tissue-box dimensions vary between brands, you will also learn how to adjust the numbers to fit the actual box in your home.
This tutorial uses standard US crochet terminology. The Craft Yarn Council notes that crochet terminology differs between US and UK usage—for example, US single crochet corresponds to UK double crochet—so check the terminology before beginning if you normally follow UK patterns.
What You’ll Learn
- How to measure a tissue box before crocheting
- How to make straight single crochet rectangles
- How to maintain a consistent stitch count
- How to create a centered opening for the tissues
- How to block slightly curling panels
- How to line up rectangular crochet pieces accurately
- How to join the side panels with slip stitches
- How to attach the top panel
- How to resize the pattern for another tissue-box brand
- How to finish the cover neatly enough for home décor or gifting
Materials You’ll Need
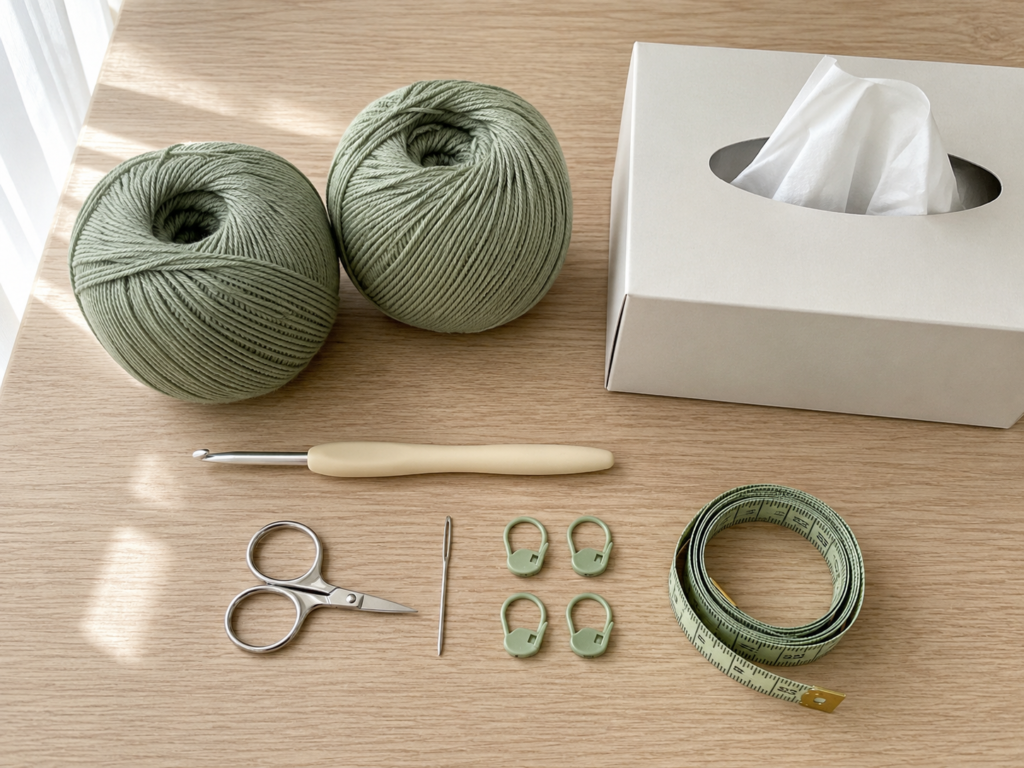
For this version, use:
- Approximately 175–210 yards of medium-weight cotton or cotton-blend yarn
- 4.5 mm crochet hook
- Scissors
- Blunt yarn or tapestry needle
- 4–8 locking stitch markers
- Flexible measuring tape or ruler
- Blocking mat and rust-resistant pins, optional
- One rectangular tissue box approximately 9 × 4.75 × 3.5 inches
A smooth yarn is easier for a beginner because individual stitches remain easy to see. The Craft Yarn Council classifies yarn by standardized weight categories and emphasizes that suggested hook ranges are guidelines rather than guarantees of gauge, so your actual swatch should determine whether your chosen yarn and hook combination works for this project.
Metric hook size is especially useful when selecting your tool because hook letter/number systems can vary between manufacturers; the Craft Yarn Council recommends relying on the millimeter measurement for precision.
Crochet Abbreviations Used
- ch = chain
- sc = single crochet
- sl st = slip stitch
- st = stitch
- sts = stitches
- rep = repeat
- RS = right side
- WS = wrong side
These abbreviations follow common US crochet conventions documented by the Craft Yarn Council.
Before You Start
Measure your actual tissue box
Do not assume every rectangular tissue box is identical.
Measure:
- Length
- Width/depth
- Height
The example pattern is designed around approximately:
9″ long × 4.75″ wide × 3.5″ high
You want the crocheted cover to sit fairly close to the box. Excessive positive ease can make the sides sag, while a piece that is substantially smaller than the box will stretch the seams and distort the top opening.
Check your gauge
For this tutorial, aim for approximately:
15 sc × 17 rows = 4 inches
Make a test square larger than 4 inches, then measure the center rather than the outermost edges.
If you have fewer than 15 stitches within 4 inches, your stitches are larger than the tutorial gauge. Try a smaller hook.
If you have more than 15 stitches, your stitches are smaller. Try a larger hook.
Gauge matters here because all five pieces must meet accurately at the corners.
How to count single crochet stitches
Look across the top edge of the row. Each completed single crochet forms a small V.
Count each V as one stitch.
The turning chain in this pattern does not count as a stitch.
If your rectangle becomes narrower as you work, you are probably skipping the final stitch.
If it becomes wider, you may accidentally be working into the turning chain.
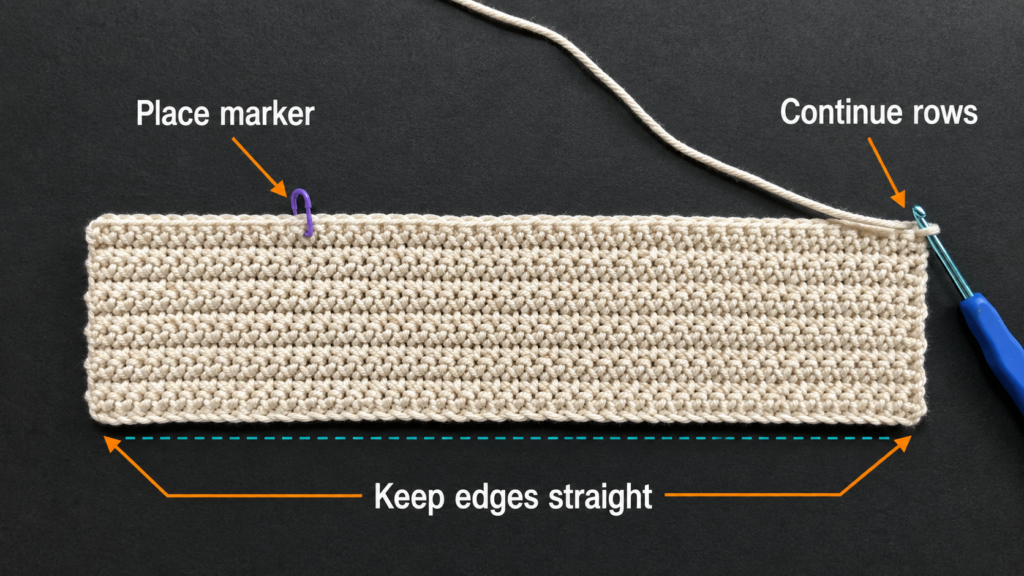
How to keep the edges straight
Place a stitch marker into the first stitch of each row while you learn.
When you reach the other end, count your stitches before turning.
Correcting one missed stitch immediately is easier than discovering the mistake eight rows later.
Right side and wrong side
Basic single crochet looks relatively similar on both faces. For this project, simply choose the surface you like better as the right side and remain consistent for all five pieces.
Step-by-Step Crochet Tutorial
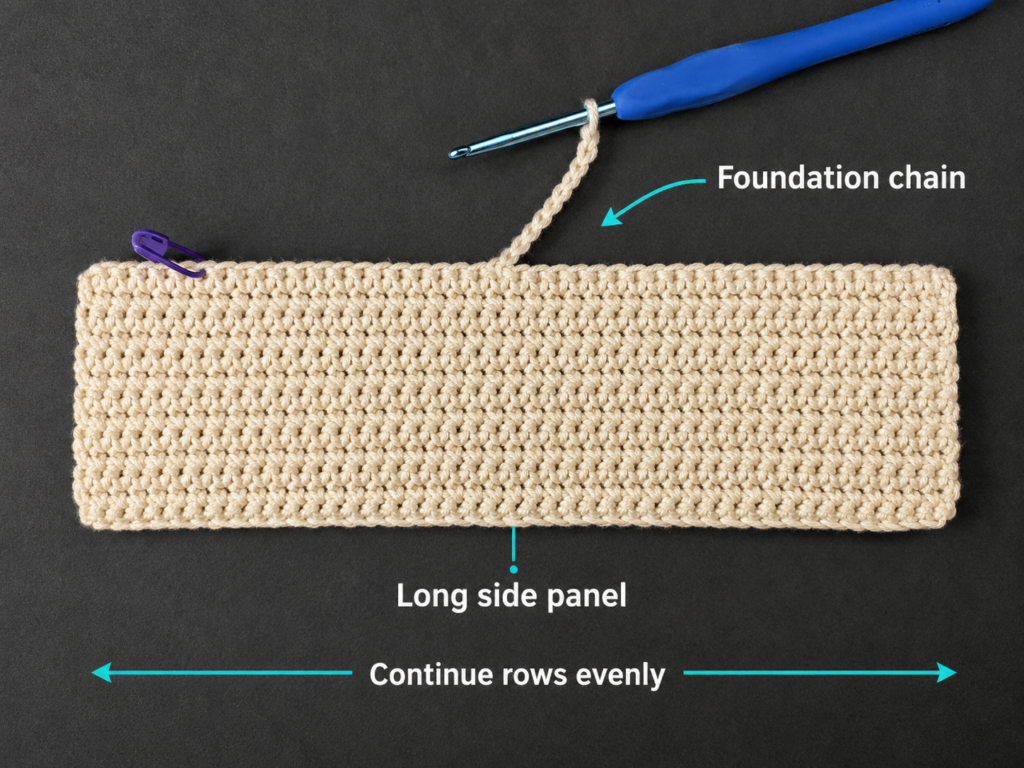
Step 1: Measure the Box and Make Your Foundation Chain
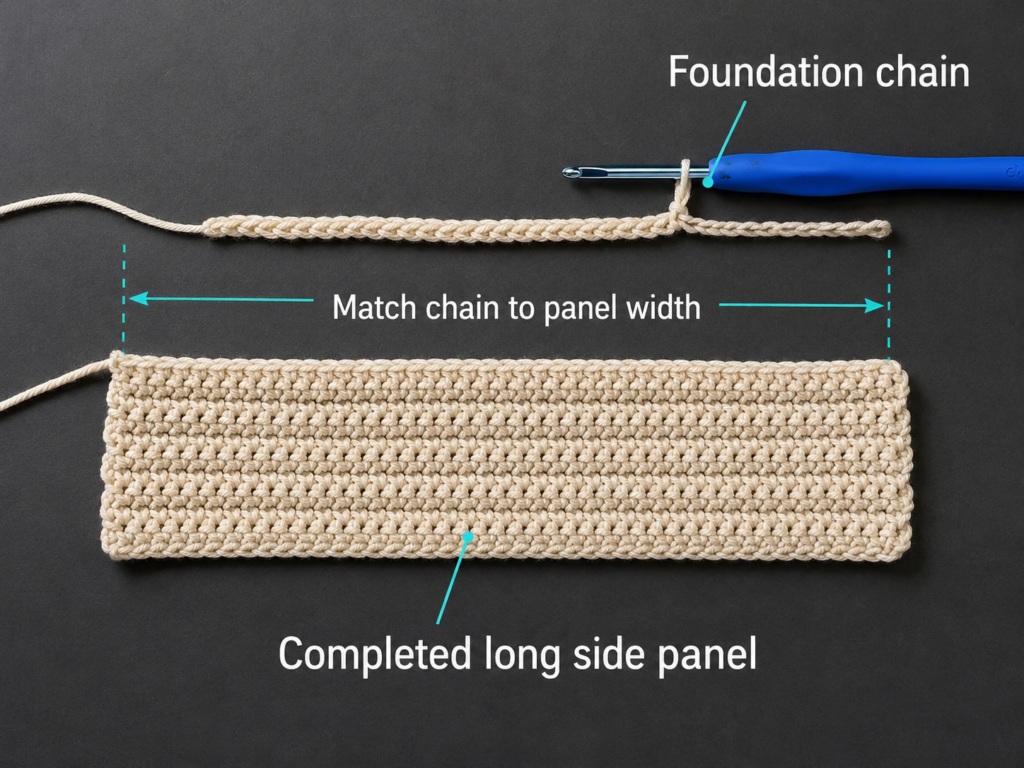
Begin with one of the long side panels.
For the sample 9-inch box:
Ch 35.
Your goal is 34 working stitches.
Insert the hook into the second chain from the hook.
Work 1 sc into that chain and 1 sc into every remaining chain.
You should finish with:
34 sc
Ch 1 and turn.
The first row should lie relatively straight when relaxed. It does not need to be stiff or perfectly flat.
Beginner tip:
Do not tighten the starting chain aggressively. A tight chain can pull the lower edge inward even if your later rows are perfectly even.
Common mistake to avoid:
Do not crochet into the first chain immediately beside the hook. That loop is your working loop, not a foundation stitch.
Step 2: Crochet the First Long Side
For Row 2:
Work 1 sc in every stitch across — 34 sc.
Ch 1 and turn.
Repeat that simple row until you have completed 15 rows total.
At the target gauge, your rectangle should measure close to:
9 inches wide × 3.5 inches high
Before fastening off, place the rectangle against the long side of your tissue box.
It should cover the side without requiring strong stretching.
A difference of roughly an eighth of an inch is usually easy to accommodate during seaming. A large discrepancy should be corrected now.
Beginner tip:
Count 34 stitches every two or three rows rather than waiting until the entire rectangle is finished.
Common mistake to avoid:
If the first or last edge begins leaning inward, inspect the final stitch carefully. It is easy to miss because the turning chain can visually hide the edge.
Fasten off, leaving a short tail for weaving in.
Step 3: Crochet the Remaining Side Panels
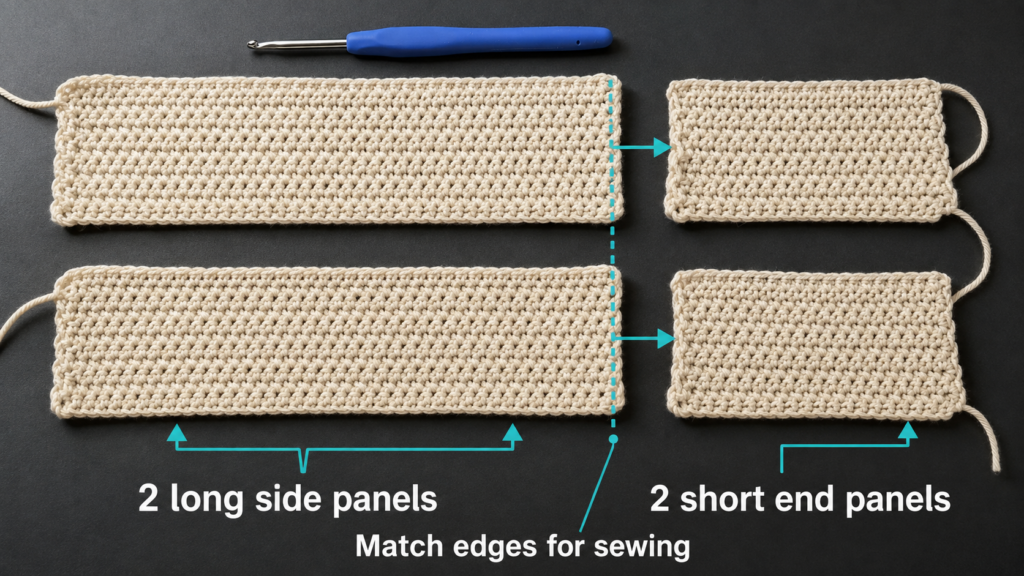
Make one more long side exactly like the first.
Then make the two short sides.
For each short side:
Ch 19.
Row 1: Sc in the second chain from the hook and across.
18 sc
Ch 1 and turn.
Rows 2–15: Work 1 sc in each stitch across.
18 sc per row
Fasten off.
You should now have:
- 2 long rectangles: 34 stitches × 15 rows
- 2 short rectangles: 18 stitches × 15 rows
Place them around the tissue box before moving on.
This is your first important fit test.
Beginner tip:
Lay both long panels on top of each other. Then compare the short panels in the same way. Matching pieces should have matching dimensions before assembly.
Common mistake to avoid:
Do not rely only on row counts when one panel was crocheted on a different day or with noticeably different tension. Measure it too.
Step 4: Crochet the First Half of the Top Panel
The top is made as one rectangle, but a chain gap in the center creates the tissue opening.
Ch 35.
Row 1: Starting in the second chain from the hook, sc across.
34 sc
Rows 2–9: Ch 1, turn, and sc across.
Keep 34 stitches in every row.
After Row 9, spread the panel flat.
The next row creates the opening.
Before crocheting it, count nine stitches from each side and place markers if that makes the center easier to visualize.
Beginner tip:
Count from both edges. If nine stitches remain on one side but eight or ten remain on the other, recount before making the chain.
Common mistake to avoid:
Do not estimate the center by eye. A noticeably off-center opening is difficult to disguise once the top has been attached.
Step 5: Create the Tissue Opening
Row 10:
Sc in the first 9 sts.
Now ch 16.
Skip the next 16 stitches of the previous row.
Insert your hook into the next stitch and sc into that stitch.
Sc across the remaining stitches.
You should have:
- 9 sc
- a 16-chain bridge
- 9 sc
The chain creates the long side of the tissue opening.
Before continuing, lay the work down and check that the opening is centered.
Beginner tip:
Keep these 16 chains relaxed. If you crochet them more tightly than your foundation chain, the top panel can pinch inward.
Common mistake to avoid:
After chaining, count exactly 16 stitches that must be skipped before inserting the hook again. Accidentally skipping 15 or 17 alters the total stitch count.
Step 6: Complete the Top Panel
Ch 1 and turn.
For Row 11, sc in each of the first 9 stitches.
Work 1 sc into each of the 16 chains.
Then sc in each of the remaining 9 stitches.
You are back to:
34 sc
Rows 12–20:
Ch 1, turn, and sc evenly across.
Fasten off after Row 20.
The top should measure close to 9 × 4.75 inches at the tutorial gauge.
Hold it directly over your tissue box.
Confirm three things:
- The outer dimensions cover the top.
- The tissue opening is approximately centered.
- A tissue can pass comfortably through the opening without heavily stretching the surrounding stitches.
Beginner tip:
Pull one tissue through the opening during this test. Doing this before assembly lets you change the opening much more easily.
Common mistake to avoid:
Do not make several extra rows simply because the top appears slightly small while curled. Measure it flat first.
Step 7: Check and Block the Five Pieces
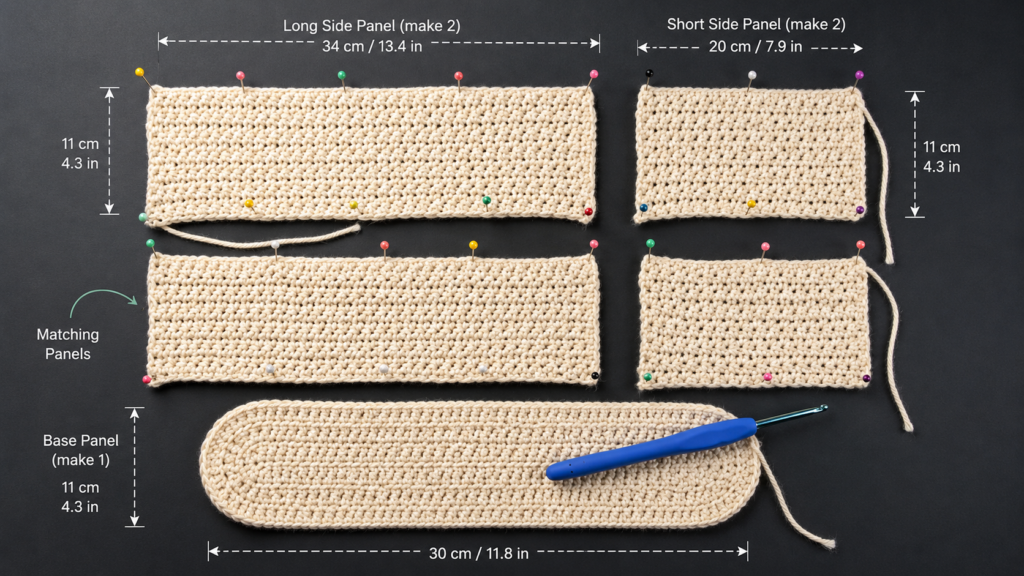
Arrange all five pieces together.
The long sides should match each other.
The short sides should match each other.
The top should align with the outside dimensions created by one long and one short panel.
If your rectangles curl at the corners, light blocking can make assembly easier.
Follow the care instructions for your particular yarn. Shape each piece to its intended measurements and allow it to dry completely before removing the pins.
Blocking should refine the shape, not stretch an incorrect panel several inches larger.
Beginner tip:
Measure the panel after pinning the first two corners. Then pin the remaining corners while maintaining that measurement.
Common mistake to avoid:
Do not force one short panel to match another if their stitch counts differ. Check the crochet first.
Step 8: Arrange the Side Panels
Lay the side pieces in this order:
Long — Short — Long — Short
You are going to join them into one continuous rectangular wall.
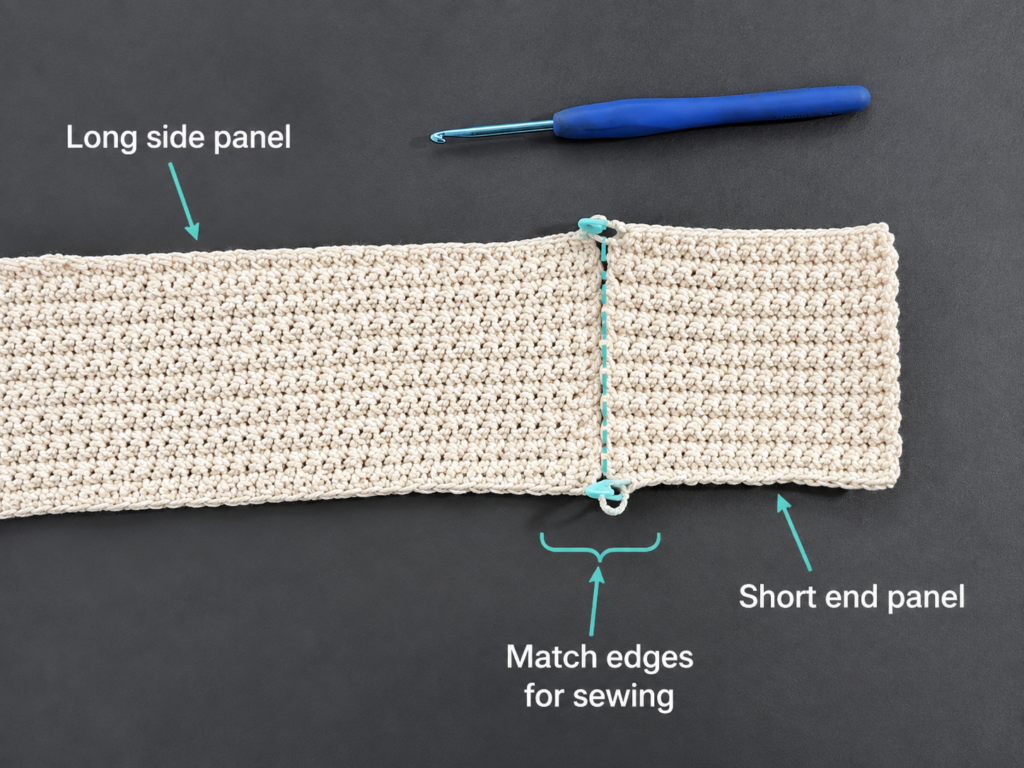
Take the first long panel and first short panel.
Place them with your chosen right sides facing each other.
Align the top and bottom corners.
Add one stitch marker near each corner and another around the center if necessary.
The row ends of each side panel should correspond because both pieces contain 15 rows.
Beginner tip:
Match the corners first, then distribute the fabric evenly between them.
Common mistake to avoid:
Do not start joining at one end before checking the opposite end. If the second corner does not meet, you may end up bunching the extra fabric into the seam.
Step 9: Join the Side Panels
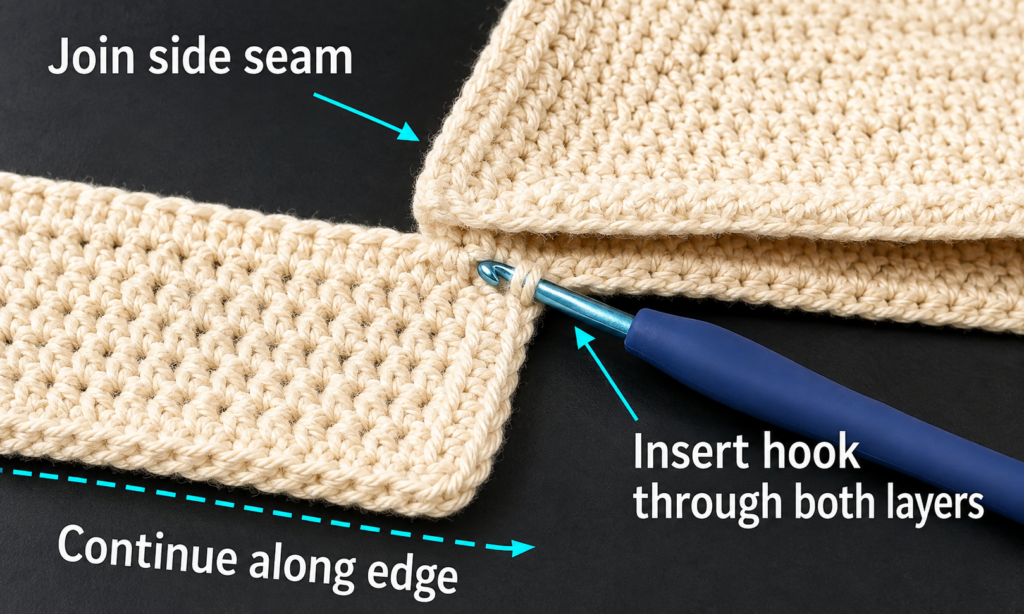
With the right sides still facing each other, attach yarn at the first corner.
Insert your hook through an edge loop from both layers.
Pull the yarn through.
Work slip stitches evenly down the edge, always passing through both panels.
Do not pull the slip stitches too tightly. The seam should remain flexible enough for the cover to sit square.
Repeat with the next short-to-long connection.
Continue until all four vertical seams have been made and the panels form a rectangular tube.
Turn the shell right side out.
Beginner tip:
Stop after every four or five slip stitches and allow the seam to relax. If it immediately puckers, your joining stitches are too tight.
Common mistake to avoid:
Avoid adding several slip stitches into one row end unless spacing requires it. Uneven seam density can create a wavy corner.
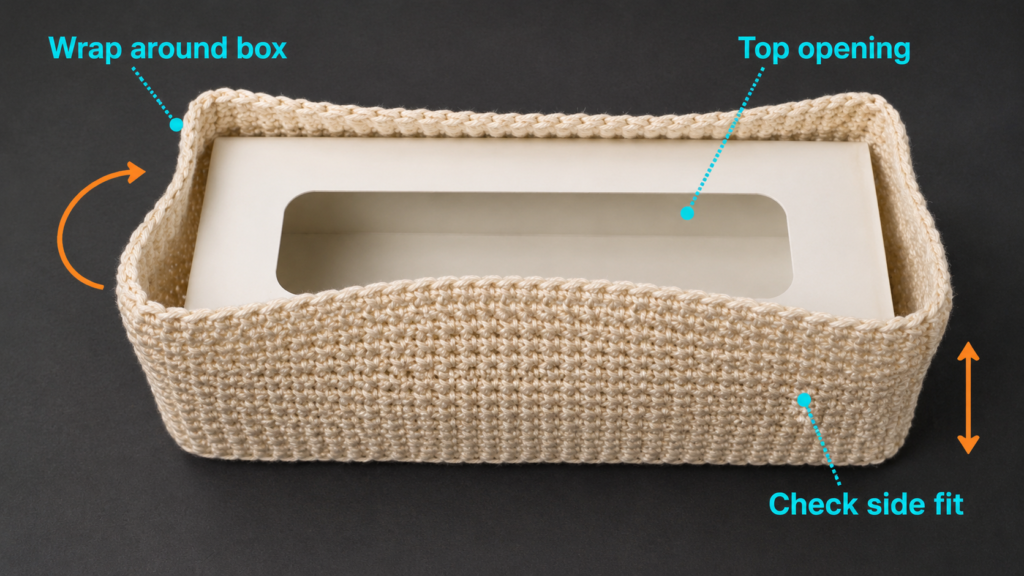
Step 10: Test the Side Shell
Before adding the top, place the side shell around your tissue box.
Check every corner.
You want the shell to slide over the box without excessive force while remaining close enough that it does not collapse away from the cardboard.
If one seam twists, remove that seam and realign the edges.
If the entire shell is dramatically too tight or loose, the issue is probably gauge or panel dimensions rather than seaming.
Step 11: Attach the Top
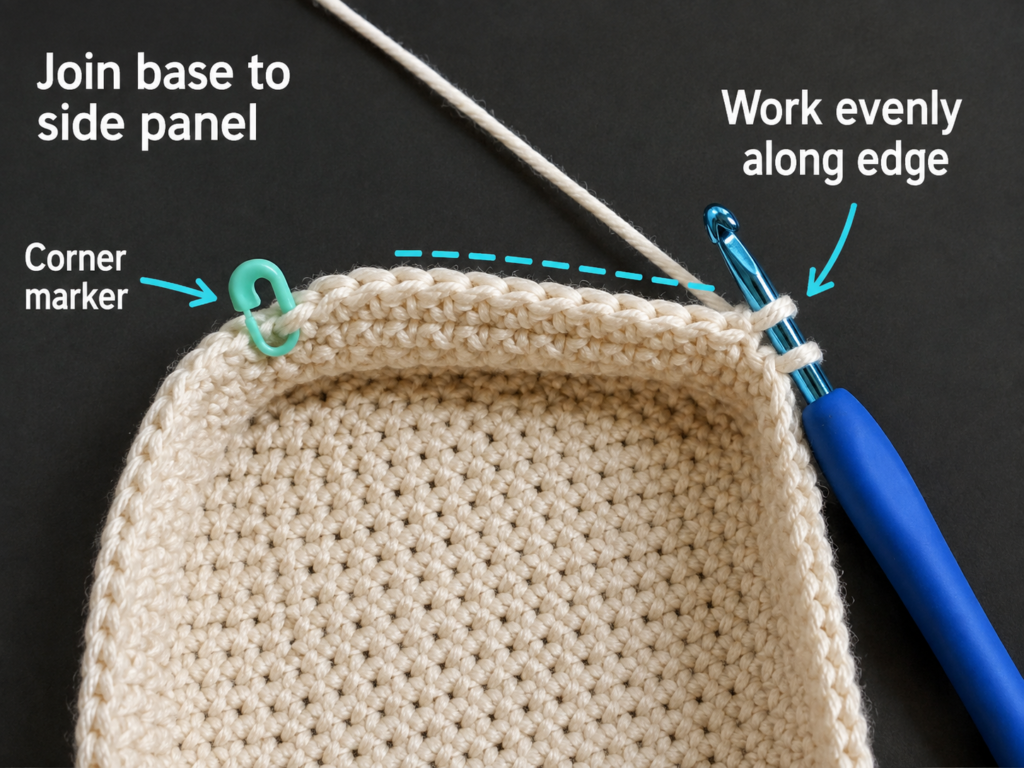
Turn the shell so the right side is facing inward.
Place the top panel inside the upper edge with its right side facing the side panels.
In other words, the right sides should face each other along the seam.
Match all four corners first and secure them with stitch markers.
Then add additional markers along each edge.
Join the top to the sides with the same relaxed slip-stitch seam.
At each corner, make sure you are joining the exact corner stitch of the top to the corner seam of the side shell.
Continue around all four edges.
Fasten off.
Turn the cover right side out.
Beginner tip:
Do not remove all stitch markers before you reach them. They keep the top from gradually shifting to one side.
Common mistake to avoid:
A top panel can look correct at the first corner but be rotated 180 degrees. Before joining, check that the long edges of the top align with the long side panels.
Step 12: Fit the Cover and Pull Through a Tissue
Slide the finished cover over the box.
Gently shape each corner with your fingers.
Pull the first tissue through the crocheted opening.
If the opening feels slightly snug, pull it horizontally with your fingers rather than aggressively stretching one small section.
Your finished cover is ready to use.
Pattern Notes and Stitch Notes
Turning chain: Ch 1 at the end of each row. It does not count as a stitch.
Long side stitch count: 34 stitches.
Short side stitch count: 18 stitches.
Top stitch count: 34 stitches, including the positions represented by the opening chain.
Long/short side rows: 15.
Top rows: 20.
Repeat: Side panels use straightforward sc rows with no stitch-pattern repeat beyond 1 sc in every stitch.
Right side/wrong side: Choose one surface as your right side and use that choice consistently.
Seaming: This tutorial uses slip-stitch seams with right sides together so the prominent part of the seam remains inside the cover.
Ease: Test each component against the actual tissue box rather than relying exclusively on nominal package dimensions.
How to Resize the Crochet Tissue Box Cover
The easiest way to customize this project is to work from your gauge.
Suppose your swatch measures:
15 stitches across 4 inches.
Divide:
15 ÷ 4 = 3.75 stitches per inch
For a 10-inch-long box:
10 × 3.75 = 37.5 stitches
Round to a practical whole number—approximately 38 stitches.
Your starting chain would then be:
38 + 1 turning chain = ch 39
Use the same idea for rows.
At 17 rows per 4 inches:
17 ÷ 4 = 4.25 rows per inch
If your box is 4 inches tall:
4 × 4.25 = 17 rows
For the top, calculate the length and width independently.
For the opening, choose the approximate physical opening length you want, convert that measurement to stitches using your stitches-per-inch figure, then subtract those opening stitches from the total top stitch count.
Divide the remaining stitches as evenly as possible between both sides.
Example:
38 total stitches
16 opening stitches
38 − 16 = 22
22 ÷ 2 = 11
You would work:
11 sc, ch 16 and skip 16, then 11 sc.
That keeps the opening centered.
Common Beginner Mistakes
1. The rectangles get narrower
Cause: The final stitch of one or more rows was skipped.
Fix: Mark the first stitch after turning and count your stitches frequently.
2. The rectangles get wider
Cause: You may be crocheting into the turning chain.
Fix: Remember that the ch 1 does not count as a stitch in this pattern.
3. The lower edge is tighter than the rest
Cause: Your foundation chain was crocheted too tightly.
Fix: Relax your hand while chaining. If necessary, use a slightly larger hook only for the foundation chain.
4. The tissue opening is off-center
Cause: The stitches on each side of the skipped center section were not counted.
Fix: Mark both boundaries before making the opening chain.
5. The corners curl
Cause: Slight curling can occur in flat crochet fabric.
Fix: Check your tension first. If the stitch count is correct, lightly block the rectangles before assembly.
6. The seams pucker
Cause: Slip stitches are being pulled too tightly.
Fix: Work each joining stitch with relaxed tension.
7. One panel ends up longer than its matching panel
Cause: Different row counts or changing tension.
Fix: Compare matching pieces before assembly and measure them rather than relying on appearance.
8. The cover fits at the top but flares at the bottom
Cause: The side rectangles may have expanded because extra stitches were added.
Fix: Count the top and bottom edge stitches. A rectangular panel should retain the same stitch count from beginning to end.
How to Customize This Crochet Project
Change the yarn color
A single solid color gives the cover a minimalist look.
For something more decorative, try:
- Warm oatmeal
- Dusty rose
- Sage green
- Terracotta
- Soft gray
- Navy
- Black
- Two-tone neutrals
You can also crochet opposite sides in contrasting colors.
Add stripes
Change yarn every three to five rows on the side pieces.
Keep the stripe sequence identical on the two long sides if you want a symmetrical finished cover.
Add a simple border
Once the cover is assembled, you can add a row of slip stitches around the tissue opening to make the edge more defined.
Keep the border relaxed so the opening does not contract.
Add texture
Once you are comfortable with the basic version, experiment with another dense stitch pattern.
Remember that changing stitch texture changes gauge, which means the stitch and row counts may also need to change.
Make a square version
Use the same measurement-first method.
Instead of making two long and two short panels, make four equal side panels corresponding to the four equal sides of your square tissue box.
Make it as a gift
A neutral tissue cover works well for:
- Housewarming gifts
- Teacher gifts
- Office décor
- Guest-room baskets
- Bathroom décor sets
- Handmade holiday gifts
Pair it with a crocheted washcloth or small storage basket for a coordinated handmade set.
Finishing Instructions
Inspect all four vertical corners first.
If any seam looks twisted, correct it before weaving in every tail.
Thread each yarn tail onto a blunt tapestry needle.
Weave the tail through several stitches on the wrong side, reverse direction, and weave through another short section.
Trim the excess yarn.
Place the cover on the tissue box again and shape the corners.
If the finished object needs a final light blocking, follow the care requirements for the yarn you actually used rather than applying one universal treatment.
When washing the cover later, follow the yarn manufacturer’s care instructions and reshape the piece before drying.
Quick Printable-Style Summary
Project: Rectangular Crochet Tissue Box Cover
Skill level: Beginner / Easy
Finished size: Approximately 9 × 4.75 × 3.5 inches when worked to the stated gauge
Yarn: Medium-weight cotton or cotton blend
Hook: 4.5 mm
Gauge: Approximately 15 sc × 17 rows = 4 inches
Stitches: ch, sc, sl st
Long panels:
Make 2.
Ch 35.
Work 34 sc for 15 rows.
Short panels:
Make 2.
Ch 19.
Work 18 sc for 15 rows.
Top panel:
Ch 35.
Work 34 sc for 9 rows.
On the opening row: 9 sc, ch 16, skip 16, 9 sc.
On the next row, return to 34 sc by crocheting across the chain.
Continue until 20 total rows are complete.
Assembly:
Join long and short panels alternately to make a rectangular side shell. Attach the top around the upper edge.
Finishing:
Fasten off, weave in all yarn ends, shape the corners and insert the tissue box.
FAQ
Is a crochet tissue box cover suitable for beginners?
Yes. This version uses flat rectangles, chains, single crochet and slip stitches. The main beginner challenge is maintaining a consistent stitch count rather than learning advanced shaping.
What yarn is best for a crochet tissue box cover?
A smooth cotton or cotton-blend yarn works especially well for a structured home décor project because it gives you clear stitch definition. Whatever fiber you choose, make a gauge swatch because yarns within the same standardized weight category are not automatically interchangeable.
How much yarn do I need?
For the sample rectangular size, allow approximately 175–210 yards. Your actual usage will change with box dimensions, yarn thickness, hook size and individual tension.
Can I use acrylic yarn?
Yes. The important factors are obtaining the correct dimensions and creating a fabric you like. Swatch first whenever you substitute a different yarn.
Why is my crochet tissue box cover too loose?
The most common reasons are larger stitches than the intended gauge, too many stitches, or a tissue box smaller than the sample dimensions. Measure the box and your finished panels separately to identify the cause.
Can I make the tissue opening smaller?
Yes. Reduce the number of skipped stitches and the corresponding number of chains. Keep the same number of stitches on the left and right sides so the opening remains centered.
For example, if you have 34 total stitches and want a 14-stitch opening:
34 − 14 = 20
20 ÷ 2 = 10
Work 10 sc, ch 14 and skip 14, then work 10 sc.
Do I have to block the panels?
Not necessarily. If your panels are already flat, square and correctly sized, you can proceed directly to assembly. Blocking is most useful when light curling makes accurate alignment difficult.
Conclusion
A handmade tissue-box cover is a useful first home décor project because it turns basic crochet skills into something three-dimensional without requiring complicated shaping.
Once you can crochet five accurate rectangles, center a simple chain opening, and join clean seams, the same skills can transfer to baskets, storage cubes, pillow constructions and other structured crochet projects.
Measure your own box before beginning, keep your stitch count consistent, and test the fit before completing the final seams. Those three habits will make a much bigger difference than trying to crochet every stitch perfectly.
Save this crochet tissue box cover pattern for your next small home décor project, and experiment with a second version in a different color once you understand how the measurement formula works.





