Tiny crochet acorns are one of those projects that look detailed when finished but are built from very basic crochet skills. Once you understand how the first acorn comes together, the remaining pieces become an easy repetitive project you can work on while listening to a podcast, watching television, or using up the small balls of yarn left in your stash.
In this crochet acorn garland pattern, we will make a softly pointed acorn body, add a separate textured cap and tiny stem, and then repeat the motif until there are enough acorns for a complete fall garland.
The project is worked mainly in single crochet, so it is approachable for a beginner who is ready to practice crocheting in continuous rounds.
The finished garland looks especially good across a mantel, shelf, bookcase, window or autumn display. You can make every acorn identical for a clean minimal look or switch the nut color from gold to rust, cream, moss and burnt orange for a more traditional fall palette.
What You’ll Learn
- How to begin a small amigurumi-style project with a magic ring
- How to crochet in continuous rounds
- How to use increases to create a pointed acorn shape
- How to make neat decreases
- How much stuffing to add to a small decorative motif
- How to crochet a separate acorn cap
- How to create a subtle textured cap edge with BLO stitches
- How to crochet and attach a tiny stem
- How to sew the cap securely to the body
- How to make a simple crochet garland cord
- How to space several acorns evenly along the finished garland
Finished Size
Using worsted-weight #4 yarn and a 3.5 mm hook, one finished acorn should measure approximately:
- Height: 2–2.5 in / 5–6.5 cm including the stem
- Width: approximately 1.5–1.75 in / 4–4.5 cm
A garland with nine acorns can comfortably measure around 55–65 in / 140–165 cm, although the final length is completely adjustable.
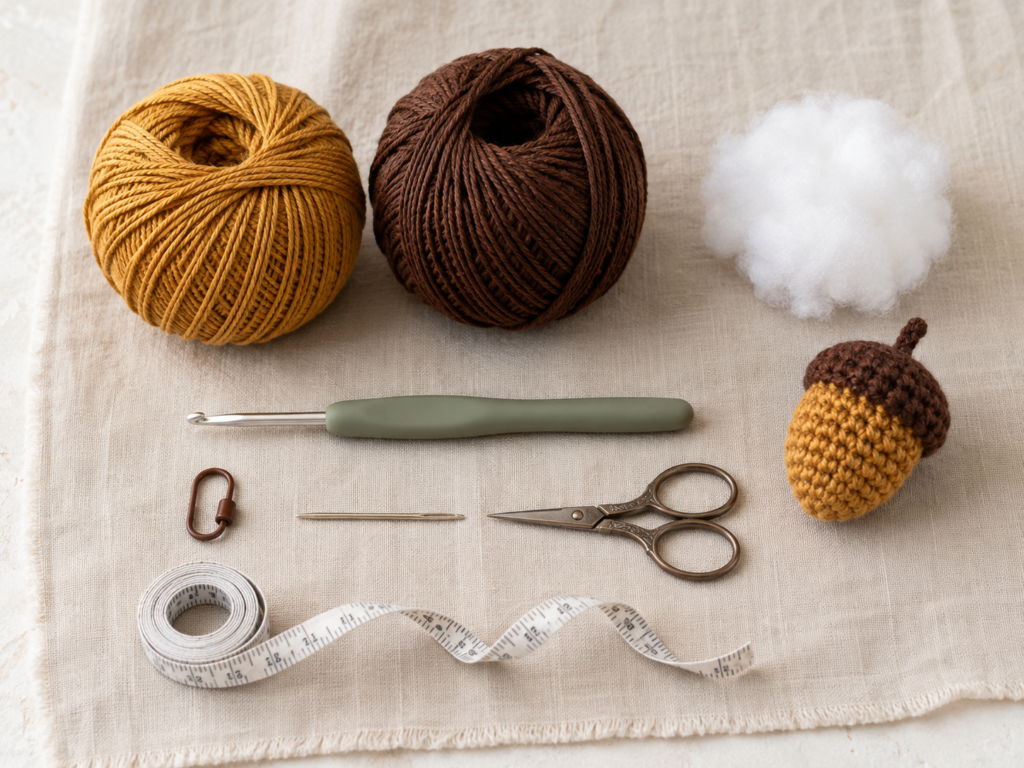
Materials You’ll Need
For a nine-acorn garland:
- Approximately 50–70 yards of warm ochre, caramel or tan worsted-weight #4 yarn for the nut portions
- Approximately 40–60 yards of deep brown worsted-weight #4 yarn for caps and stems
- Approximately 25–40 yards of cream, beige or brown yarn for the garland cord
- 3.5 mm (E/4) crochet hook
- Polyester fiberfill
- Locking stitch marker
- Tapestry or yarn needle
- Scissors
- Measuring tape
- Optional straight pins for positioning caps before sewing
Smooth yarn is easier for a beginner because the individual stitch tops remain easy to identify.
Crochet Abbreviations Used
This tutorial uses US crochet terminology. The Craft Yarn Council standard abbreviation list identifies terms such as ch, sc, sl st, inc, dec, BLO and st/sts commonly used in crochet patterns.
- ch = chain
- sc = single crochet
- sl st = slip stitch
- st / sts = stitch / stitches
- rep = repeat
- BLO = back loop only
- inc = increase; work 2 sc in one stitch
- dec = decrease; crochet 2 stitches together
- MR = magic ring
- rnd = round
US/UK Terminology Note
This article uses US terms. One important distinction is that US single crochet corresponds to UK double crochet. The Craft Yarn Council publishes a US/UK terminology comparison for reference.
Before You Start
Gauge and Tension
Exact gauge is not essential because this is decorative home décor rather than fitted clothing.
What matters more is firm tension.
Your stitches should sit closely enough together that white fiberfill cannot easily show between them. If your fabric looks loose, move down one hook size.
Do not crochet so tightly that inserting the hook becomes uncomfortable.
Use a Stitch Marker
The acorn body is worked in continuous spirals. You will not join each round unless specifically instructed.
Place a stitch marker into the first stitch of every round and move it upward after each completed round.
This prevents the common beginner problem of accidentally adding or skipping stitches.
Count Every Round
Do not rely only on the visual shape.
If the pattern says you should have 20 stitches, stop and count 20 stitches before beginning the next round. Correcting one round immediately is much easier than discovering the mistake five rounds later.
Magic Ring Alternative
If you dislike the magic ring, you may:
- Ch 2.
- Work the required first-round single crochet stitches into the second chain from the hook.
The center may be slightly less adjustable, but the method is perfectly usable for a decorative acorn.
Step-by-Step Crochet Tutorial
Step 1: Make the Point of the Acorn
Using the ochre body yarn, make a magic ring.
Round 1
Work 5 sc into the magic ring.
(5 sts)
Pull the yarn tail gently until the center closes.
Do not join.
Place your marker into the first single crochet.
Beginner tip:
The five stitches may look extremely small and crowded. That is normal. Spread them gently with your fingers before starting Round 2.
Common mistake to avoid:
Do not accidentally crochet into the slip knot or yarn tail when counting your five stitches. Count only the five actual single crochet stitches.
Step 2: Increase the Acorn Body
The next rounds gradually widen the tiny point.
Round 2
Work 2 sc in every stitch around.
(10 sts)
Round 3
Repeat [sc in next st, inc in next st] around.
(15 sts)
Round 4
Repeat [sc in next 2 sts, inc in next st] around.
(20 sts)
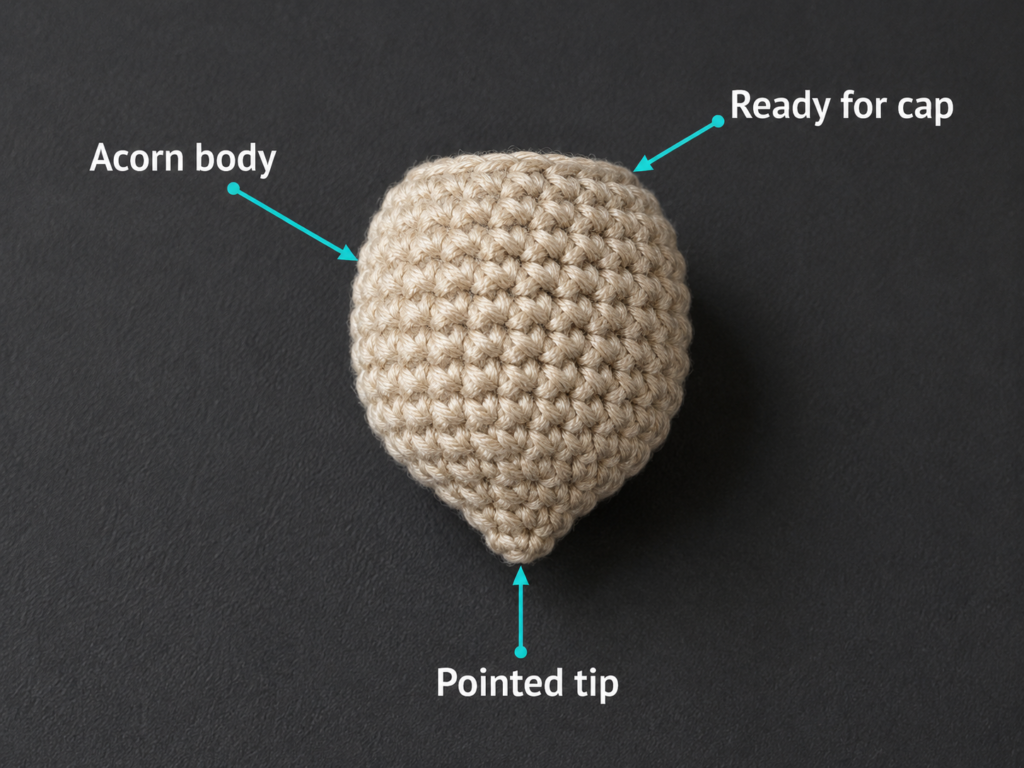
You should now have a small shallow shape with a subtle point at the center.
Beginner tip:
An increase simply means placing two single crochet stitches into the same stitch.
Common mistake to avoid:
Do not place both stitches of the increase into two separate stitches. Both must enter the same stitch from the previous round.
Step 3: Crochet the Main Body
Now stop increasing.
Rounds 5–8
Work 1 sc in every stitch around.
(20 sts per round)
As you work these rounds, the flat circle will begin curving upward into a small cup and then a rounded nut shape.
Continue moving the stitch marker at the beginning of each round.
Beginner tip:
Count your stitches after each round. Every round in this section should still contain exactly 20 stitches.
Common mistake to avoid:
Do not accidentally increase at the stitch marker. The marked stitch is simply the first stitch of the new round.
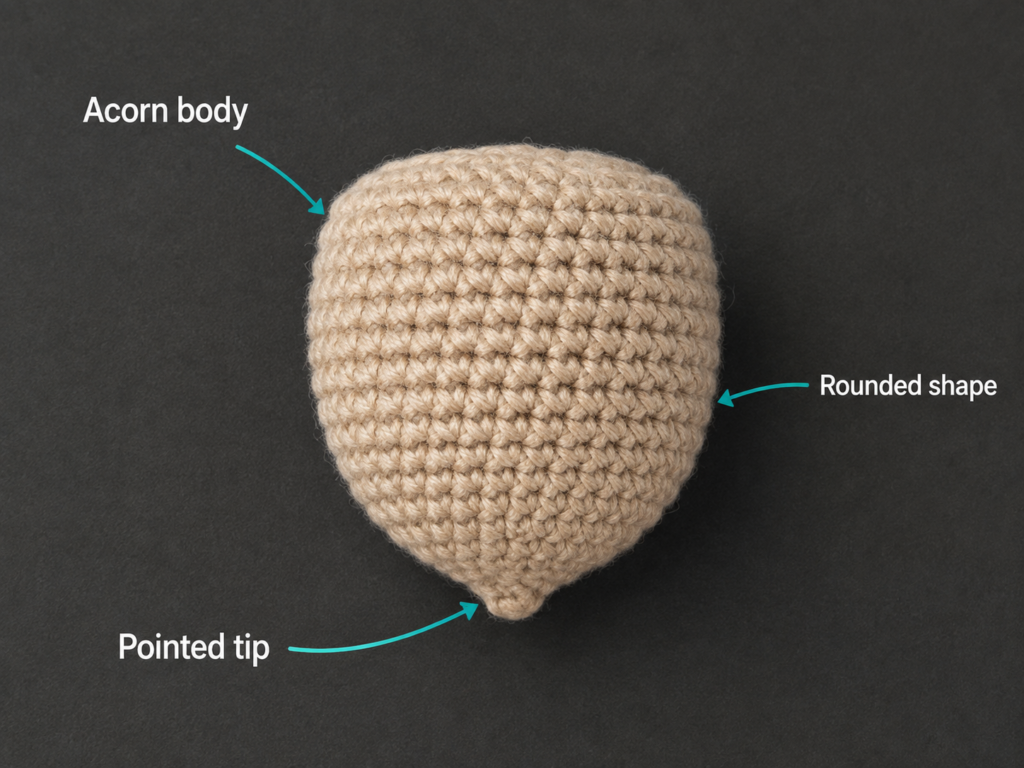
Step 4: Decrease and Stuff the Acorn
Now shape the upper portion.
Round 9
Repeat [sc in next 3 sts, dec] 4 times.
(16 sts)
Round 10
Repeat [sc in next 2 sts, dec] 4 times.
(12 sts)
Pause here to add stuffing.
Use small wisps rather than pushing one large lump into the body.
Fill the pointed lower section first. Continue until the body feels softly firm and holds its shape.
Do not overstuff.
Round 11
Repeat [sc in next st, dec] 4 times.
(8 sts)
Fasten off, leaving a 6–8 inch tail.
Thread the tail onto your yarn needle. Pass the needle through the front loop of each remaining stitch, pull gently to close the opening, secure the yarn and weave in the end.
Beginner tip:
Shape the acorn with your fingers after stuffing. Pinch the bottom very gently if you want the point to look more pronounced.
Common mistake to avoid:
Too much stuffing causes the crochet stitches to stretch apart and can flatten the point.
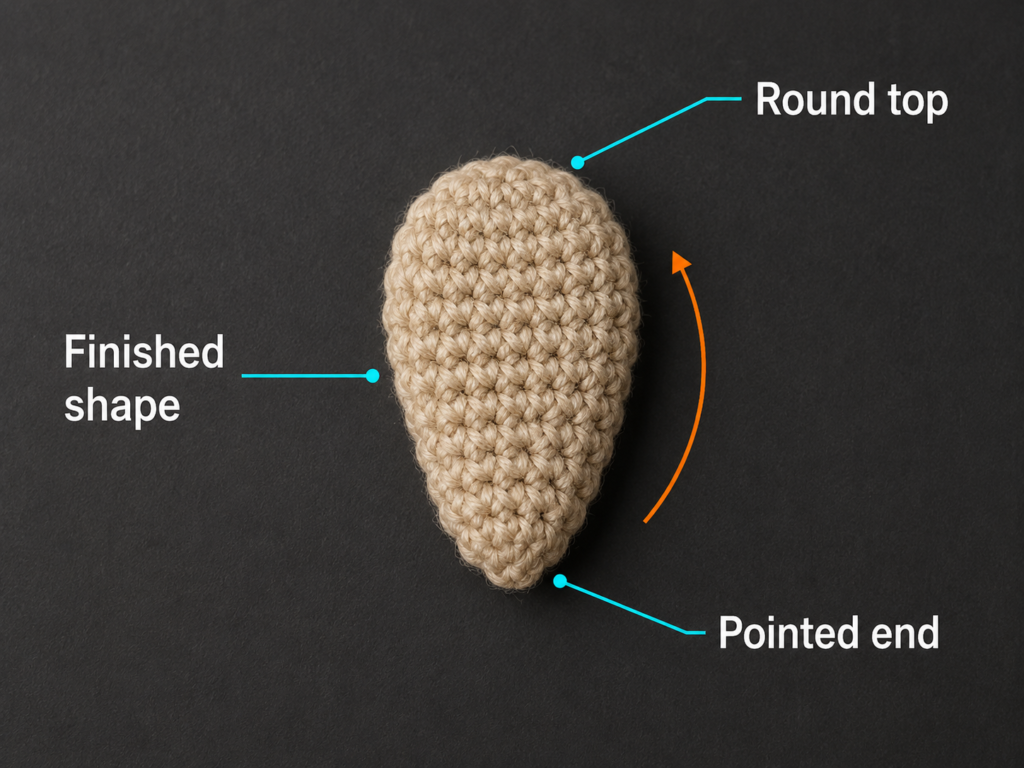
Step 5: Crochet the Acorn Cap
Switch to deep cocoa-brown yarn.
Make another magic ring.
Round 1
Work 5 sc into MR.
(5 sts)
Round 2
Inc in every stitch around.
(10 sts)
Round 3
Repeat [sc, inc] around.
(15 sts)
Round 4
Repeat [sc in next 2 sts, inc] around.
(20 sts)
The cap should now be slightly wider than the top of the stuffed nut.
Beginner tip:
Place the cap over the body before continuing. It should cover approximately the upper third of the acorn without stretching.
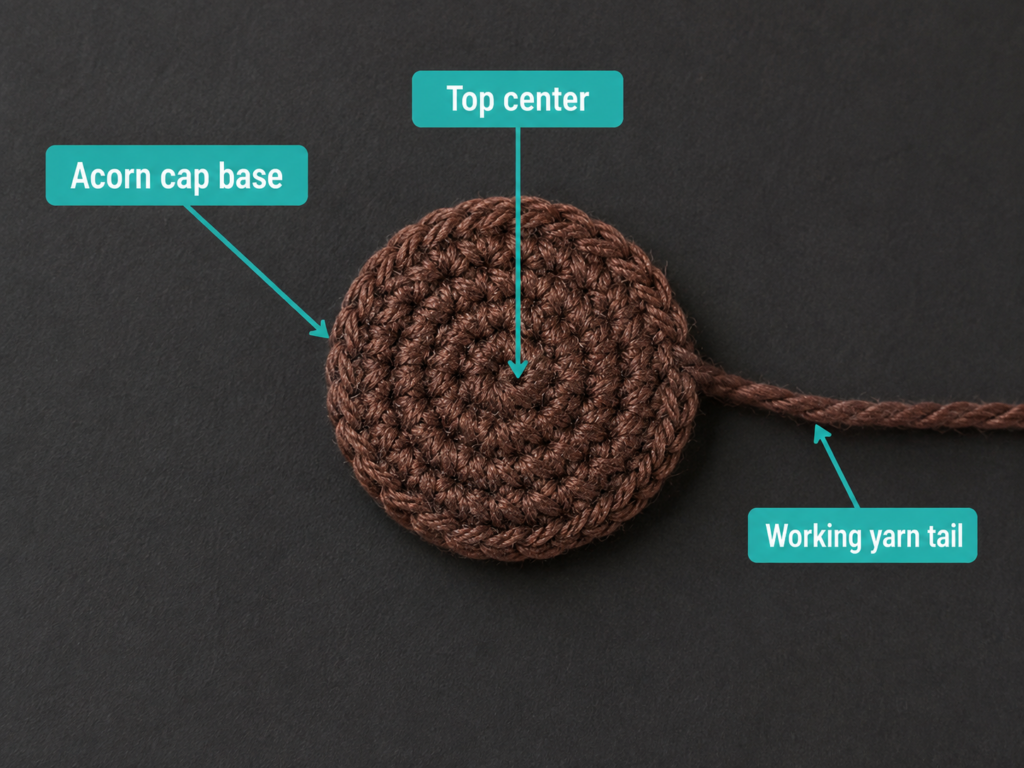
Step 6: Add Depth to the Cap
Round 5
Work 1 sc BLO in each stitch around.
(20 sts)
Working through only the back loop creates a subtle ridge that visually separates the crown from the side of the cap.
Round 6
Work 1 sc in each stitch around.
(20 sts)
Slip stitch into the next stitch.
Fasten off, leaving a long tail of approximately 12 inches for sewing.
Test the cap on the acorn again.
Beginner tip:
Do not pull your BLO stitches unusually tight. Maintain your normal tension.
Common mistake to avoid:
If the cap buckles inward, you may have missed a stitch. If it flares dramatically, an accidental increase is the likely cause.
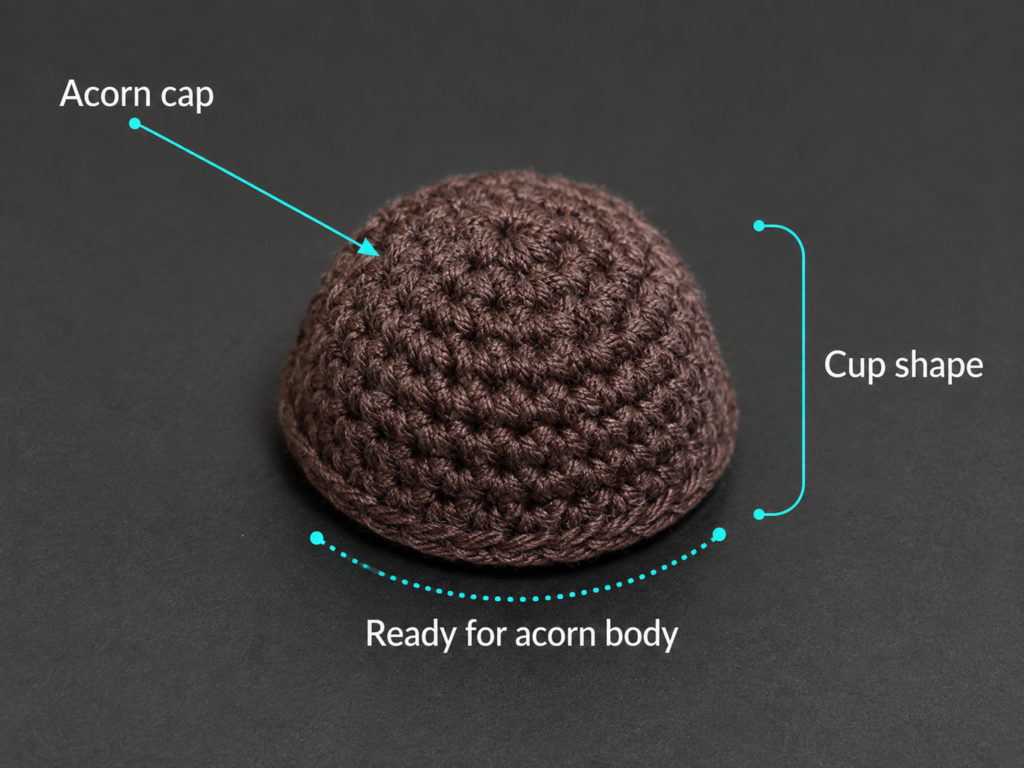
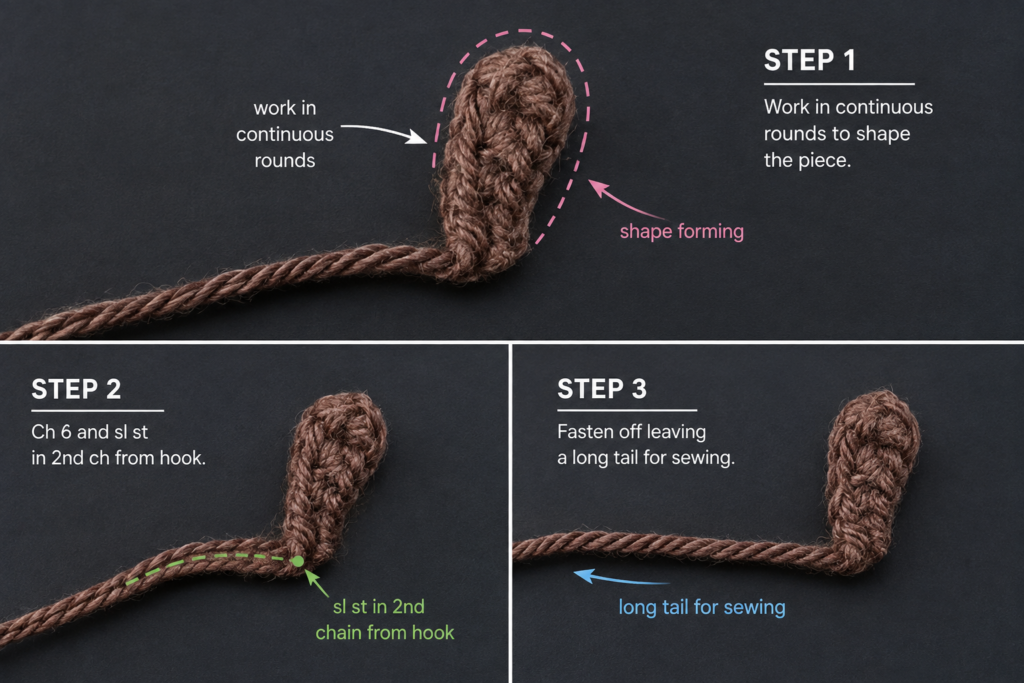
Step 7: Make the Tiny Stem
With brown yarn:
Ch 6.
Beginning in the second chain from the hook, work one slip stitch into each chain across.
You will have a short, slightly curved strip.
Fasten off leaving a sewing tail.
Use the tail to stitch one end of the stem securely to the center of the cap.
Beginner tip:
Loose chains are easier to slip stitch into than extremely tight chains.
Common mistake to avoid:
Do not count the loop currently sitting on your hook as one of the six chains.
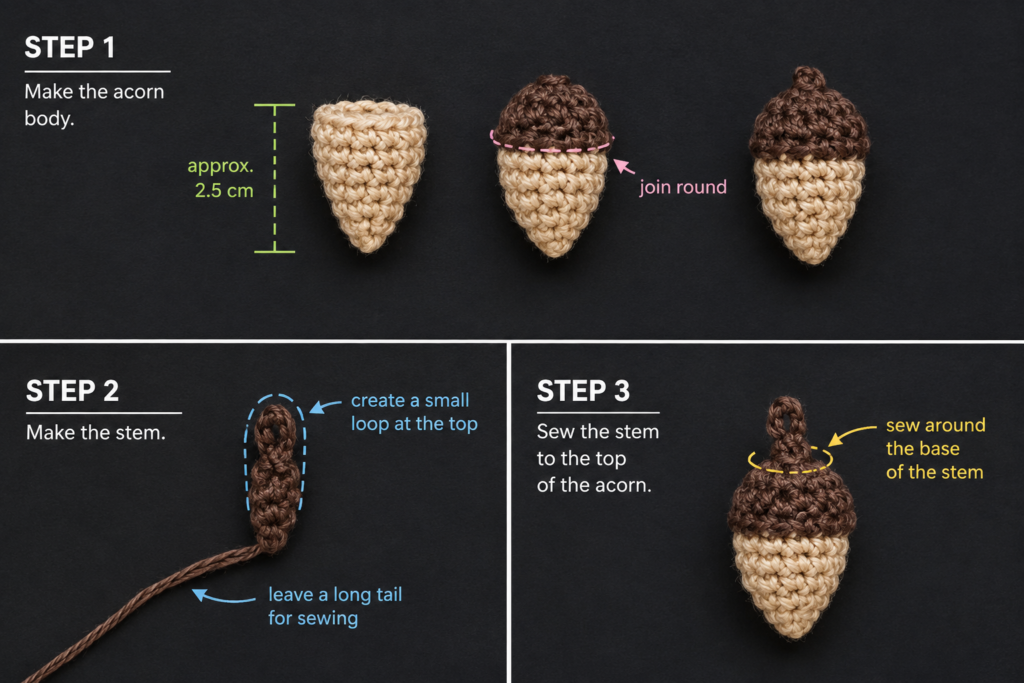
Step 8: Assemble the Acorn
Place the brown cap over the stuffed ochre body.
Rotate it until the cap sits evenly.
Thread the long cap tail onto a yarn needle.
Sew around the lower edge of the cap, catching:
- A small portion of the cap edge.
- One stitch from the body directly underneath.
Continue around the entire acorn.
Pull the sewing yarn firmly enough that no obvious gap remains, but do not pull so tightly that the cap puckers.
Secure the yarn underneath the cap and weave the tail inside the acorn.
Beginner tip:
Use three or four temporary pins if the cap keeps moving while you sew.
Common mistake to avoid:
Do not push the cap too far down one side. Check the acorn from the front, back and both sides before securing the final stitches.
Step 9: Make the Remaining Acorns
Repeat Steps 1–8 until you have the number of acorns needed.
For a medium garland, make nine acorns.
Before creating the cord, place all nine acorns together and check:
- Are the bodies approximately the same height?
- Are the caps sitting at similar depths?
- Are the stems firmly attached?
- Is any stuffing visible?
- Have all yarn ends been woven in?
Small handmade differences are fine. They often make a garland look more natural.
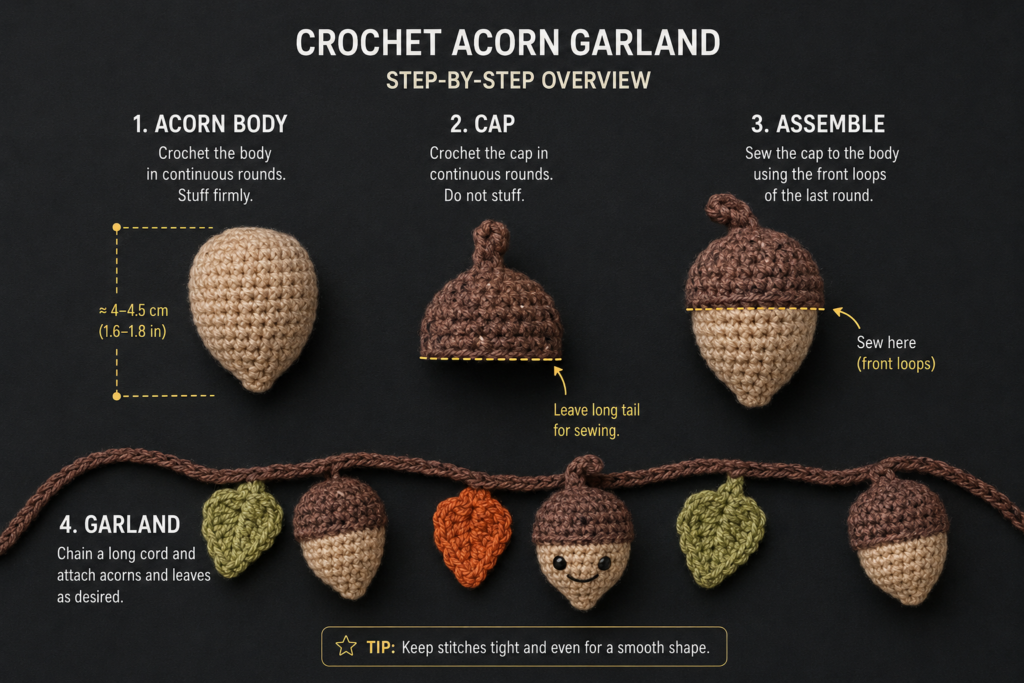
Step 10: Crochet the Garland Cord
Use cream, beige or brown yarn.
Leave approximately 8 inches / 20 cm of yarn before beginning.
Make a slip knot and chain until the cord measures approximately 55–65 inches, or your preferred garland length.
Do not depend on a fixed chain count because individual chain gauge varies significantly.
For a sturdier cord, turn and work one slip stitch through the back bump of every chain until you return to the beginning.
Fasten off leaving another 8-inch tail.
These two tails can be formed into hanging loops or woven in after the garland is installed.
Beginner tip:
Measure your intended display space before making the cord.
If the mantel is 48 inches wide, you may prefer a garland around 55–60 inches so it can hang with a relaxed curve.
Step 11: Attach the Acorns
Lay the cord flat.
Place the first acorn approximately 5 inches from one end.
Position the remaining acorns approximately 5–6 inches apart.
Do not permanently attach them immediately.
First lay all nine acorns beside the cord and adjust the spacing until the arrangement looks balanced.
Once satisfied, thread the garland cord onto a large yarn needle if possible and pass it carefully underneath a secure stitch at the back of each cap.
Alternatively, use a separate short strand of matching brown yarn to sew each acorn to the cord.
The second method gives you more control and is especially useful if your crochet cord is too thick for your yarn needle.
Pattern Notes and Stitch Notes
Turning Chain
No turning chain is required for the acorn body because it is worked continuously in spirals.
The cap is also worked in continuous rounds until it is finished.
Stitch Counts
Check your stitch count after every increase and decrease round.
The body progresses:
5 → 10 → 15 → 20 stitches
It remains at 20 stitches during the straight section before decreasing:
20 → 16 → 12 → 8
The cap increases:
5 → 10 → 15 → 20
It then remains at 20 stitches while the edge gains depth.
Right Side and Wrong Side
The outside surface of the continuously crocheted body is treated as the right side.
Avoid turning the pieces inside out during construction unless you intentionally prefer the opposite texture.
Repeat
Make one complete acorn, including cap and stem, before batch-making the remaining eight.
Once you understand the construction, you can work efficiently by making all nine bodies, then all nine caps, then all nine stems.
Size Adjustments
For smaller acorns:
- Use DK #3 yarn.
- Try a 2.75–3.25 mm hook.
- Keep the same construction.
For larger acorns:
- Use bulky #5 yarn.
- Choose a hook small enough to produce dense fabric.
- Expect the finished garland to become substantially heavier.
The Craft Yarn Council maintains a standardized yarn-weight system that can help when comparing yarn categories and recommended tool ranges.
Common Beginner Mistakes
1. Losing the Beginning of the Round
Problem: The acorn mysteriously gains or loses stitches.
Fix: Place a locking stitch marker into the first stitch of every round and move it immediately when beginning the next round.
2. Making Accidental Increases
Problem: The body begins flaring outward during the straight rounds.
Fix: Work exactly one single crochet into every stitch. Count 20 stitches before continuing.
3. Stuffing Too Firmly
Problem: White filling shows through the crochet fabric.
Fix: Remove some fiberfill and reshape the acorn. Small decorative amigurumi needs less filling than many beginners expect.
4. Stuffing Too Lightly
Problem: The finished acorn collapses when handled.
Fix: Add tiny wisps of fiberfill until the piece springs gently back into shape.
5. Crocheting the Cap Too Tightly
Problem: The cap will not slide over the upper part of the nut.
Fix: Relax your tension or move up 0.25–0.5 mm for the cap only.
6. Crocheting the Cap Too Loosely
Problem: The cap looks floppy or oversized.
Fix: Use the original 3.5 mm hook and slightly firmer tension.
7. Sewing the Cap Crooked
Problem: One side sits noticeably lower.
Fix: Pin the cap in three or four places before sewing. Check all sides before tightening the last stitches.
8. Uneven Garland Spacing
Problem: One section of the garland looks crowded.
Fix: Arrange every acorn beside the cord before attaching any permanently.
How to Customize This Crochet Project
Change the Nut Colors
A cohesive autumn palette could include:
- Ochre
- Burnt orange
- Rust
- Moss green
- Cream
- Mustard
- Caramel
Keep every cap in the same cocoa brown if you want the garland to remain visually unified.
Make a Neutral Garland
For Scandinavian or farmhouse décor, try:
- Oatmeal bodies
- Taupe caps
- Cream cord
Change the Size
Using lighter yarn produces smaller acorns without rewriting the pattern.
Using heavier yarn creates larger statement acorns.
Always adjust the crochet hook to maintain a firm fabric.
Add Wooden Beads
Small unfinished wooden beads can be positioned between acorns for additional texture.
Because beads create small-part hazards, keep this type of decorative garland away from babies and young children.
Add Crochet Leaves
Alternate acorns with small oak or autumn leaves for a fuller botanical garland.
Add Texture to the Cap
Try:
- BLO rounds
- Surface slip stitches
- Tweed yarn
- Heathered wool
- A subtly fuzzy yarn
For beginners, tweed yarn is the easiest way to add visual texture without changing the stitch pattern.
Make Mini Ornaments
Instead of making the long cord, add a short hanging loop to each acorn.
They can become:
- Fall gift toppers
- Thanksgiving place-setting decorations
- Autumn tree ornaments
- Bag charms
- Wreath decorations
Finishing Instructions
Inspect every acorn individually.
Trim any yarn ends only after they have been woven securely through several stitches.
Gently roll each stuffed body between your palms to smooth the fiberfill and improve the shape.
If the cap edge curls slightly, reshape it with your fingers.
Heavy wet blocking is unnecessary for stuffed acorns.
If you need to tidy the crochet cord, lightly dampen it, straighten it on a towel and allow it to dry completely before hanging the garland.
For washable yarn, follow the care instructions printed on the yarn label. Hand washing is usually the gentlest choice for a stuffed decorative project.
Do not iron acrylic yarn directly.
Quick Printable-Style Summary
Skill Level: Beginner / easy
Finished Acorn: Approximately 2–2.5 inches tall
Garland Length: Approximately 55–65 inches, adjustable
Yarn: Worsted-weight #4
Hook: 3.5 mm (E/4)
Other Materials: Fiberfill, stitch marker, tapestry needle, scissors
Main Stitches: ch, sc, sl st, inc, dec, BLO sc
Acorn Body
Start with MR + 5 sc.
Increase gradually to 20 sts.
Work even rounds.
Decrease gradually to 8 sts.
Stuff before the opening becomes too small.
Fasten off and close the final opening with a yarn needle.
Cap
Start with MR + 5 sc.
Increase gradually to 20 sts.
Work one BLO round followed by one regular sc round.
Fasten off with a long sewing tail.
Stem
Ch 6.
Slip stitch back along the chain.
Sew to the center of the cap.
Assembly
Sew the cap evenly around the upper body.
Repeat
Make approximately 9 acorns for a medium mantel garland.
Garland Cord
Chain until desired length.
For extra strength, slip stitch back along the chain.
Space the acorns approximately 5–6 inches apart.
Secure each acorn beneath the back edge of its cap.
FAQ
Is this crochet acorn garland suitable for beginners?
Yes. The project uses mostly single crochet plus basic increases and decreases. The main new skill for many beginners will be working continuously in the round.
It is particularly useful as a first small amigurumi-style décor project because each acorn works up quickly.
Do I need to use a magic ring?
No.
If a magic ring is frustrating, chain 2 and work the first-round stitches into the second chain from the hook.
The magic ring simply makes it easier to tighten the center completely.
What yarn is best for a crochet acorn garland?
Smooth worsted-weight cotton, acrylic or a cotton-acrylic blend is beginner-friendly.
Use yarn that provides good stitch definition and avoid very fuzzy yarn for your first acorn.
How many acorns should I make?
Nine works well for an approximately 5-foot garland.
For a short shelf garland, try five or seven.
For a long fireplace or staircase display, make eleven, thirteen or more.
Odd numbers often create an easy-to-center arrangement because one acorn can sit exactly in the middle.
Can I make the acorns without stuffing?
This particular construction is designed as a three-dimensional stuffed acorn.
For an unstuffed project, a flat crochet acorn appliqué would be a better construction.
Why can I see stuffing between my stitches?
Your tension is probably too loose, the hook is too large for the yarn, or the acorn is overstuffed.
Try removing a little fiberfill first. If the gaps remain, use a slightly smaller hook for your next acorn.
Can I add faces to the acorns?
Yes.
Small embroidered eyes and smiles can turn the motifs into cute woodland characters.
For décor intended around very young children, embroidered details are preferable to detachable small plastic embellishments.
Conclusion
Once the first acorn is finished, this crochet acorn garland becomes a wonderfully repetitive fall project.
The construction is simple enough for a beginner to practice essential amigurumi skills, but the separate cap, tiny stem and pointed shape make each finished acorn look much more detailed than the stitch list suggests.
Make nine matching acorns for a quiet neutral mantel, switch the body colors for a richer autumn palette, or mix the acorns with crochet leaves for a fuller woodland garland.
Because the cord length and motif spacing are adjustable, the same pattern can work for a narrow bookshelf, large fireplace, window, seasonal centerpiece or handmade fall gift.
Save the tutorial with your fall crochet ideas so you can make another color version next season.