A handmade wreath is one of those crochet projects that looks far more complicated than it really is. Instead of crocheting one enormous circular piece, this crochet harvest wreath pattern is built from several manageable beginner-friendly components: a simple ribbed rectangle for the wreath cover, a few small flowers, easy crochet leaves, and a final assembly step.
That makes it a satisfying fall project even if you have never crocheted home décor before.
The warm colors and dimensional flowers give the wreath a traditional harvest feeling without making it look overly themed. Hang it on a protected front door, above a mantel, on an interior wall, or in an entryway from late summer through Thanksgiving.
This tutorial uses a foam wreath form because it gives beginners a predictable shape to work around. More importantly, the sizing method is based on measuring your own wreath, so you are not locked into one exact brand or ring thickness.
The tutorial photography sequence was researched from a single fall-wreath tutorial from Agnes Creates so the instructional stages remain visually coherent, but the construction, measurements, motif instructions, explanations, colors, and photography prompts below are newly written. The reference tutorial similarly demonstrates a crocheted wreath cover followed by dimensional crochet flowers.
What You’ll Learn
By the end of this project, you will know how to:
- measure a crochet cover directly against a wreath form;
- make a long ribbed rectangle using half double crochet;
- join crochet fabric around a foam ring cleanly;
- make a dimensional spiral-style crochet mum;
- crochet a simple round sunflower;
- make easy pointed leaves by working on both sides of a foundation chain;
- arrange crochet appliqués before permanently attaching them;
- weave in and hide ends so the front of the wreath stays tidy;
- adjust the same basic project for different wreath sizes and color palettes.
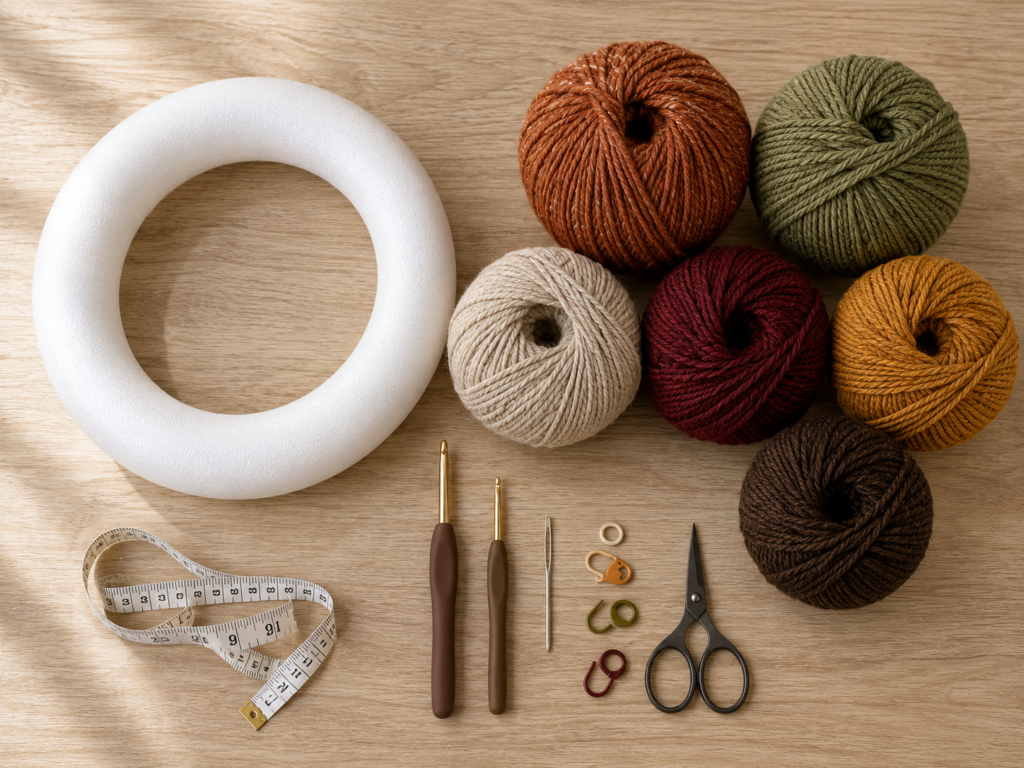
Materials You’ll Need
For a 14-inch wreath, gather:
- one 14-inch foam wreath form;
- approximately 220–300 yards of medium #4 worsted-weight yarn for the wreath cover;
- approximately 25 yards deep burgundy yarn for two mums;
- approximately 15 yards mustard or golden yellow yarn;
- approximately 10 yards espresso or dark brown yarn;
- approximately 15 yards muted olive yarn for leaves;
- 5.0 mm crochet hook for the cover;
- 4.0 mm crochet hook for the flowers and leaves;
- tapestry needle;
- sharp scissors;
- 4–6 removable stitch markers;
- flexible measuring tape;
- optional straight pins for testing the flower arrangement;
- optional floral wire if you want removable decorations.
Medium #4 is an industry yarn-weight category; hook recommendations vary with yarn construction and intended fabric, so your own tension remains more important than matching a rigid number.
Crochet Abbreviations Used
The tutorial uses US crochet terminology. Standardized crochet abbreviations are commonly used by yarn-industry designers and publishers.
- ch = chain
- sc = single crochet
- hdc = half double crochet
- dc = double crochet
- tr = treble crochet
- sl st = slip stitch
- st/sts = stitch/stitches
- rep = repeat
- BLO = back loop only
- inc = increase; work two stitches into one stitch
- MR = magic ring
US/UK terminology note
This tutorial uses US terminology. Be careful when using UK resources because several stitch names differ. Always check the terminology stated by a pattern before beginning.
Before You Start
Gauge and tension
Exact gauge is not important for this project because the wreath cover is sized directly against the form.
The important goal is consistency.
Your fabric should be dense enough that the foam does not show clearly through the stitches, but it should still stretch slightly. If the fabric feels stiff and difficult to wrap around the wreath, move up a hook size.
If the fabric looks loose and transparent, move down a hook size.
How to count stitches
After your first row, count every visible “V” along the top edge.
Place a stitch marker in the first and final stitch if you regularly lose edge stitches. Move those markers upward each row.
How to keep the rectangle straight
The turning chain in the wreath cover does not count as a stitch.
After turning, place the first hdc into the very first stitch.
At the end of the row, make sure you work into the final marked stitch.
How to prevent curling
A slight curl is normal with ribbed crochet.
Heavy curling usually means your starting chain is too tight. Make the foundation chain with relaxed tension or use a hook one size larger for the chain only.
Choosing harvest colors
For a sophisticated fall look, choose one muted base and two or three stronger accents.
This tutorial uses:
- rust + olive + oatmeal for the covered wreath;
- deep burgundy for mums;
- mustard gold for sunflower petals;
- espresso for the sunflower center;
- olive for leaves.
Keeping the same palette throughout gives the project a cohesive handmade look.
Step-by-Step Crochet Tutorial
Step 1: Measure the Foundation Chain Around the Wreath
Do not begin by assuming an exact chain count.
Every foam wreath has a slightly different tube thickness, so measure yours directly.
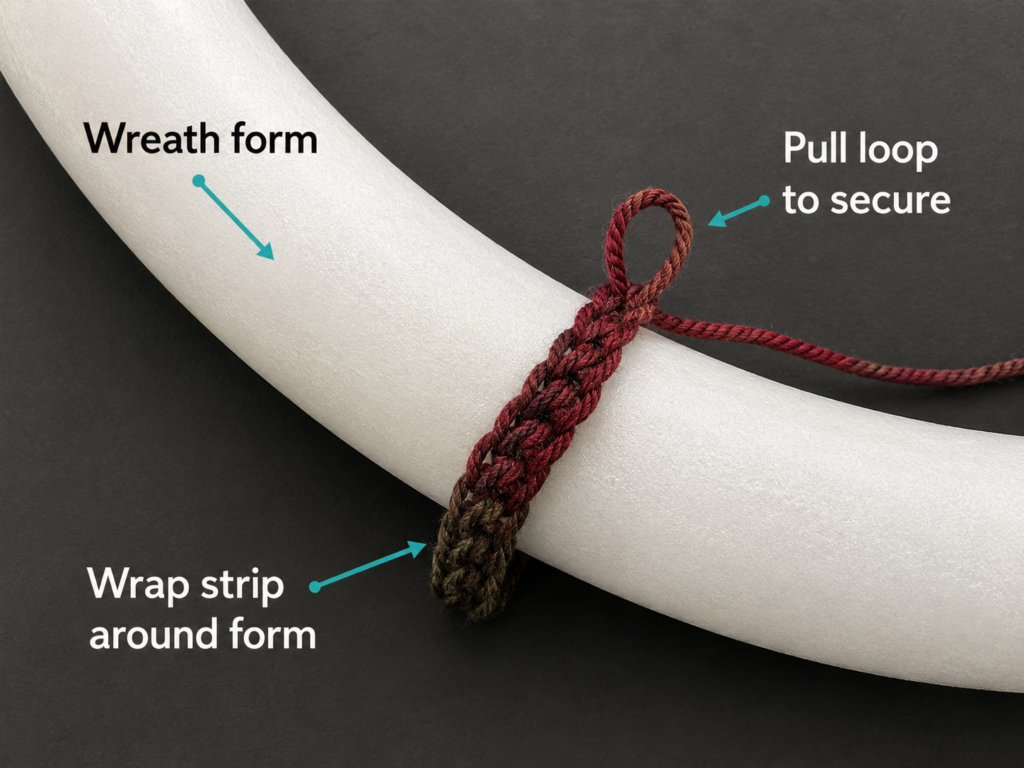
Make a loose slip knot and chain until the chain can curve around the thickness of the wreath tube. The two ends of the chain should almost meet without stretching hard.
Then remove the chain from the wreath and add one turning chain.
The goal is for your completed rectangle to wrap from the back of the ring, across the outside face, and back toward the inner opening.
Beginner tip: Keep the chain relaxed. A tight foundation chain can make one edge of your cover shorter than the other.
Common mistake to avoid: Do not measure around the entire circular wreath at this stage. You are measuring only around the thickness of the foam tube.
Step 2: Crochet the Ribbed Wreath Cover
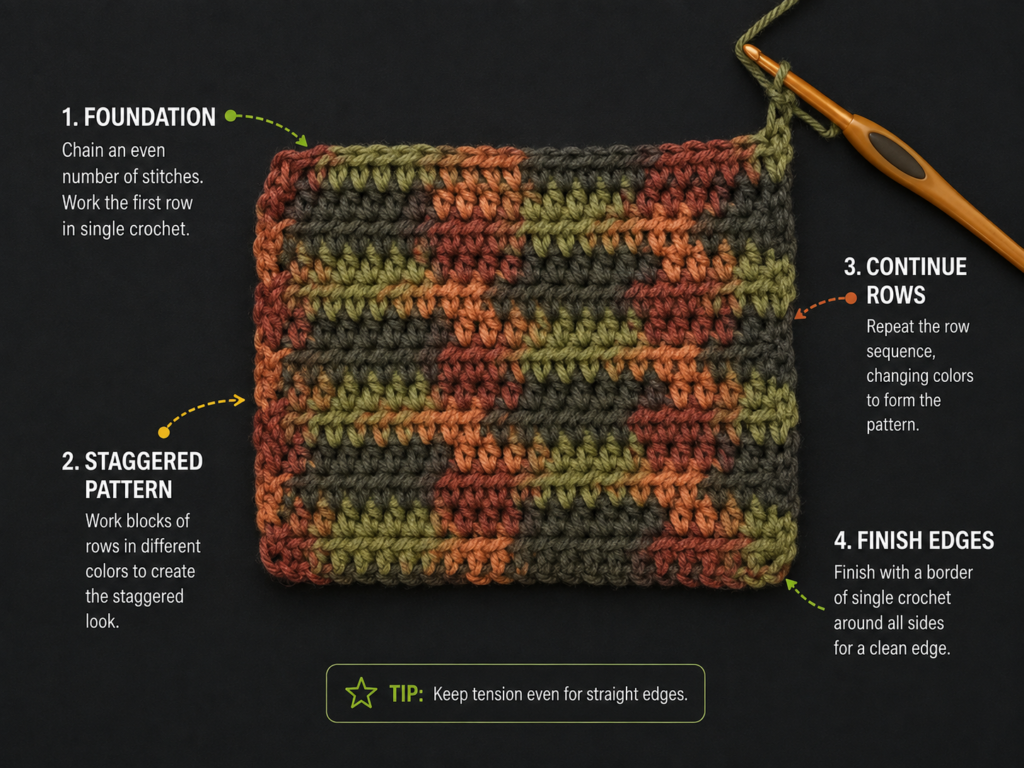
Row 1
Hdc in the second chain from the hook and in every chain across.
Ch 1 and turn.
Row 2
Working in the back loop only, hdc in every stitch across.
Ch 1 and turn.
Remaining rows
Repeat Row 2.
The unused front loops form horizontal ridges across the fabric. Those ribs give the finished wreath more texture than a completely flat cover.
Continue until the rectangle is long enough to travel around the full circular wreath form.
Instead of counting a prescribed number of rows, wrap the strip loosely around the wreath every 15–20 rows.
Stop when the beginning and ending edges can meet comfortably.
Do not stretch the strip aggressively. A small amount of stretch is useful because it keeps the finished cover smooth, but too much negative ease will compress the foam and distort the ring.
Beginner tip: Write down your stitch count after Row 1 and check it every few rows.
Common mistake to avoid: Accidentally working through both loops for a row will interrupt the ribbing. If you notice it immediately, undo that row and work it again through the back loops.
Step 3: Check the Length Before Joining
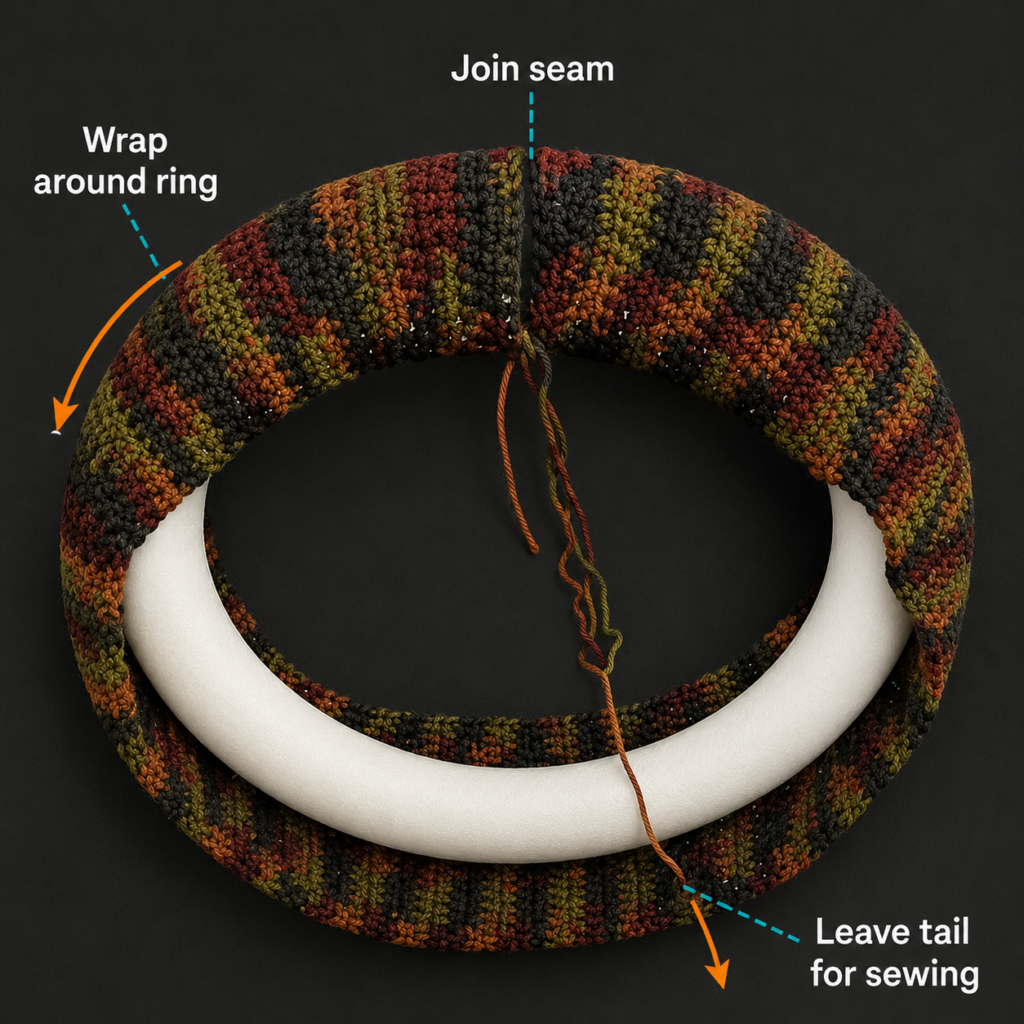
Wrap the rectangle around the wreath form with the ribs running across the width of the ring.
Bring the two short ends together.
You want them to meet without a large gap and without overlapping.
If the rectangle is too short, crochet several more rows.
If it is noticeably too long, remove a few rows.
Check the fit one last time before fastening or seaming anything.
Beginner tip: Temporarily clip the two ends together with stitch markers. This lets you inspect the whole ring while keeping both hands free.
Common mistake to avoid: Do not permanently seam the strip before checking that it reaches around the entire ring.
Step 4: Join the Short Ends
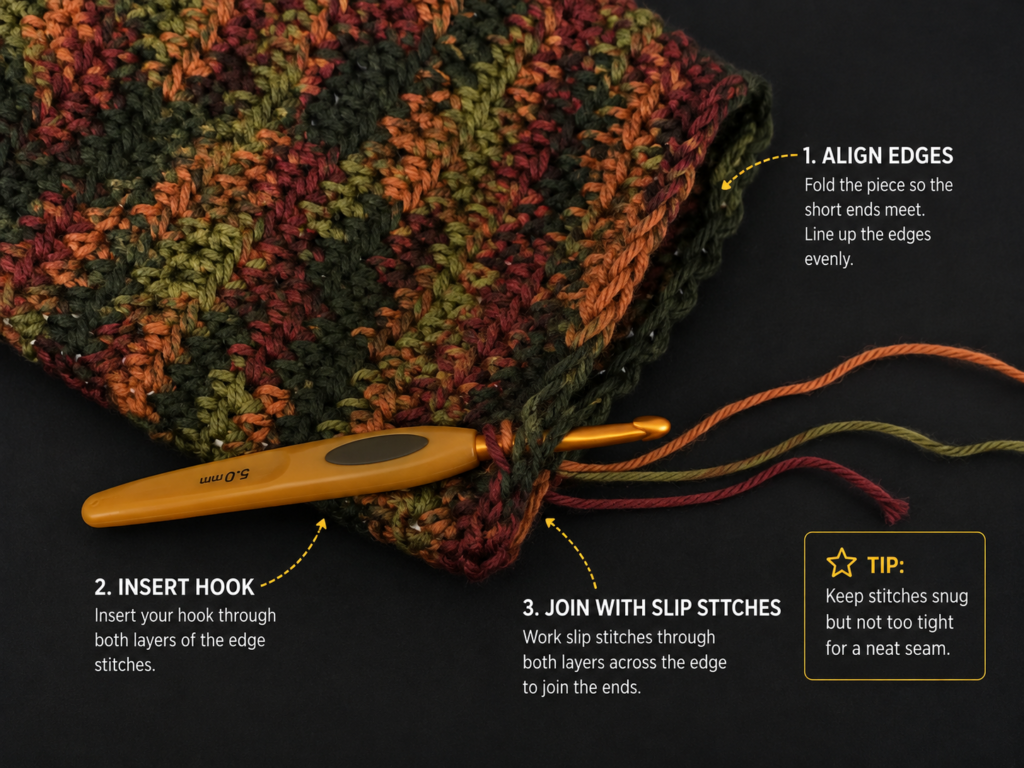
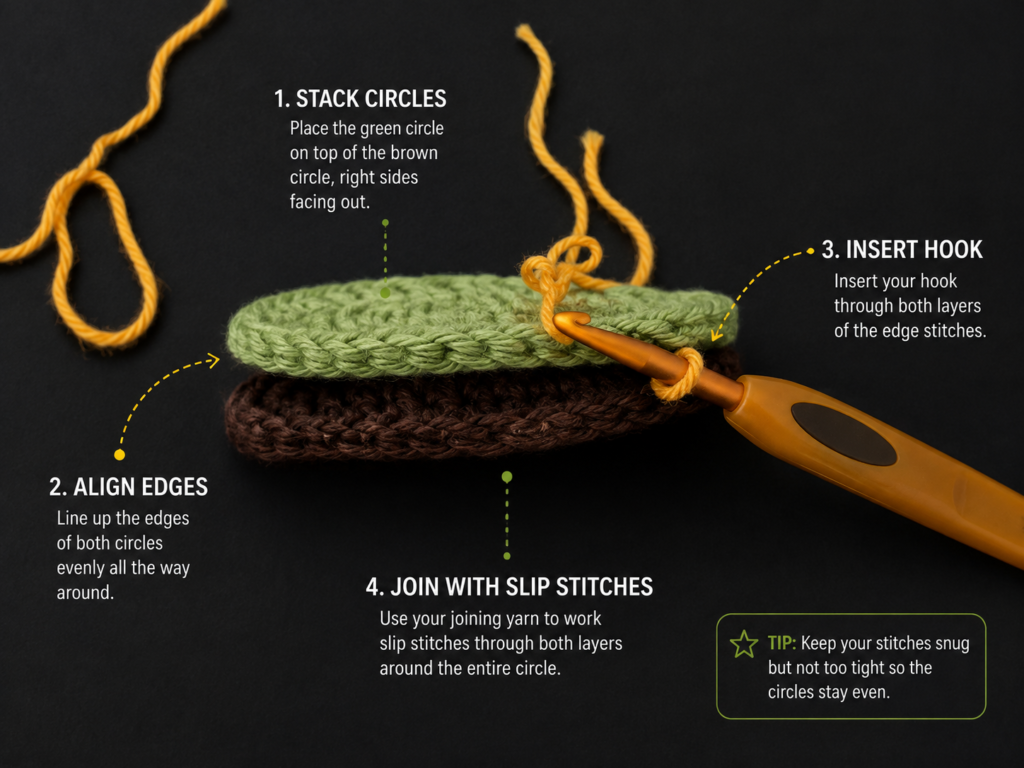
With the two short edges aligned, place them right sides together.
Insert your 5.0 mm hook through one corresponding edge loop from each side.
Slip stitch the two layers together across the entire short edge.
Fasten off, leaving a tail long enough to weave securely into the seam.
Turn the seam toward the back.
The rectangle has now become one large continuous loop.
Beginner tip: Match rib to rib as you work. This prevents the seam from drifting diagonally.
Common mistake to avoid: Pulling your slip stitches too tightly can make the join stiff. Keep the seam firm but flexible.
Step 5: Close the Cover Around the Foam Wreath
Slide the crocheted loop around the foam wreath.
Adjust it until the short joining seam sits where you want the back of the wreath to be.
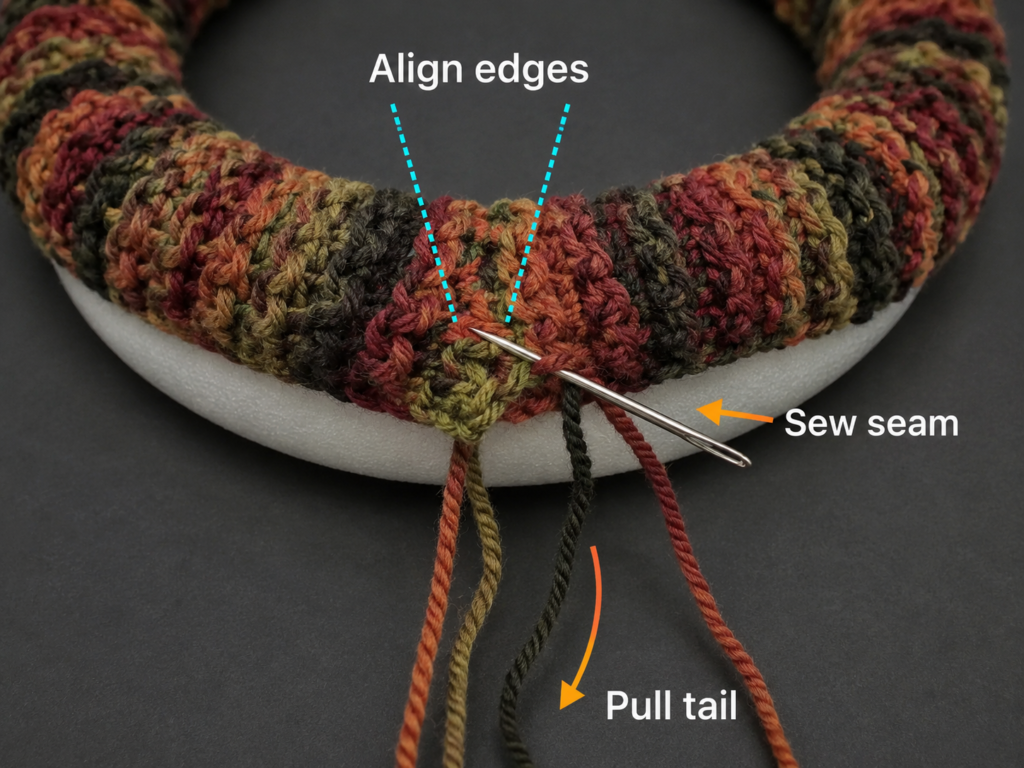
Pull the long edges of the crochet fabric toward each other along the inside circumference of the ring.
Thread a long length of matching yarn onto your tapestry needle.
Beginning near the short seam, sew the two long edges together.
A simple mattress-style seam works well:
- Insert the needle under one edge loop.
- Cross to the opposite edge.
- Insert under the corresponding loop.
- Pull gently.
- Continue alternating from side to side.
Do not pull every stitch as tight as possible. Sew 2–3 inches, then tighten the section gradually.
This makes the seam smoother.
When you reach the starting point, secure the yarn and weave the end into the inside seam.
Rotate and massage the cover until the ribs are distributed evenly.
Beginner tip: Keep the seam on the inner back portion of the wreath. It will be much less visible when displayed.
Common mistake to avoid: If the crochet fabric starts twisting, stop and straighten the ribs before continuing.
Step 6: Crochet the Looped Mum Strip
Switch to the 4.0 mm hook and deep burgundy yarn.
Make two mums.
For each flower:
Foundation
Ch 31.
Row 1
Sc in the second chain from the hook and in each chain across.
You should have 30 sc.
Do not turn.
Loops
Working across the row:
Sl st in the next stitch, ch 5, sl st again into the same stitch.
Repeat from * to * in every stitch across.
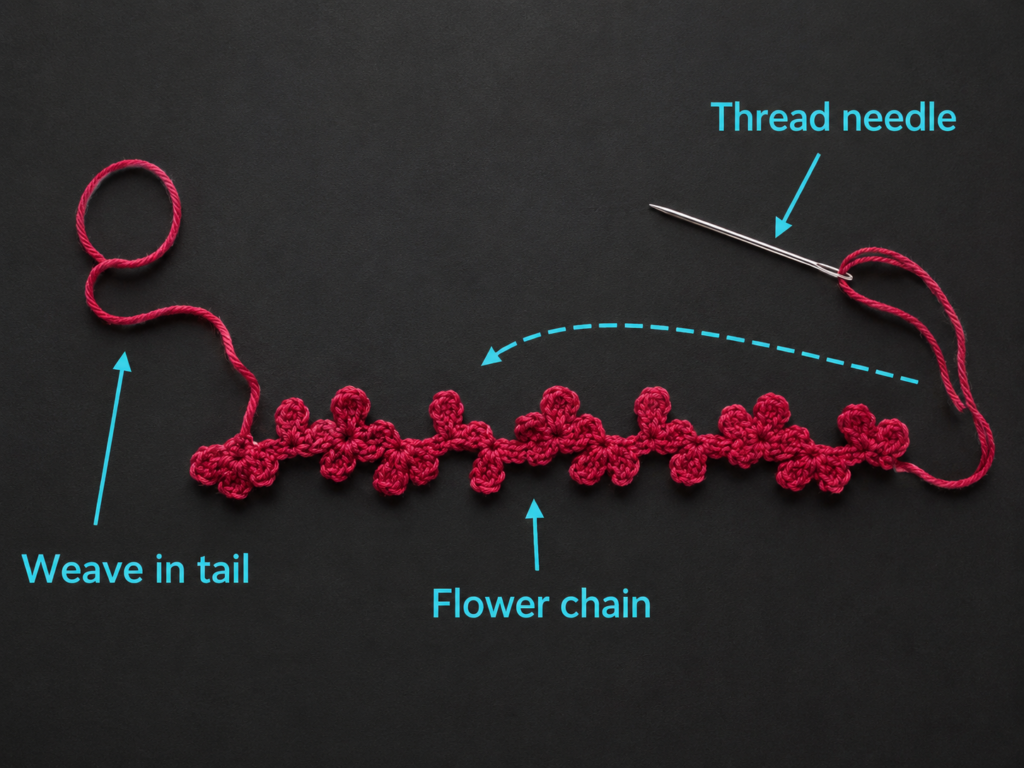
You now have a long strip with 30 loose loops.
Fasten off, leaving a 20-inch sewing tail.
The loops will look messy at this stage. That is exactly what you want. Once rolled together, they create the rounded mum texture.
Beginner tip: Make the ch-5 loops loosely. Tight loops produce a stiff flower.
Common mistake to avoid: Do not sew the loops together. Only the solid foundation edge will be stitched when assembling the flower.
Step 7: Roll and Secure the Crochet Mum
Start at one end of the strip.
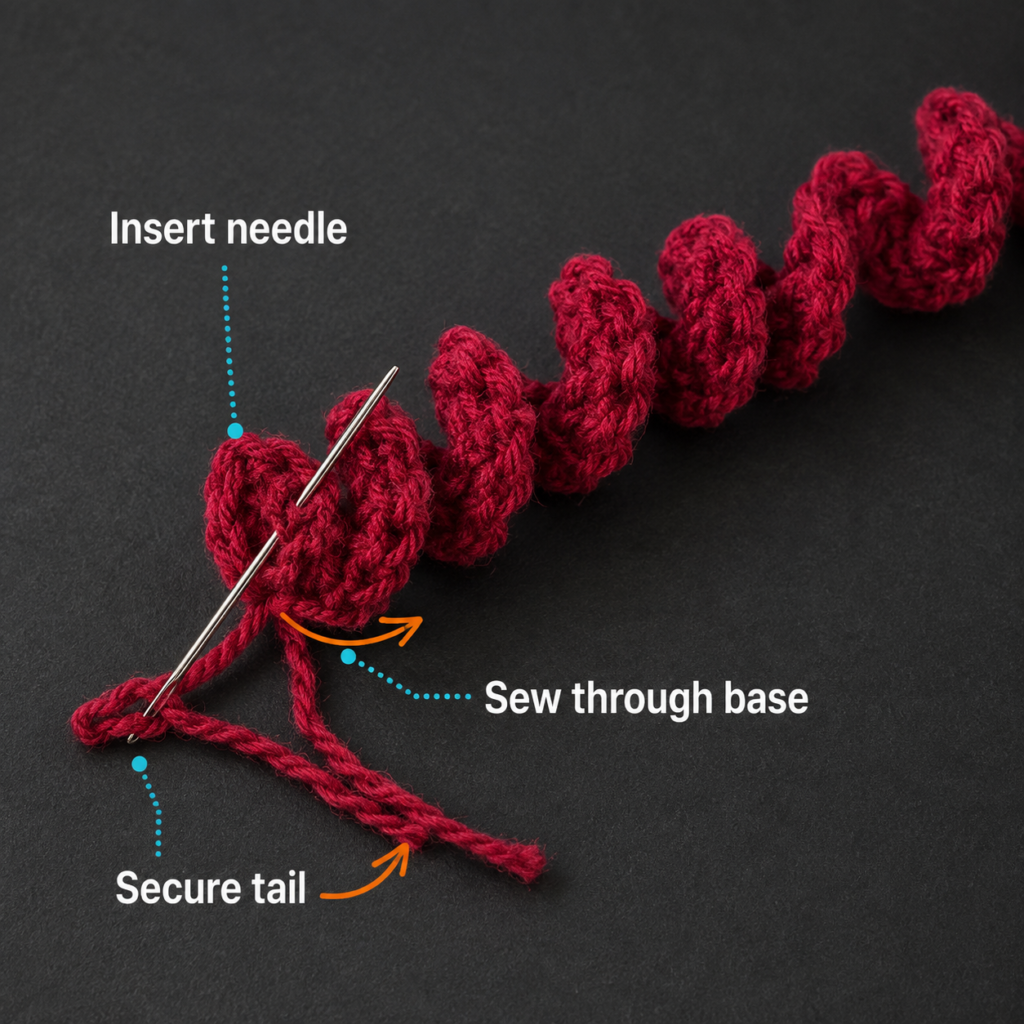
Roll the foundation edge into a small spiral.
After the first complete turn, use the long yarn tail and tapestry needle to make a stitch through the base.
Continue rolling a little at a time.
After every half turn or full turn, sew through the base again.
Keep all the loops pointing upward and outward.
When the entire strip is rolled, make several long stitches across the underside of the flower, catching multiple layers of the foundation edge.
Fasten securely but leave the remaining yarn tail if you plan to sew the mum directly onto the wreath.
Use your fingers to separate and fluff the loops.
Repeat for the second mum.
Beginner tip: A flower that looks slightly irregular usually appears more natural than one forced into a perfectly symmetrical circle.
Common mistake to avoid: If you stitch through the petal loops instead of the foundation edge, the top of the flower can become flattened.
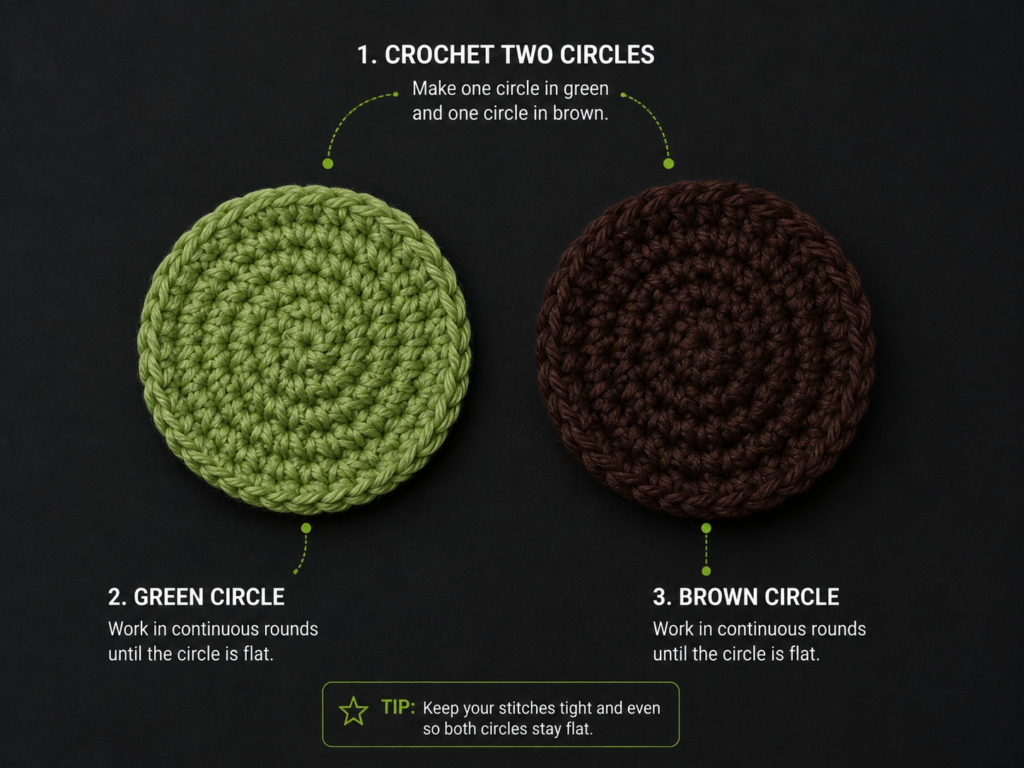
Step 8: Crochet the Sunflower Center
Using the 4.0 mm hook and espresso-brown yarn:
Round 1
Make a magic ring.
Ch 1.
Work 8 sc into the ring.
Join with a sl st to the first sc.
8 sts
Round 2
Ch 1.
Work 2 sc in each stitch around.
Join.
16 sts
Round 3
Ch 1.
Sc in the next stitch, 2 sc in the next stitch.
Repeat around.
Join.
24 sts
Fasten off.
The center should lie mostly flat.
If it cups strongly, loosen your tension slightly.
Beginner tip: Place a stitch marker into the first stitch of each round before you continue.
Common mistake to avoid: The ch 1 is only for height here; do not count it as a stitch.
Step 9: Add the Sunflower Petals
Join mustard yarn to any stitch of the brown center.
You have 24 center stitches, which will create 12 petals.
Repeat the following around:
Sl st in the next stitch. In the next stitch work: ch 2, dc, tr, dc, ch 2, sl st into the same stitch.
Repeat that two-stitch sequence around the entire center.
You should finish with 12 petals.
Join neatly and fasten off.
Gently pull each petal outward with your fingers.
If necessary, lightly steam-block the flower from several inches away, but do not press the petals flat.
Beginner tip: Count your completed petals as you work: 3, 6, 9, 12.
Common mistake to avoid: Do not add a petal to every stitch. Each petal sequence uses two center stitches.
Step 10: Make Three Simple Harvest Leaves
Using muted olive yarn and the 4.0 mm hook:
Ch 9.
Starting in the second chain from the hook, work:
- sc in next chain;
- hdc in next;
- dc in next;
- tr in next;
- dc in next;
- hdc in next;
- sc in next;
- 3 sc in the final chain.
Do not turn.
Rotate the chain and crochet along the unused loops on the opposite side:
- sc;
- hdc;
- dc;
- tr;
- dc;
- hdc;
- sc.
Join with a sl st near the beginning.
For a stem, ch 4, then sl st back down the three chains toward the leaf.
Fasten off.
Make three leaves.
The combination of short and tall stitches naturally widens the middle of the leaf while keeping both ends narrow.
Beginner tip: The first leaf is the slowest. Once you understand where the opposite-side chain loops are, Leaves 2 and 3 go much faster.
Common mistake to avoid: Do not insert your hook around the entire foundation chain when working the second side. Use the unused loops so the center chain forms a visible vein.
Step 11: Arrange Everything Before Attaching It
Set the covered wreath flat on your table.
Do not sew anything on yet.
Place the sunflower around the lower-left portion of the wreath.
Add one mum below it and one slightly toward the side.
Tuck the three leaves behind the flowers so their tips extend beyond the floral cluster.
Then stand back.
Rotate the wreath.
Take a quick phone photo.
Sometimes an arrangement that looks balanced from directly above appears too heavy once the wreath is held upright.
Move the pieces until you are satisfied.
For a modern harvest wreath, leaving a large portion of the crochet-covered base exposed usually creates a cleaner composition than decorating all 360 degrees.
Beginner tip: Use removable stitch markers or straight pins temporarily to hold the motifs while you test placement.
Common mistake to avoid: Do not permanently secure the smallest pieces first. Position the largest focal flower first, then build around it.
Step 12: Sew the Decorations to the Wreath
For a completely crochet-friendly finish, sew the flowers on instead of using glue.
Thread the long flower tail onto a tapestry needle.
Pass the needle through the crochet cover only. You do not need to push through the foam.
Make several secure stitches through the underside of the flower and the wreath cover.
Knot the yarn discreetly underneath the flower and weave the tail under surrounding crochet stitches.
Attach the mums in the same way.
Add the leaves last.
If you want to swap decorations seasonally, use floral wire instead. Thread the wire through the back of the motif, wrap it around the wreath, and twist the wire on the back.
Pattern Notes or Stitch Notes
Turning chain
The ch 1 at the beginning of the wreath-cover rows does not count as a stitch.
Stitch count
Maintain the same number of hdc stitches in every wreath-cover row.
If you begin with 18 hdc, every later row should still contain 18 hdc.
Repeat pattern
The wreath cover is simply:
Ch 1, turn, hdc BLO across.
Repeat until the rectangle is long enough.
Right side and wrong side
Because the wreath-cover texture is reversible, there is no strict right side.
For the flowers, treat the cleaner-looking surface as the front.
Adjusting the size
The project is intentionally measurement-based.
For a larger wreath:
- create a foundation chain long enough to wrap around the thicker wreath tube;
- crochet more rows until the rectangle reaches around the larger ring.
For a smaller wreath, use the same process and simply stop sooner.
Common Beginner Mistakes
1. Making the foundation chain too tight
Problem: The wreath cover curls or one edge feels shorter.
Fix: Restart the chain with relaxed tension or make the starting chain using a hook 0.5–1 mm larger.
2. Losing stitches at the edges
Problem: The rectangle gradually becomes narrower.
Fix: Place stitch markers into the first and last hdc of every row.
3. Making the wreath cover too short
Problem: You have to stretch aggressively to make the ends meet.
Fix: Add several more BLO hdc rows. Slight negative ease is useful; strong stretching is not.
4. Twisting the cover during sewing
Problem: The rib direction begins spiraling around the wreath.
Fix: Stop sewing, rotate the fabric back into position, align several inches with stitch markers, and continue.
5. Sewing the mum through the petals
Problem: The flower loses its fluffy shape.
Fix: Sew only through the solid foundation edge at the bottom.
6. Miscounting sunflower petals
Problem: You run out of stitches or end with an uneven gap.
Fix: Remember that each petal sequence uses two stitches from the 24-stitch center, producing 12 petals.
7. Attaching decorations too early
Problem: The final arrangement looks crowded or unbalanced.
Fix: Arrange every motif first and photograph the layout before permanently securing anything.
How to Customize This Crochet Project
Change the yarn
A smooth acrylic yarn is inexpensive and displays stitches clearly.
A cotton-blend yarn gives the flowers slightly more structure.
Wool can provide beautiful texture but may require gentler washing and storage.
Check the yarn label for appropriate care instructions; standardized care symbols are designed to communicate washing and treatment information for yarn and finished items.
Change the color palette
Try:
Classic harvest: pumpkin, mustard, burgundy, olive, brown.
Neutral farmhouse: oatmeal, cream, camel, taupe, muted sage.
Modern autumn: terracotta, dusty rose, ochre, olive, charcoal.
Woodland: moss green, rust, chocolate brown, burnt orange, beige.
Add more flowers
Make three mums instead of two.
Or make several small sunflowers and omit the large central flower.
Keep the cluster in one section of the wreath for a contemporary look.
Change the leaf texture
For firmer leaves, go down to a 3.5 mm hook.
For softer, broader leaves, use the same worsted yarn with a 4.5 mm hook.
Add a bow
Tie a velvet, linen, or crochet ribbon around the top.
Choose a restrained color so it does not compete with the flower cluster.
Make it a Thanksgiving wreath
Add tiny crocheted acorns, a miniature pumpkin, or several wheat-colored chain tassels.
Turn it into a gift
This wreath works well as:
- housewarming décor;
- Thanksgiving hostess gift;
- autumn birthday gift;
- teacher gift;
- handmade wedding-season décor;
- craft-fair fall inventory.
Finishing Instructions
Inspect the back and front of the wreath.
Weave any loose tails under at least several stitches, change direction once, and trim.
If the leaves curl more than you want, dampen them lightly and pin them flat until dry.
Do not aggressively block the dimensional mums.
For the sunflower, you can lightly shape each petal by hand.
Create a hanging loop from a 10–14 inch length of sturdy yarn or ribbon.
Pass it around the upper portion of the wreath and tie securely.
For outdoor display, keep the wreath on a covered door or porch. Repeated rain, snow, or intense sun can damage yarn fibers, fade colors, and affect foam or adhesive components.
Store the wreath flat in a clean dry box when the season ends.
Quick Printable-Style Summary
Skill level: Easy / confident beginner
Finished size: Approximately the diameter of your chosen wreath form; sample concept uses a 14-inch form
Yarn: Medium #4 worsted weight
Hooks: 5.0 mm for cover, 4.0 mm for motifs
Main stitches: ch, sl st, sc, hdc, dc, tr, BLO
Starting method: Chain until the foundation wraps comfortably around the thickness of the foam wreath.
Wreath cover: Hdc first row; hdc BLO on every following row until the rectangle wraps around the full wreath.
Join: Slip stitch short ends together, place around foam form, then sew long edges together along inner circumference.
Mums: Crochet looped strips, roll into coils, sew through foundation edges.
Sunflower: Crochet a three-round sc center, then work 12 mustard petals around the edge.
Leaves: Work progressively taller stitches along one side of a foundation chain and mirror them along the opposite side.
Assembly: Place the largest flower first, arrange smaller motifs around it, then sew or wire everything securely.
Finishing: Weave in ends, shape motifs, add hanging loop.
FAQ
Is this crochet harvest wreath pattern suitable for beginners?
Yes, it is appropriate for a beginner who already knows how to chain and make basic stitches. The wreath cover uses repetitive half double crochet, while the motifs introduce simple increases, taller stitches, and basic assembly.
If you have never crocheted before, practice a small hdc swatch first.
What yarn is best for a crochet wreath?
Medium worsted-weight acrylic is one of the easiest options because it is widely available, economical, and provides enough body for home décor. Cotton and cotton blends work especially well for flowers that need extra stitch definition.
The Craft Yarn Council’s yarn-weight system provides standardized weight categories and general hook/gauge ranges, although individual patterns and personal tension still determine the final hook choice.
Can I use a grapevine wreath instead of a foam wreath?
Yes, but you would normally skip the full crochet cover.
Instead, crochet the flowers and leaves and wire them directly to the grapevine base.
For this specific covered-wreath tutorial, foam is easier because its smooth shape supports the crochet sleeve evenly.
How much yarn do I need for a crochet harvest wreath?
For a 14-inch covered foam wreath, plan on roughly 220–300 yards of worsted yarn for the main cover plus smaller amounts for the motifs.
Actual consumption changes with wreath thickness, yarn construction, hook size, and tension.
Can I make the wreath larger?
Yes.
Measure the starting chain around the new wreath’s tube thickness and continue the cover rows until your rectangle reaches around the full ring.
The measurement method scales naturally without needing a separate stitch count for every wreath diameter.
Do I have to glue the flowers on?
No.
Sewing is an excellent option and makes the project easier to alter later.
Floral wire is another useful choice when you want removable seasonal decorations.
How should I wash a crochet wreath?
Because the project combines yarn with a structural wreath form, full machine washing is usually unnecessary.
Dust gently and spot-clean the crochet surface according to your yarn’s care instructions. Save the yarn label so you can reference its care information later. The Craft Yarn Council publishes standardized care-symbol guidance for yarn and handmade items.
Conclusion
A crochet harvest wreath pattern is a useful project for practicing basic crochet while making something substantial enough to display.
The secret is to treat the wreath as a collection of small tasks rather than one complicated pattern.
First make a rectangle.
Wrap and seam it around the form.
Then make a flower.
Make another.
Add a few leaves.
Finally, arrange everything until the colors and shapes feel balanced.
Because the cover is measured directly against the wreath, you can reuse the same method for different sizes. Change the flowers and color palette and the same basic construction can become a Christmas wreath, spring wreath, Halloween wreath, or neutral year-round crochet wreath.
Save the tutorial with your fall crochet ideas so you can return to it when autumn decorating begins.





