A plain dorm mirror does its job, but it does not usually add much personality to a room. This crochet dorm mirror decor pattern turns a simple round mirror into a soft handmade wall accent using basic crochet stitches, a lightweight metal craft hoop, and a small amount of cotton yarn.
The project is especially useful when you want handmade dorm decor without committing to a large blanket, complicated wall hanging, or bulky storage project. Most of the crochet is repetitive, the individual pieces are small enough to finish in an afternoon, and the final colors are easy to adapt to your bedding, desk accessories, or roommate-friendly room palette.
This tutorial is an original project rather than a reproduction of the reference tutorial discussed above. We will make a 20 cm / 8-inch mirror frame with an oatmeal crochet base, muted sage scallops, a reinforced crochet hanging loop, and optional short tassels.
If you can work a magic ring, double crochet, single crochet, and slip stitch, you already know most of what is required.
What You’ll Learn
By the end of this project, you will know how to:
- Crochet a flat circular backing.
- Increase evenly when crocheting in the round.
- Crochet directly around a metal craft hoop.
- Check crochet pieces against a rigid object.
- Enclose a mirror without permanently gluing yarn to the glass.
- Seam two round crochet pieces accurately.
- Work a simple scalloped crochet border.
- Make a strong crochet hanging loop.
- Add optional miniature tassels.
- Adjust the pattern for slightly different mirror sizes.
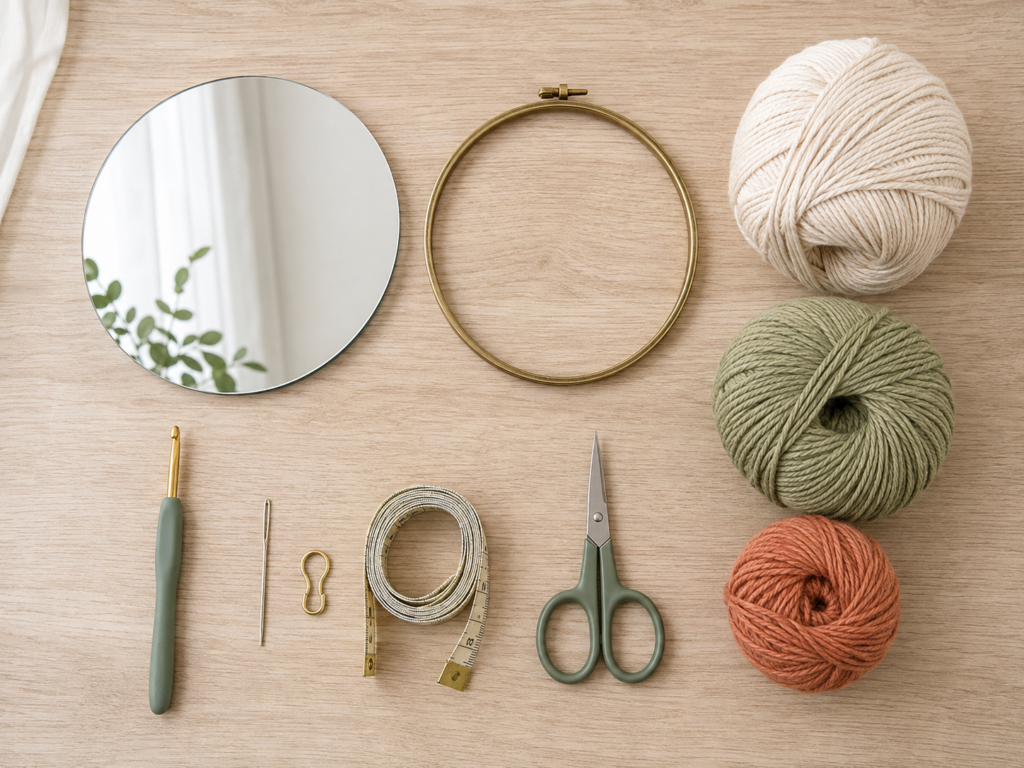
Materials You’ll Need
For one approximately 8-inch / 20 cm finished mirror:
- Main yarn: approximately 90–110 yards of medium/worsted weight cotton in warm oatmeal or cream.
- Border yarn: approximately 15–20 yards of muted sage cotton.
- Accent yarn: approximately 10–15 yards of terracotta, sage and/or cream for optional tassels.
- Crochet hook: 4.0 mm.
- Mirror: one plain round mirror approximately 8 inches / 20 cm in diameter.
- Craft hoop: one lightweight metal ring approximately 7 inches / 18 cm in diameter.
- Tapestry needle.
- Scissors.
- One locking stitch marker.
- Measuring tape.
- Optional non-scratch wall bumpers for the back.
A smooth cotton is particularly useful here because the stitches remain visible and the fabric does not need the drape you might want in a garment.
The Craft Yarn Council classifies yarn using its standardized yarn-weight system; remember that yarns within one weight category are not necessarily perfectly interchangeable, so checking the actual fabric is more useful than assuming every yarn marked with the same weight number will behave identically.
Crochet Abbreviations Used
This article uses US crochet terminology.
- MR = magic ring
- ch = chain
- sl st = slip stitch
- sc = single crochet
- dc = double crochet
- st / sts = stitch / stitches
- rep = repeat
- RS = right side
- WS = wrong side
These abbreviations follow common US crochet terminology. In UK terminology, for example, the US single crochet corresponds to UK double crochet, while US double crochet corresponds to UK treble crochet.
Before You Start
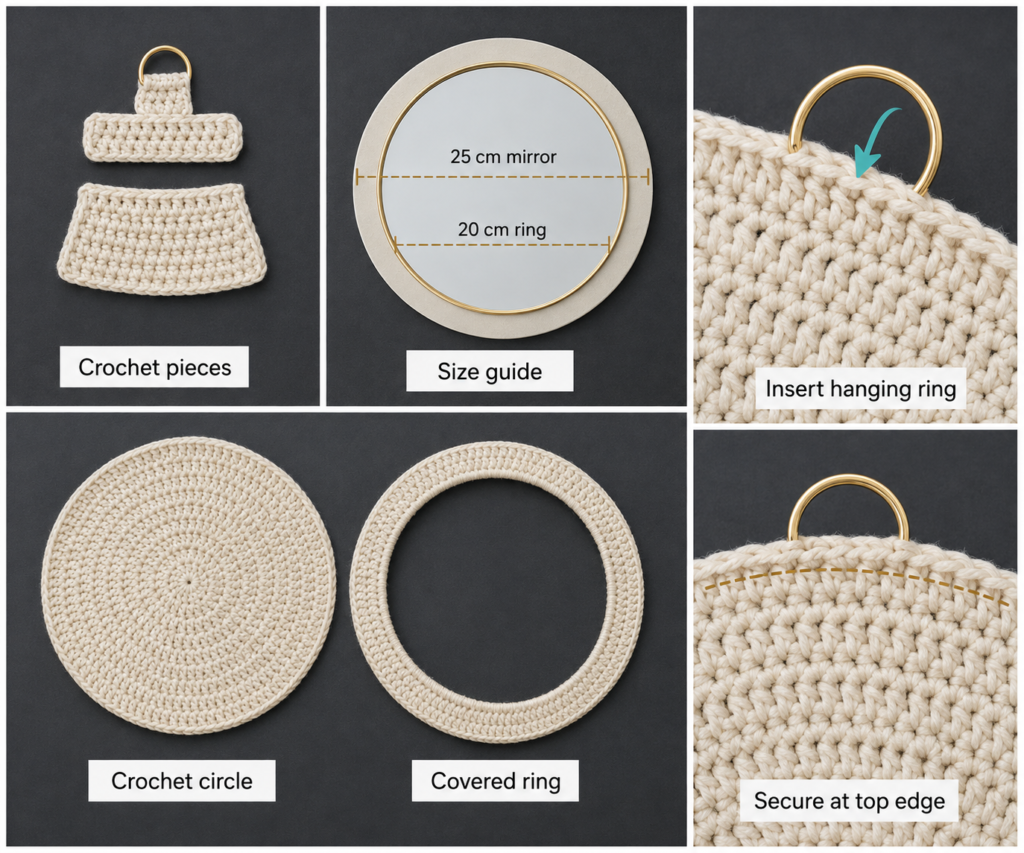
Check the mirror and hoop together
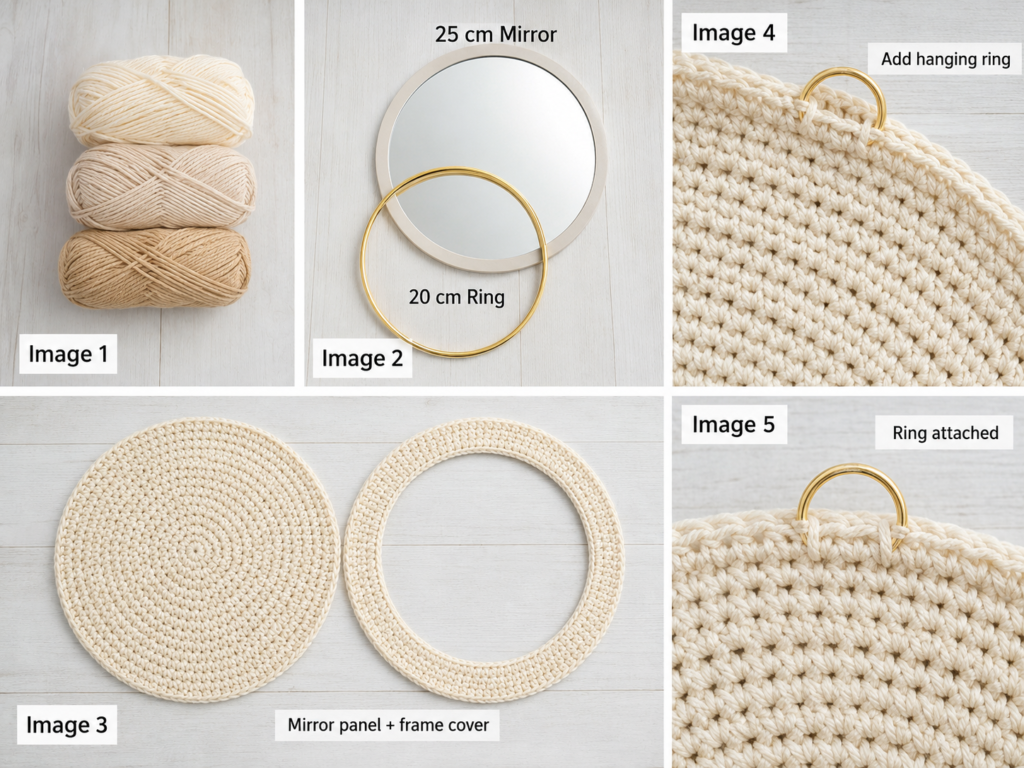
Center the 7-inch hoop over the 8-inch mirror.
You want the hoop opening to expose most of the reflective surface while hiding approximately 1/2 inch or 1 cm around the edge of the glass.
The hoop must be smaller than the mirror. If it is larger, the mirror could pass through the opening.
Gauge and fit
Exact gauge is less important than finished diameter because this project does not have to fit a body.
After Round 5 of the back, your circle should be roughly 10–11 cm / 4–4.25 inches across.
At the end of the back, aim for approximately 19–19.5 cm / 7.5–7.75 inches before stretching.
A slightly smaller backing is useful because it can stretch firmly across the rear of the mirror rather than hanging loosely.
If your circle becomes much larger too quickly, use a smaller hook.
If it stays considerably smaller, move up by 0.5 mm.
Count every round
Place a stitch marker in the first true stitch of each round.
Circular crochet mistakes become much harder to see once you have completed six or seven rounds. Counting at the end of each round takes less time than unraveling several rounds later.
Watch for curling
A shallow bowl means you probably have too few increases or unusually tight tension.
A ruffled circle means you have too many increases or unusually loose tension.
Minor waviness can usually be corrected by adjusting your tension on the next round.
Step-by-Step Crochet Tutorial
Step 1: Crochet the Center of the Back
Using oatmeal yarn, make a magic ring.
Round 1: Ch 3. The ch-3 counts as the first dc. Work 11 dc into the magic ring. Join with a sl st to the top of the beginning ch-3.
You now have 12 stitches.
Pull the center tail carefully until the opening closes.
The first round may look tiny, but this is the center of the entire backing, so concentrate on keeping the stitches evenly spaced.
Beginner tip:
Do not cut the center tail short. Leave at least 15 cm / 6 inches so you can weave it securely through several stitches later.
Common mistake to avoid:
Do not accidentally crochet into the slip stitch used to join the previous round. Your stitch marker helps identify the correct first stitch.
Step 2: Expand the Back Circle
Continue with oatmeal yarn.
The increases are distributed evenly around every round.
Round 2: Work 2 dc in every stitch around.
Stitch count: 24
Round 3: *1 dc in next st, 2 dc in next st; rep from * around.
Stitch count: 36
Round 4: *1 dc in next 2 sts, 2 dc in next st; rep around.
Stitch count: 48
Round 5: *1 dc in next 3 sts, 2 dc in next st; rep around.
Stitch count: 60
Round 6: *1 dc in next 4 sts, 2 dc in next st; rep around.
Stitch count: 72
Round 7: *1 dc in next 5 sts, 2 dc in next st; rep around.
Stitch count: 84
Round 8: *1 dc in next 6 sts, 2 dc in next st; rep around.
Stitch count: 96
Round 9: *1 dc in next 7 sts, 2 dc in next st; rep around.
Stitch count: 108
Fasten off, leaving a normal weaving tail.
Your circle should lie nearly flat.
Beginner tip:
Move the increase position slightly between rounds if a strong twelve-sided shape starts to appear. The mathematics can stay the same even if your exact increase positions are shifted by one or two stitches.
Common mistake to avoid:
Do not increase randomly to make the piece bigger. Random increases create bumps. Keep the same number of increases distributed evenly.
Step 3: Check the Back Against Your Mirror
Place the crochet circle over the back of the mirror.
Ideally, the crochet should stop just short of the mirror’s outer edge before stretching.
If the backing completely covers the mirror and extends noticeably beyond it, your tension is probably too loose.
If more than about 1 cm of mirror remains visible around the backing, add one more increase round rather than forcing a very small circle to stretch.
If you add another round, remember that your final front-edge stitch count will need to be adjusted too.
For the standard version here, continue with 108 stitches.
Beginner tip:
Fit matters more than reproducing someone else’s measurement exactly. Yarn thickness, twist and personal tension all influence crochet diameter.
Step 4: Crochet Around the Craft Hoop
Now make the front frame.
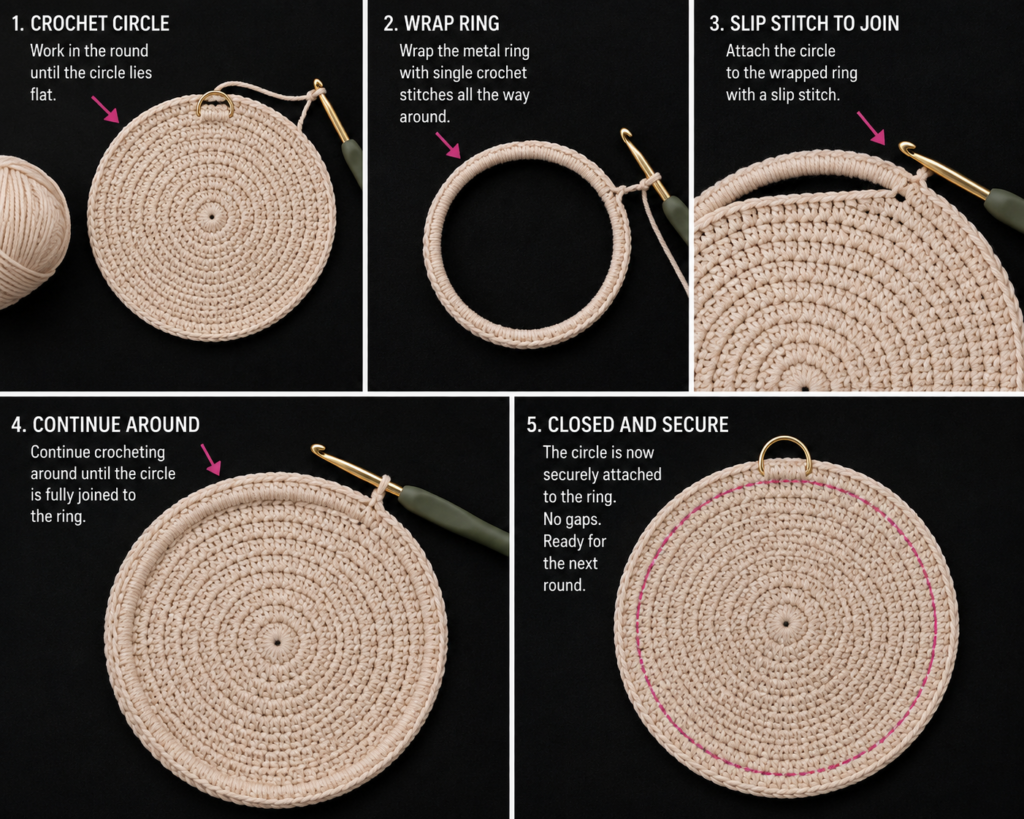
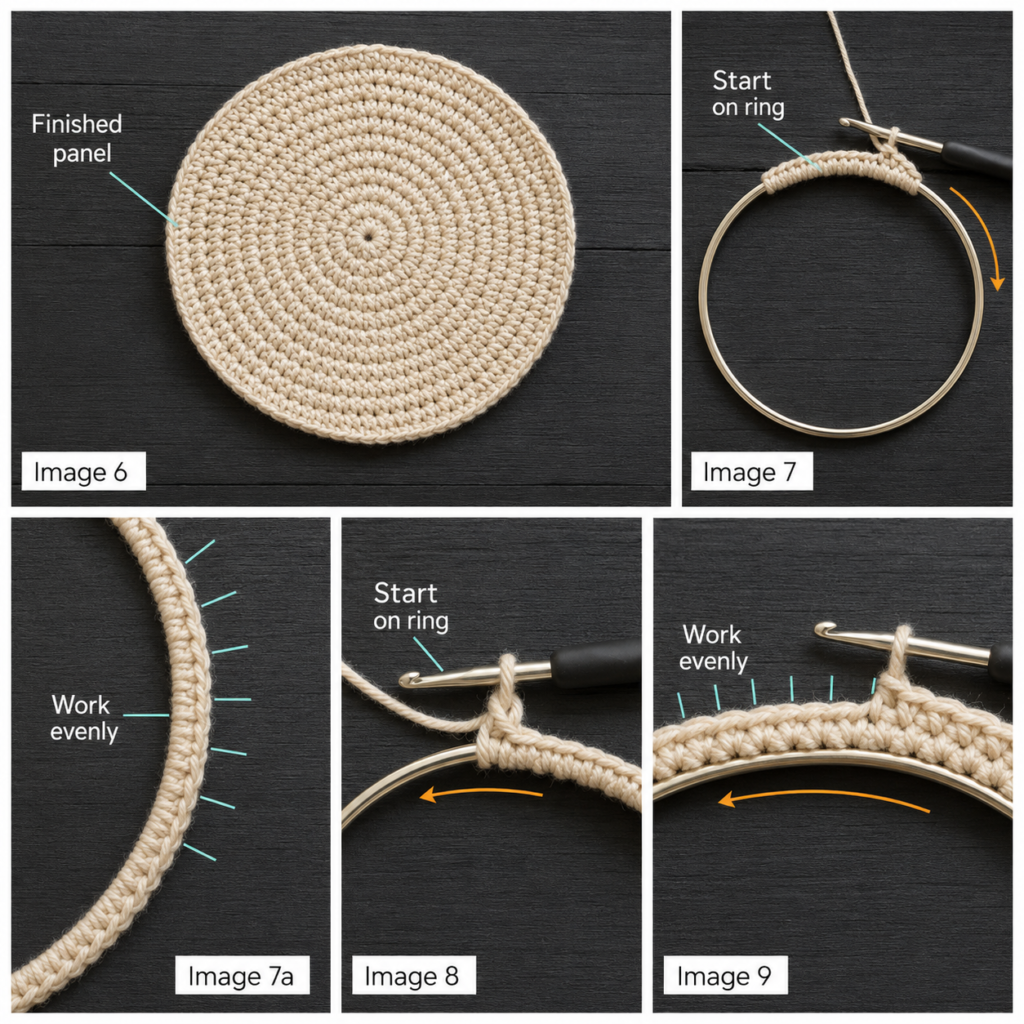
With oatmeal yarn, place a slip knot on your hook.
Hold the working yarn behind the metal hoop.
Insert your hook under the hoop, catch the yarn, and pull up a loop around the metal.
Complete a single crochet.
Continue making sc stitches directly around the hoop until you have 108 sc.
Push the stitches together periodically so the metal disappears beneath a smooth layer of yarn.
Join the last sc to the first with a sl st.
Stitch count: 108
Beginner tip:
Think of the metal hoop as if it were a giant foundation chain. Your hook passes below it before pulling yarn around it.
Common mistake to avoid:
Do not pack twenty stitches tightly into one area and then spread the remainder thinly. Rotate the hoop as you work and distribute the stitches evenly around the entire circumference.
Step 5: Build the Front Frame
We now need enough crochet fabric outside the hoop to reach the backing.
The front band should stay firm rather than floppy.
Front Round 2
Ch 2. The ch-2 does not count as a stitch.
Work 1 dc in every sc around.
Join with a sl st.
108 dc
Front Round 3
Ch 2.
Work 1 dc in every stitch around.
Join with a sl st.
108 dc
Fasten off oatmeal yarn.
Keeping the same stitch count intentionally produces a slight inward tension as the rounds move farther from the metal ring. That tension helps the frame hug the mirror instead of forming a loose ruffle.
Beginner tip:
Lay the front frame flat for a moment. A small amount of cupping is fine because it will wrap around the mirror edge.
Common mistake to avoid:
Do not add automatic increases simply because you are crocheting in a circle. This section is supposed to hug the mirror.
Step 6: Layer the Front, Mirror and Back
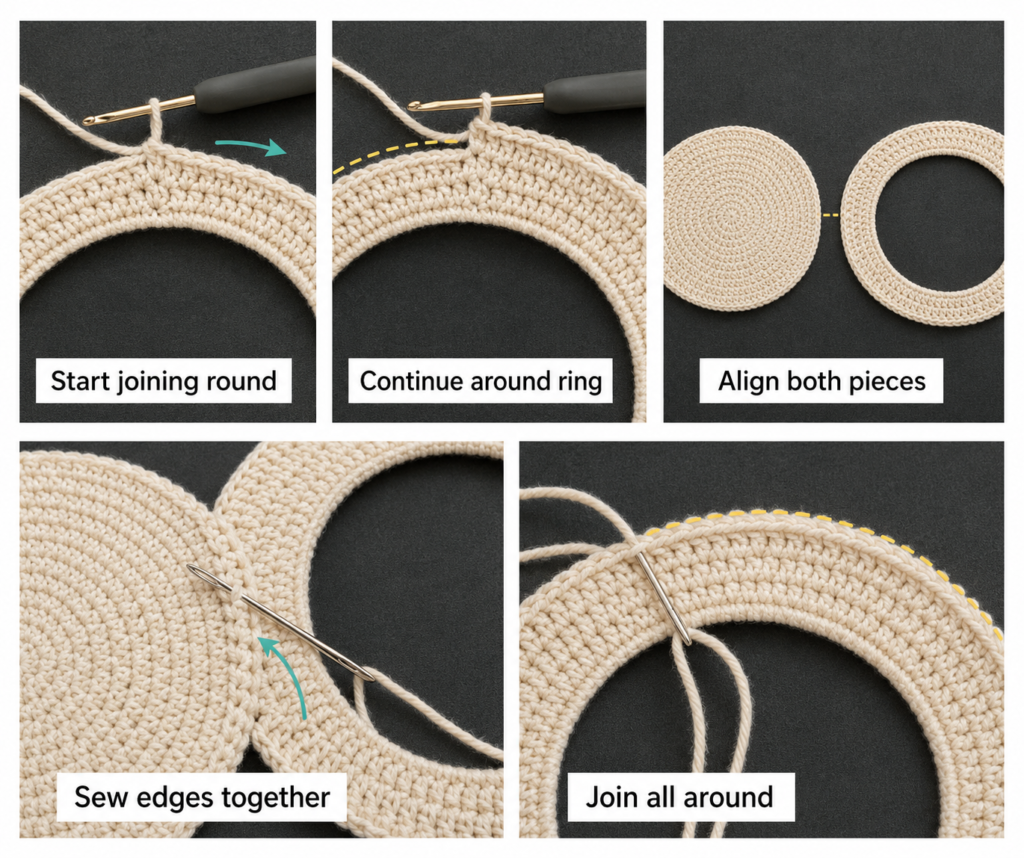
Before sewing anything, weave in all tails that would otherwise become trapped inside.
Place the pieces in this order:
- Front crochet hoop with its right side facing the room.
- Mirror centered behind it.
- Crochet backing over the rear of the mirror.
The wrong sides of the crochet pieces should face toward the mirror.
Align the 108 stitches on the front with the 108 stitches around the back.
Place four temporary markers at approximately 12, 3, 6 and 9 o’clock.
These quarter markers prevent one layer from shifting while you sew.
Beginner tip:
Before seaming, pick the exact point you want to be the top of the mirror. Small imperfections can be positioned at the bottom where the tassels will disguise them.
Step 7: Sew the Frame Closed
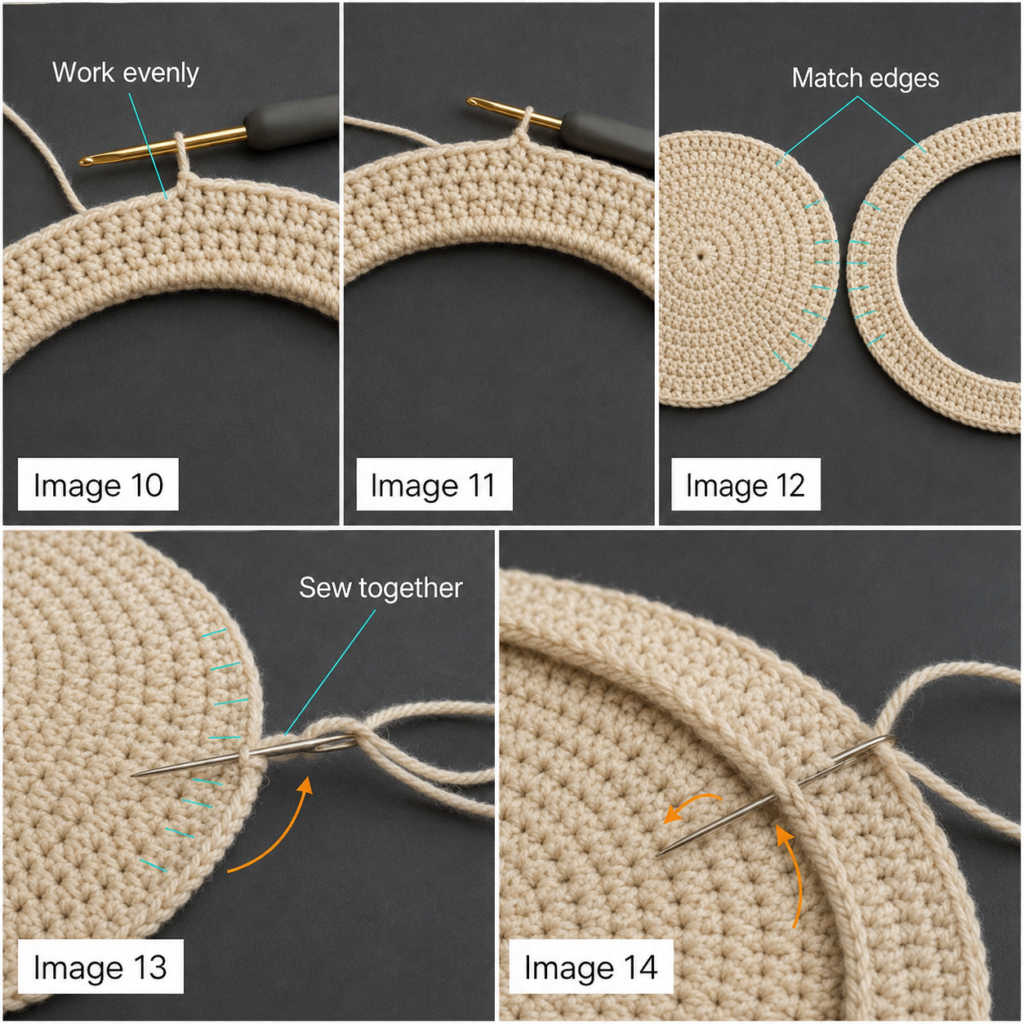
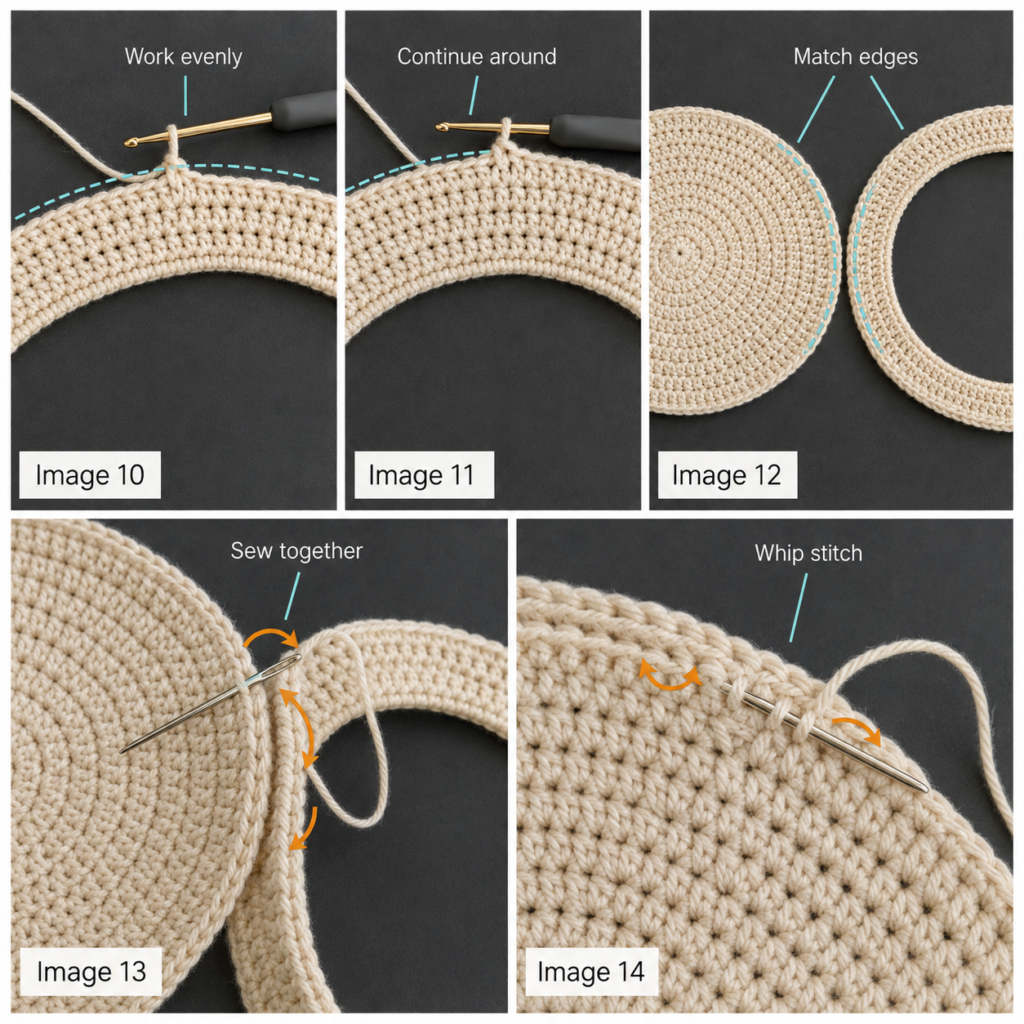
Thread a tapestry needle with a long length of oatmeal yarn.
Beginning near the bottom, pass the needle through the back loop of one front-frame stitch and the corresponding back loop of one backing stitch.
Pull the yarn until the seam is firm but not puckered.
Continue around the circumference.
Because you are using the back loops for the seam, the unused front loops of the front frame remain available for the decorative scallops in the next step.
Stop after approximately one quarter of the circumference and inspect the mirror from the front.
Make sure:
- The exposed mirror opening is centered.
- The frame is not twisted.
- No glass edge is visible.
- The backing remains smooth.
- The mirror cannot slide inside the frame.
Continue around until the seam is completely closed.
Fasten securely and weave the yarn tail through several stitches.
Beginner tip:
Use several shorter sewing lengths rather than one extremely long piece of yarn if your yarn begins twisting.
Common mistake to avoid:
Avoid pulling each sewing stitch as tightly as possible. Excessive tension can make the outer edge buckle.
Step 8: Add the Sage Scalloped Border
Now the mirror is secure, we can turn the plain outer edge into a decorative frame.
Join muted sage yarn to one of the free front loops left from the seam.
Work the following repeat:
*Sl st in next free front loop, skip 2 loops, 5 dc in next loop, skip 2 loops; rep from * around.
Because the frame has 108 stitches and this repeat uses six stitch positions, you will create approximately 18 scallops.
Join to the first sl st.
Fasten off and weave the ends toward the back.
The scallops should sit on the front surface of the mirror rather than underneath it.
Beginner tip:
Do not pull the slip stitches tightly. A tight valley between shells can cause the finished frame to ripple.
Common mistake to avoid:
If you accidentally create 17 scallops and have stitches left over, do not squeeze the remaining stitches into one enormous shell. Undo the last few repeats and check your six-stitch spacing.
Step 9: Make the Hanging Loop
Turn the mirror over.
Find the exact top center.
Join oatmeal yarn securely into the outer seam.
Ch 22.
Bring the chain back to the same attachment point and sl st securely into the frame, creating a loop.
To reinforce it, work approximately 28–32 sc around the entire chain loop, not into the individual chains.
Join and fasten off.
The finished loop should feel dense and substantial.
Test it by holding the mirror a few centimeters above a padded surface before hanging it on the wall.
Beginner tip:
Make the loop smaller rather than excessively long. A short loop keeps the mirror close to the wall.
Dorm-room note:
Use only a wall-hanging product permitted by your housing rules, and make sure its stated weight capacity comfortably exceeds the finished weight of your mirror.
Step 10: Make Optional Mini Tassels
The mirror is finished at this point, so tassels are optional.
For a softer dorm-room look without creating long fringe, make three short tassels.
For each tassel:
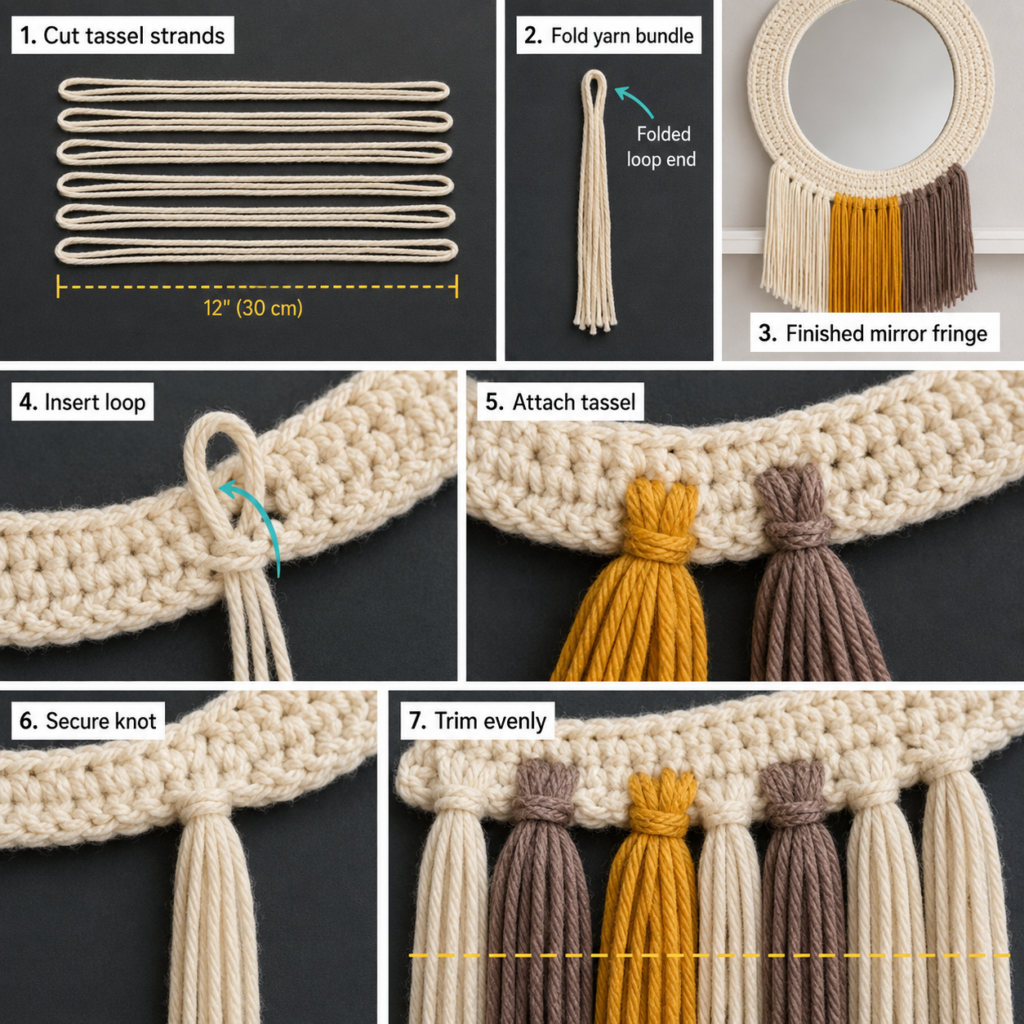
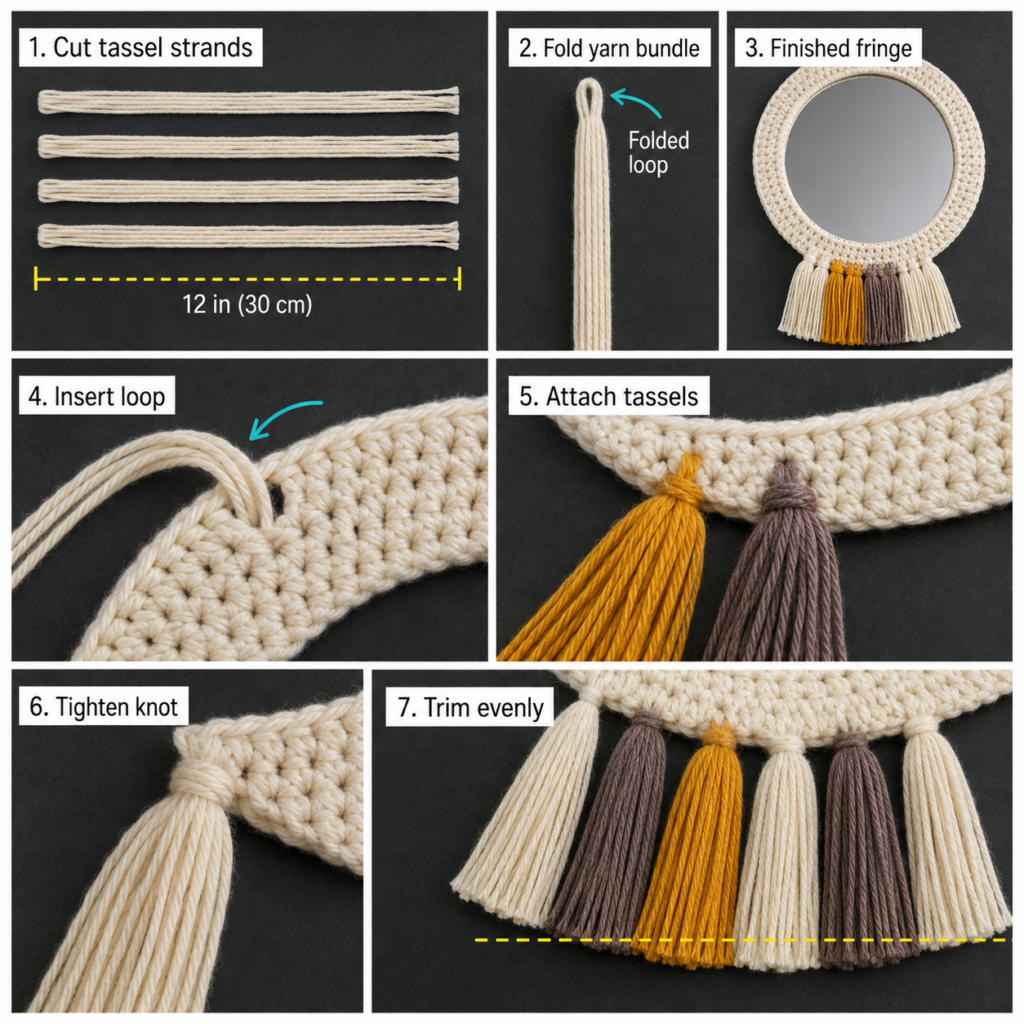
- Cut 8 strands approximately 18 cm / 7 inches long.
- Align the ends.
- Fold the bundle in half.
- Tie a separate yarn strand around the bundle approximately 1–1.5 cm beneath the fold.
- Wrap several times.
- Knot securely.
- Trim the lower ends evenly.
A simple arrangement is:
- One terracotta tassel.
- One sage tassel.
- One oatmeal tassel.
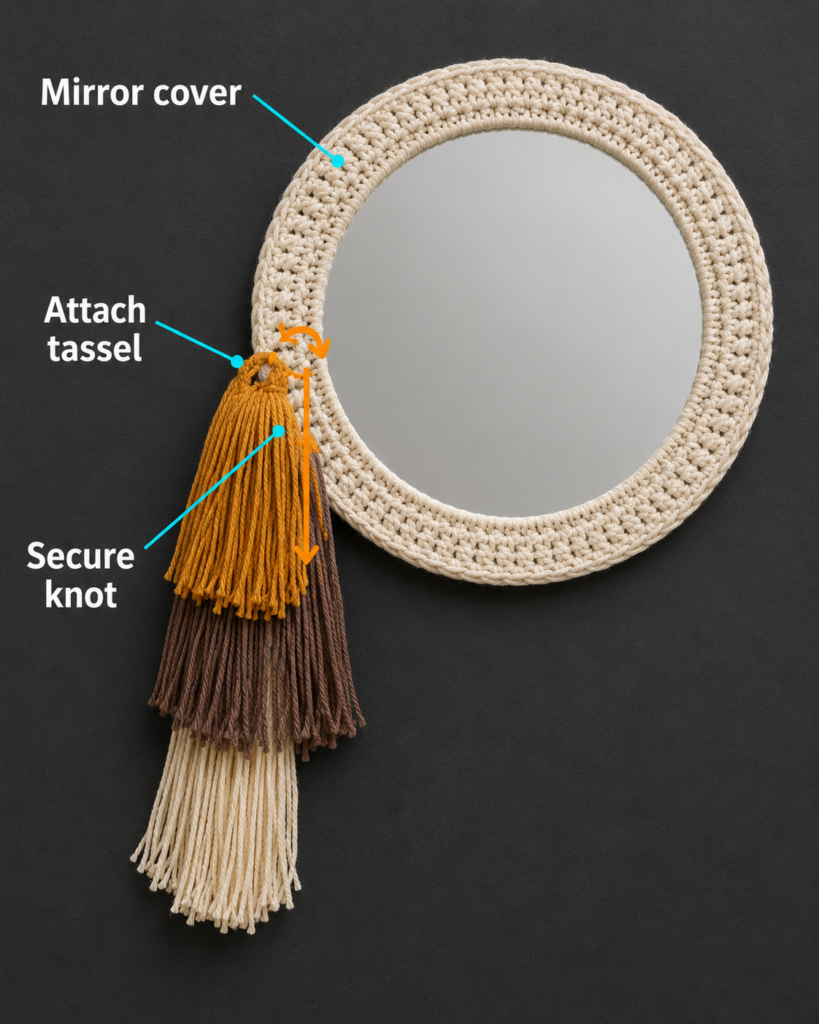
Attach the three tassels near the bottom center of the mirror.
Keep them short enough that they decorate the frame without covering a desk or getting caught when the mirror is moved.
Step 11: Final Shape Check
Lay the finished mirror face-up.
Run your fingers gently around the scallops.
If one scallop is folding underneath another, lightly reshape it.
Check the back seam once more.
No part of the mirror should move independently from the crochet frame.
Trim tassels only after the mirror is hanging vertically. Gravity changes where the strands naturally settle.
Pattern Notes or Stitch Notes
Turning chains
The back is worked in joined rounds.
The beginning ch-3 on the back counts as the first double crochet.
For the front frame, the ch-2 does not count as a stitch.
Keeping these rules separate is important when counting.
Back stitch counts
- Round 1: 12
- Round 2: 24
- Round 3: 36
- Round 4: 48
- Round 5: 60
- Round 6: 72
- Round 7: 84
- Round 8: 96
- Round 9: 108
Each back round adds 12 stitches.
Front stitch count
The standard front ring uses:
108 sc around the hoop
Then both additional front rounds remain at:
108 stitches
Scallop repeat
Each decorative repeat uses six stitch positions:
sl st, skip 2, 5 dc in next, skip 2
With 108 stitches:
108 ÷ 6 = 18 scallops
Right side and wrong side
The attractive side of the front frame faces outward toward the room.
The back circle’s cleaner side faces the wall.
The less attractive sides of both pieces face inward toward the mirror.
Size adjustments
Do not automatically copy the 108-stitch count for a completely different mirror.
For a larger mirror:
- Make the back disc until it is just slightly smaller than the mirror.
- Record the final stitch count.
- Crochet approximately that number of evenly distributed stitches around the front hoop.
- Adjust the border repeat if the new count is not divisible by six.
Common Beginner Mistakes
1. The back circle turns into a bowl
Cause: Too few increases, very tight tension, or a hook that is too small.
Fix: Check your increase count first. If the stitch count is correct but the circle still cups sharply, try the next hook size up.
2. The back becomes wavy
Cause: Too many stitches or unusually loose tension.
Fix: Verify your round count. Do not add extra increases simply because a small space looks empty.
3. The metal hoop is visible between stitches
Cause: The sc stitches around the hoop were spaced too far apart.
Fix: Slide the stitches together as you work. Add a few additional sc if necessary, but keep the distribution symmetrical.
4. The mirror sits off-center
Cause: The front and back layers shifted during seaming.
Fix: Always place markers at the four quarter points before sewing.
5. The outer seam puckers
Cause: The sewing yarn has been pulled too tightly.
Fix: Relax several seam stitches before continuing. The goal is secure contact, not maximum compression.
6. The scallops become different sizes
Cause: Some shells were placed four or five stitches apart instead of six.
Fix: Count the skipped loops between every scallop until the repeat becomes obvious.
7. The mirror hangs crooked
Cause: The hanging loop was not placed exactly opposite the bottom center.
Fix: Lay the mirror flat and locate the top using the scallop pattern or quarter markers before attaching the loop.
How to Customize This Crochet Project
Change the color palette
Dorm rooms are ideal for small color experiments.
Try:
- Cream + blush + dusty rose.
- Beige + rust + olive.
- White + navy + mustard.
- Lavender + cream + sage.
- Charcoal + ivory for a minimalist room.
- School-inspired colors without logos or trademarked graphics.
A neutral main frame with a brighter border is easiest to coordinate with changing bedding or seasonal decor.
Skip the tassels
For a cleaner modern look, use the scalloped frame without fringe.
This also makes the mirror easier to pack at the end of the semester.
Use a plain edge
Instead of scallops, work one round of reverse single crochet or a simple round of evenly spaced sc.
Make a flower version
Crochet several small flowers separately and sew them to the lower-left or lower-right portion of the frame.
Avoid covering the entire circumference if you want the mirror to remain lightweight.
Make it monochrome
Use one cotton color for:
- Back.
- Front.
- Border.
- Hanging loop.
The stitch texture will still make the frame visible without introducing multiple colors.
Adjust the size
This same construction concept can be adapted for a vanity mirror, small entryway mirror, or decorative photo frame.
Measure the rigid objects first and build the crochet around those dimensions rather than relying entirely on a fixed written gauge.
Gift ideas
A finished mirror can work as:
- College move-in gift.
- First-apartment gift.
- Roommate gift.
- Handmade graduation gift.
- Birthday room-decor gift.
- Teen bedroom accessory.
Choose neutral colors when you do not know the recipient’s exact room palette.
Finishing Instructions
Fastening off
Every yarn tail should be woven through at least several neighboring stitches.
Change direction once when weaving to reduce the chance of a tail working loose.
Avoid weaving tails directly across the opening where they could become visible in the mirror.
Blocking
Heavy blocking should not be necessary because the craft hoop provides most of the front structure.
If the scallops need reshaping, lightly dampen the yarn only and arrange the shells with your fingers.
Do not soak the assembled mirror.
Always consider the yarn’s care instructions before blocking. The Craft Yarn Council specifically advises paying attention to yarn fiber and finishing requirements, and notes that heat can damage or permanently alter some acrylic fibers.
Washing and care
Once assembled, treat this as a decorative object rather than a washable crochet textile.
Recommended care:
- Dust gently.
- Spot-clean the yarn with a slightly damp cloth.
- Clean the exposed glass with mirror cleaner applied to a cloth rather than spraying the entire project.
- Keep excessive moisture away from the back of the mirror and metal ring.
- Allow damp yarn to dry completely before rehanging.
Do not place the assembled mirror in a washing machine.
Quick Printable-Style Summary
Project: Crochet Dorm Mirror Decor
Skill level: Advanced beginner
Finished mirror size: Approximately 22–23 cm / 8.5–9 inches across including crochet edge
Mirror: 20 cm / 8 inches
Inner craft hoop: Approximately 18 cm / 7 inches
Yarn: Medium cotton
Hook: 4.0 mm
Main stitches:
Magic ring, chain, slip stitch, single crochet, double crochet
Back starting method:
12 dc in magic ring.
Back increase:
Add 12 stitches evenly per round through Round 9.
Final back stitch count:
108 sts.
Front starting method:
Work 108 sc evenly around metal hoop.
Front frame:
2 rounds of 108 dc without increases.
Assembly:
Place mirror between front and back and seam corresponding loops together.
Border repeat:
Sl st, skip 2, 5 dc in next, skip 2.
Decor:
Optional three short mini tassels.
Hanging:
Reinforced crochet chain loop at top center.
Finishing:
Weave ends securely, lightly shape scallops and spot-clean only after assembly.
FAQ
1. Can a complete beginner make this crochet dorm mirror?
A determined beginner can, but it is easiest after you are comfortable making single crochet and double crochet stitches.
The unfamiliar part is crocheting around a rigid hoop and sewing crochet around a mirror. Neither technique is especially difficult, but they require a little more control than a beginner washcloth.
2. Do I need to glue the crochet to the mirror?
No.
This version is designed so the mirror is held between the crocheted front frame and circular backing.
The metal hoop supports the front opening, while the seam prevents the mirror from sliding out.
3. Can I use acrylic yarn?
Yes, although smooth cotton is the first recommendation.
Acrylic may be softer or stretchier, depending on the yarn.
If you substitute yarn, check your finished diameter carefully rather than assuming that another yarn of the same nominal weight will produce an identical piece. The Craft Yarn Council notes that yarns within a weight category are not necessarily interchangeable without checking gauge and fabric characteristics.
4. What if my mirror is larger than 8 inches?
Use the same construction method but continue the back circle until it is slightly smaller than your mirror.
Then count the final round.
Use that number as a starting target when covering the front hoop.
For the decorative scallop border, adjust the final stitch count until it works cleanly with your chosen repeat.
5. Why is my crochet circle not perfectly round?
Evenly spaced increases can sometimes create subtle corners because increases remain stacked above one another.
Offsetting the increase positions slightly from one round to the next softens those lines.
Small irregularities usually become far less noticeable once the mirror is assembled.
6. Can I hang this with removable adhesive hooks in a dorm?
Potentially, but follow your residence-hall rules and the hanging-product manufacturer’s weight rating.
Do not assume every removable adhesive product is appropriate for every painted wall or mirror weight.
A lightweight mirror and cotton frame are preferable to a heavy glass mirror for this type of decor.
7. Can I make the frame without tassels?
Absolutely.
The scalloped edge is already decorative.
Removing the tassels gives the mirror a cleaner look and makes it easier to pack, store and move between dorm rooms.
Conclusion
A crochet dorm mirror decor pattern is a good small-space project because it combines functional room decor with enough crochet detail to feel handmade without becoming a week-long project.
The circular backing gives the mirror a finished rear surface, the crocheted hoop creates a defined front opening, and the sage scallops turn an otherwise simple frame into a recognizable crochet feature. The optional mini tassels give you another opportunity to pull in colors from bedding, pillows, desk accessories, or other handmade pieces.
Most importantly, do the fit checks as you work. Mirror diameter, yarn thickness and personal tension matter more here than following measurements blindly.
Once you understand the front-ring-and-back construction, you can reuse the technique for different mirrors, decorative frames and small wall pieces.