A crochet pencil is one of those small amigurumi projects that looks more complicated than it really is. The recognizable shape comes mostly from three simple techniques: increasing a small circle into a cone, crocheting straight single crochet rounds for the pencil body, and decreasing again to close the eraser.
That makes this crochet pencil amigurumi pattern an excellent next project if you already know basic single crochet but want to become more confident with working in continuous rounds.
In this tutorial, you’ll make the pencil in one main piece. The project begins at the graphite point, gradually widens through the wooden section, continues into a long yellow body, and finishes with a gray ferrule and pink eraser. You’ll also learn how to position safety eyes, stuff a long narrow amigurumi evenly, create an invisible decrease, and embroider a simple smile.
The pattern below is an independently drafted beginner version and does not reproduce the selected reference tutorial’s round-by-round instructions.
What You’ll Learn
- How to begin amigurumi with a magic ring
- How increases create a tapered pencil point
- How to change yarn colors neatly
- How to crochet continuous spiral rounds
- How to keep a narrow amigurumi tube straight
- How to position safety eyes evenly
- How to stuff a long project without lumps
- How to work through the back loop only
- How invisible decreases shape the eraser
- How to embroider a simple amigurumi face
- How to close a small amigurumi opening neatly
Materials You’ll Need
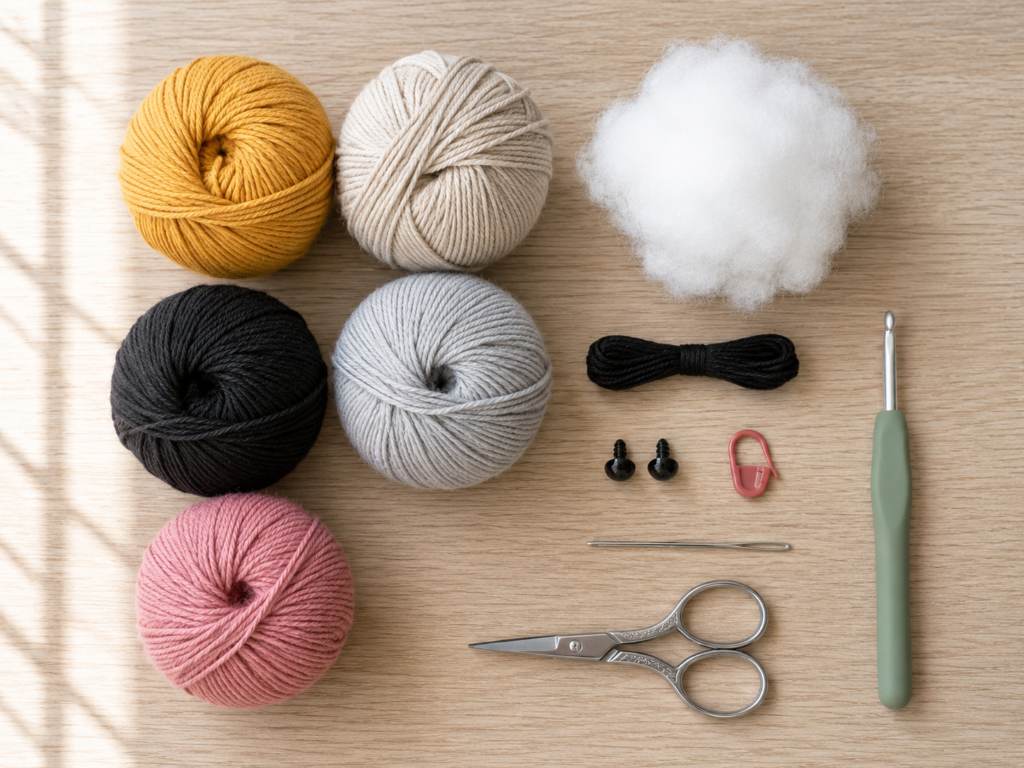
For a pencil about 7–8 inches / 18–20 cm long, gather:
- DK/light worsted cotton or cotton-acrylic yarn
- Charcoal yarn for graphite
- Natural beige yarn for wood
- Muted marigold yellow yarn for the pencil body
- Pale silver-gray yarn for the ferrule
- Dusty rose yarn for the eraser and optional cheeks
- 3.25 mm crochet hook
- Polyester fiberfill
- Two 8 mm safety eyes
- Black embroidery thread or thin black yarn
- Locking stitch marker
- Tapestry needle
- Scissors
A 3.25 mm hook is deliberately quite small for DK yarn. Amigurumi benefits from dense stitches because gaps between stitches can allow stuffing to show. The Craft Yarn Council lists DK as a light-weight yarn category and provides standardized yarn and hook information; using a hook slightly smaller than the normal range is a common amigurumi adjustment when tighter fabric is needed.
Crochet Abbreviations Used
This tutorial uses US crochet terminology.
- MR = magic ring
- sc = single crochet
- inc = increase: work 2 sc in the same stitch
- dec = invisible decrease
- BLO = back loop only
- sl st = slip stitch
- st/sts = stitch/stitches
- rnd = round
In UK terminology, the stitch called single crochet in US patterns is double crochet in UK terminology. The Craft Yarn Council’s crochet abbreviation guide documents the standard US abbreviations and US/UK terminology differences.
Before You Start
Gauge and tension
Exact gauge is not essential for this pencil. More important is creating fabric that is tight enough that the stuffing cannot be seen between stitches.
If you can easily see large holes when you stretch your work slightly, try a smaller hook.
If your hook is difficult to push through every stitch and your hands become sore, loosen your tension rather than forcing the hook.
Work in continuous spirals
Do not join each round with a slip stitch unless specifically instructed.
After finishing the last stitch of a round, simply crochet the first stitch of the next round.
This eliminates a visible seam along the pencil body.
Mark every round
Put a locking stitch marker into the first stitch of each round.
Move it upward every time you begin another round.
Long stretches of identical single crochet are where beginners most often lose track of the beginning of a round.
Count frequently
The widest part of this version contains 30 stitches.
Once you reach that number, count again every few rounds. Accidentally adding or skipping only one stitch can make a long pencil slowly lean or widen.
Color changes
For a clean transition, begin the final single crochet of the old color normally. When two loops remain on the hook, yarn over with the new color and pull it through those final two loops.
The next stitch is then made entirely with the new color.
Safety note
Safety eyes contain small components and should not be relied upon for toys intended for babies or very young children. For a child-safe decorative alternative, embroider both eyes with black yarn instead.
Step-by-Step Crochet Pencil Amigurumi Tutorial
Step 1: Crochet the Graphite Tip
With charcoal yarn, make a magic ring.
Rnd 1: Work 5 sc into the magic ring. (5 sts)
Pull the tail until the center closes firmly.
Rnd 2: Work 2 sc in each stitch around. (10 sts)
Rnd 3: Repeat 1 sc in next st, inc in next st around. (15 sts)
You now have a small cone-shaped graphite point rather than a flat circle.
The unusual five-stitch beginning is intentional. Beginning with fewer stitches than a standard six-stitch amigurumi circle helps the end look more pointed.
Beginner tip:
Keep the first few rounds slightly loose enough that you can identify each stitch. You can gently tighten the fabric after several rounds.
Common mistake to avoid:
Do not place your next stitch into the stitch marker itself. The marker simply identifies the first real stitch.
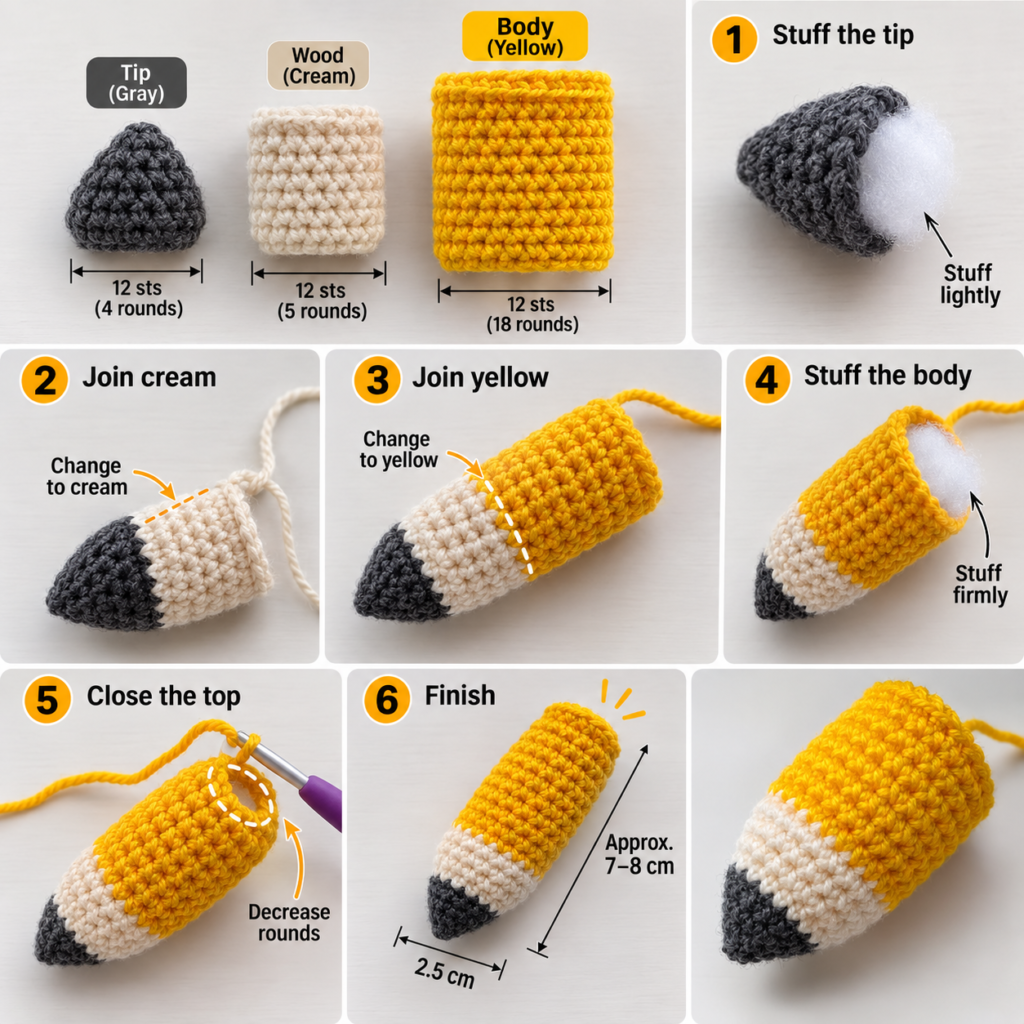
Step 2: Shape the Wooden Pencil Point
Change to natural beige yarn.
Rnd 4: Sc around. (15 sts)
Rnd 5: Repeat 2 sc, inc around. (20 sts)
Rnd 6: Sc around. (20 sts)
Rnd 7: Repeat 3 sc, inc around. (25 sts)
Rnd 8: Sc around. (25 sts)
Rnd 9: Repeat 4 sc, inc around. (30 sts)
The alternating increase and plain rounds make the beige section taper gradually rather than flare outward like a flat circle.
Look at the project from the side. You should see a small charcoal point followed by a widening beige cone.
Beginner tip:
Do not stuff the tip yet. Leaving it empty temporarily makes the next several rounds easier to hold.
Common mistake to avoid:
If the beige section begins ruffling, recount your stitches. Ruffles usually indicate accidental extra increases.
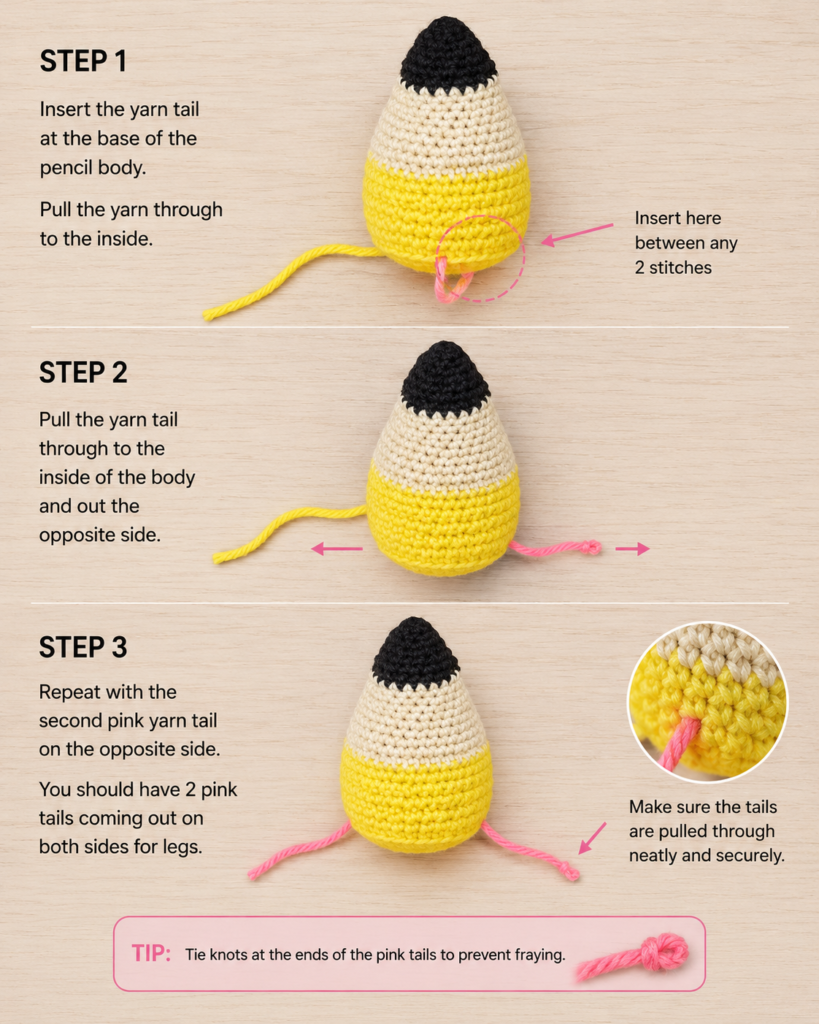
Step 3: Crochet the Long Pencil Body
Change to muted marigold yellow.
Rnd 10–29: Sc in every stitch around. (30 sts each round)
Twenty straight rounds create the long barrel of the pencil.
This is the easiest part of the project, but it is also where stitch-count mistakes can become difficult to notice.
Lay the project flat occasionally. Both sides should remain parallel once the yellow section begins.
If one side seems to flare outward, count the stitches.
Adding or removing length
Want a shorter pencil? Stop after approximately 14–16 yellow rounds.
Want a longer plush pencil? Add additional plain rounds before beginning the gray ferrule.
Each extra round increases the finished length without changing the width.
Beginner tip:
Rotate the work in your fingers instead of twisting your wrist repeatedly. This makes long amigurumi tubes more comfortable to crochet.
Common mistake to avoid:
Do not make an increase in the first stitch simply because it is beside the marker. Every yellow-body stitch is one ordinary sc.
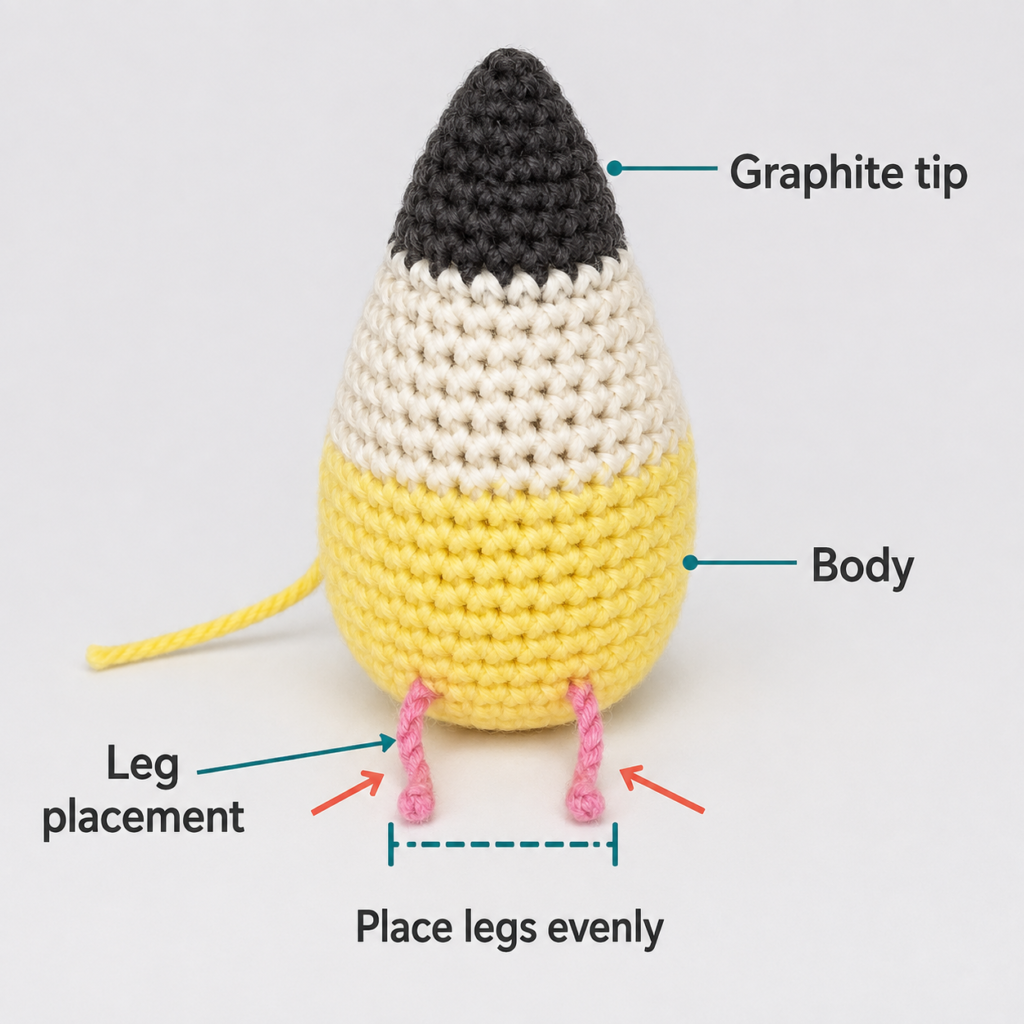
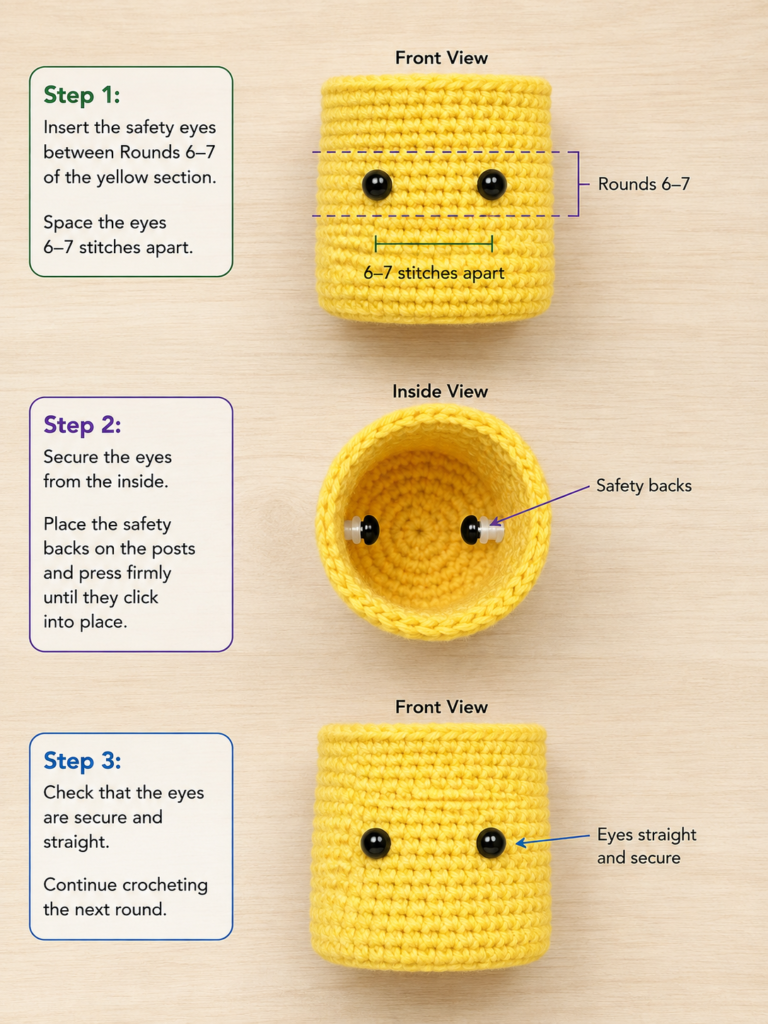
Step 4: Position and Insert the Eyes
Before continuing toward the eraser, decide whether you want your pencil to have a face.
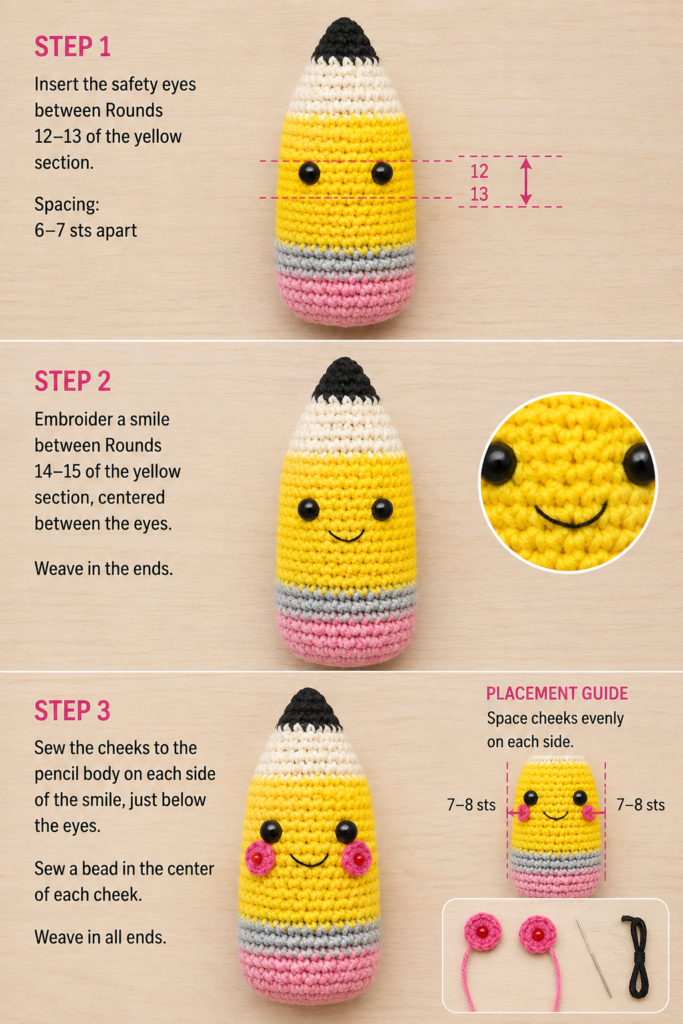
For the sample size, position two 8 mm safety eyes around the middle-to-upper portion of the yellow section.
Place the eyes about 5–6 stitches apart.
Before installing the plastic washers, insert the posts only and examine the pencil from the front.
Make sure:
- Both eyes sit on approximately the same crochet round.
- Neither eye is too close to the side edge.
- The smile will have enough room underneath.
You can also use two locking stitch markers temporarily and photograph the face before committing to a position.
Once satisfied, push the safety-eye washers onto the posts from inside the pencil.
Step 5: Crochet the Metal Ferrule and Eraser
Continue in the same spiral.
Change to pale silver-gray.
Rnd 30–31: Sc around. (30 sts)
These two rounds represent the metal band that holds an eraser to a real pencil.
Now change to dusty rose.
Rnd 32–36: Sc around. (30 sts)
At this stage your project should already look unmistakably like a pencil.
Do not close the pink end yet. You still need access for stuffing.
Beginner tip:
After each color change, gently tug the old and new yarn tails from inside the project. This can tighten a loose transition stitch.
Common mistake to avoid:
Avoid cutting the yarn with an extremely short tail. Leave several inches so the color-change end cannot pull free while stuffing.
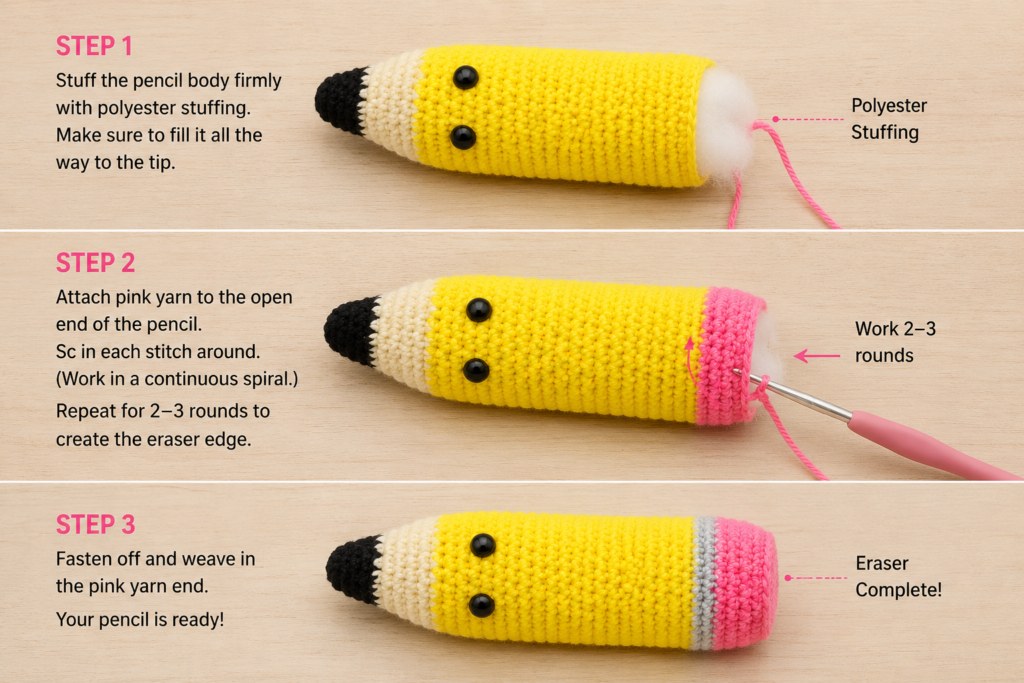
Step 6: Stuff the Pencil Evenly
Begin with a small amount of fiberfill.
Push it all the way into the charcoal and beige point using your fingertips or the blunt end of your crochet hook handle.
Add stuffing in small tufts, not one large wad.
Continue until the pencil feels firm but still compresses slightly when squeezed.
Long cylindrical amigurumi can become lumpy when too much fiberfill is inserted at once. Smaller pieces spread more evenly.
Check the point carefully. It should remain tapered rather than becoming round like a bulb.
Then inspect the yellow barrel. It should feel consistent from one end to the other.
Beginner tip:
Roll the stuffed pencil gently between both palms to redistribute small lumps.
Common mistake to avoid:
Overstuffing stretches the stitches and exposes white fiberfill. If this happens, remove a little stuffing before closing the project.
Step 7: Shape and Close the Eraser
Keep using dusty rose yarn.
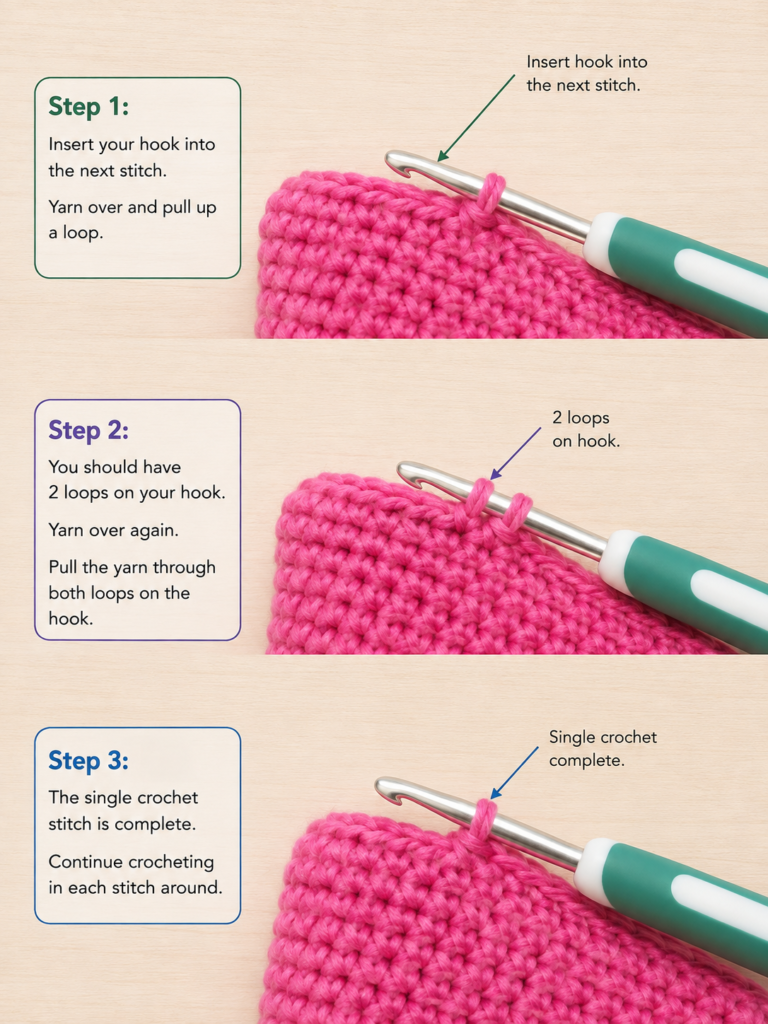
Rnd 37: Working in BLO, repeat 3 sc, dec around. (24 sts)
Working into the back loops creates a subtle ridge around the eraser. That ridge visually separates the straight side of the eraser from its rounded end.
Rnd 38: Working through both loops again, repeat 2 sc, dec around. (18 sts)
Add a final small amount of stuffing if necessary.
Rnd 39: Repeat 1 sc, dec around. (12 sts)
Rnd 40: Dec around. (6 sts)
Cut the yarn, leaving approximately 6 inches / 15 cm.
Thread the tail through a yarn needle.
Pass the needle through the front loops of the six remaining stitches.
Pull gently until the opening closes.
Insert the needle through the center of the closed end and bring it out several stitches away. Tug lightly so the finishing knot disappears inside the amigurumi, then trim the yarn.
Beginner tip:
An invisible decrease produces a cleaner surface than a standard sc2tog because it minimizes bumps between stitches.
Common mistake to avoid:
Do not repeatedly pull the final tail as tightly as possible. Excess tension can create a deep dimple in the center of the eraser.
Step 8: Embroider a Simple Smile
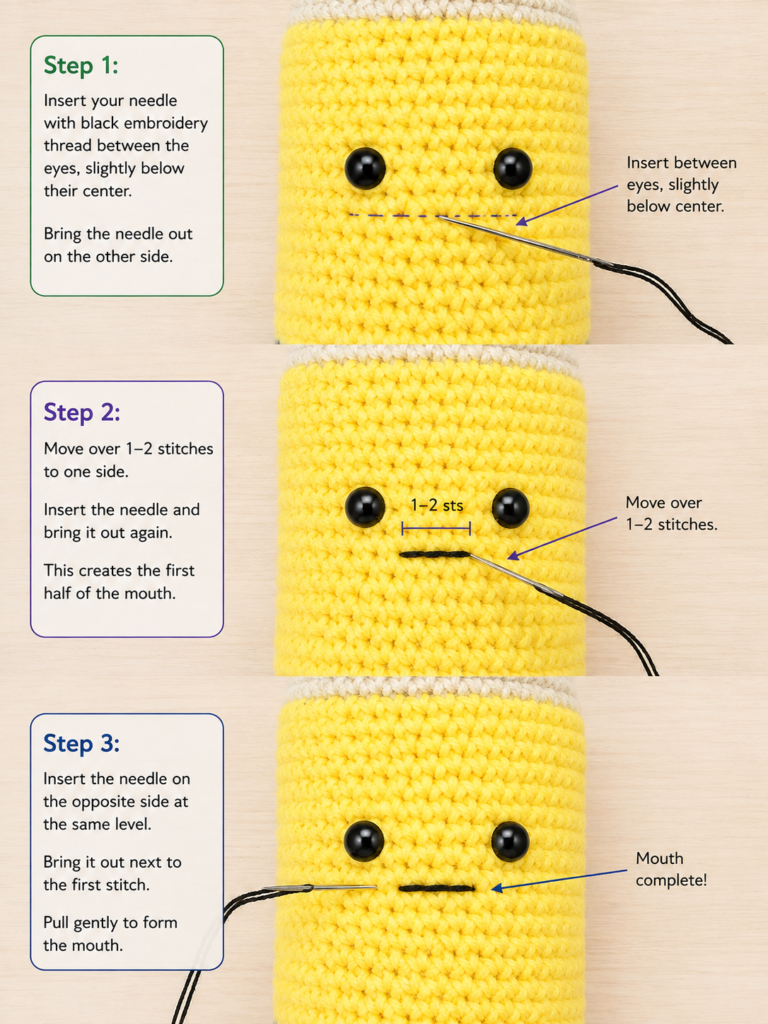
Thread a yarn needle with black embroidery thread.
Insert the needle somewhere hidden on the side or back of the pencil and bring it out one stitch below and slightly inward from one eye.
Make a loose horizontal stitch underneath the eyes.
Before tightening it, bring the needle up slightly below the center of that strand and catch the strand gently. Pulling this anchor stitch downward transforms the straight line into a small smile.
Do not pull hard.
A tiny amount of tension is enough to create the curve.
Finish by bringing both ends of the embroidery thread to the same hidden area, knotting them securely, and burying the knot inside the stuffed body.
Step 9: Add Optional Crochet Cheeks
For a kawaii-style pencil, make two tiny cheek circles.
With dusty rose yarn:
Make an MR and work 6 sc into the ring.
Join with a sl st and fasten off, leaving a long sewing tail.
Make a second circle.
Position one beside each eye.
Use the tails to sew the circles to the yellow body with tiny stitches around their edges.
Alternatively, skip the crocheted circles entirely and embroider two short pink horizontal stitches.
Pattern Notes and Stitch Notes
Construction
The pencil is worked as one continuous main piece from the graphite point to the eraser.
Turning chains
There are no turning chains because the project is crocheted continuously in spiral rounds.
Maximum stitch count
The body reaches 30 stitches after the wooden point is complete.
Maintain 30 stitches through the yellow body, gray ferrule, and straight portion of the pink eraser.
Round marker
Always mark the first stitch.
Do not move your marker until the first stitch of the new round has been completed.
Right side and wrong side
The normal outside surface of your single crochet stitches is the right side.
Keep that surface facing outward.
If your magic ring begins curling toward the wrong side, simply flip the small piece before continuing.
Invisible decrease
For an invisible decrease:
- Insert the hook through the front loop of the next stitch.
- Insert the hook immediately through the front loop of the following stitch.
- Yarn over and pull through both front loops.
- Yarn over again and complete the single crochet.
Two stitches become one while creating less visible bulk.
Size adjustment
To make the pencil longer or shorter, modify only the number of straight yellow rounds.
Changing the circumference requires recalculating the tapered tip and eraser decreases, so length adjustments are much easier for beginners.
Common Beginner Mistakes
1. Losing the beginning of the round
Problem: Your stitch count no longer matches.
Fix: Use a locking marker in the first stitch and count each completed round before moving the marker.
2. Creating visible holes
Problem: Fiberfill shows between stitches.
Fix: Use a smaller hook or slightly firmer tension. Do not solve the problem by pulling each stitch painfully tight.
3. Making the pencil tip too round
Problem: Too much stuffing has been pushed into the graphite and wooden point.
Fix: Remove a small amount and shape the point between your fingers before continuing.
4. Crooked safety eyes
Problem: One eye sits one round higher than the other.
Fix: Insert eye posts without washers first. Count both stitch columns and rounds before permanently attaching them.
5. An uneven cylinder
Problem: The yellow body slowly widens or narrows.
Fix: Recount. Every straight body round must contain 30 stitches.
6. Visible color-change steps
Problem: A large jog appears where two colors meet.
Fix: Complete the final pull-through of the previous stitch with the incoming color.
A tiny spiral jog can still remain because this project is worked continuously; that is normal.
7. Lumpy stuffing
Problem: The body has hard and soft patches.
Fix: Add smaller pieces of stuffing and distribute them gradually rather than pushing in one large ball.
8. Over-tight eraser closure
Problem: The top develops a deep indentation.
Fix: Pull the final six-stitch closure only until the hole disappears.
How to Customize This Crochet Pencil
Change the pencil-body color
Traditional yellow is immediately recognizable, but the exact same construction works in:
- Sage green
- Lavender
- Coral
- Sky blue
- Terracotta
- Rainbow stripes
- School or university colors
Keep the beige wood and charcoal graphite sections if you want the object to remain clearly recognizable as a pencil.
Make a colored pencil
Replace the charcoal tip with the same color as the body.
For example, a blue pencil can have a blue tip, beige wooden section, and blue barrel.
Skip the face
A faceless version works well as classroom decor, desk decor, or part of a school-themed crochet garland.
Simply omit the eyes, mouth, and cheeks.
Add a hanging loop
Before completely closing the eraser, secure a short yarn or cord loop inside the top.
The pencil can then become a bag charm or classroom ornament.
Turn it into a keychain
Use sport or fingering yarn with a smaller hook to create a miniature pencil.
Attach a keychain ring securely through a reinforced loop.
Make a giant pencil pillow
Use bulky or super-bulky yarn and an appropriately smaller-than-label hook.
The same construction principles scale naturally, although you’ll need considerably more stuffing.
Personalize it for a teacher
Embroider an initial onto the yellow body.
A set of pencils in different colors also makes a playful classroom or teacher-desk display.
Finishing Instructions
Once the cheeks and facial embroidery are complete, inspect every yarn end.
Any remaining tails should be woven through several nearby stitches before being pulled into the interior and trimmed.
Gently roll the pencil between your hands to straighten the body and redistribute the stuffing.
Because this is amigurumi, heavy blocking is normally unnecessary. Blocking can actually flatten the stuffing or distort the face.
For washing, follow the care information printed on the yarn label. The Craft Yarn Council recommends retaining yarn-label care information for handmade items because fiber-specific washing and drying instructions can vary significantly.
For a cotton or washable acrylic pencil without delicate accessories, gentle spot cleaning is usually sufficient for ordinary decorative use.
If safety eyes are installed, inspect them periodically if the project will be handled frequently.
Quick Printable-Style Summary
Skill level: Beginner / Easy
Finished size: Approximately 7–8 in / 18–20 cm
Yarn: DK/light worsted cotton or cotton-acrylic
Hook: 3.25 mm
Main stitches: MR, sc, inc, invisible dec, BLO
Starting method: 5 sc in a magic ring
Maximum circumference: 30 sts
Construction:
Graphite point → beige wood → yellow body → gray ferrule → pink eraser
Main body:
Work straight single crochet rounds after reaching 30 sts.
Eyes:
Optional 8 mm safety eyes, approximately 5–6 stitches apart.
Stuffing:
Add gradually before closing the eraser.
Finishing:
Decrease the pink end to six stitches, thread the tail through remaining loops, pull closed, embroider smile, add optional cheeks, and weave in ends.
FAQ
Is a crochet pencil amigurumi pattern suitable for beginners?
Yes. This project mainly uses single crochet, increases, decreases, and simple color changes. The most important beginner skills are counting stitches accurately and using a marker while working in spirals.
What yarn works best for crochet pencil amigurumi?
Cotton and cotton-acrylic blends are particularly useful because they provide defined stitches and maintain their shape well. Smooth acrylic also works.
Very fuzzy yarn makes stitch counting harder and is less suitable for a first amigurumi project.
What hook size should I use?
This tutorial uses a 3.25 mm hook with DK/light worsted yarn.
If your stitches have large gaps, move down slightly in hook size. If crocheting is uncomfortable because your fabric is extremely stiff, move up slightly or relax your tension.
How do I stop stuffing from showing?
Use dense single crochet stitches and add fiberfill gradually.
The fabric itself needs to be tight enough before stuffing. Packing more stuffing into loose crochet will usually make the gaps more visible rather than hiding them.
Can I make this crochet pencil without safety eyes?
Yes.
Embroider small vertical or horizontal black eyes instead. This is also preferable when making an item for a very young child.
How can I make the pencil longer?
Simply add extra rounds to the straight yellow body before changing to gray.
Because the stitch count remains 30, each extra round increases the length without changing the pencil’s width.
Can I make a pencil keychain from this pattern?
Yes, but use thinner yarn and a smaller hook to reduce the finished size.
For example, sport yarn and approximately a 2–2.5 mm hook can produce a much smaller version, depending on your tension.
Make sure any hanging loop is secured firmly inside the amigurumi.
Conclusion
This crochet pencil amigurumi is a useful project for practicing several core amigurumi techniques without requiring complicated assembly.
The widening pencil point introduces controlled increases, the long body gives you plenty of practice maintaining an accurate stitch count, and the eraser teaches both back-loop construction and gradual decreases. By the time the pencil is finished, you’ve also practiced color changes, stuffing, closing an amigurumi opening, and basic facial embroidery.
Once you’ve made one yellow pencil, the same idea is easy to turn into a full set of colored pencils, miniature keychains, teacher gifts, classroom decorations, or oversized pencil pillows.
Save the tutorial with your back-to-school crochet ideas so you can return to the construction sequence whenever you’re ready to make another color.





