A handmade pencil banner is one of those crochet projects that immediately looks at home in a classroom. It works for back-to-school decorating, teacher gifts, reading corners, homeschool rooms, tutoring spaces, or simply as cheerful desk-area décor.
The problem with many picture-style crochet projects is that they require frequent color changes, bobbins, graph reading, or complicated tapestry crochet. That can make a cute project surprisingly frustrating for a beginner.
This crochet classroom pencil banner pattern takes a simpler route.
Instead of crocheting the pencil directly into the background, you will make a plain rectangular banner first. Then you will crochet the eraser, ferrule, pencil body and tip as easy flat pieces and sew them onto the panel.
That gives you the graphic look of a pencil banner while keeping almost every section simple enough for someone who knows basic chains, single crochet and half double crochet.
What You’ll Learn
By the end of the tutorial, you will know how to:
- crochet a flat rectangular wall banner
- keep your crochet edges straight
- make a narrow pencil appliqué
- shape a simple triangle with decreases
- join several appliqué sections neatly
- attach an appliqué without puckering the background
- crochet an even border
- weave in ends cleanly
- personalize a classroom banner
- mount crochet fabric on a wooden dowel
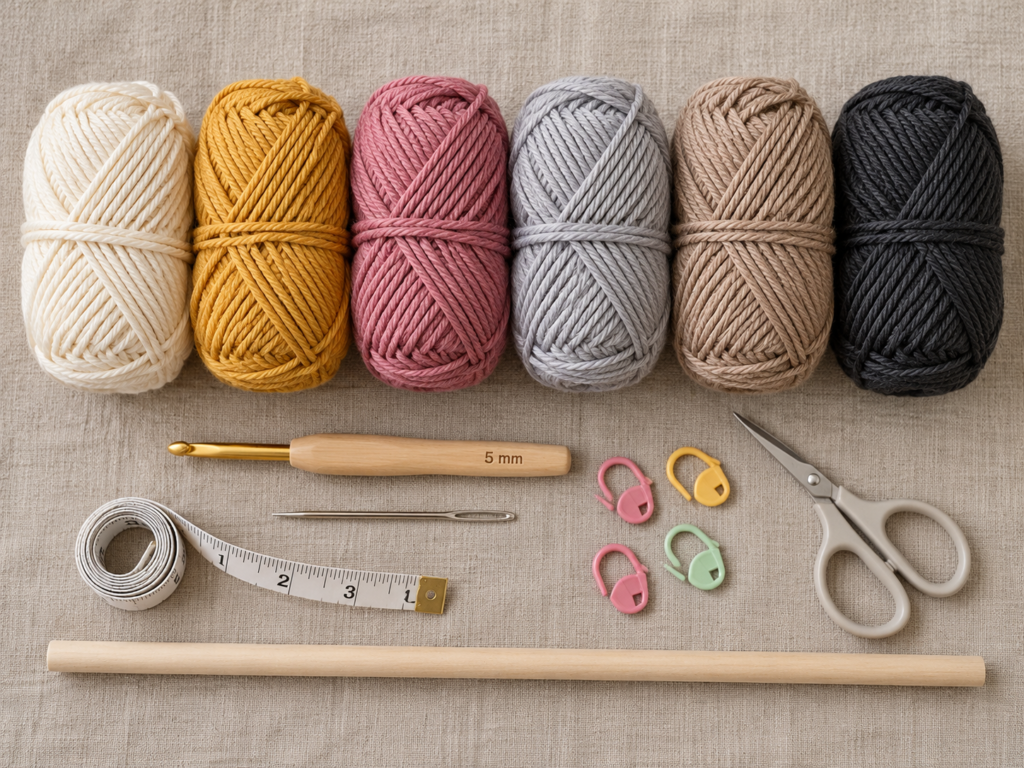
Materials You’ll Need
For the sample-style project, gather:
- Category 4 medium/worsted yarn in warm ivory for the panel
- Mustard yellow for the pencil body
- Dusty rose for the eraser and optional border
- Soft gray for the metal ferrule
- Tan or light beige for the sharpened wood
- Charcoal or black for the graphite tip
- 5 mm crochet hook
- yarn needle
- scissors
- stitch markers
- measuring tape
- approximately 18–20 inch wooden dowel
- optional felt for backing
- optional fabric glue for securing a backing
A smooth yarn works better than fuzzy novelty yarn because the pencil shape and stitch definition remain clearly visible.
Crochet Abbreviations Used
This tutorial uses standard U.S. terminology.
- ch = chain
- sc = single crochet
- hdc = half double crochet
- sl st = slip stitch
- st / sts = stitch / stitches
- dec = decrease
- RS = right side
- WS = wrong side
These abbreviations align with standard crochet terminology published by the Craft Yarn Council. The Council also notes that U.S. single crochet corresponds to UK double crochet, while U.S. half double crochet corresponds to UK half treble. craftyarncouncil.com
Finished Size
Using medium-weight yarn and approximately a 5 mm hook, expect a banner roughly:
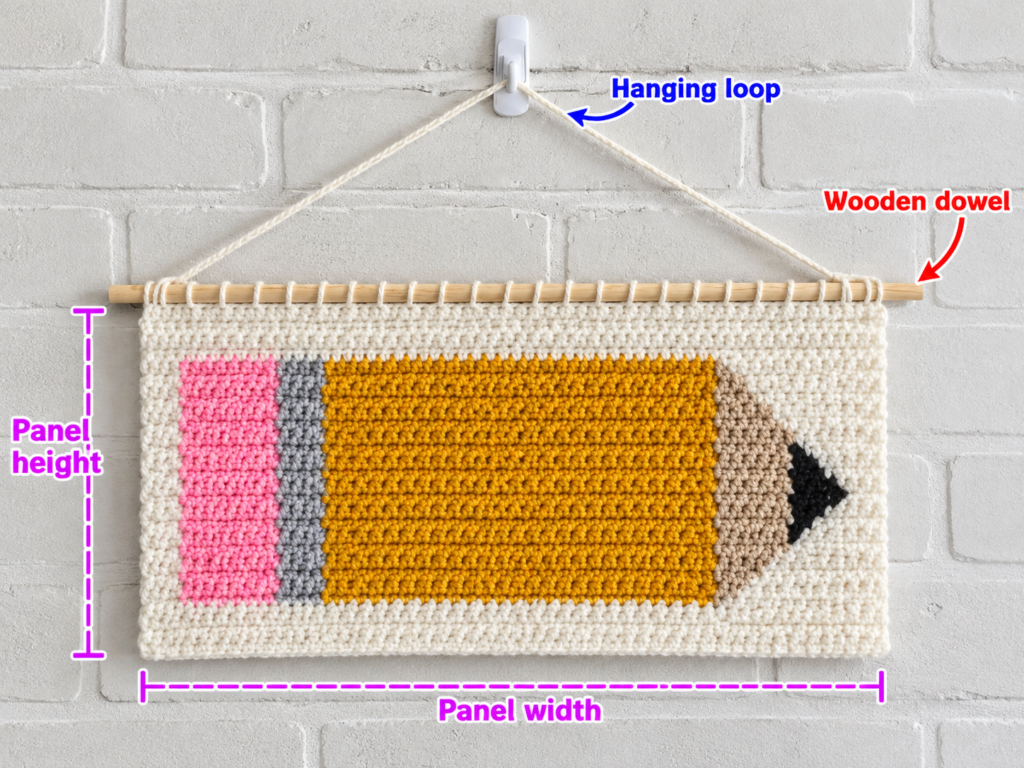
16–18 inches wide × 8–9 inches high
The pencil appliqué will measure approximately:
12–14 inches long × 2–2½ inches high
Exact dimensions are not critical because this is decorative rather than fitted.
Before You Start
Gauge
Exact gauge is optional, but consistency matters.
Aim for approximately:
13–15 hdc stitches × 10–12 rows = 4 inches
If your fabric feels stiff, move up one hook size. If your stitches are loose enough that the stuffing-free appliqué loses its shape, use a slightly smaller hook.
Count Your Stitches
The most common reason rectangular crochet panels become narrower is accidentally missing the final stitch.
Put a stitch marker into the first and last stitch of every row until you are comfortable identifying them.
Keep Your Edges Straight
The turning chain in this pattern does not count as a stitch.
After turning:
- chain 1
- work the first hdc directly into the first stitch
- continue across
- work the final hdc into the last true stitch
Step-by-Step Crochet Tutorial
Step 1: Crochet the Main Banner Panel
With ivory yarn:
Foundation: Ch 46.
Row 1
Hdc in the second chain from the hook and in every chain across.
You should have 45 hdc.
Rows 2–24
Ch 1 and turn.
Hdc in each of the 45 stitches across.
Continue until the panel looks proportionate and measures roughly 8–9 inches high.
Do not fasten off yet if you plan to work the border in the same color.
Beginner tip
Count your stitches at least every three or four rows. It takes only a few seconds and can save you from discovering a tapered edge twenty rows later.
Common mistake to avoid
Do not place two stitches into the first stitch because you mistake the turning chain for a stitch.
Step 2: Crochet the Yellow Pencil Body
The appliqué is made separately so you do not have to manage six strands of yarn while crocheting the background.
With mustard-yellow yarn:
Ch 7.
Row 1
Sc in the second chain from the hook and across.
6 sc
Rows 2–26
Ch 1, turn and sc across.
Fasten off, leaving a 12-inch tail for sewing.
Your strip should look like a long, narrow rectangle.
If you want a shorter pencil, simply stop several rows earlier.
Beginner tip
A pencil appliqué looks best when its stitches are moderately firm. If your rectangle feels floppy, use a hook 0.5 mm smaller for the appliqué.
Common mistake to avoid
Do not accidentally increase by crocheting into the turning chain.
Keep 6 stitches in every row.
Step 3: Crochet the Eraser and Metal Ferrule
Eraser
With dusty-rose yarn:
Ch 7.
Sc in the second chain from the hook and across.
6 sc
Work 6–7 rows total.
Fasten off.
Ferrule
With gray yarn:
Ch 7.
Sc across as before.
Work 3 rows.
Fasten off.
Place the pieces in this order:
pink eraser → gray ferrule → yellow pencil body
All three sections should be approximately the same width.
If one piece is visibly wider, remake it rather than stretching the other pieces during sewing.
Beginner tip
Lay the components beside one another after every few rows. Crochet tension can change when you switch colors or yarn brands.
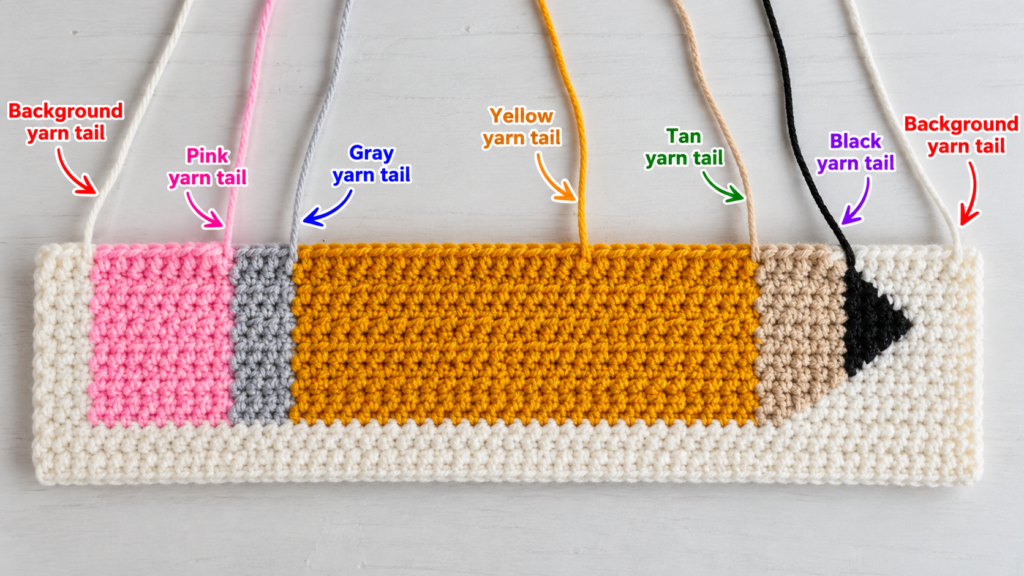
Step 4: Shape the Wooden Pencil Point
With tan yarn:
Ch 7.
Row 1
Sc across.
6 sts
Row 2
Ch 1 and turn.
Sc2tog, sc in the next 2 stitches, sc2tog.
4 sts
Row 3
Ch 1 and turn.
Sc2tog twice.
2 sts
Row 4
Ch 1 and turn.
Sc2tog.
1 st
Fasten off.
You now have a small triangular section resembling sharpened wood.
Thread a short piece of charcoal yarn onto your tapestry needle and make several compact stitches over the very point to suggest graphite.
Alternatively, crochet a tiny black nub and sew it to the end.
Beginner tip
When working sc2tog, do not pull the first loop tight before entering the second stitch. Keeping both loops relaxed makes the decrease much easier.
Common mistake to avoid
A loose triangular tip can flare outward. If yours is wider than the pencil body, use a slightly smaller hook.
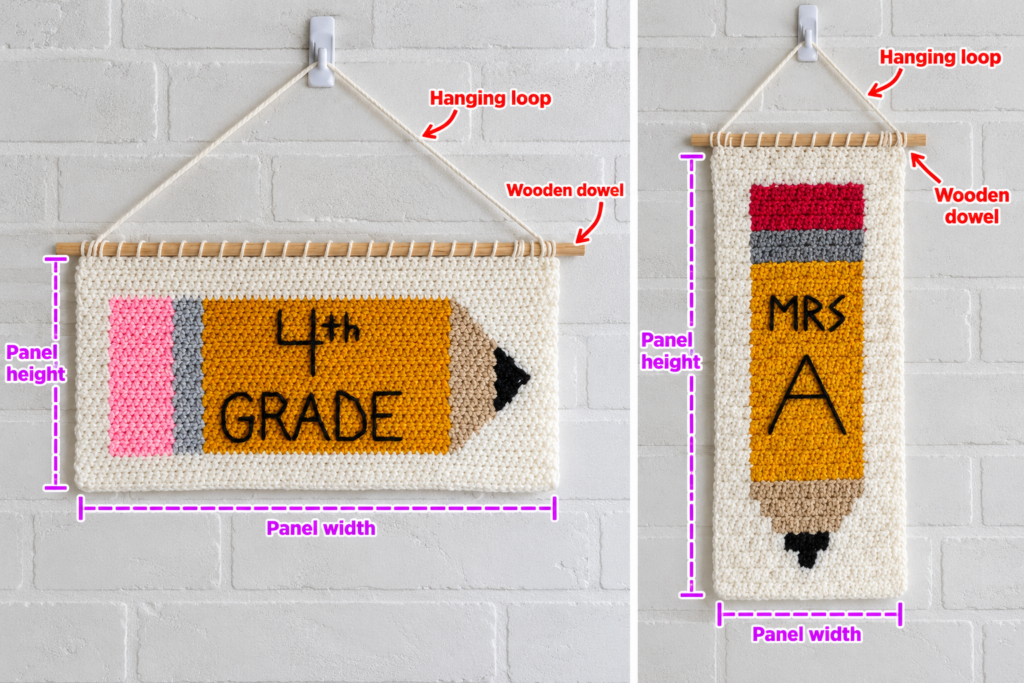
Step 5: Assemble the Pencil Appliqué
Arrange the components horizontally:
eraser → ferrule → yellow body → wood → graphite
Thread the long yarn tail from one section onto your yarn needle.
Use small whip stitches through the edge loops to connect each section.
Avoid pulling too tightly. The seam should close the gap without causing either component to curl.
When finished, lay the entire pencil flat.
If needed, lightly block it before proceeding.
Beginner tip
Join the components while they are lying flat on the table instead of holding them in the air. This helps keep the pencil straight.
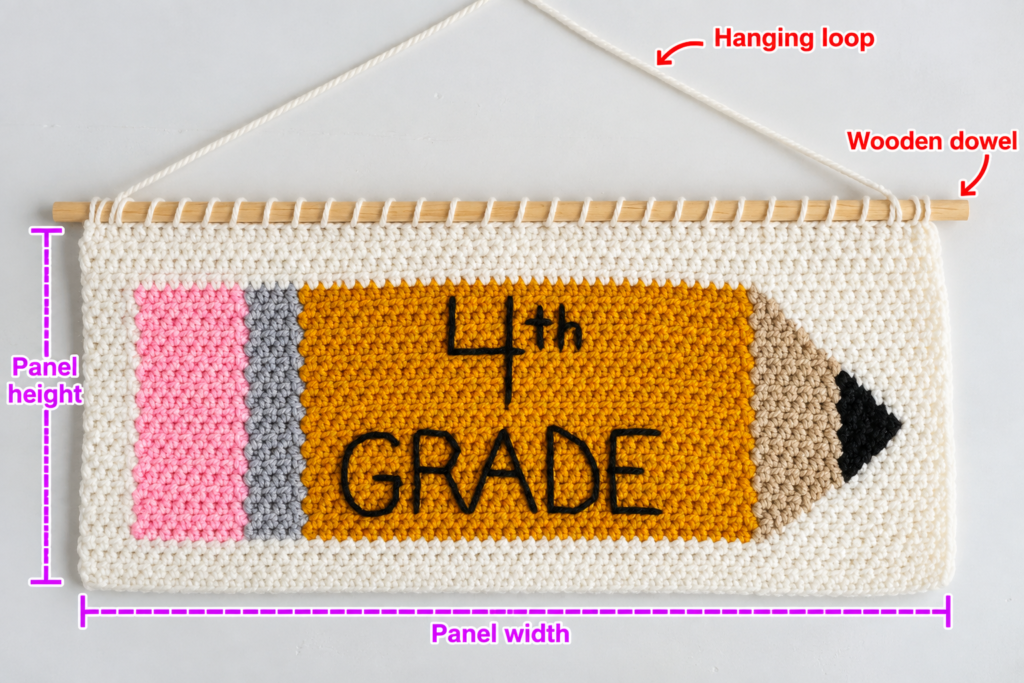
Step 6: Sew the Pencil onto the Banner
Place the ivory panel right side up.
Lay the pencil horizontally across the center.
Leave roughly equal empty space above and below the pencil.
Pin it with locking stitch markers if necessary.
Thread your yarn needle with yarn matching the part of the pencil you are currently sewing.
Stitch around the outside edge using small, discreet stitches.
Switch yarn colors when moving from yellow to gray, pink or tan.
This takes longer than using one color for the entire seam, but the attachment becomes much less visible.
Do not pull the sewing yarn tightly
The pencil must lie flat.
If the background starts puckering, undo several stitches and resew them more loosely.
Step 7: Add a Simple Border
A border makes the rectangular panel look intentional and gives the edges additional structure.
Join dusty-rose yarn in one corner.
Ch 1.
Sc evenly around all four edges.
Along the row ends, avoid putting too many stitches into the same space or the fabric will ruffle.
At each corner:
sc, ch 1, sc
into the corner space.
When you return to the beginning, sl st to the first sc.
Fasten off.
The Winding Road Crochet C2C tutorial similarly recommends a preliminary single-crochet border to make an unfinished crochet edge appear cleaner. windingroadcrochet.com
Beginner tip
If your border waves, you probably added too many stitches.
If the panel cups inward, you probably added too few.
Step 8: Add Optional Classroom Personalization
This is where the project becomes a particularly nice teacher gift.
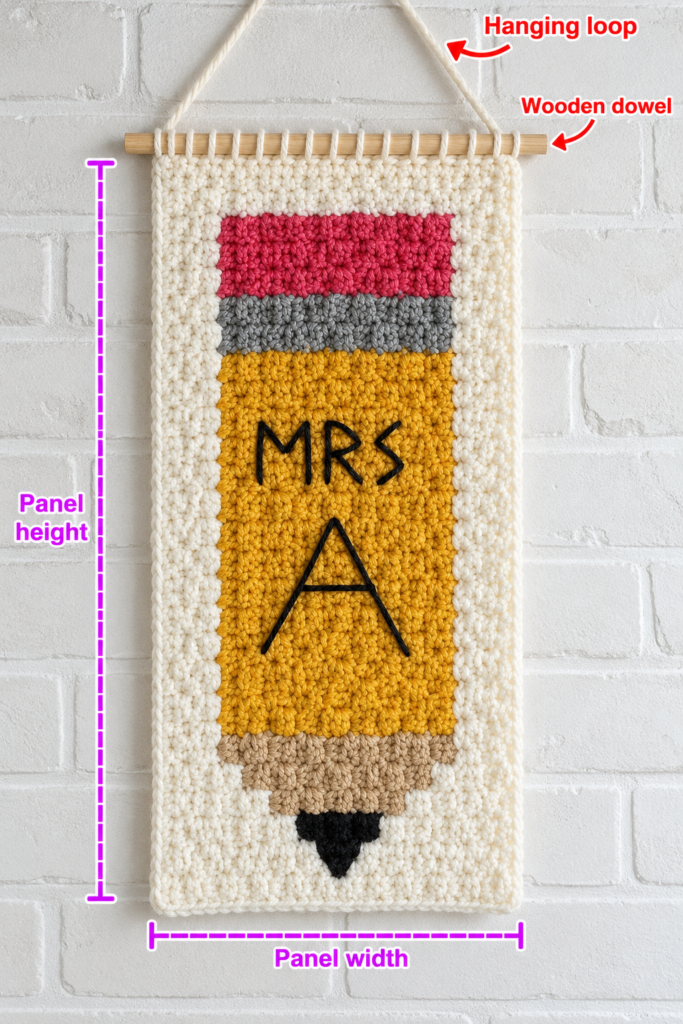
You could embroider:
- a teacher’s first name
- “READ”
- “CREATE”
- “LEARN”
- the classroom number
- a grade level
- a school-year date
- a single initial
Before embroidering, write your word on paper and estimate its width.
Use the crochet rows as horizontal guidelines.
Simple straight stitches are easier than curved script for a first embroidery project.
The original research source also recommends using the crochet structure as a guide when positioning embroidered letters. windingroadcrochet.com
Pattern and Stitch Notes
Turning chain
The ch-1 at the beginning of each panel row does not count as a stitch.
Banner stitch count
Maintain 45 hdc throughout the rectangular panel.
Pencil width
Keep all rectangular pencil components at 6 sc wide.
Right side and wrong side
Half double crochet is reversible enough that either side can technically face forward. Choose whichever side looks more even before attaching the appliqué.
Adjusting the banner width
Add or remove foundation chains.
For example:
- smaller banner: approximately 38–40 stitches
- standard banner: approximately 45 stitches
- larger banner: approximately 50–55 stitches
Adjusting pencil length
Add or remove rows from the yellow body.
This is easier than resizing every component.
Common Beginner Mistakes
1. The banner gets narrower
Cause: Missing the final stitch.
Fix: Mark both edge stitches.
2. The banner becomes wider
Cause: Accidentally crocheting into the turning chain.
Fix: Remember that the ch-1 does not count as a stitch.
3. The pencil curves
Cause: Different tension between the individual sections.
Fix: Lightly block every component before sewing.
4. The background puckers around the appliqué
Cause: Sewing stitches are too tight.
Fix: Loosen the attaching yarn and smooth the banner after every few stitches.
5. The border becomes wavy
Cause: Too many stitches along the side edges.
Fix: Remove several evenly spaced edge stitches and try again.
6. The pencil point looks blunt
Cause: The decrease rows are too loose.
Fix: Use a slightly smaller hook for the tan section.
7. Yarn tails show through the front
Cause: Ends were carried across contrasting colors.
Fix: Weave each tail through stitches of the same color whenever possible.
How to Customize This Crochet Project
Change the school colors
Instead of the traditional yellow pencil, crochet the body in the school’s main color and use the secondary color for the border.
Make a pastel classroom version
Try:
- sage
- blush
- cream
- muted gold
- pale blue
This works particularly well for neutral modern classrooms.
Make a rainbow pencil
Divide the pencil body into several colored rectangles and join them in sequence.
Add several pencils
For a wider wall hanging, make three smaller pencil appliqués and arrange them diagonally.
Add lettering
A short word such as LEARN, READ or CREATE works particularly well because it can be centered without crowding the design.
Change the texture
Instead of hdc, make the background using:
- moss stitch
- linen stitch
- linked double crochet
- simple alternating sc and hdc
Keep the appliqué smooth so the pencil remains easy to recognize.
Turn it into a gift
Roll the finished banner around its dowel and pair it with:
- pencils
- sticky notes
- classroom supplies
- a bookstore gift card
- handmade bookmarks
Finishing Instructions
Weave in all ends
Turn the piece to the back.
Thread each yarn tail through the yarn needle and weave it under several stitches of the same color.
Reverse direction once before trimming.
This helps prevent the ends from slipping free.
Lightly block the banner
Acrylic yarn generally requires only gentle shaping.
Cotton can be lightly damp-blocked.
Lay the panel flat, straighten the corners and allow it to dry completely before attaching the dowel.
Attach the wooden dowel
Position the dowel along the top edge.
Leave approximately ½–1 inch visible beyond either side of the panel.
Thread a long piece of ivory yarn onto the yarn needle.
Whip stitch around the dowel and through the top edge of the crochet fabric at regular intervals.
Do not wrap so tightly that the top edge bunches.
The researched pencil-banner tutorials also use a dowel-based hanging method, making it a particularly suitable finishing technique for this type of classroom décor.
Add the hanging cord
Cut a strand of yarn roughly 22–26 inches long.
Tie one end securely to each end of the dowel.
Adjust until the banner hangs level.
For a cleaner finish, hide the knots behind the top corners.
Washing and care
For classroom wall décor, frequent washing should not be necessary.
If washing is required:
- check the yarn manufacturer’s care instructions
- remove the dowel
- place the banner in a mesh laundry bag if machine washing is permitted
- reshape it flat to dry
Quick Printable-Style Summary
Project: Crochet Classroom Pencil Banner
Skill level: Beginner / easy
Yarn: Category 4 medium-weight
Hook: Approximately 5 mm
Main stitches: ch, sc, hdc, sl st
Banner start: Ch 46
Banner: 45 hdc across for approximately 24 rows
Pencil body: 6 sc wide; adjust length by changing row count
Eraser: Short 6-sc-wide rectangle
Ferrule: Short 6-sc-wide rectangle
Tip: 6 sts narrowing through decreases
Assembly: Sew pencil components together, then appliqué to banner
Border: 1 round sc
Finishing: Weave ends, block, whip stitch to dowel, add hanging cord
FAQ
Is the crochet classroom pencil banner suitable for beginners?
Yes. This version avoids complicated graph crochet by making the background and pencil separately. You need only basic chains, single crochet, half double crochet and simple decreases.
What yarn works best for a crochet pencil banner?
Smooth category 4 acrylic or cotton/acrylic yarn is ideal. It provides enough body for a wall hanging while keeping the stitches clearly defined.
The Craft Yarn Council classifies worsted and Aran yarns within category 4 medium yarn. media.craftyarncouncil.com
Can I make the pencil in another color?
Absolutely. Traditional yellow is immediately recognizable, but school colors, rainbow stripes, pastel colors or a teacher’s favorite color can make the banner more personal.
How do I make the banner larger?
Increase the number of foundation chains and crochet more rows.
Remember to lengthen the pencil proportionally so it does not look too small against the larger background.
Can I make this without a wooden dowel?
Yes.
Alternative hanging methods include:
- crocheted loops
- a yarn hanging cord sewn directly to the corners
- a decorative branch
- clip-style wall hangers
A dowel simply gives the top edge more structure.
Why is my banner curling?
Tight tension is the most likely cause.
Try a larger hook, relax your hdc stitches and block the finished panel before attaching the appliqué.
Can I personalize it with a teacher’s name?
Yes. Embroidery is one of the easiest ways to turn the project into a teacher gift. Plan the lettering on paper first so the name fits comfortably.
Conclusion
A crochet classroom decoration does not have to involve complicated graph work.
By separating the project into an easy rectangular panel and a handful of small pencil components, you can create a recognizable crochet classroom pencil banner while practicing foundational skills that transfer to many other projects: straight rows, decreases, appliqué sewing, edging, embroidery and finishing.
Once you have made one, the same basic banner can be adapted for apples, crayons, books, alphabet letters, rulers or other school-themed appliqués.