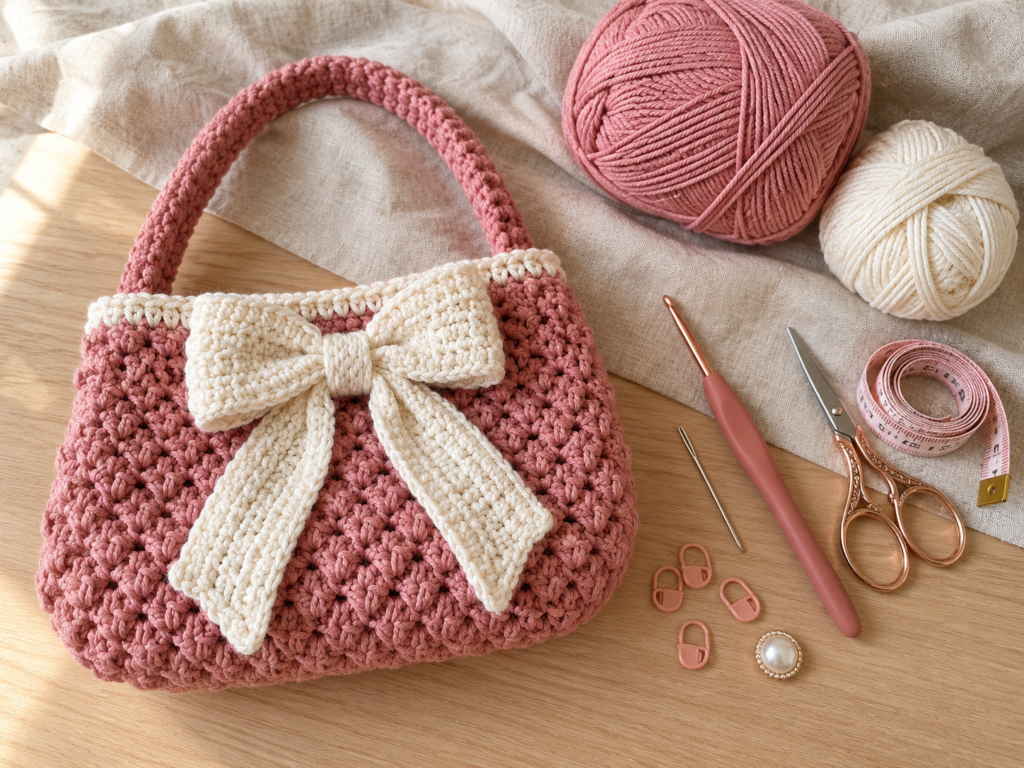
A crochet bag is already a lovely handmade accessory, but add an oversized bow and it becomes something a little more special. This crochet bow bag pattern combines a simple rectangular purse with a soft, gathered bow that gives the finished project a sweet, coquette-inspired look.
The best part? You don’t need to know complicated crochet stitches to make it.
This beginner-friendly bow purse uses mostly single crochet. You’ll make one long piece for the bag, shape a small closing flap, crochet a separate bow, and sew everything together. The finished bag is just the right size for carrying a phone, keys, cards, and a few small essentials.
If you’ve already made a crochet washcloth or scarf, you have many of the skills needed for this project. The new techniques are basic decreases, sewing crochet pieces together, and gathering the bow.
Throughout this tutorial, you’ll find detailed written instructions, stitch counts, practical tips, and planned step-by-step images showing what each stage should look like.
The design uses a dusty-rose bag with a contrasting ivory bow, but you can easily change the colors to suit your style.
What You’ll Learn
By the end of this crochet bow bag tutorial, you’ll know how to:
- Crochet a sturdy, flat bag panel using single crochet.
- Keep your stitch count consistent and your edges straight.
- Shape a tapered closing flap with simple decreases.
- Make an oversized crochet bow from a rectangle.
- Gather the bow neatly with a crocheted center band.
- Fold and sew the bag into a functional clutch.
- Add a button closure and matching wrist strap.
- Finish your crochet bag with neat seams and hidden yarn ends.
This is a project-style crochet tutorial using an original, beginner-oriented construction.
Crochet Bow Bag Pattern Details
| Detail | Pattern Information |
|---|---|
| Skill level | Advanced beginner |
| Finished width | Approximately 9 inches / 23 cm |
| Finished height | Approximately 5 inches / 13 cm |
| Estimated time | 5–7 hours |
| Yarn weight | Medium / worsted #4 |
| Main color | Dusty rose |
| Contrast color | Warm ivory |
| Hook size | 4.5 mm |
| Construction | One-piece folded body, separate bow and wristlet |
| Main stitch | Single crochet |
| Terminology | US crochet terms |
The finished measurements are approximate and depend on your yarn, hook, and tension.
Materials You’ll Need
Gather your supplies before starting so you can work through the project without stopping.
Yarn
Use medium-weight (#4) cotton yarn for a structured, durable bag.
For the sample design, plan for approximately:
- 180–220 yards of dusty-rose cotton yarn for the bag and wristlet.
- 55–75 yards of warm ivory cotton yarn for the oversized bow.
- A little extra matching yarn for sewing and finishing.
These are planning estimates. Actual yarn use will vary with tension and any changes to the bag size.
Cotton is particularly useful for crochet bags because it generally has less elasticity than many soft acrylic yarns. That helps the finished purse keep its shape.
Crochet hook
A 4.5 mm ergonomic crochet hook is a good starting point. If your stitches are very loose, try a 4 mm hook. If they are uncomfortably tight, move up slightly.
Other tools
- Sharp scissors
- Blunt tapestry needle
- Two or more locking stitch markers
- Flexible measuring tape
- One small button, approximately 15 mm wide
- Matching sewing thread and sewing needle for the button
- Rustproof pins or removable stitch markers for assembly
- Optional cotton fabric for lining
Crochet Abbreviations Used
This pattern uses US crochet terminology.
| Abbreviation | Meaning |
|---|---|
| ch | Chain |
| sc | Single crochet |
| sl st | Slip stitch |
| st / sts | Stitch / stitches |
| sc2tog | Single crochet two stitches together |
| rep | Repeat |
| RS | Right side |
| WS | Wrong side |
How to make a single crochet decrease (sc2tog)
Insert your hook into the next stitch, yarn over, and pull up a loop. Insert your hook into the following stitch, yarn over, and pull up another loop. You should have three loops on your hook.
Yarn over and pull through all three loops.
You’ve now turned two stitches into one.
US/UK terminology note: This tutorial uses US single crochet (sc), called double crochet (dc) in UK terminology. All stitch instructions below follow US terminology only.
Before You Start
Check your gauge
For this design, use a planning gauge of approximately 16 single crochet stitches and 18 rows across 4 inches (10 cm).
Make a small swatch before beginning the bag.
Chain 21, work 20 single crochet stitches across, and continue until your swatch is at least 5 inches tall. Measure the center 4 inches rather than the edges.
If you have more than 16 stitches in 4 inches, your stitches are smaller than the target gauge. Try a slightly larger hook.
If you have fewer stitches, try a smaller hook.
Gauge matters because it controls both the size and firmness of the finished bag.
Learn to recognize the last stitch
One of the most common beginner problems is accidentally missing the final stitch of a row.
Look closely at the top edge of your crochet fabric. Each stitch forms a small V shape. Count these V shapes, rather than the spaces between them.
You can place a stitch marker in the first and last stitches of a row until you’re comfortable recognizing them.
Keep your tension comfortable
For bags, you want fabric that feels firm without becoming stiff or difficult to crochet.
Loose stitches can stretch when the bag is filled. Very tight stitches can make the edges pull inward.
Aim for even tension that allows your hook to move through each stitch without forcing it.
Understand the construction
The bag starts as one long crocheted panel. One half becomes the front, and the other becomes the back. A tapered flap extends from the back.
You’ll add the decorative bow to the front while the body is still flat. Then you’ll fold the body and sew the side seams.
This order makes it easier to keep the bow centered and hide its attachment stitches.
Step-by-Step Crochet Bow Bag Tutorial
Step 1: Make the Foundation Chain
Start with your dusty-rose cotton yarn and 4.5 mm crochet hook.
Make a slip knot and place it on your hook.
Foundation: Chain 37.
Keep the chains loose enough to work into comfortably, but not so loose that they form large gaps.
To begin the first row, insert your hook into the second chain from the hook.
Yarn over, pull up a loop, yarn over again, and pull through both loops.
You have completed your first single crochet.
Continue working one single crochet into each remaining chain.
Row 1: Sc in the second ch from the hook and in each ch across. (36 sc)
Count your stitches before moving on. You should have exactly 36 single crochet stitches.
Beginner tip: If the foundation chain twists while you’re working, straighten it on the table before continuing.
Common mistake to avoid: Don’t work into the chain directly beneath the hook. Skipping that first chain gives you the correct starting height.
Step 2: Crochet the Main Bag Panel
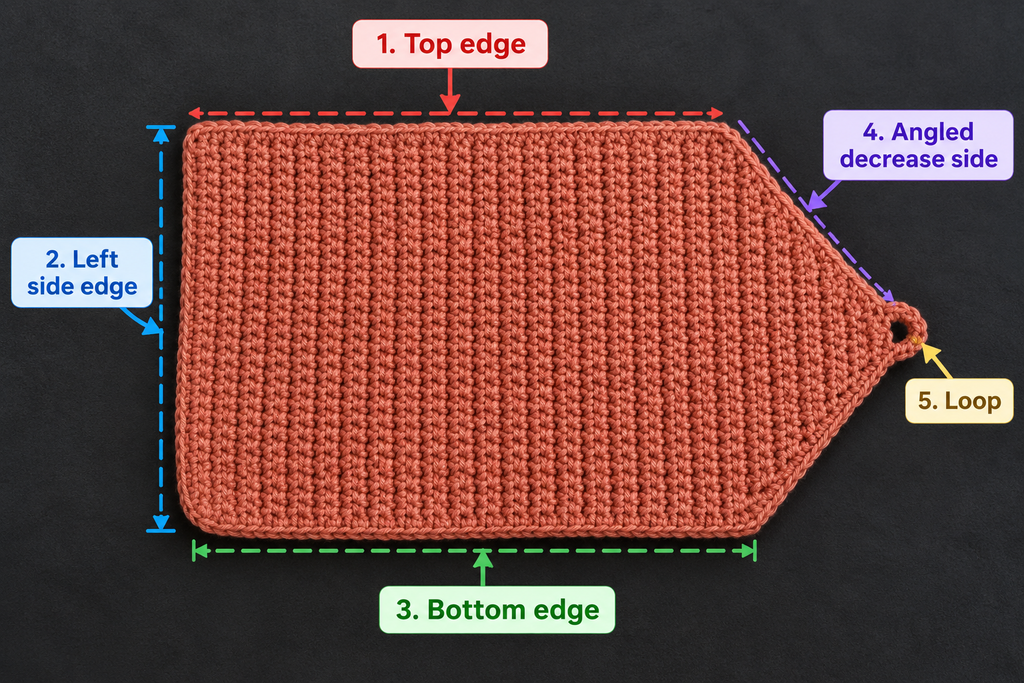
Now you’ll build the long rectangle that forms the main body of your crochet bow bag.
Row 2: Ch 1, turn, sc in each of the 36 stitches across. (36 sc)
Repeat Row 2 until you have completed 46 rows in total.
Rows 3–46: Ch 1, turn, sc in each st across. (36 sc)
This is the easiest part of the project because the stitch pattern stays exactly the same.
After several rows, you’ll begin to see a firm rectangle forming.
Lay your work flat occasionally to check that the sides are straight.
If one side looks wider than the other, count the stitches in your most recent row. You may have accidentally added or missed a stitch.
At the suggested gauge, the completed 46-row section should measure approximately 9 inches wide and 10¼ inches long.
Don’t fasten off yet. The flap will continue from the same piece.
Beginner tip: Use a row counter or move a stitch marker every five rows. It is much easier than recounting a large rectangle later.
Common mistake to avoid: Your turning chain does not count as a stitch. Always work 36 actual single crochet stitches.
Step 3: Shape the Closing Flap
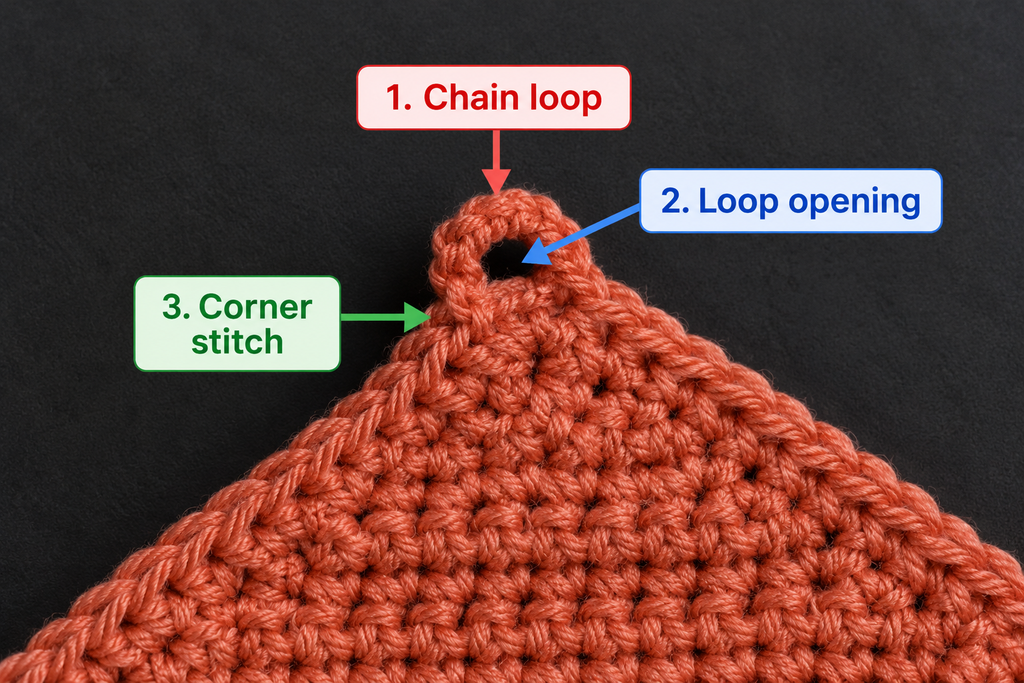
Instead of making a separate flap, you’ll continue crocheting directly from the body panel.
The flap narrows gradually on both sides, creating a short tapered shape.
To do this, decrease once at the beginning and once at the end of each row.
Row 47: Ch 1, turn. Sc2tog over the first two stitches, sc in the next 32 stitches, sc2tog over the final two stitches. (34 sc)
Row 48: Ch 1, turn. Sc2tog, sc in the next 30 stitches, sc2tog. (32 sc)
Continue decreasing one stitch at each end of every row.
Your stitch counts will be:
| Row | Stitch Count |
|---|---|
| 49 | 30 |
| 50 | 28 |
| 51 | 26 |
| 52 | 24 |
| 53 | 22 |
| 54 | 20 |
| 55 | 18 |
After Row 55, fasten off and leave a tail long enough to weave in securely.
Your panel should now have a long rectangular body with a tapered extension at one end.
This flap will fold over the opening of the finished bag.
Beginner tip: Count after every decrease row. It’s much easier to fix an incorrect count immediately.
Common mistake to avoid: Don’t decrease only at one side. Both edges should narrow evenly.
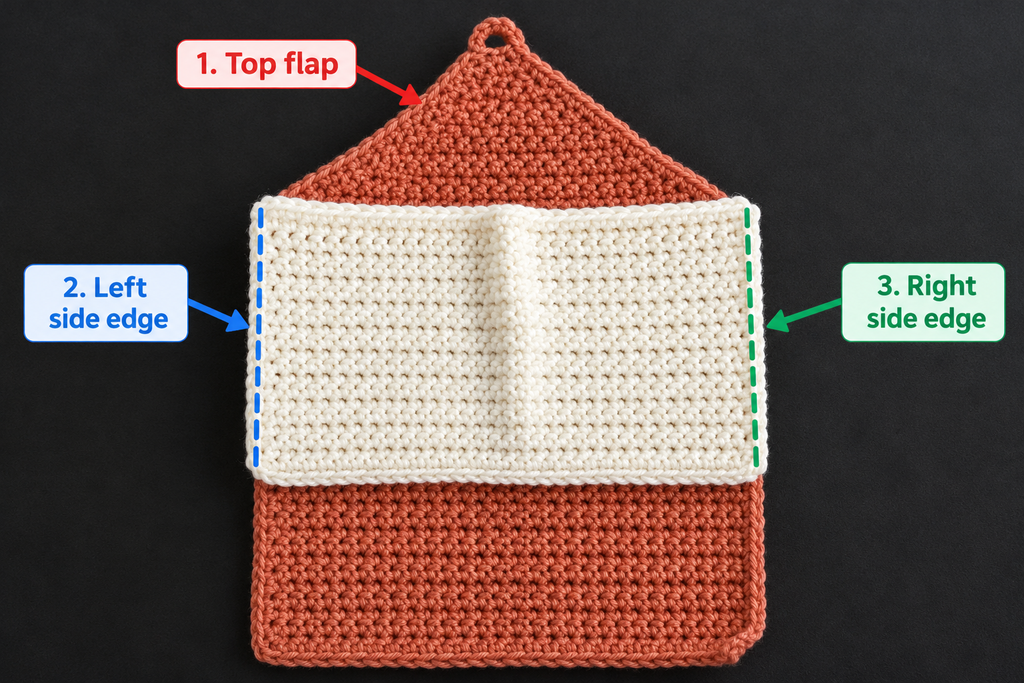
Step 4: Add a Neat Flap Border
A simple border helps the flap keep its shape and gives the edge a more finished appearance.
With the dusty-rose yarn, join at one upper corner where the tapered section begins.
Work single crochet stitches evenly down the first sloping edge, across the 18 stitches at the flap tip, and back up the opposite sloping edge.
Aim for approximately one single crochet in the end of each decrease row along the sides.
If the edge begins to ripple, you may be adding too many stitches. If it pulls inward, your stitches may be too tight.
Slip stitch to finish and weave in the yarn end.
Don’t add the button loop yet. You’ll do that after the bag is assembled, so you can check the exact button placement.
Step 5: Crochet the Oversized Bow Rectangle
Now for the decorative feature that makes this bag special.
Switch to warm ivory cotton yarn.
The bow begins as a simple rectangle, so there is no complicated shaping to learn.
Foundation: Ch 39.
Row 1: Sc in the second ch from the hook and in each ch across. (38 sc)
Rows 2–10: Ch 1, turn, sc in each stitch across. (38 sc)
Fasten off, leaving a tail for sewing.
Lay the bow rectangle flat.
It should be slightly wider than the front of your bag. That extra width allows the bow to gather into soft, rounded loops.
At the suggested gauge, the rectangle will measure approximately 9½ inches wide and 2¼ inches tall.
Don’t worry if it looks like a plain strip right now. The bow shape appears when you gather the center.
Beginner tip: Make sure the rectangle lies flat before fastening off. Uneven edges can make the finished bow look lopsided.
Common mistake to avoid: Don’t make the bow rectangle much narrower than the bag. A little extra width helps create the gathered effect.
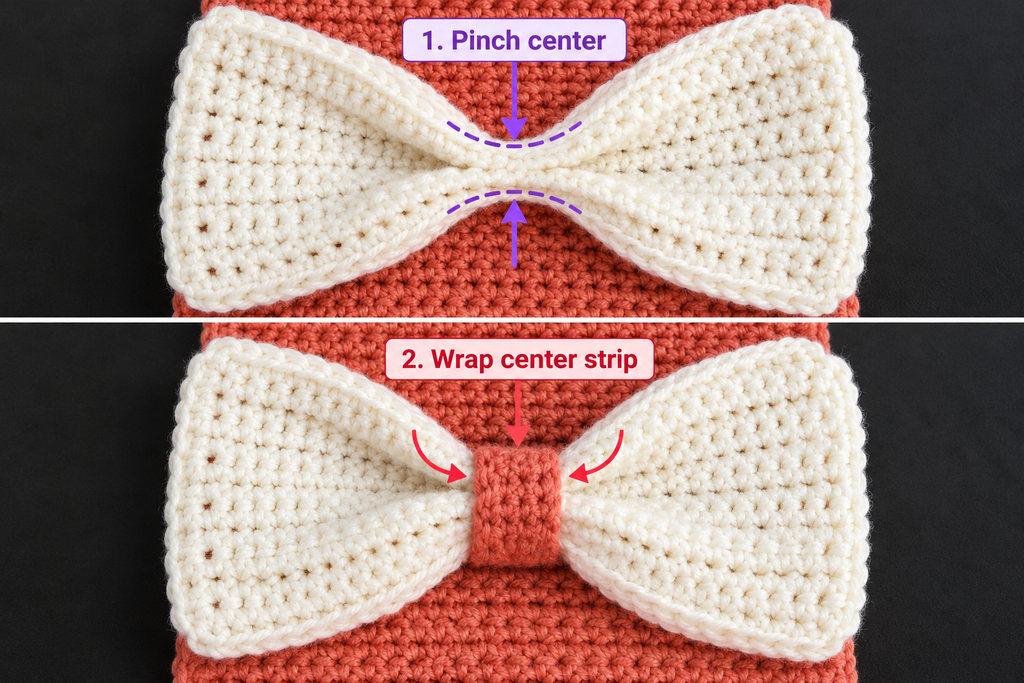
Step 6: Make the Bow Center Band
The center band is a narrow strip that wraps around the middle of the bow.
Using ivory yarn:
Foundation: Ch 7.
Row 1: Sc in the second chain from the hook and across. (6 sc)
Rows 2–16: Ch 1, turn, sc in each stitch across. (6 sc)
Fasten off, leaving a long tail for sewing.
Your finished band should be long enough to wrap around the gathered bow center with a small overlap on the back.
Before sewing, place it around the pinched bow to check the fit.
If the strip is too short, add a few more rows. If it’s too long, remove a few rows before fastening off.
The band should hold the bow securely without crushing the fabric into a hard lump.
Step 7: Position the Bow on the Bag
Before folding the main bag panel, decide which half will become the front.
The first 23 rows form the front section. Rows 24–46 form the back, and Rows 47–55 form the flap.
Lay the panel flat with the front section facing you.
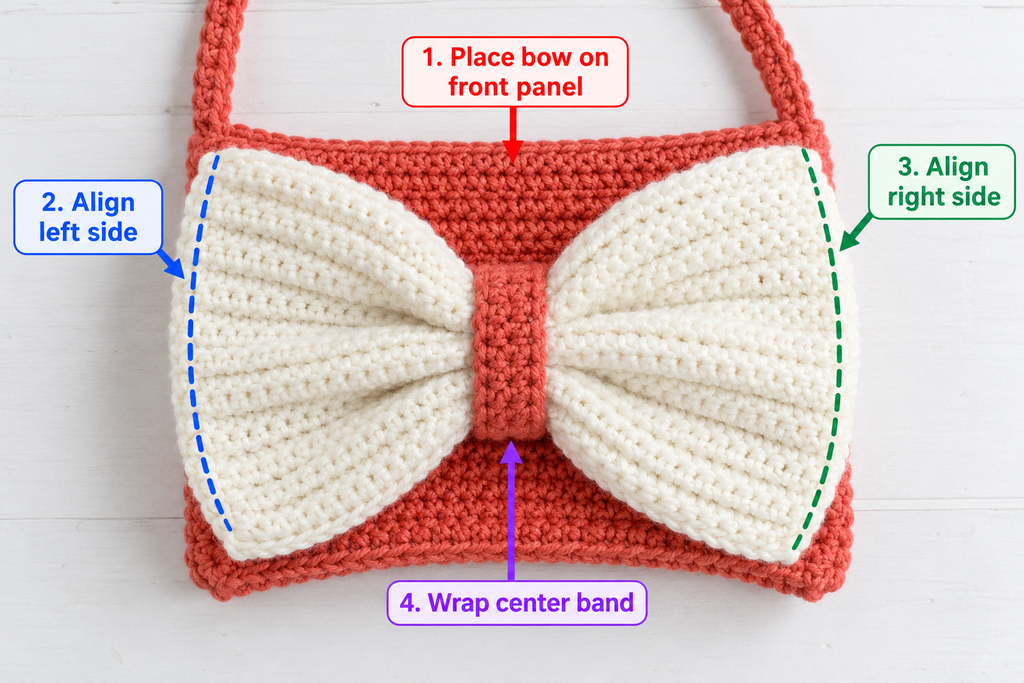
Position the ivory bow rectangle horizontally across the front, with its top edge approximately 11 rows below the front opening and its bottom edge near Row 20.
The bow should sit below the area where the flap will close.
Use removable stitch markers to hold the outer ends of the ivory rectangle near the side edges of the dusty-rose panel.
Allow a little fullness in the ivory fabric instead of stretching it tightly.
Thread your tapestry needle with ivory yarn and secure both short ends of the bow rectangle to the front panel.
Keep the stitches small and work through the crochet fabric rather than pulling large loops across the surface.
Beginner tip: Check that the bow is centered before sewing. Measure from each side edge to the center of the rectangle.
Common mistake to avoid: Don’t sew the entire bow flat against the purse. The center needs enough freedom to gather.
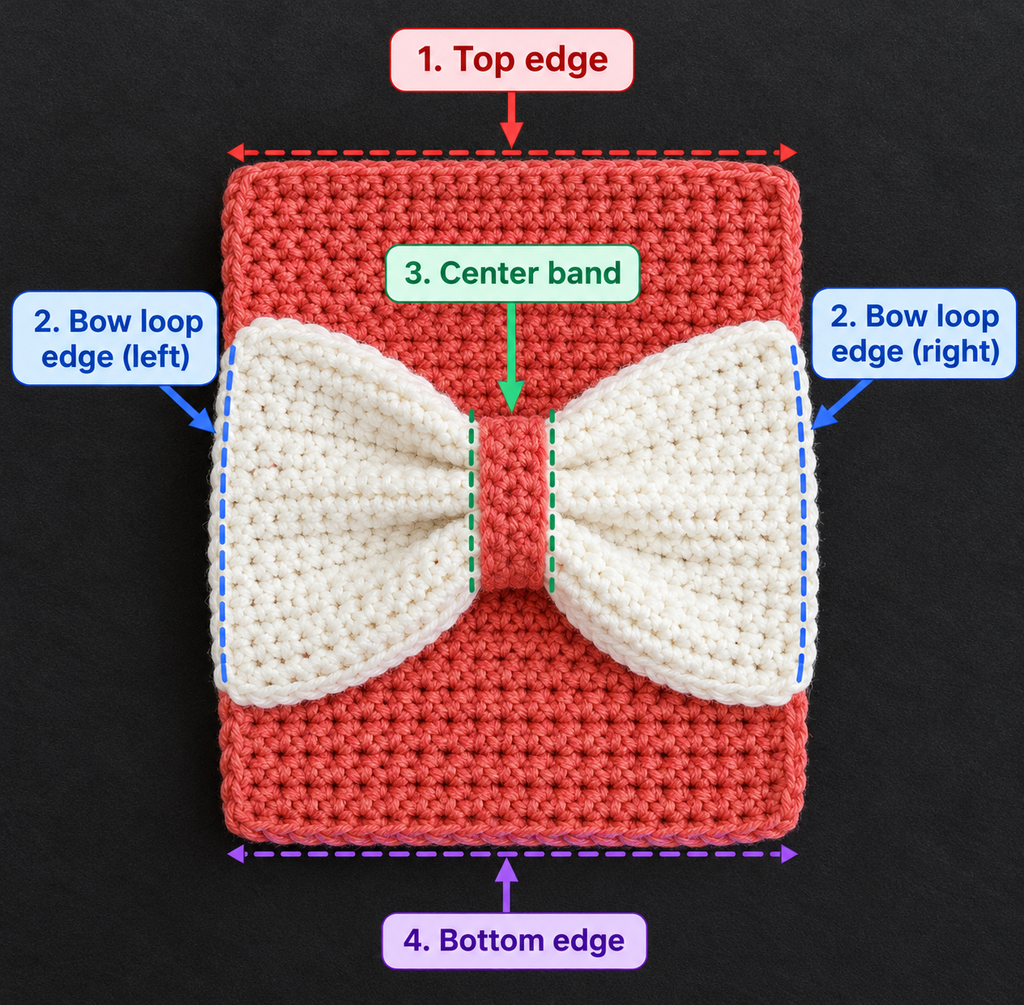
Step 8: Gather the Bow and Secure the Center
Find the middle of the ivory rectangle.
Use your fingers to pinch the center, folding the fabric into small pleats.
Try folding the top edge slightly downward and the bottom edge slightly upward toward the center. This helps create the rounded appearance of a classic bow.
Adjust the two sides until they look balanced.
Now wrap the narrow ivory center band around the gathered middle.
Bring the ends of the band to the back and overlap them slightly.
Using the long yarn tail, sew the band ends together.
Add several hidden stitches through the gathered bow and into the dusty-rose bag front. These extra stitches keep the bow from slipping sideways.
Gently pull the two bow loops outward to restore their shape.
Beginner tip: Look at the bow from directly above before tightening the center band. The left and right loops should be similar in size.
Common mistake to avoid: Don’t pull the center band so tightly that the bow becomes a narrow knot.
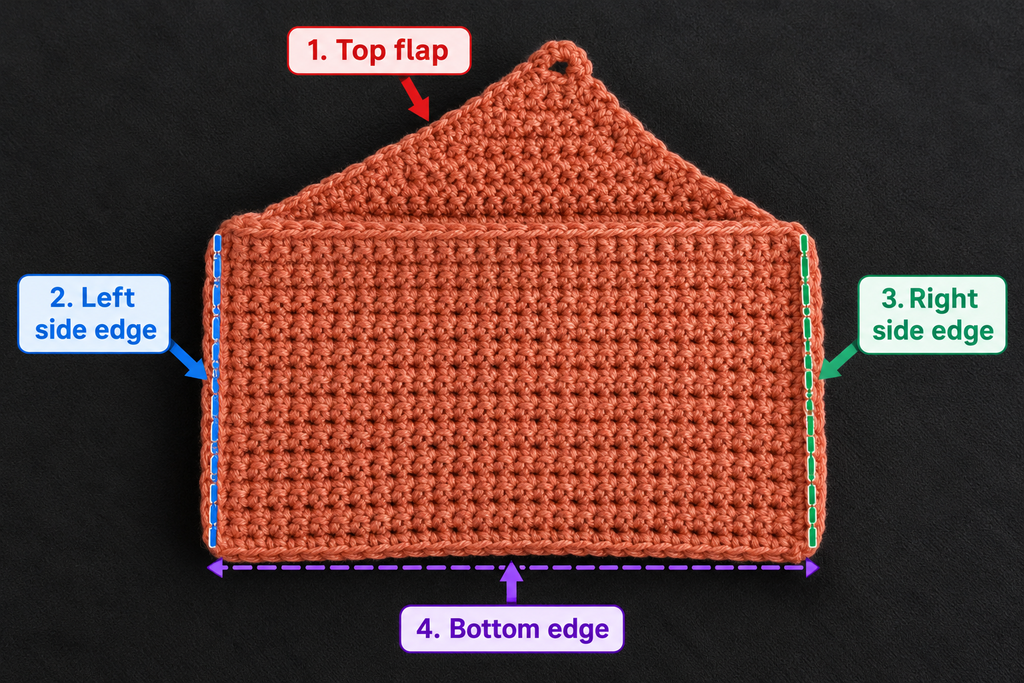
Step 9: Fold and Sew the Bag Sides
Now it’s time to turn your flat crochet panel into a purse.
Lay the panel with the bow facing upward.
Fold the body at the junction between Rows 23 and 24, bringing the front and back sections together. The bow should remain on the outside.
The tapered flap extends above the back opening.
Match the side edges carefully and place a stitch marker near each upper corner.
Thread your tapestry needle with dusty-rose yarn.
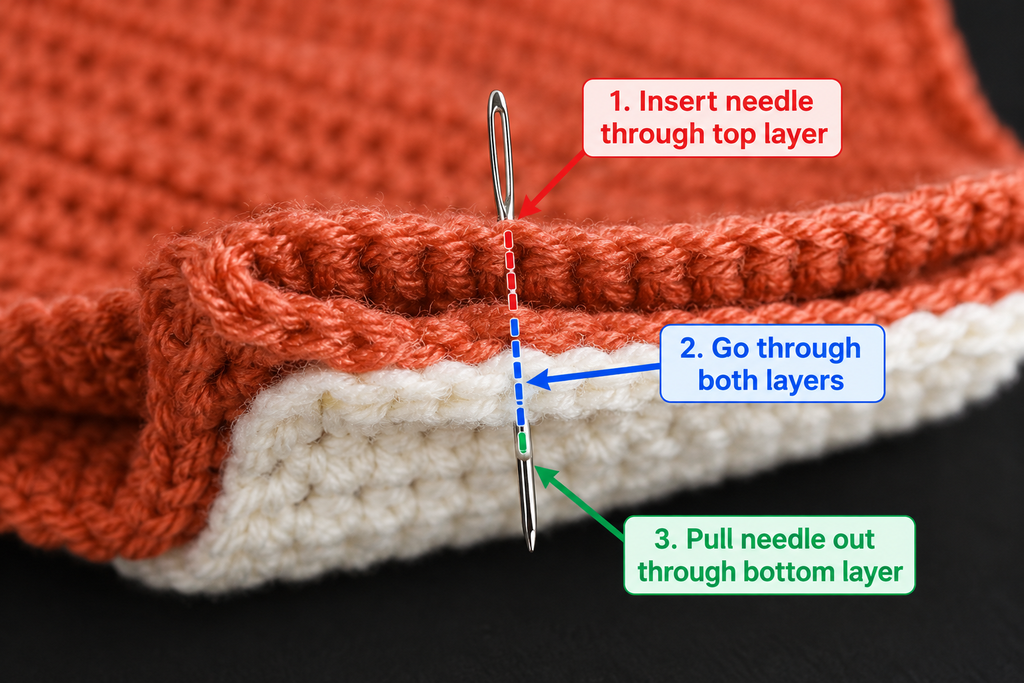
Beginning at the bottom fold, sew one side seam upward through the corresponding edge stitches of the front and back layers.
A whipstitch works well here.
Pass the needle through both layers, pull the yarn snugly, and continue along the edge.
Avoid pulling so tightly that the seam puckers.
Repeat on the opposite side.
Keep the ivory bow fabric out of the seam so the contrast yarn remains clean and visible.
Once both seams are secure, turn and shape the bag as needed, then gently flatten the corners.
Beginner tip: Before sewing, place a small item inside the folded bag to check that the pouch opens properly.
Common mistake to avoid: Don’t accidentally sew the top opening closed. Stop where the front and back upper edges meet.
Step 10: Add the Button Closure
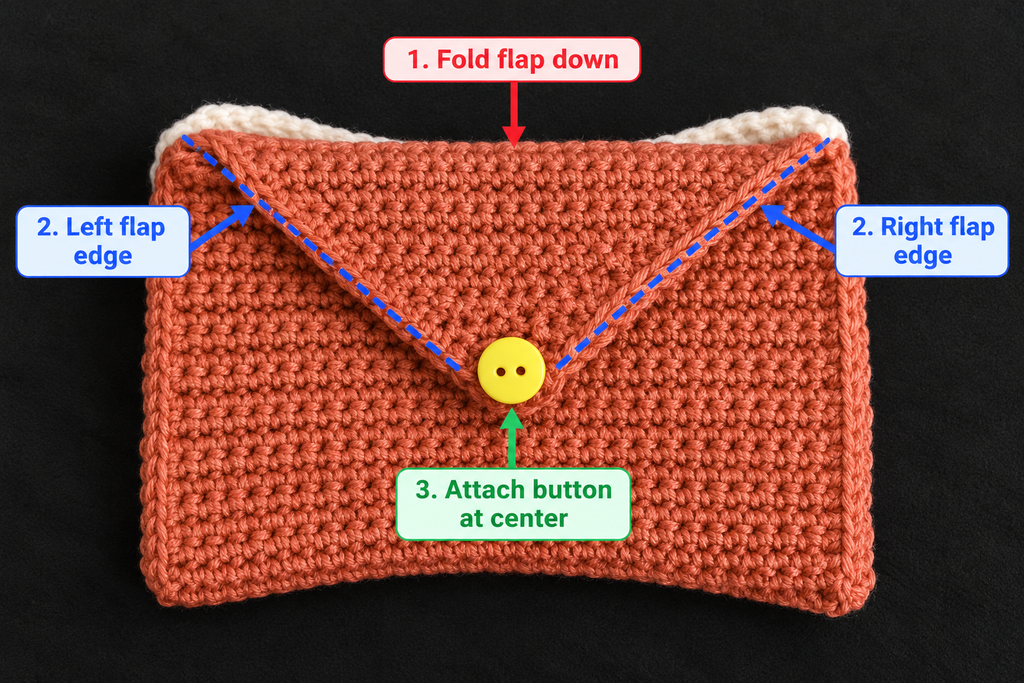
Fold the tapered flap down over the front of the bag.
It should sit just above the ivory bow.
Find the center of the flap tip and mark the corresponding point on the bag front.
This is where the button will go.
Using matching sewing thread and a needle, sew the button securely onto the dusty-rose fabric.
Pass the thread through several stitches to reinforce the attachment.
Now make the button loop.
Join dusty-rose yarn to the ninth stitch of the flap’s final row, chain 7, and slip stitch into the tenth stitch to form a loop.
Test the loop around your button before fastening off.
If the loop is too loose, use fewer chains. If it is too tight, add one or two chains.
Once the fit is correct, fasten off and weave in the yarn ends securely.
Beginner tip: Test the closure with something small inside the bag. A filled purse can sit differently from an empty one.
Common mistake to avoid: Don’t sew the button through both front and back layers. It should be attached only to the front fabric.
Step 11: Crochet and Attach the Wrist Strap
A wrist strap makes this small clutch easier to carry.
Using dusty-rose yarn:
Foundation: Ch 5.
Row 1: Sc in the second chain from the hook and in each chain across. (4 sc)
Rows 2–72: Ch 1, turn, sc in each stitch across. (4 sc)
Fasten off, leaving a long tail for sewing.
You should have a narrow strip approximately 16 inches long, depending on your gauge.
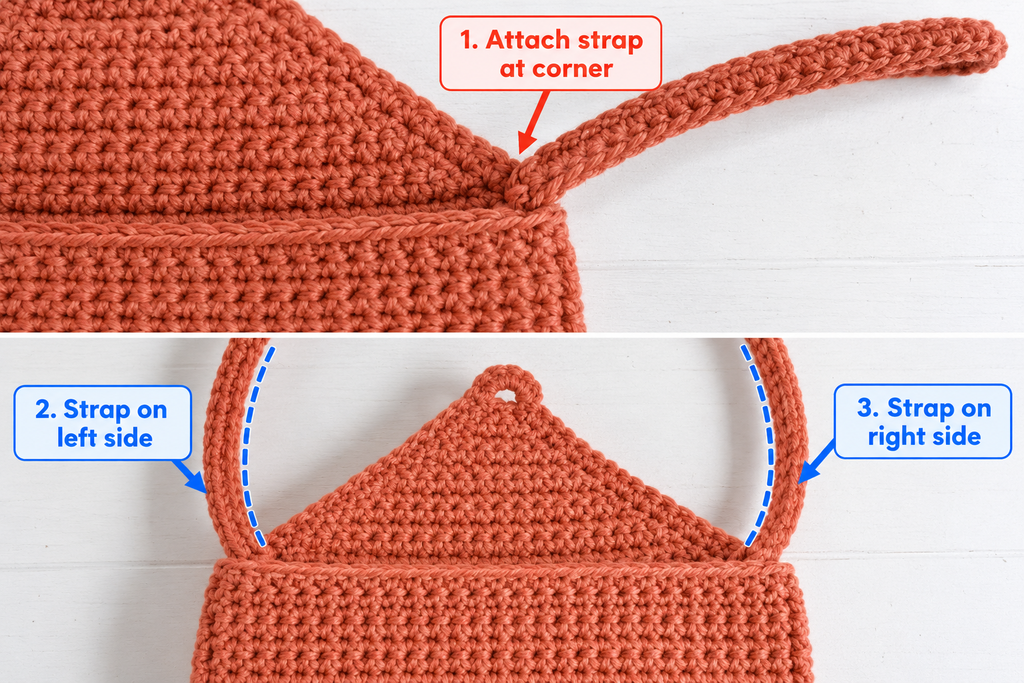
Fold the strip in half to create a wrist loop.
Place both short ends together inside one upper side of the bag.
Using your tapestry needle and the long yarn tail, sew the strap ends securely through multiple rows of the bag fabric.
Repeat the reinforcement stitches several times.
Gently tug the strap to check that it feels secure.
Beginner tip: Make the wristlet longer or shorter by adjusting the number of rows.
Common mistake to avoid: Don’t attach the strap with only one or two stitches. Reinforced sewing helps the strap withstand normal use.
Step 12: Shape the Finished Bow Bag
Your bag is now assembled.
Place it on a flat surface and gently smooth the front and back.
Adjust the ivory bow loops until they look balanced.
Check that the center band is straight and the flap closes comfortably.
If the bow looks flat, gently lift the loops with your fingers rather than pulling hard on the yarn.
The finished bag should have a compact rectangular shape, a prominent ivory bow, and a short tapered flap above the decoration.
For a more structured finish, you can add a lightweight cotton lining. A lining is particularly useful if you plan to carry small items that might slip through the crochet fabric.
Pattern Notes and Stitch Counts
A few details will help you understand the pattern if you want to make it again.
Turning chains: The chain 1 at the beginning of each row is for turning only. It does not count as a stitch.
Main body: Each of the first 46 rows contains 36 single crochet stitches.
Flap: The stitch count decreases by two on every row, from 34 stitches on Row 47 to 18 stitches on Row 55.
Bow rectangle: Each of the 10 rows contains 38 single crochet stitches.
Center band: Each of the 16 rows contains 6 single crochet stitches.
Wristlet: Each of the 72 rows contains 4 single crochet stitches.
Right side and wrong side: The single-crochet fabric looks similar on both sides. Choose the side with the neatest appearance as the visible outside before attaching the bow.
Adjusting the size: To make the bag wider, add stitches to the starting chain and the bow rectangle. To make it taller, add an even number of rows to the rectangular body before starting the flap, so both folded halves grow evenly.
Common Beginner Mistakes and How to Fix Them
1. The bag gets narrower with every row
This usually happens when the last stitch is missed.
Fix: Count the stitches at the end of each row and use markers at both edges. Your main panel should stay at 36 stitches.
2. The bottom of the bag curls
Tight foundation chains can pull the fabric inward.
Fix: Use a slightly larger hook for the foundation chain or work your starting chains more loosely.
3. The flap looks uneven
The decreases may not be happening at both ends of each row.
Fix: Check that you work one sc2tog at the beginning and one at the end of every decrease row.
4. The bow looks flat instead of full
The center may not be gathered enough, or the bow rectangle may be stretched too tightly across the bag.
Fix: Loosen the bow slightly, create small pleats at the center, and reshape both loops before securing the band.
5. One bow loop is bigger than the other
The center band may have been placed off-center.
Fix: Measure the rectangle’s midpoint before wrapping it. Adjust the loops until both sides appear balanced.
6. The side seams look bulky
The sewing yarn may be too thick or the seam stitches may be too close together.
Fix: Use a single strand of matching yarn, catch corresponding edge stitches, and pull each seam stitch snug without over-tightening.
7. The wrist strap stretches too much
Loose crochet fabric can lengthen when the bag is carried.
Fix: Use firm cotton yarn, maintain consistent tension, and reinforce the attachment. For extra durability, sew a narrow fabric or cotton tape backing inside the strap.
How to Customize Your Crochet Bow Bag
One of the nicest things about this project is how easily you can change its appearance.
Try different yarn colors
Dusty rose and ivory create a soft, romantic look, but the same design also works beautifully in:
- Sage green and cream
- Chocolate brown and beige
- Black and ivory
- Lavender and white
- Burgundy and blush pink
You can also crochet the bow in the same color as the bag for a subtle, textured design.
Make a smaller bag
For a mini purse, reduce the starting chain and the number of body rows.
Keep the two folded body sections the same length and adjust the flap decreases to match the new width.
Make the bow rectangle slightly wider than the mini bag front.
Add a shoulder strap
Instead of a wristlet, crochet a longer strap and attach one end to each upper side of the bag.
Use several rows of reinforced stitching at each attachment point.
For heavier contents, a fabric-backed crochet strap is more reliable than a narrow, stretchy strip.
Experiment with texture
Once you’re comfortable with the basic design, try working the bow rectangle in half double crochet or a simple ribbed stitch.
Remember that different stitches change the gauge and dimensions, so measure the bow before attaching it.
Add a lining
A cotton lining gives the inside a cleaner finish and helps prevent small items from catching in the stitches.
Cut fabric to fit the pouch, sew its side seams, fold under the top edge, and hand-stitch it just below the crochet opening.
Avoid stitching through the visible bow attachment.
Make it a handmade gift
This crochet bow purse is a sweet gift idea for birthdays, bridal showers, holidays, or anyone who loves feminine handmade accessories.
You can personalize it with the recipient’s favorite colors or a decorative button.
Finishing Instructions
Before using your finished crochet bow bag, take a few minutes to check the details.
First, weave in every remaining yarn end. Thread each end onto your tapestry needle and pass it through several stitches on the inside of the bag. Change direction once to help secure the yarn.
Trim the excess only after the end is firmly hidden.
Next, check the side seams and strap attachment. Reinforce any areas that feel loose.
If the bag looks slightly uneven, lightly dampen the crochet fabric and shape it by hand. Allow it to dry flat before carrying it.
Avoid pressing the bow flat with a hot iron.
For cleaning, follow the yarn label. Gentle handwashing in cool water is a good conservative choice, particularly if the bag includes a button, lining, or other decorative details.
Reshape the bag while damp and allow it to air dry completely.
Quick Printable-Style Crochet Bow Bag Pattern Summary
Skill level: Advanced beginner
Finished size: Approximately 9 × 5 inches (23 × 13 cm)
Yarn: Medium-weight (#4) cotton in dusty rose and ivory
Hook: 4.5 mm
Stitches: Chain, single crochet, slip stitch, sc2tog
Main body:
- Ch 37.
- Row 1: 36 sc.
- Rows 2–46: 36 sc each row.
- Rows 47–55: Decrease one stitch at each end of every row, finishing with 18 sc.
- Add a simple border to the flap edges.
Bow:
- Ch 39.
- Work 10 rows of 38 sc.
Center band:
- Ch 7.
- Work 16 rows of 6 sc.
Wristlet:
- Ch 5.
- Work 72 rows of 4 sc.
Assembly: Attach the bow to the front panel, gather and wrap its center, fold the body, sew the side seams, add a button and loop, and secure the wrist strap.
Finishing: Weave in ends, reinforce seams, gently shape, and air dry.
Frequently Asked Questions
Is this crochet bow bag pattern suitable for beginners?
Yes, it’s suitable for an advanced beginner who knows how to make a chain and single crochet.
The main body and bow use simple rows. The slightly more challenging parts are decreasing the flap, gathering the bow, and sewing the bag together.
If you’re completely new to crochet, practice making a small single-crochet rectangle first.
What is the best yarn for a crochet bow bag?
Medium-weight cotton is a practical choice because it creates a firm fabric with relatively little stretch.
You can use acrylic or cotton blends, but very soft yarn may produce a more flexible bag.
If you want the purse to hold its shape, choose a smooth yarn and use a hook that creates a fairly dense fabric.
How much yarn do I need to crochet a bow bag?
For this small clutch, plan for approximately 180–220 yards of the main color and 55–75 yards of the contrast color, plus extra if you want a longer strap.
The exact amount depends on your gauge, yarn thickness, and finished size.
Buying a little extra yarn is helpful if you plan to add lining details, a longer strap, or a larger bow.
Can I make a crochet bow bag without sewing?
This version requires some sewing because the bow, side seams, and strap are attached separately.
However, the sewing is straightforward and uses a basic tapestry needle.
If you prefer fewer seams, you could crochet a bag body in continuous rounds and attach a separate bow afterward.
How do I make the crochet bow stand out more?
Use a contrasting yarn color and gather the bow firmly at its center.
Make sure the rectangle is slightly wider than the bag so it has enough fabric to form rounded loops.
You can also add a few hidden stitches behind the bow wings to hold their shape without flattening them.
Can I turn this crochet bow clutch into a shoulder bag?
Yes. Replace the short wristlet with a longer crocheted strap.
Attach the strap securely to opposite upper sides of the bag and reinforce the attachment points.
If you expect to carry heavier items, consider adding a lining and a fabric-backed strap to reduce stretching.
How do I stop my crochet bag from stretching?
Use a firm cotton yarn, keep your stitches reasonably tight, and avoid making the strap too narrow.
A fabric lining can help support the body, while a reinforced strap prevents excessive lengthening.
Also avoid overloading a small crochet clutch with heavy items.
Conclusion
This crochet bow bag pattern is a lovely way to turn basic crochet stitches into something you can actually wear and use.
The simple bag body keeps the project approachable, while the oversized bow adds personality without requiring advanced crochet techniques.
Once you’ve made your first one, try changing the yarn colors, making a smaller version, or adding a longer shoulder strap.
Save this tutorial to your favorite crochet Pinterest board so you can find it when you’re ready to start, and enjoy making a handmade bow purse that’s completely your own.