A teacher badge reel is one of those small crochet projects that manages to be both useful and fun. It uses very little yarn, works up quickly, and gives you plenty of room to personalize the finished piece without turning the project into a complicated amigurumi pattern.
For this tutorial, we are making a flat apple teacher badge reel topper. The apple has a warm ivory center, a contrasting red outer edge, a small stem, a leaf, and two tiny embroidered seed details. Once the crochet work is complete, the motif is reinforced with felt and attached to the front of a standard retractable badge reel.
The result is lightweight enough for everyday school use while still looking unmistakably handmade.
The crochet section uses only basic stitches, so this is a good project if you already know how to make a magic ring and work stitches in the round but want to try something slightly more interesting than a plain circle.
The instructions below are an original badge-reel construction and are not a reproduction of the reference apple pattern.
What You’ll Learn
In this tutorial, you will learn how to:
- Crochet a small flat circle in continuous-looking joined rounds
- Increase evenly without creating a ruffled edge
- Add a contrasting border that gives the circle a more apple-like silhouette
- Make a tiny crochet stem
- Crochet a miniature leaf around both sides of a foundation chain
- Add simple embroidered seed details
- Reinforce a small crochet appliqué with felt
- Attach the finished motif to a retractable badge reel
- Adjust the project for different reel sizes
- Prevent common problems such as cupping, curling, and loose hardware
Materials You’ll Need
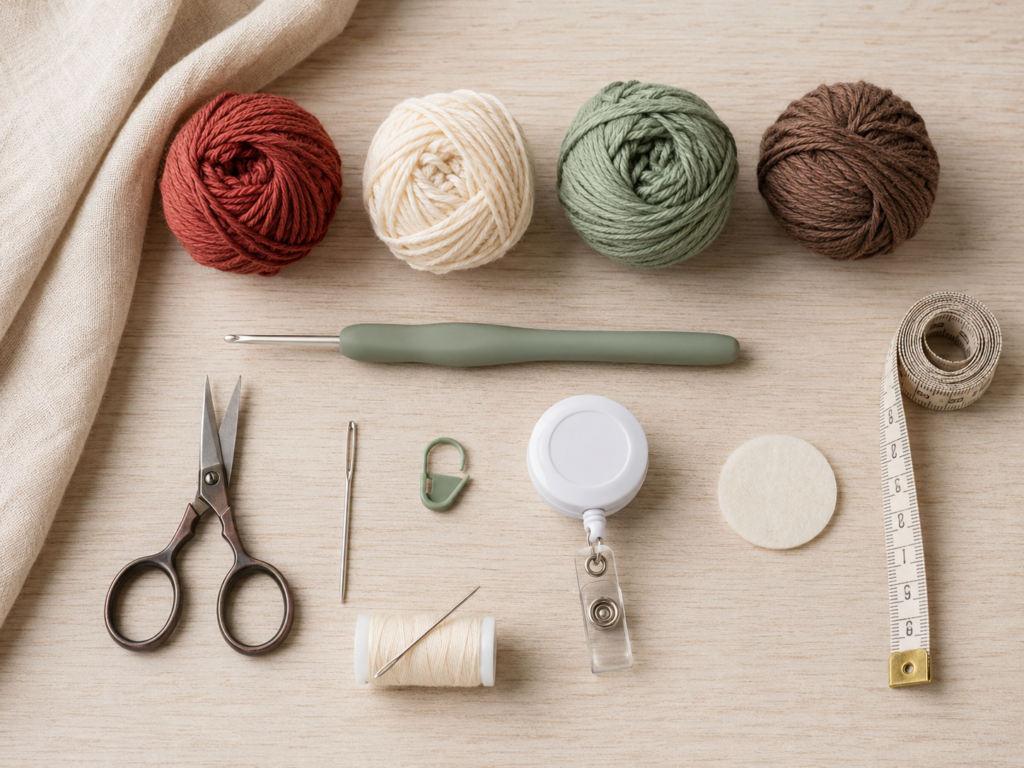
Yarn
Use smooth DK or light worsted cotton yarn.
Cotton works particularly well here because the stitches stay defined and the finished appliqué tends to hold its shape better than very fuzzy yarn.
You will need only small amounts:
- Warm ivory for the center
- Muted brick red for the outer apple edge
- Dusty sage green for the leaf
- Cocoa brown for the stem and seeds
This is an excellent scrap-yarn project.
Crochet supplies
- 3.0 mm crochet hook
- Scissors
- Tapestry needle
- Stitch marker
- Measuring tape
Badge reel supplies
- One retractable badge reel with a flat front
- Small piece of felt
- Sewing needle
- Strong sewing thread
- Flexible craft adhesive suitable for your reel material and felt
Measure the flat face of your reel before you start. The crochet apple should extend beyond the reel so the plastic mechanism remains hidden from the front.
Crochet Abbreviations Used
The pattern uses US crochet terminology.
- MR = magic ring
- ch = chain
- sc = single crochet
- hdc = half double crochet
- dc = double crochet
- sl st = slip stitch
- st/sts = stitch/stitches
- inc = increase, meaning two stitches worked into one stitch
- rep = repeat
- rnd = round
These abbreviations follow commonly used crochet terminology documented by the Craft Yarn Council.
US/UK terminology note
If you normally use UK terminology, remember that the stitch names differ. For example, a US single crochet corresponds to a UK double crochet, while a US half double crochet corresponds to a UK half treble.
Before You Start
Gauge and tension
A formal gauge swatch is unnecessary for such a tiny project, but finished dimensions still matter because the motif needs to cover the badge reel.
After completing the ivory center, lay it over the front of your reel.
The circle should already cover most or all of the plastic face before the red shaping round is added.
If your piece is dramatically smaller, try a slightly larger hook.
If it is much larger than you want, use:
- A smaller hook
- Thinner yarn
- Or stop one round earlier
Consistent gauge is what keeps repeated projects the same size, even on small accessories.
How to count stitches
Place a stitch marker in the first stitch of each round.
Do not count the joining slip stitch as an additional pattern stitch.
Your ivory circle should contain:
- Round 1: 8 sts
- Round 2: 16 sts
- Round 3: 24 sts
- Round 4: 32 sts
- Round 5: 40 sts
If you lose count, recount before starting another round. Correcting one stitch is far easier than trying to reshape a lopsided apple later.
How to avoid curling
If the center begins forming a bowl, your tension may be too tight.
Try one of these fixes:
- Loosen your grip on the working yarn.
- Move up 0.25–0.5 mm in hook size.
- Relax each stitch before beginning the next one.
If the edge waves or ruffles instead, you probably have too many stitches or very loose tension.
Choosing colors
Traditional teacher imagery makes red and green an obvious combination, but nothing requires your badge reel to look exactly like a grocery-store apple.
Try:
- Burgundy + olive
- Pink + mint
- Mustard + dark green
- Coral + sage
- Red + teal
- School-color combinations
Keep enough contrast between the center and border that the apple shape remains visible from a distance.
Step-by-Step Crochet Tutorial
Step 1: Crochet the Ivory Apple Center
Begin with warm ivory yarn.
Round 1
Make a magic ring.
Ch 1.
Work 8 hdc into the ring.
Pull the ring closed and join to the first hdc with a sl st.
Stitch count: 8
Round 2
Ch 1.
Work 2 hdc into each stitch around.
Join with a sl st.
Stitch count: 16
Round 3
Ch 1.
Repeat:
1 hdc in next st, 2 hdc in next st
around the entire circle.
Join.
Stitch count: 24
Round 4
Ch 1.
Repeat:
1 hdc in each of next 2 sts, 2 hdc in next st
around.
Join.
Stitch count: 32
Round 5
Ch 1.
Repeat:
1 hdc in each of next 3 sts, 2 hdc in next st
around.
Join.
Stitch count: 40
Fasten off ivory.
Your piece should lie reasonably flat.
Beginner tip
Do not pull the slip-stitch joins extremely tight. A tight join can pull one side of a small circle inward and make the center appear uneven.
Common mistake to avoid
Problem: The circle looks like a shallow bowl.
Fix: Check that you completed every increase. Missing even two or three increases can noticeably change a motif this small.
Step 2: Shape the Red Apple Edge
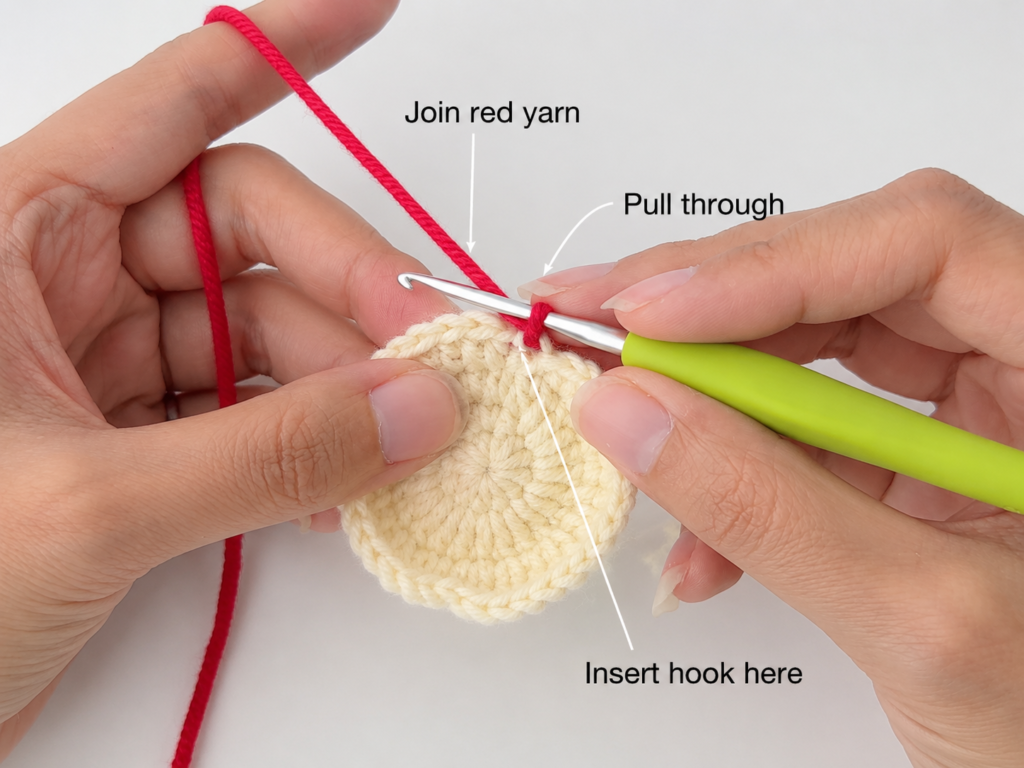
Now switch to muted brick-red yarn.
Lay the ivory circle flat.
Choose one stitch to become the top center of the apple. This is where the stem will eventually sit.
Join red yarn into that stitch.
Work the following around the 40 stitches:
- Sl st in first st
- Sc in next 2 sts
- Hdc in next 3 sts
- Dc in next 4 sts
- 2 dc in next st
- Dc in next 4 sts
- Hdc in next 3 sts
- Sc in next 2 sts
- Sl st in next st
- Sc in next 2 sts
- Hdc in next 3 sts
- Dc in next 4 sts
- 2 dc in next st
- Dc in next 4 sts
- Hdc in next 3 sts
- Sc in final 2 sts
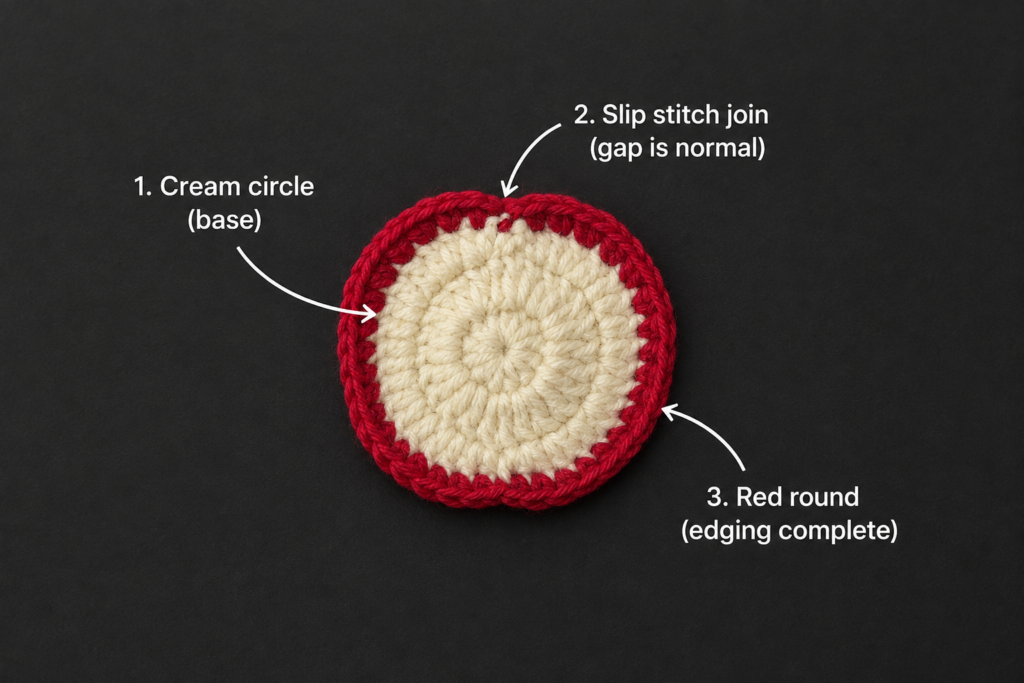
Join neatly into the beginning.
Fasten off.
You now have a low stitch at the top, fuller stitches toward the sides, another subtle narrowing around the lower center, and rounded outer edges.
It should read more like an apple than a perfectly uniform circle.
Beginner tip
Before fastening off, lay the piece flat and rotate it.
The exact orientation matters less than balance. Choose whichever indentation looks best as the top.
Common mistake to avoid
Do not force the shaping round perfectly flat while you crochet. Let the different stitch heights do the shaping.
If the border ripples dramatically, your tension is probably too loose.
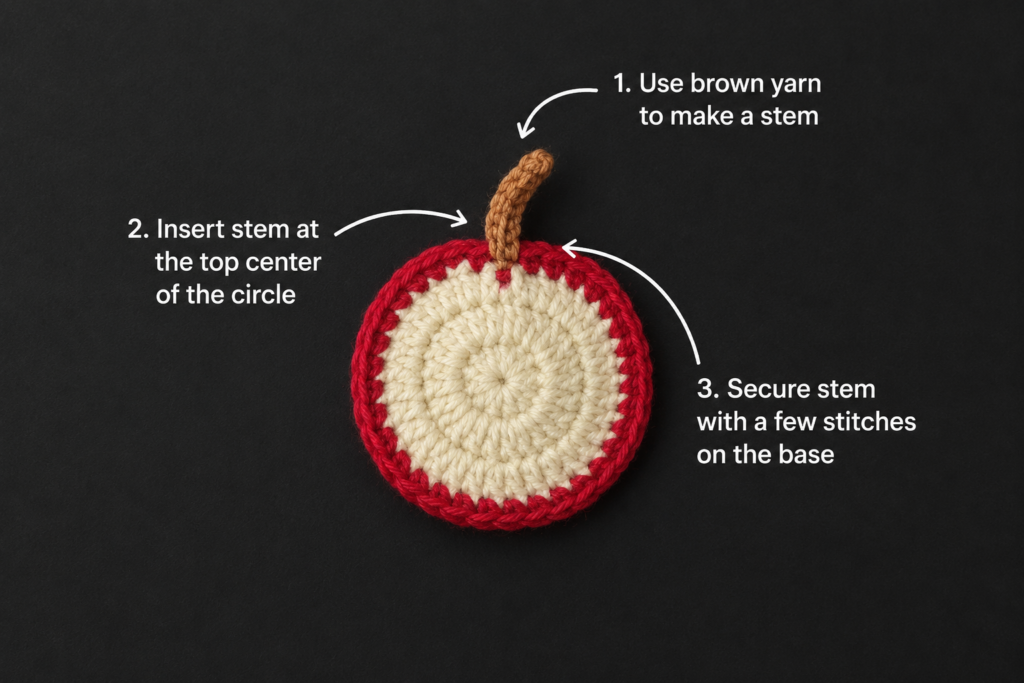
Step 3: Crochet the Apple Stem
Turn the apple so the selected top indentation points upward.
Join cocoa-brown yarn into a red stitch immediately beside the center indentation.
Ch 5.
Starting in the second chain from the hook, work a sl st into each of the four remaining chains.
Sl st back into the apple border.
Fasten off.
Weave the tails into the back.
The stem should be narrow rather than bulky.
Beginner tip
Slip stitches can become extremely tight.
When working back down the chain, keep each stitch loose enough that your hook slides through comfortably.
Common mistake to avoid
Do not make the stem too long. This project will be worn and handled frequently, and an oversized loose stem can snag.
Step 4: Make the Small Green Leaf
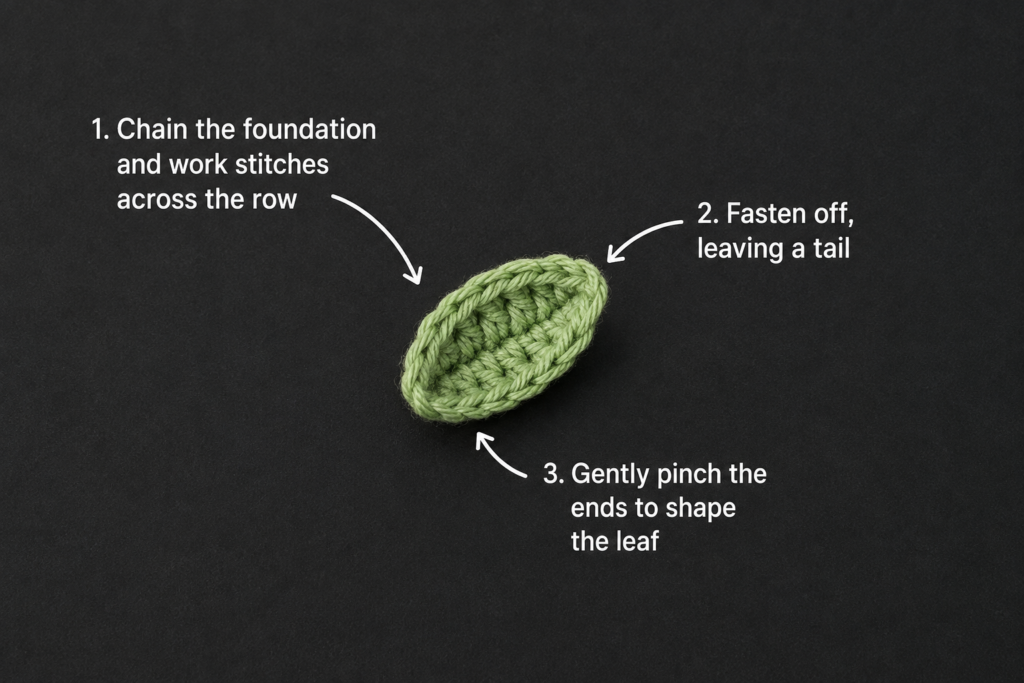
With dusty-sage yarn, ch 7.
Starting in the second chain from the hook:
- Sc in first chain
- Hdc in next
- Dc in next 2
- Hdc in next
- Sc in final chain
Ch 1.
Do not turn.
Rotate your work so you can crochet down the unused loops on the opposite side of the original foundation chain.
Work:
- Sc
- Hdc
- Dc in next 2
- Hdc
- Sc
Sl st near the starting point.
Fasten off, leaving a tail of about 8 in / 20 cm for sewing.
Gently flatten the leaf between your fingers.
Beginner tip
Crocheting down both sides of a chain creates a neat leaf without requiring separate rows.
Keep the first-side stitches loose enough that you can still see the unused loops when you rotate the chain.
Common mistake to avoid
If the leaf twists into a spiral, your foundation chain was probably too tight.
Redo it with a relaxed chain rather than trying to block out a severe twist.
Step 5: Add the Apple Seed Details
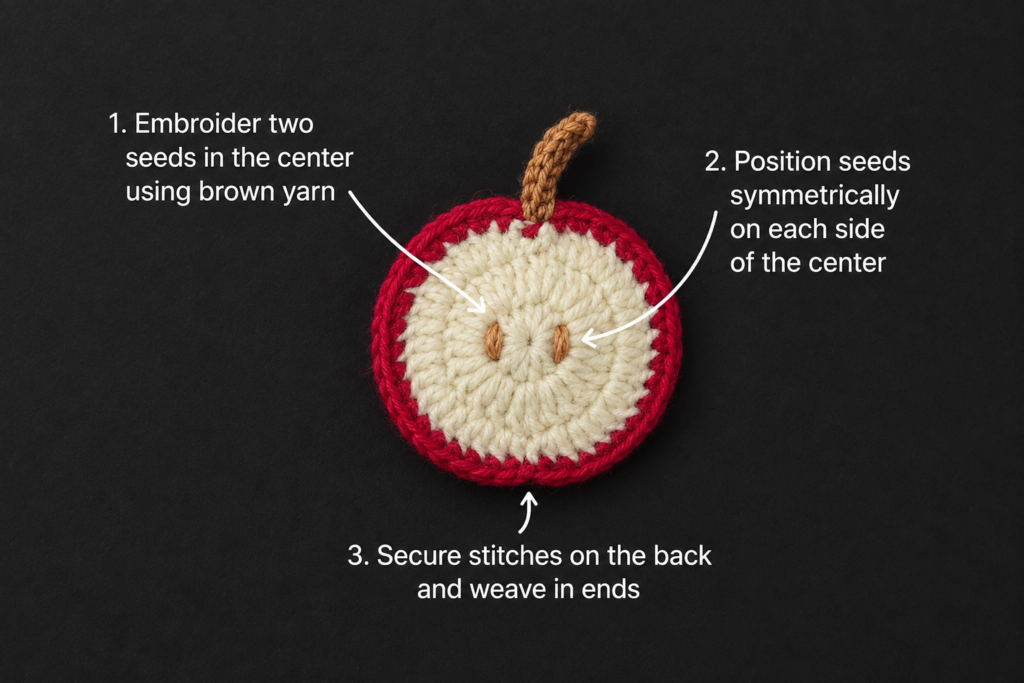
Thread a tapestry needle with cocoa-brown yarn.
Look at the center of the ivory section.
Make two short vertical stitches approximately 1/4–3/8 in apart.
Each seed can be formed with two passes of yarn if you want it slightly thicker.
Keep the stitches small.
This detail is optional, but it helps turn a generic red circle into an instantly recognizable apple slice.
Secure the yarn on the wrong side.
Beginner tip
Do not pull embroidery stitches tightly.
The embroidery should rest on top of the crochet fabric rather than sink between the stitches.
Common mistake to avoid
Check the placement from arm’s length before tying off.
A tiny detail that looks centered from three inches away can look noticeably uneven once the reel is worn.
Step 6: Sew the Leaf to the Apple
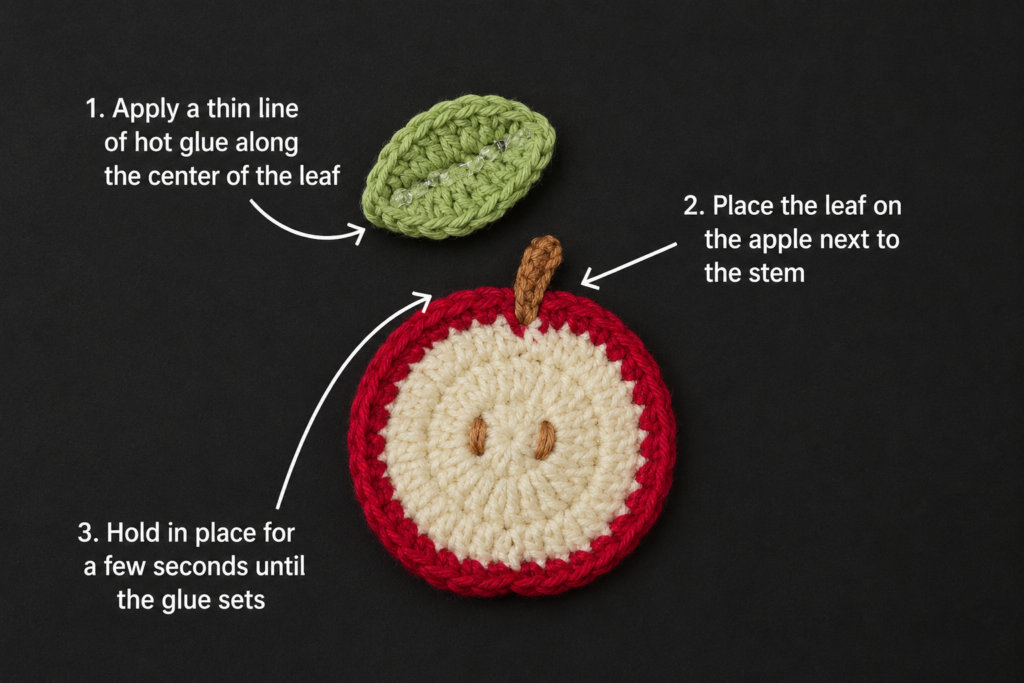
Position the leaf near the base of the stem.
Angle it slightly rather than placing it perfectly horizontal.
Using the green yarn tail, make several small sewing stitches through:
- The back of the leaf
- The upper red border
- Back through the leaf
Avoid pushing the needle all the way through the front of the ivory section.
Secure the tail at the back and weave it through several stitches.
Why sewing is useful here
This accessory will move every time the wearer reaches for an ID card.
Sewing the leaf gives you a flexible yarn-to-yarn connection rather than relying on a decorative piece that is only resting on the surface.
Step 7: Reinforce the Back with Felt
At this point, the crochet apple itself is finished.
Turn it over.
Trace a circle of felt slightly larger than the flat face of your badge reel but smaller than the crochet apple.
For example, if your reel face is around 1.25 in across, you might use a felt circle roughly 1.5 in across.
The exact size should be based on your hardware, not a fixed measurement.
Trim the felt cleanly.
Position it in the center of the back of the apple.
Thread a sewing needle with strong matching thread.
Use small stitches around the outside of the felt to anchor it to the crochet fabric.
Catch the backs of the crochet stitches rather than pushing your needle visibly through the front.
The felt accomplishes two things:
- It provides a flatter surface for attaching the reel.
- It distributes pulling force over a larger area of the crochet fabric.
Beginner tip
Place the badge reel behind the apple before sewing the felt.
This is your last easy opportunity to make sure the crochet motif is large enough to hide the hardware.
Step 8: Attach the Retractable Badge Reel
Before using adhesive, determine the correct orientation.
Place the badge reel behind the apple with:
- The retractable cord pointing downward
- The wearable clip positioned at the top/back
- The apple stem pointing upward
Pull the cord once.
Make sure the movement is completely unobstructed.
Now remove the reel and apply a suitable flexible craft adhesive to the felt area only, following the adhesive manufacturer’s directions.
Do not put adhesive near:
- The retractable cord opening
- The moving spool
- The swivel connection
- The clip mechanism
Press the flat reel face against the felt.
Check the orientation one more time.
Allow the adhesive to cure completely according to its instructions before testing the reel.
Important functional check
After curing:
- Clip the badge reel to fabric.
- Pull the ID strap downward.
- Let it retract slowly.
- Repeat several times.
- Check that the crochet motif remains stationary.
- Check that nothing rubs against the retractable cord.
If anything interferes with the mechanism, stop using it until the obstruction is corrected.
Pattern Notes or Stitch Notes
Turning chains
This pattern is worked primarily in joined rounds.
The beginning ch 1 is used to bring the hook into position and does not count as a stitch.
Stitch counts
Ivory body:
- Rnd 1: 8
- Rnd 2: 16
- Rnd 3: 24
- Rnd 4: 32
- Rnd 5: 40
The outer red round intentionally changes stitch heights and contains two increases to create gentle shaping.
Right side and wrong side
The side facing you while completing most of the rounds becomes the right side.
Keep:
- Embroidery knots
- Leaf sewing tails
- Woven yarn ends
- Felt backing
on the wrong side.
Repeat pattern
The ivory circle uses standard evenly spaced increases.
Each new round adds eight stitches.
Size adjustment
For a smaller reel topper, you can omit Round 5 and shape the red edge around Round 4 instead, but you will need to redistribute the shaping sequence evenly across 32 stitches.
For a larger motif, add another ivory increase round before the red shaping.
Always test the motif against the actual reel before finishing.
Common Beginner Mistakes
1. The apple center becomes a bowl
Cause: Missing increases or tight tension.
Fix: Recount the round. If the stitch count is correct, loosen your tension or move up slightly in hook size.
2. The center becomes wavy
Cause: Too many stitches or overly loose tension.
Fix: Verify the stitch count before continuing. A heavily ruffled circle will not become flat simply because you add a border.
3. The red edge does not look symmetrical
Cause: Beginning the shaping sequence in the wrong location or accidentally skipping a stitch.
Fix: Find the intended top center first and place a marker before joining the red yarn.
4. The stem is floppy
Cause: The chains or slip stitches are too loose.
Fix: Work the stem at a comfortable but slightly firm tension and keep it short.
5. The leaf curls
Cause: Tight foundation chain.
Fix: Make the starting chains slightly looser. You can also gently damp-block the finished leaf before sewing it on.
6. The embroidery disappears into the crochet
Cause: Pulling the seed stitches too tightly.
Fix: Let the embroidery float gently over the surface.
7. The badge reel is crooked behind the apple
Cause: Hardware was attached without first testing orientation.
Fix: Before using adhesive, temporarily place the reel behind the motif and mark the top and bottom positions.
8. The reel does not retract properly
Cause: Crochet, felt, or adhesive is interfering with the cord opening or mechanism.
Fix: Keep the entire moving mechanism exposed. The topper should be attached only to the flat decorative face.
How to Customize This Crochet Project
Change the yarn colors
A teacher badge reel does not have to use traditional apple colors.
For a softer look:
- Dusty pink
- Cream
- Sage
- Taupe
For autumn:
- Burnt orange
- Mustard
- Olive
- Brown
For a school-color version, replace the red skin with one of the school’s main colors.
Make a whole apple instead of an apple slice
Use red yarn for the center rounds as well as the border.
Skip the seed embroidery.
Add the same stem and leaf.
The result looks more like a whole apple viewed from the front.
Add a tiny initial
Instead of seeds, embroider a single small letter in the center.
Keep it simple because the available space is limited.
Create different sizes
For a petite reel, use sport-weight yarn and a smaller hook.
For a larger statement topper, use light worsted yarn and a 3.5–4.0 mm hook.
The Craft Yarn Council provides standardized yarn-weight and hook-size references if you need help comparing yarn categories or metric hook sizes.
Try a different border
The last red round controls much of the final appearance.
You could experiment with:
- All single crochet for a flatter graphic edge
- Crab stitch for a firm textured border
- Surface slip stitching for a thin outline
- A second contrasting round for school colors
Turn the same motif into another accessory
Before permanently adding the retractable reel, the apple can also become:
- A backpack charm
- A keychain
- A teacher gift tag
- A classroom garland element
- A bookmark decoration
- A pencil pouch embellishment
- A brooch
- A magnet
Finishing Instructions
Once all crochet and embroidery work is complete, inspect the wrong side.
Every yarn tail should be woven through several stitches and trimmed closely.
Do not simply knot and cut short tails. This project will experience repeated movement during normal use.
Optional light blocking
If the apple does not lie flat:
- Lightly dampen the crochet portion before installing the badge reel.
- Shape it gently by hand.
- Pin it flat on an appropriate blocking surface.
- Allow it to dry completely.
Do not wet-block the project after the retractable mechanism has been installed unless you know the hardware is designed to tolerate moisture.
Washing and care
Because a retractable reel contains hardware and a moving mechanism, treat the finished item as an accessory rather than as ordinary washable crochet.
For minor dirt, spot-clean the crochet surface carefully and avoid soaking the reel mechanism.
Wear check
Occasionally inspect:
- Felt backing
- Adhesive bond
- Leaf
- Stem
- Badge reel cord
If the topper begins separating from the reel, repair it before continuing to use it.
Quick Printable-Style Summary
Project: Crochet Teacher Apple Badge Reel
Skill level: Beginner/easy
Finished size: Approximately 2.75–3 in / 7–7.5 cm
Yarn: DK/light worsted cotton
Hook: 3.0 mm
Main colors: Ivory, brick red, sage green, brown
Stitches: MR, ch, sl st, sc, hdc, dc, inc
Starting method: Magic ring
Main body: Five increasing hdc rounds
Center counts: 8 → 16 → 24 → 32 → 40 sts
Border: Variable-height red shaping round
Details: Crochet stem, crochet leaf, embroidered seeds
Backing: Felt circle sewn to wrong side
Hardware: Flat-front retractable badge reel
Finishing: Weave ends securely, lightly block if necessary, sew on felt, attach reel after checking cord orientation
FAQ
1. What is the best yarn for a crochet teacher badge reel?
Smooth cotton is particularly practical because it produces clear stitches and a relatively firm flat motif.
DK or light worsted yarn keeps the badge reel small enough to wear comfortably.
Avoid extremely fluffy yarn because it can hide the apple details.
2. Can a beginner make this crochet badge reel?
Yes.
The main skills are:
- Magic ring
- Half double crochet
- Simple increases
- Single crochet
- Double crochet
- Slip stitch
- Basic sewing
The leaf is probably the least familiar section for a new crocheter, but it is only a short foundation chain worked on both sides.
3. Can I crochet directly around the badge reel?
Some reel designs may permit covers, but retractable badge reels differ significantly in clip placement, body shape, and cord construction.
For this tutorial, attaching a reinforced flat topper to the front is easier because the moving mechanism remains accessible.
4. How big should a crochet badge reel topper be?
Measure your actual badge reel first.
The finished crochet motif should cover the front plastic face when viewed straight on without interfering with the cord or clip.
For this version, approximately 2.75–3 inches across creates a visible teacher-themed motif while remaining relatively compact.
5. Can I use worsted-weight yarn?
Yes.
The finished apple will probably be larger and thicker.
Try a 3.5 mm hook first and compare your motif with the hardware as you work.
If you need a particularly small badge reel, DK cotton is easier to control.
6. Do I have to add felt behind the crochet?
No, but felt provides reinforcement and creates a more uniform mounting surface.
Attaching hardware directly to a soft crochet circle concentrates stress in a smaller area.
For something that will be pulled repeatedly during the workday, reinforcement is useful.
7. Can I make these as teacher gifts?
Yes. They are especially suitable for:
- Back-to-school gifts
- Teacher appreciation gifts
- End-of-year gifts
- Classroom staff gifts
- Librarian accessories
- School-office staff
- Teaching assistants
You can also customize the yarn to school colors or make each teacher a different apple.
Conclusion
This crochet teacher badge reel pattern is a good example of how a very small project can teach several useful techniques at once.
You begin with straightforward increasing rounds, use different stitch heights to reshape the edge, practice crocheting around both sides of a foundation chain for the leaf, add a little embroidery, and finally turn the crochet motif into a functional accessory with reinforced backing.
Once you understand the basic construction, the apple becomes only the starting point. The same badge-reel method could be adapted into flowers, pencils, books, crayons, stars, or other classroom-inspired motifs.
Save the tutorial if you want an easy back-to-school project that can be finished with scraps from your yarn basket.