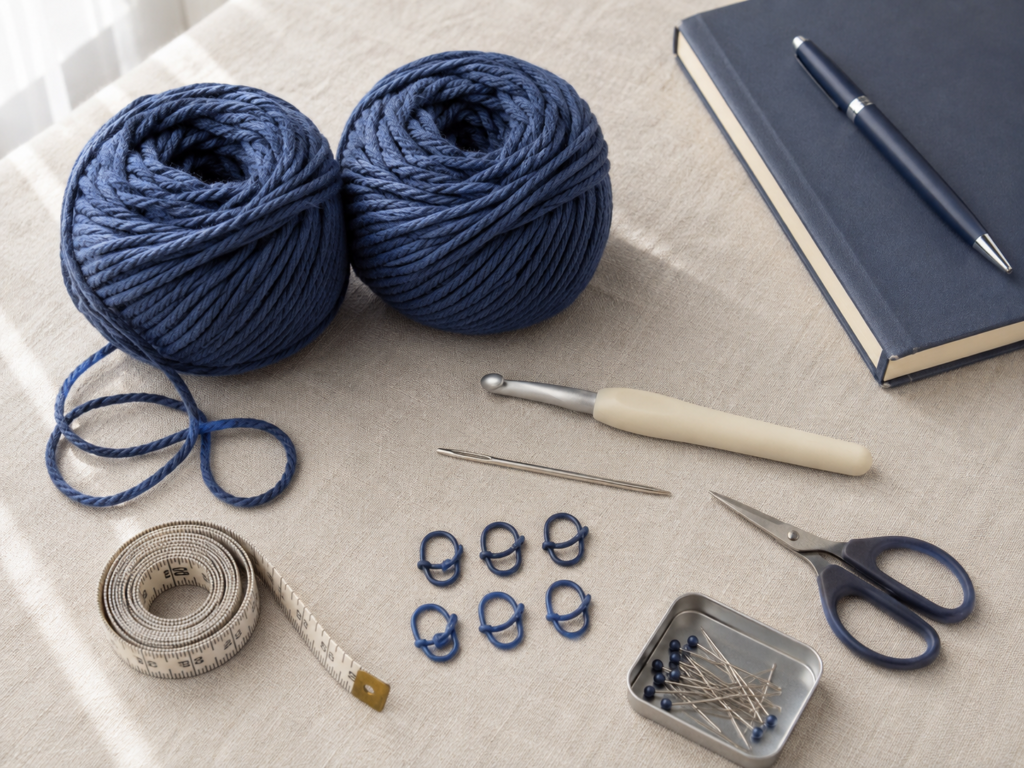
A crochet tote can be cute enough to carry to class and still practical enough to hold notebooks, a planner, a pencil case, headphones, and the small things that tend to disappear at the bottom of a backpack.
The important part is construction.
A very loose market bag may look lovely, but textbooks and notebooks need more support. For this crochet tote bag for college pattern, we are going to use two strands of medium-weight yarn together, a firm oval base, an easy moss-stitch body, a reinforced upper edge, and wide shoulder straps that are sewn well below the rim rather than attached at only a few stitches.
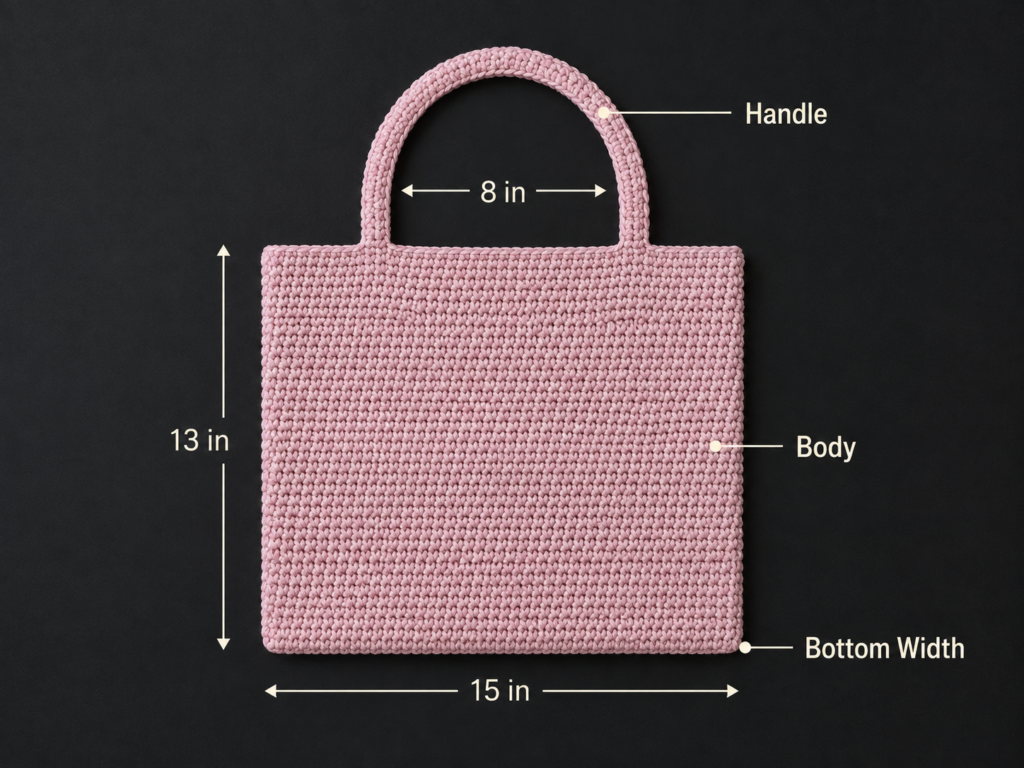
The result is an approximately 16-inch-wide everyday campus tote that is approachable for a confident beginner.
This is an original tutorial. The reference photography listed throughout the article comes from one consistent professional crochet tutorial and is provided only as visual research. Do not republish those photographs unless you own the appropriate rights.
What You’ll Learn
You will learn how to:
- hold two strands of yarn together;
- crochet around both sides of a foundation chain;
- shape an oval bag base;
- use increases without making the base curl;
- create a clean transition from the base to the sides;
- crochet an easy moss-stitch body;
- keep a joined round from gradually losing stitches;
- reinforce the top of a tote;
- make strong shoulder straps;
- position two straps evenly;
- reinforce strap attachment for everyday use;
- resize the bag for different college supplies.
Skill Level
Easy / confident beginner
You should already be comfortable making a chain and basic single crochet stitch. Everything else is explained as you go.
Finished Size
Approximately:
- Width: 16 in / 40.5 cm
- Height: 13 in / 33 cm
- Depth: about 4 in / 10 cm
- Strap drop: approximately 11–12 in / 28–30.5 cm
Your measurements can vary according to yarn, hook and tension.
Materials You’ll Need
- Approximately 900–1,000 yd / 825–915 m total Category 4 worsted cotton or sturdy cotton-blend yarn
- Yarn is held double, so use two balls simultaneously or divide a larger skein
- 6.0 mm crochet hook
- Scissors
- Blunt tapestry/yarn needle
- 6 locking stitch markers
- Measuring tape
- Several rust-proof pins or removable locking markers for strap placement
Cotton is especially useful for this project because it generally produces a firmer bag than very springy acrylic. A cotton-acrylic blend is also suitable if you prefer less weight.
The Craft Yarn Council classifies worsted/Aran yarn within Category 4 and notes typical hook ranges for that category, although the Council also stresses that these ranges are guidelines rather than substitutes for pattern gauge.
Crochet Abbreviations Used
- ch = chain
- sc = single crochet
- sl st = slip stitch
- st/sts = stitch/stitches
- sp = space
- ch-1 sp = chain-one space
- BLO = back loop only
- inc = increase; work two single crochet stitches into one stitch
- rep = repeat
- RS = right side
- WS = wrong side
This tutorial uses US crochet terminology. In UK terminology, a US single crochet is called a double crochet.
The Craft Yarn Council maintains standardized crochet abbreviation guidance if you need a terminology reference.
Before You Start
Hold Two Strands as One
Pull one strand from each ball of yarn and hold the strands together.
Every time this pattern says to make one stitch, insert the hook through the indicated stitch and crochet using both strands together as though they were one thicker yarn.
Watch your hook carefully. Accidentally catching only one of the two strands creates a thin weak spot.
Gauge and Tension
Gauge is less critical for a tote than for a fitted garment, but tension still affects strength.
Aim for approximately:
9 single crochet stitches = about 4 inches / 10 cm
More important than the exact number is the feel of the fabric. It should be firm without becoming difficult to crochet.
If the fabric looks floppy and you can easily spread the stitches apart, try a 5.5 mm hook.
If crocheting feels painful or the hook will barely enter a stitch, move to 6.5 mm.
Count Your Stitches
Use a marker in the first stitch of every round.
Never assume you will recognize the start once you have worked several rounds.
One accidentally skipped stitch at the join can make the entire bag gradually narrower.
Keeping the Base Flat
A correct base should lie flat on a table.
If the curved ends begin curling upward, you probably have too few increases or excessively tight tension.
If the base becomes wavy, you have either added too many increases or your tension is becoming much looser.
Choosing College-Friendly Colors
Solid colors make it easiest to see the stitch structure while learning.
Good options include:
- navy;
- charcoal;
- oatmeal;
- forest green;
- burgundy;
- muted blue;
- school colors.
You can add contrast later at the reinforced top edge or straps.
Step-by-Step Crochet Tutorial
Step 1: Crochet the Foundation Chain and First Base Round
With your 6.0 mm hook and two strands held together:
Chain 33.
Do not make the chain excessively tight. You need to work into it twice.
Base Round 1
- Work 1 sc in the second chain from the hook.
- Work 1 sc in each of the next 30 chains.
- Work 3 sc into the final chain.
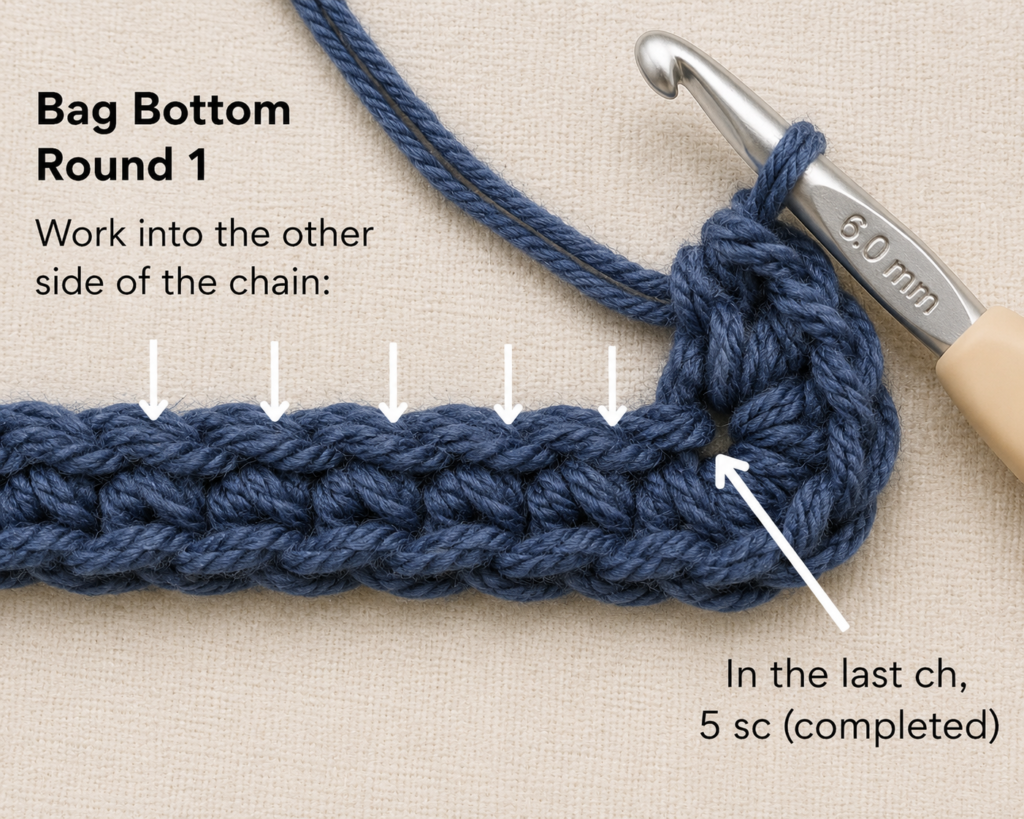
- Rotate the chain so you can work along its unused underside.
- Work 1 sc in each of the next 30 available loops.
- Work 2 additional sc into the same starting chain that already contains your first sc.
- Join with a sl st to the first sc.
You should have 66 stitches.
You have now crocheted around the foundation chain rather than making two separate rectangular panels.
Beginner tip: Before working down the second side, flatten the chain and identify the unused loops. This prevents accidentally crocheting twice into a loop already used.
Common mistake to avoid: Do not turn your work as you would when crocheting flat rows. The base is worked around the chain.
Step 2: Increase Around the Curved Ends
The next rounds make the base wide enough for notebooks, a small lunch container or other daily essentials.
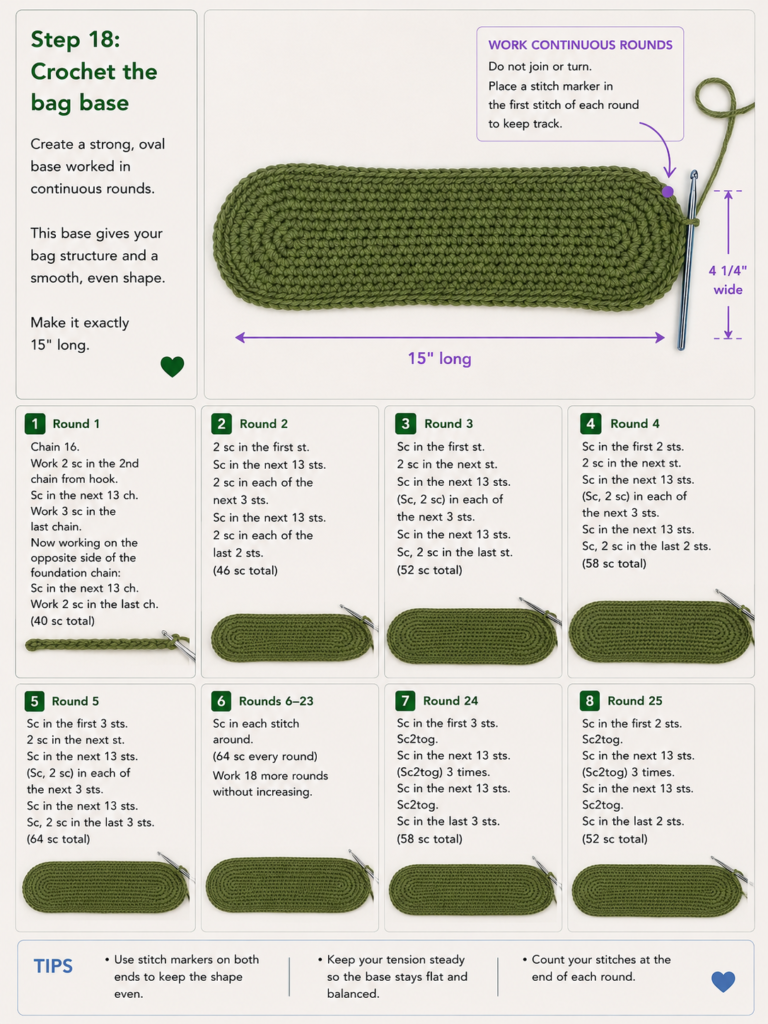
Base Round 2
Chain 1.
- 2 sc in the first stitch.
- Sc in each of the next 30 sts.
- 2 sc in each of the next 3 sts around the first curved end.
- Sc in each of the next 30 sts.
- 2 sc in each of the final 2 sts.
- Join.
72 stitches.
Now place three stitch markers around each rounded end, marking approximately evenly spaced increase points.
Base Round 3
Work one sc into every stitch, except at the six marked increase points.
Work 2 sc into each marked stitch.
Move each marker into the second sc of its increase.
78 stitches.
Base Round 4
Repeat the same principle, but move your increase positions slightly so the increases are not stacked directly on top of those in the previous round.
Add six stitches total.
84 stitches.
Base Round 5
Repeat once more.
90 stitches.
Lay the base flat.
It should resemble a long rounded rectangle or oval.
Beginner tip: Exact mathematical spacing is less important than keeping the increases restricted to the two curved ends and distributing them evenly.
Common mistake to avoid: If you increase along the long straight sides as well, the bag bottom will flare and become wavy.
Step 3: Create the Base-to-Body Fold
The next round gives the tote a more definite bottom edge.
Base Round 6:
Chain 1.
Work 1 sc BLO in every stitch around.
Join to your first sc.
90 stitches.
BLO means you insert the hook under only the loop furthest away from you rather than under both loops.
This leaves an unused front loop around the bag. Visually, that ridge helps the sides turn upward rather than continuing flat.
After this round, stop increasing.
The stitch count remains the same while the bag grows vertically.
Beginner tip: Fold the new round upward gently with your fingers. The ridge will become much easier to recognize.
Common mistake to avoid: Do not continue increasing once the body begins. Extra increases will make the tote flare outward.
Step 4: Start the Easy Moss-Stitch Body
The body uses an alternating single crochet and chain-one pattern.
It creates attractive texture without making the tote excessively open.
Body Round 1
Chain 1.
Sc in the first stitch.
Then repeat:
Ch 1, skip the next stitch, sc in the next stitch.
Continue around.
After your final sc, chain 1, skip the last available stitch and join to the first sc.
You should have:
- 45 sc;
- 45 ch-1 spaces.
The chain spaces are part of the fabric even though they are not single crochet stitches.
Beginner tip: Count your chain spaces as you work your first round. If you have 45 single crochets, you should also have 45 spaces.
Common mistake to avoid: Do not work into the stitch you were instructed to skip.
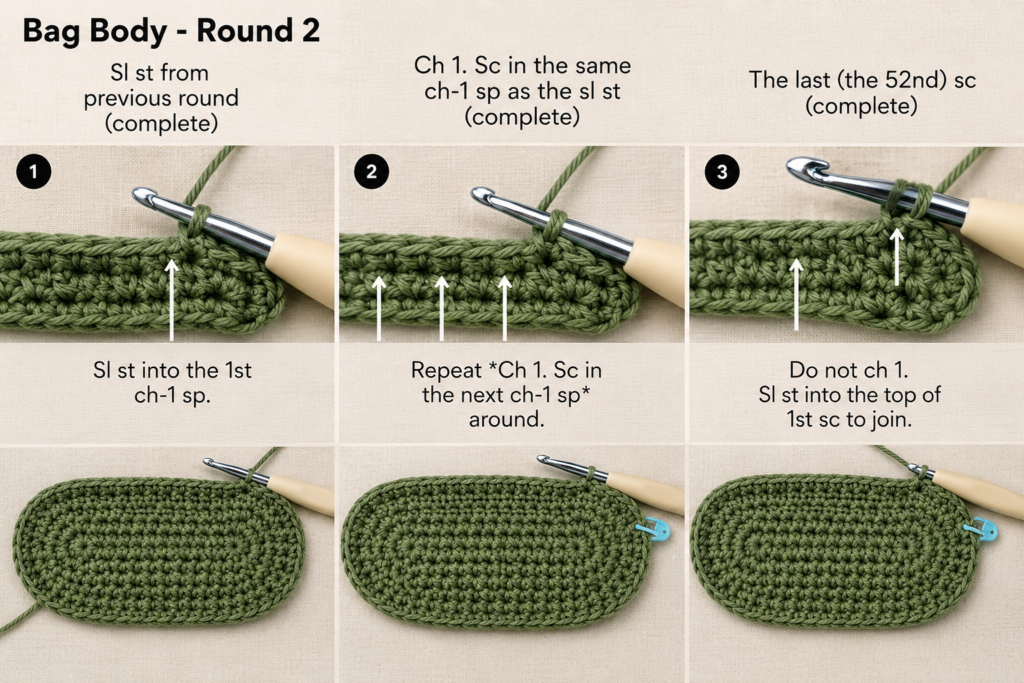
Step 5: Repeat the Moss Stitch
For every following body round:
- Slip stitch into the first ch-1 space.
- Chain 1.
- Sc into that same ch-1 space.
- Chain 1.
- Sc into the next ch-1 space.
- Continue ch 1, sc in next ch-1 space around.
- Chain 1 after the final sc.
- Join to the first sc.
Repeat this round until the body is tall enough.
Because each new sc is placed into a chain space from the previous round, the texture gradually develops into the familiar woven-looking moss stitch.
How to Recognize a Chain Space
A chain space looks like a small horizontal opening between two compact stitches.
Do not insert the hook into the top “V” of the neighboring sc.
Insert it through the open space created by the chain.
Beginner tip: When you cannot tell whether something is a space, stretch the fabric gently sideways. A real chain space opens clearly.
Common mistake to avoid: Beginners sometimes accidentally create two chains between single crochets. That makes a noticeably larger hole. Undo the stitches back to the error rather than trying to compensate on the next round.
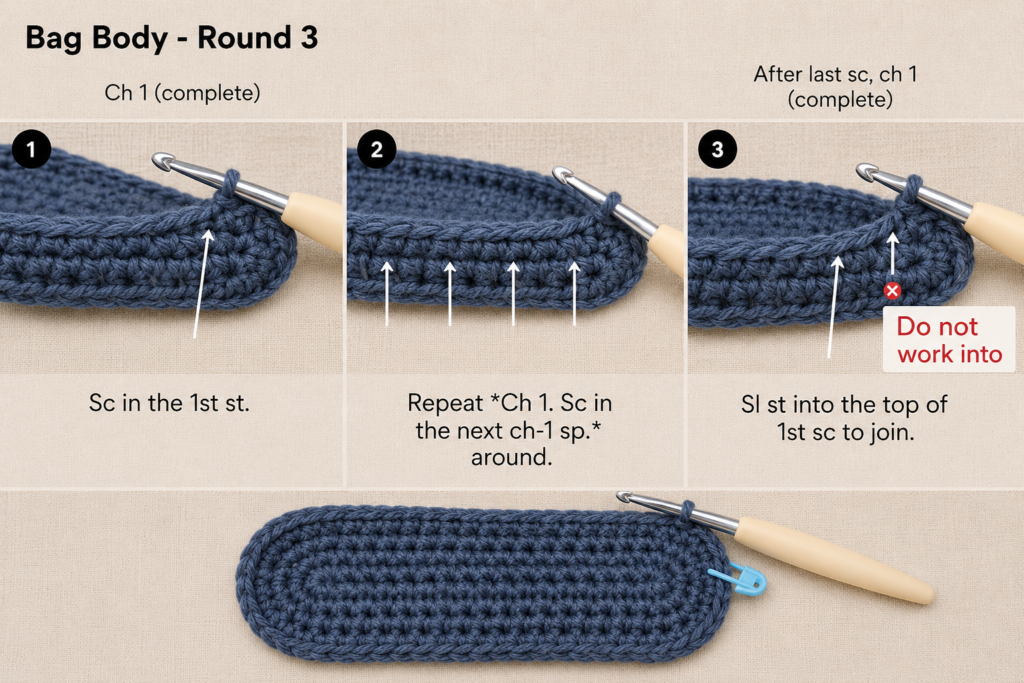
Step 6: Crochet Until the Tote Reaches 13 Inches High
Continue the body repeat until the bag measures approximately 12 to 12½ inches from the base ridge.
The reinforced top rounds added next will bring the finished height closer to 13 inches.
Do not rely only on the number of rounds. Different crocheters produce different row heights.
Lay the bag flat every few rounds and measure from the bottom fold to the working edge.
For college use, resist the temptation to make the tote extremely tall. A very deep bag becomes awkward when you need to find keys, pens or earbuds quickly.
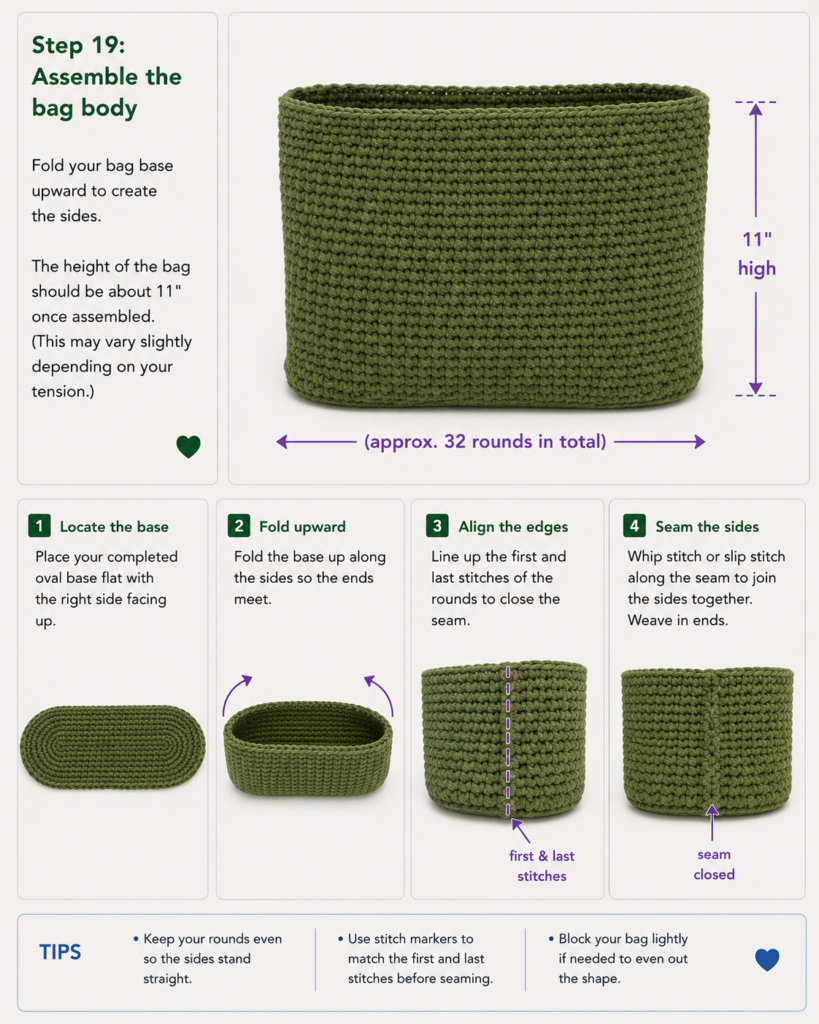
Step 7: Reinforce the Top Edge
A college tote may be picked up dozens of times during a busy week.
The opening should therefore be firmer than the textured body.
Top Edge Round 1
Chain 1.
Work:
- 1 sc into every sc;
- 1 sc into every ch-1 space.
Join.
You should now have 90 solid sc stitches.
Top Edge Round 2
Chain 1.
Sc in every stitch around.
Join.
Optional Top Edge Round 3
If your yarn is particularly soft, add one additional solid sc round.
Fasten off.
The solid band provides a better foundation for the straps than attaching them directly to an open-textured edge.
Beginner tip: Do not tighten the final rounds aggressively. They should stabilize the opening, not pull it inward.
Step 8: Crochet Two Strong Shoulder Straps
Make two identical straps.
Leave a long starting tail for sewing.
Chain 6.
Strap Row 1
Sc in the second chain from the hook and in each remaining chain.
5 sc.
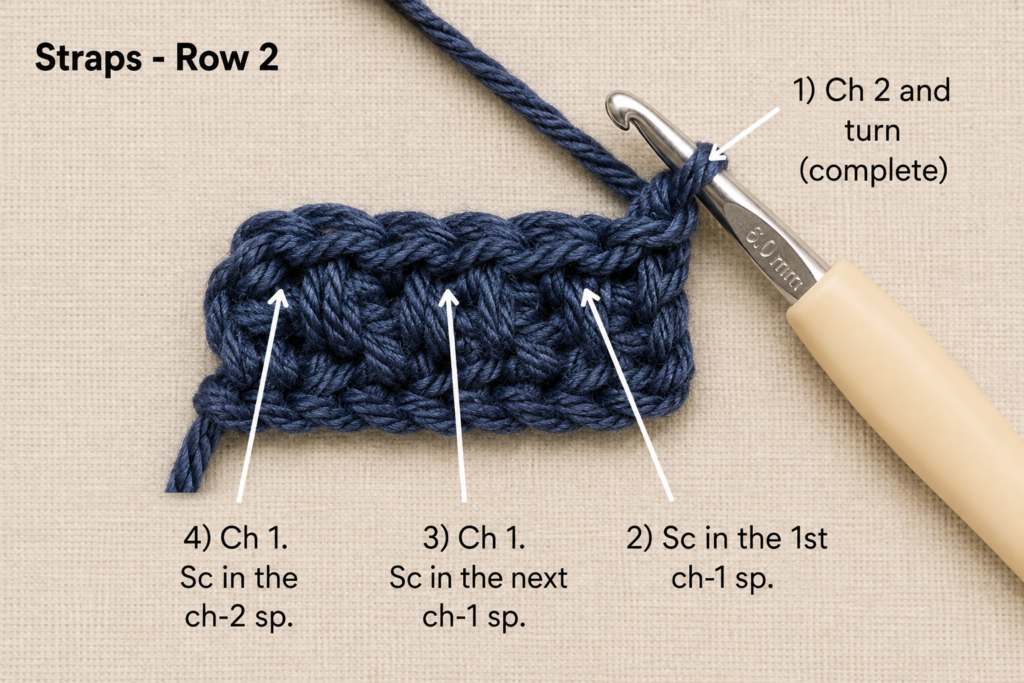
Strap Row 2
Chain 1 and turn.
Sc in all 5 stitches.
Repeat Row 2 until the strap measures approximately 30 inches / 76 cm.
Fasten off, leaving another long sewing tail.
Make the second strap to the same length.
Why These Straps Are Wider
Very narrow crochet handles can dig into your shoulder when the bag is loaded.
Five dense single crochets produce a more substantial strap.
If your cotton stretches during use, you can make the strap slightly shorter—around 28 inches—and gently stretch it before attachment.
Beginner tip: Count five stitches at the end of every row. Accidentally losing only one stitch will quickly taper the strap.
Step 9: Position the Straps Evenly
Turn the bag inside out.
Lay it completely flat.
Place the first strap on one side of the bag.
Position each strap end approximately:
- 4 inches from the nearest side edge, and
- 3 inches down from the top edge.
Pin the ends temporarily.
Turn the bag over and position the second strap using exactly the same measurements.
Before sewing anything, hold the tote by both straps.
Check that:
- neither strap is twisted;
- both loops are the same height;
- front and back straps line up;
- the bag hangs evenly.
Beginner tip: Measure rather than judging by eye. A half-inch difference becomes surprisingly obvious after the tote is finished.
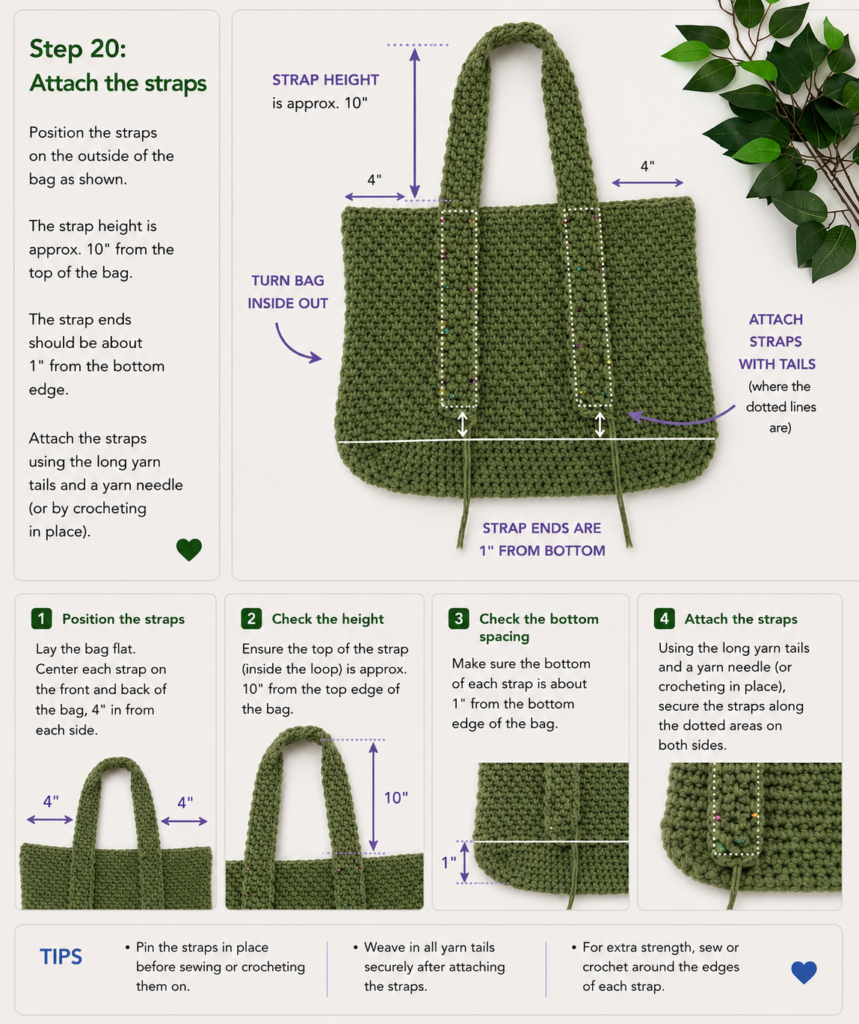
Step 10: Sew and Reinforce the Handles
Thread a yarn tail onto your tapestry needle.
Sew around the entire perimeter of the strap end, catching the inside of the tote fabric securely.
Then sew diagonally through the attachment area to create an X-shaped reinforcement.
Repeat for all four strap ends.
Whenever possible, work through the back portions of the tote stitches so your sewing is less visible from the outside.
After securing the final stitch:
- weave the tail through several stitches;
- reverse direction;
- weave through another section;
- trim only when you are confident the yarn cannot pull free.
This reinforcement matters more than decorative perfection.
A tote used for college books experiences repeated downward force at the handle attachment points.
Pattern Notes or Stitch Notes
Turning Chain Rules
The body is worked in joined rounds.
The starting chain does not count as a stitch.
The straps are worked back and forth in rows. Chain 1 at the end of a strap row is for turning and does not count as a stitch.
Stitch Count
Base:
- Round 1: 66 sts
- Round 2: 72 sts
- Round 3: 78 sts
- Round 4: 84 sts
- Round 5: 90 sts
- BLO transition: 90 sts
Body:
- 45 sc
- 45 ch-1 spaces
Top band:
- 90 sc
Straps:
- 5 sc per row
Repeat Pattern
Once established, the body repeat is essentially:
sc in ch-1 space, ch 1, sc in next ch-1 space
Continue around.
Right Side and Wrong Side
The tote is crocheted predominantly from the right side.
You do not turn the body.
The straps are the only major section worked in turned rows.
Size Adjustment Notes
To make the tote wider, add chains to the starting chain.
Because the body uses an alternating sc/ch pattern, maintain an even total body stitch count after your increase rounds.
To make it taller, simply add more body rounds before the solid top band.
To change strap length, crochet each strap to your preferred measurement before sewing.
Common Beginner Mistakes
1. The Base Curls Up Like a Bowl
Cause: Too few increases or extremely tight tension.
Fix: Check that you completed all six increases in the shaping rounds. If the count is correct, try a slightly larger hook.
2. The Base Is Wavy
Cause: Too many increases.
Fix: Remove the last increase round or space increases farther apart.
The base should rest flat without having to be stretched.
3. The Body Gradually Gets Smaller
Cause: A stitch or chain space is being skipped at the round join.
Fix: Mark the beginning of every round and verify that you still have 45 sc plus 45 ch-1 spaces.
4. The Moss Stitch Has Large Random Holes
Cause: You may have chained twice instead of once or skipped an extra chain space.
Fix: Compare the hole with the rows beneath it. If it is visibly larger, unravel to the mistake and work the section again.
5. One Strap Is Longer Than the Other
Cause: Counting rows is less reliable when tension changes.
Fix: Measure the completed first strap in inches or centimeters and make the second strap to the same physical length.
6. The Handles Stretch Too Much
Cause: Loose tension or highly elastic yarn.
Fix: Use cotton or a less stretchy blend, crochet with firmer tension, shorten the straps slightly, or sew cotton webbing to the hidden underside of each handle.
7. The Strap Ends Pull Away From the Body
Cause: Attachment over too small an area.
Fix: Extend each strap several inches down the inside of the tote and sew both around the perimeter and diagonally across the center.
How to Customize This Crochet Project
Change the Yarn
Cotton is the strongest all-around choice for a school tote.
You can also use:
- recycled cotton;
- cotton-acrylic blend;
- cotton cord;
- firm recycled-fiber yarn.
Avoid very fuzzy yarn because repeated friction against clothing and notebooks can make it pill quickly.
Add College or School Colors
Make the base in one color and the body in another.
You could also add narrow stripes every six to eight rounds.
Keep the straps either in the base color or the darkest shade for a balanced look.
Make It Laptop-Friendly
A crochet tote should not be treated as impact protection for an unprotected laptop.
Use a padded laptop sleeve inside the tote.
For additional support, add a fabric lining to reduce stretching and keep small items from pushing through the crochet texture.
Add an Inside Pocket
Crochet a simple rectangle using a single strand of yarn.
Make it large enough for:
- phone;
- ID card;
- pens;
- keys.
Sew three sides to the lining or inside wall and leave the top open.
Add a Closure
Good beginner options include:
- magnetic closure sewn to a lining;
- large button with crochet loop;
- drawstring insert;
- simple snap.
Add a Border
For a subtle finish, work the final upper round in a contrast color.
Avoid very decorative scallops around a college tote because the opening and handle areas benefit from firm, compact stitches.
Gift Ideas
This tote works well as a handmade:
- college acceptance gift;
- graduation gift;
- teacher bag;
- library tote;
- book-club gift;
- planner bag;
- commuter craft bag.
Fill it with a notebook, pens and a handmade crochet pencil pouch for a coordinated gift.
Finishing Instructions
Fastening Off
After the final strap has been secured, cut the yarn leaving a 6–8 inch tail.
Pull the tail completely through the final loop.
Weaving in Ends
Use a blunt yarn needle.
Weave horizontally through several stitches on the wrong side.
Change direction and weave through several more stitches.
For a bag, avoid simply weaving in a straight line once and cutting immediately; repeated use can pull short tails loose.
Blocking
A structured tote usually needs only light blocking.
Shape the empty bag with your hands.
If your yarn permits wet blocking:
- dampen the tote;
- press out excess water without twisting;
- shape it to the intended dimensions;
- allow it to dry completely.
Do not hang a wet crochet tote by its straps because the water weight may stretch them.
Washing and Care
Always follow the care instructions printed on your specific yarn label rather than assuming every cotton yarn can be washed identically.
The Craft Yarn Council provides standardized care-symbol explanations for interpreting yarn labels.
Quick Printable-Style Summary
Project: Crochet Tote Bag for College
Skill level: Easy / confident beginner
Finished size: Approximately 16″ wide × 13″ high × 4″ deep
Yarn: Category 4 cotton or cotton blend held double
Hook: 6.0 mm
Main stitches: ch, sc, sl st, BLO sc, moss stitch
Starting method: Chain 33 and crochet around both sides of the chain
Base: Increase from 66 sts to 90 sts over several rounds
Body: Alternate sc and ch-1 spaces around; work subsequent sc stitches into previous ch-1 spaces
Body height: About 12–12½ inches before top reinforcement
Top: 2–3 solid sc rounds
Straps: Make two; 5 sc wide and about 30 inches long
Attachment: Position evenly and sew approximately 3 inches down inside the bag
Finishing: Weave in ends securely and lightly block if required
FAQ
Is a crochet tote strong enough for college?
A densely crocheted tote made from firm cotton can comfortably carry normal daily supplies such as notebooks, a planner, pencil pouch and small personal items.
For extremely heavy textbooks, reinforce the straps and consider adding a fabric lining.
What yarn is best for a crochet college tote?
Firm cotton or a cotton-rich blend is usually a practical choice because it gives the bag structure and tends to stretch less than very elastic yarn.
Can I put a laptop in a crochet tote?
You can carry a laptop inside the tote, but use a separate padded protective sleeve. Crochet fabric itself does not provide meaningful impact protection.
Why are two strands of yarn held together?
Using two medium-weight strands creates a thicker, firmer fabric without requiring specialty cord.
It also strengthens the bottom and straps.
Can a complete beginner make this tote?
A determined beginner can, but you should practice:
- chains;
- single crochet;
- slip stitches;
- working in rounds
before beginning.
The moss-stitch section becomes very repetitive once the first few rounds are complete.
How can I make the tote less stretchy?
Use cotton, reduce your hook size slightly, keep firm tension, reinforce the top edge, and add a fabric lining.
You can also sew non-stretch cotton tape to the underside of the crochet handles.
How do I make the tote larger?
Use a longer foundation chain for additional width and work extra body rounds for height.
Maintain an even stitch count before beginning the alternating moss-stitch body.
Conclusion
A useful crochet tote bag for college needs a little more structure than a lightweight market bag. The combination of a dense oval base, double-stranded yarn, an easy moss-stitch body, solid upper band and deeply anchored straps gives this version the strength needed for regular campus use while keeping the actual crochet techniques beginner-friendly.
Once you understand the construction, the same method can become a library bag, work tote, crochet-project bag or everyday book bag.





