A handmade garment can feel intimidating when you are still learning to crochet. Sleeves, neck shaping, button bands, and complicated increases often make a sweater look like a project for another day.
This crochet lace shrug pattern takes a much simpler route.
You will crochet one large rectangle in an easy V-lace stitch, fold it, sew two short seams, and finish the openings with uncomplicated borders. There are no separate sleeves to attach and no complicated neckline shaping. The open stitch keeps the shrug light enough for spring and summer while still providing comfortable shoulder coverage.
The tutorial is written as a size-adjustable pattern with four suggested size groups. Measure your fabric as you work, rather than relying only on a fixed number of rows. That makes it easier to adapt the shrug to your body, your yarn, and your preferred amount of drape.
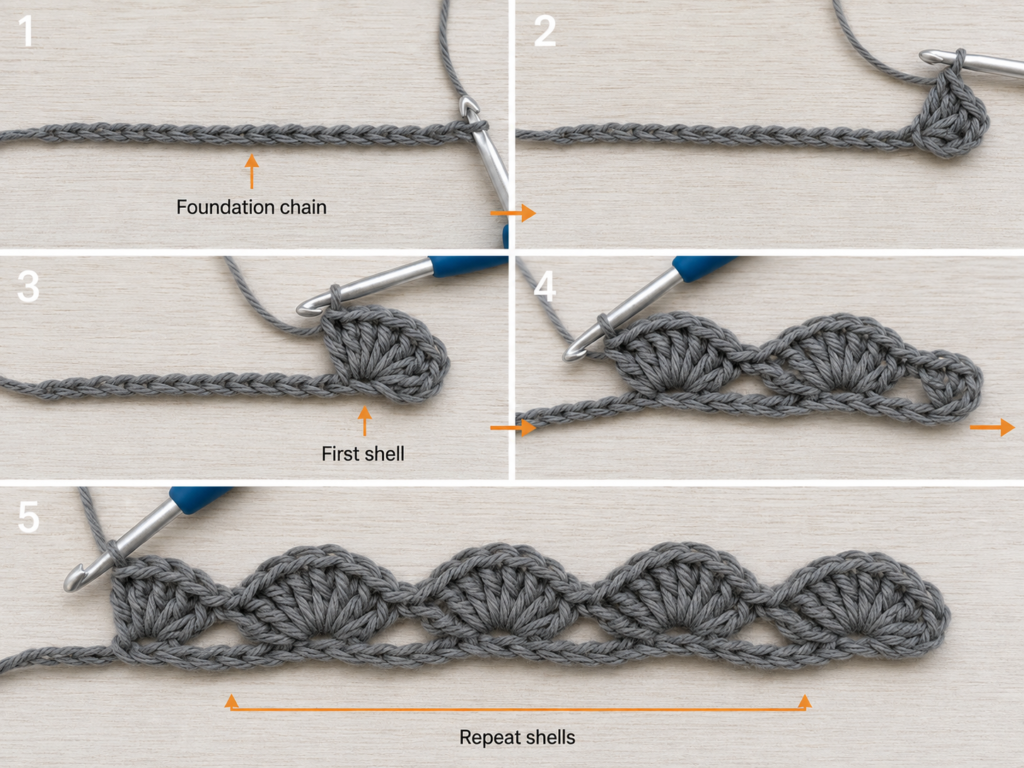
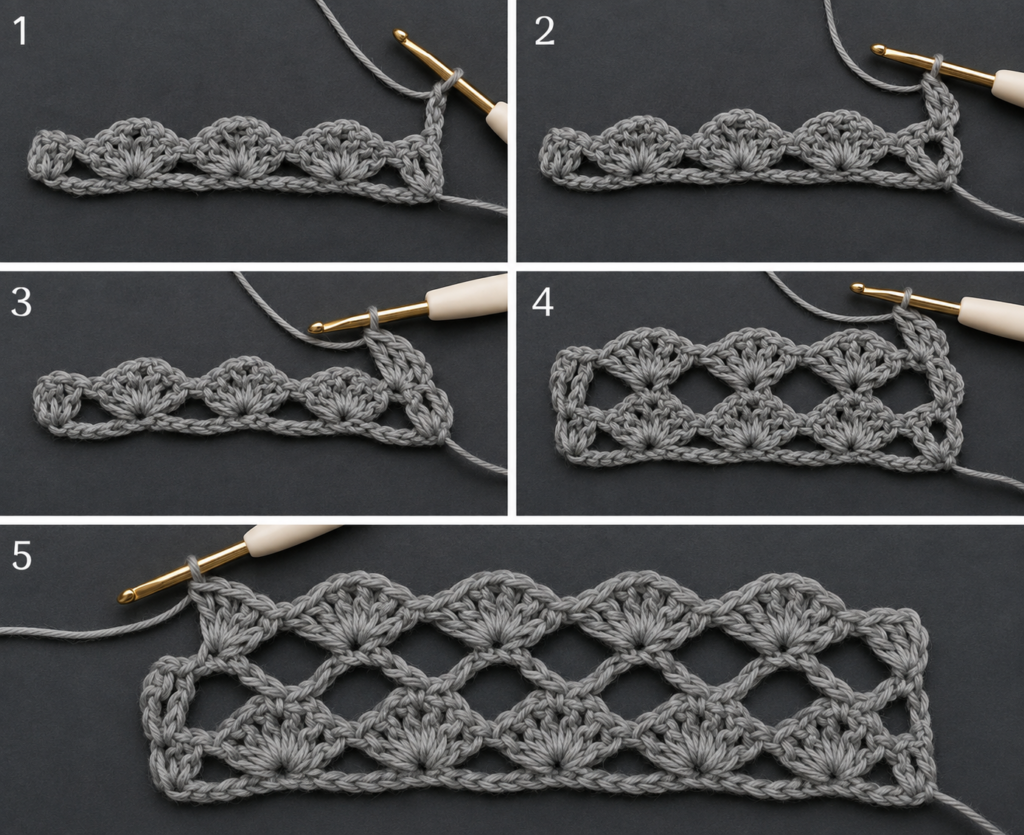
This is an original V-lace design. The research images listed above are used only to study the visual sequence of a one-rectangle shrug and are not the pattern for the project below.
What You’ll Learn
- How to crochet a relaxed foundation chain without making it too tight.
- How to make a simple V-stitch lace pattern.
- How to maintain straight edges while crocheting open lace.
- How to measure a rectangle for a wearable shrug.
- How to fold the rectangle and create matching armholes.
- How to sew flexible side seams.
- How to add clean borders around the body opening and armholes.
- How to block lightweight crochet lace for better drape.
Skill Level
Confident beginner
You should be comfortable making chains and double crochet stitches. The project introduces working into chain spaces, measuring a garment panel, seaming, and crocheting around an opening.
Finished Sizes
The dimensions below refer to the rectangle before it is folded.
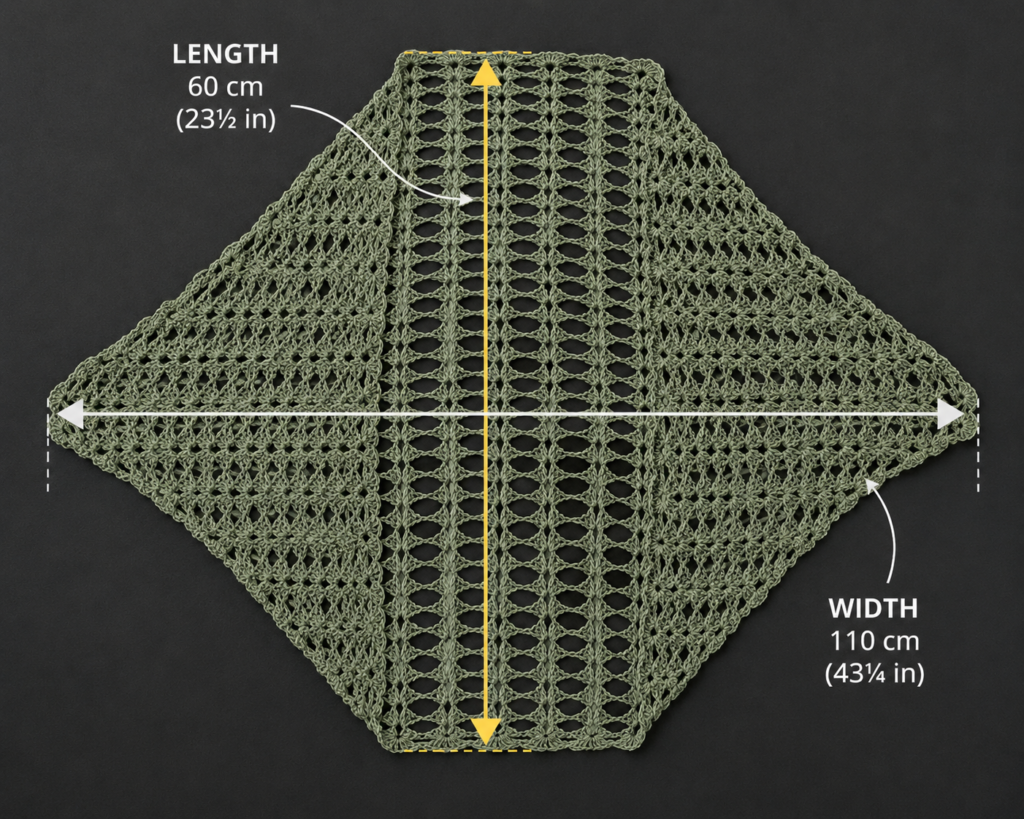
- XS/S: approximately 38 inches wide × 26 inches tall
- M/L: approximately 42 inches wide × 28 inches tall
- XL/2XL: approximately 46 inches wide × 30 inches tall
- 3XL/4XL: approximately 50 inches wide × 32 inches tall
These sizes create a relaxed shrug rather than a closely fitted bolero. Crochet fabric, body proportions, and preferred sleeve depth vary, so compare the measurements with an existing shrug or cardigan before completing the full panel.
Estimated Yarn
- XS/S: 750–850 yards
- M/L: 900–1,000 yards
- XL/2XL: 1,100–1,250 yards
- 3XL/4XL: 1,300–1,450 yards
These are working estimates for sport-weight cotton-bamboo yarn. Buy slightly more when using a yarn with short skein yardage, planning a wider border, or lengthening the shrug.
Materials You’ll Need
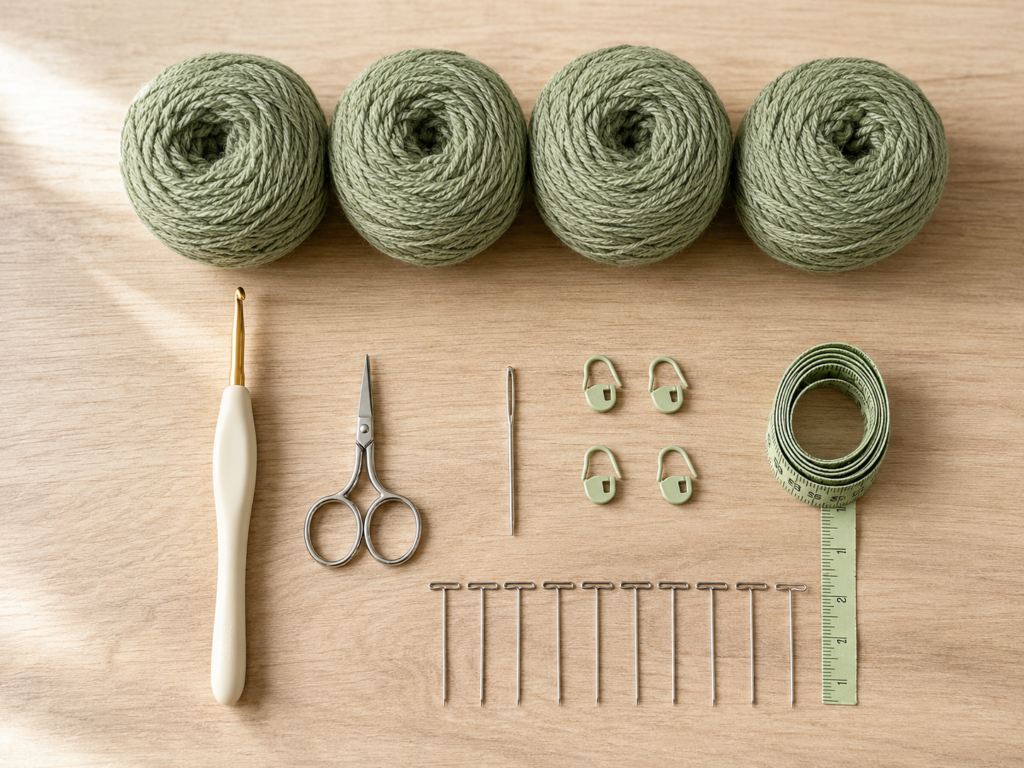
- Sport-weight number 2 cotton-bamboo or smooth cotton-blend yarn
- 4.0 mm crochet hook, or size required to meet gauge
- Scissors
- Blunt tapestry needle
- Four locking stitch markers
- Flexible measuring tape
- Blocking mats or clean towels
- Rustproof blocking pins
- Optional spray bottle or garment steamer
A smooth yarn makes it easier to see where each V-stitch begins and ends. Cotton-bamboo is suitable for a lightweight garment because it creates a fluid fabric, but it can stretch after washing. Always block and measure your gauge swatch before choosing a size.
The Craft Yarn Council classifies sport yarn in category 2 and advises crocheters to use a gauge swatch rather than assuming that all yarns within one weight category are interchangeable. Fiber, twist, softness, and drape can change the finished fabric even when two yarn labels show the same weight number.
Crochet Abbreviations Used
- ch = chain
- dc = double crochet
- sc = single crochet
- sl st = slip stitch
- sp = space
- st/sts = stitch/stitches
- rep = repeat
- RS = right side
- WS = wrong side
V-stitch: Work (dc, ch 1, dc) in the same stitch or chain-one space.
The instructions use US crochet terminology. In UK terminology, a US double crochet is called a treble crochet, and a US single crochet is called a double crochet. The Craft Yarn Council publishes standardized US abbreviations and a US/UK terminology comparison.
Gauge
After gentle blocking:
4 V-stitches and 6 rows = approximately 4 inches
Because the shrug is made from a rectangle, a small gauge difference will not make the project unusable. It will, however, change the rectangle’s dimensions, yardage, and drape.
Make a swatch at least six inches square. Wash or damp-block it in the same way you plan to care for the finished shrug. Let it dry completely before measuring the center four inches.
- Too many V-stitches in four inches: use a larger hook.
- Too few V-stitches in four inches: use a smaller hook.
- Fabric feels stiff: increase the hook size even when the stitch gauge is close.
- Fabric feels unstable or overly loose: reduce the hook size.
Before You Start
Count V-stitches, not individual double crochets
Each V-stitch contains two double crochets separated by one chain. The chain-one opening is the easiest feature to count. Place a removable marker in every tenth V-stitch during the first row.
Keep the foundation chain loose
A tight foundation chain pulls the lower edge inward and can make a large rectangle curve. Use a hook 0.5 mm larger for the foundation chain when your chains are naturally tight. Change back to the pattern hook before working Row 1.
Check the edges every few rows
Each repeat row begins with a turning chain, continues with one V-stitch in every chain-one space, and ends with one double crochet in the top of the turning chain. Missing that final double crochet gradually narrows the panel.
Do not judge the fabric before blocking
Open lace often looks uneven while it is on the hook. Blocking helps the V-stitches open, aligns the columns, and relaxes minor tension differences.
Choose the size by rectangle width
The rectangle width determines the overall span across the back and sleeves. The rectangle height controls the vertical depth and the available armhole length. When between sizes, use the wider dimension and stop the rows at the height that suits you.
Step-by-Step Crochet Tutorial
Step 1: Make the Foundation Chain
Choose your size:
- XS/S: chain 118
- M/L: chain 130
- XL/2XL: chain 142
- 3XL/4XL: chain 154
The foundation follows a multiple of 3 plus 4. This allows the V-stitches to repeat evenly while leaving one straight double-crochet edge at each side.
Lay the chain on the table after every 25–30 chains. Confirm that it has not twisted and that the loops are approximately the same size.
Beginner tip:
Place a stitch marker in every twentieth chain. Counting six smaller sections is much easier than recounting more than one hundred chains from the beginning.
Common mistake to avoid:
Do not pull the chain against the narrow throat of the hook. Form each new loop around the full shaft of the hook so the chain remains flexible.
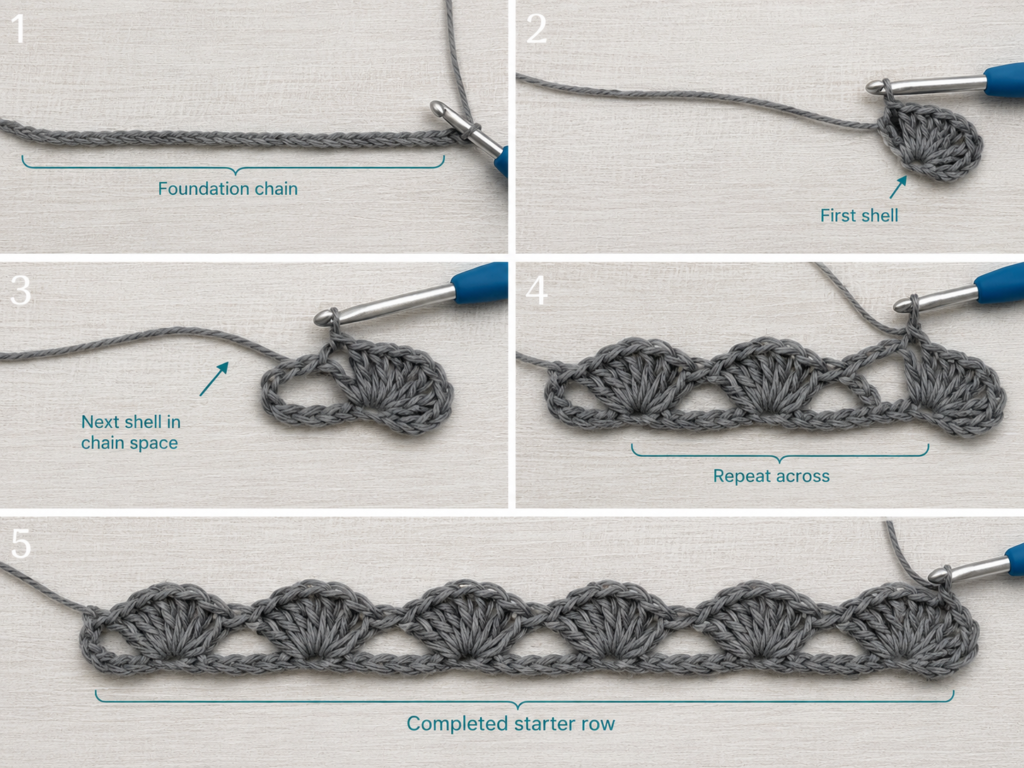
Step 2: Work the First V-Lace Row
Row 1, RS:
Work one V-stitch in the fourth chain from the hook. The three skipped chains act as the first edge double crochet.
*Skip the next 2 chains, work 1 V-stitch in the next chain.*
Repeat between the asterisks across until three chains remain. Skip the next two chains and work one double crochet in the final chain. Turn.
You should have:
- XS/S: 38 V-stitches
- M/L: 42 V-stitches
- XL/2XL: 46 V-stitches
- 3XL/4XL: 50 V-stitches
There is also one straight double crochet at each edge.
Before continuing, count the chain-one center of every V-stitch. The number of chain-one spaces should remain unchanged throughout the rectangle.
Beginner tip:
Look for the small horizontal bar formed by the chain-one between the two double crochets. That opening is where the next row’s V-stitch will be placed.
Common mistake to avoid:
Do not work into the side of the first double crochet when forming a V. Both double crochets and the chain between them must be made in the same foundation chain.
Step 3: Establish the Repeat Row
Row 2, WS:
Chain 3 and turn. The chain 3 counts as the first edge double crochet.
Work one V-stitch in the chain-one space at the center of every V-stitch across.
At the end of the row, work one double crochet in the top of the beginning chain 3 from the previous row. Turn.
Row 3 and all following rows:
Repeat Row 2.
After three or four rows, the V shapes should sit in vertical columns. The fabric should have open diamond-like gaps without appearing pulled tightly between stitch groups.
Beginner tip:
Spread the fabric slightly with your non-hook hand. The chain-one spaces become much easier to see when the fabric is not bunched against the hook.
Common mistake to avoid:
Do not work the next V-stitch in the gap between two V groups. It belongs inside the chain-one center of the V directly below it.
Step 4: Crochet the Rectangle to the Required Height
Continue repeating Row 2 until the rectangle reaches approximately:
- XS/S: 26 inches or approximately 39 rows
- M/L: 28 inches or approximately 42 rows
- XL/2XL: 30 inches or approximately 45 rows
- 3XL/4XL: 32 inches or approximately 48 rows
The inch measurement is more important than the suggested row count.
Measure the panel on a flat surface without pulling or stretching it. Check the width at the foundation edge, center, and final row. A difference of up to about one inch may relax during blocking, but a larger difference usually means stitches have been added or missed.
Fasten off after the final row, leaving a tail approximately 30 inches long for the first seam.
Beginner tip:
Write down the number of completed rows. Both sides of the folded panel must align row for row when you sew it.
Common mistake to avoid:
Do not measure the rectangle while it hangs from the hook. Cotton-bamboo can stretch under its own weight and give a misleading measurement.
Step 5: Fold the Rectangle and Mark the Armholes
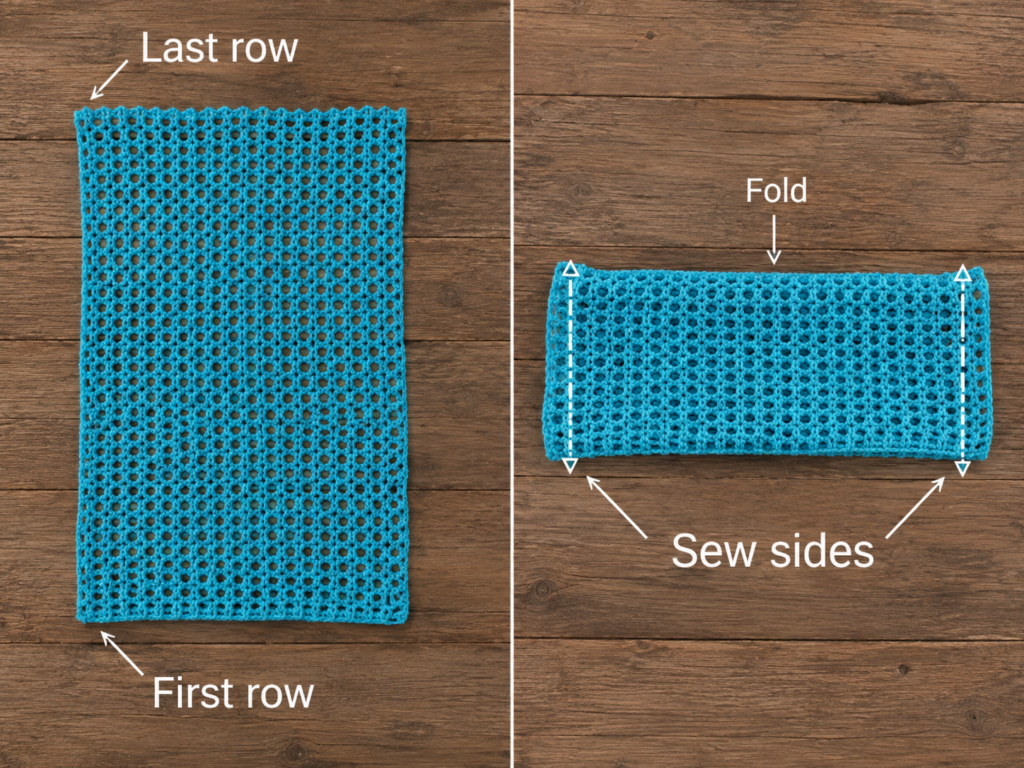
Place the rectangle flat with the wrong side facing upward.
Bring the final row down to meet the foundation edge. The fabric is now folded in half lengthwise. The folded edge will sit across the upper arm and shoulder area. The two aligned open edges form the lower edge of the shrug.
Match the four corners. Place a marker through both layers at each outer corner.
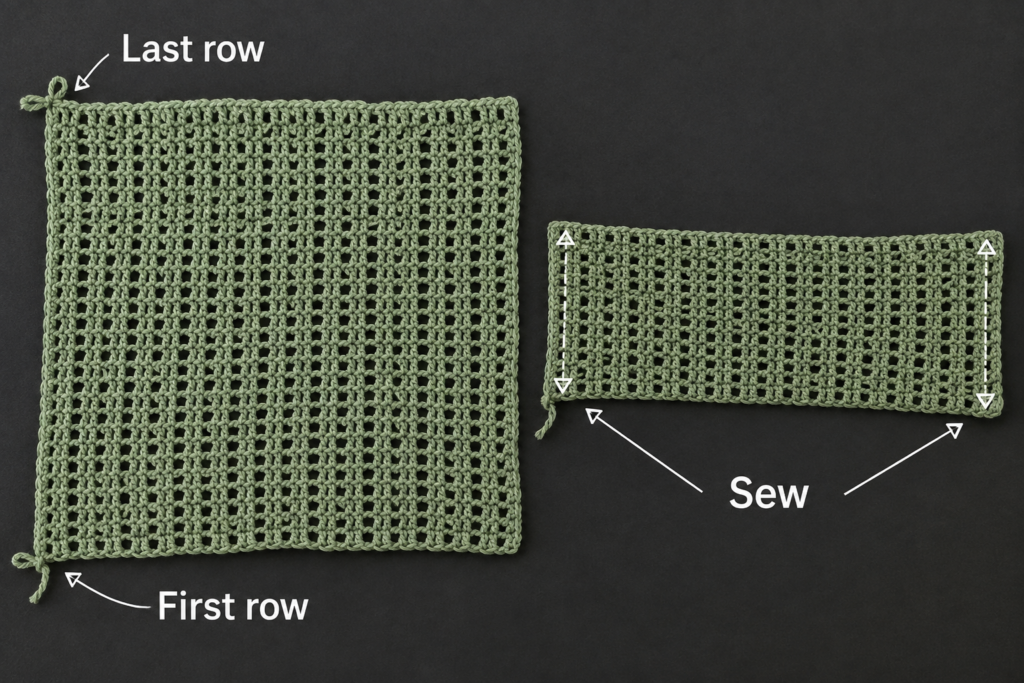
Measure from each open outer corner toward the folded edge and mark the end of the seam:
- XS/S: seam approximately 5½ inches; leave approximately 7½ inches open
- M/L: seam approximately 6 inches; leave approximately 8 inches open
- XL/2XL: seam approximately 6½ inches; leave approximately 8½ inches open
- 3XL/4XL: seam approximately 7 inches; leave approximately 9 inches open
The unsewn section beside the folded edge becomes the armhole.
Before sewing, carefully slide one arm through each marked opening. The back opening will still be extremely large, but this fitting check tells you whether the armholes feel comfortable.
Beginner tip:
Count the same number of row ends from each corner and place the markers in matching rows. Equal armholes are more important than following the suggested measurement exactly.
Common mistake to avoid:
Do not sew all the way to the folded edge. Doing so closes the armhole.
Step 6: Sew Both Side Seams
Thread the long yarn tail through the tapestry needle.
Starting at the outer corner, sew through corresponding row ends on both layers. A whip stitch is easy for beginners, while a mattress-style seam creates a flatter join. Keep the stitches secure but not tight.
Stop at the armhole marker and weave the tail back through several seam stitches.
Cut another length of yarn for the second side. Sew the second seam in exactly the same direction and across the same number of rows.
Turn the shrug right side out and try it on.
Check that:
- Both armholes have the same depth.
- The back is centered.
- Neither seam pulls tightly under the arm.
- The front edges fall in a similar position.
Adjust the seams before weaving in the ends permanently.
Beginner tip:
Place the seam yarn through only the sturdy outer loops at each row end. Avoid splitting the yarn strands, which makes corrections difficult.
Common mistake to avoid:
Pulling the seam yarn too firmly creates a rigid ridge. The seam must stretch with the lace fabric.
Step 7: Crochet Around the Main Body Opening
Lay the shrug flat with the right side facing upward.
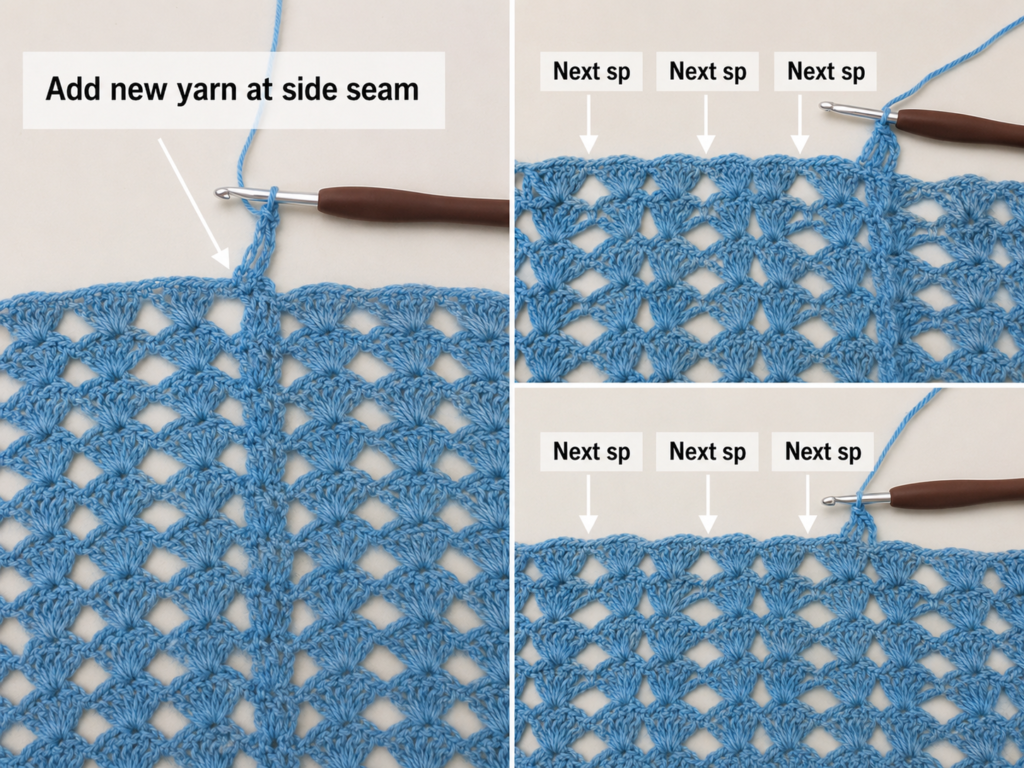
Join the yarn at one side seam where it meets the large body opening.
Body Border Round 1
Chain 1. Work single crochet stitches evenly around the entire opening.
A useful starting rate is:
- One single crochet in each visible stitch along the foundation and final-row sections.
- Approximately two single crochets around each double-crochet row end.
- One additional stitch at each seam when needed to prevent pulling.
The exact count is less important than creating a flat border. If the edge ripples, there are too many stitches. If it cups inward, add more stitches.
Join with a slip stitch to the first single crochet.
Body Border Round 2
Chain 3; this counts as the first double crochet.
Work one double crochet in every single crochet around. Join with a slip stitch to the top of the beginning chain 3.
Fasten off, or repeat Round 2 once for a wider border.
Beginner tip:
Stop after every eight to ten inches and lay the border flat. Correcting stitch distribution early is easier than removing an entire round.
Common mistake to avoid:
Do not force the same number of stitches into every row end. The goal is a smooth edge, not a mathematically identical rate around areas with different stitch structures.
Step 8: Edge the Armholes
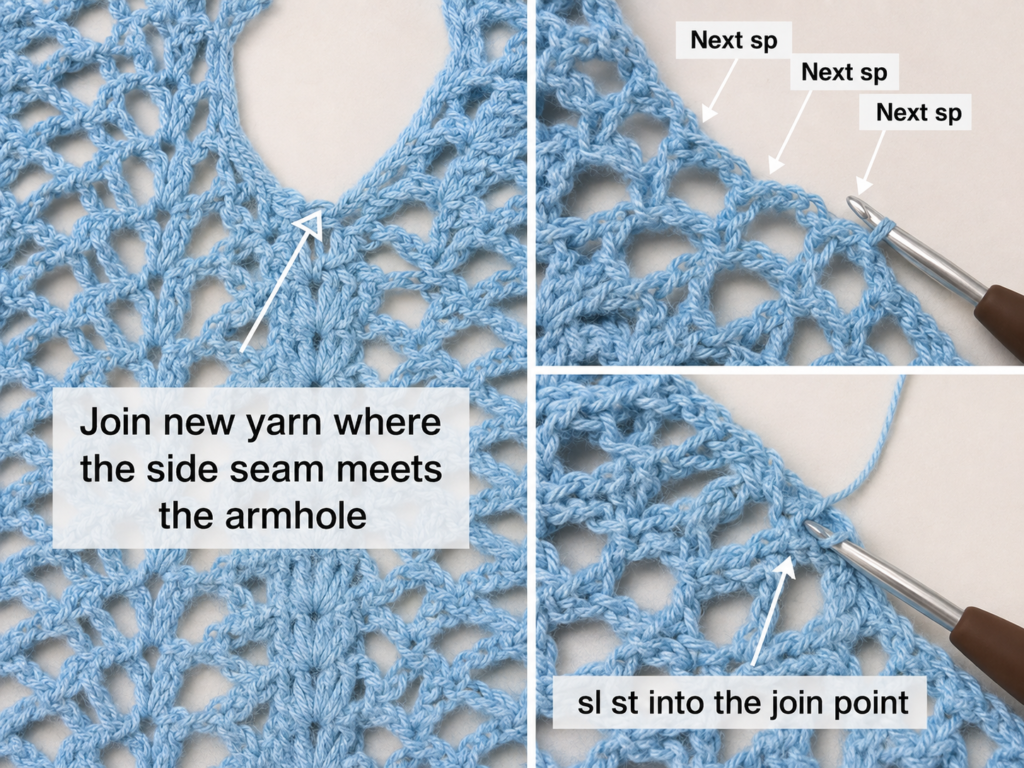
Join the yarn at the bottom of the first armhole where the side seam ends.
Armhole Round 1
Chain 1 and work single crochet stitches evenly around the opening. Begin with approximately two single crochets around each double-crochet row end.
Join with a slip stitch to the first single crochet.
Count the stitches.
Armhole Round 2
Chain 3 and work one double crochet in every stitch around. Join with a slip stitch to the top of the beginning chain 3.
Fasten off.
Repeat both rounds around the second armhole. Use the same stitch count whenever possible.
Try on the shrug after the first single-crochet round. When the opening feels loose, reduce a few stitches evenly before working the double-crochet round. When it feels restrictive, add several stitches around the upper half of the armhole.
Beginner tip:
Write down the first armhole’s final stitch count before starting the second side.
Common mistake to avoid:
Do not place extra stitches only at the underarm seam. Concentrating increases in one point causes a visible flare.
Step 9: Weave In the Ends
Thread each tail into the tapestry needle.
For lace fabric, weave through denser areas such as:
- The base of several double crochet stitches.
- The body-border stitches.
- The side seam.
- The armhole edging.
Change direction at least once. Avoid carrying a dark or bulky tail across an open chain space where it will remain visible.
Trim the end only after gently stretching the surrounding fabric.
Step 10: Block the Finished Shrug
Check the yarn label before washing or steaming.
For a washable cotton blend:
- Soak or spray the shrug until evenly damp.
- Press out excess water without twisting.
- Support the garment when lifting it.
- Lay it on blocking mats or clean towels.
- Straighten the back and front borders.
- Open the V-stitches gently with your fingers.
- Pin only where needed.
- Confirm that the armholes match.
- Leave the shrug undisturbed until completely dry.
Never allow the hot surface of an iron to touch the yarn. Acrylic blends can be permanently altered by excessive heat, while plant fibers can stretch when wet.
The Craft Yarn Council recommends retaining the yarn label or its care information so the finished handmade item can be cleaned according to the fiber manufacturer’s instructions.
Pattern Notes or Stitch Notes
Turning Chain
The beginning chain 3 counts as the first double crochet throughout the V-lace panel and double-crochet borders.
Place a marker in the top chain when you have difficulty locating it at the end of the following row.
Stitch Count
Maintain the same number of V-stitches on every panel row:
- 38 for XS/S
- 42 for M/L
- 46 for XL/2XL
- 50 for 3XL/4XL
Count the chain-one spaces rather than counting every double crochet.
Repeat Pattern
After Row 1, repeat one simple row:
- Chain 3.
- Work one V-stitch in every chain-one space.
- Work one final double crochet in the top of the turning chain.
Right Side and Wrong Side
The V-lace stitch is visually similar on both sides. Mark the right side after Row 1 so both seams can be sewn from the same side.
Size Adjustment
The foundation follows a multiple of 3 plus 4.
For a custom width:
- Make a chain in a multiple of 3.
- Add 4 chains.
- Work the first row as written.
- Stop when the unblocked panel is close to your desired width.
- Confirm the blocked width with a swatch before committing to a full panel.
For a deeper shrug, add rows. For a shorter back, remove rows while preserving enough folded height for a comfortable armhole.
Pattern Testing Note
This size-adjustable tutorial is drafted from the stated gauge and rectangle measurements. Yarn behavior and body proportions vary, and the four size groups have not been sample-tested on every body size. Make a blocked swatch and perform the marked-armhole fitting check before permanently sewing the seams.
Common Beginner Mistakes
1. The Foundation Edge Curves Inward
Cause: The starting chain is tighter than the V-lace fabric.
Fix: Remake the chain using a hook 0.5–1.0 mm larger, then return to the pattern hook for Row 1.
2. The Rectangle Becomes Narrower
Cause: The final edge double crochet has been missed.
Fix: Mark the top of every turning chain immediately after making it. At the end of the following row, work the edge double crochet into that marked chain.
3. Extra V-Stitches Appear
Cause: A V-stitch was worked both into a chain-one space and into the open gap beside it.
Fix: Count the chain-one spaces after every row. Each chain-one center receives exactly one V-stitch.
4. The Lace Looks Uneven
Cause: Chain-one loops vary in size or some double crochets are pulled shorter than others.
Fix: Form each chain around the full shaft of the hook. Lift the first loop of every double crochet to a consistent height.
5. The Side Seams Feel Stiff
Cause: The sewing yarn was pulled too tightly.
Fix: Loosen the seam and match its stretch to the lace panel before fastening the tail.
6. One Armhole Is Smaller
Cause: The seams cover different numbers of rows.
Fix: Count the joined row ends on both sides instead of comparing only the inch measurement.
7. The Border Ripples
Cause: Too many stitches were placed around the opening.
Fix: Remove the border and reduce the stitch rate, particularly around curved sections and corners.
8. The Border Pulls the Opening Inward
Cause: Too few stitches were worked along the row ends.
Fix: Add stitches gradually around the affected section rather than increasing only at the seams.
How to Customize This Crochet Project
Change the Yarn
For more structure, use a smooth sport-weight cotton.
For softer drape, choose cotton-bamboo or cotton-modal.
For a cooler-weather version, use a fine merino blend. Make a fresh swatch because wool can block and stretch differently from cotton.
Avoid fuzzy yarn for your first lace shrug. A strong halo hides the chain spaces and makes mistakes harder to correct.
Change the Color
A single solid color makes the V columns easiest to see.
Other attractive options include:
- Soft ivory for a bridal or occasion layer.
- Muted terracotta for autumn.
- Deep navy for evening wear.
- Pale lavender for spring.
- A long-gradient yarn for subtle color movement.
When using stripes, change color at the beginning of a row. Carrying colors along both edges can become visible after the opening border is added.
Add a Contrasting Border
Crochet the rectangle in one color and use a second color for:
- The main body border.
- Both armhole borders.
- Only the final border round.
Use the same fiber and yarn weight so the border and body behave similarly after washing.
Add a Scalloped Final Round
After the double-crochet body border, experiment on a small section with:
*Skip 1 stitch, work 5 double crochet in the next stitch, skip 1 stitch, slip stitch in the next stitch.*
Repeat around, adjusting the final spacing discreetly near a side seam.
A scalloped border adds decoration but also increases yardage and visual weight.
Make the Sleeves Longer
This rectangle construction creates loose, short cocoon sleeves. For more coverage, crochet a separate cuff directly around each finished armhole:
- Join yarn at the underarm.
- Work one round of double crochet.
- Repeat until the cuff reaches the preferred length.
- Reduce several stitches evenly when a narrower wrist is desired.
Long fitted sleeves require additional shaping and should be treated as a separate modification.
Gift and Use Ideas
A lightweight shrug works well as:
- A layer over a summer dress.
- Shoulder coverage for an evening event.
- A handmade bridal accessory in ivory.
- A travel layer for air-conditioned spaces.
- A birthday or Mother’s Day gift.
- A coordinating piece for a handmade skirt or camisole.
Include the remaining yarn label with a gifted shrug so the recipient has accurate care instructions.
Finishing Instructions
- Confirm that both side seams are secure but flexible.
- Weave all tails through dense stitch areas.
- Check that both armhole borders have similar stitch counts.
- Inspect the main opening for rippling or tight sections.
- Damp-block the finished garment.
- Shape the back into a smooth rectangle.
- Align the side seams symmetrically.
- Open the lace without overstretching the chain spaces.
- Allow the project to dry completely.
- Store folded rather than hanging when the yarn stretches easily.
Wash according to the yarn label. Support the wet garment with both hands because water adds weight and can lengthen cotton or bamboo fabric.
Quick Printable-Style Summary
Project: One-rectangle crochet lace shrug
Skill level: Confident beginner
Yarn: Sport-weight cotton-bamboo
Hook: 4.0 mm or size needed for gauge
Gauge: 4 V-stitches × 6 rows = 4 inches after blocking
Stitches: Chain, double crochet, single crochet, slip stitch, V-stitch
V-stitch: (dc, ch 1, dc) in the same stitch or chain-one space.
Starting chains:
- XS/S: 118
- M/L: 130
- XL/2XL: 142
- 3XL/4XL: 154
Row 1:
Work a V-stitch in the fourth chain from the hook. Repeat skip 2 chains, V-stitch in next chain across until three chains remain. Skip two chains and double crochet in the final chain.
Repeat row:
Chain 3, turn, V-stitch in every chain-one space, double crochet in the top of the turning chain.
Panel height:
- XS/S: 26 inches
- M/L: 28 inches
- XL/2XL: 30 inches
- 3XL/4XL: 32 inches
Assembly:
Fold first and final rows together. Seam both short sides from the open corners toward the folded edge, leaving matching armholes.
Finishing:
Work one single-crochet round and one double-crochet round around the body opening and both armholes. Weave in ends and block.
FAQ
Is a crochet lace shrug suitable for a beginner?
It is suitable for a confident beginner who can make chains and double crochet stitches. The lace repeat is simple, but the project also requires consistent stitch counting, measuring, seaming, and working borders around large openings.
Can I use DK yarn instead of sport-weight yarn?
Yes, but the fabric will be heavier and your gauge will change. Make a blocked swatch and choose the foundation-chain count by the required finished width rather than automatically using the sport-weight counts.
How much yarn is needed for a crochet lace shrug?
The amount depends on size, yarn weight, stitch density, sleeve depth, and border width. For this design, plan for approximately 750–1,450 yards of sport-weight yarn across the four size groups, plus a small safety allowance.
Why is my crochet shrug too short across the arms?
The original rectangle may be too narrow, the gauge may be tighter than expected, or the fabric may not have been blocked. Measure the blocked rectangle width before seaming. A wider foundation chain creates more coverage across the back and arms.
How do I make the armholes larger?
Unpick part of each side seam and leave more rows open near the folded edge. Adjust both sides by the same number of rows.
Can I make this shrug without sewing?
This particular construction requires two short seams. They are simple straight seams and can be sewn with a tapestry needle or joined with slip stitches. A completely seamless shrug would require a different construction method.
Why is the back of my shrug sagging?
The panel may be too tall, the yarn may stretch strongly, or the garment may have been stored on a hanger. Shorten the rectangle for future versions, block it to the intended dimensions, and store the shrug folded.
Conclusion
This beginner crochet lace shrug turns a flat rectangle into a wearable garment with only two short seams. The repeating V-stitch creates the airy texture, while the straight-edge construction makes sizing and assembly easier to understand than a traditionally shaped sweater.
Make the gauge swatch first, measure the rectangle regularly, and try the marked armholes before sewing permanently. Those three checks prevent most fit problems.
Save the tutorial with your summer crochet patterns and use the same V-lace fabric later for scarves, wraps, lightweight tops, or simple cover-ups.