If you can make a chain and a double crochet, you already know most of what you need for this crochet triangle shawl pattern for beginners.
Triangle shawls sometimes look complicated because each row becomes longer than the one before it. In reality, the shaping comes from making a few increases in the same predictable places. Once you can recognize the two outer edges and the center chain space, the project becomes a relaxing one-row repeat.
This beginner version starts at the center of the long upper edge and grows downward and outward. There are no seams, separate panels, complicated stitch combinations, or color changes required. You can use one solid yarn, a self-striping yarn, or a gently variegated yarn and simply crochet until the shawl reaches the size you want.
The pattern below is an original simplified construction, rather than a reproduction of the reference tutorial’s row sequence. Its main body uses only double crochet stitches and a chain-2 center space, making it especially useful as a first shawl project.
What You’ll Learn
By making this triangle shawl, you will practice:
- making a magic ring
- working double crochet stitches
- using a turning chain
- identifying the first and last stitch
- increasing at both outer edges
- making a center chain space
- moving a stitch marker
- counting predictable stitch increases
- adjusting a shawl to your preferred size
- fastening off and weaving in yarn tails
- gently blocking crochet fabric
Materials You’ll Need
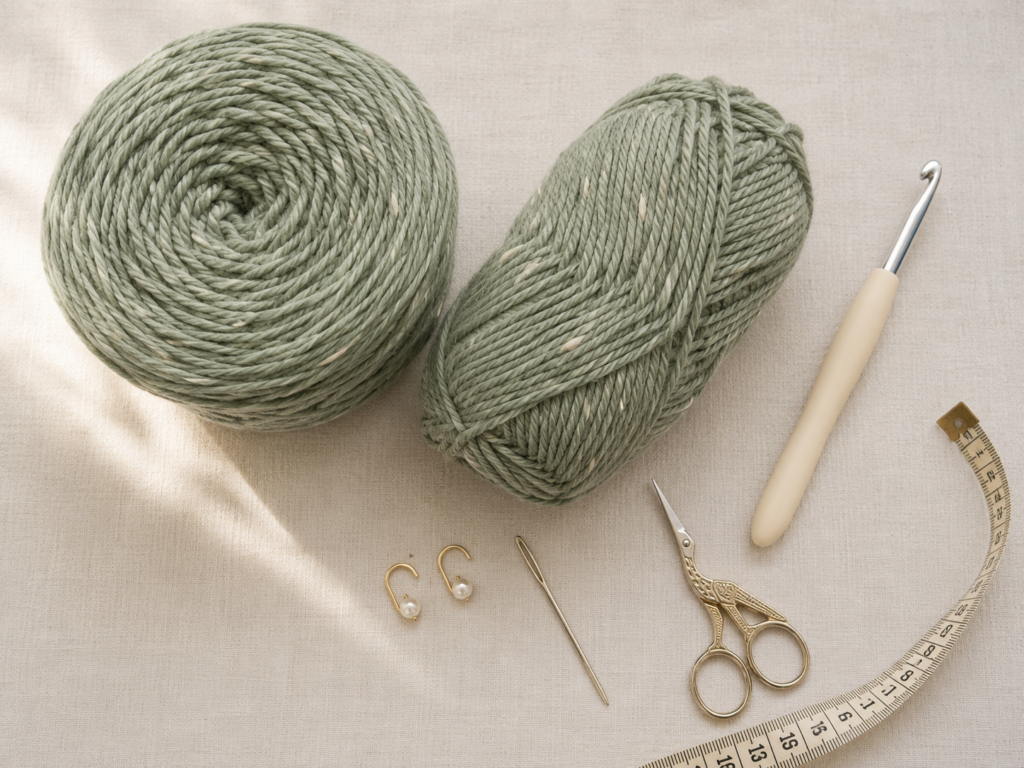
For an easy medium-sized adult shawl, prepare:
- approximately 650–750 yards / 595–685 m of #4 medium or worsted-weight yarn
- 6.0 mm crochet hook
- scissors
- tapestry or yarn needle
- 3 removable stitch markers
- measuring tape
- blocking mat and rustproof pins, optional
A #4 medium yarn is a practical choice for beginners because the stitches are large enough to see without producing an extremely heavy fabric. The Craft Yarn Council places medium/worsted yarn in category 4 and lists 5.5–6.5 mm among the typical crochet-hook range for the category, so a 6 mm hook sits comfortably within that general range.
For a soft, flowing shawl, choose yarn that does not feel excessively stiff when crocheted with your hook.
Crochet Abbreviations Used
This pattern uses standard US crochet terminology.
- ch = chain
- dc = double crochet
- sp = space
- st / sts = stitch / stitches
- rep = repeat
- beg = beginning
The Craft Yarn Council’s standard abbreviation guide likewise uses ch for chain, dc for double crochet, rep for repeat, sp for space, and st for stitch.
US/UK terminology note
A US double crochet (dc) is called a treble crochet (tr) in UK terminology.
Before You Start
Gauge and tension
Gauge is not critical for this adjustable shawl because you will continue crocheting until the piece reaches the size you want.
As a starting reference, aim for a fabric near:
12 dc × 7 rows = approximately 4 × 4 inches / 10 × 10 cm
Do not force your stitches to match this exactly.
The more important test is drape. Hold your swatch by one corner. It should bend and fall rather than feeling like a stiff placemat.
If your fabric feels hard, try a hook 0.5–1 mm larger.
If the stitches look excessively loose, try a slightly smaller hook.
Approximate finished size
After roughly 50–54 rows, expect a medium shawl somewhere around:
- 60–64 inches / 152–163 cm across the wingspan
- 28–30 inches / 71–76 cm from upper center to bottom point
Exact dimensions vary with yarn, tension, and blocking.
How the shaping works
There are three important areas in every row:
- the first edge
- the center chain-2 space
- the last edge
You increase at all three locations.
The result is predictable:
- Row 1 = 6 dc
- Row 2 = 10 dc
- Row 3 = 14 dc
- Row 4 = 18 dc
- Row 5 = 22 dc
Each new row contains 4 more double crochet stitches than the previous row.
That simple rule is one of your best error-checking tools.
Keep three stitch markers handy
Place one marker:
- in the first stitch
- in the center ch-2 space
- in the last stitch
Move them upward as you crochet.
This is particularly helpful because accidentally missing the final turning chain is one of the easiest ways to make one side of a triangle shawl narrower than the other.
Step-by-Step Crochet Tutorial
Step 1: Make the Magic Ring
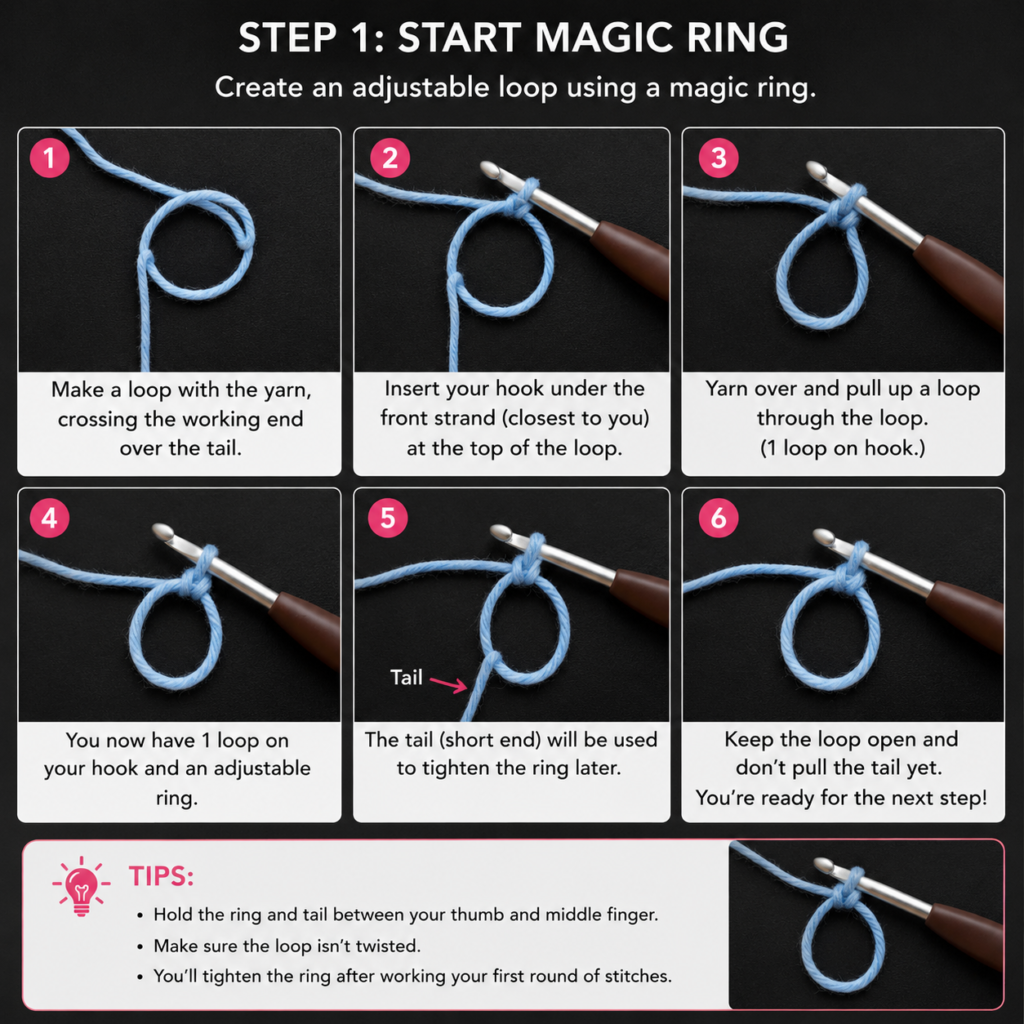
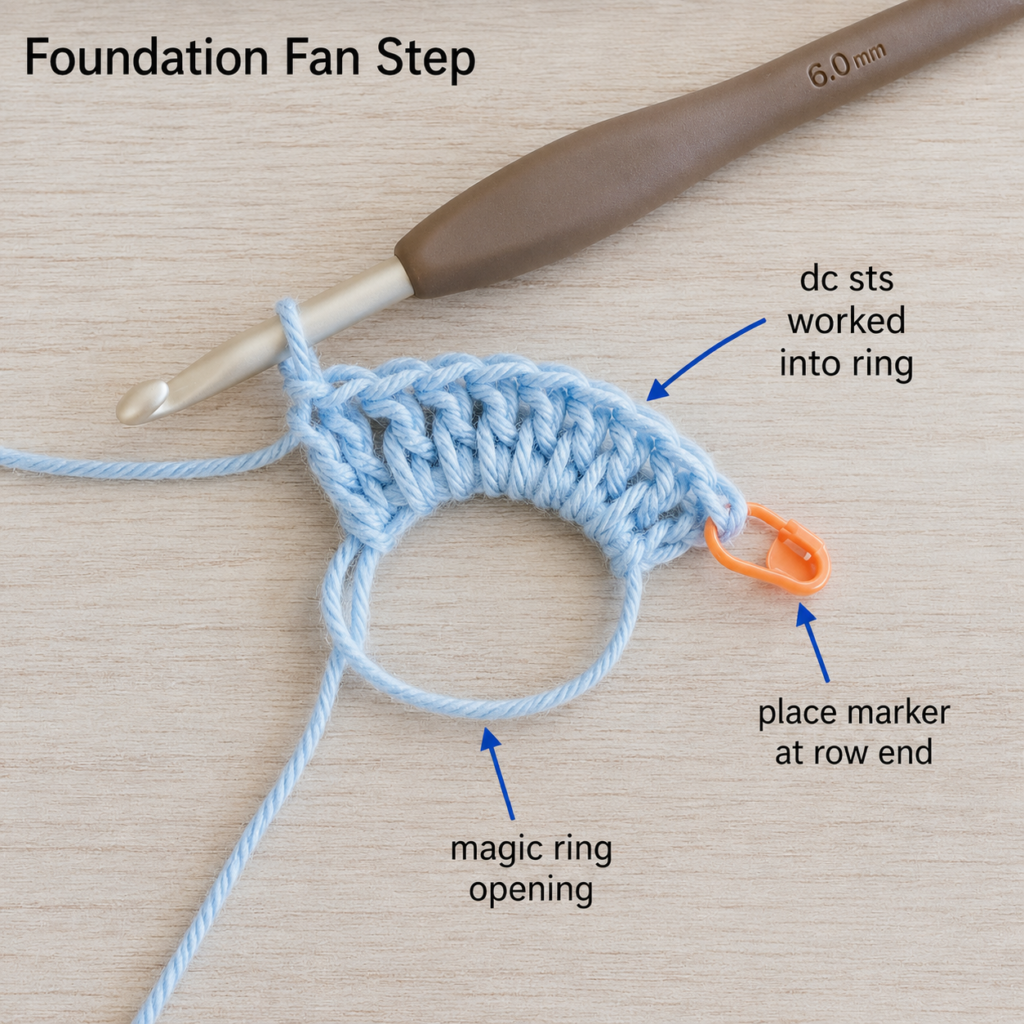
Form a magic ring but do not pull it closed yet.
You need enough room inside the ring to make the first groups of double crochet stitches.
If you dislike magic rings, you can alternatively chain 4, slip stitch into the first chain to make a small ring, and work the first row into that opening. The finished center will simply be slightly less adjustable.
Beginner tip: Keep the yarn tail several inches long. A tiny tail is harder to weave securely into the finished shawl.
Common mistake to avoid: Do not tighten the magic ring before Row 1 is complete.
Step 2: Chain Three
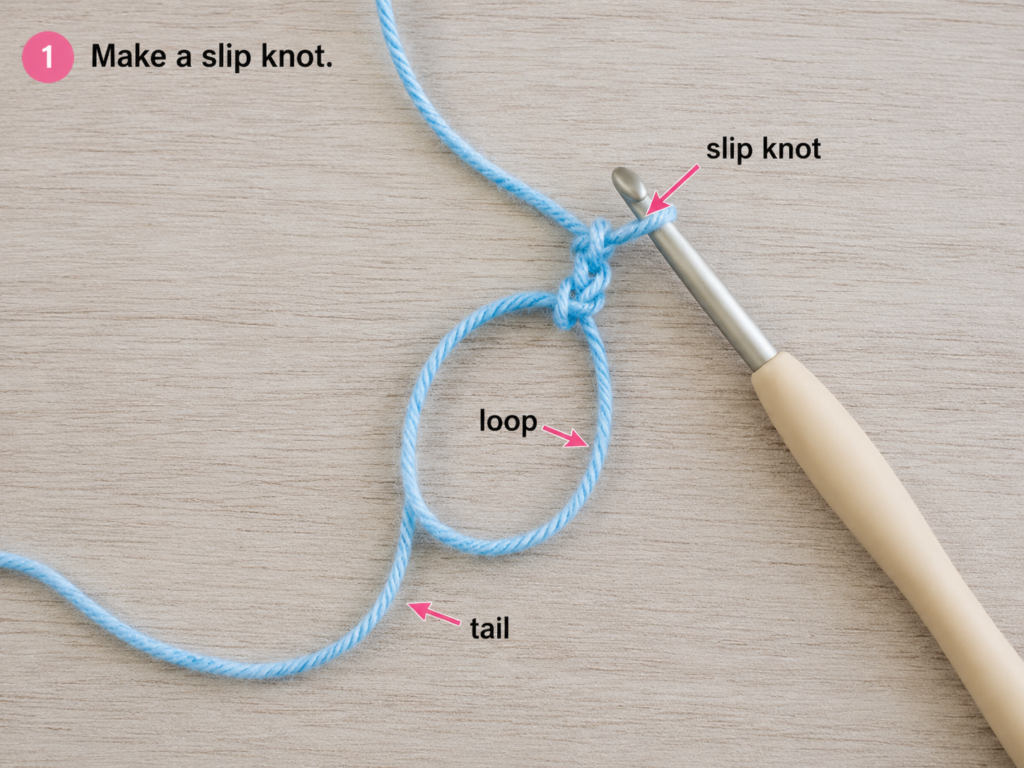
Chain 3.
For this pattern, the beginning ch-3 counts as your first double crochet.
Try to keep these chains relaxed. A very tight turning chain can pull the outer edge upward and create a puckered corner.
Step 3: Complete Row 1
With the magic ring still open:
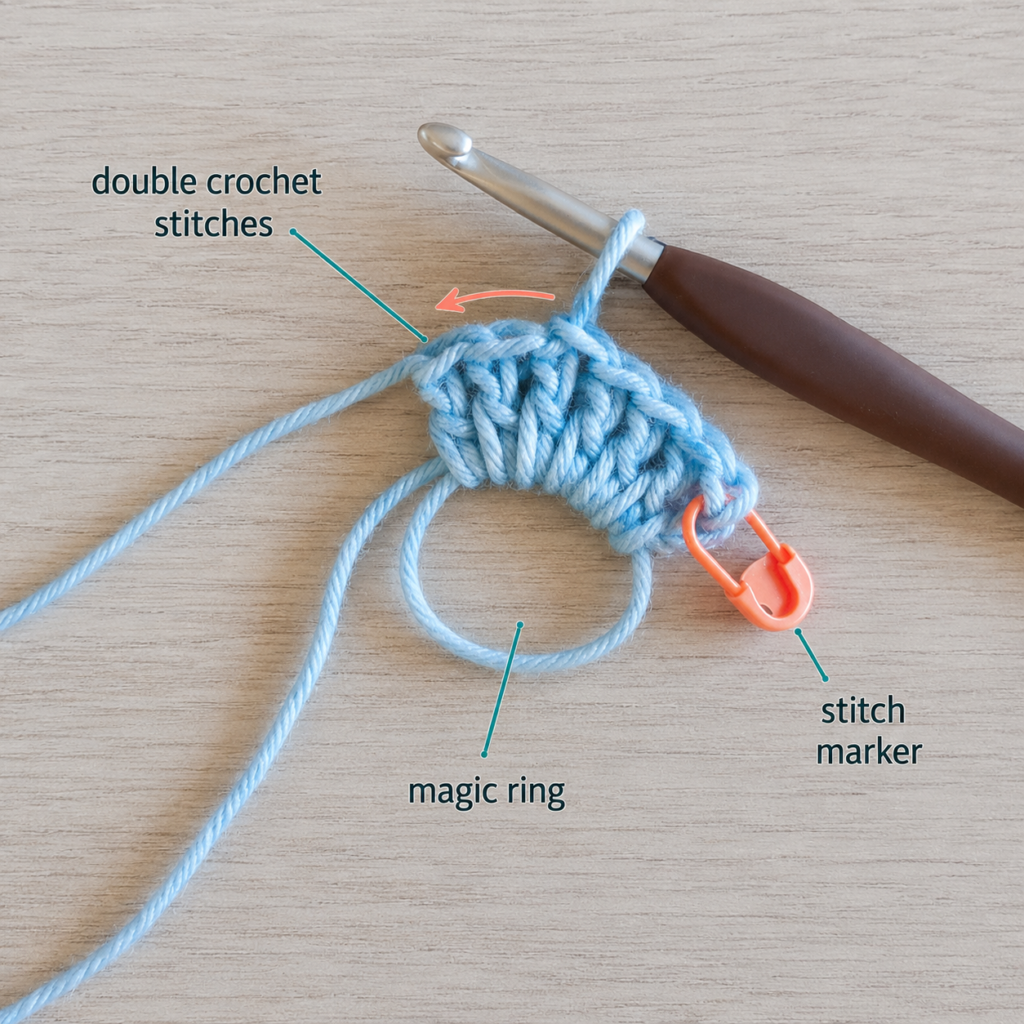
Row 1: Ch 3, work 2 dc into the ring, ch 2, then work 3 dc into the ring.
You now have:
6 dc + one center ch-2 space
Remember that the starting ch-3 counts as one of those six double crochets.
Pull the magic ring gently closed.
Turn your work.
The tiny piece may initially look more like a shallow V or semicircle than a triangle. That is normal. The shape becomes obvious after several more rows.
Step 4: Begin Row 2 With an Edge Increase
Turn the shawl.
Row 2 begins: Ch 3, then work 1 dc in the same first stitch.
Because your chain 3 counts as one dc, you now effectively have two stitches at the beginning edge.
That extra stitch is part of the shawl shaping.
Move your first-edge stitch marker into the top of the beginning chain if that helps you locate it when you return on the next row.
Beginner tip: The outer edge should gradually lengthen. It should not suddenly pull inward.
Step 5: Double Crochet to the Center
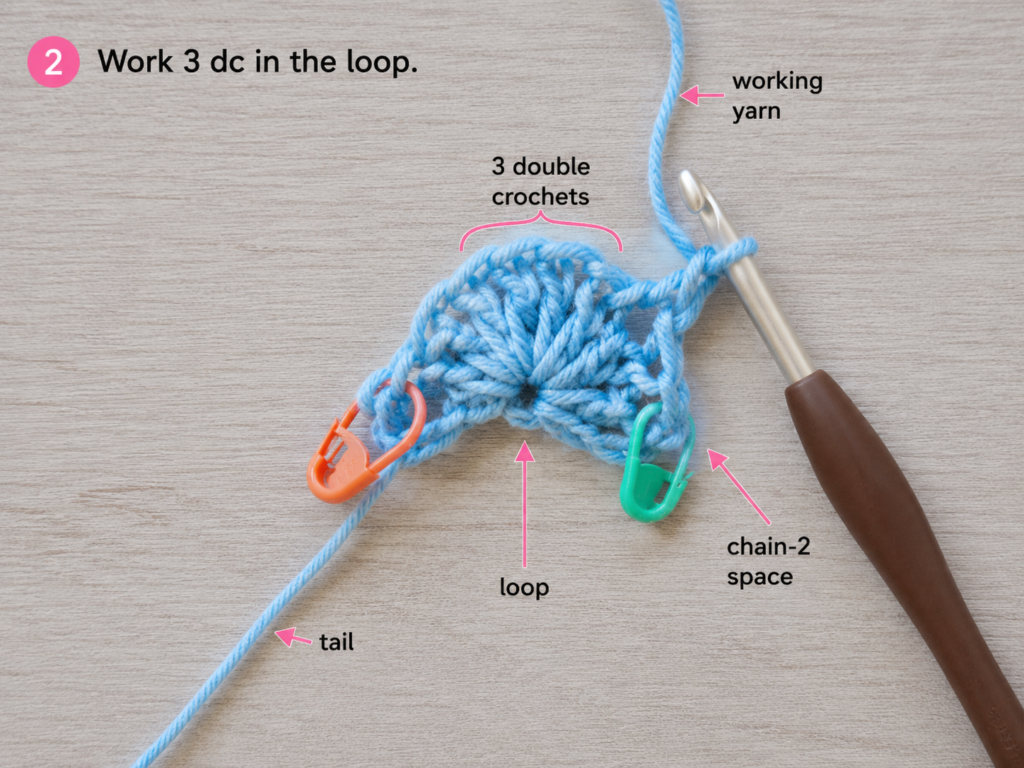
Work 1 dc in each stitch until you reach the marked center ch-2 space.
Do not crochet into the individual chains yet. Instead, your next stitches will be worked around the entire chain space.
The center opening is the easiest landmark in the project. Keep moving your marker into the newest center space after every row.
Common mistake to avoid: Do not accidentally work straight across the center without increasing. If you miss the center increase once, the point may lean to one side.
Step 6: Make the Center Increase
Into the center ch-2 space, work:
1 dc, ch 2, 1 dc
Move the center marker into the new ch-2 space.
This is the center increase.
You are adding stitches on both sides of the center opening while recreating the opening above them. Repeating this action creates the vertical center line and the downward-pointing shape.
Then work 1 dc in every stitch across the second half of the row until only the final stitch remains.
Step 7: Increase at the Final Edge
When one stitch remains, work 2 dc into the final stitch.
The final stitch is normally the top of the previous row’s beginning chain-3.
Turn.
You should now have:
Row 2 = 10 dc + one ch-2 space
Your shawl has increased by four double crochet stitches.
For beginners, the last stitch is often harder to identify than the first. This is why a stitch marker is so useful.
Beginner marker system
After finishing each row, confirm that you can identify:
- the first stitch
- the center ch-2 space
- the last stitch
Step 8: Repeat the Same Row
From this point forward, the construction is intentionally repetitive.
Every following row
- Ch 3 and turn.
- Dc in the same first stitch.
- Dc in every stitch to the center ch-2 space.
- Work (dc, ch 2, dc) into the center space.
- Dc in every stitch until the last stitch.
- Work 2 dc in the last stitch.
- Turn.
That’s the entire main-body repeat.
Stitch-count check
Your counts should progress:
| Row | Double crochet stitches |
|---|---|
| 1 | 6 |
| 2 | 10 |
| 3 | 14 |
| 4 | 18 |
| 5 | 22 |
| 10 | 42 |
| 20 | 82 |
| 30 | 122 |
| 40 | 162 |
| 50 | 202 |
Formula:
4 × row number + 2 = dc count
You do not need to count several hundred stitches every row. Instead, count occasionally, especially if the two sides begin looking different.
Step 9: Continue Until the Shawl Is Large Enough
For an adult shoulder shawl, around 50–54 rows is a useful starting target with worsted yarn and a 6 mm hook.
But measuring is better than relying on a fixed row count.
Lay your shawl flat and measure straight across the upper wingspan.
Stop when the dimensions suit the person who will wear it.
You can make:
- a small neckerchief at approximately 30–36 inches
- a shoulder wrap around 48–55 inches
- a full shawl around 60 inches or more
Because the construction repeats indefinitely, there is no complicated resizing calculation.
Pattern Notes or Stitch Notes
Turning chain
The beginning ch 3 counts as one dc.
That means you should treat the top of the chain as a real stitch when you reach it on the following row.
Stitch count
Each completed row gains exactly 4 dc.
Two increases happen around the center and one additional stitch is created at each outside edge.
If a row increases by only two stitches, check whether you missed an outside-edge increase.
Center repeat
Every row uses:
(dc, ch 2, dc) in center ch-2 space
Keep a marker in that space.
Right side and wrong side
There is no important designated right or wrong side for this basic shawl.
Because the work is turned after every row, both surfaces have a similar appearance.
Size adjustment
Simply repeat the established row until the shawl reaches your preferred wingspan and depth.
Common Beginner Mistakes
1. Missing the last stitch
This is probably the most common problem.
The last stitch can hide beside the turning chain.
Fix: Place a marker in the first stitch immediately after starting each row. When you return to that location, you will know exactly where the row ends.
2. Forgetting the center increase
If you simply double crochet across the center opening, one row will not widen properly.
Fix: Keep a removable marker in every new ch-2 center space.
3. Working into the wrong center space
As the shawl grows, other small gaps may appear between stitches.
Fix: Follow the visible center line downward. The true center opening should form a continuous vertical spine.
4. Tight turning chains
A very tight ch-3 can make the outer corners curl upward.
Fix: Make your turning chains slightly more relaxed than normal stitches.
5. Uneven tension
Beginners sometimes become progressively tighter as the rows grow longer.
Fix: Pause every few rows and check whether the fabric still drapes freely. Relax your grip or move up a hook size if necessary.
6. One side growing faster
This almost always means an edge or center increase was missed or accidentally repeated.
Fix: Fold the shawl vertically along the center line. The two halves should approximately mirror one another.
7. Splitting the yarn
Some loosely twisted yarns separate when inserting the hook.
Fix: Slow down when inserting the hook and make sure the full yarn strand rests in the hook groove before pulling through.
How to Customize This Crochet Project
Change the yarn
For a lighter spring shawl, try #3 DK yarn with a hook large enough to preserve drape.
For a warmer winter version, use a soft worsted wool blend.
Avoid extremely stiff yarn unless you intentionally want a structured wrap.
Use self-striping yarn
A triangle shawl works especially well with long color changes because each new row becomes progressively longer.
The stripes naturally form increasingly broad V-shaped bands.
Make a solid-color version
A solid cream, olive, rust, burgundy, charcoal, or muted rose shawl creates a simple wardrobe accessory and makes the stitch structure especially easy to see.
Add a contrast border
Once the main shawl is complete, attach a contrasting yarn at one outer corner.
A simple row of single crochet around the two sloping lower edges can produce a clean finish.
Place three single crochets around the bottom point so the edging can turn without pulling.
Add fringe
Cut equal lengths of yarn and attach small groups along the two lower edges.
Avoid attaching excessively heavy fringe because it can stretch a loose crochet fabric.
Add tassels
A single tassel at each wing tip and one at the center point gives the shawl a simple boho finish without requiring a complicated border.
Make a prayer shawl or gift
This pattern’s repetitive construction makes it suitable for relaxed gift crochet.
Choose washable yarn if the recipient may need easy-care fabric.
Finishing Instructions
When your shawl reaches the desired size:
- Complete the final row normally.
- Cut the working yarn, leaving approximately a 6-inch tail.
- Pull the yarn completely through the final loop.
- Thread the tail onto a yarn needle.
- Weave the tail through several nearby stitches in one direction.
- Reverse direction and weave through another section before trimming.
- Repeat with the starting tail.
Do not simply cut the yarn close to the last stitch. Crochet fabric moves and stretches, and an unsecured tail can work free.
Blocking
Blocking can make the center point, top edge, and individual stitches look more even.
Check the yarn label first.
For washable acrylic or blended yarn, gentle wet blocking is usually sufficient:
- dampen according to fiber-care instructions
- remove excess water without twisting
- spread the shawl flat
- straighten the center line
- gently shape the two wings evenly
- pin only if needed
- allow it to dry completely
Do not aggressively stretch the shawl merely to reach a particular measurement.
Quick Printable-Style Summary
Skill level: Beginner
Yarn: Approximately 650–750 yd #4 medium/worsted yarn
Hook: 6.0 mm
Stitches: Chain and double crochet
Starting method: Magic ring
Row 1: Ch 3, 2 dc in ring, ch 2, 3 dc in ring; close ring and turn.
Main repeat: Ch 3, dc in same first st, dc to center, (dc, ch 2, dc) in center space, dc to last st, 2 dc in final st; turn.
Increase rate: 4 additional dc per row
Suggested adult size: Approximately 50–54 rows or continue to preferred measurements
Finishing: Fasten off, weave in yarn tails, gently block if desired.
FAQ
Is a triangle shawl suitable for a complete crochet beginner?
Yes, provided you already know how to chain and make a double crochet. The shaping may look unusual at first, but the actual stitch repeat is simpler than many rectangular stitch patterns because the increases always occur in predictable places.
How do I crochet a triangle instead of a rectangle?
A rectangle keeps approximately the same stitch count from row to row.
A triangle deliberately adds stitches.
In this tutorial, stitches are added at the two outside edges and around the center opening, causing every row to become wider.
How many skeins of yarn do I need for a crochet triangle shawl?
For #4 medium yarn, approximately 650–750 yards is a sensible estimate for a medium adult shawl.
Check the yardage rather than the number of skeins because skein sizes vary considerably between brands.
Can I use DK yarn instead?
Yes.
Your shawl will generally be lighter and your stitches smaller. You may need additional rows and potentially more total yardage to reach the same physical size.
Make a small swatch and choose a hook that creates pleasant drape.
Why is my triangle shawl curling?
The most common reasons are tight tension, a hook that is too small, tight turning chains, or missed increases.
First verify the stitch pattern. If your counts are correct but the fabric is stiff, try crocheting more loosely or increasing your hook size.
Why does my center point lean sideways?
Check that you are consistently making the complete center increase in the marked chain space.
Also verify that neither edge has missed an increase.
Folding the shawl along the center spine can make asymmetry easier to spot.
How large should a crochet triangle shawl be?
There is no mandatory size.
A small triangle scarf may measure approximately 30–40 inches across, while a generous adult shawl may have a wingspan of 60 inches or more.
The advantage of this repeat-until-large-enough pattern is that you can stop when the dimensions work for you.
Conclusion
A first triangle shawl does not need complicated lace, unusual stitches, or a long pattern repeat.
Once you understand the three shaping locations—the first edge, center chain space, and final edge—the project becomes a straightforward rhythm of double crochet stitches and predictable increases.
Use stitch markers while the shawl is small, check your symmetry occasionally, and focus more on comfortable tension and drape than on making every stitch look perfect immediately. By the time the shawl reaches full size, you will have repeated the fundamental techniques enough times that locating the center and outer edges should feel natural.
Because the pattern can continue for as many rows as you like, you can turn the same construction into a small triangle scarf, everyday shoulder wrap, oversized shawl, gift, or prayer shawl simply by changing the yarn and finished dimensions.





