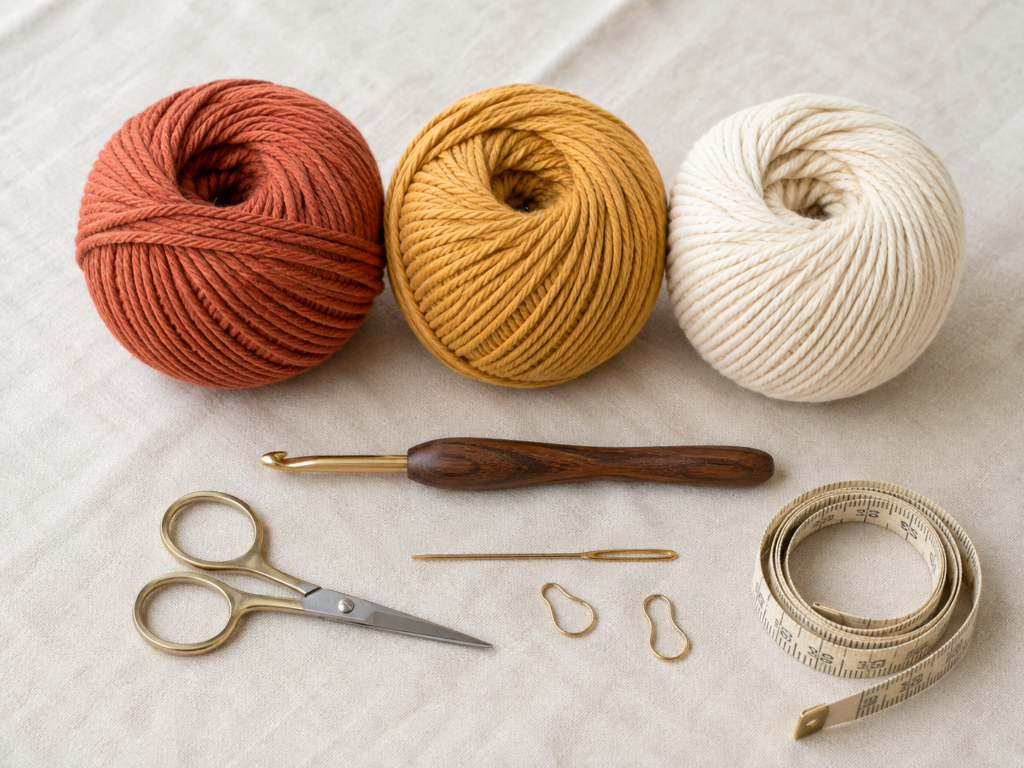
There is something about autumn that makes handmade table decor feel especially appropriate. Rust-colored leaves, warm golds, natural cotton, and textured stitches all work beautifully around a fall table—and a placemat is small enough that you can finish one without committing to a large seasonal project.
This crochet autumn placemat pattern is worked from the center outward, so there are no long foundation chains to measure and no rectangle edges to keep perfectly straight. You will begin with a small circular center, add a ring of raised popcorn stitches, expand the placemat with simple double-crochet increases, create subtle front-post texture, and finish with an open chain-and-shell border.
The finished design is decorative enough for Thanksgiving or an autumn dinner table but practical enough for everyday use.
The instructions below are an original pattern variation created for this article. The external tutorial photographs listed throughout are visual research references only; they are not the finished images for this article and should not be republished without permission.
What You’ll Learn
By the end of the tutorial, you will know how to:
- Make and close a magic ring.
- Crochet a flat circle with controlled increases.
- Make a popcorn stitch.
- Work around a stitch post for raised texture.
- Change yarn colors cleanly.
- Create chain spaces around a circular edge.
- Crochet a simple shell border.
- Add small picots.
- Recognize ruffling and cupping before they become serious.
- Block a cotton placemat so it lies neatly on the table.
Materials You’ll Need
For one approximately 13–14 inch / 33–35 cm placemat, gather:
- Medium/worsted-weight (#4) 100% cotton yarn.
- Color A: deep terracotta — approximately 100–120 yd.
- Color B: muted goldenrod — approximately 45–60 yd.
- Color C: warm cream — approximately 25–40 yd.
- 4.5 mm crochet hook.
- Yarn or tapestry needle.
- Scissors.
- 1–2 removable stitch markers.
- Measuring tape.
- Blocking mat and rust-resistant pins, optional but helpful.
Cotton works particularly well because it gives the finished mat enough body to stay flat while still showing the stitch definition. The Craft Yarn Council notes that yarn-weight and hook-size ranges are guidelines rather than strict interchangeability rules, so adjust your hook if your fabric behaves differently.
Crochet Abbreviations Used
This pattern uses US crochet terminology.
- ch = chain
- ch-sp = chain space
- sc = single crochet
- dc = double crochet
- FPdc = front post double crochet
- pc = popcorn stitch
- sl st = slip stitch
- st/sts = stitch/stitches
- sk = skip
- rep = repeat
- rnd = round
These abbreviations follow standard US crochet terminology used by the Craft Yarn Council. Note that US single crochet is called double crochet in UK terminology, while US double crochet corresponds to UK treble crochet.
Special Stitch: Popcorn
Work 5 dc into the indicated stitch. Remove the active loop from the hook without pulling it out. Insert the hook into the top of the first dc in the group, pick up the dropped loop, and pull it through. Ch 1 to secure the popcorn.
Special Stitch: Picot
Ch 3, then sl st into the first chain made.
Before You Start
Gauge and tension
Exact gauge is less important for a placemat than for a garment. What matters is that the circle remains flat.
As a useful checkpoint, your piece should measure approximately 4–4.5 inches / 10–11.5 cm across after Round 4.
If yours is significantly smaller and stiff, loosen your tension or try a 5 mm hook.
If it is loose and floppy, try a 4 mm hook.
How to count stitches
Place a removable stitch marker in the first actual stitch of each round. Do not count the beginning chain as a stitch in the solid body rounds unless the instructions specifically tell you otherwise.
Counting at the end of every round may feel slow, but correcting two missing stitches immediately is much easier than discovering the problem four rounds later.
How to keep the placemat flat
A circle that curls upward like a bowl generally needs more circumference.
A circle that develops waves or ruffles has too much circumference.
Before immediately changing the stitch count, first check:
- Did you miss or add an increase?
- Did your tension change?
- Did you accidentally work into the joining slip stitch?
- Did you mistake the beginning chain for a stitch?
Color planning
The three-color palette used here is:
- Terracotta for the main body.
- Goldenrod for concentrated decorative texture.
- Cream for contrast around the outer edge.
For a quieter placemat, use only two colors.
For a stronger Thanksgiving palette, substitute chocolate brown for cream.
For modern autumn decor, try clay, oatmeal, and olive.
Beginner note
The first three rounds require the most concentration because the stitches are compact. Once the circle begins expanding, the work becomes much easier to hold.
Step-by-Step Crochet Tutorial
Step 1: Make the Center Circle
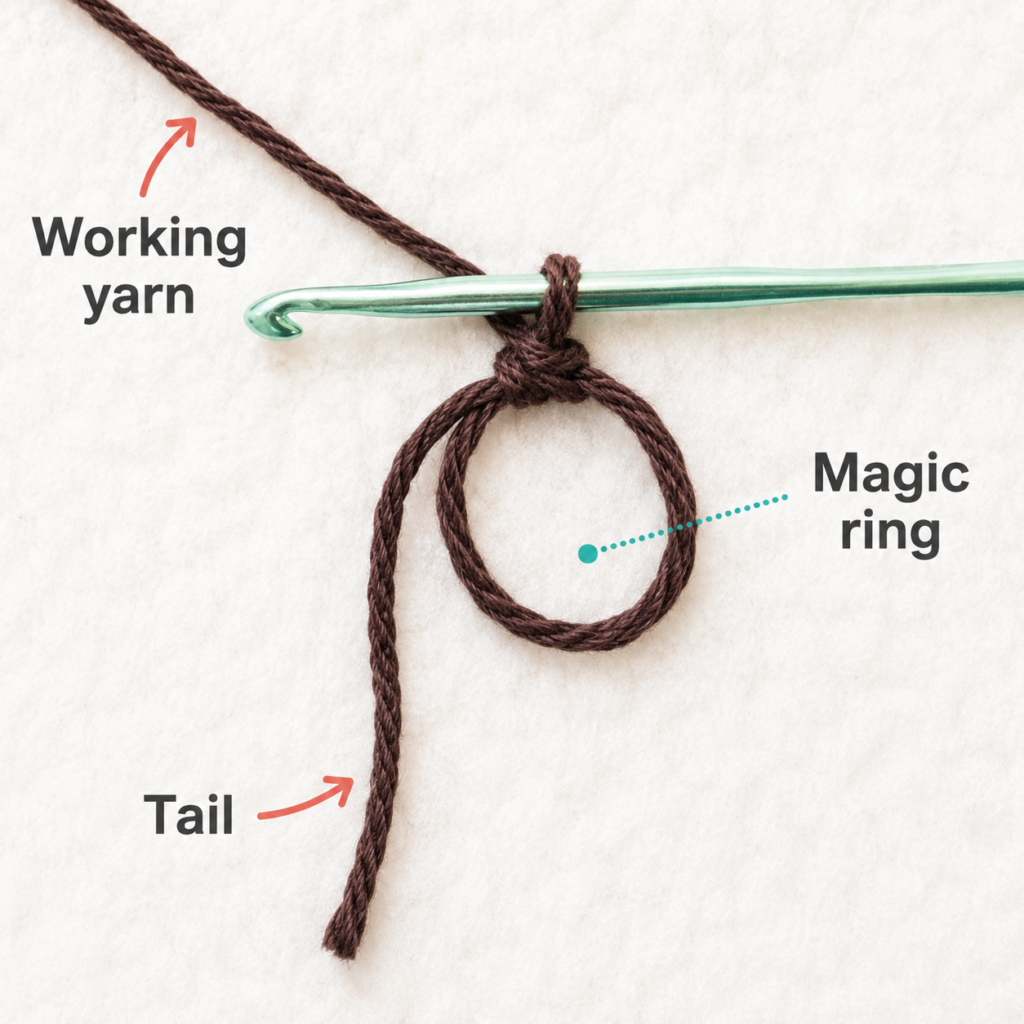
Using Color A — terracotta, create a magic ring.
Round 1
Ch 2. This beginning chain is only for height and does not count as a stitch.
Work 14 dc into the magic ring.
Pull the yarn tail gently until the center closes.
Join with a sl st to the first dc.
Stitch count: 14 dc
The unusual 14-stitch center is intentional. It creates the fourteen-section rhythm that continues through the body and border.
Beginner tip: Before pulling the ring completely shut, count all 14 double crochets. Counting is much easier while the opening is still visible.
Common mistake to avoid: Do not join into the top of the beginning ch-2. Join into the first actual double crochet.
Step 2: Add the Popcorn Flower Center
Change to Color B — goldenrod.
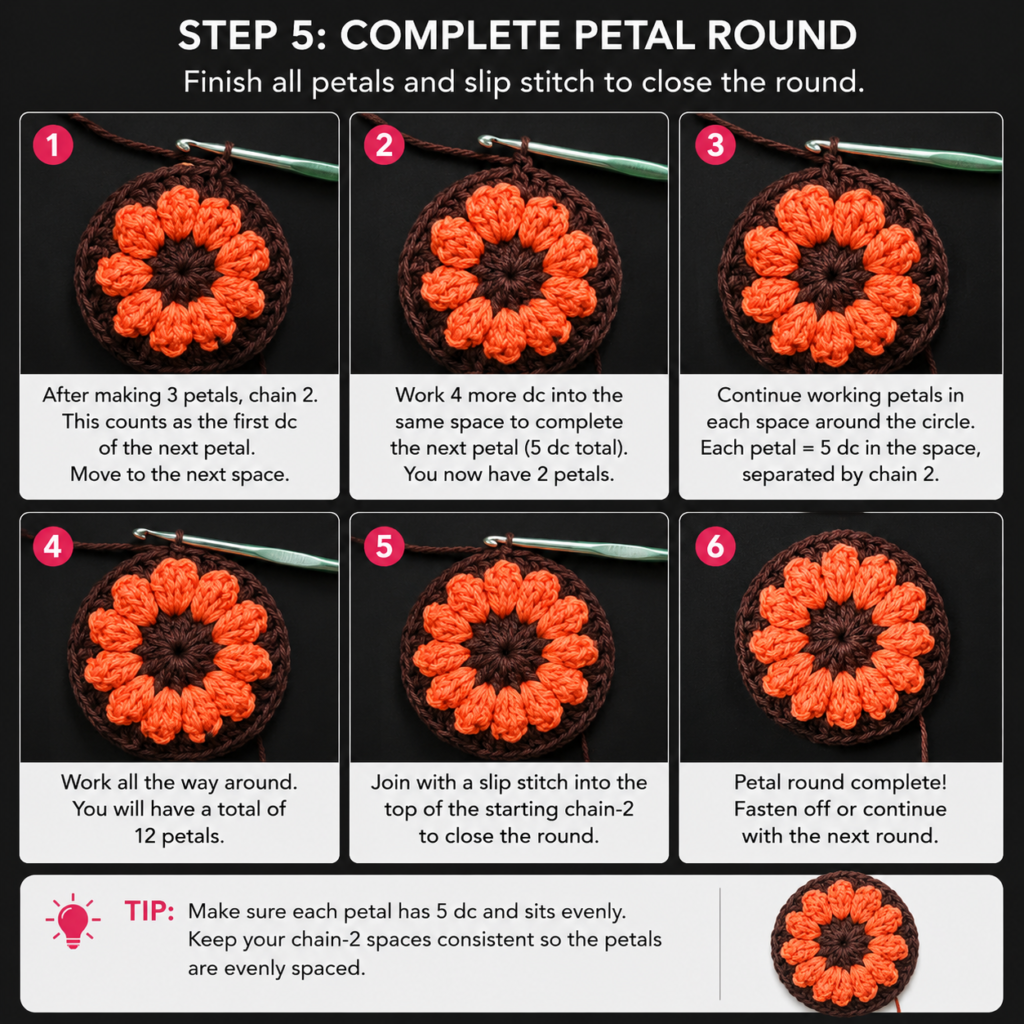
Round 2
Ch 2.
Work 1 popcorn stitch in the first stitch, ch 1.
Continue working:
[1 pc in next st, ch 1] around.
Join with a sl st to the first popcorn.
You should have:
- 14 popcorn stitches.
- 14 ch-1 spaces.
The popcorn stitches form a raised ring that becomes the visual center of the finished placemat.
Beginner tip: When you drop the loop to close a popcorn, make the loop slightly larger first. That makes it easier to pick up again.
Common mistake to avoid: Do not crochet the five double crochets into separate stitches. All five dc belong in the same base stitch.
Step 3: Build the Flat Foundation Disc
Change back to Color A.
Round 3
Attach the yarn in any ch-1 space.
Ch 2.
Work 2 dc into each ch-1 space around.
Join to the first dc.
Stitch count: 28 dc
Round 4
Ch 2.
Repeat:
[1 dc in next st, 2 dc in next st] around.
Join.
Stitch count: 42 dc
At this stage, the fabric should already resemble a small coaster.
Lay it on the table without stretching it. The edge should rest naturally rather than lifting sharply or forming strong waves.
Beginner tip: Think of an increase as simply placing two stitches where you would normally place one.
Common mistake to avoid: Avoid tightening the joining slip stitch more than the surrounding stitches. An overly tight join can create a visible dent.
Step 4: Add the First Raised Texture Round
Change to Color C — warm cream.
Round 5
Ch 2.
Repeat the following sequence 14 times:
FPdc around the next stitch, dc in the next stitch, 2 dc in the next stitch.
Join.
Stitch count: 56 stitches
The front-post stitches create subtle radial spokes.
How to make the FPdc
Yarn over.
Instead of inserting the hook through the top V of the stitch, move the hook:
- From the front of the fabric to the back.
- Around the vertical post of the stitch.
- Back out to the front.
Yarn over and complete the double crochet normally.
The stitch should sit slightly forward from the fabric.
Beginner tip: If you are unsure which post belongs to the next stitch, temporarily stretch the top edge very slightly with your fingers.
Common mistake to avoid: Do not work a regular dc into the top of the same stitch after making the FPdc unless the instructions explicitly tell you to. Each FPdc in this round replaces the normal stitch in that position.
Step 5: Grow the Placemat to Full Size
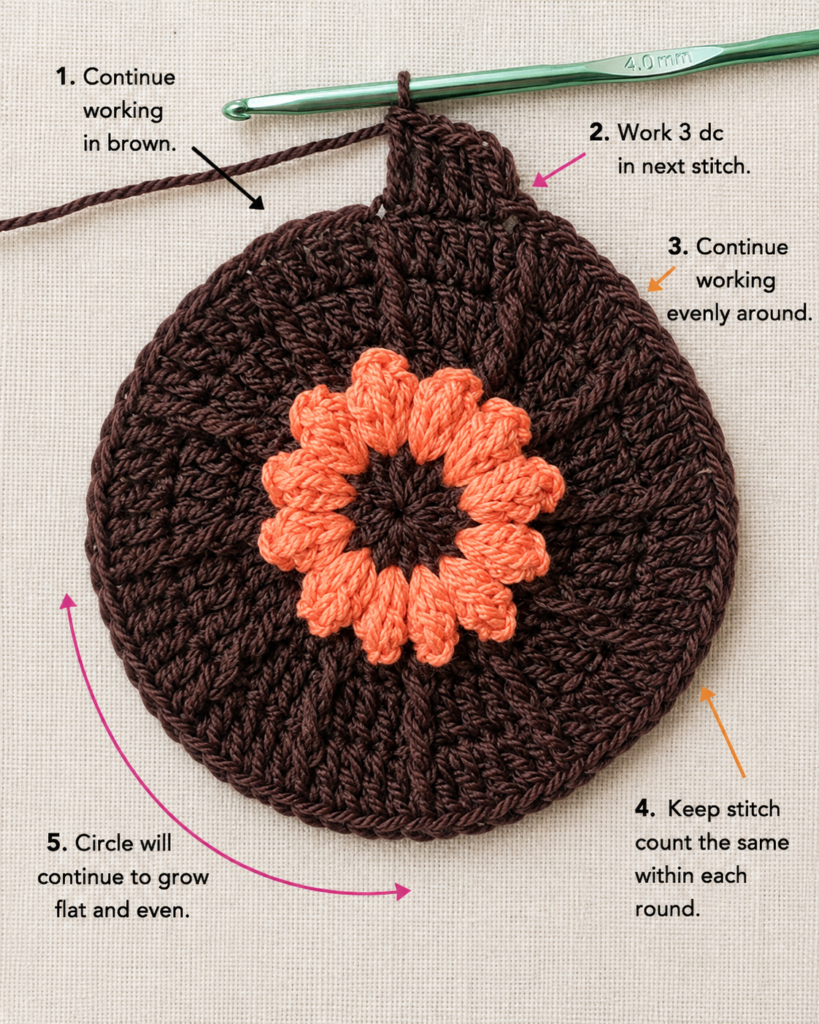
Return to Color A.
Round 6
Ch 2.
[Dc in next 3 sts, 2 dc in next st] around.
Join.
70 sts
Round 7
Ch 2.
[Dc in next 4 sts, 2 dc in next st] around.
Join.
84 sts
Change to Color B.
Round 8
Ch 2.
Repeat 14 times:
FPdc around next st, dc in next 4 sts, 2 dc in next st.
Join.
98 sts
Change back to Color A.
Round 9
Ch 2.
[Dc in next 6 sts, 2 dc in next st] around.
Join.
112 sts
Stop here and check the diameter.
Your placemat body should measure roughly 11–12 inches / 28–30 cm before the decorative border.
Flatness check
Place the piece on a level surface.
If the center and outer edge both touch the surface, continue.
If the placemat cups slightly but relaxes when gently smoothed, blocking may be enough.
If it strongly resembles a bowl, check your counts before making another round.
If it forms pronounced waves, you may be crocheting more loosely than the pattern gauge.
Beginner tip: Take a quick photograph from directly overhead. Waves and uneven areas are often easier to notice in a photograph than while the project is in your hands.
Common mistake to avoid: Do not keep adding increases simply because the edge lifts slightly while you are holding the piece. Always judge flatness with the work resting on a table.
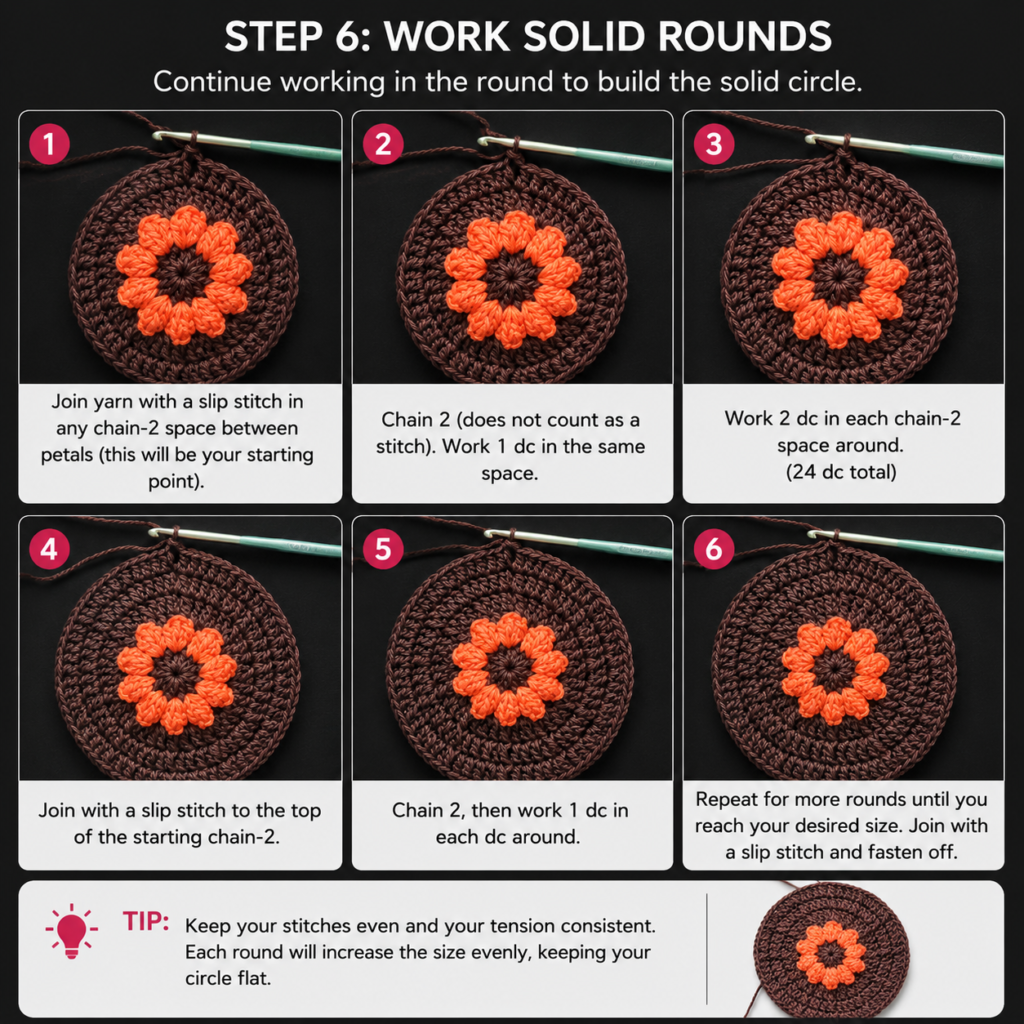
Step 6: Crochet the Open Chain-Loop Round
Change to Color C.
Round 10
Ch 1.
Repeat the following 28 times:
Sc in next st, ch 5, sk next 3 sts.
Join with a sl st to the first sc.
You now have 28 chain-5 spaces evenly distributed around the placemat.
These loops separate the dense central fabric from the decorative shells and give the border a lighter appearance.
Before moving on, count the loops.
You need an even number because the next round alternates a shell space with a valley space.
Beginner tip: Count the loops in groups of seven and place a stitch marker after each group. Four groups of seven equal 28.
Common mistake to avoid: Make sure the chain loops are loose enough to lie naturally. Very tight chains can pull the outer edge inward.
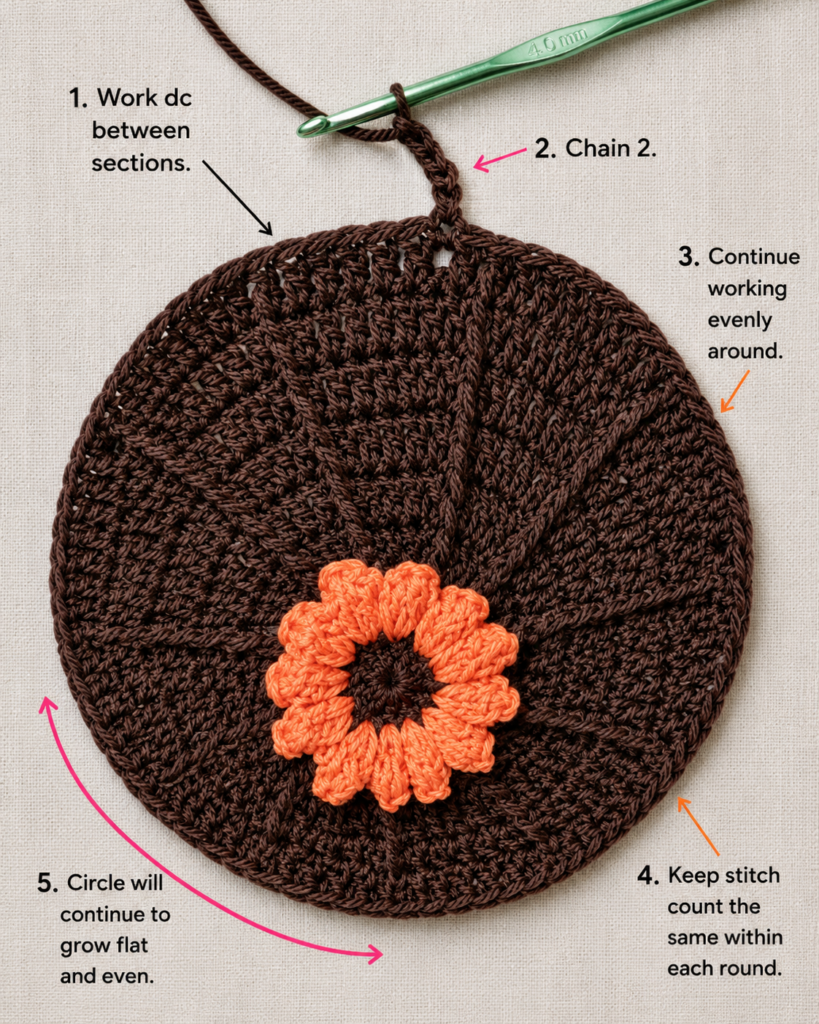
Step 7: Make the Golden Shell Border
Change to Color B.
Slip stitch into the first ch-5 space.
Round 11
Work 7 dc into the first ch-5 space.
Slip stitch into the next ch-5 space.
Then repeat:
[7 dc into next ch-5 space, sl st into next ch-5 space] around.
Join at the beginning.
You should finish with 14 shells.
Notice that every shell uses one chain space and the following chain space becomes its valley. That alternating construction keeps the shells separated instead of allowing them to merge into one continuous ruffle.
Beginner tip: After the first three shells, stop and look at the edge from above. The shells should open outward but should not fold over one another.
Common mistake to avoid: Do not place a shell in every chain space. Doing so would double the number of shells and cause significant ruffling.
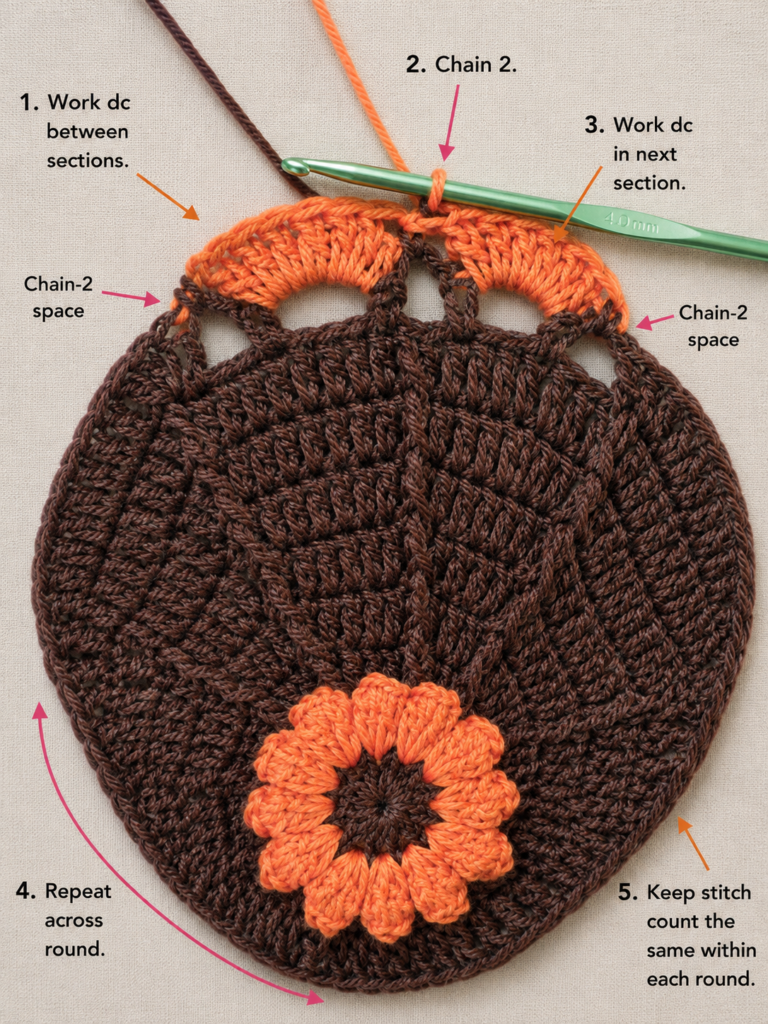
Step 8: Add the Picot Finish
Change to Color C.
Attach the cream yarn to the first dc of any shell.
For each shell:
- Sc in the first 3 dc.
- In the fourth dc, work 1 sc, picot.
- Sc in the final 3 dc.
- Work 1 sc into the valley chain space between shells.
Repeat around all 14 shells.
Join with a sl st to the first sc.
Fasten off.
The picots form small points at the center of every shell without adding a bulky final round.
Beginner tip: Keep the picot chains relaxed. Tight chains create hard little bumps rather than soft points.
Common mistake to avoid: Make every picot in the fourth dc of the seven-dc shell. If the picots shift left or right, the border will look uneven even when the stitch count is correct.
Pattern Notes or Stitch Notes
Turning-chain rule
This placemat is worked in joined rounds rather than turned rows.
The beginning ch-2 in the solid dc rounds does not count as a stitch.
Stitch-count progression
The main body counts are:
- Round 1: 14
- Round 3: 28
- Round 4: 42
- Round 5: 56
- Round 6: 70
- Round 7: 84
- Round 8: 98
- Round 9: 112
The regular increase rhythm is what allows the circle to expand.
Repeat structure
The design is based on 14 sections.
Keeping that number consistent gives you:
- 14 popcorns.
- 14 textured spoke sections.
- 28 chain loops.
- 14 decorative shells.
- 14 final picot points.
Right side / wrong side
The front, where the popcorns and front-post ridges project toward you, is the right side.
Keep the right side facing you for the entire project.
Making the placemat larger
If you want a larger dinner placemat, add another dc increase round before Round 10.
Do not simply add more shell repeats without adjusting the chain-loop math.
A straightforward larger body round after 112 stitches would be:
[Dc in next 7 sts, 2 dc in next] around = 126 sts.
You would then need to redesign the chain-loop spacing so the resulting number of loops remains even.
Common Beginner Mistakes
1. The center hole will not close
The magic ring may have been crocheted around the wrong strand, or the tail may have become trapped.
Fix: Before adding the second round, gently pull the tail. If it does not move, redo Round 1 rather than forcing it.
2. The popcorn stitches look flat
Usually the five dc have not been properly closed together.
Fix: After working five dc in one stitch, close the group by pulling the last loop through the first dc before making the securing chain.
3. The placemat looks like a bowl
First recount your stitches.
If the counts are correct, your tension may be tighter than intended.
Fix: Try a hook 0.5 mm larger.
4. The placemat is ruffling
Ruffling usually means there is too much fabric around the circumference.
Fix: Confirm that you have not accidentally worked increases more frequently than instructed.
5. The joining seam drifts sideways
You may be joining into the beginning chain instead of the first actual stitch.
Fix: Mark the first real stitch immediately after making the beginning chain.
6. The front-post stitches disappear
You may be inserting the hook into the top loops rather than around the stitch post.
Fix: Look for the vertical body of the stitch one round below the top V.
7. The shell border is extremely wavy
The most common reason is placing seven dc into every chain space.
Fix: The pattern alternates one shell space, one valley space.
How to Customize This Crochet Project
Change the yarn
Cotton is my first choice for a placemat because it creates clear stitches and a useful table-mat texture.
A cotton-acrylic blend can also work, although it may feel softer.
If you use a much heavier yarn, your finished diameter will increase considerably.
Change the colors
Some autumn combinations to try:
- Pumpkin + chocolate + oatmeal.
- Burgundy + camel + cream.
- Rust + olive + natural.
- Mustard + warm gray + ivory.
- Cinnamon + dark teal + beige.
For a minimalist version, crochet the complete placemat in one natural cotton color and allow the popcorns, spokes, shells, and picots to provide the contrast through texture.
Change the size
For a smaller charger or centerpiece mat, stop the solid-body section after Round 8 and redesign the chain-loop spacing to fit the available stitch count.
For a full dinner placemat, aim for approximately 13–15 inches depending on your dishes.
Change the border
If shells feel too decorative, finish after Round 10 with one or two rounds of single crochet.
For a more rustic edge, replace the picots with reverse single crochet.
For a softer floral look, use five dc rather than seven dc in each shell.
Change the texture
You can replace the front-post dc with regular dc for an easier version.
Alternatively, work the front-post rounds in your contrast color so the spokes become more obvious.
Gift and use ideas
Make a set of four for a housewarming gift.
Pair two placemats with coordinating handmade coasters for a fall hostess gift.
Use one oversized mat beneath a vase, pumpkin arrangement, or candle centerpiece.
Finishing Instructions
After the final slip stitch, cut the yarn leaving a tail approximately 6 inches / 15 cm long.
Pull the tail completely through the active loop.
Thread the tail onto a tapestry needle.
Weave it back and forth through the wrong-side stitches, changing direction at least once so the end cannot easily work loose.
Repeat for every color-change tail.
Avoid trimming the ends immediately after only one pass through the fabric.
Blocking
Blocking is worthwhile because the border contains open loops and shells.
Lightly wet the cotton placemat or use the care method recommended on your yarn label.
Gently press out excess water in a towel. Do not wring.
Lay the placemat right side up on a blocking mat.
Smooth it into a true circle.
Pin the fourteen picot points evenly if necessary.
Allow it to dry completely before removing the pins.
The Craft Yarn Council recommends checking the yarn’s care directions before blocking and notes that cotton should be handled carefully because it has relatively little natural resilience and can be overstretched.
Finished Crochet Autumn Placemat
Once blocked, the different stitch sections should be easy to see: a raised floral center, smooth expanding body, subtle radial texture, open transition round, golden shells, and small cream points around the perimeter.
Quick Printable-Style Summary
Skill level: Confident beginner
Finished size: Approx. 13–14 in / 33–35 cm
Yarn: Medium-weight cotton (#4)
Hook: 4.5 mm
Colors: Terracotta, goldenrod, warm cream
Main stitches: dc, sc, popcorn, FPdc, chain spaces, shell, picot
Starting method: Magic ring with 14 dc
Construction: Center-out joined rounds
Body progression: 14 → 28 → 42 → 56 → 70 → 84 → 98 → 112 stitches
Decorative edge: 28 chain loops → 14 shells → 14 picots
Finishing: Fasten off, weave in every end, lightly wet block to a flat circle
FAQ
Is this crochet autumn placemat pattern suitable for beginners?
Yes, provided you already know basic chain and double crochet stitches. The popcorn and front-post stitches may be new, but both are repeated in predictable locations.
What yarn is best for crochet placemats?
Cotton is particularly useful because it has good stitch definition and can create a relatively firm fabric. Always check the care label for washing and heat instructions.
Can I use acrylic yarn?
Technically yes, but it will behave differently from cotton. It may be softer and more flexible, and you should be particularly careful about heat near hot serving dishes.
How much yarn do I need for one placemat?
Allow approximately 170–220 yards total of medium-weight cotton. Actual consumption depends on gauge, yarn construction, and finished diameter.
Why is my crochet placemat curling?
Curling or cupping can come from insufficient circumference, tight tension, an undersized hook, or missing increases. Verify your stitch counts before changing the pattern.
Why is my placemat wavy?
A strongly wavy edge usually means there is too much circumference. Check for accidental extra increases or an overly loose tension.
Can I make matching coasters?
Yes. Use the same center motif but stop much earlier—before the placemat reaches its larger body rounds. Keeping the same colors will create an obvious matching table set.
Conclusion
A fall placemat is a useful project for learning circular crochet because the finished piece does more than practice a stitch—it becomes something you can actually use.
The combination of the terracotta body, golden textured details, open cream border, and small picot points gives this pattern a seasonal look without relying on literal pumpkin or leaf shapes. That also means the same construction can move into other seasons simply by changing the colors.
Make one first so you can check your preferred diameter and tension. Once you are happy with it, repeat the same hook, yarn, and gauge for the remaining placemats so the full set stays consistent.





