A crochet vest is one of the friendliest ways to move from scarves and blankets into handmade clothing. There are no sleeves to shape, you can check the fit before committing to the seams, and a slightly relaxed fit usually looks intentional rather than oversized.
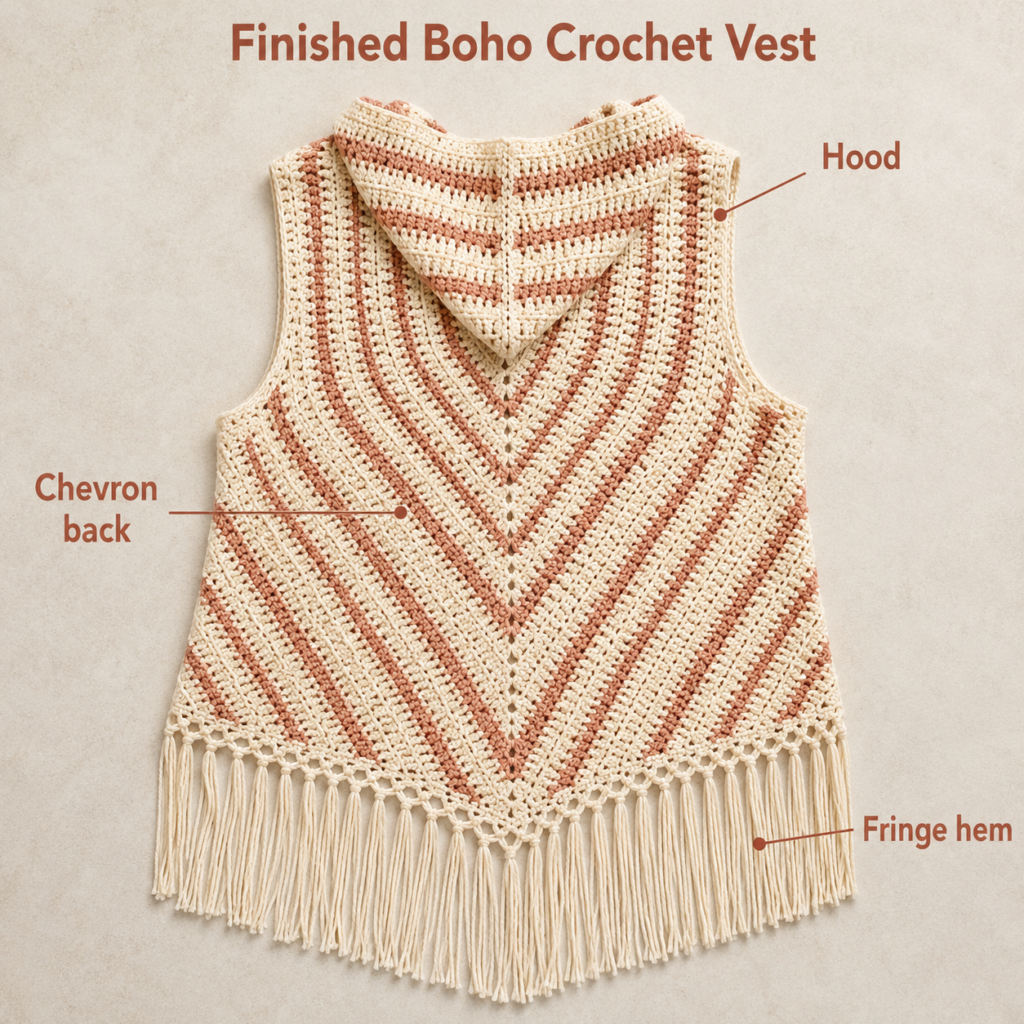
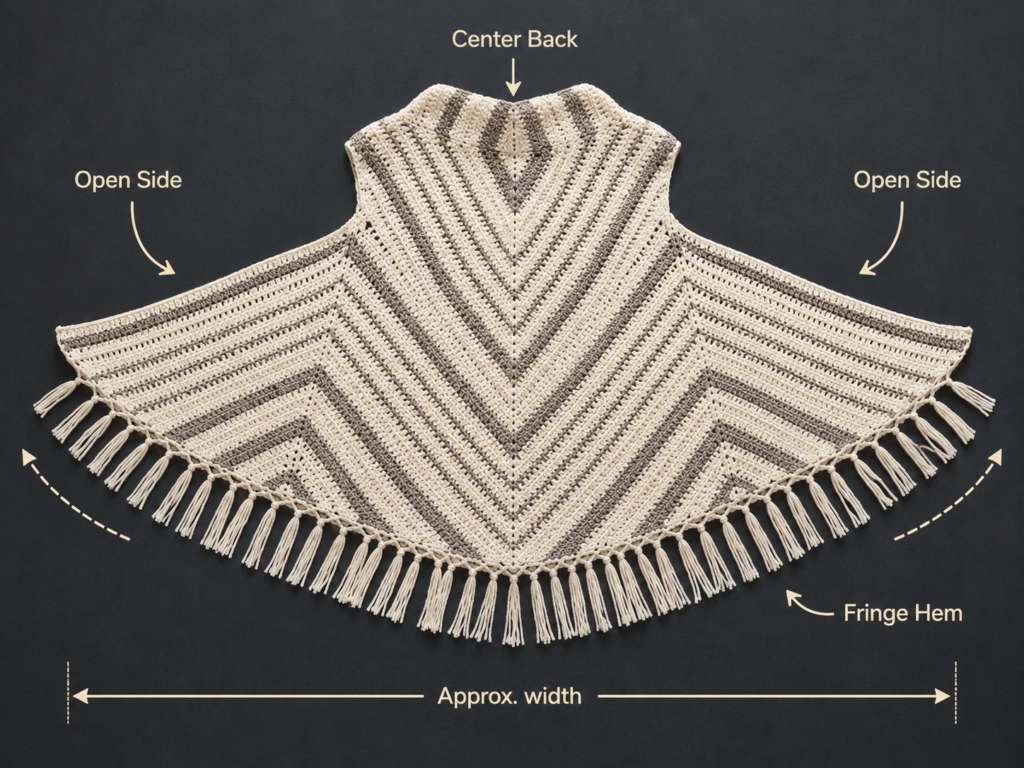
This crochet boho vest pattern takes that approachable idea one step further. Instead of making complicated shaped front and back pieces, you will crochet three simple triangular panels, arrange them into a draped vest, leave openings for your arms, and finish the hem with optional fringe.
The construction is inspired by the visual logic of triangular crochet vests, but the actual stitch pattern, sizing system, colors and instructions below are original. Rather than reproducing another designer’s row counts, this version is made to measurement, so you can stop each triangle when the proportions work for your body.
What You’ll Learn
- How to crochet a simple expanding triangle
- How to recognize the center increase
- How to make three panels the same size
- How to use stitch markers when assembling a garment
- How to test armhole depth before seaming
- How to crochet an even garment edging
- How to add simple fringe
- How to create decorative knotted fringe
- How to stabilize armholes
- How to customize the vest length and color placement
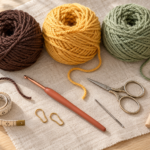
Materials You’ll Need
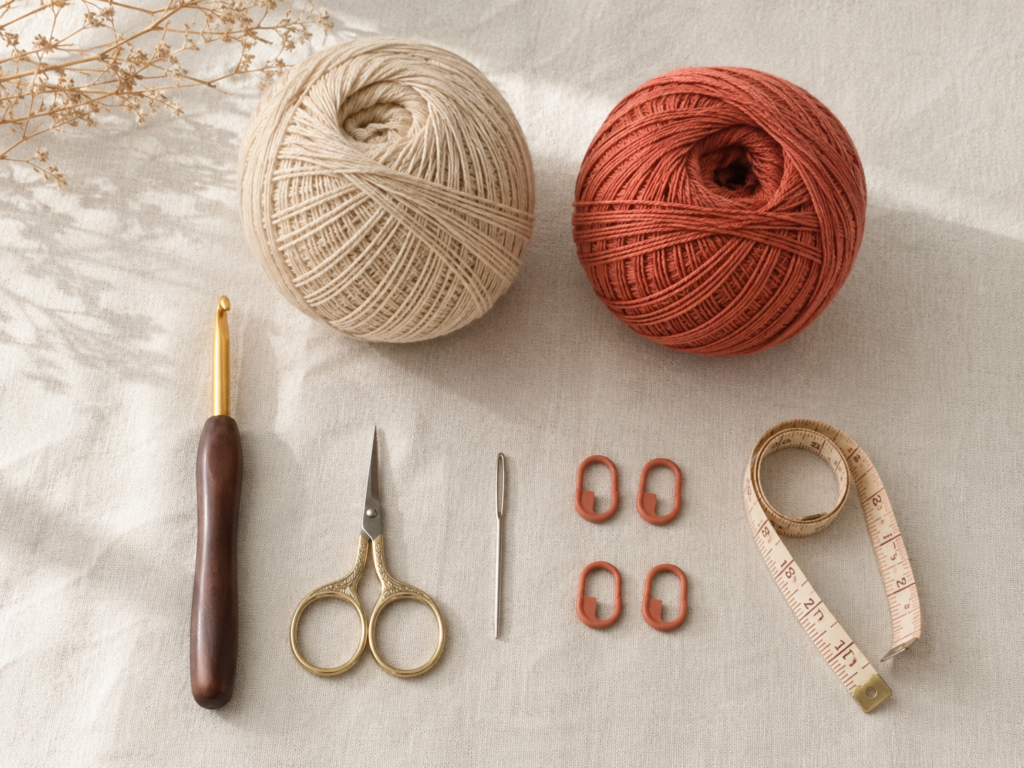
For a light, drapey vest, use a #3 light/DK cotton or cotton-blend yarn. Cotton keeps the stitch definition crisp, while a cotton-acrylic or cotton-bamboo blend can add softness and movement.
Plan on approximately 900–1,500 yards for an adult vest, depending on body size, desired length, fringe and yarn gauge. It is safer to buy an extra skein than to run short during the third panel.
You will also need:
- 5.5 mm crochet hook
- Scissors
- Tapestry or yarn needle
- 8–12 locking stitch markers
- Measuring tape
- Blocking mats or clean towels
- Rustproof pins if wet blocking
- Optional wooden toggle or button
- Optional small piece of cardboard for cutting fringe evenly
The Craft Yarn Council places light/DK yarn in category #3. Hook recommendations are only guidelines, so using a slightly roomy gauge for a vest is perfectly reasonable when you want more drape.
Crochet Abbreviations Used
This tutorial uses US crochet terminology.
- ch = chain
- dc = double crochet
- sc = single crochet
- sl st = slip stitch
- st/sts = stitch/stitches
- sp = space
- rep = repeat
- RS = right side
- WS = wrong side
These abbreviations correspond with standard US terminology used by the Craft Yarn Council.
Before You Start
Gauge and tension
Because this vest is made to measurement, you do not have to match a rigid stitch gauge. You do, however, need all three triangles to match each other.
Make six or seven practice rows before committing to the garment. The fabric should feel supple enough to bend easily over your hand.
If it feels stiff and board-like, move up 0.5 mm in hook size. If your stitches are extremely loose and the fabric stretches out of shape, move down 0.5 mm.
How to count the triangle
The most important feature is the center ch-2 space. Every row places an increase inside this space, and that increase keeps the triangle growing symmetrically.
Put a stitch marker in the center space if you have trouble spotting it.
Turning chain rule
The beginning ch 3 counts as the first dc.
Because it counts as a stitch, do not place another dc in the stitch directly underneath it.
Color choice
For a calm boho look, use one main neutral and one earthy accent:
- warm cream + terracotta
- sand + dusty blue
- ivory + olive
- oatmeal + faded rust
- mushroom + charcoal
Irregular narrow stripes often look more relaxed than perfectly alternating stripes.
US/UK terminology note
A US double crochet is called a treble crochet in UK terminology. If you normally follow UK patterns, pay special attention to this difference.
Step-by-Step Crochet Tutorial
Step 1: Make a Small Swatch and Decide Your Length
Before making three large panels, crochet six to eight rows of the triangle pattern below.
Wash or dampen the sample the way you intend to wash the finished vest, allow it to dry, and check the drape.
Then decide where you want the finished points to fall: natural waist, upper hip, mid-hip or longer.
For a typical adult vest, a triangle height in the 20–27 inch range after blocking creates a useful starting point, but do not treat this as a fixed size chart. Your torso length and preferred styling matter more.
Beginner tip: Write down your hook size and yarn before continuing. A surprising number of mismatched garment panels happen because the second panel is worked weeks later with a different hook.
Common mistake to avoid: Do not measure a stretched triangle. Place it flat with no tension before taking measurements.
Step 2: Start the First Triangle
With your main color:
Foundation: Ch 3.
Row 1: Work 3 dc in the third chain from the hook, ch 2, then work 3 dc into the same chain. Turn.
You now have two groups of three double crochet stitches separated by a clear center ch-2 space.
Do not worry if the first row looks tiny. The shape becomes obvious after several repeats.
Beginner tip: Place a locking marker directly through the center ch-2 space.
Common mistake to avoid: Do not accidentally work into one of the dc stitches instead of the center space. The center increase must always go into the ch-2 opening.
Step 3: Grow the Triangle
For every remaining triangle row:
Repeat Row: Ch 3 and turn. The ch 3 counts as the first dc. Skip the first dc directly beneath the turning chain. Dc in every dc until you reach the center ch-2 sp. Work 2 dc, ch 2, 2 dc into the center space. Dc in every remaining stitch across.
Turn.
Each repeat adds four double crochet stitches at the center, so the panel gradually widens while keeping a clear point.
Continue until the triangle reaches your planned height.
Measure from the center point vertically to the widest edge while the piece lies flat.
Beginner tip: Count several rows on both sides of the center periodically. If one side contains a different number of stitches than the other, look backward for a missed stitch.
Common mistake to avoid: The last stitch of a row can hide in the top of the previous turning chain. Missing it repeatedly makes one edge shrink inward.
Step 4: Add Stripes and Make Two More Triangles
You can keep the vest completely solid, but subtle stripes immediately push the design toward a relaxed boho look.
A useful rhythm is:
- 5 rows main color
- 2 rows contrast
- 6 rows main
- 1 row contrast
- 4 rows main
- 2 rows contrast
You do not need to follow that sequence exactly.
Change colors at the final yarn-over of the last dc in a row so the new color is ready before you turn.
Once the first triangle reaches the desired dimensions, fasten off and record:
- total row count
- triangle height
- widest-edge measurement
- color-change rows
Then make two more identical triangles.
Lay all three on top of one another before assembly. Their points, top edges and side edges should align reasonably well.
Beginner tip: Follow your recorded row count rather than measuring every row of panels two and three.
Common mistake to avoid: Do not assume two triangles are identical because they contain the same number of rows if you changed hook or tension halfway through.
Step 5: Block the Panels Before Assembly
Blocking now is much easier than trying to force three uneven panels into alignment later.
For cotton or cotton-rich yarn, lightly wet the panels, gently remove excess water in a towel, and lay them flat.
Shape all three to identical measurements.
Pin if necessary and allow them to dry completely.
Always check the yarn label before applying heat. Lion Brand specifically notes that blocking method depends on fiber content and cautions that acrylic is heat-sensitive.
Beginner tip: Stack one dry blocked triangle over another. This is the fastest way to find an extra row or stretched corner.
Common mistake to avoid: Do not hang wet crochet garments to dry. The weight of the water can stretch them dramatically.
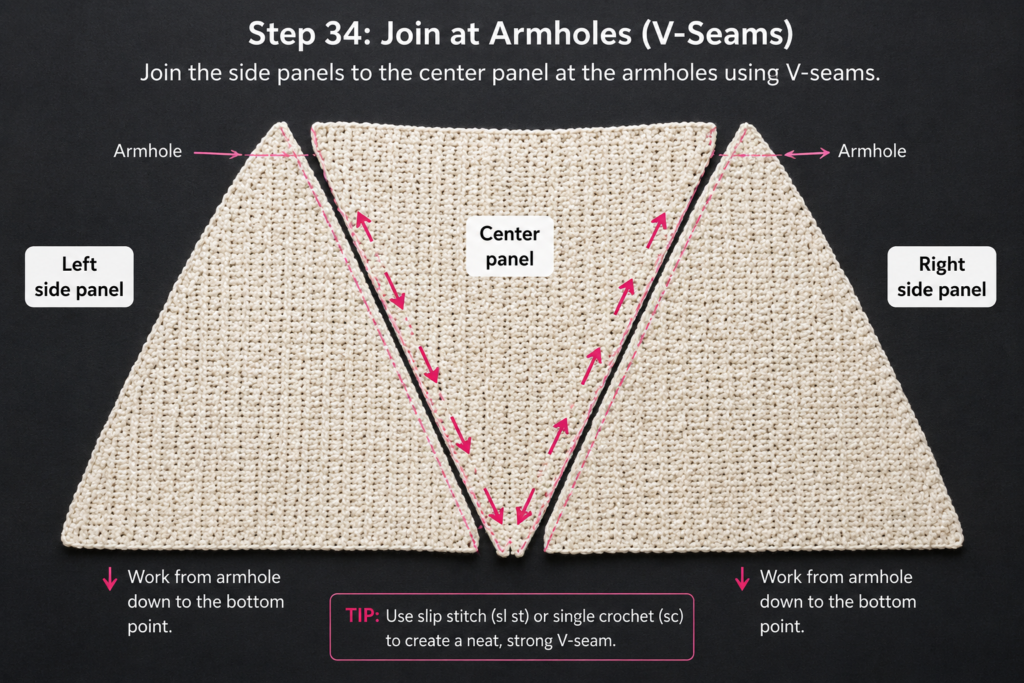
Step 6: Arrange the Vest and Mark the Armholes
Place one triangle as the back panel with its point hanging toward the lower back.
Position the two remaining triangles as the left and right fronts.
The upper portions should overlap the back panel around the shoulder area, while the lower edges can fall freely toward the front.
Use locking stitch markers to temporarily join the pieces.
Before sewing anything permanently, put the vest on over a fitted T-shirt.
For each side, leave an arm opening approximately 8–11 inches deep, adjusting to your body and layering preference.
Raise your arms.
Reach forward.
Sit down.
The armhole should not cut into your underarm or pull the back upward.
Mark the beginning and end of each seam with stitch markers.
Beginner tip: Fit with markers first. Crochet seams are much easier to move before they are sewn.
Common mistake to avoid: Making the armholes too small is far more common than making them too large.
Step 7: Seam the Panels
Turn the vest so the wrong sides face outward if you want the seam concealed inside.
Thread a yarn needle with a strand roughly three times the length of the planned seam.
Use mattress stitch or a simple whip stitch, moving back and forth between corresponding edge stitches.
Do not pull tightly after every stitch. Sew several stitches, then gently snug the seam until the edges meet without bunching.
Repeat for the other side.
Turn the garment right side out and try it on again.
Beginner tip: A flexible seam is better than an extremely tight seam in a loose summer garment.
Common mistake to avoid: If the seam shortens the side noticeably, you are pulling your sewing yarn too tightly.
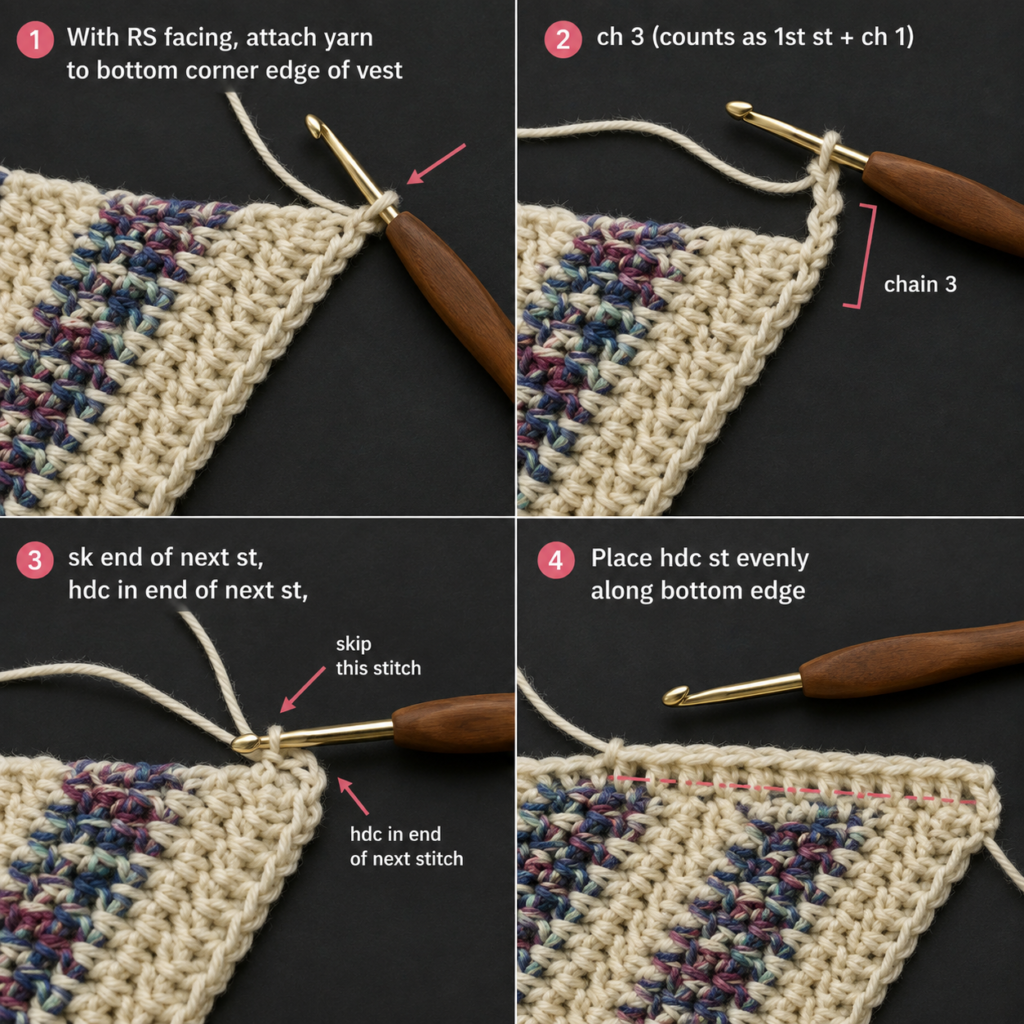
Step 8: Crochet an Even Bottom Edging
The lower edges of triangular panels can look slightly irregular after assembly. A simple edging creates a deliberate base for fringe.
Attach the main yarn at one lower front corner.
Work sc, ch 1 repeatedly along the entire lower edge, spacing the sc stitches evenly.
When working into row ends, you are not required to place exactly one stitch in every visible hole. Judge the fabric.
Stop every few inches and lay the edge flat.
If it curls inward, you need slightly more spacing.
If it forms waves or ruffles, you have too many stitches.
Fasten off once you reach the opposite front.
Beginner tip: Flatness is more important than an exact stitch count when edging raw row ends.
Common mistake to avoid: Stuffing too many stitches around corners produces unwanted ruffles.
Step 9: Add the Fringe
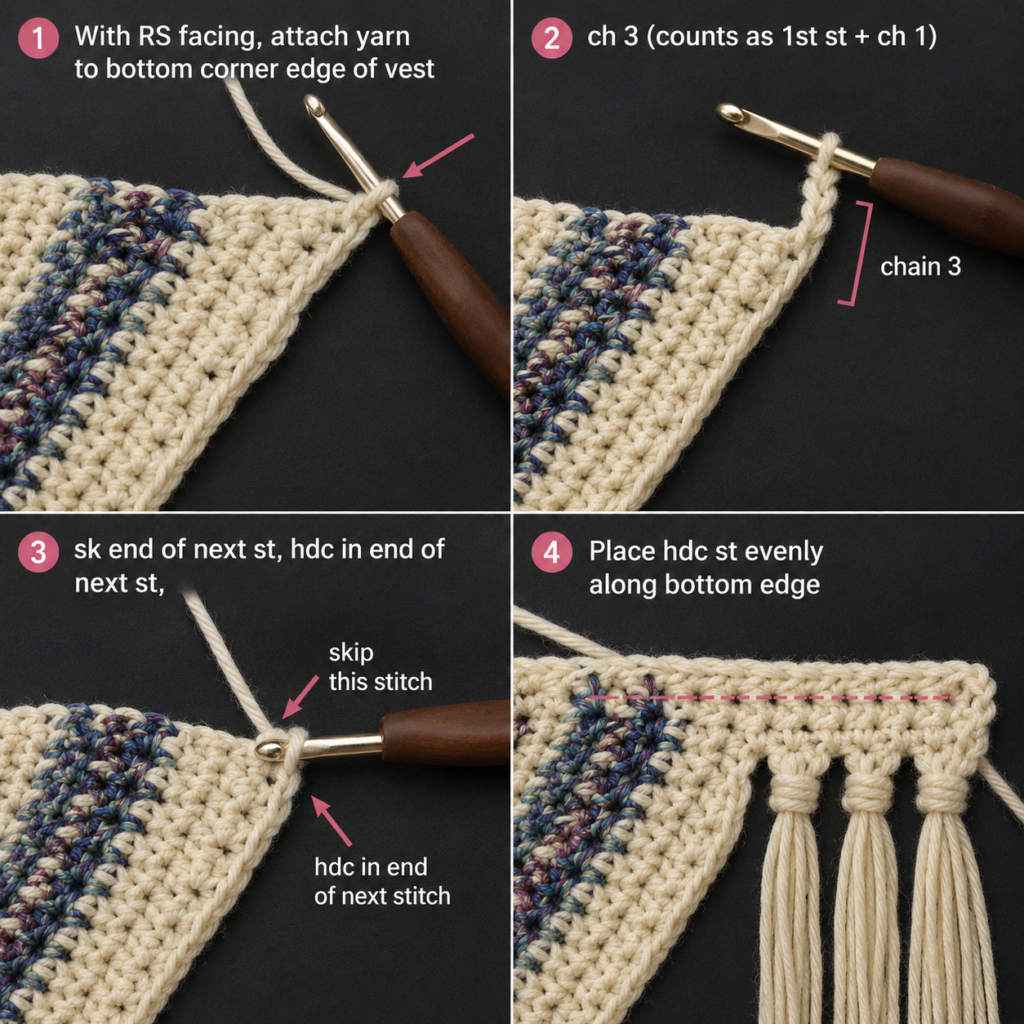
Cut yarn pieces approximately 14–18 inches long, depending on how dramatic you want the fringe.
For each fringe bundle:
- Gather four strands.
- Fold them in half.
- Insert the crochet hook through one ch-1 edging space.
- Catch the folded center.
- Pull the loop partly through.
- Pass all loose ends through the loop.
- Pull gently to secure.
Skip one edging space if the fringe looks crowded.
Continue across the hem.
Remember that folded strands become approximately half their cutting length, minus the knot.
Beginner tip: Wrap yarn repeatedly around a piece of cardboard and cut along one edge to prepare equal-length strands quickly.
Common mistake to avoid: Do not trim every individual bundle immediately. Wait until all fringe is attached, hang the vest, then trim the whole hem together.
Step 10: Add Optional Decorative Knots
Plain fringe already gives the vest a boho finish, so you can stop there.
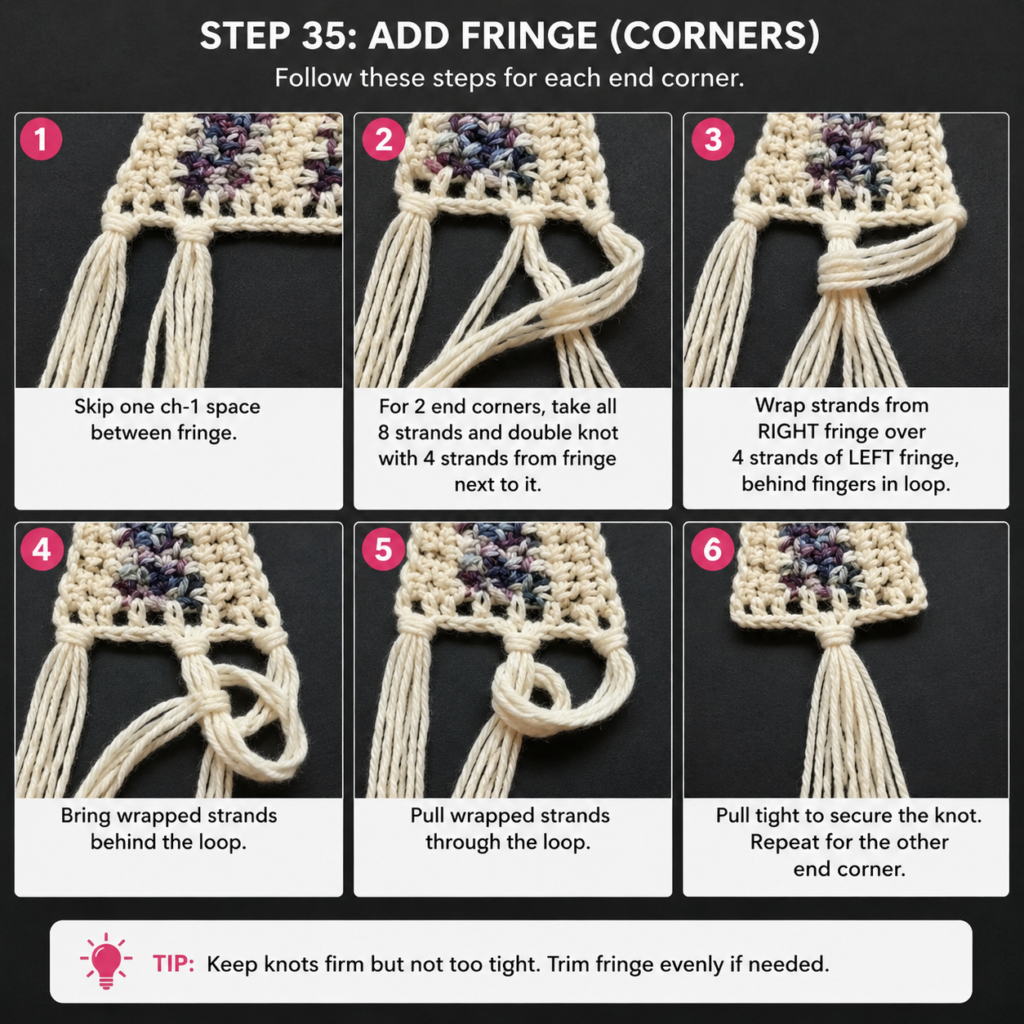
For a more macramé-inspired look, make a second row of knots.
Take half the strands from one fringe bundle and half from the neighboring bundle.
Tie them together approximately 1.5–2 inches below the attachment point.
Repeat across the garment.
The resulting staggered knots form a subtle diamond effect.
Keep each knot at approximately the same height.
Beginner tip: Place a ruler under the fringe while knotting to keep the row level.
Common mistake to avoid: Pulling one knot much tighter than the others makes the hem look uneven.
Step 11: Add an Optional Front Closure
The vest can be worn completely open, but one small closure can help it stay positioned.
Try the vest on and decide where the front panels naturally meet.
Mark that point.
Options include:
- wooden toggle
- medium button
- crochet chain tie
- braided yarn tie
- narrow leather-style cord
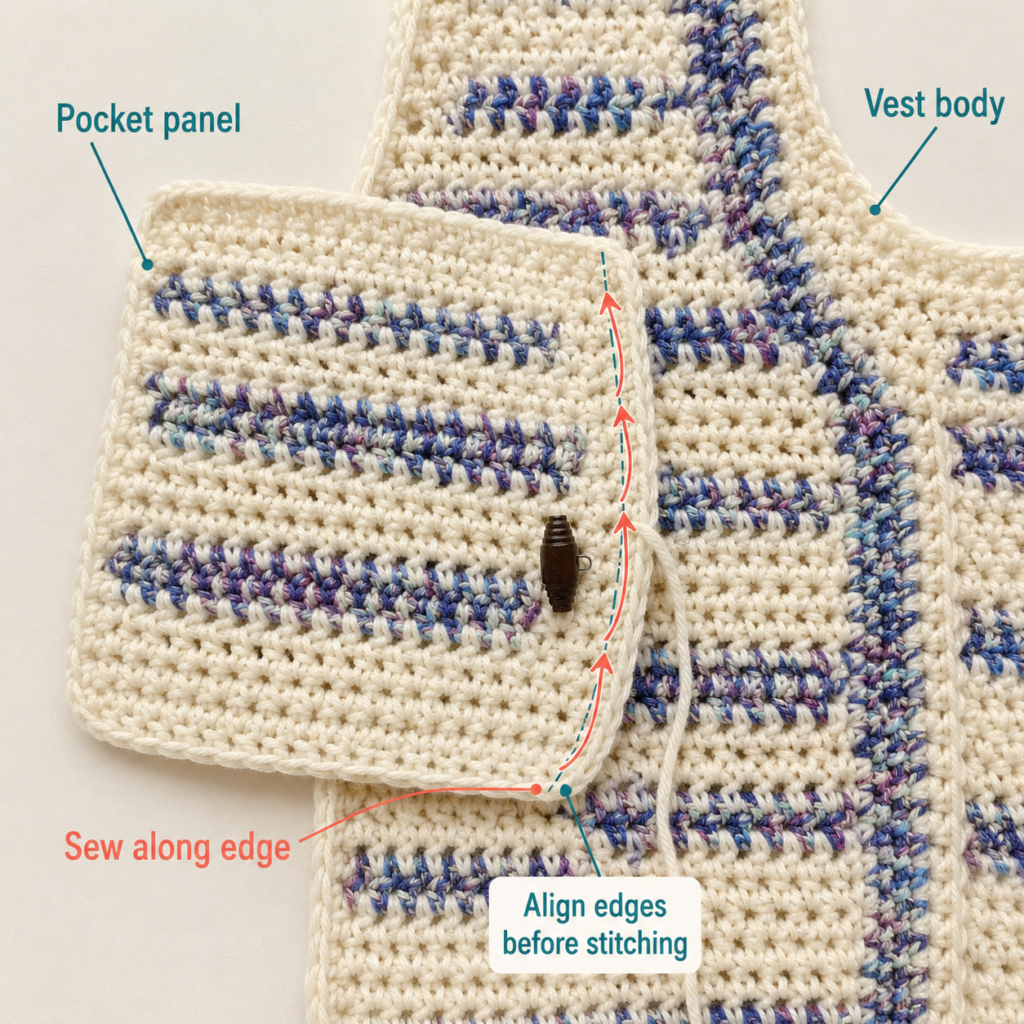
If using a button or toggle, sew it through sturdy crochet stitches rather than a loose chain space.
On the opposite side, use an existing opening as the buttonhole if it fits securely, or crochet a small chain loop.
Beginner tip: Test the closure with the vest on before sewing it permanently.
Common mistake to avoid: A heavy button can stretch a loose openwork edge. Keep hardware light.
Pattern Notes or Stitch Notes
Turning chain: Ch 3 counts as the first dc.
Stitch count: The triangle gains four dc stitches on each repeat row because of the center increase.
Repeat pattern: After Row 1, repeat the same center-increase row until the panel reaches the desired measurement.
Right side/wrong side: Because rows are turned, both faces are visually usable. Choose the side you prefer as the RS and keep all three panels oriented the same way before seaming.
Size adjustment: Add rows to make all three triangles larger. Remove rows to make them smaller.
Length adjustment: Triangle size affects both overall drape and coverage, so test the panel against your body before making panels two and three.
Fringe: Optional. Removing it creates a cleaner everyday vest.
Ease: This design is intended to drape rather than fit tightly. Trying the marked garment on before sewing is more reliable than relying only on bust size.
Common Beginner Mistakes
- Losing the center ch-2 space.
Place a marker in it and move the marker upward after every row. - Missing the final stitch.
The top of the turning chain can be hard to see. Count both sides of the triangle occasionally. - Making panels at different tension.
Complete all three with the same hook and preferably within a similar period of time. - Skipping blocking before assembly.
Blocking reveals the true dimensions of each panel and makes mismatches easier to correct. - Making armholes too tight.
Pin the garment and physically move your arms before sewing. - Pulling seams too tightly.
A rigid seam can distort an otherwise soft garment. - Crowding the hem edging.
If the bottom forms waves, remove a few stitches rather than hoping blocking will fix severe ruffling. - Cutting fringe too short.
Remember that the strand is folded in half when attached.
How to Customize This Crochet Project
Change the yarn
Cotton gives crisp stitch definition. Bamboo blends create more shine and movement. Acrylic can make the vest lighter and easier to care for.
Avoid very heavy yarn for a long fringed vest; the finished garment may stretch under its own weight.
Change the colors
Try:
- cream + faded rust for desert boho
- ivory + sage for soft botanical style
- oatmeal + charcoal for modern neutral
- tan + turquoise for Southwest-inspired color
- one solid natural shade for minimalist boho
Change the length
For a cropped version, stop the triangles earlier.
For a long festival vest, keep increasing the panels and use longer fringe.
Leave off the fringe
Without fringe, the same construction becomes a relaxed layering vest that works with jeans, dresses and long-sleeved shirts.
Add a contrasting border
Work one final round of sc in the accent color around the front openings and armholes.
Add a tie instead of a button
Ch a long cord and slip stitch back across it for strength. Make two and sew one to each front.
Gift idea
Because this garment is loose and adjustable, it is more forgiving as a handmade gift than a fitted pullover.
Finishing Instructions
Weave every loose yarn tail toward the wrong side, changing direction once or twice so the end cannot easily pull out.
Next, stabilize the armholes.
Attach the main color at the bottom of an armhole and work one round of sc evenly around the opening.
Join with a sl st.
Repeat for the second armhole.
Do not crowd stitches around the curves.
Final blocking
Wash or damp-block according to your yarn label.
Arrange the vest flat, straighten the front edges, shape both armholes similarly and comb the fringe with your fingers.
Let it dry completely before trimming the fringe.
If needed, place the dry vest on a hanger only long enough to check the hem. For storage, folding is generally safer for a heavy crochet garment.
Washing and care
Follow the yarn manufacturer’s care instructions. If uncertain, gentle hand washing in cool water and flat drying is the conservative option.
Quick Printable-Style Summary
Skill level: Advanced beginner
Yarn: #3 lightweight cotton or cotton-blend yarn
Hook: 5.5 mm or size needed for a soft drape
Main stitches: ch, dc, sc, sl st
Starting method: Ch 3; work two 3-dc groups separated by a center ch-2 space into the third chain.
Triangle repeat: Ch 3, work dc across to center, work 2 dc/ch 2/2 dc into center space, continue dc across.
Make: Three matching triangles.
Sizing: Repeat triangle row until each panel reaches the desired garment measurement.
Assembly: Pin three panels together; leave comfortable armhole openings; try on; seam only after fit is confirmed.
Edging: Work evenly spaced sc/ch-1 around lower edge.
Fringe: Add folded yarn bundles to edging spaces.
Finishing: Sc around armholes, weave in ends, block and trim fringe.
FAQ
Is this crochet boho vest pattern suitable for beginners?
Yes, if you can chain and make double crochet stitches. The garment uses very little shaping because the shape comes from repeating the same center increase. The assembly stage requires patience but no advanced garment technique.
What yarn is best for a crochet boho vest?
A lightweight cotton, cotton-acrylic, linen blend or bamboo blend works especially well because the garment needs drape. Very stiff yarn will make the triangular sections stand away from the body.
How much yarn do I need?
Approximately 900–1,500 yards is a practical starting range for many adult sizes, but body size, panel length, yarn thickness and fringe can change usage considerably. Buy extra if you plan a long vest or dense fringe.
Can I make the vest without fringe?
Absolutely. Finish the hem with one or two neat crochet rounds and stop there. The vest will look cleaner and more contemporary.
How do I make the vest larger?
Add more repeat rows to all three triangles. Check fit by pinning the panels before committing to seams.
Why is my crochet triangle leaning to one side?
You have probably missed a stitch at an outer edge or accidentally placed the center increase in the wrong space. Count the stitches on both sides of the center.
Why is my bottom edging ruffling?
Too many stitches are being worked into the raw edge. Remove the edging and space the anchor stitches farther apart.
Conclusion
A boho vest does not need complicated shaping to look intentional. Three simple triangles, careful fit checks and a little fringe can create a garment with far more personality than the individual stitches suggest.
The key is to resist rushing the assembly. Make the three panels match, block them first, pin the vest on your body, and only then commit to the seams. Once those proportions work, the edging, fringe and optional closure become the enjoyable finishing details.
Save the tutorial if you want to experiment later with a solid-color version, a cropped version, or a longer festival-style vest.




Do you have an image of the 3 triangles coming together? I’m more of a visual learner.
Thank you