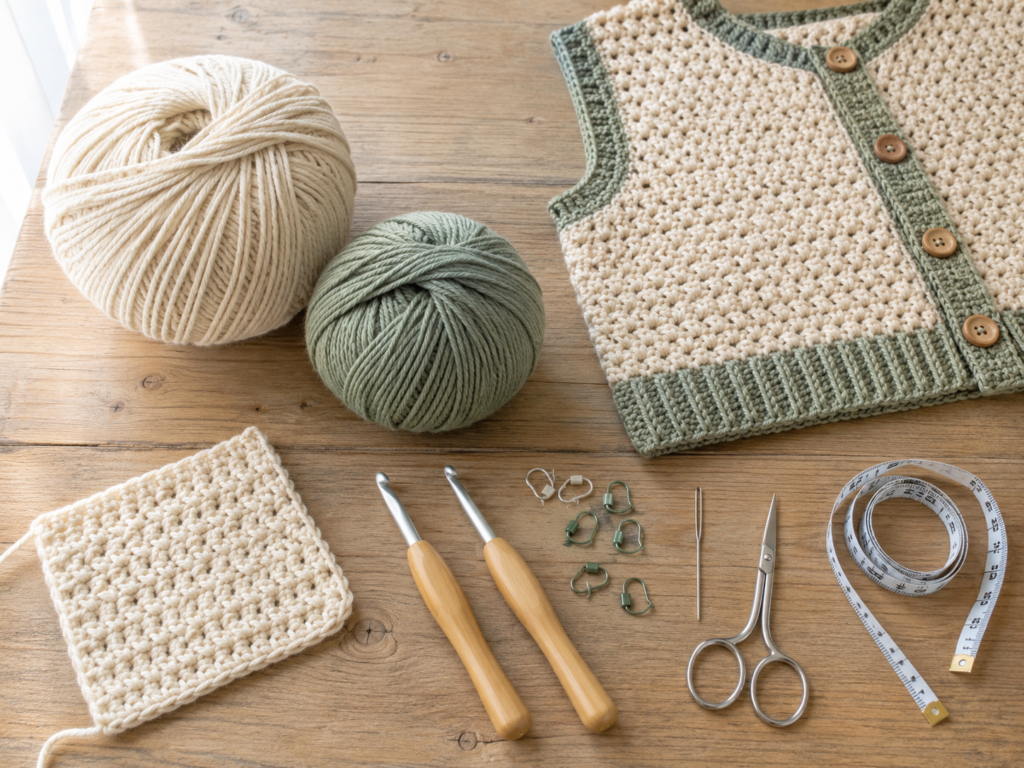
A crochet vest is one of the best first wearable projects because it gives you the satisfaction of making clothing without the extra complication of sleeves. You still learn real garment skills: measuring, making panels, shaping armholes, creating a neckline, seaming, adding ribbing, and finishing the fabric so it looks neat enough to wear.
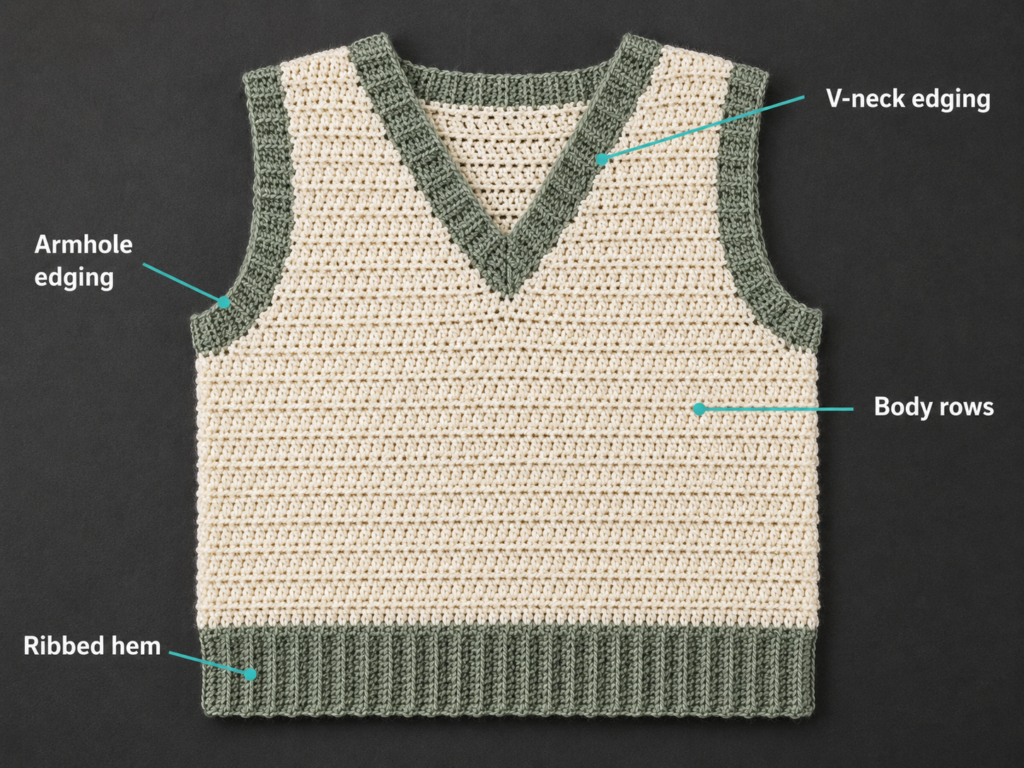
This beginner-friendly crochet vest pattern is designed as a simple sleeveless sweater vest with a cream body and contrasting ribbed edges. The shape is classic: a straight lower body, open armholes, shoulder seams, side seams, and a soft V-neck. The fabric is worked mostly in half double crochet, which creates a flexible, medium-density texture that is easier to manage than lace and faster than single crochet.
The selected visual reference for this tutorial is a professional Leelee Knits crochet vest tutorial. That source uses flat front and back panels, shoulder and side seams, and ribbing added around the waistline, armholes, and neckline. This article uses that construction flow only as a visual learning reference and creates a new original beginner pattern with different instructions, sizing method, and image prompts.
The sample size below is written as a made-to-measure beginner vest. Instead of forcing you into one exact size, the tutorial teaches you how to measure your body, create a front and back panel, check the fit before seaming, and adjust the length or width as needed.
What You’ll Learn
- How to choose yarn and hook size for a crochet vest.
- How to make a gauge swatch before starting.
- How to crochet a simple back panel.
- How to crochet a front panel with a beginner-friendly V-neck.
- How to shape armholes without complex decreases.
- How to seam shoulders and sides.
- How to add bottom ribbing.
- How to add armhole ribbing.
- How to add V-neck ribbing.
- How to block and finish a wearable crochet garment.
- How to adjust the vest for different body sizes.
Materials You’ll Need
For an adult beginner vest, gather:
- Worsted weight / medium #4 yarn in a main color.
- Worsted weight / medium #4 yarn in a contrast color for ribbing.
- 5.0 mm crochet hook for the main body.
- 4.5 mm crochet hook for ribbing.
- Scissors.
- Tapestry needle.
- Stitch markers.
- Measuring tape.
- Blocking mat or towel.
- Rustproof pins.
The Craft Yarn Council classifies medium yarn as weight category #4 and notes that yarn-weight and hook recommendations are guidelines because gauge varies by yarn and crocheter.
Approximate Yarn Amount
For a cropped to hip-length vest:
- XS/S: 550–700 yards.
- M/L: 700–850 yards.
- XL/2XL: 850–1,050 yards.
- 3XL/4XL: 1,050–1,250 yards.
Use more yarn for a longer vest, oversized fit, thicker ribbing, or larger armhole/neckline bands.
Finished Size
This is a made-to-measure pattern.
The sample is designed for a relaxed vest with approximately 2–4 inches of positive ease.
To choose your starting width:
- Measure the fullest part of your bust.
- Add 2–4 inches of ease.
- Divide that number by 2.
- This number is the target width of each panel.
Example:
- Bust measurement: 38 inches.
- Desired ease: 4 inches.
- Total garment circumference: 42 inches.
- Panel width: 21 inches.
Both the front panel and back panel should each measure approximately 21 inches wide.
Gauge / Tension Note
Make a small swatch before beginning.
With main yarn and a 5.0 mm hook:
Work 18 hdc stitches × 12 rows.
Measure the center 4 inches of the swatch after it rests flat.
Approximate target gauge:
13–14 hdc stitches = 4 inches
10–11 hdc rows = 4 inches
Gauge is important in crochet garments because small stitch differences become large size differences across a full panel. The Craft Yarn Council’s beginner pattern-reading guidance also emphasizes stitch counts and gauge as part of understanding crochet instructions.
Crochet Abbreviations Used
This tutorial uses standard U.S. crochet terms:
- ch = chain
- sc = single crochet
- hdc = half double crochet
- sl st = slip stitch
- st/sts = stitch/stitches
- rep = repeat
- BLO = back loop only
- RS = right side
- WS = wrong side
The Craft Yarn Council lists common crochet abbreviations including chain, slip stitch, single crochet, half double crochet, and double crochet, and also explains U.S. and U.K. terminology differences.
U.S. / U.K. Term Note
This pattern is written in U.S. terminology.
A U.S. single crochet is called a double crochet in U.K. terminology. A U.S. half double crochet is called a half treble in U.K. terminology.
Before You Start
This vest is built from two main panels:
- One back panel.
- One front panel with V-neck shaping.
After the panels are finished, the shoulders and sides are seamed. Then ribbing is added to the bottom edge, armholes, and neckline.
How to keep edges straight
The easiest beginner method is to chain 1 at the beginning of each hdc row and work the first hdc into the first stitch. Do not count the chain 1 as a stitch.
How to avoid curling
Curling usually happens when the foundation chain is too tight or the turning chain is inconsistent. Make the starting chain relaxed, and do not pull the first and last stitches too tight.
How to choose colors
For a classic vest, use:
- Main color: cream, oatmeal, gray, navy, rust, or brown.
- Ribbing color: sage, charcoal, black, cream, or a slightly darker shade of the main yarn.
For the cleanest beginner look, use only two colors.
Step-by-Step Crochet Tutorial
Step 1: Make the Foundation Chain for the Front Panel
Start with the main color and 5.0 mm hook.
Make a foundation chain that measures your target panel width.
For a sample M/L-style panel width of approximately 21 inches, start with:
Ch 70.
Row 1: Hdc in the 2nd ch from the hook and in each chain across. Turn.
You should have 69 hdc stitches.
Row 2: Ch 1, hdc in the first stitch and in each stitch across. Turn.
Repeat Row 2 until the panel measures approximately 10–11 inches from the lower edge, or until it reaches the lower underarm area on your body.
Beginner tip:
Measure the width after Row 3 or Row 4, not immediately after the chain. A foundation chain can look longer or shorter before the fabric settles.
Common mistake to avoid:
Do not count the loop on your hook as a chain. That loop never counts as a stitch.
Step 2: Continue the Main Front Panel Fabric
Continue in half double crochet rows.
Each row:
Ch 1, hdc in each stitch across, turn.
Keep the stitch count the same on every row.
For the sample:
69 hdc stitches per row.
Work until the panel reaches from your desired lower hem to your lower underarm.
For a cropped vest, this may be 10 inches.
For a hip-length vest, this may be 13–15 inches.
Beginner tip:
Place a stitch marker in the first and last stitch of each row. This prevents accidental narrowing.
Common mistake to avoid:
The most common beginner panel mistake is missing the final stitch. The last hdc can hide beside the turning chain.
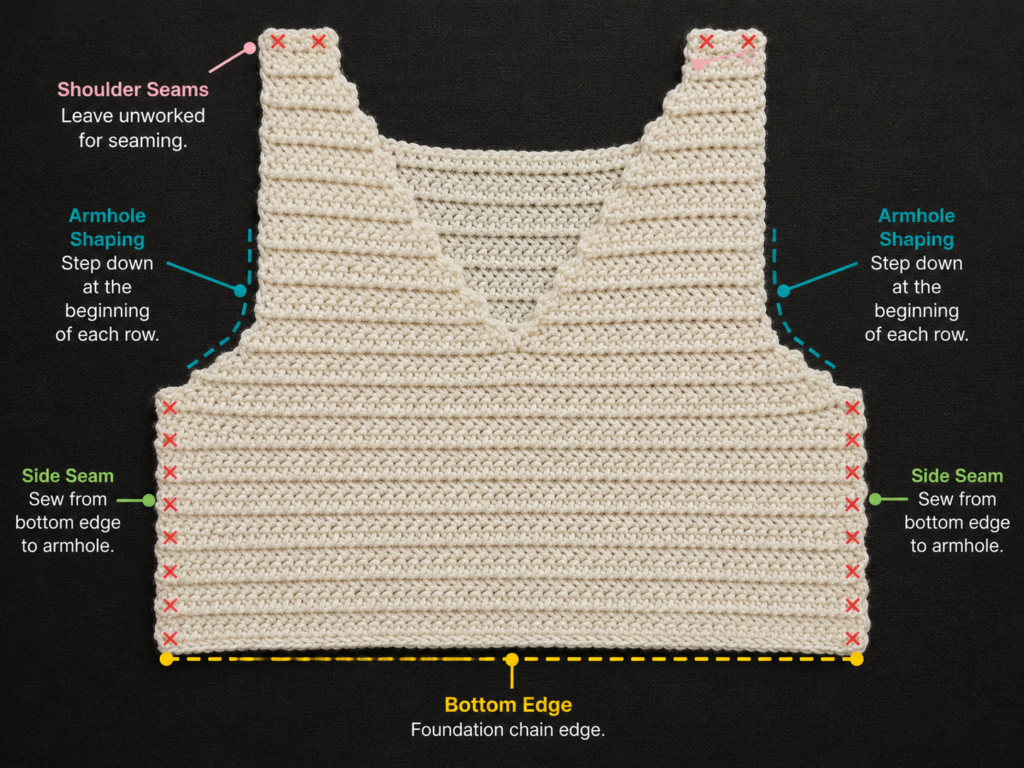
Step 3: Shape the Underarms
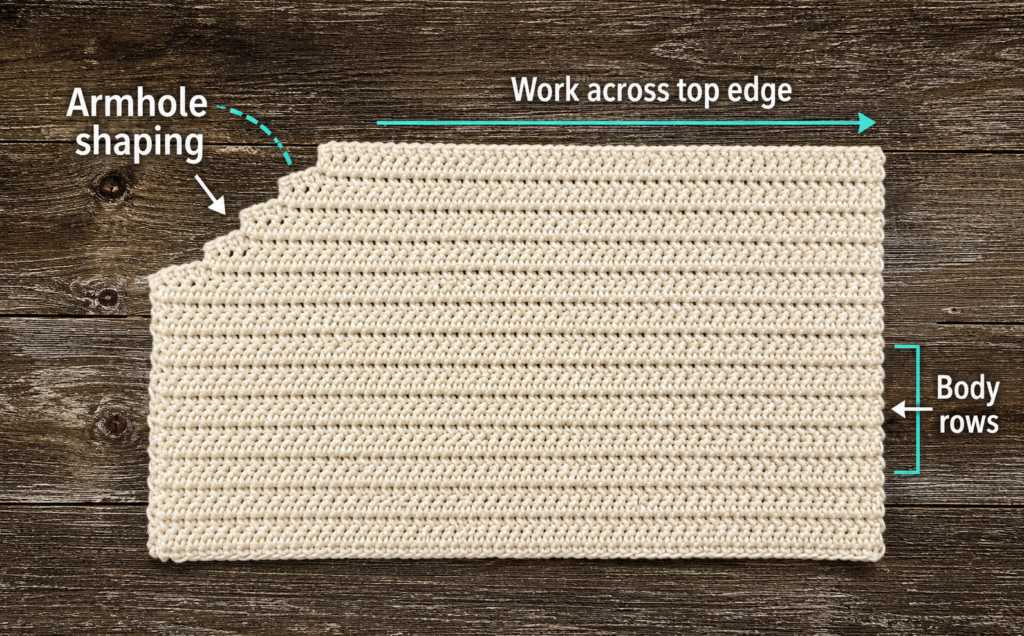
When the front panel reaches the lower underarm area, shape both armhole edges.
The beginner version uses stepped shaping rather than complex decreases.
Next row:
Sl st in the first 4 stitches, ch 1, hdc in the same stitch where the final slip stitch was made, hdc across until 4 stitches remain, leave the last 4 stitches unworked. Turn.
Next row:
Ch 1, hdc in each stitch across. Turn.
Repeat the plain hdc row until the piece measures approximately 2 inches above the underarm shaping.
This creates a simple armhole opening while keeping the instructions manageable.
Beginner tip:
The slip stitches used to move inward are only a shaping method. They do not become part of the main stitch count for the row.
Common mistake to avoid:
Do not crochet across the skipped stitches at the end of the shaping row. Leaving them unworked is what creates the armhole curve.
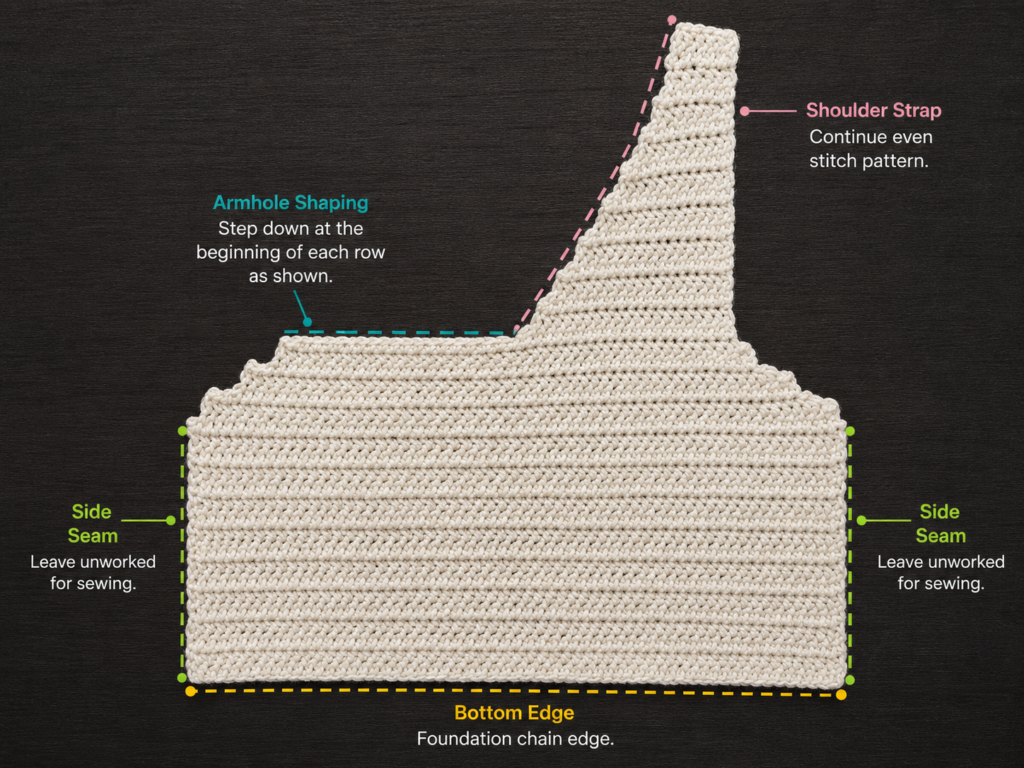
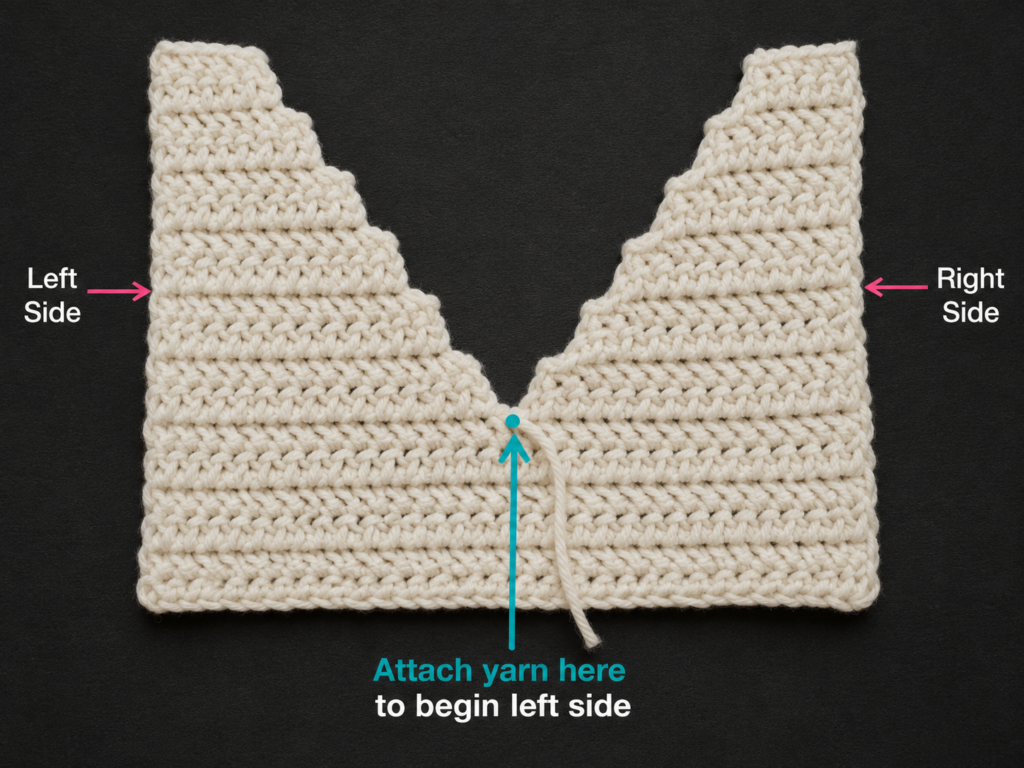
Step 4: Shape the Right Side of the V-Neck
Lay the front panel flat.
Find the center stitch area at the top of the panel.
Place a stitch marker at the center front.
You will work one shoulder side first.
With the right side facing you, continue across only the right half of the panel.
For the sample:
Work hdc rows across the right half, decreasing one stitch at the neckline edge every other row until the shoulder section measures approximately 3.5–4 inches wide.
A simple beginner decrease method:
At the neckline edge, work hdc2tog over the first two stitches or the last two stitches, depending on which side you are shaping.
Continue until the V-neck slope looks smooth.
Then work even rows until the front panel reaches your desired shoulder height.
Fasten off.
Beginner tip:
Write down how many shaping rows you worked. You will mirror that number on the other side.
Common mistake to avoid:
Do not decrease on the armhole edge and neckline edge at the same time unless you intentionally want a very narrow shoulder.
Step 5: Shape the Left Side of the V-Neck
Reattach the main yarn at the opposite side of the center neckline marker.
Work the left shoulder to mirror the right side.
Use the same number of rows and the same decrease rhythm you used for the first side.
If you decreased every other row on the right side, decrease every other row on the left side.
Once the shoulder width and length match the first side, fasten off.
Lay the panel flat and compare both shoulders.
They do not need to be mathematically perfect, but they should look balanced.
Beginner tip:
Count rows, not just inches. Matching row count helps both shoulders seam evenly later.
Common mistake to avoid:
Do not reattach the yarn too far from the center neckline. If the V opening is too wide at the bottom, the neckline ribbing will not sit neatly.
Step 6: Crochet the Back Panel
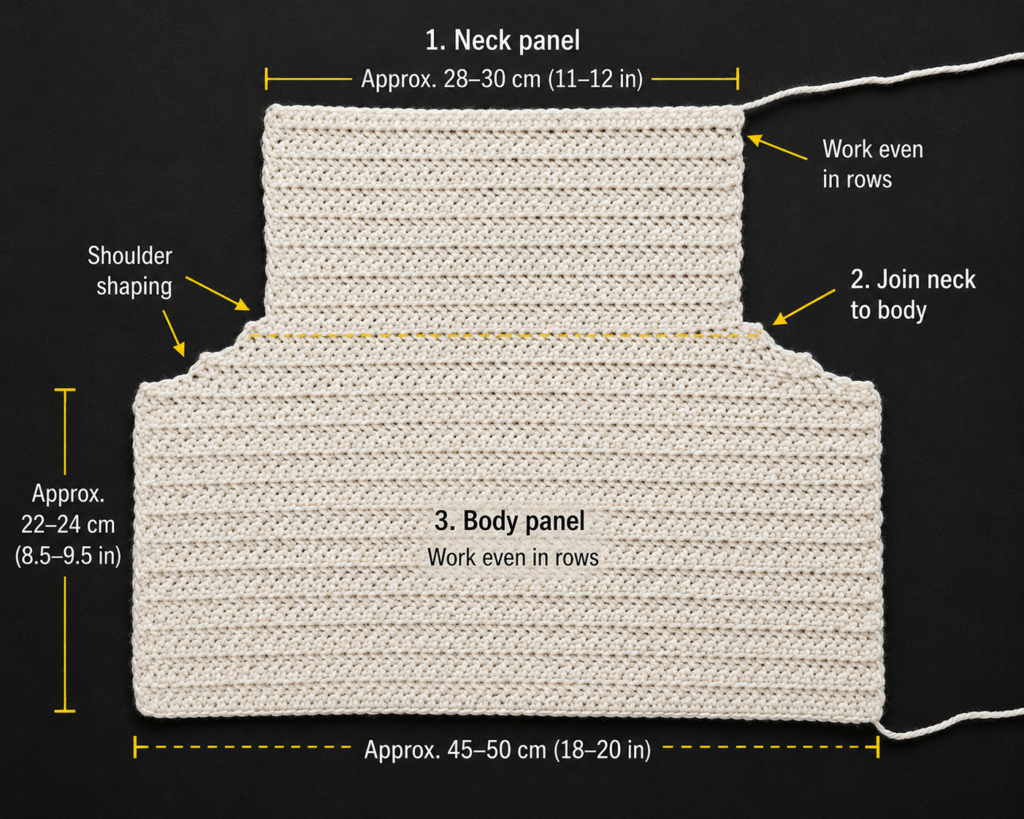
The back panel is simpler than the front panel.
Make a second foundation chain the same width as the front panel.
For the sample:
Ch 70.
Row 1: Hdc in the 2nd ch from the hook and in each chain across. Turn.
Row 2: Ch 1, hdc in each stitch across. Turn.
Repeat Row 2 until the back panel reaches the same lower underarm height as the front panel.
Shape the underarms the same way:
Sl st in the first 4 stitches, ch 1, hdc in the same stitch, hdc across until 4 stitches remain, leave last 4 stitches unworked. Turn.
Continue in hdc rows until the back panel reaches the same full height as the front panel shoulder.
For a simple beginner back neckline, work straight across until the full height is reached. This creates a boat-style back neckline that is easy to seam.
Fasten off.
Beginner tip:
Lay the front panel on top of the back panel while checking height. This is easier than relying only on measurements.
Common mistake to avoid:
Do not make the back panel shorter than the front shoulder. Uneven panel height causes the shoulder seam to twist.
Step 7: Seam the Shoulders and Sides
Place the front panel on top of the back panel with the right sides facing together.
Line up:
- Shoulder edges.
- Underarm shaping.
- Side edges.
- Lower hem.
Use stitch markers to clip the pieces in place.
With a tapestry needle and matching main-color yarn, seam the shoulders first.
Use a simple whip stitch or mattress-style seam.
Then seam the side edges from the bottom upward, stopping at the underarm opening.
Try the vest on before weaving in the side-seam tails. If the armholes feel too tight, remove a small amount of side seaming at the top.
Beginner tip:
Do not pull the seam yarn too tightly. A tight side seam can make the vest pucker.
Common mistake to avoid:
Do not accidentally seam the armholes closed. Stop at the lower underarm.
Step 8: Add Bottom Ribbing
Switch to the contrast color and 4.5 mm hook.
Join yarn at one side seam along the lower edge.
Work one setup round of single crochet evenly around the bottom edge.
Join with a slip stitch to the first single crochet.
Now make perpendicular ribbing:
- Ch 9.
- Sc in the 2nd chain from hook and each chain back toward the vest edge. You should have 8 sc.
- Sl st into the next 2 setup-round stitches along the vest edge.
- Turn.
- Skip the slip stitches.
- Sc BLO in each ribbing stitch back across.
- Ch 1, turn.
- Sc BLO in each ribbing stitch back toward the vest edge.
Repeat around the bottom edge.
When the ribbing meets the beginning, seam the two short ribbing ends together.
Beginner tip:
Work the slip stitches loosely. If they are too tight, the ribbing will pull the lower edge inward.
Common mistake to avoid:
Do not crochet the ribbing flat as a separate strip unless you plan to sew it on later. This version attaches the ribbing as you go.
Step 9: Add Armhole Ribbing
Join contrast yarn at the bottom of one armhole.
Work one setup round of single crochet evenly around the armhole.
Join with a slip stitch.
For narrow armhole ribbing:
- Ch 6.
- Sc in 2nd chain from hook and each chain back. You should have 5 sc.
- Sl st into the next 2 setup-round stitches.
- Turn.
- Skip the slip stitches.
- Sc BLO across the ribbing.
- Ch 1, turn.
- Sc BLO back toward the armhole.
Repeat around the armhole.
Seam the short ribbing ends together.
Repeat for the second armhole.
Beginner tip:
Lay the armhole flat every few repeats. If the edge cups inward, your ribbing attachment is too tight.
Common mistake to avoid:
Do not place too few setup stitches around the armhole. Sparse stitches can make the armhole pull and feel uncomfortable.
Step 10: Add the V-Neck Ribbing
The neckline is the most visible finishing section, so work slowly.
Join contrast yarn near the back neckline.
Work one setup round of single crochet evenly around the entire neckline.
When you reach the V point, place 2–3 single crochets close together so the ribbing can turn cleanly without pulling.
Join with a slip stitch.
Now add narrow BLO ribbing around the neckline, using the same technique as the armhole ribbing.
For a neat V point, keep the ribbing relaxed around the center front. If the neckline pulls upward, remove a few repeats and rework them with looser slip stitches.
Beginner tip:
Use stitch markers to mark both shoulder seams and the center V point before beginning the neckline setup round.
Common mistake to avoid:
Do not crowd too many stitches into the V point. A few extra stitches help the angle turn, but too many will create a bump.
Pattern Notes or Stitch Notes
Turning chain rules
The beginning ch 1 does not count as a stitch.
Work the first hdc into the first stitch of every row.
Stitch count
For the sample front and back panels:
- Starting chain: 70.
- Row 1 count: 69 hdc.
- Main panel count before shaping: 69 hdc.
After shaping, stitch counts will decrease depending on armhole and neckline depth.
Main repeat
For the body fabric:
Ch 1, hdc in each stitch across, turn.
Ribbing repeat
For attached ribbing:
Sc BLO across ribbing, sl st into edge stitches, turn, repeat.
Right side / wrong side
For plain hdc fabric, the difference may be subtle. Choose the smoother-looking side as the right side and stay consistent when seaming.
Size adjustment notes
To make the vest wider, start with more chains.
To make it narrower, start with fewer chains.
To make the vest longer, add more hdc rows before underarm shaping.
To make a deeper V-neck, begin neckline shaping earlier.
To make a more modest V-neck, begin neckline shaping later.
Common Beginner Mistakes
1. Skipping the last stitch of each row
Problem: The panel narrows unintentionally.
Fix: Mark the first and last stitch of every row until you can recognize them easily.
2. Making the foundation chain too tight
Problem: The lower edge pulls inward.
Fix: Remake the foundation chain with looser tension or use a hook one size larger for the chain only.
3. Not checking panel width early
Problem: The panel is too wide or too narrow after many rows.
Fix: Measure after 3–4 rows and compare it to your target panel width.
4. Seaming the side edges too high
Problem: Armholes feel tight.
Fix: Try on the vest before weaving in side-seam ends. Open the seam slightly if needed.
5. Pulling the ribbing too tight
Problem: The bottom edge, armholes, or neckline pucker.
Fix: Use looser slip stitches and add enough setup stitches around curves.
6. Making the V-neck sides uneven
Problem: One shoulder is wider than the other.
Fix: Count rows and decreases on the first side, then copy the same sequence on the second side.
7. Skipping blocking
Problem: The panels look uneven or the seams twist.
Fix: Lightly block the finished vest to smooth the fabric and help the ribbing settle.
How to Customize This Crochet Vest
Yarn changes
A soft acrylic blend creates an easy-care vest.
Wool blends add warmth.
Cotton blends create a more structured, spring-friendly vest.
Avoid very stiff cotton for your first wearable because it may feel boxy.
Color changes
Try:
- Cream body with sage ribbing.
- Brown body with cream ribbing.
- Navy body with oatmeal ribbing.
- Charcoal body with black ribbing.
- Rust body with ivory ribbing.
Size changes
For an oversized vest, add 4–6 inches of ease instead of 2–4.
For a fitted vest, use only 1–2 inches of ease.
Border options
Instead of full ribbing, you can finish edges with:
- One round of single crochet.
- Two rounds of single crochet.
- Crab stitch.
- Slip-stitch edging.
Ribbing looks the most sweater-like, but a simple single crochet border is easier.
Texture options
After making one basic vest, try replacing the body fabric with:
- Herringbone half double crochet.
- Moss stitch.
- Extended single crochet.
- Linked double crochet.
- Back-loop half double crochet.
Gift ideas
A handmade crochet vest makes a thoughtful gift for:
- A teen learning handmade fashion.
- A crocheter building a capsule wardrobe.
- A friend who loves layering pieces.
- A teacher or maker who likes cozy handmade clothing.
Finishing Instructions
Fastening off
After each section, cut the yarn leaving a 6–8 inch tail.
Pull the tail completely through the final loop.
Weaving in ends
Use a tapestry needle to weave the yarn tail through several stitches on the wrong side.
Change direction once before trimming.
Do not weave ribbing tails too tightly, or the edge may pucker.
Seaming the neckline ribbing
When the neckline ribbing meets the beginning, seam the short ends together with a tapestry needle and matching yarn.
Try to match the BLO ridges so the seam blends into the ribbed texture.
Blocking
Lay the finished vest flat.
Gently shape:
- Shoulder seams.
- Side seams.
- Armholes.
- V-neck point.
- Bottom ribbing.
Pin lightly if needed.
Steam or wet block according to your yarn fiber. Do not apply high heat directly to acrylic yarn.
Washing and care
Follow the yarn label.
For handmade garments, gentle washing and flat drying usually help maintain shape.
Quick Printable-Style Summary
Project: Easy Crochet Vest Pattern
Skill level: Beginner to Easy
Construction: One front panel, one back panel, shoulder seams, side seams, added ribbing.
Yarn: Worsted weight / medium #4 yarn.
Hook: 5.0 mm for body, 4.5 mm for ribbing.
Main stitch: Half double crochet.
Ribbing stitch: Single crochet in back loop only.
Starting method: Foundation chain to match half of desired finished bust circumference.
Body repeat: Ch 1, hdc in each stitch across, turn.
Front shaping: Simple armhole shaping, then mirrored V-neck shaping.
Back shaping: Simple armhole shaping, then straight upper back.
Finishing: Seam shoulders and sides, add bottom ribbing, armhole ribbing, neckline ribbing, weave ends, block.
FAQ
Is a crochet vest good for beginners?
Yes, a vest can be a good first wearable because it does not require sleeves. This pattern still teaches real garment skills, including panels, seaming, armholes, neckline shaping, and ribbing.
What is the easiest stitch for a crochet vest?
Half double crochet is a strong choice because it is faster than single crochet, less open than double crochet, and creates a flexible fabric.
How much yarn do I need for a crochet vest?
Most adult crochet vests need approximately 550–1,250 yards depending on size, length, yarn weight, stitch pattern, and ease.
How do I make a crochet vest bigger?
Increase the starting chain for each panel, add more body rows for length, and allow more positive ease around the bust.
Can I make this vest without ribbing?
Yes. You can replace ribbing with one or two rounds of single crochet around the bottom, armholes, and neckline. Ribbing gives the vest a more sweater-like finish, but it is not required.
Why is my vest panel slanting?
Uneven edges usually come from adding or missing stitches at row ends. Use stitch markers in the first and last stitches until your edges stay straight.
Should I block a crochet vest?
Yes. Blocking helps smooth the fabric, relax the seams, even the edges, and make the finished garment look more polished.
Conclusion
This easy crochet vest pattern is a practical first step into handmade garments. You only need simple stitches, flat panels, basic shaping, and patient finishing. The most important parts are measuring before you start, keeping your stitch count consistent, matching the front and back panel height, and working the ribbing loosely enough that the edges do not pull.
Once you finish your first vest, you can make the same structure again with different yarn, a longer body, a deeper V-neck, bolder ribbing, or a textured stitch pattern.





